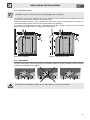
1
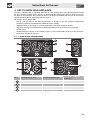
Contents
1. INSTRUCTIONS FOR USE ................................................................................................... 28
2. SAFETY PRECAUTIONS ...................................................................................................... 30
3. ENVIRONMENTAL CARE ..................................................................................................... 32
3.1 Our environmental care ................................................................................................................................ 32
3.2 Your environmental care ............................................................................................................................... 32
4. GET TO KNOW YOUR APPLIANCE ..................................................................................... 33
4.1 Layout of the cooking zones ......................................................................................................................... 33
4.2 Cookware recognition ................................................................................................................................... 34
4.3 Cookware suitable for use in induction cooking ............................................................................................ 34
4.4 Limiting the cooking duration ........................................................................................................................ 34
4.5 Protection from hob overheating ................................................................................................................... 35
4.6 Other functions .............................................................................................................................................. 35
4.7 Advice on energy-saving ............................................................................................................................... 35
4.8 Power levels .................................................................................................................................................. 35
5. USING THE COOKING HOB ................................................................................................. 36
5.1 General warnings and advice ....................................................................................................................... 36
5.2 Control panel ................................................................................................................................................. 36
5.3 Switching on and off the hob ......................................................................................................................... 36
5.4 Switching on the cooking zone ..................................................................................................................... 37
5.5 Switching off the cooking zone ..................................................................................................................... 37
5.6 Residual heat ................................................................................................................................................ 37
5.7 Automatic temperature control ...................................................................................................................... 37
5.8 Cooking zone automatic shutdown timer ...................................................................................................... 37
5.9 Control lock ................................................................................................................................................... 38
5.10 Power management .................................................................................................................................... 39
5.11 Secondary menu (Automatic control lock - Showroom - ECO-logic) .......................................................... 40
5.12 Cooking guidelines ...................................................................................................................................... 41
6. CLEANING AND MAINTENANCE ......................................................................................... 42
6.1 Cleaning the glass ceramic hob .................................................................................................................... 42
6.2 Weekly cleaning ............................................................................................................................................ 42
7. TROUBLESHOOTING .......................................................................................................... 43
8. INSTALLATION .................................................................................................................... 44
8.1 Safety instructions for installing in kitchen units ............................................................................................ 44
8.2 Section cut from the work surface ................................................................................................................. 44
8.3 Mounting ....................................................................................................................................................... 46
8.4 Ventilation ..................................................................................................................................................... 47
8.5 Hob seal ........................................................................................................................................................ 48
8.6 Fixing using brackets .................................................................................................................................... 48
8.7 Electrical connection .................................................................................................................................... 49
INSTRUCTIONS FOR THE USER: these contain user advice, the description of the controls and the
correct procedures for cleaning and maintenance of the appliance.
INSTRUCTIONS FOR THE INSTALLER: these are intended for the qualified technician who must install
the appliance, set it functioning and carry out an inspection test.
@
Further information about the products can be found at www.smeg.com
27
General instructions
1. INSTRUCTIONS FOR USE
THIS MANUAL IS AN INTEGRAL PART OF THE APPLIANCE. IT MUST BE KEPT IN ITS ENTIRETY
AND IN AN ACCESSIBLE PLACE FOR THE WHOLE WORKING LIFE OF THE HOB. WE ADVISE YOU
TO READ THIS MANUAL AND ALL THE INFORMATION IT CONTAINS CAREFULLY BEFORE USING
THE HOB. INSTALLATION MUST BE CARRIED OUT BY QUALIFIED PERSONNEL IN ACCORDANCE
WITH THE REGULATIONS IN FORCE. THIS APPLIANCE IS INTENDED FOR DOMESTIC USE AND
CONFORMS TO THE EEC DIRECTIVES CURRENTLY IN FORCE. THE APPLIANCE HAS BEEN
BUILT TO CARRY OUT THE FOLLOWING FUNCTION: COOKING AND HEATING UP FOOD; ALL
OTHER USES ARE CONSIDERED UNSUITABLE.
THE MANUFACTURER CANNOT BE HELD LIABLE FOR USES OTHER THAN THOSE INDICATED.
NEVER OBSTRUCT THE OPENINGS AND SLOTS PROVIDED FOR VENTILATION AND HEAT
DISPERSAL.
DO NOT USE THIS APPLIANCE FOR HEATING ROOMS.
THE IDENTIFICATION PLATE CONTAINING THE TECHNICAL DATA, SERIAL NUMBER AND BRAND
NAME IS IN A VISIBLE POSITION UNDER THE CASING OF THE APPLIANCE. A COPY OF THE
IDENTIFICATION PLATE IS INCLUDED IN THE BOOKLET. IT SHOULD BE APPLIED TO THE
APPROPRIATE SPACE ON THE BACK OF THE COVER. DO NOT REMOVE THIS PLATE FOR ANY
REASON.
BEFORE THE APPLIANCE IS PUT INTO OPERATION, ALL LABELS AND PROTECTIVE FILMS
APPLIED ON EXTERNAL SURFACES MUST BE REMOVED.
TAKE CARE NOT TO SPILL SUGAR OR SWEET MIXTURES ON THE HOB WHILE
COOKING OR TO PLACE MATERIALS OR SUBSTANCES WHICH COULD MELT
ON IT (PLASTIC OR TIN FOIL). IF THIS HAPPENS, TO AVOID DAMAGE TO THE
SURFACE, TURN OFF THE HEAT IMMEDIATELY AND CLEAN THE SURFACE
WITH THE SCRAPER PROVIDED WHILE THE HOT PLATE IS STILL LUKEWARM.
IF THE GLASS CERAMIC HOB IS NOT CLEANED IMMEDIATELY, THERE IS A
RISK THAT INCRUSTATIONS WILL BE LEFT THAT ARE IMPOSSIBLE TO
REMOVE ONCE THE HOB HAS COOLED.
DO NOT USE METALLIC SPONGES: THEY WILL DAMAGE THE SURFACE. USE
NORMAL NON-ABRASIVE PRODUCTS AND A WOODEN OR PLASTIC TOOL IF
NECESSARY.
TAKE CARE NOT TO SPILL ACID SUBSTANCES SUCH AS LEMON JUICE OR VINEGAR ON THE
HOB.
NEVER PLACE SAUCEPANS WITH BASES WHICH ARE NOT PERFECTLY FLAT AND SMOOTH ON
THE COOKING HOB.
THE APPLIANCE BECOMES VERY HOT DURING USE. SUITABLE HEAT-PROOF GLOVES SHOULD
BE WORN FOR ALL OPERATIONS.
ENSURE THAT THE SENSOR KEYS ARE ALWAYS KEPT CLEAN AS THE APPLIANCE MAY
INTERPRET DIRTY MARKS AS AN INTENTIONAL FINGER CONTACT. DO NOT PLACE OBJECTS
OF ANY KIND (SAUCEPANS, TOWELS, ETC.) ON THE SENSORS. IF FOOD OVERFLOWS ONTO
THE SENSOR KEYS, YOU ARE ADVISED TO TURN OFF THE APPLIANCE.
AFTER USE, TURN OFF THE COOKING ZONE IMMEDIATELY BY PRESSING THE APPROPRIATE
KEY AND NOT JUST USING SAUCEPAN RECOGNITION.
SAUCEPANS AND OTHER PANS MUST NOT COVER THE SENSOR KEYS AS THE APPLIANCE MAY
AUTOMATICALLY DEACTIVATE.
28
General instructions
ACTIVATE THE CHILD LOCK IF YOU HAVE PETS WHICH COULD REACH THE HOB.
DO NOT PUT EMPTY SAUCEPANS AND FRYING PANS ON COOKING ZONES WHICH HAVE BEEN
SWITCHED ON.
DO NOT USE THE HOB IF PYROLYSIS IS TAKING PLACE INSIDE THE OVEN.
The manufacturer declines all responsibility for damage to persons or things caused by non-observance
of the above prescriptions or by interference with any part of the appliance or by the use of non-original
spare parts.
29
General instructions
2. SAFETY PRECAUTIONS
CONSULT THE INSTALLATION INSTRUCTIONS FOR THE SAFETY STANDARDS APPLICABLE TO
ELECTRICAL APPLIANCES AND FOR THE VENTILATION FUNCTIONS.
IN YOUR INTERESTS AND FOR YOUR SAFETY THE LAW REQUIRES THAT THE INSTALLATION
AND SERVICING OF ALL HOUSEHOLD APPLIANCES IS CARRIED OUT BY QUALIFIED
PERSONNEL IN ACCORDANCE WITH THE REGULATIONS IN FORCE.
OUR APPROVED INSTALLERS GUARANTEE A SATISFACTORY JOB.
ELECTRICAL APPLIANCES MUST ALWAYS BE UNINSTALLED BY COMPETENT PERSONS.
BEFORE CONNECTING THE APPLIANCE TO THE POWER GRID, CHECK THE DATA ON THE
PLATE AGAINST THE DATA FOR THE GRID ITSELF.
BEFORE CARRYING OUT INSTALLATION/MAINTENANCE WORK, MAKE SURE THAT THE
APPLIANCE IS NOT CONNECTED TO THE POWER GRID.
IMMEDIATELY AFTER INSTALLATION, CARRY OUT A QUICK TEST ON THE APPLIANCE
FOLLOWING THE INSTRUCTIONS PROVIDED LATER IN THIS MANUAL. SHOULD THE APPLIANCE
NOT FUNCTION, DISCONNECT IT FROM THE POWER SUPPLY AND CALL THE NEAREST
TECHNICAL ASSISTANCE CENTRE.
THE PLUG TO BE CONNECTED TO THE POWER SUPPLY CABLE AND ITS SOCKET MUST BE OF
THE SAME TYPE AND CONFORM TO THE REGULATIONS IN FORCE.
THE SOCKET MUST BE ACCESSIBLE AFTER THE APPLIANCE HAS BEEN BUILT IN.
NEVER UNPLUG BY PULLING ON THE CABLE.
IF THE POWER SUPPLY CABLE IS DAMAGED, CONTACT THE TECHNICAL ASSISTANCE CENTRE
IMMEDIATELY AND THEY WILL REPLACE IT.
THE APPLIANCE MUST BE CONNECTED TO EARTH IN COMPLIANCE WITH ELECTRICAL
SYSTEM SAFETY REGULATIONS.
DURING COOKING THE APPLIANCE BECOMES VERY HOT IN THE ZONE IN CONTACT WITH THE
PANS. TAKE CARE NOT TO TOUCH THE SURFACE OF THE HOB.
THE APPLIANCE IS INTENDED FOR USE BY ADULTS. DO NOT ALLOW CHILDREN TO GO NEAR IT
OR PLAY WITH IT.
IMPORTANT: SUPERVISE CHILDREN CAREFULLY AS THEY CANNOT READILY SEE THE
RESIDUAL HEAT INDICATOR ON THE HOB.
THE COOKING ZONES REMAIN HOT FOR A CERTAIN PERIOD OF TIME EVEN AFTER THEY HAVE
BEEN TURNED OFF.
KEEP CHILDREN AWAY FROM THE COOKING ZONES.
IF CRACKS OR FISSURES FORM, OR IF THE GLASS CERAMIC COOKING SURFACE BREAKS,
TURN OFF THE APPLIANCE IMMEDIATELY. DISCONNECT THE ELECTRICITY SUPPLY AND CALL
TECHNICAL SUPPORT.
USERS OF PACEMAKERS OR SIMILAR DEVICES MUST ENSURE THAT THE OPERATION OF
THEIR DEVICES WILL NOT BE AFFECTED BY THE INDUCTION FIELD, WHICH HAS A
FREQUENCY RANGE OF 20-50 KHZ.
THIS APPLIANCE MUST NOT BE USED BY PEOPLE (INCLUDING CHILDREN) OF REDUCED
PHYSICAL AND MENTAL CAPACITY, OR LACKING IN EXPERIENCE IN THE USE OF ELECTRICAL
APPLIANCES, UNLESS THEY ARE SUPERVISED OR INSTRUCTED BY ADULTS WHO ARE
RESPONSIBLE FOR THEIR SAFETY.
BEFORE THE APPLIANCE IS PUT INTO OPERATION, ALL LABELS AND PROTECTIVE FILMS
APPLIED ON EXTERNAL SURFACES MUST BE REMOVED.
30
General instructions
NEVER ATTEMPT TO REPAIR THE APPLIANCE. ALL REPAIRS MUST BE CARRIED OUT BY AN
AUTHORISED TECHNICIAN OR AT AN AUTHORISED SERVICE CENTRE.
IN CONFORMITY WITH THE PROVISIONS REGARDING ELECTROMAGNETIC COMPATIBILITY,
THE ELECTROMAGNETIC INDUCTION COOKING HOB COMES UNDER GROUP 2 AND CLASS B
(EN 55011).
DO NOT LEAVE THE INDUCTION HOB UNATTENDED WHEN SWITCHED ON.
BE AWARE OF HOW RAPIDLY THE COOKING ZONES HEAT UP. DO NOT PLACE EMPTY
SAUCEPANS ON THE HEAT. DANGER OF OVERHEATING.
FATS AND OILS CAN CATCH FIRE IF THEY OVERHEAT. YOU ARE THEREFORE RECOMMENDED
NOT TO LEAVE THE HOB UNATTENDED WHILE PREPARING FOODS CONTAINING OILS OR FATS.
IF FATS OR OILS CATCH FIRE, NEVER PUT WATER ON THEM. COVER THE PAN AND SWITCH
OFF THE COOKING ZONE.
THE GLASS CERAMIC SURFACE IS HIGHLY RESISTANT TO IMPACTS. HOWEVER, AVOID HARD,
SOLID OBJECTS FALLING ON THE COOKING SURFACE AS THEY MAY CAUSE IT TO BREAK IF
THEY ARE SHARP.
THE GLASS CERAMIC COOKING SURFACE MUST NOT BE USED AS A SURFACE FOR PLACING
OBJECTS.
IF IT BECOMES IMPOSSIBLE TO TURN OFF THE HOB DUE TO A FAULT IN THE SENSOR
CONTROL, IMMEDIATELY DISCONNECT THE ELECTRICITY SUPPLY AND CALL TECHNICAL
SUPPORT.
BE CAREFUL WHEN CONNECTING ADDITIONAL ELECTRICAL APPLIANCES. CONNECTION
CABLES MUST NOT COME INTO CONTACT WITH HOT COOKING ZONES.
NEVER PLACE METAL OBJECTS, SUCH AS DISHES OR CUTLERY, ON THE INDUCTION HOB
SURFACE AS THEY MAY OVERHEAT. DANGER OF BURNS.
NEVER PLACE FLAMMABLE, READILY EXPLOSIVE OR DEFORMABLE OBJECTS DIRECTLY
UNDERNEATH THE HOB.
BE CAREFUL WITH METAL OBJECTS WHICH COME INTO DIRECT CONTACT WITH THE BODY.
THEY MAY OVERHEAT IN THE IMMEDIATE VICINITY OF THE HOB. DANGER OF BURNS.
THE SAME RISK DOES NOT APPLY TO NON-MAGNETISABLE OBJECTS SUCH AS GOLD AND
SILVER RINGS.
DO NOT USE SEALED TINS OR CONTAINERS IN THE APPLIANCE. OVERPRESSURE MAY OCCUR
INSIDE THE CONTAINERS DURING COOKING, CREATING A DANGER OF EXPLOSION.
The manufacturer declines all responsibility for damage to persons or things caused by non-observance
of the above prescriptions or by interference with any part of the appliance or by the use of non-original
spare parts.
31
Instructions for disposal
3. ENVIRONMENTAL CARE
3.1 Our environmental care
Pursuant to Directives 2002/95/EC, 2002/96/EC and 2003/108/EC relating to the reduction of the use of
hazardous substances in electrical and electronic appliances, as well as to the disposal of refuse, the
crossed out bin symbol on the appliance indicates that the product, at the end of its working life, must be
collected separately from other refuse. Therefore, the user must consign the product that has reached
the end of its working life to the appropriate selective collection centres for electrical and electronic
refuse, or deliver it back to the retailer when purchasing an equivalent product, on a one for one basis.
Adequate selective collection for the subsequent forwarding of the decommissioned product to recycling,
treatment and ecologically compatible disposal contributes to avoiding possible negative effects on the
environment and on health and promotes the recycling of the materials of which the appliance consists.
Illicit disposal of the product by the user will lead to the application of administrative sanctions.
The product does not contain substances in quantities sufficient to be considered hazardous to health
and the environment, in accordance with current European directives.
3.2 Your environmental care
Our product's packaging is made of non-polluting materials, therefore compatible with the environment
and recyclable. Please help by disposing of the packaging correctly. You can obtain the addresses of
collection, recycling and disposal centres from your retailer or from the competent local organisations.
Do not discard the packaging or any part of it, or leave it unattended. It can constitute a suffocation
hazard for children, especially the plastic bags.
Your old appliance also needs to be disposed of correctly.
Important: hand over your appliance to the local agency authorised for the collection of electrical
appliances no longer in use. Correct disposal enables intelligent recovery of valuable materials.
Before disposing of your appliance it is important to remove doors and leave shelves in the same
position as for use, to ensure that children cannot accidentally become trapped inside during play. It is
also necessary to cut the connecting cable to the power supply network, removing it along with the plug.
32
Instructions for the user
4. GET TO KNOW YOUR APPLIANCE
The hob is equipped with an induction generator for each cooking zone. Each generator located under
the glass ceramic cooking surface creates an electromagnetic field which induces a thermal current in
the base of the saucepan. This means the heat is no longer transmitted from the hob to the pan but
created directly inside the pan by the inductive current.
Advantages of an induction hob
- Energy saving thanks to the direct transmission of energy to the pan (suitable magnetisable
cookware is required) compared with traditional electric cooking.
- Improved safety as the energy is only transmitted to the container placed on the hob.
- High level of energy transmitted from the induction cooking zone to the base of the saucepan.
- Rapid heating.
- Reduced danger of burns as the cooking surface is only heated under the base of the saucepan;
foods which overflow do not stick.
4.1 Layout of the cooking zones
Zone
Outside diameter (mm)
Max absorbed power (W) *
Absorbed power
function (W) *
160
1400
2000
210
2000
3100
280
2000
3600
180
2000
2800
in
power
* power levels are indicative and can vary according to the pan used or the settings made.
33
Instructions for the user
4.2 Cookware recognition
If there is no saucepan on a cooking zone or if the saucepan is too small, no energy will be transmitted.
If there is a suitable saucepan on the cooking zone, the recognition system notices it and turns on the
hob to the set power level. Energy transmission is also interrupted when the saucepan is removed from
the cooking zone (the power level selected will then flash). If the cookware recognition function is
activated in spite of the saucepan or frying pan on the cooking zone being smaller than the zone itself,
only the necessary energy will be transmitted.
Cookware recognition limits: The minimum diameter of the saucepan base is indicated by a circle
inside the cooking zone. Pans with smaller diameters risk not being detected and therefore not activating
the inductor.
4.3 Cookware suitable for use in induction cooking
The containers used on the induction cooking surface must be made of metal, with magnetic properties
and a sufficiently large base.
Use only cookware with bases suitable for induction hot plates.
Suitable containers
Unsuitable containers
• Copper, stainless steel, aluminium, fireproof
• Enamelled steel cookware with thick bases.
glass, wood, ceramic and terracotta cookware.
• Cast iron cookware with an enamelled base.
• Cookware in multilayer stainless steel, ferritic
stainless steel and aluminium with a special
base.
To see whether the pan is suitable, bring a magnet close to the bottom: if it is attracted,
the pan is suitable for induction cooking. If you do not have a magnet, you can put a
small amount of water in the pan, place it on a cooking zone and start the hot plate. If
the power symbol starts flashing on the display, it means the pan is not suitable.
Use only cookware with a perfectly flat bottom. Using a cookware with an irregular bottom could
jeopardise the efficiency of the heating system so that cookware is not detected on the hot plate.
4.4 Limiting the cooking duration
The hob has an automatic device which limits the duration of use.
If the cooking zone settings are not changed, the maximum duration of operation of each zone depends
on the power level selected.
When the device for limiting the duration of use is activated, the cooking zone turns off, a short alert is
sounded and if the zone is hot the symbol
will show on the display.
However, the automatic switch-off function takes precedence over the limitation device; the cooking zone
only turns off after the time set for automatic switch-off is past.
Set power level
1-2
3-4
5 -6
7
8
9
P
34
Maximum
cooking
duration in hours
8
6
5
3
2
1½
1
Instructions for the user
4.5 Protection from hob overheating
If the hob is used on full power for a long period, the electronics will have trouble cooling down if the
room temperature is high.
To avoid excessively high temperatures forming in the electronics, the power to the cooking zone is
reduced automatically.
If during normal use of the hob at normal room temperatures the code E1 appears frequently, it means
that cooling is probably insufficient. This may be caused by insufficient cooling slots or the lack of
appropriate screening. If necessary, check the installation.
4.6 Other functions
Pressing two or more sensors at the same time or for a long period, e.g. due to accidentally placing a
saucepan on them or due to an overflow of liquid, does not activate any of the switch-on functions. An
acoustic alert is sounded and the error code E2 appears. The buttons deactivate after a few seconds.
Remove the object from the keys.
4.7 Advice on energy-saving
Below you will find advice on how to use your hob effectively and economically.
• The diameter of the base of the saucepan must correspond to the diameter of the cooking zone.
• When buying a saucepan, check whether the diameter indicated is that of the base or the top of the
container, as the top is almost always larger than the base.
• When preparing dishes with long cooking times, you can save time and energy by using a pressure
cooker, which also makes it possible to preserve the vitamins in the food.
• Make sure that the pressure cooker contains enough liquid as, if there is not enough and it overheats,
this may cause damage to both the pressure cooker and the cooking zone.
• If possible, always cover saucepans with a suitable lid.
• Choose a saucepan suitable for the quantity of food to be cooked. A large, half-empty saucepan
leads to a waste of energy.
4.8 Power levels
The power in the cooking zone can be adjusted to various levels. The table shows the levels suitable for
various types of cooking.
Power level
0
1-2
3-4
5-6
7-8
9
P
Suitable for
OFF position
Cooking small amounts of food (minimum power)
Cooking
Cooking large quantities of food, roasting larger
portions
Roasting, slow frying with flour
Roasting
Roasting / browning, cooking (maximum power)
35
Instructions for the user
5. USING THE COOKING HOB
5.1 General warnings and advice
On first connection to the electrical mains, an operating check will be carried out automatically and all
indicator lights will come on for a few seconds.
After use, switch off the hot plates using the controls described in point “5.5 Switching off the cooking
zone”. Never rely solely on the cookware detector.
Never place metal objects, such as dishes or cutlery, on the induction hob surface as they may overheat.
Danger of burns.
5.2 Control panel
All the appliance's control and monitoring devices are located together on the front panel. The induction
hob is controlled by means of the Touch Control sensor keys. Lightly touch a symbol on the glass
ceramic surface. The buzzer will sound to confirm every effective touch.
ON/OFF key: this key allows to switch the cooking zone on or off.
Power increase key: increases the power level or cooking time.
Touch sensor lock key: activates or deactivates the control lock if pressed for 3 seconds.
Timer key: activates the timer for the automatic shutdown.
Power decrease key: reduces the power level or cooking time.
5.3 Switching on and off the hob
To activate the hob keep the On/Off key
key
pressed for at least 1 second. To deactivate the hob keep
pressed for at least 2 seconds.
If after having activated the hob, no power value is selected within a few seconds, the hob is
automatically deactivated.
36
Instructions for the user
5.4 Switching on the cooking zone
After having switched on the hob the displays will show the value 0 (zero). Using keys
and
the
cooking power of each hot plate can be selected ranging from 1 to 9 or P.
Once the hob has been turned on, if you press key
you can set the maximum power P.
5.5 Switching off the cooking zone
To deactivate a cooking zone return the power value to 0 (zero) using keys
and
.
To switch off all cooking zones at the same time, hold down the On/Off key
for at least 2 seconds.
5.6 Residual heat
If the cooking zone is still hot after being switched off, the symbol
will appear on the display. The
symbol clears once the temperature drops below 60°C.
Supervise children carefully as they cannot readily see the residual heat indicator. The cooking zones
remain hot for a certain period of time even after they have been turned off. Make sure that children
never touch the hob.
5.7 Automatic temperature control
This function can be used to keep the cooking temperature constant. Once the required level has been
reached press simultaneously keys
and
of the relevant cooking zone. The electronic circuit
board will keep the cooking temperature constant in time. The display of the zone where this function
has been set will show symbol
.
To disable automatic temperature control, press simultaneously keys
and
for at least 3
seconds.
You cannot set automatic temperature control simultaneously for zones belonging to the same group,
see “5.10 Power management”.
Moreover, if automatic temperature control has been enabled for a group of hot plates, priority is given to
the zone where this function has been actually selected. The attempt of setting a higher power level for
the second cooking zone (of the same group) will be displayed by the symbol
flashing.
You cannot enable automatic temperature control for more than two different zones on the 5 cooking
zone model. If you attempt to enable automatic temperature control on the third zone error E2 will be
displayed.
5.8 Cooking zone automatic shutdown timer
After activating the cooking zone and having selected the required power level you can program the
automatic shutdown at the end of a period of time (from 1 to 99 minutes).
37
Instructions for the user
5.8.1 Setting the cooking time
Hold down key
for 2 seconds, the display of the first hot plate will show
and the flashing dot to
indicate that the timer is being modified.
Set the required cooking time using keys
and
(keep the keys pressed to set the time more
quickly). The display will show the set time for 5 seconds and then it will return to showing the power
level set.
By pressing key
you can set a different timer for each individual hot plate.
5.8.2 Changing the set time
Hold down key
for 2 seconds, the display will show the remaining time and the flashing dot.
The cooking time can be changed using keys
and
(keep the keys pressed to set the time more
quickly). The display will show the set time for 5 seconds and then it will return to showing the power
level set.
After the final minute, when
is pressed, the display will show the remaining seconds.
The automatic shutdown timer can be used as a simple timer. Follow the previous instructions without
selecting the cooking zone power level.
The automatic shutdown timer is subject to the cooking time limitations, see “4.4 Limiting the cooking
duration”.
5.9 Control lock
The control lock is a device that protects the appliance from accidental or inappropriate use. Useful for
preventing accidental changes to set cooking values, the lock can be activated while the hob is on or off.
5.9.1 Activating the control lock
Press key
for at least 3 seconds, a confirmation buzzer will sound and the display will show
for
2 seconds.
The controls are now locked and if any of the keys is pressed,
For safety reasons, key
will be displayed.
remains active. The cooking zone or the entire hob can be switched off at
any time, even if the lock is active.
The 2 cooking zone models are not equipped with the control lock function.
5.9.2 Deactivating the control lock
Press
for at least 3 seconds, a confirmation buzzer will sound.
The controls are now unlocked and any key may be pressed.
38
Instructions for the user
5.10 Power management
To optimise energy consumption, the groups made up of two hot plates (see figure below) are prevented
from supplying more than a determined maximum operating power. If the value set for the two hot plates
exceeds the permitted power, the electronic circuit board will automatically maintain the maximum level
permitted modifying the power supplied by the hot plates. The power level selected by the electronic
circuit board will always be visible on the display.
Priority is given to the last zone set.
39
Instructions for the user
5.11 Secondary menu (Automatic control lock - Showroom - ECO-logic)
The hob is equipped with a secondary menu for activating or deactivating some parameters:
1 Automatic control lock (not fitted on the 2 cooking zone model): on activating this mode, one
minute after the last operation by the user, the controls will automatically be locked (see 5.9 Control
lock).
2 Showroom: on activating this mode, the appliance deactivates all heating elements, while keeping
the control panel active (useful for demonstration purposes in store). To use the hob normally, set this
mode to “n”.
When Show room mode is activated, “SH” flashes on the display every 5 minutes.
3 ECO-logic (on some models only): on activating this mode, the hob electronics will automatically
adjust the power levels to stay within the set maximum power absorbed: 2; 3 or 4 kW. To use the hob
at maximum power, set this mode to “n”.
On 2 cooking zone models maximum power consumption can be limited to 2 kW.
5.11.1Changing the settings in the secondary menu
With all cooking zones off keep keys
and
pressed for at least 5 seconds.
The display of the first cooking zone will show the number of the setting currently being modified (1:
automatic control lock, 2: showroom, 3: ECO-logic) with its setting at the side (
inactive). For example,
Use keys
and
: active ;
indicates that the automatic control lock is inactive.
to change the setting to “
the following may be selected
(2 kW),
” or to “
(3 kW),
”; if changing the ECO-logic parameter
(4 kW) and
absorbed). To advance and change the subsequent settings, press key
(maximum power
.
In the version fitted with two hot plates, you can access the secondary menu pressing keys
at the same time. To advance and change the subsequent settings, press key
40
:
.
and
Instructions for the user
5.12 Cooking guidelines
The table below shows the power values which can be set, together with the corresponding type of food.
Settings may vary depending on the amount of food and consumer taste.
SETTING
1-2
3-4
TYPE OF FOOD
To heat food, keep small amounts of water on the boil, and whip up sauces with
egg yolk or butter.
To cook solid or liquid food, keep water on the boil, defrost deep-frozen food, cook
2 or 3 egg omelettes, fruit and vegetables, various cooking processes.
5-7
To stew meat, fish and vegetables, simmer food, make jams, etc.
8-9
To roast meat, fish, steaks and liver; to sauté meat, fish, eggs, etc.
P
To deep-fry potatoes, etc., or bring water to the boil rapidly.
For best cooking results and energy saving, only use containers suitable for
electric cooking:
- The bases of containers must be very thick, perfectly flat, clean and dry. The
hob must also be clean and dry.
- Do not use cast iron saucepans or saucepans with a rough base, as they
may scratch the cooking surface.
The diameter of the base of the saucepans must be equal to the diameter of the
circle outlining the cooking zone. If not, energy will be wasted.
41
Instructions for the user
6. CLEANING AND MAINTENANCE
Before performing any operations requiring access to powered parts, disconnect the appliance from the
power supply.
Do not use a steam jet for cleaning the appliance.
6.1 Cleaning the glass ceramic hob
The glass ceramic hob should be regularly cleaned, preferably after every use, once the
symbol
has disappeared from the displays.
Smudges from aluminium-based pans can be easily cleaned off with a cloth dampened
in vinegar.
After cooking remove any burnt residues with the scraper provided; rinse with water
and dry thoroughly with a clean cloth. Regular use of the scraper considerably reduces
the need for chemical detergents for the daily cleaning of the hob.
Never use abrasive or corrosive detergents (e.g. cleaning powders, oven sprays, spotremovers and wire sponges).
Dirt which may have fallen on the hob while cleaning lettuce or potatoes can scratch the hob when
moving saucepans.
Consequently, remove any dirt from the cooking surface immediately.
Changes in colour do not affect the functioning and stability of the glass ceramic. These are not
alterations to the material of the hob but just residues which have not been removed and have then
carbonised.
Shiny surfaces can form due to the bases of saucepans, especially aluminium ones, rubbing on the
surface, and due to the use of unsuitable detergents. These are difficult to remove with ordinary cleaning
products. It may be necessary to repeat the cleaning process several times. Using aggressive
detergents, or friction with the base of saucepans, can wear away the decoration on the hob over time
and contribute to the formation of stains.
6.2 Weekly cleaning
Clean and maintain the hob once a week using an ordinary glass ceramic cleaning product. Always
follow the manufacturer's instructions. The silicon in these products creates a protective, water-repellent
membrane which also resists dirt. All marks stay on the membrane and can therefore be easily removed.
After cleaning, dry the surface with a clean cloth. Make sure that there is no detergent left on the cooking
surface as it will undergo an aggressive reaction when heated up and could modify the structure of the
cooking surface.
42
Instructions for the user
7. TROUBLESHOOTING
PROBLEM
POSSIBLE CAUSES
- The hob is not wired in or the main
switch is not on.
- There is a power failure.
- The fuse or the magnetothermal
switch of the appliance has blown.
- The sensor keys are blocked
(child lock).
- The keys are partially covered by
a damp cloth, a liquid or a metal
object.
- Unsuitable saucepans have been
used.
The hob does not work.
SOLUTION
- Switch on the main switch.
-
-
The
results
unsatisfactory.
of
cooking
are -
The hob smokes.
The error code E2 is displayed and
an acoustic signal is temporarily
heard.
An E1 - E3 - E4 - E5 - E6 - E7 error code is displayed
The fuses or the magnetothermal
switch of the appliance are
repeatedly triggered.
The saucepans in use are making a noise.
The cooling fan continues to function even after the hob has been turned
off.
Sounds can be heard as if something is creaking or switching on.
Temperature is too high or too low. The hob is dirty.
-
Food has spilled onto the hob.
The Touch-control keys have been activated due to food falling on the
hob, saucepans or other objects. Attempt to enable the temperature
control for the third cooking zone
(5 cooking zone model only).
There is a technical fault.
-
See "Saucepans suitable for use
in induction cooking" section.
Consult cooking guidelines.
Clean the hob once cooking is
finished. Let it cool first.
Use a larger saucepan.
Clean the surface or remove the
object.
See “5.7 Automatic temperature
control”.
Contact Technical Support.
-
Call Technical Support or an
electrician.
There is no danger to the hob or the saucepan.
This is normal because the
electronics need to cool down.
This is normal with certain types
of pan.
This is for technical reasons and
cannot be avoided.
-
There are cracks or fissures in the
hob.
Check power supply.
Replace the fuse or reactivate the
magnetothermal switch of the
appliance.
Unlock the sensor keys (child
lock).
Remove the obstacle.
If cracks or fissures form, or if the
glass ceramic cooking surface
breaks, turn off the appliance
immediately. Disconnect the hob
from the power supply and call
Technical Support.
43
Instructions for the installer
8. INSTALLATION
8.1 Safety instructions for installing in kitchen units
USE PERSONAL PROTECTIVE
EQUIPMENT
WHEN
INSTALLING THE APPLIANCE.
Veneers, adhesives or plastic coatings on adjacent furniture should be temperature-resistant (>90°C). If
they are not sufficiently temperature-resistant, they may warp over time.
The minimum distance between a ventilation hood and the cooking surface must be at least the distance
indicated in the ventilation hood installation instructions.
The minimum distances must also be respected for the edges of the hob on the back as indicated in the
installation illustrations.
8.2 Section cut from the work surface
The following operation requires building and/or carpentry work and must therefore be carried out by a
competent tradesman.
Installation can be carried out on various materials such as masonry, metal, solid wood or plastic
laminated wood as long as they are heat resistant (T 90°C).
Create an opening in the counter top with the dimensions shown in the figure, keeping a minimum
distance A from the rear edge.
This appliance can be mounted against walls higher than the work surface on condition that a minimum
distance B be kept between the appliance and the wall as shown in the figure so as to avoid damage
from overheating.
Make sure there is a minimum distance C between the hob and any shelf that may be installed directly
above it.
44
Instructions for the installer
8.2.1 Mounting dimensions for hobs with beveled edge
L (mm)
300
600
700
900
X (mm)
270
560
560
878
Y (mm)
490
490
490
490
A (mm)
50 min.
50 min.
50 min.
50 min.
B (mm)
50 min.
50 min.
50 min.
50 min.
C (mm)
750 min.
750 min.
750 min.
750 min.
L (mm)
900
X (mm)
882
Y (mm)
332
A (mm)
50 min.
B (mm)
50 min.
C (mm)
750 min.
8.2.2 Mounting dimensions for hobs with straight edge
L (mm)
300
600
700
900
X (mm)
270
560
665
878
Y (mm)
490
490
490
490
G (mm)
304
604
704
904
H (mm)
519
519
519
519
A (mm)
50 min.
50 min.
50 min.
50 min.
B (mm)
50 min.
50 min.
50 min.
50 min.
C (mm)
750 min.
750 min.
750 min.
750 min.
45
Instructions for the installer
L (mm)
900
X (mm)
882
Y (mm)
332
G (mm)
904
H (mm)
354
A (mm)
50 min.
B (mm)
50 min.
C (mm)
750 min.
After laying the adhesive sponge (A) on the glass
surface (see 8.5 Hob seal) and after positioning and
securing the hob, fill the edges with insulating
silicone (B) and wipe away any excess. In the event
the glass surface has to be removed, cut the
silicone using a cutter before attempting to remove
it (C).
Enough silicone must be used to create a seal between the hob and the counter top, but not so much as
to fasten the appliance to the counter top. To fasten the appliance see “8.6 Fixing using brackets”.
8.3 Mounting
8.3.1 Over empty kitchen unit or drawers
If there are other pieces of furniture (lateral walls,
drawers, etc.) under the hob, a double-layer
wooden base must be installed at least 30 mm from
the bottom of the hob to avoid any accidental
contact. It must only be possible to remove the
double-layer base using suitable equipment.
opens on bottom
46
opens on rear
Instructions for the installer
8.3.2 Over built-in oven
If installed on top of an oven, the latter must be equipped with a cooling fan.
The distance between the induction hob and the kitchen furniture or other built-in appliances must be
enough to ensure sufficient ventilation and air discharge.
Remove the front transverse strip (if necessary) on the unit to create an opening for the air flow of at
least 4 mm under the work surface across the full width of the appliance.
In any event, if installed above an oven, a dishwasher or a fridge, a space of at least 5 cm must be left
between the hob and the top of the appliance installed below.
opens only on bottom
opens on bottom and on rear
8.4 Ventilation
The illustrations below show two examples of installation suitable for proper ventilation and one example
of incorrect installation to be avoided.
Do not obstruct the ventilation grille in front of the product in any type of installation.
47
Instructions for the installer
8.5 Hob seal
To prevent leakage of liquid between the frame of
the hob and the work surface, place the seal
provided along the entire outer edge of the hob
before assembly.
Do not fix the hob using silicon as this would make it impossible to remove the hob, if necessary, without
damaging it.
8.6 Fixing using brackets
Fix the hob to the unit using the appropriate brackets supplied.
To secure the hob correctly to the counter top, tighten the
brackets A in the appropriate holes on the sides of the casing.
Take care while securing with the brackets; if tightened too much the glass may be strained causing it to
crack.
48
Instructions for the installer
8.7
Electrical connection
Make sure that the voltage and capacity of the power line conform to the data shown on the plate located
under the casing. Do not remove this plate for any reason.
THE HOB MUST BE CONNECTED TO THE POWER SUPPLY BY A QUALIFIED TECHNICIAN.
BEFORE ANY INTERVENTION, DISCONNECT THE POWER SUPPLY OF THE HOB.
THE APPLIANCE MUST BE CONNECTED TO EARTH IN COMPLIANCE WITH ELECTRICAL
SYSTEM SAFETY REGULATIONS.
WHEN LINKING UP TO THE POWER SUPPLY NETWORK BY PLUG AND SOCKET, MAKE SURE
THAT BOTH ARE COMPATIBLE AND THEY SHOULD BE CONNECTED BY MEANS OF A POWER
CABLE COMPLYING WITH THE REGULATIONS IN FORCE. THE SOCKET MUST BE ACCESSIBLE
AFTER THE APPLIANCE HAS BEEN BUILT IN. NEVER UNPLUG BY PULLING ON THE CABLE.
IMMEDIATELY AFTER INSTALLATION CARRY OUT A BRIEF INSPECTION TEST OF THE HOB,
FOLLOWING THE INSTRUCTIONS. IF THE HOB FAILS TO OPERATE, AFTER CHECKING THAT
YOU HAVE CARRIED OUT THE INSTRUCTIONS CORRECTLY, DISCONNECT THE APPLIANCE
FROM THE ELECTRICAL MAINS AND CONTACT YOUR NEAREST SERVICE CENTRE.
NEVER ATTEMPT TO REPAIR THE APPLIANCE.
RUN THE POWER CABLE UNDER THE UNIT, TAKING CARE THAT IT DOES NOT COME INTO
CONTACT WITH THE BOTTOM OF THE CASING OF THE HOB OR THE OVEN BENEATH IT IF
THERE IS ONE.
THE EARTHING WIRE MUST BE LONGER THAN THE CONDUCTING WIRES SO THAT, IF THE
PLUG IS TORN OFF THE POWER CABLE, IT IS THE LAST TO BE DETACHED.
AVOID USE OF ADAPTERS AND SHUNTS AS THESE COULD CAUSE OVERHEATING AND RISK OF
BURNS.
WHERE A FIXED CONNECTION IS IN USE, A MULTIPOLAR CUT-OUT DEVICE MUST BE
INSTALLED ON THE SUPPLY CABLE WITH A CONTACT OPENING DISTANCE EQUAL OR
GREATER THAN 3 MM, LOCATED IN A READILY REACHABLE POSITION NEAR THE APPLIANCE.
The manufacturer declines all responsibility for damage to persons or things caused by nonobservance of the above prescriptions or by interference with any part of the appliance.
The adjacent diagram illustrates the power supply terminal board from
below, with no cables connected. Terminals 4 and 5 must be
connected at all times.
49
Instructions for the installer
POSSIBLE CONNECTION CABLE TYPE
TYPES
(if not present)
380
-
415
V
3N~ 5-pole
5 x 2.5 mm²
H05V2V2-F
380
-
415
V
2N~ 4-pole
4 x 2.5 mm²
H05V2V2-F
220
-
240
V
3~
4 x 2.5 mm²
H05V2V2-F
220
-
240
V
1N~ 3-pole
3 x 4 mm²
H05V2V2-F
220
-
240
V
1N~ 3-pole
3 x 6 mm²
H05V2V2-F
4-pole
70 - 90
60 - 70
60 - 70 -90
HOB TYPE
(CM)
Carefully read the connection layout plate underneath the appliance or around the power cable.
Use H05V2V2-F cables withstanding a temperature of at least 90°C.
The aforementioned power cables are sized taking into account the coincidence factor (in compliance
with standard EN 60335-2-6).
50