1
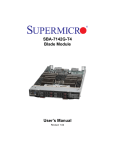
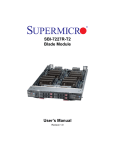
SBA-7222G-T2
Blade Module
User’s Manual
Revison 1.0a
SBA-7222G-T2 Blade Module User’s Manual
The information in this User’s Manual has been carefully reviewed and is believed to be accurate. The
vendor assumes no responsibility for any inaccuracies that may be contained in this document, makes no
commitment to update or to keep current the information in this manual, or to notify any person or
organization of the updates. Please Note: For the most up-to-date version of this manual, please see
our web site at www.supermicro.com.
Super Micro Computer, Inc. ("Supermicro") reserves the right to make changes to the product described
in this manual at any time and without notice. This product, including software and documentation, is the
property of Supermicro and/or its licensors, and is supplied only under a license. Any use or reproduction
of this product is not allowed, except as expressly permitted by the terms of said license.
IN NO EVENT WILL SUPERMICRO BE LIABLE FOR DIRECT, INDIRECT, SPECIAL, INCIDENTAL,
SPECULATIVE OR CONSEQUENTIAL DAMAGES ARISING FROM THE USE OR INABILITY TO USE
THIS PRODUCT OR DOCUMENTATION, EVEN IF ADVISED OF THE POSSIBILITY OF SUCH
DAMAGES. IN PARTICULAR, SUPERMICRO SHALL NOT HAVE LIABILITY FOR ANY HARDWARE,
SOFTWARE, OR DATA STORED OR USED WITH THE PRODUCT, INCLUDING THE COSTS OF
REPAIRING, REPLACING, INTEGRATING, INSTALLING OR RECOVERING SUCH HARDWARE,
SOFTWARE, OR DATA.
Any disputes arising between manufacturer and customer shall be governed by the laws of Santa Clara
County in the State of California, USA. The State of California, County of Santa Clara shall be the
exclusive venue for the resolution of any such disputes. Super Micro's total liability for all claims will not
exceed the price paid for the hardware product.
FCC Statement: This equipment has been tested and found to comply with the limits for a Class A digital
device pursuant to Part 15 of the FCC Rules. These limits are designed to provide reasonable protection
against harmful interference when the equipment is operated in a commercial environment. This
equipment generates, uses, and can radiate radio frequency energy and, if not installed and used in
accordance with the manufacturer’s instruction manual, may cause harmful interference with radio
communications. Operation of this equipment in a residential area is likely to cause harmful interference,
in which case you will be required to correct the interference at your own expense.
California Best Management Practices Regulations for Perchlorate Materials: This Perchlorate warning
applies only to products containing CR (Manganese Dioxide) Lithium coin cells. Perchlorate
Material-special handling may apply. See www.dtsc.ca.gov/hazardouswaste/perchlorate for further
details.
WARNING: HANDLING OF LEAD SOLDER MATERIALS USED IN THIS
PRODUCT MAY EXPOSE YOU TO LEAD, A CHEMICAL KNOWN TO THE
STATE OF CALIFORNIA TO CAUSE BIRTH DEFECTS AND OTHER
REPRODUCTIVE HARM.
Manual Revison 1.0a
Release Date: May 18, 2011
Unless you request and receive written permission from Super Micro Computer, Inc., you may not copy
any part of this document.
Information in this document is subject to change without notice. Other products and companies referred
to herein are trademarks or registered trademarks of their respective companies or mark holders.
Copyright © 2011 by Super Micro Computer, Inc.
All rights reserved.
Printed in the United States of America
ii
Preface
About this Manual
This manual is written for professional system integrators, Information Technology
professionals, service personnel and technicians. It provides information for the
installation and use of Supermicro's SBA-7222G-T2 Blade Module. Installation and
maintenance should be performed by experienced professionals only.
Manual Organization
Chapter 1: Introduction
The first chapter provides a checklist of the main components included with the
SBA-7222G-T2 Blade Module and describes its main features.
Chapter 2: System Safety
You should familiarize yourself with this chapter for a general overview of safety
precautions that should be followed when installing and servicing the SBA-7222G-T2
Blade Module.
Chapter 3: Setup and Installation
Refer to this chapter for details on installing the SBA-7222G-T2 Blade Module into the
SuperBlade chassis. Other sections cover the installation and placement of memory
modules and the installation of hard disk drives into the blade module.
Chapter 4: Blade Module Features
This chapter covers features and component information about the SBA-7222G-T2
Blade Module. Included here are descriptions and information for mainboard
components, connectors, LEDs and other features of the blade module.
Chapter 5: RAID Setup Procedure
RAID setup and operations for the SBA-7222G-T2 Blade Module are covered in this
chapter.
Chapter 6: BIOS
BIOS setup is covered in this chapter for the SBA-7222G-T2 Blade Module.
Appendix A: BIOS POST Codes
BIOS POST Codes for the SBA-7222G-T2 Blade Module are explained in this appendix.
iii
SBA-7222G-T2 Blade Module User’s Manual
Notes
iv
Table of Contents
Chapter 1 Introduction....................................................................... 1-1
1-1 Overview ............................................................................................. 1-1
1-2 Product Checklist of Typical Components..................................... 1-1
1-3 Blade Module Features .................................................................... 1-2
Processors .............................................................................................. 1-2
Memory ................................................................................................... 1-2
Storage.................................................................................................... 1-3
Density .................................................................................................... 1-3
1-4 Contacting Supermicro ..................................................................... 1-5
Chapter 2 System Safety .................................................................. 2-1
2-1 Electrical Safety Precautions........................................................... 2-1
2-2 General Safety Precautions............................................................. 2-2
2-3 Electrostatic Discharge Precautions .............................................. 2-2
2-4 Operating Precautions ...................................................................... 2-3
Chapter 3 Setup and Installation ................................................. 3-1
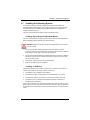
3-1 Overview ............................................................................................. 3-1
3-2 Installing Blade Modules .................................................................. 3-1
Powering Up a Blade Unit....................................................................... 3-1
Powering Down a Blade Unit .................................................................. 3-1
Removing a Blade Unit from the Enclosure ............................................ 3-1
Removing/Replacing the Blade Cover .................................................... 3-2
Installing a Blade Unit into the Enclosure ............................................... 3-2
3-3 Processor Installation ....................................................................... 3-4
3-4 Onboard Battery Installation ............................................................ 3-5
3-5 Memory Installation ........................................................................... 3-6
Populating Memory Slots ........................................................................ 3-6
DIMM Installation .................................................................................... 3-8
3-6 Hard Disk Drive Installation ............................................................. 3-9
Removing a Hard Drive Carrier............................................................... 3-9
Installing a Hard Drive............................................................................. 3-9
3-7 Installing the Operating System .................................................... 3-11
Installing with an External USB CD-ROM Drive.................................... 3-11
Installing via PXE Boot.......................................................................... 3-11
v
SBI-7226T-T2 Blade Module User’s Manual
Installing via Virtual Media (Drive Redirection) ..................................... 3-12
Linux Installation with Two Hard Drives ................................................ 3-12
3-8 Management Software ................................................................... 3-12
3-9 Configuring and Setting up RAID ................................................. 3-12
Chapter 4 Blade Module Features .............................................. 4-1
4-1 Control Panel ..................................................................................... 4-2
Power Button .......................................................................................... 4-3
KVM Button............................................................................................. 4-3
LED Indicators ........................................................................................ 4-3
KVM Connector....................................................................................... 4-3
4-2 Mainboard........................................................................................... 4-4
Jumpers .................................................................................................. 4-6
CMOS Clear............................................................................................ 4-6
4-3 Blade Unit Components ................................................................... 4-7
Memory Support ..................................................................................... 4-8
Hard Disk Drives ..................................................................................... 4-8
Chapter 5 RAID Setup Procedure ............................................... 5-1
5-1 BIOS Setup ........................................................................................ 5-1
Chapter 6 BIOS ....................................................................................... 6-1
6-1 Introduction......................................................................................... 6-1
Running Setup ........................................................................................ 6-1
6-2 Main BIOS Setup Menu ................................................................... 6-1
System Time/System Date ..................................................................... 6-2
6-3 Advanced Settings Menu ................................................................. 6-2
Boot Feature ........................................................................................... 6-3
Processor & Clock Options ..................................................................... 6-4
Advanced Chipset Control ...................................................................... 6-4
IDE Configuration.................................................................................... 6-6
PCI/PnP Configuration............................................................................ 6-7
Super IO Device Configuration ............................................................... 6-8
Remote Access Configuration ................................................................ 6-8
Hardware Health Configuration............................................................... 6-9
ACPI Configuration ................................................................................. 6-9
IPMI Configuration ................................................................................ 6-10
Event Log Configuration ....................................................................... 6-11
6-4 Security Menu .................................................................................. 6-11
vi
6-5 Boot Menu ........................................................................................ 6-12
6-6 Exit Menu .......................................................................................... 6-13
Appendix A BIOS POST Codes ....................................................A-1
A-1 BIOS POST Messages ....................................................................A-1
A-2 BIOS POST Codes ...........................................................................A-4
Recoverable POST Errors ......................................................................A-4
Terminal POST Errors.............................................................................A-4
Uncompressed Initialization Codes......................................................A-4
Bootblock Recovery Codes..................................................................A-5
Uncompressed Initialization Codes......................................................A-6
vii
SBI-7226T-T2 Blade Module User’s Manual
Notes
viii
List of Figures
Figure 1-1. Full Rack of Blade Enclosures and Blade Servers ......................... 1-4
Figure 3-1. Inserting a Blade into the Enclosure ............................................... 3-3
Figure 3-2. Locking the Blade into Position....................................................... 3-3
Figure 3-3. Installing a G34 Processor in a Socket........................................... 3-5
Figure 3-4. Installing the Onboard Battery ........................................................ 3-6
Figure 3-5. 8-Slot DIMM Numbering for Two Node Blade Modules.................. 3-7
Figure 3-6. Installing a DIMM into a Memory Slot ............................................. 3-8
Figure 3-7. Installing a Hard Drive in a Carrier................................................ 3-10
Figure 4-1. SBA-7222G-T2 Blade Unit Front View ........................................... 4-1
Figure 4-2. Blade Control Panel........................................................................ 4-2
Figure 4-3. BHDGT Mainboard ......................................................................... 4-4
Figure 4-4. BHDGT Block Diagram................................................................... 4-6
Figure 4-5. Exploded View of SBA-7222G-T2 Blade Module ........................... 4-7
Figure 5-1. IDE Configuration Screen – Configure RAID Drives....................... 5-2
Figure 5-2. Exit BIOS Setup.............................................................................. 5-3
Figure 5-3. Screen Message............................................................................. 5-4
ix
SBI-7226T-T2 Blade Module User’s Manual
Notes
x
List of Tables
Table 1-1. SBA-7222G-T2 Blade Specification Features.................................. 1-2
Table 3-1. Populating Memory Slots per Node for Interleaved Operation ........ 3-6
Table 4-1. SBA-7222G-T2 Blade Unit Features................................................ 4-1
Table 4-2. Blade Control Panel ......................................................................... 4-2
Table 4-3. Blade Module LED Indicators .......................................................... 4-3
Table 4-4. BHDGT Mainboard Layout............................................................... 4-5
Table 4-5. Main Components of SBA-7222G-T2 Blade Unit............................. 4-8
Table 6-1. Boot Feature Submenu.................................................................... 6-3
Table 6-2. Processor & Clock Options Submenu.............................................. 6-4
Table 6-3. Advanced Chipset Control Submenu............................................... 6-4
Table 6-4. IDE Configuration Submenu ............................................................ 6-6
Table 6-5. PCI/PnP Configuration Submenu .................................................... 6-7
Table 6-6. Super IO Configuration Submenu.................................................... 6-8
Table 6-7. Remote Access Configuration Submenu ......................................... 6-8
Table 6-8. Hardware Health Configuration Submenu ....................................... 6-9
Table 6-9. ACPI Configuration Submenu.......................................................... 6-9
Table 6-10. IPMI Configuration Submenu....................................................... 6-10
Table 6-11. Event Log Configuration Submenu .............................................. 6-11
Table 6-12. Security Menu .............................................................................. 6-11
Table 6-13. Boot Menu.................................................................................... 6-12
Table 6-14. Exit Menu ..................................................................................... 6-13
Table A-1. BIOS POST Messages....................................................................A-1
Table A-2. Uncompressed Initialization Error Codes ........................................A-4
Table A-3. Bootblock Recovery Error Codes ....................................................A-5
Table A-4. Uncompressed Initialization Error Codes ........................................A-6
xi
SBI-7226T-T2 Blade Module User’s Manual
Notes
xii
Chapter 1
Introduction
1-1
Overview
The SBA-7222G-T2 blade module is a compact self-contained server that connects into
a pre-cabled enclosure that provides power, cooling, management and networking
functions. One enclosure for the SBA-7222G-T2 blade module can hold ten blade units.
Each blade module contains two “Nodes” that each are a separate and server system,
providing up to the equivalent of 20 blade units in one 10-blade module enclosure.
In this manual, “blade system” refers to the entire system (including the enclosure and
blades units), “blade” or “blade unit” refers to a single blade module and “blade
enclosure” is the chassis that the blades, power supplies and modules are housed in.
Please refer to our web site for information on operating systems that have been
certified for use with the SuperBlade (www.supermicro.com/products/superblade/).
1-2
Product Checklist of Typical Components
Your blade module ships with its mainboard already installed in its chassis. Memory,
hard disk drives and the CPU must all be installed by the user after shipment. See
Chapter 3: "Setup and Installation" on page 3-1 for details on installation of these
components.
Aside from the blade module unit itself, the optional AOC-XEH-iN2 Mezzanine add-on
card (with 10G Pass-Through or 10G Switch) may be ordered for your blade module
along with the following add-on cards:
•
AOC-IBH-XDD
•
AOC-IBH-XDS
•
AOC-IBH-XQS
•
AOC-IBH-XQD
See the Supermicro website and the SuperBlade Network Modules User’s Manual on
your SuperBlade system’s CD-ROM for more details on these add-on cards.
1-1
SBA-7222G-T2 Blade Module User’s Manual
1-3
Blade Module Features
Table 1-1 lists the main features of the SBA-7222G-T2 blade module. See the
proceeding section for components typically included in a blade system and other
optional components. Specific details on the SBA-7222G-T2 blade module is found in
Chapter 4: "Blade Module Features" on page 4-1.
Table 1-1. SBA-7222G-T2 Blade Specification Features
Mainboard
BHDGT (proprietary form factor)
Blade Module Chassis Dimensions (HxWxD): 11.32” x 1.67” x 20.5”
Processors
Supports two 1944-pin G34 socket AMD Opteron 6100 series processors
in each node for up to four processors per blade module. Please refer to
our web site for a complete listing of supported processors.
FSB Speed
1333/1066/800 MHz speed
Chipset
AMD SR5650 & SP5100 chipset
Graphics Controller
One embedded Matrox G200eW Graphics chip with 16MB of SDRAM
BIOS
16 Mb AMI® SPI Flash EPROM BIOS
Memory Capacity
Eight 240-pin DIMM sockets per node supporting up to 128 GB of ECC
Registered DDR3-1333/1066/800 SDRAM DIMMs or 32 GB of ECC
Unbuffered DDR3-1333/1066/800 SDRAM DIMMs.
SATA Controller
SATA Controller SP5100 on-chip controller for four Serial ATA drives total
(two per node).
Hard Drive Bays
Four (4) hot-swap drive bays for 2.5" SATA disk drives (two per node)
Processors
The SBA-7222G-T2 blade module supports up to two 1944-pin G34 socket AMD
Opteron 6100 series processors in each node for a total of four.
Refer to the Supermicro web site for a complete listing of supported processors (http://
www.supermicro.com/products/superblade). Please note that you will need to check the
detailed specifications of a particular blade module for a list of the CPUs it supports.
Details on installation of the processor into the SBA-7222G-T2 blade module are found
in Chapter 3: "Setup and Installation" on page 3-1.
Memory
The SBA-7222G-T2 blade module has eight 240-pin DIMM sockets in each node that
can support up to 32 GB of ECC Unbuffered DDR3-1333/1066/800 SDRAM or 128 GB
of ECC Registered DDR3-1333/1066/800 SDRAM DIMMs. Both interleaved and
non-interleaved memory are supported, so you may populate any number of DIMM
slots.
Please refer to the Supermicro web site for a list of supported memory
(www.supermicro.com/products/superblade). The detailed specifications for a blade
module will contain a link to a list of recommended memory sizes and manufacturers.
1-2
Chapter 1: Introduction
Details on installation of memory modules into the SBA-7222G-T2 blade module are
found in Chapter 3: "Setup and Installation" on page 3-1.
Storage
The SBA-7222G-T2 blade module can have four 2.5" SATA (Serial ATA) hard disk drives
in front-mounted easy removable carriers, two for each node. See Chapter 3: "Setup
and Installation" on page 3-1 for storage installation details.
Density
A maximum of ten blade modules may be installed into a single blade enclosure with
two nodes. Each blade enclosure is a 7U form factor, so a standard 42U rack may
accommodate up to six enclosures with 60 blade modules, two nodes per module, or
the equivalent of 120 1U servers. With the inclusion of six CMM modules, twelve Gigabit
Ethernet switches and six InfiniBand switches, this would occupy up to 144U space in a
conventional 1U dual processor server configuration.
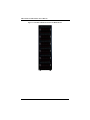
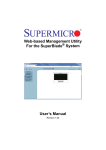
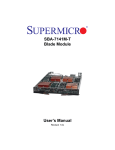
Figure 1-1 displays a view of a full rack with six blade enclosures in it, each with ten
blades to an enclosure.
1-3
SBA-7222G-T2 Blade Module User’s Manual
Figure 1-1. Full Rack of Blade Enclosures and Blade Servers
1-4
Chapter 1: Introduction
1-4
Contacting Supermicro
Headquarters
Address:
Super Micro Computer, Inc.
980 Rock Ave.
San Jose, CA 95131 U.S.A.
Tel:
Fax:
+1 (408) 503-8000
+1 (408) 503-8008
[email protected] (General Information)
Email:
[email protected] (Technical Support)
Web Site:
www.supermicro.com
Europe
Address:
Super Micro Computer B.V.
Het Sterrenbeeld 28, 5215 ML
‘s-Hertogenbosch, The Netherlands
Tel:
+31 (0) 73-6400390
Fax:
+31 (0) 73-6416525
[email protected] (General Information)
Email:
[email protected] (Technical Support)
[email protected] (Customer Support)
Asia-Pacific
Address:
Super Micro Computer, Inc.
4F, No. 232-1, Liancheng Rd.
Chung-Ho 235, Taipei County
Taiwan, R.O.C.
Tel:
+886-(2) 8226-3990
Fax:
+886-(2) 8226-3991
Web Site:
www.supermicro.com.tw
Technical Support:
Email:
[email protected]
Tel:
+886-2-8228-1366, ext. 132 or 139
1-5
SBA-7222G-T2 Blade Module User’s Manual
Notes
1-6
Chapter 2
System Safety
2-1
Electrical Safety Precautions
Basic electrical safety precautions should be followed to protect yourself from harm and
the SuperBlade from damage:
•
Be aware of how to power on/off the enclosure power supplies and the individual
blades as well as the room's emergency power-off switch, disconnection switch or
electrical outlet. If an electrical accident occurs, you can then quickly remove power
from the system.
•
Do not work alone when working with high voltage components.
•
Power should always be disconnected from the blade module when removing or
installing such system components as the mainboard, memory modules and
processors.
•
When working around exposed electrical circuits, another person who is familiar
with the power-off controls should be nearby to switch off the power if necessary.
•
Use only one hand when working with powered-on electrical equipment. This is to
avoid making a complete circuit, which will cause electrical shock. Use extreme
caution when using metal tools, which can easily damage any electrical components
or circuit boards they come into contact with.
•
Do not use mats designed to decrease electrostatic discharge as protection from
electrical shock. Instead, use rubber mats that have been specifically designed as
electrical insulators.
•
The power supply power cords must include a grounding plug and L line. It must be
plugged into grounded electrical outlets. Power input requires 110-240 VAC,
depending upon your power supply module.
•
Mainboard Battery: This battery must be replaced only with the same or an
equivalent type recommended by the manufacturer (CR2032 Lithium 3V battery).
Dispose of used batteries according to the manufacturer's instructions.
WARNING: There is a danger of explosion if the onboard battery is installed
upside down, which will reverse its polarities.
WARNING: Please handle used batteries carefully. Do not damage the battery in
any way; a damaged battery may release hazardous materials into the
environment. Do not discard a used battery in the garbage or a public landfill.
Please comply with the regulations set up by your local hazardous waste
management agency to dispose of your used battery properly.
•
Mainboard replaceable soldered-in fuses: Self-resetting PTC (Positive Temperature
Coefficient) fuses on the mainboard must be replaced by trained service technicians
2-1
SBA-7222G-T2 Blade Module User’s Manual
only. The new fuse must be the same or equivalent as the one replaced. Contact
technical support for details and support.
2-2
General Safety Precautions
Follow these rules to ensure general safety:
•
Keep the area around the SuperBlade clean and free of clutter.
•
Place the blade module cover and any system components that have been removed
away from the system or on a table so that they won't accidentally be stepped on.
•
While working on the system, do not wear loose clothing such as neckties and
unbuttoned shirt sleeves, which can come into contact with electrical circuits or be
pulled into a cooling fan.
•
Remove any jewelry or metal objects from your body, which are excellent metal
conductors that can create short circuits and harm you if they come into contact with
printed circuit boards or areas where power is present.
•
After accessing the inside of the system, replace the blade module's cover before
installing it back into the blade enclosure.
2-3
Electrostatic Discharge Precautions
Electrostatic discharge (ESD) is generated by two objects with different electrical
charges coming into contact with each other. An electrical discharge is created to
neutralize this difference, which can damage electronic components and printed circuit
boards.
The following measures are generally sufficient to neutralize this difference before
contact is made to protect your equipment from ESD:
•
Use a grounded wrist strap designed to prevent static discharge.
•
Keep all components and printed circuit boards (PCBs) in their antistatic bags until
ready for use.
•
Touch a grounded metal object before removing the board from the antistatic bag.
•
Do not let components or PCBs come into contact with your clothing, which may
retain a charge even if you are wearing a wrist strap.
•
Handle a board by its edges only; do not touch its components, peripheral chips,
memory modules or contacts.
•
When handling chips or modules, avoid touching their pins.
•
Put the mainboard and peripherals back into their antistatic bags when not in use.
•
For grounding purposes, make sure the blade enclosure provides excellent
conductivity between the power supplies, the blade modules and the mainboard.
WARNING: This product may be connected to an IT power system. In all cases,
make sure that the unit is also reliably connected to Earth (ground).
2-2
Chapter 2: System Safety
2-4
Operating Precautions
Care must be taken to assure that the cover of the blade unit is in place when the blade
is operating to assure proper cooling. Out of warranty damage to the blade can occur if
this practice is not strictly followed.
Any drive carrier without a hard drive installed must remain fully installed in the drive bay
when the blade module is operating to ensure proper airflow.
2-3
SBA-7222G-T2 Blade Module User’s Manual
Notes
2-4
Chapter 3
Setup and Installation
3-1
Overview
This chapter covers the setup and installation of the blade module and its components.
3-2
Installing Blade Modules
Up to ten SBA-7222G-T2 blade modules may be installed into a single blade enclosure
(depending upon your enclosure and blade). Blade modules with Windows and Linux
operating systems may be mixed together in the same blade enclosure.
Powering Up a Blade Unit
Each blade unit may be powered on and off independently from the rest of the blades
installed in the same enclosure. A blade unit may be powered up in two ways:
•
Press the power button on the blade unit.
•
Use IPMIView or the web-browser based management utility to apply power using
either a CMM module, or by the use of the onboard BMC chip in the blade module.
Powering Down a Blade Unit
A blade unit may be powered down in either of five ways:
•
Press the power button on the blade unit.
•
Use IPMIView or the web-browser based management utility to power down (if you
have Operator or Admin privileges on the CMM).
•
Use SMCIPMItool when connected to the CMM to power down (if you have
Operator or Admin privileges on the CMM).
•
Use IPMIview or a browser connected to the onboard BMC chip to power down.
•
Use SMCIPMItool to use a Command Line Interface (CLI) to the onboard BMC
chip, if you have Operator or Admin privileges.
Removing a Blade Unit from the Enclosure
Although the blade system may continue to run, individual blades should always be
powered down before removing them from the enclosure.
Removing a Blade Unit from the Enclosure
1. Power down the blade unit (see "Powering Down a Blade Unit" above).
2. Squeeze both handles to depress the red sections then pull out both handles
completely and use them to pull the blade unit from the enclosure.
3-1
SBA-7222G-T2 Blade Module User’s Manual
NOTE: Blade Modules can be Hot-Plugged from the enclosure.
Removing/Replacing the Blade Cover
The blade cover must be removed to access the mainboard when you need to install or
remove processors, memory units, the onboard battery and so on.
Removing/Replacing the Blade Cover
1. Remove the blade unit from the enclosure (see "Removing a Blade Unit from the
Enclosure" above).
2. Depress the two buttons on the cover while pushing the cover toward the rear of the
blade unit. When it stops, lift the cover off the blade unit.
3. To replace the cover, fit the six grooves in the cover into the studs in the sides of the
blade, then slide the cover toward the front of the blade to lock it into place.
Installing a Blade Unit into the Enclosure
Make sure the cover of the blade unit has been replaced first before installing a blade
unit in the enclosure.
Installing a Blade Unit into the Enclosure
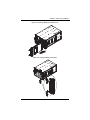
1. Slowly push the blade unit into its bay with the handles fully pulled out (see
Figure 3-1).
2. When the blade stops, push the handles back in to their locked position, making
sure the notches in both handles catch the lip of the enclosure (see Figure 3-2).
NOTE: Blade Modules can be Hot-Plugged into the enclosure.
WARNING: Use extreme caution when inserting a blade module into the
enclosure. If the blade's power connector becomes damaged, it can damage
pins on other blade bays that it is inserted into.
3-2
Chapter 3: Setup and Installation
Figure 3-1. Inserting a Blade into the Enclosure
Figure 3-2. Locking the Blade into Position
3-3
SBA-7222G-T2 Blade Module User’s Manual
3-3
Processor Installation
One or two 1944-pin G34 socket AMD Opteron 6100 series processors may be installed
to the mainboard of each node. See Chapter 1 for general information on the features of
the blade unit and the Supermicro web site for further details including processor,
memory and operating system support.
WARNING: This action should only be performed by a trained service
technician. Allow the processor heatsink to cool before removing it.
Removing a Processor
1. Power down and remove the blade unit from the enclosure (see Section 3-2:
Installing Blade Modules on page 3-1 for details).
2. Remove the cover of the blade unit (see "Removing/Replacing the Blade Cover" on
page 3-2).
3. Loosen the two screws that secure the heatsink to the mainboard.
4. Remove the heatsink by gently rotating it back-and-forth sideways with your fingers
to release it from the processor. Set the heatsink aside and upside-down so that
nothing comes into contact with the thermal grease on its underside.
5. Raise the lever of the processor socket up until the processor is released from the
socket, then lift the silver cover plate and remove the processor.
WARNING: This action should only be performed by a trained service
technician.
Installing a Processor
1. If present, remove the protective black PnP cap from the processor socket.
2. Raise the lever of the processor socket until it reaches its upper limit.
3. Lift the silver cover plate completely up and out of the way.
NOTE: Be careful not to damage the pins protruding from the CPU socket.
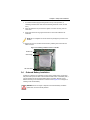
4. Align pin 1 of the processor with pin 1 of the socket (both are marked with a small
gold triangle) and gently seat the processor into the socket (Figure 3-3).
5. Check to make sure the processor is flush to the socket and fully seated.
6. Lower the socket lever until it locks.
3-4
Chapter 3: Setup and Installation
7. To install the heatsink, apply thermal grease to the top of the processor. (If
reinstalling a heatsink, first clean off the old thermal grease with a clean, lint-free
cloth.)
8. Place the heatsink on the processor then tighten one screw until snug, then the
other screw.
9. When both screws are snug, tighten them down to secure the heatsink to the
mainboard.
NOTE: Do not overtighten the screws as this may damage the processor or the
heatsink.
10. Replace the cover on the blade unit and finish by installing the unit back into the
blade enclosure.
Figure 3-3. Installing a G34 Processor in a Socket
Socket Lever
Gold Triangle
CPU Cover Plate
3-4
Onboard Battery Installation
A battery is included on the mainboard to supply certain volatile memory components
with power when power has been removed from the blade module. If this battery dies, it
must be replaced with an equivalent CR2032 Lithium 3V battery. Dispose of used
batteries according to the manufacturer's instructions. See Figure 3-4 for a diagram of
installing a new onboard battery.
WARNING: There is a danger of explosion if the onboard battery is installed
upside down, which reverses its polarities.
3-5
SBA-7222G-T2 Blade Module User’s Manual
Figure 3-4. Installing the Onboard Battery
Lithium Battery
Battery Holder
3-5
Memory Installation
The mainboard of each blade unit must be populated with DIMMs (Dual In-line Memory
Modules) to provide system memory. The DIMMs should all be of the same size and
speed and from the same manufacturer to avoid compatibility issues. See details
below on supported memory and our web site (www.supermicro.com/products/
superblade for recommended memory.
Populating Memory Slots
The mainboard of a SBA-7222G-T2 blade module has 8 memory slots per node. Both
interleaved and non-interleaved memory are supported, so you may populate any
number of DIMM slots.
Populating slots at the same time with memory modules of the same size and of the
same type will result in three-channel, interleaved memory, which is faster than
single-channel, non-interleaved memory. See Table 3-1 and Figure 3-5 for details.
For an interleaved configuration, memory modules of the same size and speed
must be installed. You should not mix DIMMs of different sizes and speeds.
Table 3-1. Populating Memory Slots per Node for Interleaved Operation
Number
of
DIMMs
CPU
Channel 1
Channel 2
Channel3
Channel4
CPU1
P1-DIMM1
P1-DIMM2
---
---
CPU2
P2-DIMM1
P2-DIMM2
---
---
4 DIMMs
CPU1
P1-DIMM1
P1-DIMM2
P1-DIMM3
P1-DIMM4
CPU2
P2-DIMM1
P2-DIMM2
P2-DIMM3
P2-DIMM4
8 DIMMs
NOTE: The DIMM slot number specified in Table 3-1 equals the DIMM slot to
be populated. A “---” indicates that the DIMM slot should be left unpopulated.
DIMMs for one board are P1/P2 and P3/P4 for the other board.
NOTE: Though multiple DIMM memory module types and speeds may be
supported, you need to use DIMM memory modules of the same speed and
type.
3-6
Toward CPU
Toward CPU
3-7
P4-DIMM1
P4-DIMM2
P4-DIMM3
P4-DIMM4
P2-DIMM4
P2-DIMM3
P2-DIMM2
Edge of Board
Toward CPU
Toward CPU
Edge of Board
P2-DIMM1
P3-DIMM4
P3-DIMM3
P3-DIMM2
P1-DIMM1
P3-DIMM1
P1-DIMM2
P1-DIMM3
P1-DIMM4
Chapter 3: Setup and Installation
Figure 3-5. 8-Slot DIMM Numbering for Two Node Blade Modules
SBA-7222G-T2 Blade Module User’s Manual
DIMM Installation
WARNING: Exercise extreme care when installing or removing DIMM modules
to prevent any possible damage.
Installing DIMM Memory Modules
1. Power down the blade module (see "Powering Down a Blade Unit" on page 3-1).
2. Remove the blade from the enclosure and the cover from the blade (see
"Removing/Replacing the Blade Cover" on page 3-2).
3. Insert each DIMM vertically into its slot. Pay attention to the notch along the bottom
of the module to prevent inserting the DIMM incorrectly (see Figure 3-6).
Figure 3-6. Installing a DIMM into a Memory Slot
To Install: Insert module vertically
and press down until it snaps into
place. Pay attention to the bottom
notch.
To Remove: Use your thumbs to
gently push each release tab
outward to free the DIMM from the
slot.
4. Gently press down on the DIMM until it snaps into place in the slot. Repeat for all
modules (see Table 3-1 for installing DIMMs into the slots in the correct order).
5. Replace the air shroud and the blade cover and install the blade module back into
the enclosure.
6. Power up the blade unit (see "Powering Up a Blade Unit" on page 3-1).
3-8
Chapter 3: Setup and Installation
3-6
Hard Disk Drive Installation
Hard disk drives are installed in “carriers” which are hot-swappable and can be removed
or replaced without powering down the blade unit they reside in. A blade module needs
a hard disk drive with an operating system installed to operate.
WARNING: To maintain proper airflow, both hard drive bays must have drive
carriers inserted during operation whether or not a drive is installed in the carrier.
Removing a Hard Drive Carrier
To remove a hard drive carrier, do the following:
Removing a Hard Drive Carrier
1. Locate the colored “Open” button at the bottom of the drive carrier and press it with
your thumb. This action releases the drive carrier from the drive bay.
2. Pull the release handle out about 45-degrees, then use it to pull the drive carrier out.
Installing a Hard Drive
To Install a hard drive, use the following procedure:
Installing a Hard Drive
1. Remove a blank drive carrier from the blade (see removal procedure above).
2. Insert a 2.5” drive into the carrier with the PCB side facing down and the connector
end toward the rear of the carrier.
3. Align the drive in the carrier so that the screw holes of both line up. Note that there
are holes in the carrier marked “SATA” to aid in correct installation.
4. Secure the drive to the carrier with four screws as shown in Figure 3-7: "Installing a
Hard Drive in a Carrier" on page 3-10.
5. Insert the drive carrier into its slot keeping the Open button at the bottom. When the
carrier reaches the rear of the bay the release handle will retract.
6. Push the handle in until you hear the carrier click into its locked position.
3-9
SBA-7222G-T2 Blade Module User’s Manual
Figure 3-7. Installing a Hard Drive in a Carrier
3-10
Chapter 3: Setup and Installation
3-7
Installing the Operating System
An operating system (OS) must be installed on each blade module. Blades with
Microsoft Windows OS and blades with Linux OS can both occupy and operate within
the same blade enclosure. Refer to the SuperMicro web site for a complete list of
supported operating systems.
There are several methods of installing an OS to the blade modules.
Installing with an External USB CD-ROM Drive
The most common method of installing the OS is with an external USB CD-ROM drive.
Take the following steps to install the OS to a blade module:
WARNING: Installing the OS from an external CD-ROM drive may take several
hours to complete.
1. Connect an SUV cable (Serial port/USB port/Video port cable) to the KVM
connector on the front of the blade module. You will then need to attach a USB hub
to the USB port on this cable to provide multiple USB ports.
2. Connect the external CD-ROM drive, a USB keyboard and a mouse to the USB hub.
You will also need to connect a monitor to the video connector on the SUV cable.
Turn on the blade module.
3. Insert the CD containing the OS into the CD-ROM drive.
4. Follow the prompts to begin the installation.
Installing via PXE Boot
PXE (Preboot Execution Environment) is used to boot a computer over a network. To
install the OS via PXE, the following conditions must be met:
1. The PXE BOOT option in BIOS must be enabled.
2. A PXE server has been configured (this can be another blade in the system).
3. The PXE server must be connected over a network to the blade to be booted.
4. The blade has only non-partitioned/unformatted hard drives installed and no
bootable devices attached to it.
Once these conditions are met, make sure the PXE server is running. Then turn on the
blade on which you wish to boot and/or install the OS. The BIOS in the blade will look at
all bootable devices and finding none will connect to the PXE server to begin the boot/
install.
3-11
SBA-7222G-T2 Blade Module User’s Manual
Installing via Virtual Media (Drive Redirection)
You can install the OS via Virtual Media through either the IPMIview (Java based client
utility), SuperBladeTool or the Web-based Management Utility. With this method, the OS
is installed from an ISO image that resides on another system/blade.
Refer to the manuals on your SuperBlade CD-ROM for further details on the Virtual
Media (CD-ROM or Drive Redirection) sections of these two utility programs.
Linux Installation with Two Hard Drives
When installing Linux with 2 HDD on the SBA-7222G-T2 (one per node) you may
encounter a situation where one drive is recognized as HDA and the other drive is
recognized as SDA. This is normal since in this case the connection for SATA HDDs is
from two different controllers.
So under Native IDE mode (which is the default), your Linux OS will see one drive as
HDA and the other as SDA. If the SATA controller mode operation is changed to
AMD_AHCI in the BIOS, then the HDDs will appear as SDA and SDB.
3-8
Management Software
System management may be performed with either of three software packages:
IPMIview, SuperBladeTool or a Web-based Management Utility. These are designed to
provide an administrator with a comprehensive set of functions and monitored data to
keep tabs on the system and perform management activities.
Refer to the manuals on your SuperBlade CD-ROM for further details on the various
functions provided by these management programs.
3-9
Configuring and Setting up RAID
Each blade module that supports two or more hard drives may be used to create a RAID
array. The procedures for doing this vary depending upon the blade model chosen for
your SuperBlade system.
See Chapter 5 for details on how to configure and set up RAID on your blade module.
3-12
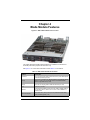
Chapter 4
Blade Module Features
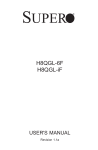
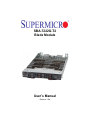
Figure 4-1. SBA-7222G-T2 Blade Unit Front View
This chapter describes the SBA-7222G-T2 blade unit. Installation and maintenance
should be performed by experienced technicians only.
See Figure 4-1 for a front view of the blade unit and Table 4-1 for its features.
Table 4-1. SBA-7222G-T2 Blade Unit Features
Feature
Description
Processors
Each node supports two 1944-pin G34 sockets for up to two AMD Opteron
6100 series processors per node.
Memory
Supports up to 128 GB of ECC Registered DDR3-1333/1066/800 SDRAM
DIMMs or 32 GB of ECC Unbuffered DDR3-1333/1066/800 SDRAM
DIMMs in eight DIMM slots per node
Storage
One or two 2.5" hot-plug SATA or SSD hard disk drives per node
Ports
KVM port (1 per node)
Features
Onboard Matrox G200eW Graphics chip with 16 MB of SDRAM, IPMI 2.0,
Plug and Play, APM 1.2, DMI 2.3, PCI 2.2, ACPI 1.0/2.0, SMBIOS 2.3,
Real Time Clock
Power Consumption
Base Power Draw (~35W) / Power per CPU (85W/115W/137W/140W) /
Power per DIMM (typically ~7W)
4-1
SBA-7222G-T2 Blade Module User’s Manual
4-1
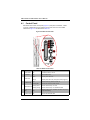
Control Panel
Each blade has a similar control panel (Figure 4-2) with power on/off button, a KVM
connector, a KVM button and four LEDs on the top front of the unit. The numbers
mentioned in Figure 4-2 are described in Table 4-2.
Figure 4-2. Blade Control Panel
3
4
5
6
7
1
2
Table 4-2. Blade Control Panel
Item Function
State
Description
1
Power Button
N/A
Turns blade module on and off
2
KVM Button
N/A
Initiates KVM function
Green
Indicates power status “On”
3
4
Power LED
Orange
Indicates power status “Off” (with power cables plugged in)
Blue
Indicates KVM being utilized on blade unit
Flashing Blue
Indicates UID activated on blade module
Flashing Green
Indicates network activity over LAN
KVM/UID LED
5
Network/IB LED
6
System Fault
LED
7
KVM Connector N/A
Flashing Orange Indicates network activity over InfiniBand module
Red
Indicates a memory error, overheat, VGA error or any error
that prevents booting
Connector for SUV/KVM cable
4-2
Chapter 4: Blade Module Features
Power Button
Each blade has its own power button so that individual blade units within the enclosure
may be turned on or off independently of the others. Press the power button (#1) to turn
on the blade server. The power LED (#3) will turn green. To turn off, press and hold the
power button for >4 seconds (one second if between POST and boot-up) and the power
LED will turn orange.
KVM Button
KVM stands for Keyboard/Video/Mouse. With KVM, a user can control multiple blades
with a single keyboard/video/mouse setup. Connect your keyboard, mouse and monitor
to the USB and VGA connectors on the CMM module, then push the KVM button on the
control panel of the blade module you wish to access.
LED Indicators
Blade module LEDs are described below in Table 4-3.
Table 4-3. Blade Module LED Indicators
LED
State
Description
Green
Power On
Amber
Standby
Red
Power Failurea
Steady On
Indicates that KVM has been initialized on this blade module
Flashing
Serves as a UID indicator (the UID function is activated with a
management program)
Network LED
(Green)
Flashing
Flashes on and off to indicate traffic (Tx and Rx data) on the LAN
connection to this blade module.
System Fault
LED (Red)
Steady On
This LED illuminates red when a fatal error occurs. This may be the
result of a memory error, a VGA error or any other fatal error that
prevents the operating system from booting up.
Power LED
KVM/UID LED
(Blue)
a. In the event of a power failure, the N+1 Redundant Power Supply (if included in your
system's configuration) shares the system load to provide uninterrupted operation. The
failed power supply should be replaced with a new one as soon as possible.
KVM Connector
Alternatively, you may connect a KVM cable (CBL-0218L, with a keyboard/video/mouse
attached) to the KVM connector (#7) of the blade you wish to access. To switch to
another blade, disconnect the cable then reconnect it to the new blade.
See the Web-based Management Utility User’s Manual on your SuperBlade system
CD-ROM for further details on using the KVM function remotely.
4-3
SBA-7222G-T2 Blade Module User’s Manual
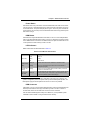
4-2
Mainboard
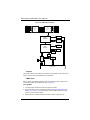
The mainboard of the SBA-7222G-T2 blade unit is a proprietary design, which is based
on the AMD SR5650 & SP5100 chipset. See Figure 4-4 for a block diagram of this
chipset, Figure 4-3 for a view of the BHDGT Mainboard and Figure 4-5 for an exploded
view diagram of the blade unit.
Figure 4-3. BHDGT Mainboard
7
7
13
15
10
15
8
8
11
10
14
11
10
9
9
1
5
12
14
3
5
5
2
4
6
6
4-4
5
12
Chapter 4: Blade Module Features
Table 4-4. BHDGT Mainboard Layout
Item
Description
1
CPU1 Socket
2
CPU2 Socket
3
CPU3 Socket
4
CPU4 Socket
5
DIMM Slots (see Figure 3-5: "8-Slot DIMM Numbering for Two Node Blade Modules" on
page 3-7 for details)
6
Space for 2.5” SATA Hard Drive
7
Gbx Connector (for power and logic to backplane)
8
SATA Connector
9
Onboard Battery
10
AMD SR5650 chipset
11
SP5100 Chipset
12
KVM Module includes USB Type-A Connector (Not Shown)
13
NPCM450 BMC Controller with Embedded Matrox G200eW Graphics chip
14
TPM Connector
15
InfiniBand Daughter Card Connectors
4-5
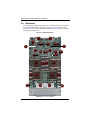
SBA-7222G-T2 Blade Module User’s Manual
Figure 4-4. BHDGT Block Diagram
DIMM A0
DIMM B0
DIMM C0
DIMM A0
HT3 Link 8x8-3.2GT/s
AMD
Socket G34
CPU2
AMD
Socket G34
CPU1
HT3 Link 8x8-3.2GT/s
DIMM B0
DIMM C0
HT3 Link (8+8)x(8+8)-6.4GT/s
DIMM D0
DIMM D0
16/16-1GHz
PCI-e X4 Gen2
AMD
SR5650
G_LAN
2_PORTs
IB
PCI-e X16 Gen2
DAUGHTER CARD
ALink
SATA
AMD
SP5100
USB
SATA_CONN
USB PORT
Front KB,MS
LPC
PCI
LPC I/O
83527
DDR II
RTL8201N
WINBOND
HERMON
Front
VGA
MIDDLE PLANE
Jumpers
The jumpers present on the mainboard are used by the manufacturer only; there are no
jumpers used to configure the operation of the mainboard.
CMOS Clear
JBT1 is used to clear CMOS and will also clear any passwords. JBT1 consists of two
contact pads located near the BIOS chip (#10 in Figure 4-3).
Clearing CMOS
1. First power down the blade and remove it from the enclosure.
2. Remove the blade cover to access the mainboard (see "Removing/Replacing the
Blade Cover" on page 3-2 for further details). Short the CMOS pads with a metal
object such as a small screwdriver.
3. Replace the cover, install the blade back into the enclosure and power it on.
4-6
Chapter 4: Blade Module Features
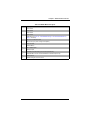
4-3
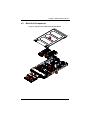
Blade Unit Components
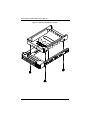
Figure 4-5. Exploded View of SBA-7222G-T2 Blade Module
5
4
4
3
3
3
2
2
2
2
4-7
1
SBA-7222G-T2 Blade Module User’s Manual
Table 4-5. Main Components of SBA-7222G-T2 Blade Unit
Item
Description
1
Blade Unit/Module
2
SATA Hard Drives (2 per blade node, 4 total)
3
DIMMs (system memory, 8 per node, 16 total)
4
CPU Heatsinks (2 per node, 4 total)
5
Top Cover
Memory Support
Each node of the SBA-7222G-T2 blade module each supports up to 128 GB of ECC
Registered DDR3-1333/1066/800 SDRAM or 32 GB of ECC Unbuffered DDR3-1333/
1066/800 SDRAM in eight DIMM sockets. See Section 3-5 for further details on
mainboard memory installation.
Hard Disk Drives
The SBA-7222G-T2 blade unit accommodates up to four 2.5" SATA hard disk drives,
two per node, which are mounted in drive “carriers”. The drives are hot-swappable and
can be removed or replaced without powering down the blade unit they reside in. The
four drives can be used to set up a RAID array (SATA RAID 0 or 1 only) or JBOD. These
drives use a blue color for the Blade HDD active LED.
WARNING: Enterprise level hard disk drives are recommended for use in
Supermicro chassis and servers. For information on recommended HDDs, visit
the Supermicro WEB SITE at http://www.supermicro.com/products/nfo/files/
storage/SAS-1-CompList-110909.pdf.
WARNING: To maintain proper airflow, both hard drive bays must have drive
carriers inserted during operation whether or not a drive is installed in the carrier.
4-8
Chapter 5
RAID Setup Procedure
Each SBA-7222G-T2 blade module supports four hard drives, two per node, which may
be used to create a RAID array.
Important Notes
Please read the following notes and warnings before setting up your RAID array.
NOTE: Before adding a new drive to an array, back up any data contained on
the new drive. Otherwise, all data will be lost.
NOTE: If you stop the BUILD or CLEAR process on a RAID 1 from the ACU, you
can restart it by pressing <CTRL> + <R>.
NOTE: A RAID 1 created using the QUICK INIT option may return some data
miscompares if you later run a consistency check. This is normal and is not a
cause for concern.
NOTE: The ACU allows you to use drives of different sizes in an array.
However, during a build operation, only the smaller drive can be selected as the
source or first drive.
NOTE: When migrating from single volume to RAID 0, migrating from a larger
drive to a smaller drive is allowed. However, the destination drive must be at
least half the capacity of the source drive.
WARNING: Adaptec does not recommend that you migrate or build an array on
Windows dynamic disks (volumes), as it will result in data loss.
WARNING: Do not interrupt the creation of a RAID 0 using the MIGRATE option. If
you do, you will not be able to restart or to recover the data that was on the
source drive.
5-1
BIOS Setup
Use the BIOS setup to configure to set RAID options. The BIOS setup procedure is
shown below.
5-1
SBA-7222G-T2 Blade Module User’s Manual
See Chapter 6 for information on using your system’s BIOS setup.
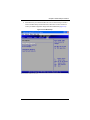
Setting up the BIOS for RAID
1. In the ADVANCED SETTINGS screen of the BIOS Setup, select the IDE
CONFIGURATION sub-menu and press ENTER.
2. In the IDE Configuration screen that appears (Figure 5-1), select the OnChip SATA
Type option and select RAID.
Figure 5-1. IDE Configuration Screen – Configure RAID Drives
5-2
Chapter 5: RAID Setup Procedure
3. Press the Esc key once to exit the IDE CONFIGURATION screen and go to the EXIT
menu in the BIOS setup. From the Exit menu, select SAVE CHANGES AND EXIT to
confirm your RAID configuration changes and exit the BIOS Setup (Figure 5-2).
Figure 5-2. Exit BIOS Setup
5-3
SBA-7222G-T2 Blade Module User’s Manual
4. Your system will reboot. When the reboot displays the screen message in
Figure 5-3 press CTRL-A to bring up the RAID Configuration Utility.
Figure 5-3. Screen Message
5-4
Chapter 6
BIOS
6-1
Introduction
This document describes the AMI® BIOS Setup utility for the SBA-7222G-T2 Blade
Module. The AMI ROM BIOS is stored in a flash chip and can be easily upgraded using
a floppy disk-based program.
Running Setup
NOTE: Default settings are in bold text unless otherwise noted.
The BIOS setup options described in this section are selected by choosing the
appropriate text from the MAIN BIOS SETUP screen. All displayed text is described in this
section, although the screen display is often all you need to understand how to set the
options.
When you first power on the computer, the BIOS is immediately activated. While the
BIOS is in control, the Setup program can be activated in one of two ways:
1. By pressing <DELETE> immediately after turning the system on, or
2. When the message Press the <Delete> key to enter Setup appears briefly at the
bottom of the screen during the POST, press the <DELETE> key to activate the main
SETUP menu.
6-2
Main BIOS Setup Menu
The MAIN MENU screen has two main frames. The left frame displays all the options that
can be configured. “Grayed-out” options cannot be configured. The right frame displays
the key legend. Above the key legend is an area reserved for a text message. When an
option is selected in the left frame, it is highlighted in white. Often a text message will
accompany it.
NOTE: The BIOS has default text messages built in. SuperMicro retains the
option to include, omit, or change any of these text messages.
Settings printed in Bold are the default values. Use the UP/DOWN arrow keys to move
among the different settings in each menu. Use the LEFT/RIGHT arrow keys to change
the options for each setting.
6-1
SBA-7222G-T2 Blade Module User’s Manual
Items that use sub-menus are indicated with the icon. With the item highlighted,
press the <ENTER> key to access the submenu.
The BIOS setup utility uses a key-based navigation system called hot keys. Most of
these hot keys (<F1>, <F10>, <ENTER>, <ESC>, <ARROW> keys, and so on) can be
used at any time during the setup navigation process. Press the <ESC> key to exit the
CMOS SETUP menu.
When you first enter the AMI BIOS Setup utility, you will see the MAIN MENU screen. You
can always return to the MAIN MENU by selecting the Main tab on the top of the screen
with the arrow keys. The MAIN MENU screen provides you with a system overview, which
includes the version, built date and ID of the AMIBIOS, the type, speed and number of
the processors in the system and the amount of memory installed in the system.
System Time/System Date
You can edit the SYSTEM TIME/SYSTEM DATE field to change the system time and date.
Highlight SYSTEM TIME or SYSTEM DATE using the <ARROW> keys. Enter new values
through the keyboard. Press the <TAB> key or the <ARROW> keys to move between
fields.
The date must be entered in DAY/MM/DD/YYYY format. The time is entered in
HH:MM:SS format. Please note that time is in a 24-hour format. For example, 5:30 A.M.
appears as 05:30:00 and 5:30 P.M. as 17:30:00.
6-3
Advanced Settings Menu
Choose Advanced from the BIOS Setup Utility main menu with the arrow keys. The
items with a triangle beside them have sub menus that can be accessed by highlighting
the item and pressing <ENTER>. Below is a list of all submenus in the ADVANCED
SETTINGS menu:
•
Boot Feature
•
Processor & Clock Options
•
Advanced Chipset Control
•
IDE Configuration
•
PCI/PnP Configuration
•
Super IO Device Configuration
•
Remote Access Configuration
•
Hardware Health Configuration
•
ACPI Configuration
•
IPMI Configuration
•
Event Log Configuration
6-2
Chapter 6: BIOS
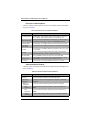
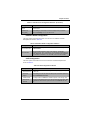
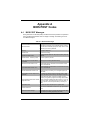
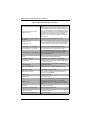
Boot Feature
The menu options in the BOOT FEATURE submenu and their descriptions are shown in
Table 6-1.
Table 6-1. Boot Feature Submenu
Menu Option
Description
Quick Boot
This option allows BIOS to skip certain tests while booting. This will decrease the
time needed to boot the system. Options include Enabled or Disabled.
Quiet Boot
When this option is Enabled, it displays the OEM Logo instead of POST
messages. When Disabled, it displays normal POST messages.
AddOn ROM Display
Mode
This option sets the display mode for Option ROM. It can be set as either Force
BIOS or Keep Current.
Bootup Num-Lock
This option selects the power-on state for the Numlock. It can be set to either On
or Off.
PS/2 Mouse Support
Use this option to select support for the PS/2 mouse. Options include Auto,
Enabled or Disabled.
Wait for ‘F1’ If Error
This option sets the system to wait for the F1 key to be pressed if an error
occurs. Options include Enabled or Disabled.
Hit ‘DEL’ Message
Display
This option displays the message “Press DEL to run Setup in Post” when
enabled. Options include Enabled or Disabled.
Watch Dog Function
This option allows the system to restart when it is not active more than 5
minutes. Options include Enabled or Disabled.
Power Button
Function
This sets the power button function to either Instant Off or 4 Second Override.
Restore on AC Power This option allows you to specify the action the system will take when there is an
Loss
AC power loss. Options include Power-Off, Power-On or Last State.
Interrupt 19 Capture
When enabled, this option allows the system’s option ROMs to trap interrupt 19.
6-3
SBA-7222G-T2 Blade Module User’s Manual
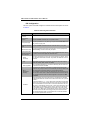
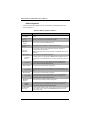
Processor & Clock Options
The menu options in the PROCESSOR & CLOCK OPTIONS submenu and their descriptions
are shown in Table 6-2.
Table 6-2. Processor & Clock Options Submenu
Menu Option
Description
This menu displays static information for each CPU in the system. It includes
CPU Settings (Static) CPU Manufacturer, Chip information, Revision, Speed, Cache L1, Cache L2,
Cache L3, NB Clk, Able to change frequency and uCode Patch Level.
Gart Error Reporting
This option should remain disabled for normal operation. The driver developer
may enable it for testing purpose. Options include Disabled and Enabled.
Microcode Update
This option allows you to enable or disable microcode updating for the system.
Secure Virtual
Machine Mode
This option allows you to enable or disable Secure Virtual Machine Mode (SVM)
PowerNow
This option allows you to enable or disable the generation of ACPI _PPC, _PPS,
and _PCT objects.
PowerCap
This option can decide the highest performance P-state in the OS. Options
include P-state 0, P-state 1, P-state 2, P-state 3 and P-state 4.
ACPI SRAT Table
This option enables or disables the building of the ACPI SRAT Table.
CPU Down Core
This option allows you to specify the Down Core support for the CPU. Options
include Disabled, 2 cores, 4 cores, 6 cores, 8 cores and 10 cores.
C1E Support
This option allows you to disable or enable C1E support in your system.
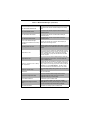
Advanced Chipset Control
The menu options in the Advanced Chipset Control submenu and their descriptions are
shown in Table 6-3.
Table 6-3. Advanced Chipset Control Submenu
Menu Option
Description
Chipset Version
Information
This static information is provided for the chipset CIMx version.
NorthBridge
Configuration
This submenu contains the following submenus and options for NorthBridge
Configuration.
Memory
Configuration
This submenu contains the following options for Memory Configuration.
Bank
Interleaving
This option enables Bank Memory Interleaving. Options include Auto and
Disabled.
Node
Interleaving
This option enables Node Memory Interleaving. Options include Auto and
Disabled.
Channel
Interleaving
This option enables Channel Interleaving. Options include Auto and Disabled.
6-4
Chapter 6: BIOS
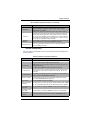
Table 6-3. Advanced Chipset Control Submenu
Menu Option
Description
CS Sparing
Enable
This option reserves a spare memory rank in each node. Options include
Enabled and Disabled.
Bank Swizzle
Mode
This option enables or disables bank swizzle mode.
ECC
Configuration
This submenu contains the following options for ECC Configuration.
ECC Mode
This option sets the level of ECC protection. Setting the option to ‘Super’ ECC
mode dynamically sets the DRAM scrub rate so all of memory is scrubbed in 8
hours. If you set this option to ‘User’ then you may further set the DRAM ECC
Enable option manually. Options include Disabled, Basic, Good, Super, Max and
User.
DRAM
ECC
Enable
This option is only available for manual setting if the ECC Mode option above is
set to ‘User”. This option allows hardware to report and correct memory errors
automatically, maintaining system integrity. Options include Enabled or
Disabled.
DRAM Timing
Configuration
DRAM Timing
Configuration
This submenu contains the following options for DRAM Timing Configuration.
This option allows you to set the DRAM Timing configuration as Auto or Manual.
Memory Timing
Parameters
This option selects which node’s timing parameters to display. Options include
CPU Node 0 or CPU Node 3.
Memory
Information
Static memory information is also displayed in this submenu that includes
Memory CLK, CAS Latency (Tcl), RAS/CAS Delay (Trcd), Row Precharge Time
(Trp), Min Active RAS (Tras), RAS/RAS Delay (Trrd), Row Cycle (Trc), Read to
Precharge (Trtp) and Write Recover Time (Twr).
IOMMU
This option enables or disables the IOMMU setting.
OHCI HC and EHCI
HC Bus Settings
These settings allow to enable or disable the various OHCI or EHCI HC bus
settings.
USB 2.0 Controller
Mode
This option allows you to configure the USB 2.0 controller in HiSpeed (480Mbps)
or Full Speed (12Mbps) mode. Options include Enabled or Disabled.
This option enables support for legacy USB devices. Auto disables legacy
Legacy USB Support support if no USB devices are connected. Options include Auto, Enabled or
Disabled.
6-5
SBA-7222G-T2 Blade Module User’s Manual
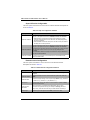
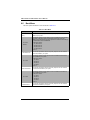
IDE Configuration
The menu options in the IDE ConfiguraTION submenu and their descriptions are shown
in Table 6-4
Table 6-4. IDE Configuration Submenu
Menu Option
Description
OnBoard PCI IDE
Controller
This option enables or disables the onboard PCI IDE controller.
OnChip SATA
Channel
This option enables or disables the on-chip SATA channel.
OnChip SATA Type
This option specifies the on-chip SATA type. Options include Native IDE, RAID,
AMD_AHCI and Legacy IDE.
SATA IDE Combined
Mode
This option enables or disables SATA IDE Combined Mode in your system.
PATA Channel Config
This option specifies the PATA Channel configuration. You may specify either
SATA as Primary or SATA as Secondary as options.
Primary/Secondary/
These submenus are specifying options for each installed Master/Slave drive in
Third/Fourth Master/
the system. Their common options are described below.
Slave submenus
Device
Information
Static device information is shown at the top of this submenu for Device, Vendor,
Size, LBA Mode, Block Mode, PIO Mode, Async DMA, Ultra DMA and S.M.A.R.T
information.
Type
Use thsi option to select the type of device connected to the system. Options
include Not Installed, Auto, CD/DVD and ARMD.
LBA/Large Mode
LBA (Logical Block Addressing) is a method of addressing data on a disk drive.
The options are Disabled and Auto.
Block
(Multi-Sector
Transfer)
Block mode boosts IDE drive performance by increasing the amount of data
transferred. Only 512 bytes of data can be transferred per interrupt if block mode
is not used. Block mode allows transfers of up to 64 KB per interrupt.
Select "Disabled" to allow the data to be transferred from and to the device one
sector at a time. Select "Auto" to allows the data transfer from and to the device
occur multiple sectors at a time if the device supports it. The options are Auto
and Disabled.
PIO Mode
PIO (Programmable I/O) mode programs timing cycles between the IDE drive
and the programmable IDE controller. As the PIO mode increases, the cycle time
decreases.
The options are Auto, 0, 1, 2, 3, and 4. Select Auto to allow BIOS to auto detect
the PIO mode. Use this value if the IDE disk drive support cannot be determined.
Select 0 to allow BIOS to use PIO mode 0, which has a data transfer rate of 3.3
MBs. Select 1 to allow BIOS to use PIO mode 1, which has a data transfer rate of
5.2 MBs. Select 2 to allow BIOS to use PIO mode 2, which has a data transfer
rate of 8.3 MBs. Select 3 to allow BIOS to use PIO mode 3, which has a data
transfer rate of 11.1 MBs. Select 4 to allow BIOS to use PIO mode 4, which has a
data transfer rate of 16.6 MBs. This setting generally works with all hard disk
drives manufactured after 1999. For other disk drives, such as IDE CD-ROM
drives, check the specifications of the drive.
6-6
Chapter 6: BIOS
Table 6-4. IDE Configuration Submenu (Continued)
Menu Option
Description
DMA Mode
Selects the DMA Mode. Options are Auto, SWDMA0, SWDMA1, SWDMA2,
MWDMA0. MDWDMA1, MWDMA2, UDMA0. UDMA1, UDMA2, UDMA3,
UDMA4, UDMA5. and UDMA6.
(SWDMA=Single Word DMA, MWDMA=Multi Word DMA, UDMA=UltraDMA.)
S.M.A.R.T
Self-Monitoring Analysis and Reporting Technology (SMART) can help predict
impending drive failures. Select "Auto" to allow BIOS to auto detect hard disk
drive support. Select "Disabled" to prevent AMI BIOS from using the S.M.A.R.T.
Select "Enabled" to allow AMI BIOS to use the S.M.A.R.T. to support hard drive
disk. The options are Disabled, Enabled, and Auto.
32Bit Data
Transfer
Select "Enabled" to activate the function of 32-Bit data transfer. Select "Disabled"
to deactivate the function. The options are Enabled and Disabled.
IDE Detect Time Out
Use the +/- keys to adjust and select the time out for detecting ATA/ATAPI
devices. The default value is 35.
PCI/PnP Configuration
The menu options in the PCI/PNP CONFIGURATION submenu and their descriptions are
shown in Table 6-5.
Table 6-5. PCI/PnP Configuration Submenu
Menu Option
Description
Clear NVRAM
Select YES to clear NVRAM during boot-up. The options are YES and No.
Plug & Play OS
Select YES to allow the OS to configure Plug & Play devices.
NOTE: Selecting YES is not required for system boot if your system has an OS
that supports Plug & Play.
Select No to allow AMIBIOS to configure all devices in the system.
PCI Latency Timer
This option sets the latency of all PCI devices on the PCI bus. Select a value to
set the PCI latency in PCI clock cycles. Options are 32, 64, 96, 128, 160, 192,
224 and 248.
PCI IDE BusMaster
When enabled, this allows BIOS to use PCI busmastering for reading/writing to
IDE drives. Options include Enabled and Disabled.
ROM Scan Ordering
This setting determines which kind of option ROM activates prior to another.
Options include Onboard First and Addon First.
PCIE X16 Slot 1
This option enables or disables slot OPROM.
Onboard LAN Option This setting allows you to select the onboard LAN option ROM for iSCSI or PXE.
ROM Select
Note: You must enable ONLY LAN1 when the iSCSI support option is specified.
Load Onboard LAN 1
This option allows you to enable or disable the onboard LAN 1 option ROM.
Option ROM
Load Onboard LAN 2
This option allows you to enable or disable the onboard LAN 2 option ROM.
Option ROM
Primary Video
Controller
This option specifies the primary video controller for Onboard VGA or Other.
6-7
SBA-7222G-T2 Blade Module User’s Manual
Super IO Device Configuration
The menu options in the SUPER IO CONFIGURATION submenu and their descriptions are
shown in Table 6-6.
Table 6-6. Super IO Configuration Submenu
Menu Option
Description
Serial Port1 Address
This option specifies the base I/O port address and Interrupt Request address of
serial port 1. The options are DISABLED, 3F8/IRQ4, 3E8/IRQ4 and 2E8/IRQ3.
• Select DISABLED to prevent the serial port from accessing any system
resources. When this option is set to DISABLED, the serial port physically
becomes unavailable.
• Select 3F8/IRQ4 to allow the serial port to use 3F8 as its I/O port address
and IRQ 4 for the interrupt address.
Serial Port2 Address
This option specifies the base I/O port address and Interrupt Request address of
serial port 2. The options are DISABLED, 2F8/IRQ3, 3E8/IRQ4 and 2E8/IRQ3.
Select DISABLED to prevent the serial port from accessing any system resources.
When this option is set to DISABLED, the serial port physically becomes
unavailable.
Select 2F8/IRQ3 to allow the serial port to use 2F8 as its I/O port address and
IRQ 3 for the interrupt address.
Serial Port 2 Attribute
This option can set COM 2 as a normal serial port or virtual COM for SOL.
Options are COM or SOL.
Remote Access Configuration
The menu options in the REMOTE ACCESS CONFIGURATION submenu and their
descriptions are shown in Table 6-7.
Table 6-7. Remote Access Configuration Submenu
Menu Option
Description
Remote Access
Allows you to Enable or Disable remote access. If enabled, the settings below
will appear.
Serial Port Number
Selects the serial port to use for console redirection. Options are COM1 and
COM2*
Serial Port Mode
Selects the serial port settings to use. Options are (115200 8, n, 1), (57600 8, N,
1), (38400 8, N, 1), (19200 8, N, 1) AND (09600 8, N, 1).
Flow Control
Selects the flow control to be used for console redirection. Options are None,
HARDWARE and SOFTWARE.
Redirection After
BIOS POST
Options are DISABLE (no redirection after BIOS POST), BOOT LOADER
(redirection during POST and during boot loader) and Always (redirection
always active). Note that some OS's may not work with this set to Always.
Terminal Type
Selects the type of the target terminal: ANSI, VT100 and VT-UTF8.
6-8
Chapter 6: BIOS
Table 6-7. Remote Access Configuration Submenu (Continued)
Menu Option
Description
VT-UTF8 Combo Key Allows you to Enable or DISABLE VT-UTF8 combination key support for ANSI/
Support
VT100 terminals.
Sredir Memory
Display Delay
Use this setting to set the delay in seconds to display memory information.
Options are No Delay, 1 SEC, 2 SECS and 4 SECS.
Hardware Health Configuration
The menu options in the HARDWARE HEALTH CONFIGURATION submenu and their
descriptions are shown in Table 6-8.
Table 6-8. Hardware Health Configuration Submenu
Menu Option
Description
CPU Overheat Alarm
This option lets you specify the CPU Overheat Alarm to either The Early Alarm or
The Default Alarm.
CPU Information
Static CPU health information is shown in this submenu. The following
information is shown: CPU 1 Temperature, CPU Temperature, NB Temperature,
System Temperature, CPU1 Vcore, CPU2 Vcore, CPU1 Mem VTT, CPU2 Mem
VTT, CPU1 Mem, CPU2 Mem, 1.1V, 5V, 5VSB, +12V, 3.3Vcc and 3.3VSB.
ACPI Configuration
The menu options in the ACPI CONFIGURATION submenu and their descriptions are
shown in Table 6-9.
Table 6-9. ACPI Configuration Submenu
Menu Option
Description
ACPI Aware O/S
This option enables or disables ACPI support for the operating system. Options
are Yes or No.
ACPI APIC
support
Use this setting to include the ACPI APIC table pointer to the RSDT pointer list.
Options are Enabled and Disabled.
Headless Mode
This setting Enables or Disables the Headless operation mode through ACPI.
ACPI Version
Features
This option enables RSDP pointers to the 64-bit Fixed System Description Table
and specifies the ACPI Version. Options are ACPI v1.0, ACPI v2.0 and ACPI
v3.0.
6-9
SBA-7222G-T2 Blade Module User’s Manual
IPMI Configuration
The menu options in the IPMI CONFIGURATION submenu and their descriptions are
shown in Table 6-10.
Table 6-10. IPMI Configuration Submenu
Menu Option
Description
IPMI Information
Display (Static)
This static display provides information for the Status of BMC and IPMI Firmware
Revision.
View BMC System This sub-menu allows you to view all events in the BMC Event Log. It will take a
Event Log
maximum of 15 seconds to read all BMC SEL records.
SEL Entry
Number
Use the +/- keys to traverse the BMC Event Log.
Clear BMC System
Event Log
Use this option to clear all events in the BMC System Event Log.
Set LAN
Configuration
This is the input for the SET LAN Configuration command. See IPMI 1.5
Specification Table 19.1 for details.
NOTE: Each question in this sub-menu may take a considerable amount of time
to complete.
IP Address
Use this sub-menu for IP Address configuration.
IP Address
Source
This setting allows you to specify either a DHCP or Static IP Address Soruce. If
you select Static for the IP Address Source, then the IP Address setting becomes
active.
IP Address
This setting allows you to set the IP Address for your LAN Configuration in
decimal format of XXX.XXX.XXX.XXX and with values less than 256. The
current IP Address is statically displayed below.
MAC Address
MAC Address
Subnet Mask
Subnet Mask
Gateway
Address
Gateway
Address
BMC Watch Dog
Timer Action
Use this sub-menu for MAC Address configuration.
This setting allows you to set the IP Address for your LAN Configuration in hex
format of XX.XX.XX.XX.XX.XX. The current MAC Address is statically displayed
below.
Use this sub-menu for Subnet Mask configuration.
This setting allows you to set the Subnet Mask for your LAN Configuration in
decimal format of XXX.XXX.XXX.XXX and with values less than 256. The
current Subnet Maks is statically displayed below.
Use this sub-menu for Gateway Address configuration.
This setting allows you to set the Gateway Address for your LAN Configuration in
decimal format of XXX.XXX.XXX.XXX and with values less than 256. The
current Gateway Address is statically displayed below.
This option allows the BMC to reset or power down the system if the operating
system crashes or hangs. Options include Disabled, Reset System, Power
Down or Power Cycle.
6-10
Chapter 6: BIOS
Event Log Configuration
The menu options in the EVENT LOG CONFIGURATION submenu and their descriptions are
shown in Table 6-11.
Table 6-11. Event Log Configuration Submenu
Menu Option
Description
View Event Log
Highlight this item and press <ENTER> to view the contents of the event log.
Mark All Events as
Read
Highlight this item and press <ENTER> to mark all events as read.
Clear Event Log
Select Yes and press <ENTER> to clear all event logs. The options are YES and
NO to verify.
SR56x0 (RD890S)
PCIE Error Log
This option allows you to enable or disable the SR56x0 (RD890S) PCIE error
log. Options include Yes or No.
6-4
Security Menu
The menu options for the SECURITY menu are shown in Table 6-12.
The AMI BIOS provides a Supervisor and a User password. If you use both passwords,
the Supervisor password must be set first.
Table 6-12. Security Menu
Menu Option
Description
Change Supervisor
Password
Select this option and press <ENTER> to access the sub menu, and then type in
the password.
Change User
Password
Select this option and press <ENTER> to access the sub menu, and then type in
the password.
Boot Sector Virus
Protection
This option is near the bottom of the SECURITY SETUP screen. The options are
ENABLED and Disabled.
• Select DISABLED to deactivate the Boot Sector Virus Protection.
• Select ENABLED to enable boot sector protection.
When ENABLED, the AMI BIOS displays a warning when any program (or virus)
issues a Disk Format command or attempts to write to the boot sector of the hard
disk drive.
6-11
SBA-7222G-T2 Blade Module User’s Manual
6-5
Boot Menu
The menu options for the BOOT menu are shown in Table 6-13.
Table 6-13. Boot Menu
Menu Option
Description
Boot Device
Priority
Use this sub-menu to specify the boot device priority sequence for devices
installed in your system. .
1st ~ Boot
Devices
Hard Disk Drives
1st ~ Drive
Removable Drives
These settings specify the boot sequence from the available devices installed in
your system. A device enclosed in parenthesis indicates that it has been
disabled in the corresponding type menu. Options for all three of these settings
are available boot devices and Disabled.
The devices to set are:
• 1ST BOOT DEVICE
• 2ND BOOT DEVICE
• 3RD BOOT DEVICE
• 4TH BOOT DEVICE
and so on.
This sub-menu specifies the boot device priority sequence from the available
hard drives installed in your system.
These settings specify the boot sequence from the available hard disk drives
devices installed in your system.
The devices to set are:
• 1ST DRIVE
• 2ND DRIVE
• 3RD DRIVE
• 4TH DRIVE
and so on.
This sub-menu specifies the boot device priority sequence from the available
removable drives installed in your system.
1st ~ Drive
These settings specify the boot sequence from the available removable drive
devices installed in your system.
The devices to set are:
• 1ST DRIVE
• 2ND DRIVE
• 3RD DRIVE
• 4TH DRIVE
and so on.
CD/DVD Drives
This sub-menu specifies the boot device priority sequence from the available
CD/DVD drives installed in your system.
6-12
Chapter 6: BIOS
Table 6-13. Boot Menu
Menu Option
1st ~ Drive
Retry Boot Devices
6-6
Description
These settings specify the boot sequence from the available CD/DVD drive
devices installed in your system.
The devices to set are:
• 1ST DRIVE
• 2ND DRIVE
• 3RD DRIVE
• 4TH DRIVE
and so on.
This option allows the system to retry boot devices. Options are Enabled or
Disabled.
Exit Menu
Select the EXIT tab from AMI BIOS SETUP UTILITY screen to enter the EXIT BIOS SETUP
screen. The options for the EXIT menu are shown in Table 6-14. You may also
additionally press <ESC> to exit without saving or <F10> to save your settings and exit.
Table 6-14. Exit Menu
Menu Option
Description
Save Changes and
Exit
When you have completed the system configuration changes, select this option
to leave BIOS Setup and reboot the computer, so the new system configuration
parameters can take effect. Select SAVE CHANGES AND EXIT from the EXIT menu
and press <ENTER>.
Select this option to quit BIOS Setup without making any permanent changes to
Discard Changes and
the system configuration and reboot the computer. Select DISCARD CHANGES AND
Exit
EXIT from the EXIT menu and press <ENTER>.
Discard Changes
Select this option and press <ENTER> to discard all the changes and return to
AMI BIOS Utility Program.
Load Optimal
Defaults
To set this feature, select LOAD OPTIMAL DEFAULTS from the EXIT menu and press
<ENTER>. Then Select OK to allow BIOS to automatically load the OPTIMAL
DEFAULTS as the BIOS Settings. The OPTIMAL SETTINGS are designed for
maximum system performance, but may not work best for all computer
applications.
Load Fail-Safe
Defaults
To set this feature, select LOAD FAIL-SAFE DEFAULTS from the EXIT menu and
press <ENTER>. The FAIL-SAFE settings are designed for maximum system
stability, but not maximum performance.
6-13
SBA-7222G-T2 Blade Module User’s Manual
Notes
6-14
Appendix A
BIOS POST Codes
A-1
BIOS POST Messages
During the Power-On Self-Test (POST), the BIOS will check for problems. If a problem is
found, the BIOS will activate an alarm or display a message. The following is a list of
such BIOS messages.
Table A-1. BIOS POST Messages
BIOS Message
Description
Failure Fixed Disk
Fixed disk is not working or not configured properly. Check to
see if fixed disk is attached properly. Run Setup. Find out if the
fixed-disk type is correctly identified.
Stuck key
Stuck key on keyboard.
Keyboard error
Keyboard not working.
Keyboard Controller Failed
Keyboard controller failed test. May require replacing keyboard
controller.
Keyboard locked - Unlock key switch
Unlock the system to proceed.
Monitor type does not match CMOS Run SETUP
Monitor type not correctly identified in Setup
Shadow Ram Failed at offset: nnnn
Shadow RAM failed at offset nnnn of the 64k block at which
the error was detected.
System RAM Failed at offset: nnnn
System RAM failed at offset nnnn of in the 64k block at which
the error was detected.
Extended RAM Failed at offset: nnnn
Extended memory not working or not configured properly at
offset nnnn.
System battery is dead - Replace and
run SETUP
The CMOS clock battery indicator shows the battery is dead.
Replace the battery and run Setup to reconfigure the system.
System CMOS has been corrupted or modified incorrectly,
perhaps by an application program that changes data stored in
System CMOS checksum bad - Default CMOS. The BIOS installed Default Setup Values. If you do not
want these values, enter Setup and enter your own values. If
configuration used
the error persists, check the system battery or contact your
dealer.
System timer error
The timer test failed. Requires repair of system board.
Real time clock error
Real-Time Clock fails BIOS hardware test. May require board
repair.
Check date and time settings
BIOS found date or time out of range and reset the Real-Time
Clock. May require setting legal date (1991-2099).
A-1
SBA-7222G-T2 Blade Module User’s Manual
Table A-1. BIOS POST Messages (Continued)
BIOS Message
Description
Previous boot incomplete - Default
configuration used
Previous POST did not complete successfully. POST loads
default values and offers to run Setup. If the failure was caused
by incorrect values and they are not corrected, the next boot
will likely fail. On systems with control of wait states, improper
Setup settings can also terminate POST and cause this error
on the next boot. Run Setup and verify that the waitstate
configuration is correct. This error is cleared the next time the
system is booted.
Memory Size found by POST differed
from CMOS
Memory size found by POST differed from CMOS.
Diskette drive A error
Diskette drive B error
Drive A: or B: is present but fails the BIOS POST diskette tests.
Check to see that the drive is defined with the proper diskette
type in Setup and that the diskette drive is attached correctly.
Incorrect Drive A type - run SETUP
Type of floppy drive A: not correctly identified in Setup.
Incorrect Drive B type - run SETUP
Type of floppy drive B: not correctly identified in Setup.
System cache error - Cache disabled
RAM cache failed and BIOS disabled the cache. On older
boards, check the cache jumpers. You may have to replace the
cache. See your dealer. A disabled cache slows system
performance considerably.
CPU ID:
CPU socket number for Multi-Processor error.
EISA CMOS not writeable
ServerBIOS2 test error: Cannot write to EISA CMOS.
DMA Test Failed
ServerBIOS2 test error: Cannot write to extended DMA (Direct
Memory Access) registers.
Software NMI Failed
ServerBIOS2 test error: Cannot generate software NMI
(Non-Maskable Interrupt).
Fail-Safe Timer NMI Failed
ServerBIOS2 test error: Fail-Safe Timer takes too long.
device Address Conflict
Address conflict for specified device.
Allocation Error for: device
Run ISA or EISA Configuration Utility to resolve resource
conflict for the specified device.
CD ROM Drive
CD ROM Drive identified.
Entering SETUP...
Starting Setup program
Failing Bits: nnnn
The hex number nnnn is a map of the bits at the RAM address
which failed the memory test. Each 1 (one) in the map
indicates a failed bit. See errors 230, 231, or 232 above for
offset address of the failure in System, Extended, or Shadow
memory.
Fixed Disk n
Fixed disk n (0-3) identified.
Invalid System Configuration Data
Problem with NVRAM (CMOS) data.
I/O device IRQ conflict
I/O device IRQ conflict error.
PS/2 Mouse Boot Summary Screen:
PS/2 Mouse installed.
A-2
:
Table A-1. BIOS POST Messages (Continued)
BIOS Message
Description
nnnn kB Extended RAM Passed
Where nnnn is the amount of RAM in kilobytes successfully
tested.
nnnn Cache SRAM Passed
Where nnnn is the amount of system cache in kilobytes
successfully tested.
nnnn kB Shadow RAM Passed
Where nnnn is the amount of shadow RAM in kilobytes
successfully tested.
nnnn kB System RAM Passed
Where nnnn is the amount of system RAM in kilobytes
successfully tested.
One or more I2O Block Storage
There was not enough room in the IPL table to display all
Devices were excluded from the Setup
installed I2O block-storage devices.
Boot Menu
Operating system not found
Operating system cannot be located on either drive A: or drive
C:. Enter Setup and see if fixed disk and drive A: are properly
identified.
Parity Check 1 nnnn
Parity error found in the system bus. BIOS attempts to locate
the address and display it on the screen. If it cannot locate the
address, it displays ????. Parity is a method for checking
errors in binary data. A parity error indicates that some data
has been corrupted.
Parity Check 2 nnnn
Parity error found in the I/O bus. BIOS attempts to locate the
address and display it on the screen. If it cannot locate the
address, it displays ????.
Displayed after any recoverable error message. Press <F1> to
start the boot process or <F2> to enter Setup and change the
Press <F1> to resume, <F2> to Setup,
settings. Press <F3> to display the previous screen (usually an
<F3> for previous
initialization error of an Option ROM, i.e., an add-on card).
Write down and follow the information shown on the screen.
Press <F2> to enter Setup
Optional message displayed during POST. Can be turned off in
Setup.
PS/2 Mouse:
PS/2 mouse identified.
Run the I2O Configuration Utility
One or more unclaimed block storage devices have the
Configuration Request bit set in the LCT. Run an I2O
Configuration Utility (e.g. the SAC utility).
System BIOS shadowed
System BIOS copied to shadow RAM.
UMB upper limit segment address:
nnnn
Displays the address nnnn of the upper limit of Upper
Memory Blocks, indicating released segments of the BIOS
which can be reclaimed by a virtual memory manager.
Video BIOS shadowed
Video BIOS successfully copied to shadow RAM.
A-3
SBA-7222G-T2 Blade Module User’s Manual
A-2
BIOS POST Codes
This section lists the POST (Power-On Self-Test) codes for the AMI BIOS. POST codes
are divided into two categories: recoverable and terminal.
Recoverable POST Errors
When a recoverable type of error occurs during POST, the BIOS will display an POST
code that describes the problem. BIOS may also issue one of the following beep codes:
•
One long and two short beeps – video configuration error
•
One repetitive long beep – no memory detected
Terminal POST Errors
If a terminal type of error occurs, BIOS will shut down the system. Before doing so,
BIOS will write the error to port 80h, attempt to initialize video and write the error in the
top left corner of the screen.
The following is a list of codes that may be written to port 80h.
Uncompressed Initialization Codes
The uncompressed initialization checkpoint codes are listed in order of execution in
table Table A-2.
Table A-2. Uncompressed Initialization Error Codes
Post Code Description
D0h
The NMI is disabled. Power on delay is starting. Next, the initialization
code checksum will be verified.
D1h
Initializing the DMA controller, performing the keyboard controller BAT
test, starting memory refresh and entering 4 GB flat mode next.
D3h
Starting memory sizing next.
D4h
Returning to real mode. Executing any OEM patches and setting the
Stack next.
D5h
Passing control to the uncompressed code in shadow RAM at
E000:0000h. The initialization code is copied to segment 0 and control
will be transferred to segment 0.
D6h
Control is in segment 0. Next, checking if <Ctrl> <Home> was pressed
and verifying the system BIOS checksum. If either <Ctrl> <Home> was
pressed or the system BIOS checksum is bad, next will go to checkpoint
code E0h. Otherwise, going to checkpoint code D7h.
A-4
:
Bootblock Recovery Codes
The bootblock recovery checkpoint codes are listed in order of execution in Table A-3.
Table A-3. Bootblock Recovery Error Codes
Post Code Description
E0h
The onboard floppy controller if available is initialized. Next, beginning the
base 512 KB memory test.
E1h
Initializing the interrupt vector table next.
E2h
Initializing the DMA and Interrupt controllers next.
E6h
Enabling the floppy drive controller and Timer IRQs. Enabling internal
cache memory.
Edh
Initializing the floppy drive.
Eeh
Looking for a floppy diskette in drive A:. Reading the first sector of the
diskette.
Efh
A read error occurred while reading the floppy drive in drive A:.
F0h
Next, searching for the AMIBOOT.ROM file in the root directory.
F1h
The AMIBOOT.ROM file is not in the root directory.
F2h
Next, reading and analyzing the floppy diskette FAT to find the clusters
occupied by the AMIBOOT.ROM file.
F3h
Next, reading the AMIBOOT.ROM file, cluster by cluster.
F4h
The AMIBOOT.ROM file is not the correct size.
E0h
The onboard floppy controller if available is initialized. Next, beginning the
base 512 KB memory test.
E1h
Initializing the interrupt vector table next.
E2h
Initializing the DMA and Interrupt controllers next.
E6h
Enabling the floppy drive controller and Timer IRQs. Enabling internal
cache memory.
Edh
Initializing the floppy drive.
Eeh
Looking for a floppy diskette in drive A:. Reading the first sector of the
diskette.
Efh
A read error occurred while reading the floppy drive in drive A:.
F0h
Next, searching for the AMIBOOT.ROM file in the root directory.
F1h
The AMIBOOT.ROM file is not in the root directory.
F2h
Next, reading and analyzing the floppy diskette FAT to find the clusters
occupied by the AMIBOOT.ROM file.
F3h
Next, reading the AMIBOOT.ROM file, cluster by cluster.
F5h
Next, disabling internal cache memory.
FBh
Next, detecting the type of flash ROM.
A-5
SBA-7222G-T2 Blade Module User’s Manual
Table A-3. Bootblock Recovery Error Codes
Post Code Description
FCh
Next, erasing the flash ROM.
FDh
Next, programming the flash ROM.
FFh
Flash ROM programming was successful. Next, restarting the system
BIOS.
Uncompressed Initialization Codes
The following runtime checkpoint codes are listed in order of execution in Table A-4.
These codes are uncompressed in F0000h shadow RAM.
Table A-4. Uncompressed Initialization Error Codes
Post Code Description
03h
The NMI is disabled. Next, checking for a soft reset or a power on
condition.
05h
The BIOS stack has been built. Next, disabling cache memory.
06h
Uncompressing the POST code next.
07h
Next, initializing the CPU and the CPU data area.
08h
The CMOS checksum calculation is done next.
0Ah
The CMOS checksum calculation is done. Initializing the CMOS status
register for date and time next.
0Bh
The CMOS status register is initialized. Next, performing any required
initialization before the keyboard BAT command is issued.
0Ch
The keyboard controller input buffer is free. Next, issuing the BAT
command to the keyboard controller.
0Eh
The keyboard controller BAT command result has been verified. Next,
performing any necessary initialization after the keyboard controller BAT
command test.
0Fh
The initialization after the keyboard controller BAT command test is done.
The keyboard command byte is written next.
10h
The keyboard controller command byte is written. Next, issuing the Pin 23
and 24 blocking and unblocking command.
11h
Next, checking if <End or <Ins> keys were pressed during power on.
Initializing CMOS RAM if the Initialize CMOS RAM in every boot
AMIBIOS POST option was set in AMIBCP or the <End> key was
pressed.
12h
Next, disabling DMA controllers 1 and 2 and interrupt controllers 1 and 2.
13h
The video display has been disabled. Port B has been initialized. Next,
initializing the chipset.
14h
The 8254 timer test will begin next.
19h
Next, programming the flash ROM.
A-6
:
Table A-4. Uncompressed Initialization Error Codes
Post Code Description
1Ah
The memory refresh line is toggling. Checking the 15 second on/off time
next.
2Bh
Passing control to the video ROM to perform any required configuration
before the video ROM test.
2Ch
All necessary processing before passing control to the video ROM is
done. Looking for the video ROM next and passing control to it.
2Dh
The video ROM has returned control to BIOS POST. Performing any
required processing after the video ROM had control
23h
Reading the 8042 input port and disabling the MEGAKEY Green PC
feature next. Making the BIOS code segment writable and performing any
necessary configuration before initializing the interrupt vectors.
24h
The configuration required before interrupt vector initialization has
completed. Interrupt vector initialization is about to begin.
25h
Interrupt vector initialization is done. Clearing the password if the POST
DIAG switch is on.
27h
Any initialization before setting video mode will be done next.
28h
Initialization before setting the video mode is complete. Configuring the
monochrome mode and color mode settings next.
2Ah
Bus initialization system, static, output devices will be done next, if
present. See the last page for additional information.
2Eh
Completed post-video ROM test processing. If the EGA/VGA controller is
not found, performing the display memory read/write test next.
2Fh
The EGA/VGA controller was not found. The display memory read/write
test is about to begin.
30h
The display memory read/write test passed. Look for retrace checking
next.
31h
The display memory read/write test or retrace checking failed. Performing
the alternate display memory read/write test next.
32h
The alternate display memory read/write test passed. Looking for
alternate display retrace checking next.
34h
Video display checking is over. Setting the display mode next.
37h
The display mode is set. Displaying the power on message next.
38h
Initializing the bus input, IPL, general devices next, if present. See the last
page of this chapter for additional information.
39h
Displaying bus initialization error messages. See the last page of this
chapter for additional information.
3Ah
The new cursor position has been read and saved. Displaying the Hit
<DEL> message next.
3Bh
The Hit <DEL> message is displayed. The protected mode memory test
is about to start.
A-7
SBA-7222G-T2 Blade Module User’s Manual
Table A-4. Uncompressed Initialization Error Codes
Post Code Description
40h
Preparing the descriptor tables next.
42h
The descriptor tables are prepared. Entering protected mode for the
memory test next.
43h
Entered protected mode. Enabling interrupts for diagnostics mode next.
44h
Interrupts enabled if the diagnostics switch is on. Initializing data to check
memory wraparound at 0:0 next.
45h
Data initialized. Checking for memory wraparound at 0:0 and finding the
total system memory size next.
46h
The memory wraparound test is done. Memory size calculation has been
done. Writing patterns to test memory next.
47h
The memory pattern has been written to extended memory. Writing
patterns to the base 640 KB memory next.
48h
Patterns written in base memory. Determining the amount of memory
below 1 MB next.
49h
The amount of memory below 1 MB has been found and verified.
4Bh
The amount of memory above 1 MB has been found and verified.
Checking for a soft reset and clearing the memory below 1 MB for the soft
reset next. If this is a power on situation, going to checkpoint 4Eh next.
4Ch
The memory below 1 MB has been cleared via a soft reset. Clearing the
memory above 1 MB next.
4Dh
The memory above 1 MB has been cleared via a soft reset. Saving the
memory size next. Going to checkpoint 52h next.
4Eh
The memory test started, but not as the result of a soft reset. Displaying
the first 64 KB memory size next.
4Fh
The memory size display has started. The display is updated during the
memory test. Performing the sequential and random memory test next.
50h
The memory below 1 MB has been tested and initialized. Adjusting the
displayed memory size for relocation and shadowing next.
51h
The memory size display was adjusted for relocation and shadowing.
52h
The memory above 1 MB has been tested and initialized. Saving the
memory size information next.
53h
The memory size information and the CPU registers are saved. Entering
real mode next.
54h
Shutdown was successful. The CPU is in real mode. Disabling the Gate
A20 line, parity, and the NMI next.
57h
The A20 address line, parity, and the NMI are disabled. Adjusting the
memory size depending on relocation and shadowing next.
58h
The memory size was adjusted for relocation and shadowing. Clearing
the Hit <DEL> message next.
A-8
:
Table A-4. Uncompressed Initialization Error Codes
Post Code Description
59h
The Hit <DEL> message is cleared. The <WAIT...> message is displayed.
Starting the DMA and interrupt controller test next.
60h
The DMA page register test passed. Performing the DMA Controller 1
base register test next.
62h
The DMA controller 1 base register test passed. Performing the DMA
controller 2 base register test next.
65h
The DMA controller 2 base register test passed. Programming DMA
controllers 1 and 2 next.
66h
Completed programming DMA controllers 1 and 2. Initializing the 8259
interrupt controller next.
67h
Completed 8259 interrupt controller initialization.
7Fh
Extended NMI source enabling is in progress.
80h
The keyboard test has started. Clearing the output buffer and checking for
stuck keys. Issuing the keyboard reset command next.
81h
A keyboard reset error or stuck key was found. Issuing the keyboard
controller interface test command next.
82h
The keyboard controller interface test completed. Writing the command
byte and initializing the circular buffer next.
83h
The command byte was written and global data initialization has
completed. Checking for a locked key next.
84h
Locked key checking is over. Checking for a memory size mismatch with
CMOS RAM data next.
85h
The memory size check is done. Displaying a soft error and checking for
a password or bypassing WINBIOS Setup next.
86h
The password was checked. Performing any required programming
before WINBIOS Setup next.
87h
The programming before WINBIOS Setup has completed.
Uncompressing the WINBIOS Setup code and executing the AMIBIOS
Setup or WINBIOS Setup utility next.
88h
Returned from WINBIOS Setup and cleared the screen. Performing any
necessary programming after WINBIOS Setup next.
89h
The programming after WINBIOS Setup has completed. Displaying the
power on screen message next.
8Ch
Programming the WINBIOS Setup options next.
8Dh
The WINBIOS Setup options are programmed. Resetting the hard disk
controller next.
8Fh
The hard disk controller has been reset. Configuring the floppy drive
controller next.
91h
The floppy drive controller has been configured. Configuring the hard disk
drive controller next.
A-9
SBA-7222G-T2 Blade Module User’s Manual
Notes
Table A-4. Uncompressed Initialization Error Codes
Post Code Description
95h
Initializing the bus option ROMs from C800 next. See the last page of this
chapter for additional information.
96h
Initializing before passing control to the adaptor ROM at C800.
97h
Initialization before the C800 adaptor ROM gains control has completed.
The adaptor ROM check is next.
98h
The adaptor ROM had control and has now returned control to BIOS
POST. Performing any required processing after the option ROM
returned control.
99h
Any initialization required after the option ROM test has completed.
Configuring the timer data area and printer base address next.
9Ah
Set the timer and printer base addresses. Setting the RS-232 base
address next.
9Bh
Returned after setting the RS-232 base address. Performing any required
initialization before the Coprocessor test next.
9Ch
Required initialization before the Coprocessor test is over. Initializing the
Coprocessor next.
9Dh
Coprocessor initialized. Performing any required initialization after the
Coprocessor test next.
9Eh
Initialization after the Coprocessor test is complete. Checking the
extended keyboard, keyboard ID, and Num Lock key next. Issuing the
keyboard ID command next.
A2h
Displaying any soft errors next.
A3h
The soft error display has completed. Setting the keyboard typematic rate
next.
A4h
The keyboard typematic rate is set. Programming the memory wait states
next.
A5h
Memory wait state programming is over. Clearing the screen and
enabling parity and the NMI next.
A7h
NMI and parity enabled. Performing any initialization required before
passing control to the adaptor ROM at E000 next.
A8h
Initialization before passing control to the adaptor ROM at E000h
completed. Passing control to the adaptor ROM at E000h next.
A9h
Returned from adaptor ROM at E000h control. Performing any
initialization required after the E000 option ROM had control next.
Aah
Initialization after E000 option ROM control has completed. Displaying the
system configuration next.
Abh
Uncompressing the DMI data and executing DMI POST initialization next.
B0h
The system configuration is displayed.
A-10
:
Table A-4. Uncompressed Initialization Error Codes
Post Code Description
B1h
Copying any code to specific areas.
00h
Code copying to specific areas is done. Passing control to INT 19h boot
loader next.
A-11
SBA-7222G-T2 Blade Module User’s Manual
Notes
A-12
Disclaimer
The products sold by Supermicro are not intended for and will not be used in life support
systems, medical equipment, nuclear facilities or systems, aircraft, aircraft devices,
aircraft/emergency communication devices or other critical systems whose failure to
perform be reasonably expected to result in significant injury or loss of life or
catastrophic property damage. Accordingly, Supermicro disclaims any and all liability,
and should buyer use or sell such products for use in such ultra-hazardous applications,
it does so entirely at its own risk. Furthermore, buyer agrees to fully indemnify, defend
and hold Supermicro harmless for and against any and all claims, demands, actions,
litigation, and proceedings of any kind arising out of or related to such ultra-hazardous
use or sale.
SBA-7222G-T2 Blade Module User’s Manual