1
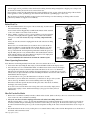
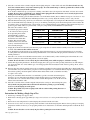
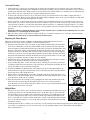
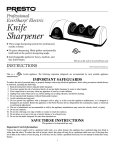
Heat ’n Steep electric tea kettle Visit us on the web at www.GoPresto.com •Heats water and steeps tea in the same pot. •Infuser for brewing both loose leaf and bag teas. •Built-in thermometer and timer. Instructions 2010 by National Presto Industries, Inc. This is a Listed appliance. The following important safeguards are recommended by most portable appliance manufacturers. IMPORTANT SAFEGUARDS To reduce the risk of personal injury or property damage when using electrical appliances, basic safety precautions should always be followed, including the following: 1. Read all instructions. 2. Do not touch hot surfaces. Use handle for lifting and pouring. 3. To protect against fire, electric shock, and personal injury, do not immerse cord, plug, or this kettle in water or other liquid. 4. Close supervision is necessary when any appliance is used by or near children. 5. Be sure that the cover is securely in place when heating water, while steeping tea, and before serving. 6. Do not remove cover when water is boiling. 7. Unplug tea kettle from wall outlet before installing the infuser/cover assembly in the tea kettle and before removing the infuser/cover assembly from the tea kettle. 8. Unplug from outlet when not in use and before cleaning. Allow to cool before cleaning the appliance. Empty water/tea between uses. 9. Do not operate any appliance with a damaged cord or plug, or in the event the appliance malfunctions, or is dropped or damaged in any manner. Return the appliance to the Presto Factory Service Department for examination, repair, or adjustment. 10. The use of accessory attachments not recommended by the appliance manufacturer may result in fire, electrical shock, or personal injury. 11. Do not let cord hang over edge of table or counter, or touch hot surfaces. 12. Do not place on or near a hot gas or electric burner, or in a heated oven. 13. Extreme caution must be used when moving an appliance containing hot liquids. 14. To disconnect, remove plug from wall outlet. 15. Do not pour boiling water or tea before disconnecting the plug from the wall outlet. 16. Do not use outdoors. 17. Do not use appliance for other than intended use. SAVE THESE INSTRUCTIONS This product is for household use only. 1 A short supply cord is provided to reduce the hazards resulting from becoming entangled in or tripping over a longer cord. An extension cord may be used if care is exercised in its use. If an extension cord is used, the marked electrical rating should be at least as great as the electrical rating of the tea kettle. If the appliance is of the grounded type, the extension cord should be a grounding-type 3-wire cord. The extension cord, if used, should be arranged so that it will not drape over the countertop or tabletop where it can be pulled on by children or tripped over accidentally. Before First Use 1. Become familiar with the various parts of the tea kettle (Fig. A) and read and follow the instructions carefully. Your tea kettle will be shipped fully assembled. The infuser will be attached to the cover and the cover will be on the tea kettle. 2. Prior to making your first pot of tea, it is suggested that you boil water in the tea kettle to thoroughly rinse the appliance. It may contain some manufacturing oil or residue. Do not use any soap or cleaning compounds in the water. Always be sure the tea kettle is unplugged from the wall outlet before filling with water. Remove the cover and the infuser (it is attached to the cover) from the tea kettle by holding the tea kettle handle with one hand. Then use your other hand to grasp the cover knob. Pull the cover off. Next, fill the tea kettle to the top of the fill mark, the triangular shaped rib that is inside the spout (see Fig. B). Then place the cover (with the infuser still attached) back on the tea kettle and plug unit into wall outlet. When water begins to boil, unplug from wall outlet and carefully discard heated water. DO NOT IMMERSE TEA KETTLE IN WATER OR OTHER LIQUID. Timer Operating Instructions Built-in timer Cover knob Cover Infuser Handle Spout Built-in thermometer Fig. A Note: The timer works independently from the unit; it does not turn the unit on or off. Fig. B Fill mark 1. Activate the timer by holding the button (Fig. C) down until 00 is visible in the display screen. 2. Press the button once for each individual minute or hold the button down to increase the display time rapidly until you have reached the desired time. The timer can be set for 1 to 30 minutes. The timer will automatically begin counting down approximately two seconds after it is set. Note: Shortly after you depress the button, the time remaining will flash on the screen. It will continue to flash until the time has elapsed. To reset the timer to zero, press the timer button for about two seconds. Fig. C 3. When there is just one minute left on the timer, you will hear two beeps to alert you that Display screen Timer button time is almost up. In addition, the seconds remaining will now be displayed. When the set time has expired, the timer will beep five times. After about one minute, the display screen will go blank. Note: If for some reason the timer does not beep, this can be corrected by simply removing the battery, wiping it clean, and then reinserting it. (See page 4 for battery removal instructions.) How To Use the Tea Kettle 1. Remove the cover/infuser assembly from the tea kettle and set it aside. (Refer to the Before First Use section above for instructions on removal of the cover/infuser assembly). 2. Always be sure the tea kettle is unplugged from the wall outlet before filling with water. Fill the tea kettle with 2 to 5 cups* of water. The maximum fill level is indicated inside the spout with a triangle (see Fig. B). Do not fill beyond this triangle. Overfilling may result in hot water boiling out of the spout. Do not heat less than 2 cups* of water. In order for the thermometer probe to get an accurate temperature reading of the water, it must be inserted into at least 2 cups* of water. 3. Detach the infuser from the cover by rotating the cover counterclockwise until you hear it click. Then pull the cover off the rim of the infuser and set the infuser aside. *One cup equals 8 ounces. 2 4. Place the cover back on the tea kettle and push it down tightly. Plug into a 120 volt AC wall outlet. Use the tea kettle on a dry, level, heat resistant surface, away from countertop edge. To avoid steam damage to cabinets, position the tea kettle so that the spout is pointed away from the cabinets. Note: As the tea kettle heats up, you may hear a clicking sound; this is due to the expansion of the metal as it heats. It is normal. Caution: Do not remove or install the cover while the unit is plugged in. Be sure that the cover is securely in place when heating water, while steeping tea, and before serving. 5. While the water is heating, place the desired amount of tea in the infuser basket. (We recommend 1 teaspoon of tea leaves or 1 tea bag per 8 ounce cup of water.) Because individual preferences vary, you may adjust the amount you use to suit your taste. 6. The built-in thermometer (Fig. A) will let you monitor the water temperature as it is being heated. Heat until the correct temperature is reached which will vary with the type of tea you are making. Usually, the precise desired temperature can be found on the tea package. If not, use the chart below or the tea kettle’s color coded thermometer gauge which provides temperature ranges for green tea (green band), white tea (yellow band), oolong tea (orange band), and black/herbal teas (blue band). The water will continue to heat/ boil until the plug is disconnected TYPE OF TEA TEMPERATURE STEEPING TIME or all of the water has evaporated. Black 195° – 205° 3 to 5 minutes Note: Operating the tea kettle Oolong 190° – 203° 3 to 6 minutes in high humidity conditions may cause condensation to form Green 155° – 175° 1 to 3 minutes between the lens and the therWhite 175° – 180° 5 to 6 minutes mometer. This is normal. The condensation does not affect the Herbal (tisane) 195° – 205° 5 to 7 minutes accuracy of the thermometer and will eventually dissipate. 7. Unplug the tea kettle from the wall outlet when the proper temperature is reached and then carefully remove the cover from the tea kettle. Use caution as there will be hot steam. Note: Should the tea kettle boil dry or be accidentally plugged in when empty, it is protected against damage by its automatic re-setting thermostat that will turn off the heating element. If this occurs, disconnect the plug and allow the kettle to cool before refilling with water. 8. Place the cover over the rim of the infuser and rotate the cover clockwise until you hear it click in place. Then insert the cover/ infuser assembly into the tea kettle and push the cover down tightly. Caution: Be sure that the cover is securely in place when heating water, while steeping tea, and before serving. 9. Set the timer by pressing the button to the desired steeping time. (See page 2 for timer operating instructions.) As with temperature, the desired time also varies with the type of tea being prepared and can usually be found on the tea package. If not, refer to the chart above. 10. When set time has expired, carefully remove the cover/infuser assembly from the tea kettle by holding the tea kettle handle with one hand. Then, use your other hand to grasp the cover knob and pull the cover off. Tilt the infuser, keeping your hand away from the tea kettle opening, and allow liquid to drain from the infuser. Then set the cover/infuser assembly on a plate or in a saucer. Fig. D 11. Using care, detach the infuser from the cover. Hold the top of the cover with one hand and place Infuser ribs the fingers of your other hand on the infuser’s plastic ribs (Fig. D). Do not touch the mesh, as it is hot. Rotate the cover counterclockwise until you hear it click. Then pull the cover off the rim of the infuser and set the infuser aside. 12. Place the cover back on the tea kettle and push it down before serving tea. It should snap into place. Always make sure plug is disconnected from wall outlet before pouring, to prevent boiling water or tea from surging out of the spout. Caution: Keep hands away from escaping steam and use caution when pouring hot water or tea from the tea kettle. Instructions for Making a Single Cup of Tea 1. Follow steps 1 through 4 on pages 2 and 3. 2. While water is heating, place approximately 1 teaspoon of tea leaves or 1 tea bag in the infuser and place the infuser in a large mug. 3. When correct water temperature is reached, unplug the tea kettle from the wall outlet. 4. Pour water over tea leaves or tea bag in mug and set the timer for the desired steeping time. Refer to the tea package for steeping temperature and time for the tea you are preparing. If there are no instructions, use the times and temperatures found in the above chart. Caution: Be sure that the cover is securely in place before pouring hot water from tea kettle. *One cup equals 8 ounces. 3 Care and Cleaning 1. Under normal use, a deposit of scale, which is due to mineral deposits found in tap or bottled water, may form on the inside of the tea kettle. This scale buildup can be minimized by pouring out remaining water after each use. Wait until your next use before refilling again with fresh water. If the tea kettle is used on a daily basis, clean the inside once a month to remove mineral deposits. If the water in your area is quite hard, more frequent cleaning may be necessary. 2. To remove the scale deposit, boil one cup of vinegar and one cup of water in the kettle for five minutes. Unplug and allow to stand for 15 minutes. Empty tea kettle and rinse thoroughly. If mineral buildup is quite severe, repeat cleaning process with fresh vinegar and water. Always rinse thoroughly after cleaning. 3. In time, the interior of the tea kettle may become stained from tea. To minimize staining, pour out unused tea after each use. To remove stains, use a solution of water and cream of tarter. Combine 1 teaspoon of cream of tarter per cup of water. Pour enough solution into the tea kettle to cover the stains. Plug unit in and boil solution for 5 to 10 minutes. Unplug and allow to cool. Then pour out solution. Prior to making your next pot of tea, it is suggested that you boil water in the tea kettle to thoroughly rinse the appliance. Important: Whenever cleaning the interior of the tea kettle, always be sure to carefully clean around the probe area of the thermometer to avoid damaging the thermometer. 4. Wipe the exterior of the tea kettle with a soft damp cloth. Do not scour surfaces with steel wool or abrasive cleaners. DO NOT IMMERSE TEA KETTLE or cover IN WATER OR OTHER LIQUID. Replacing the Timer Battery Fig. E The battery used in the tea kettle is a CR2032 3V lithium battery which will seldom need to be replaced. If you ever need to replace the battery, follow the instructions below. 1. The timer is the inner piece of the cover knob (see Fig. E and Fig. H). Along the rim of the timer there are two undercuts. Locate the left undercut which is about a ½ inch to the left of the timer button by running your fingernail under the edge of the timer. You will feel an undercut there (Fig. E). Insert a thin object (such as a butter knife) in the undercut and lift that side of the timer away from the tea kettle cover. Hold that side of the timer with your finger, to prevent it from slipping back in the cover. Next, locate the right undercut which is about a ½ inch to the right of the timer button. Insert the knife in that undercut and lift that side away from the tea kettle cover. Now pull the timer out completely from the opening in the cover (Fig. H). 2. Turn the timer over so the back side is facing up. Using your thumb, remove the battery compartment cover by sliding it in the direction the arrow is pointing (Fig. F). 3. Using a small paring knife, or some other narrow object, carefully press near the top of the interlock spring towards the wall of the timer to release the battery from under the hooks (Fig. G). Use the tip of the knife to remove the battery and discard. 4. Position new CR2032 3V lithium battery, with writing facing up, in compartment fitting it underneath the plastic edge (Fig. G). Push battery down on the side by the interlock spring until the battery snaps into position under the hooks. 5. Replace battery cover. Holding the cover with your thumb on the arrow, fit the sides of the cover in the grooves on the timer and slide the door towards the interlock spring. Turn the timer over and press the button to make sure it is operating. 6. Place the timer back in the tea kettle cover by aligning the rib on the timer with the notch on the inner rim of the cover knob (Fig. H) and push the timer down so it is securely positioned. Note: The timer can only be inserted into the tea kettle cover one way; the rib on the timer must be aligned with the notch on the cover knob. Fig. F Battery compartment cover Fig. G Interlock spring Hooks Plastic edge Rib Helpful Hints • The timer can also be used to alert you when the water has reached the desired temperature. If you typically prepare the same amount and same kind of tea, for the first couple of uses, monitor the amount of time it takes to reach the correct temperature. For instance, if you drink white tea and you always fill the tea kettle with 2 cups of water, it will take approximately 2½ minutes for the water to reach 180˚. If you fill the tea kettle with 5 cups of water, it will take approximately 6 minutes to reach 180˚. For future pots of tea, set the timer for that time, following the timer operating instructions on page 2. Timer Undercut Fig. H Notch • Pouring heated water into a cold mug or tea service may cool the water below the desired steeping temperature. When preparing tea in a mug or a traditional pot, be sure to heat the mug or pot first by filling it with hot water. Discard the water immediately before preparing the tea. 4 • When purchasing tea from a tea shop, the recommended temperature and steeping time are typically on the tea package. As the desired time and temperature does vary from tea to tea, please follow the recommendations on the package. • A range of steeping times has been provided for each type of tea. For a more delicate brew, use the shorter point in the range. For a more robust flavor, use the longer time. Consumer Service Information If you have any questions regarding the operation of your Presto appliance or need parts for your appliance, contact us by any of these methods: • Call 1-800-877-0441 weekdays 8:00 AM to 4:30 PM (Central Time) • Email us at our website www.GoPresto.com • Write: National Presto Industries, Inc. Consumer Service Department 3925 North Hastings Way, Eau Claire, WI 54703-3703 When contacting the Consumer Service Department, please indicate the model number and the date code for the tea kettle. These numbers can be found on the bottom of the tea kettle. Please record this information: Model Number ___________________ Date Code _______________ Date Purchased ___________________________________ Inquiries will be answered promptly by telephone, email, or letter. When emailing or writing, please include a phone number and a time when you can be reached during weekdays if possible. Any maintenance required for this product, other than normal household care and cleaning, should be performed by our Factory Service Department. Be sure to indicate date of purchase and a description of defect when sending an appliance for repair. Send appliances for repair to: Canton Sales and Storage Company Presto Factory Service Department 555 Matthews Dr., Canton, MS 39046-0529 The Presto Factory Service Department is equipped to service all PRESTO appliances and supply genuine PRESTO parts. Genuine PRESTO replacement parts are manufactured to the same exacting quality standards as PRESTO appliances and are engineered specifically to function properly with its appliances. Presto can only guarantee the quality and performance of genuine PRESTO parts. “Look-alikes” might not be of the same quality or function in the same manner. To ensure that you are buying genuine PRESTO replacement parts, look for the PRESTO trademark. PRESTO Limited Warranty This quality PRESTO appliance is designed and built to provide many years of satisfactory performance under normal household use. Presto pledges to the original owner that should there be any defects in material or workmanship during the first year after purchase, we will repair or replace it at our option. Our pledge does not apply to damage caused by shipping. To obtain service under the warranty, return this PRESTO appliance, shipping prepaid, to the Presto Factory Service Department. When returning a product, please include a description of the defect and indicate the date the appliance was purchased. We want you to obtain maximum enjoyment from using this PRESTO appliance and ask that you read and follow the instructions enclosed. Failure to follow instructions, damage caused by improper replacement parts, abuse or misuse will void this pledge. This warranty gives you specific legal rights, and you may also have other rights which vary from state to state. This is Presto’s personal pledge to you and is being made in place of all other express warranties. NATIONAL PRESTO INDUSTRIES, INC. Eau Claire, WI 54703-3703 Form 72-909B 5