1
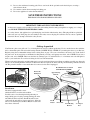
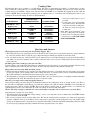
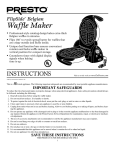
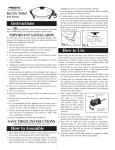
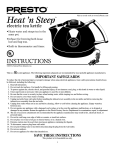
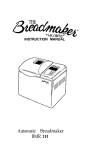
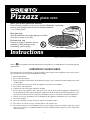
Pizzazz pizza oven Makes your favorite pizza extra delicious! Fresh or frozen, regular or rising crust, exclusive Rotabake technology assures great tasting pizza every time. Recommended for 7- to 12-inch pizzas. Pizza your way! Special control lets you make toppings as bubbly or crusts as crispy as you like. Fast and easy, too! Freezer to perfect in minutes with no preheating. While ordinary ovens are heating...you’re eating. Instructions 2000 by National Presto Industries, Inc. Visit us on the web at www.GoPresto.com This is a Listed appliance. The following important safeguards are recommended by most portable appliance manufacturers. IMPORTANT SAFEGUARDS To reduce the risk of personal injury or property damage, when using electrical appliances, basic safety precautions should always be followed, including the following: 1. Read all instructions. 2. Do not touch hot surfaces. 3. To protect against electrical shock, do not immerse the pizza oven, except the removable baking pan, in water or other liquid. 4. Close supervision is necessary when any appliance is used by or near children. 5. Do not leave unit unattended. 6. Unplug from outlet after using and before cleaning. 7. Do not operate any appliance with a damaged cord or plug or in the event the appliance malfunctions or has been damaged in any manner. Return the appliance to the Presto Factory Service Department or to the nearest Presto Authorized Service Station for examination, repair, or electrical or mechanical adjustment. 8. The use of accessory attachments not recommended by the appliance manufacturer may cause injuries. 9. Do not use outdoors. 10. Do not let cord hang over edge of table or counter or touch hot surfaces. 11. Do not place on or near a hot gas or electric burner or in a heated oven. 12. Do not operate pizza oven near flammable objects or place below a paper towel holder. A fire may occur if pizza oven is covered or touching flammable materials, including curtains, draperies, walls, and the like, when in operation. 1 13. Do not clean with metal scouring pads. Pieces can break off the pad and touch electrical parts, creating a risk of electric shock. 14. Use extreme caution when removing hot baking pan. 15. Do not use appliance for other than intended use. SAVE THESE INSTRUCTIONS This product is for household use Only. Important Cord and Plug Information A short power supply cord is provided to reduce the risk resulting from becoming entangled in or tripping over a longer cord. DO NOT USE WITH AN EXTENSION CORD. As a safety feature, this appliance has a polarized plug (one blade is wider than the other). This plug will fit in a polarized outlet only one way. If the plug does not fit fully in the outlet, reverse the plug. If it still does not fit, contact a qualified electrician. Do not attempt to defeat this safety feature. Getting Acquainted Your Pizzazz pizza oven will cook 7- to 12-inch pizzas fast and easy without preheating. Use it to make frozen, take-and-bake, deli, or homemade pizza. The selectable heating elements (LOWER–DUAL–UPPER) let you make pizza the way you like best. Begin by using the recommended settings in the cooking chart on page 5. For your convenience, the chart is also on the back of the pizza oven. At the end of the recommended cooking time if you want your toppings more done, select UPPER. If you want a crispier crust, select LOWER. Then reset the timer by turning it past “6” and then back to 1 or 2 minutes and cook until pizza is done to your satisfaction. To avoid overcooking, do not leave unit unattended. Whenever the unit is plugged in and the baking pan is correctly positioned, the motor will turn on and the pan will rotate. Once the timer is set, the heating elements will turn on. When the time has expired, the timer will ring and the heating elements will shut off. The pan will continue to rotate until either it is removed or the unit is unplugged. Unit Assembled Heat Element Selector Switch (LOWER–DUAL–UPPER) Fig. A Removable Baking Pan Timer Upper Heating Element Cooking Chart Reset Button The unit is equipped with a sensor which will detect an overheated condition. Possible causes of overheating include preheating an empty baking pan or leaving an empty baking pan on the unit while the unit is still hot. Should the unit become overheated, the unit will not operate until reset. Allow the unit to cool and then press the Reset Button located at the lower front of the unit. Reset Button 2 Drive Shaft Lower Heating Element “L” Shaped Post How To Use Before using for the first time, become familiar with the Pizzazz pizza oven (see Fig. A on page 8). Wash the baking pan in warm, soapy water; rinse and dry thoroughly. 1. Set pizza oven on a flat, dry countertop away from countertop edge. 2. Locate the two “L” shaped posts (see Fig. A on page 8). Position the baking pan over the lower heating element at an angle so the back inside rim of the pan rests against the top of the “L” shaped posts. Now center the pan so the pan hub is over the drive shaft (Fig. B). The pan must be pulled forward against the posts for the hub to align with the drive shaft. Lower the pan so that the drive shaft is seated into the hub. The pan may rotate slightly while Baking Pan it drops into position, when the hub and drive shaft engage. 3. Remove pizza from box or wrapper and cardboard disk. Center pizza on baking pan. When baking take-out pizza or rising crust pizza, you may use the baking wheel or special baking tray if provided by the Pan Hub pizza manufacturer. Drive Shaft 4. Plug the unit in. The motor will turn on and the baking pan will begin to rotate. Note: If the baking pan does not rotate, the pan hub is probably not centered over the drive shaft (Fig. B). Reposition the Fig. B “L” Shaped Post pan following the instructions in step 2. 5. Slide the heat element selector switch to the appropriate setting (LOWER–DUAL–UPPER). Refer to the cooking chart on page 10 or on back of pizza oven. 6. Turn the timer dial clockwise to the desired baking time. Refer to the cooking chart on page 10 or on back of pizza oven, rather than the pizza manufacturer’s instructions. Typically, pizzas will cook faster on the Pizzazz pizza oven than in a conventional oven. Once the timer is set, the heating elements will turn on and the pizza will begin to cook. Do not preheat the pizza oven. Note: When the heating elements are turned on, the metal surrounding the heating elements will expand. You may hear a light humming or vibrating sound, or a slight pop, as the metal expands. This is normal. 7. If timer goes off and additional baking time is needed, simply reset timer to desired time. To cook 6 minutes or less, turn timer past “6” and then back to time desired. This will activate the heating elements and timer function. When pizza appears done, turn timer to “0” if it is not at “0” already. The heating elements will turn off when the timer is at the “0” position. 8. Then while the pan continues to rotate, using hot pads carefully lift the baking pan and pizza off the pizza oven, being careful pizza does not touch the upper heating element. Set hot baking pan on a heat resistant surface. Note: As soon as you lift the baking pan from the pizza oven, the automatic shut-off switch will shut the pizza oven off. 9. Unplug the unit. Allow the unit to cool before cleaning or storing. 10. Carefully slide pizza onto cardboard circle or pizza plate. Cut and serve. Do not cut pizza on the baking pan. For best results use nylon, plastic, wooden or rubber utensils. Do not use metal utensils as they may scratch the nonstick surface. Warnings Never leave unit unattended. Pizza ingredients burn and smoke when overcooked and in extreme situations may even ignite. The amount of rising that occurs on rising crust pizzas varies from pizza to pizza. In rare instances, at the end of the cooking cycle, a rising crust may rise so high that it touches the upper heating element, scorching the crust and overcooking the pizza toppings. Either situation can be avoided simply by turning the timer dial to “0” before the overcooking/overrising occurs. Do not preheat Pizza Oven. With the Pizzazz pizza oven, no preheating is necessary. Preheating an empty baking pan may cause the unit to overheat and possibly damage the pan finish. Never wrap baking pan or any portion of the pizza oven with aluminum foil. Never operate the unit if the pan is not rotating. Close adult supervision is necessary whenever using this appliance with children present. Never touch the pizza or any metal parts on the unit while it is operating. They are very hot. Always remove baking pan from unit when baking is completed. Operating the pizza oven with an empty baking pan or placing an empty baking pan on the unit before the unit has cooled may result in damage to the baking pan finish and may also cause overheating of the unit. 3 Cooking Chart The following times are for cooking 9- to 12-inch pizzas. The times are approximate. If cooking 7- or 8-inch pizzas, you may need to reduce the cooking times by 1 to 2 minutes. When the cheese is melted and bubbling, the pizza is done. At the end of the cooking time if you would like a crispier crust, slide the switch to LOWER; if you would like the toppings more done, slide the switch to UPPER. Then reset the timer by turning it past “6” and then back to 1 or 2 minutes and cook until pizza is done to your satisfaction. To avoid overcooking, do not leave unit unattended. Approximate Type of Pizza Element Setting Cooking Time** FROZEN (9” – 12”) Regular Crust DUAL 12-15 minutes Rising Crust* LOWER then DUAL 10-12 minutes 10-12 minutes Stuffed Crust LOWER then DUAL 7 minutes 12-15 minutes Regular Crust, extra topping DUAL then UPPER 15 minutes 3-4 minutes FRESH* (9” – 12”) DUAL 11-13 minutes *You may use baking wheel or tray, if provided. **Cooking times will vary depending on household voltage. The higher the voltage the shorter the cooking time; the lower the voltage the longer the cooking time. Note: When using the Pizzazz pizza oven, the cooking times will generally be shorter than if cooking the pizza in a conventional oven. Do not leave unit unattended. Questions and Answers When I plug my pizza oven in and set the timer nothing happens. Why? 1.The baking pan may not be positioned correctly on the unit. In order for the pan to rotate and the unit to heat, the pan hub must be seated over the drive shaft (see Fig. B, page 9). Reposition the pan making sure the hub is on the drive shaft. 2.It is very likely the unit was overheated at the last use and needs to be reset. If the baking pan was placed on the unit while it was still hot, it may have caused the unit to overheat. Allow the unit to cool, if it is hot, and then press the reset button on the front of the unit. The baking pan rotates, but my pizza does not cook. Why? You have failed to turn on the timer. The timer has a dual function. Once the timer is set, the heating elements will turn on and begin cooking the pizza. When the time has expired, the timer will ring and the heating elements will shut off. My pizza does not cook evenly. What am I doing wrong? 1. If the bottom is done and the top isn’t or if the top is done and the bottom isn’t, you probably have not selected the correct setting for the type of pizza you are cooking. Refer to the cooking chart above or on back of pizza oven for recommended guidelines. Most pizzas should be cooked using the dual setting for part of the cooking time. 2.The ingredients on your pizza are not distributed evenly. If that is the case, allow the pizza to cook slightly and then redistribute the ingredients with a fork. This will allow the pizza to cook more evenly. How do I get a crispier crust or make my toppings browner? Always begin cooking your pizza using the recommended settings in the cooking chart above or on back of pizza oven. Then at the end of the recommended cooking time if you would like a crispier crust, slide the switch to LOWER; if you would like the toppings more done, slide the switch to UPPER. Then reset the timer by turning it past “6” and then back to 1 or 2 minutes and cook until pizza is done to your satisfaction. To avoid overcooking, do not leave unit unattended. When I cook rising crust pizza, sometimes the crust seems doughy or sometimes the crust doesn’t rise very much. Why? Your problem is caused by one of two things: 1. You did not follow the recommended cooking settings––cook 9- to 12-inch pizzas 10 to 12 minutes first on LOWER and then 10 to 12 minutes on DUAL. OR 2. The yeast in your pizza crust is no longer fully active. The amount of rising and the consistency of a rising crust is dependent upon the conditions of the yeast. Freshness, freezer temperatures, packaging (vacuum packaged is best), and original dough quality are all important factors. Generally, more consistent results will be secured by nationally branded pizzas since they abide by more rigorous packaging and quality standards than many regional/grocery store pizzas. 4 Can I use my Pizzazz Pizza Oven to reheat pizza or to cook other foods besides pizza? Such use is not recommended. The product was designed for cooking whole (7- to 12-inch) pizzas. Reheating less than a whole pizza or cooking other foods will not cover the baking pan the way a whole pizza does. As a result, the pan’s finish may be damaged and the product itself may overheat, necessitating a cool down and use of the reset button. Care and Cleaning 1. Always remove baking pan from unit when baking is completed. 2. Unplug pizza oven from outlet and allow entire unit to cool completely before cleaning. 3. Wash the nonstick baking pan in warm sudsy water, rinse, and dry. 4.Occasionally, wipe the exterior of the pizza oven with a damp cloth and dry thoroughly. Never immerse the pizza oven, except the baking pan, in water or other liquid. Do not wash in the dishwasher. 5. If necessary, the outer rim of the element trays may be cleaned with a nylon mesh pad to remove any food residue. Do not use steel wool scouring pads or abrasive kitchen cleansers on any part of the pizza oven. Try this quick and easy recipe with your favorite toppings for a pizza with great homemade taste. Homemade Pizza 1 loaf of frozen bread dough, thawed OR 1⁄2 (12 ounces) of Homestyle Pizza Dough Mix*. Prepare as directed. 1 ⁄2 cup commercial pizza sauce OR 1⁄2 cup tomato puree mixed with 1⁄2 Homestyle seasoning packet. ⁄2 1 1 cup of favorite toppings (see suggestions below) cup shredded part-skim milk mozzarella cheese Form bread loaf or Homestyle pizza dough into a ball; place ball in center of baking pan and roll or stretch dough to a 10 to 12-inch circle.‡ Lightly prick dough with fork. Spread pizza sauce evenly over dough. Place toppings evenly over sauce; sprinkle with mozzarella cheese. Place loaded baking pan on pizza oven and bake using the DUAL setting for 11 to 13 minutes or until cheese is melted and bubbling. If you prefer a crisp crust and have a large amount of toppings, it may be desirable to use the LOWER setting for 4 to 6 minutes before switching to DUAL for 11 to 13 minutes. *Makes two 12-inch pizzas. Second piece of dough may be frozen for future use. ‡To make baking pan more stable for rolling or stretching dough, place a kitchen towel under baking pan. Suggestions for Pizza Toppings: spicy sausage/onions/black olives spicy chicken/yellow and red pepper Canadian bacon/pineapple squash/sun-dried tomatoes pepperoni/mushrooms ham/sauerkraut spinach/onions/garlic artichoke hearts/tomatoes 5 Consumer Service Information If you have any questions regarding the operation of your Presto appliance or need parts for your appliance, call our Consumer Service Department weekdays 8:00 AM to 4:30 PM (Central Time) at 1-800-877-0441 or write: National Presto Industries, Inc. Consumer Service Department 3925 North Hastings Way, Eau Claire, WI 54703-3703 You may also email your inquiries to [email protected]. Inquiries will be answered promptly by telephone, letter, or email. When writing, please include a phone number and a time when you can be reached during weekdays if possible. Any maintenance required for this product, other than normal household care and cleaning, should be performed by our Factory Service Department or any Presto Authorized Service Station. Be sure to indicate date of purchase and a description of defect when sending an appliance for repair. Send appliances for repair to: Canton Sales and Storage Company Presto Factory Service Department 555 Matthews Dr., Canton, MS 39046-0529 Appliances may also be repaired at any Presto Authorized Service Station. Check your yellow pages for Service Stations near you. The Presto Factory Service Department and Presto Authorized Service Stations are equipped to service all PRESTO appliances and supply genuine PRESTO parts. Genuine PRESTO replacement parts are manufactured to the same exacting quality standards as PRESTO appliances and are engineered specifically to function properly with its appliances. Presto can only guarantee the quality and performance of genuine PRESTO parts. “Look-alikes” might not be of the same quality or function in the same manner. To ensure that you are buying genuine PRESTO replacement parts, look for the PRESTO trademark. PRESTO Limited Warranty This quality PRESTO appliance is designed and built to provide many years of satisfactory performance under normal household use. Presto pledges to the original owner that should there be any defects in material or workmanship during the first two years after purchase, we will repair or replace it at our option. Our pledge does not apply to damage caused by shipping. To obtain service under the warranty, return this PRESTO appliance, shipping prepaid, to the Presto Factory Service Department or to the nearest Presto Authorized Service Station. When returning a product, please include a description of the defect and indicate the date the appliance was purchased. We want you to obtain maximum enjoyment from using this PRESTO appliance and ask that you read and follow the instructions enclosed. Failure to follow instructions, damage caused by improper replacement parts, abuse or misuse will void this pledge. This warranty gives you specific legal rights, and you may also have other rights which vary from state to state. This is Presto’s personal pledge to you and is being made in place of all other express warranties. NATIONAL PRESTO INDUSTRIES, INC. Eau Claire, WI 54703-3703 U.S. Patent No. 6,125,740 and other domestic and foreign patents pending 6 Form 72-255G