1
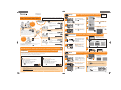
Digital Camera Model No. DMC-FX90 If you are using the Wi-Fi function for the first time STEP 1 Setup VQC8706 Camera operations Easy connection setup guide Outdoors Send your favourite still pictures or motion pictures Setting is only required the first time. Select [Easy Setup] on the camera The camera cannot be used to connect to a public wireless LAN connection. Easily send still pictures or motion pictures from your camera 1 Send images to services such as Facebook or YouTube. Connects* .................................... 1 - WEB service user registration*4 .................................... 2 See the back page Connects*1 ..................................... 3 Images sent to AV device Select still pictures or motion pictures, and send it*2 .................................................. 5 Touch [ 6 Touch [Next ]. ] ([Smartphone]). Touch [ ] to display the menu screen. Select still pictures or motion pictures, and send it*2 .................................................. Images sent to smartphone Touch [Easy Setup]. Turn the camera on and ] to set Playback touch [ Mode. Images sent to WEB service Register to “LUMIX CLUB”*1 ......................... 4 Touch [ • The SSID and encryption key of the camera are displayed. Enter the displayed details in the next . ] ([Wi-Fi Setup]). Send images to Panasonic AV device in your home. • Installation of the smartphone application “LUMIX LINK” is required. • Still pictures or motion pictures can also be sent to the WEB service via a smartphone. Refer to the “Operating Instructions for advanced features (PDF format)” for details. Connects*1 .................................... Select still pictures or motion pictures, and send it*2 .................................................. STEP 2 Connection Connect your smartphone and camera See the back page Smartphone operations Indoors Send your favourite still pictures or motion pictures 3 Images sent to PC Wireless access point (Broadband router)*3 Connects*1 .................................... Select still pictures or motion pictures, and send it*2 .................................................. Set the Wi-Fi function to ON in the settings menu of the smartphone. 1 Camera operations • If entering the encryption key takes longer than approximately 4 minutes, the To select multiple still pictures or motion pictures and send them, touch [ *3 Name will differ depending on the manufacturer. *4 Setting is only required the first time using a smartphone or a PC. See the back page ] during Playback Mode. • A message is displayed on the camera when the connection is complete. Touch [OK] twice. Select the camera ([FX90-XXXXXX]) from the displayed network name (SSID) in the Wi-Fi settings. 2 Send still pictures or motion pictures from your camera to your smartphone Step 5. camera will return to the screen in • For further details, see the instructions of your smartphone. • The “PHOTOfunSTUDIO 6.4 HD Lite Edition with Wi-Fi” software on the CD-ROM (supplied) must be installed. *1 During Playback Mode, select [Easy Setup] to change settings for the first time only. *2 To send one still picture or motion picture at a time, select the still picture or motion picture during Playback Mode and press the [Wi-Fi] button. Input the encryption key displayed on the camera. PASSWORD • Exit the menu after it is set. (Touch [ 4 ] several times.) Start the smartphone application “LUMIX LINK”. Connetion waiting... LUMIX LINK Preparation Download and install the smartphone application “LUMIX LINK” Send About the “LUMIX LINK” “LUMIX LINK” is a smartphone application provided by Panasonic to receive still pictures or motion pictures sent from LUMIX models with Wi-Fi, or to stream live to WEB services. “LUMIX LINK” is required to connect this camera and your smartphone. Download “LUMIX LINK” (available free of charge) using the method below. Send still pictures or motion pictures from your camera to your smartphone Select still picture or motion picture and send one at a time Camera operations For Android: 1 Smartphone operations 1. Connect your Android device to the network. 1. Connect the iPhone to the network. 2. Select “Android Market”. 2. Select “App Store”. 3. Enter “LUMIX LINK” into the search box. 3. Enter “LUMIX LINK” into the search box. 4. Select “LUMIX LINK” and install it. 4. Select “LUMIX LINK” and install it. ] icon will be added to the menu. • The [ • Compatible OSes (current as of August 2011) For Android: Android2.1, Android2.2, Android2.3 For iPhone: iOS3, iOS4 • The service may not be able to be used properly depending on the type of smartphone being used. For compatible devices, see the following support site. http://panasonic.jp/support/global/cs/dsc/ (This Site is English only.) • If you are downloading or transferring still pictures and motion pictures using your mobile network, you may be subject to high network usage fees under your contract. In Playback Mode, drag the screen horizontally and select an image. • Go to next image: • A message will appear when the image has been sent. Touch [OK]. The screen returns to step 3. Drag from right to left • Go to previous image: Drag from left to right ] icon will be added to the menu. LUMIX LINK Simply_Operation_FX90_EB_eng.indd 1 Touch [Yes]. For iPhone: Smartphone operations • The [ 4 • If the screen is not displayed during the sending, reconnect your smartphone. . Go to 2 Press the [Wi-Fi] button. 3 Touch [ LUMIX LINK ] ([Smartphone]). • A list of smartphones that can be connected will appear. (This may take several minutes) Touch the destination name and touch [OK]. • If still pictures or motion pictures cannot be sent, check “Message Display” and “Troubleshooting” on pages 29 to 32 of the “Basic Operating Instructions”. Sending multiple still pictures or motion pictures Touch [ • Refer to details. ]. on the back page for 2011/08/30 10:48:37 When [WEB service] is selected Send still pictures or motion pictures from your camera to WEB services, AV device or a computer 1 Setup STEP Select [Easy Setup] Camera operations 1 Registering the WEB services being used with LUMIX CLUB means still pictures or motion pictures can be sent to multiple WEB services at once. Setting is only required the first time. 4 Preparation Touch [Easy Setup]. Smartphone or Turn the camera on and ] to set Playback touch [ Mode. 2 Touch [ ] to display the menu screen. 1 5 WEB service user registration Register Setting is only required the first time. Touch the icon for the destination of the image. • Touch [ ] ([Web Service]), [ device]), or [ ] ([PC]). ] ([AV 2 • Create an account to use in the WEB service (Facebook/YouTube etc.), set aside your login information. PC operations XXXXXX@XXXXX Connect to the “LUMIX CLUB” site. Register your email address. • A registration confirmation email will be sent to the registered email address. Click the URL link included within the email. • http://lumixclub.panasonic.net/eng/c/ Login ID XXXXXXXXXXXX Password ●●●●●●●●●●●● • When selecting [AV device ], touch [Home]. 3 email address Enter the login ID and password you acquired using . 4 Select the WEB service you wish to use and register it. • Follow the on-screen instructions to carry out the registration. • Check the “FAQ/Contact us” on the following site for compatible WEB services. http://lumixclub.panasonic.net/eng/c/ • Enter the login ID using only numbers. 3 Touch [ ] ([Wi-Fi Setup]). 6 Touch [Next]. Send • Follow the on-screen instructions and make the settings. Preparation the camera to a wireless access Connection Connect point (broadband router) Select still pictures or motion pictures and send them from your camera When sending images to a [PC] Install “PHOTOfunSTUDIO 6.4 HD Lite Edition with Wi-Fi” on the CD-ROM (supplied). • Refer to the “Basic Operating Instructions” (P28) for further information on operating environments or installation. Refer to the operating instructions of “PHOTOfunSTUDIO 6.4 HD Lite Edition with Wi-Fi” (PDF) for further information on the save destination of still pictures or motion pictures sent to computers. • Turn the computer power ON. Setting is only required the first time. If you are using a wireless access point (broadband router) that supports the WPS (Wi-Fi Protected Setup) (PUSH button function)* * WPS is a function that allows connection and security related settings to be changed easily on wireless LAN devices. See the instructions of the wireless access point (broadband router) being used to check if it is compatible or not. If you are using a wireless access point (broadband router) that does not support WPS (PUSH button function), read through the “Operating Instructions for advanced features (PDF format)”. Camera operations 1 2 Press and hold down the WPS button until the wireless access point (broadband router) goes into WPS mode. Touch [WPS (Push-Button)]. • For further details, see the instructions of the wireless access point (broadband router). Select multiple still pictures or motion pictures and send them • Images saved on the built-in memory cannot be sent. Copy the pictures to a card before sending. • Exit the menu after it is set. ((Touch [ ] several times.)) 1. Touch [Search Wireless AP]. 2. Touch the wireless access point you are connecting to. 3. Enter the encryption key and touch [Set]. • To ensure reliable connection settings, it is recommended to avoid covering the Wi-Fi transmitter with your hand, and change settings near the wireless access point (broadband router). • A message is displayed when the wireless access point (broadband router) has been saved. • Refer to the “Operating Instructions for advanced features (PDF format)” for details. Touch [Send now over Wi-Fi]. Camera operations Save the selected pictures you plan to send. Select this function to send pictures later, or to use the upload 1 2 tool (LUMIX Image Uploader) to send pictures to WEB In Playback Mode, touch ]. [ • A message will be displayed on the camera when registration of the wireless access point (broadband router) is complete. Touch [OK] or [Next]. When connecting with [Search Wireless AP] 4 services. 5 Touch the picture destination icon and move it to the front. 6 Touch [List]. Touch the image you want to send (repeat). • Touch the same image again to cancel the selection. • The page can be changed by touching [ ]/[ ]. Wi-Fi Transmitter • Equipment that can be connected and a WEB service list will be displayed. • When selecting [AV device], touch [Home]. When [WEB service] is selected Setup Acquire a “LUMIX CLUB” login ID and password with the camera Setting is only required the first time. Register as a member of the “LUMIX CLUB” (free of charge). Registration allows still pictures or motion pictures to be sent to multiple WEB services via “LUMIX CLUB”. Camera operations 1 Read through the “LUMIX CLUB” terms of use and touch [Agree]. 3 Touch [Set]. • Still pictures or motion pictures can also be sent by dragging selected items upward. Touch the destination name and touch [OK]. 7 • When [WEB Service] is selected, multiple names can be selected. The selection will be cleared by touching the name again. Check the login ID, and touch [OK]. 3 • A message will appear when the connection has finished. Touch [OK]. • Exit the menu after it is set. (Touch [ ] several times.) The name of the send destination of this computer is • A message will appear when the image has been sent. Touch [OK]. “Pfs-XXXXXX”. • You can change the page by dragging the screen left or right. 2 Enter a password and touch [Set]. • Enter any combination of 8 to 16 characters and numbers for the password. • You will need your login ID and password to reset. Please be sure to take a note of them. Login ID Password Refer to the “Operating Instructions for advanced features (PDF format)” for details. Simply_Operation_FX90_EB_eng.indd 2 2011/08/30 10:48:42