1
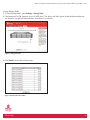
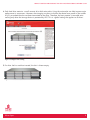
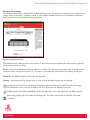
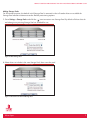
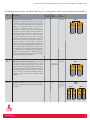
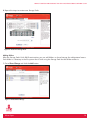
WHITE PAPER
IOMEGA® STORCENTER™ px12-350r
STORAGE PROVISIONING AND RAID MIGRATION
CONFIGURATION GUIDE
This white paper describes the flexible and advanced
storage provisioning capabilities available on an
Iomega® StorCenter™ px12-350r network storage array.
The paper includes detailed instructions to help users
provision storage and plan for RAID migration.
JUNE 2010
INTRODUCTION
1
AUDIENCE
1
TERMINOLOGY
1
STORAGE PROVISIONING
Listing Storage Pools
Managing Storage Pools
Adding Storage Pools
Adding folders
Adding iSCSI drives
3
4
6
7
12
14
RAID MIGRATION
RAID migration by adding more drives
RAID 1 migration to RAID 5
RAID 5 migration to RAID 6
15
16
17
18
CONCLUSION
19
IOMEGA STORAGE PROVISIONING AND RAID MIGRATION CONFIGURATION GUIDE
INTRODUCTION
The Iomega® StorCenter™ px12-350r network storage array offers versatile storage provisioning, advanced
protocol capabilities, expandability and affordability in an easy-to-use product ideal for small business,
workgroups and departments. Based on enterprise-class EMC® storage technology, the StorCenter px12-350r
provides quad gigabit Ethernet connections, direct or network attach, easy file sharing, iSCSI block access,
multiple RAID configurations for optimized data protection, Storage Pools for application flexibility and
expandability to match your budget. Business users will appreciate the robust data protection features such as
UPS support, print serving, Rsync device-to-device replication, and user replaceable hot swap fans, power supplies,
and drives for business continuity and disaster recovery. The easy-to-use interface, Active Directory support, and
remote access provide no-hassle management. The StorCenter px12-350r supports PC, Mac®, Linux® and UNIX
clients and is VMware® certified for NFS and iSCSI and Microsoft Windows Server 2008 R2 (Hyper-V) certified
for iSCSI.
The Iomega px12-350r allows flexible storage provisioning to offer users configuration options based on data
protection, storage utilization, and performance considerations, as well as application requirements. Disks can
be grouped into Storage Pools with or without a RAID protection level. The supported RAID data protection
types include 0, 1, 10, 5, and 6.
An existing Storage Pool with certain RAID protection types can be migrated by adding more disks while data is
online. Moreover, a Storage Pool with certain RAID types can be migrated to some other RAID types while data is
online. During the migration, the RAID group will be reconstructed but data will be continuously available,
although I/O to the Storage Pool could be significantly slowed down during the reconstruction.
This document describes the supported RAID types and storage provisioning options available on an Iomega
px12-350r, and the RAID migration paths that are permitted. The paper includes detailed instructions to help
users provision storage and plan for RAID migration.
AUDIENCE
Information contained in this white paper is intended for Iomega customers, partners, and service personnel
involved in provisioning storage on an Iomega StorCenter px12-350r network storage array.
TERMINOLOGY
RAID: Redundant Array of Independent Disks. RAID is a technology that allows high levels of storage reliability
from low-cost and less reliable disks via the technique of arranging the disks into arrays for redundancy.
JBOD: Just a Bunch Of Disks. In this mode, all disks are addressed independently with no collective properties
and the disks are concatenated to be presented as a single logical disk.
White Paper
1
IOMEGA STORAGE PROVISIONING AND RAID MIGRATION CONFIGURATION GUIDE
RAID 0: this RAID level distributes data across multiple disks in a way that gives improved speed at any given
instance. If one disk fails, however, all the data on the array will be lost, as there is neither parity nor mirroring.
RAID 0 is non-redundant. A RAID 0 array requires a minimum of two drives.
RAID 1: this RAID level mirrors the contents of the disks, making a form of 1:1 ratio real-time backup. The contents
of each disk in the array are identical to that of every other disk in the array. A RAID 1 array requires a minimum of
two drives.
RAID 5: this RAID level combines three or more disks in a way that protects data against loss of any one disk.
Fault tolerance is achieved by calculating parity and distributing parity to all disks. Distributed parity requires all
drives but one to be present to operate; drive failure requires replacement, but the array is not destroyed by a
single drive failure. Upon drive failure, any subsequent reads can be calculated from the distributed parity, such
that the drive failure is masked from the end user. The array will have data loss in the event of a second drive
failure and is vulnerable until the data that was on the failed drive is rebuilt onto a replacement drive. A single
drive failure in the set will result in reduced performance of the entire set, until the failed drive has been replaced
and rebuilt.
RAID 6: this RAID level combines four or more disks in a way that protects data against loss of any two disks.
Fault tolerance is achieved by calculating dual parity and distributing them to all disks. Distributed dual parity
requires all drives but two to be present to operate.
RAID 10 (or 1+0): this RAID type is a mirrored data set (RAID 1) which is then striped (RAID 0), hence the “10”
name. RAID 10 normally requires a minimum of four drives: two mirrored drives to hold half of the striped data,
plus another two mirrored for the other half of the data.
CIFS: Common Internet File System, also known as Server Message Block (SMB). It operates as an applicationlayer network protocol mainly used to provide shared access to files, printers, serial ports, and miscellaneous
communications between nodes on a network. It also provides an authenticated inter-process communication
mechanism. Most usage of CIFS involves computers running Microsoft Windows.
Network File System (NFS): A distributed file system providing transparent access to remote file systems.
NFS allows all network systems to share a single copy of a directory.
iSCSI: Internet Small Computer System Interface. This is a protocol for sending SCSI packets over a TCP/IP
network.
SCSI: Small Computer System Interface. Standard set of protocols for host computers communicating with
attached peripherals.
White Paper
2
IOMEGA STORAGE PROVISIONING AND RAID MIGRATION CONFIGURATION GUIDE
LUN: Logical Unit Number. Identifying number of a SCSI or iSCSI object that processes SCSI commands. The LUN
is the last part of the SCSI address for a SCSI object. The LUN is an ID for the logical unit, but the term is often
used to refer to the logical unit itself.
Storage Pool: a unit of provisioning. A Storage Pool contains a set of disk drives using a common data protection type.
Folder: on an Iomega px12-350r, a folder is a file system directory that can be accessed by hosts using file sharing
protocols, including NFS and CIFS. A folder resides in a single Storage Pool.
iSCSI Drive: on an Iomega px12-350r, an iSCSI drive is an iSCSI LUN that resides in a single Storage Pool.
SATA: Serial Advanced Technology Attachment. This is a storage interface for connecting host bus adapters to
mass storage devices, such as hard disk drives and optical drives.
STORAGE PROVISIONING
An Iomega px12-350r network storage array contains a maximum of twelve drives which can be grouped into one
or more Storage Pools. At least one Storage Pool must exist before any folders or iSCSI drives can be created.
A Storage Pool can be configured in the JBOD mode without any data protection, or be configured in one of the
supported RAID protection types. The RAID types available on an Iomega px12-350r are RAID 0, RAID 1, RAID
10, RAID 5, and RAID 6.
The Iomega px12-350r provides a graphical representation of the device enclosure, the drives, and their layout in
the enclosure. This graphical representation makes complex storage provisioning jobs much more intuitive and
easier to understand. When mousing over either a Storage Pool listed in the pool table or one of the drives
belonging to a pool, all drives in the same Storage Pool are highlighted in the graphical representation to clearly
illustrate how the Storage Pool is constructed. Faulted disks or Storage Pools are displayed with an alert icon or
with an error icon. When a Storage Pool is degraded or faulted, the Storage Pool is grayed out to prevent
modification.
In this white paper, an Iomega px12-350r device with twelve 1TB drives is used for illustration purpose.
White Paper
3
IOMEGA STORAGE PROVISIONING AND RAID MIGRATION CONFIGURATION GUIDE
Listing Storage Pools
1. To view Storage Pools, go to Settings > Storage Pools.
2. The Iomega px12-350r supports up to 12 SATA disks. The drives and their layout inside the device enclosure
are shown in a graphical representation. Each drive is numbered.
Figure 1 Storage Pools UI
3. Click Details to view drive information.
Figure 2 Detailed drive information
White Paper
4
IOMEGA STORAGE PROVISIONING AND RAID MIGRATION CONFIGURATION GUIDE
4. Each hard drive contains a small amount of on-disk write cache. Using the write cache can help improve write
performance in some cases. However, data integrity may be at risk when the device loses power in the middle
of I/O, yet cached data has not been committed to the drive. Therefore, the best practice is to enable write
caching only when the Iomega device is protected by UPS. This is a global setting that applies to all drives.
Figure 3 Configure write caching
5. If a drive slot has no drive inserted, the slot is shown empty.
Figure 4 Drive slot without a drive
White Paper
5
IOMEGA STORAGE PROVISIONING AND RAID MIGRATION CONFIGURATION GUIDE
Managing Storage Pools
The StorCenter px12-350r is ordered and shipped with four drives. By default, one Storage Pool is created using
all four drives in the RAID 5 protection mode as shown below. Additional drives can be ordered in expansion
packs but will not be constructed in any Storage Pool.
Figure 5 Array initial provisioning
Characteristics of the Storage Pool and the drives in the enclosure are displayed in the table and the graphical
representation of the enclosure.
Name – the name of the Storage Pool; by default it is called “SP1” during initial provisioning. A Storage Pool is
assigned a letter starting from capital “A”. The letter is associated with all the drives that belong to the pool.
Protection – the RAID protection level of the Storage Pool.
Capacity – total capacity of the Storage Pool; it is the sum of allocated storage and free storage.
clicking the information icon will display information relevant to the pool: space allocation and usage,
data protection, name, and a list of folders and iSCSI drives that are created in the pool.
clicking the edit icon will allow modification of the pool properties: name, data protection, and RAID migration.
clicking the garbage icon will remove the Storage Pool. The drives are released and all data in the pool
is deleted.
White Paper
6
IOMEGA STORAGE PROVISIONING AND RAID MIGRATION CONFIGURATION GUIDE
Adding Storage Pools
For illustration purpose, the default initial Storage Pool is removed so that all twelve drives are available for
Storage Pool creation to demonstrate the flexible provisioning options.
1. Go to Settings > Storage Pools and click the
icon to create a new Storage Pool. By default all drives that do
not belong to any existing Storage Pool are checked for use.
Figure 6 Add a Storage Pool
2. Select drives to include in the new Storage Pool, then name the pool.
Figure 7 Select drives for the new Storage Pool
White Paper
7
IOMEGA STORAGE PROVISIONING AND RAID MIGRATION CONFIGURATION GUIDE
3. Choose a RAID level for the Protection type. On the Iomega px12-350r, the following data protection types are
available in the Protection selection box.
Figure 8 Choose data protection type
t Double Parity (RAID 6) – the pool must contain at least 4 drives.
t Parity (RAID 5) – the pool must contain at least 3 drives.
t Mirror (RAID 10) – the pool must contain at least 2 drives.
t None (RAID 0) – the pool must contain at least 2 drives.
t None – the pool can contain one or more drives, and the drives are in a JBOD mode without data protection.
Note: the Protection dropdown box does not list RAID 1 explicitly. However, when only two drives are selected and
the RAID 10 option is chosen, the Storage Pool is effectively built into the RAID 1 mode.
White Paper
8
IOMEGA STORAGE PROVISIONING AND RAID MIGRATION CONFIGURATION GUIDE
The following table compares the different RAID levels. For more details, refer to http://en.wikipedia.org/wiki/RAID.
Level
Description
Min. #
of Disks
Space
Efficiency
Fault
Tolerance
RAID 0
Striped set without parity or Striping. Provides improved
performance and additional storage but no redundancy
or fault tolerance. Because there is no redundancy, this
level is not actually a Redundant Array of Inexpensive
Disks, i.e. not true RAID. However, because of the
similarities to RAID (especially the need for a
controller to distribute data across multiple disks),
simple stripe sets are normally referred to as RAID 0.
Any disk failure destroys the array, which has greater
consequences with more disks in the array (at a
minimum, catastrophic data loss is twice as severe
compared to single drives without RAID). A single disk
failure destroys the entire array because when data is
written to a RAID 0 drive, the data is broken into
fragments. The number of fragments is dictated by the
number of disks in the array. The fragments are written to
their respective disks simultaneously on the same sector.
This allows smaller sections of the entire chunk of data to
be read off the drive in parallel, increasing bandwidth.
RAID 0 does not implement error checking so any error
is unrecoverable. More disks in the array means higher
bandwidth, but greater risk of data loss.
2
n
0 (none)
Mirrored set without parity or Mirroring. Provides fault
tolerance from disk errors and failure of all but one of
the drives. Increased read performance occurs when
using a multi-threaded operating system that supports
split seeks, as well as a very small performance reduction
when writing. Array continues to operate so long as at
least one drive is functioning. Using RAID 1 with a
separate controller for each disk is sometimes called
duplexing.
2
RAID 1
RAID 10
Striped set of mirrors. Provides both disk replication
and data sharing by combining the benefits of RAID 0
and RAID 1.
White Paper
1
RAID 0
n/2
A2
A4
A6
A7
A8
DISK 0
DISK 1
n-1 disks
RAID 1
(size of the
smallest disk)
4
A1
A3
A5
A1
A2
A3
A1
A2
A3
A4
A4
DISK 0
DISK 1
RAID 10
RAID 0
n/2 disks,
one from
each mirror
set
RAID 1
RAID 1
A1
A3
A5
A1
A3
A5
A2
A4
A6
A2
A4
A6
A7
A7
A8
A8
9
IOMEGA STORAGE PROVISIONING AND RAID MIGRATION CONFIGURATION GUIDE
Level
RAID 5
RAID 6
Description
Min. #
of Disks
Space
Efficiency
Fault
Tolerance
Striped set with distributed parity or interleave parity.
3
n-1
1 disk
Distributed parity requires all drives but one to be present to
operate; drive failure requires replacement, but the array is not
destroyed by a single drive failure. Upon drive failure, any
subsequent reads can be calculated from the distributed parity,
such that the drive failure is masked from the end user. The
array will have data loss in the event of a second drive failure
and is vulnerable until the data that was on the failed drive is
rebuilt onto a replacement drive. A single drive failure in the
set will result in reduced performance of the entire set until
the failed drive has been replaced and rebuilt.
Striped set with dual distributed parity. Provides fault
4
n-2
Image
RAID 5
A1
B1
C1
Dp
A2
B2
Cp
A3
Bp
C2
Aq
B3
C3
D1
D2
D3
DISK 0
DISK 1
DISK 3
RAID 6
2 disks
tolerance from two drive failures; array continues to operate
with up to two failed drives. This makes larger RAID groups
more practical, especially for high availability systems. This
becomes increasingly important because large-capacity
drives lengthen the time needed to recover from the failure
of a single drive. Single parity RAID levels are vulnerable to
data loss, until the failed drive is rebuilt: the larger the drive,
the longer the rebuild will take. Dual parity gives time to
rebuild the array without the data being at risk if a (single)
additional drive fails before the rebuild is complete.
DISK 2
A1
B1
C1
A2
B2
Cp
A3
Bp
Cq
Ap
Bq
C2
Aq
B3
C3
Dp
Dq
D1
D2
D3
Eq
E1
E2
E3
Ep
DISK 0
DISK 1
DISK 2 DISK 3
DISK 4
Note: Due to parity calculation, write performance could be greatly impacted. Therefore, as a best practice, it is
recommended to create RAID 5 using at least 4 drives and RAID 6 using at least 6 drives.
Note: Typically a RAID 10 group consists of an even number of drives. On an Iomega px12-350r, RAID 10 can
be created using an odd number of drives. Each data block is repeated n times in a k-way stripe. The layout is
equivalent to the standard RAID 10 layout, but it does not require that n divides k. For example, an n2 layout on
2, 3, 4 drives would look like:
2 Drives
A1
A2
A3
A4
White Paper
3 Drives
A1
A2
A3
A4
A1
A2
A4
A5
A1
A3
A4
A6
4 Drives
A2
A3
A5
A6
A1
A3
A5
A7
A1
A3
A5
A7
A2
A4
A6
A8
A2
A4
A6
A8
10
IOMEGA STORAGE PROVISIONING AND RAID MIGRATION CONFIGURATION GUIDE
4. There could be three checkboxes associated with Storage Pool creation.
t By default, Create commonly used folders is checked to automatically create the Backups folder, Pictures folder,
and Documents folder in the Storage Pool. If the checkbox is unchecked, no folder will be created. However, this
checkbox is not presented if the folders had already been created in another Storage Pool.
t By default, Use as a default folder location is checked to assign this Storage Pool to be the default pool for folder
and iSCSI LUN creation.
t By default, Enable periodic consistency check is checked to enable RAID consistency check monthly. This
checkbox is not presented if the protection type is either RAID 0 or None.
5. Click Apply to complete the creation of the Storage Pool. The newly created pool is displayed along with the
RAID construction progress. During RAID construction, the Storage Pool cannot be modified but can be
deleted. The flashing
icon indicates that RAID construction is in progress.
Figure 9 Finish Storage Pool creation
White Paper
11
IOMEGA STORAGE PROVISIONING AND RAID MIGRATION CONFIGURATION GUIDE
6. Repeat the steps to create more Storage Pools.
Figure 10 Create more Storage Pools
Adding folders
After the Storage Pools finish RAID construction, you can add folders as shared storage for multiprotocol access.
Each folder is a directory in the file system that is built using the Storage Pool that the folder resides in.
1. Go to Shared Storage and click the Add button.
Figure 11 Create Shared Storage
White Paper
12
IOMEGA STORAGE PROVISIONING AND RAID MIGRATION CONFIGURATION GUIDE
2. Select Folder as Shared Storage Type, enter a name for the folder, and select which Storage Pool to create the folder in.
Figure 12 Create a folder
3. By default the Enable security box is checked to allow you to specify access controls to the folder. Security
configuration is out of the scope of this white paper and is skipped.
4. If the Media Server is enabled on the Iomega px12-350r, by default the Enable media sharing box is checked to
allow the media server on the Iomega px12-350r device to scan the folder for media files.
5. After the folder is created, it is listed in the Shared Storage table.
t Space Available = free space in the Storage Pool
Figure 13 List folders
White Paper
13
IOMEGA STORAGE PROVISIONING AND RAID MIGRATION CONFIGURATION GUIDE
Adding iSCSI drives
The iSCSI service must be enabled before iSCSI drives can be created. Refer to the Configuring iSCSI on the Iomega
StorCenter Pro ix4-200r NAS Server (http://download.iomega.com/com/nas/pdfs/iscsi_200r_wp_0909.pdf ) white paper
about how to configure iSCSI. This section assumes iSCSI configuration is already finished.
1. Go to Shared Storage and click the Add button.
2. Select iSCSI Drive as Shared Storage Type. Enter a name for the drive and choose the Storage Pool where the
drive is placed.
3. Specify a size for the drive; the drive size can be manually increased later.
4. By default the Enable security box is checked to allow you assign access privileges for this iSCSI drive.
Figure 14 Create an iSCSI drive
White Paper
14
IOMEGA STORAGE PROVISIONING AND RAID MIGRATION CONFIGURATION GUIDE
5. After the drive is created, it is listed in the Shared Storage table without information about Used/Available.
Figure 15 List iSCSI drives
RAID MIGRATION
Storage pools with certain RAID types can be migrated by adding additional drives while data is online. After new
drives are added, the Storage Pool will perform RAID reconstruction to include the new drives in the RAID
protection mechanism. During this process, I/O performance may be degraded.
The supported RAID migration paths by adding more drives include:
t RAID 5 l RAID 5 by adding at least one HDD
t RAID 6 l RAID 6 by adding at least one HDD
White Paper
15
IOMEGA STORAGE PROVISIONING AND RAID MIGRATION CONFIGURATION GUIDE
RAID migration by adding more drives
The procedures for migrating RAID 5 and RAID 6 Storage Pools by adding new drives are the same. In this paper,
RAID 5 migration procedure is described.
1. Go to Settings > Storage Pools and click
to migrate a RAID 5 Storage Pool.
Figure 16 Migrate a RAID 5 Storage Pool
2. Add one or more disks to the pool by checking the desired disks.
Figure 17 Add more disks to the pool
White Paper
16
IOMEGA STORAGE PROVISIONING AND RAID MIGRATION CONFIGURATION GUIDE
3. Leave the protection type as Parity (RAID 5) and click Apply. The Storage Pool is shown as being reconstructed.
Figure 18 Storage pool reconstruction
Storage pools with certain RAID types can also be migrated to certain other RAID types by adding additional drives
while data is online. After new drives are added and a RAID type is changed, the Storage Pool will perform RAID
reconstruction to change data protection mechanism and include the new drives in the protection. During this
process, I/O performance may be degraded.
The supported RAID migration paths by changing RAID types include:
t RAID1 (2-drive RAID 10 only) l RAID5 by adding at least 1HDD
t RAID5 l RAID6 by adding at least 1HDD
RAID 1 migration to RAID 5
1. Go to Settings > Storage Pools and click
to modify a RAID10 Storage Pool that contains two drives only.
A RAID 10 Storage Pool containing more than two drives cannot be migrated
2. Add one or more disks to the pool by checking the desired disks.
White Paper
17
IOMEGA STORAGE PROVISIONING AND RAID MIGRATION CONFIGURATION GUIDE
3. Change the data protection type from Mirror (RAID 10) to Parity (RAID 5) and click Apply. The Storage Pool will
be reconstructed into the new RAID type.
Figure 19 RAID 1 migration to RAID 5
RAID 5 migration to RAID 6
1. Go to Settings > Storage Pools and click
to modify a RAID 5 Storage Pool.
2. Add one or more disks to the pool by checking the desired disks.
3. Change the data protection type from Parity (RAID 5) to Double Parity (RAID 6) and click Apply. The Storage Pool
will be reconstructed into the new RAID type.
Figure 20 RAID 5 migration to RAID 6
White Paper
18
IOMEGA STORAGE PROVISIONING AND RAID MIGRATION CONFIGURATION GUIDE
CONCLUSION
The Iomega StorCenter px12-350r network storage array is a high-performance, easy-to-use, and highly reliable
storage device, specifically designed to meet the storage challenges that small- and medium-sized businesses
face daily.
The Iomega px12-350r allows flexible storage provisioning by creating multiple Storage Pools that can be protected
in a RAID. The supported RAID types include RAID 0, RAID 1, RAID 10, RAID 5, and RAID 6. Disks in a Storage
Pool can also be used as JBOD without data protection. Storage pools with certain RAID types can also be
migrated to certain other RAID types. All these happen while data is online.
Copyright © 2009, 2010 EMC Corporation. All rights reserved. EMC believes the information in this publication is accurate as of its publication date. The information is subject to change without notice.
THE INFORMATION IN THIS PUBLICATION IS PROVIDED “AS IS.” EMC CORPORATION MAKES NO REPRESENTATIONS OR WARRANTIES OF ANY KIND WITH RESPECT TO THE INFORMATION IN THIS PUBLICATION, AND SPECIFICALLY DISCLAIMS IMPLIED
WARRANTIES OF MERCHANTABILITY OR FITNESS FOR A PARTICULAR PURPOSE.
Use, copying, and distribution of any EMC software described in this publication requires an applicable software license. For the most up-to-date listing of EMC product names, see EMC Corporation Trademarks on EMC.com
All other trademarks used herein are the property of their respective owners.
Part Number XXX-XXX-XXX