1
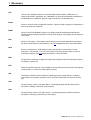
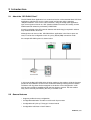
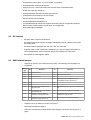
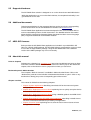
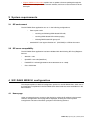
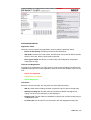
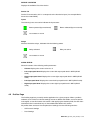
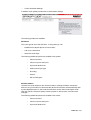
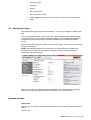
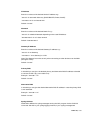
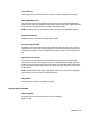
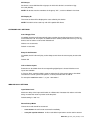
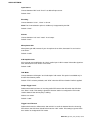
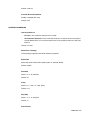
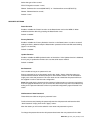
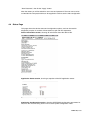
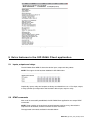
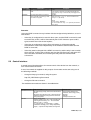
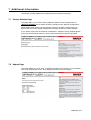
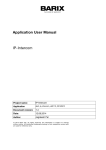
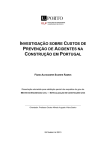
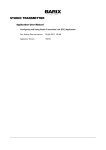
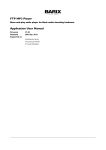
Application User Manual
Configuring and Using SIP-RAVA Client V02.12D
Table of Contents
1
Glossary...................................................................................................................................................5
CGI .................................................................................................................................................................................................. 5
DHCP ............................................................................................................................................................................................. 5
DTMF ............................................................................................................................................................................................. 5
FDX ................................................................................................................................................................................................. 5
HDX ............................................................................................................................................................................................... 5
PBX ................................................................................................................................................................................................ 5
RTP ................................................................................................................................................................................................. 5
SIP..................................................................................................................................................................................................... 5
2
Introduction............................................................................................................................................6
2.1 About the “SIP-RAVA Client”............................................................................................................................................................. 6
2.2 General features..................................................................................................................................................................................... 6
2.3 SIP features.............................................................................................................................................................................................. 7
2.4 RAVA related features.......................................................................................................................................................................... 7
2.5 Supported hardware............................................................................................................................................................................. 8
2.6 Additional documents........................................................................................................................................................................... 8
2.7 ABCL SIP firmware............................................................................................................................................................................... 8
2.8 About this manual.................................................................................................................................................................................. 8
Links to chapters.......................................................................................................................................................................... 8
Bookmarks pane in Adobe Acrobat........................................................................................................................................ 8
Chapter overview......................................................................................................................................................................... 8
3
System requirements............................................................................................................................9
3.1 SIP environment..................................................................................................................................................................................... 9
3.2 SIP server compatibility........................................................................................................................................................................ 9
4
SIP-RAVA WEB UI configuration.......................................................................................................9
4.1 Home page.............................................................................................................................................................................................. 9
4.2 Profiles Page.......................................................................................................................................................................................... 11
4.3 Configuration Page.............................................................................................................................................................................. 13
NETWORK SETTINGS............................................................................................................................................................ 13
SIP PROTOCOL SETTINGS.................................................................................................................................................... 15
CIP PROTOCOL SETTINGS................................................................................................................................................... 16
OUTBOUND CALL SETTINGS............................................................................................................................................ 17
INBOUND CALL SETTINGS................................................................................................................................................. 17
AUDIO SETTINGS.................................................................................................................................................................... 19
CONTROL INTERFACES........................................................................................................................................................ 20
SECURITY SETTINGS.............................................................................................................................................................. 21
4.4 Status Page............................................................................................................................................................................................. 22
5
Extra features in the SIP-RAVA Client application ......................................................................23
5.1 Inputs, outputs and relays.................................................................................................................................................................. 23
5.2 DTMF commands................................................................................................................................................................................ 23
5.3 Control interface................................................................................................................................................................................. 24
6
Common issues....................................................................................................................................25
6.1 SIP-RAVA client cannot initiate CIP enabled calls....................................................................................................................... 25
6.2 SIP-RAVA client can receive SIP paging for group “ALL”, but cannot initiate multiple INVITEs to that group ..........25
6.3 SIP-RAVA client sends CIP query messages even when configured in SIP Server Mode ................................................. 25
6.4 SIP call starts 2-3 seconds after the call button is pressed...................................................................................................... 25
7
Additional Information......................................................................................................................26
7.1 Factory Defaults Page......................................................................................................................................................................... 26
7.2 Update Page.......................................................................................................................................................................................... 26
Updating files............................................................................................................................................................................... 27
7.3 Updating a device using the RS-232 serial port........................................................................................................................... 27
8
Document details................................................................................................................................28
9
Legal Information................................................................................................................................28
1 Glossary
CGI
The Common Gateway Interface is a standardised method used by a Web server to
interact with specific application (ex. a database). A CGI script processes the request from
the Web server to a database, gets the output and returns it to the Web client.
DHCP
Short for Dynamic Host Configuration Protocol, a protocol used to assign an IP address to a
device connected to a Network.
DTMF
Short for Dual Tone Multiple Frequency, a signaling method developed by Bell Labs for
sending telephone dialing information over the same analog, voice-quality phones lines that
carry voice.
FDX
Short for Full Duplex. A full-duplex system allows communication between two parties to
be done in both directions simultaneously. See this Wikipedia article for more information.
HDX
Short for Half Duplex. In a half-duplex system simultaneous communication in both
directions is not possible, i.e. if one of the parties is sending, the other have to wait it to
finish before replying. See this Wikipedia article for more information.
PBX
Private Branch Exchange; a telephone system that handles the internal and external calls of
a building, company, etc.
RTP
Real time transport protocol; a layer added to the internet protocol (IP) used for transporting
media content in real-time to reduce latency issues.
SIP
The Session Initiation Protocol (SIP) is a signalling protocol, widely used for controlling
multimedia communication sessions such as voice and video calls over Internet Protocol
(IP).
UAC
SIP terminology, means “user agent client”, to indicate generally the device that start a
transaction, sending a request to a server (UAS).
UAS
SIP terminology, means “user agent server”, to indicate generally the device that start a
transaction, receiving a request from a client (UAC).
BARIX AG | sip-rava_user_manual | 5/28
2 Introduction
2.1 About the “SIP-RAVA Client”
The SIP-RAVA Client Application is a customised version of the standard Barix SIP Client
application, optimised to work in a peer to peer environment using a standard
“telephone fashion” voice over IP communication, using the widely used applicationlayer control protocol known as "SIP" (Session Initiation Protocol, RFC 3261), and the
RAVA based SIP extension provided by CRESTRON.
A basic knowledge of the SIP protocol features and terminology is required in order to
fully understand this document.
Although the main focus of the SIP-RAVA Client application is the Peer to peer use
case, it can be also configured to work in a proxy based (PBX) connection mode.
An example SIP-RAVA system is shown below:
Illustration 1: SIP-RAVA System Overview
In this case the Barix SIP-RAVA client is being used as a door-station, while the Crestron
panels can be installed in several rooms around the building. Pressing the door-station
call button will ring those devices assigned to the device via its configuration. A SIP
peer-to-peer call will be established with the first device to answer. The door-station
relay can be remotely activated by the entry of a DTMF code.
2.2 General features
• Supports profiles for easy configuration
• Configurable destination number to call for each input contact
• Configurable call “pick up”/”hang up” timeout interval
• Configurable “call/close on level” feature
BARIX AG | 6/28
• Configurable “peer to peer” or “proxy based” connections
• Configurable SIP and audio RTP ports
• Support for G.711 and G.722 audio with Acoustic Echo Cancellation (AEC)
• DTMF door open key sequence
• Configurable relay activation at call answer/call ring
• Configurable use of beep tone on call answer
• Serial and CGI control interface
• Profile based WEB configuration UI
• 10/100 Mbit Ethernet connection supports automatic network configuration (BOOTP,
DHCP, IPzator, and as well as manual static IP configuration)
• Syslog debugging messages.
2.3 SIP features
•
SIP (RFC 3261) compliant architecture:
•
Processed methods and status messages: REGISTER, INVITE, CANCEL, BYE, INFO
(for DTMF), ACK
•
Processed status messages:180, 200, 401, 403, 407, 503, 603
•
Supports Peer to Peer mode which enables any two SIP user agents (UAS/UAC) to
communicate directly with one another without the mediation of a SIP server
•
Can register to a SIP Registrar (PBX)
2.4 RAVA related features
•
Support for Crestron over Internet Protocol (CIP). The following CIP messages are
supported:
Message
type
RX
RX Action
TX
TX Action
0x14
Yes Reply with 0x15
No
0x15
No
Yes
0x16
Yes Reply with 0x16
No
0x17
No
Yes
0x18
No
No
0x19
No
No
0xA6
Yes Check if its ID is requested, and
reply with 0xA7
Yes
Broadcast this query to get the IP to start a SIP
call
0xA7
Yes If in reply of its own 0xA6 request,
then start SIP call
Yes
Sent in response of received 0xA6 query
0xA8
Yes Check if its own SIP group is
requested, and reply with 0xA9
Yes
Broadcast this query to collect info about all
locations it is trying to reach
0xA9
Yes Build IP table (max 8) of all locations,
and start a group INVITE to all
Yes
Sent in response of received 0xA8 query
Sent in response of 0x14
Sent in response (unicast) of 0x16, and
broadcasted 3 times at device boot
•
Supports CIP IP_ID Tables of maximum 8 entries
•
Receiving SIP Multicast paging
•
SIP Group call (sending multiple INVITE SIP messages, one active call only) up to 8
peers
BARIX AG | sip-rava_user_manual | 7/28
2.5 Supported hardware
The SIP-RAVA Client solution is designed to run on the Annuncicom 200-RAVA device.
While the application may run on other Barix devices, its complete functionality is not
guaranteed in such a case.
2.6 Additional documents
Technical specifications for the supported devices can be found in the corresponding
product sheet which can be downloaded from the Barix site www.barix.com.
The SIP-RAVA Client Application has been developed in BCL and is available with its
source code enabling users to further customise it. For detailed technical information
about the BCL programming language please download the “Barix Control Language
(BCL) Programmers Manual” from the Barix website.
2.7 ABCL SIP firmware
Barix provides the SIP-RAVA Client application as included in a pre-built ABCL SIP
(abcl_sip_vXX.XX_DATE) package. The SIP-RAVA Client is guaranteed to work only when
it is run with its original ABCL package. Using the SIP-RAVA Client with a different
version of the ABCL package may not work correctly.
2.8 About this manual
Links to chapters
References to chapters (e.g. X Chapter name) are red and underlined and serve as direct
links when viewed in Adobe Acrobat Viewer. Click on the link to jump to the referenced
chapter, click on the left arrow icon to jump back to where you came from.
Bookmarks pane in Adobe Acrobat
The complete “Table of Contents” is available in Adobe Acrobat Viewer. Click on the
“Bookmarks” pane tab on the left side of Adobe Acrobat Viewer to open it. Click on any
bookmark to directly jump to the corresponding part of the manual.
Chapter overview
This manual is divided into the following chapters:
• Chapter System requirements describing some basic SIP environment and system
configurations.
• Chapter Error: Reference source not found explaining how to quickly set up the device
for use with the SIP client.
• Chapter Error: Reference source not found giving a detailed guide for the WEB UI SIPRAVA Client configuration.
• Chapter Extra features in the SIP-RAVA Client application describing in details how to
use some of the advanced features provided by the application.
• Chapter Common issues explaining how to solve the most common issues to have
the application working.
BARIX AG | 8/28
• Chapter Additional Information explain how to update a firmware package through the
WEB UI, how to setup the device network interface, and how to rescue a device via the
serial port
3 System requirements
3.1 SIP environment
The SIP-RAVA Client application can run in the following configurations:
•
•
Peer to peer mode:
–
receiving and initiating RAVA based SIP calls;
–
receiving RAVA based SIP multicast paging
–
initiating RAVA based SIP group call
standard SIP “user agent client/server” (UAC/UAS) in a PBX environment.
3.2 SIP server compatibility
The SIP-RAVA Client application has been validated with the following SIP Proxy/Registrar
Servers:
•
Asterisk 1.4.29
•
OpenSER 1.3.2-notls (i386/linux)
•
FreeSWITCH 1.0.head (git-00207ce 2010-09-30 02-37-57 -0400)
•
Cisco CUCM 8.6
4 SIP-RAVA WEB UI confi guration
This chapter explains in detail all configuration options for the SIP-RAVA Client, basic use of
the application is explained in the SIP-RAVA Quick Start Guide document available from the
Barix website.
4.1 Home page
Using an Internet browser, connect to the device by writing the IP address in the browser
URL bar, the application home page will be displayed, showing the most important
configuration and status information grouped in the following sections:
BARIX AG | sip-rava_user_manual | 9/28
Illustration 2: SIP-RAVA Home Page
APPLICATION STATUS
Application mode
Shows the current mode of the application, and may take the following values:
•
Device is still booting: The Boot process has not finished yet
•
SIP mode: The device is in SIP mode. The SIP server name, and the SIP ID are also
shown in this case. Direct IP (P2P) calls are ignored
•
Peer to peer mode: The device is in P2P mode, and configured to accept and
make direct IP calls
Time till next Registration
If the device is configured to use a SIP server it will show the remaining time till the next
registration attempt. The current registration status is shown with different colours of the
text:
•
Device not registered
•
Registration in progress
•
Device Registered
Call Status
Shows the current call state, and may take one of the following values:
•
Idle: No audio stream is being received, and the SIP client is able to accept calls;
•
Getting incoming call: The SIP client has received an INVITE message and is
ringing. The ID of the remote party is also displayed;
•
Outgoing call: The SIP client has initiated an outgoing call, and the remote party ID
is displayed as well;
•
In active call: The SIP client is in a call session with the displayed remote party.
BARIX AG | 10/28
DEVICE I/O STATUS
Displays the available I/Os of the device.
Device I/O
Device I/O enumeration; bit "0" corresponds to the first device input ( for example IN0 for
Annuncicom 200-RAVA).
Inputs
The following icons are used to indicate the inputs state:
Button pressed (input activated)
Button released (input not active)
Not available on the HW
Relays
Monitors the device relays, indicated with the following states:
Relay activated
Relay not active
Not available on the HW
AUDIO STATUS
Shows the status of the following audio parameters:
•
Volume: Displays the current volume in %
•
Left output peak level: Displays the current left output peak level in dBFS (dB full
scale)
•
Right output peak level: Displays the current right output peak level in dBFS (dB full
scale)
•
Left input peak level: Displays the current left input peak level in dBFS (dB full scale)
•
Right input peak level: Displays the current right input peak level in dBFS (dB full
scale)
4.2 Profiles Page
The Profiles page lets you easily set the application for a given purpose. When a profile is
selected, some of the non relevant settings are set to default and hidden, and some are left
unchanged, so use this feature with caution. After applying the desired profile, the SIP client
should be further customised only for those fields described in this section.
All profiles allow access to the complete set of settings from the following sections:
•
SIP Protocol Settings
•
Door Settings
BARIX AG | sip-rava_user_manual | 11/28
•
Control Interfaces Settings
In addition, each profile provides extra customisation settings.
Illustration 3: SIP Client Profiles page
The following profiles are available:
SIP Phone
This is the typical use of the SIP client. In this profile you can:
•
Establish a full-duplex phone communication;
•
Call up to 2 extensions
•
Select the audio input
The following additional options are enabled in this profile:
–
Close on timeout
–
Close on Input 0 and Input 1
–
Input audio buffer level
–
Audio source input type
–
Encoding
–
Volume
–
Mic and A/D gains
SIP Door Station
The device is to be used as a door intercom station. Pushing the button causes the
device to ring. If the call is not answered the device will close the call automatically after
a preconfigured timeout. In this mode the SIP client can be used in half duplex mode
with door panels. The phone pickup mode is preset to “auto answer” and cannot be
changed.
The following additional options are enabled in this mode:
–
Close on timeout
–
Close on Input 0 and Input 1
–
Input audio buffer level
BARIX AG | 12/28
–
Audio input type
–
Encoding
–
Volume
–
Mic and A/D gains
–
Talk mode (HDX or FDX)
–
Output trigger level and trigger level timeout for the Voice Activity Detection
(VAD)
4.3 Configuration Page
The configuration page consists of several areas - for the menu navigation, settings, and
help.
The menu navigation section contains two parts - Basic and Advanced. While the Basic
menu shows only the most essential settings needed to initially configure the application,
the Advanced menu gives access to all settings available for the selected application
profile.
When the required changes have been made, click the “Apply” button to save the changes.
The device will reboot
NOTE: The changed settings are not preserved if you switch between the Basic and
Advanced menus. Make sure you apply the changes you have already done before
switching to the other submenu!
Illustration 4: SIP Client Advanced Configuration page
Below is the full list of configuration options available in the Advanced menu. Please be
aware that not all of them may be visible, depending on your selected profile.
NETWORK SETTINGS
Use SonicIP
If set to "yes", the device will announce its IP address over the audio output during device
startup.
Default: "yes"
BARIX AG | sip-rava_user_manual | 13/28
IP Address
Enter the 4 values of the desired device IP address e.g.:
"0.0.0.0" for automatic discovery (DHCP/BOOTP, IPzator, AutoIP)
"192.168.0.12" for an internal LAN
Default: "0.0.0.0"
Netmask
Enter the 4 values of the desired Static IP e.g.:
"0.0.0.0" for a default Netmask depending on the used IP Address.
"255.255.255.0" for a C class network
Default: "255.255.255.0"
Gateway IP Address
Enter the 4 values of the desired Gateway IP address e.g.:
"0.0.0.0" for no Gateway
"192.168.0.1" for a Gateway in a LAN
Note: The Gateway has to be set only when connecting to other devices over the WAN
(through a router).
Default: "0.0.0.0"
Primary DNS
In this field you can give the desired primary and alternative DNS IP address to be able
to connect to URLs (e.g. www.radio.com).
Example: "195.186.1.111"
Default: "0.0.0.0"
Alternative DNS
In this field you can give the desired alternative DNS IP address in case the primary DNS
is not reachable.
Example: "195.186.4.111"
Default: "0.0.0.0"
Syslog Address
Destination address for syslog messages sent by the BCL program via the SYSLOG
command. Set this to your syslog logging machine, if your syslog messages are
BARIX AG | 14/28
recorded centrally.
If set to 0.0.0.0, syslog messages are broadcast.
Default: "0.0.0.0"
DHCP Host Name
Name of the device to be sent in the DHCP requests. If left empty, the device will use
internally an automatically generated name based on its MAC address (this one will not be
displayed to the user). Enter up to 15 characters.
Web Server Port
Defines the port where the web server of the device can be reached. If set to "0" the default
HTTP port (80) is used.
SNMP System Name
SNMP MIB entry for system name (system.sysName.0)
SNMP System Location
SNMP MIB entry for system location (system.sysLocation.0)
SNMP System Contact
SNMP MIB entry for system contact (system.sysContact.0)
This parameter can be queried using any SNMP browser but can not be updated.
SIP PROTOCOL SETTINGS
Peer to Peer
Choose whether peer to peer calls should be allowed.
SIP Server (PBX) / Remote Peer
Enter either the hostname/IP address of a SIP server, or of the remote peer.
SIP ID
Enter the SIP ID (username) that has been created for this device.
SIP Password
Leave this field empty if the PBX doesn't require authentication.
Listen SIP Port
Listening port for the SIP protocol messages. A value of 0 means a default value of 5060.
BARIX AG | sip-rava_user_manual | 15/28
Listen RTP Port
Listening port for the RTP audio blocks. A value of 0 means a default value of 5004.
Default REGISTER Time
The value that the SIP client suggests to the SIP server when sending the REGISTER
request. If this value is accepted by the SIP server, the SIP client has to register after this
amount of time. Allowed values in the range of 60-3600 seconds.
NOTE: The SIP server may overwrite this value in its reply to the REGISTER request.
Send NAT-Keepalives
Enable this function if the device resides behind a NAT.
Periodically Renew DNS
If enabled, it will force the SIP client to renew the DNS of the SIP server every time the
registration to the server fails. Use this feature if you have a backup SIP server with the
same DNS name and you wish to enable the SIP client to switch to it if the main server
fails.
Registration Fail Timeout
The SIP client will automatically resolve the DNS of the SIP server if the REGISTER
request fails. However, if the SIP server is down, or the REGISTER message gets lost,
the SIP client will not get a reply from the SIP server. Use this field to set a timeout after
which the registration will be assumed to have failed if no reply has been received from
the SIP server.
NOTE: Use this feature with caution. Setting this value too low may result in registration
malfunctioning. If unsure, leave it to the default value.
Debug Mode
Sends received or sent SIP messages via Syslog.
CIP PROTOCOL SETTINGS
CIP Port Number
Set here the port to send and receive CIP control messages.
Default: 41794
BARIX AG | 16/28
SIP Groups
Set here a comma delimited list of groups in which this device is a member of (eg.
ALL,LAB_DOOR).
NOTE: All devices must be members of the group "ALL", so do not delete it from here.
SIP Display ID
The name set here will be displayed to users called by this device.
NOTE: This field can be used only with CIP capable SIP clients.
OUTBOUND CALL SETTINGS
Auto Hangup Time
If enabled, the device will automatically hang-up after the configured amount of time if no
one answers the call. This option is suitable for door station panels that have only one ring
button, and no button to cancel the initiated call.
Values: 5 to 30 seconds.
Default: 15 seconds
Beep On Call Answer
If enabled, the SIP client will play a short beep sound when the remote party answers the
call.
Default: Off
Call on Device Inputs
Extensions to be called when the corresponding digital input is closed. Maximum two
inputs are available.
In "Peer to Peer" mode this field is used to assign the IP of the remote peer to be called.
This field can contain just remote peer ID, or the IP preceded with its call ID.
For example “[email protected]”, or just “192.168.0.1”
INBOUND CALL SETTINGS
Input Buffer Level
Maximum delay of the input audio buffer in milliseconds. Decrease this value to minimize
delay, increase this value to prevent audio dropouts.
Default setting is "300" ms.
Phone Pickup Mode
Choose how calls should be answered:
•
auto-answer: the call is auto-answered immediately.
•
auto-pick-up after timeout: in this mode either input button can be used to answer
BARIX AG | sip-rava_user_manual | 17/28
and terminate the call. If the call is not answered inside the "Pick/Hang up After"
time period, the device will auto answer the incoming call.
•
auto-hang-up after timeout: (default) in this mode the input button is used to
answer and terminate the call. If the call is not answered inside "Pick/hang up after"
time period, the device will decline the call.
•
not callable: in this mode incoming calls will be declined.
Pick/Hang up After
This field sets the timeout delay used to auto-pick-up, or auto-hang-up, depending upon
the Phone Pickup mode.
Stream Timeout
In some scenarios the remote party may go offline without explicitly closing the active
call. In this case the SIP-RAVA client may stay in an active call state for an unlimited
amount of time. Set here the time in minutes after which the SIP client will close the
active call if there is no audio stream received. You can change between 0 and 600
minutes.
Beep On Call Answer
If enabled, the SIP client will play a short beep sound when the incoming call is
answered.
Default: Off
Door Open Code
Set the secret code to open the door by entering this DTMF sequence while
communicating with the device. When the sequence is detected from the remote peer,
the first relay contact is closed. Leave it empty to disable this functionality.
Open Door Relay for
Set the contact closure duration. After this period, the relay contact is switched back to
open.
Enable Relay
Select here when you would like to have the relay enabled.
Options are: "on door open command" (default), “on call answer”, “on incoming ring”
BARIX AG | 18/28
AUDIO SETTINGS
Input Source
Choose between “Mic” and “Line in” as desired input source.
Default: "Mic".
Encoding
Choose between "uLaw", "aLaw" or G.722.
Note: The G.722 selection option is visible only if supported by the HW.
Default: "uLaw".
Volume
Choose between "0%" and "100%" in 5% steps.
Default: "50%".
Microphone Gain
Microphone gain dB, increase if your microphone is too faint, decrease if it's too loud or
over-driven.
Default: "21dB"
A/D Amplifier Gain
A/D converter pre-amplification for Line-in audio input in dB. Increase if the audio signal too
faint, decrease if it's too loud or over-driven.
Default: "0dB"
Talk Mode
Choose between “full-duplex” and “half-duplex” talk mode. This option is available only in
the SIP Door Station profile.
Default: "FDX" at factory defaults, and "HDX" when the SIP Door Station Profile is applied.
Output Trigger Level
Defines the audio level from an incoming audio RTP stream that will switch the SIP client
into "listen" mode. This setting is ignored if the door station is configured in FDX mode.
Used to detect if the remote party is talking.
Values: 0 to 32767.
Default: "1000"
Trigger Level Timeout
Defines the timeout in milliseconds, after which if no audio is detected from the incoming
RTP stream, the SIP Client should switch back to "talk" mode. This setting is ignored if the
door station is configured in FDX mode.
BARIX AG | sip-rava_user_manual | 19/28
Default: "200 ms"
Acoustic Echo Cancellation
Enable or disable AEC here.
Default: "Off"
CONTROL INTERFACES
Use Serial Port For
•
No use: In this mode the serial port is not used.
•
Serial Control Interface: In this mode the serial port is used to send commands to
the SIP-RAVA client. For more information how to use it please refer to the SIP User
Manual.
Default: "No use"
Serial Port 1 Settings
These settings adjust the first serial interface properties.
Baud Rate
Select the serial transmission speed ("300" to "230400" Baud).
Default: "9600"
Data Bits
Select "7" or "8" data bits.
Default: "8"
Parity
Select "no", "even" or "odd" parity.
Default: "no"
Stop Bits
Select "1" or "2" stop bits.
Default: "1"
Flow Control
BARIX AG | 20/28
Select the type of flow control:
RTS/CTS signals not used: "none";
RS232: "Software flow control(XON/XOFF)" or "Hardware flow control (RTS/CTS)";
RS485: "RS485 direction control";
Default: "none".
SECURITY SETTINGS
Reset Function
Enable or disable the "Reset" function on the Reset button and on the WEB UI. When
enabled restart the device by pressing the Reset button once.
Default: "enabled"
Factory Defaults
Enable or disable the "Factory Defaults" function on the Reset button. In order to revert all
settings to factory defaults keep the Reset button pressed until the red LED starts blinking
(approx. 10 seconds).
Default: "enabled"
Update Function
Enable or disable the WEB Update function of the device. If the Update function is disabled,
the only way to update the firmware is to use the serial rescue method.
Default: "enabled"
Set Password
This is visible as long as no password is set.
Enter a password (up to 25 characters) and hit the "Apply" button. After the restart you
should close the browser window and open a new browser window. You will be asked to
supply user name and password. The user name can be omitted but the password has to
be supplied in order to see the web configuration.
Note: After applying the changes for the password, please restart your browser and reload
the home page of the device. If you do not do this, the browser may enter into endless loop
asking for the password because of the non protected configuration page still stored in its
cache.
Old Password / New Password
These fields are visible as long as a password is set.
To allow free access (clearing the password) enter the old password and leave the field
"New Password" empty, then hit the "Apply" button.
After the restart you will not be asked for user name and password anymore.
To change the password enter the old password and enter the new password in the field
BARIX AG | sip-rava_user_manual | 21/28
"New Password", then hit the "Apply" button.
After the restart you will be asked for user name and password. The user name can be
omitted but the new password has to be supplied in order to see the web configuration.
4.4 Status Page
This page shows the device status and configuration options, and can be used for
diagnostic purpose. It consists of three sections, split with line separators:
Device Information section, showing all information about the device HW:
Illustration 5: Device status page
Application Status section, showing a snapshot of the SIP application status:
Illustration 6: SIP-RAVA Client application status page
Application Configuration section, showing all EEPROM configuration parameters for
SIP, even the ones not being shown in the current profile configuration menu:
BARIX AG | 22/28
Illustration 7: SIP Client EEPROM settings status page
5 Extra features in the SIP-RAVA Client application
5.1 Inputs, outputs and relays
The SIP-RAVA Client WEB UI shows the device input, output and relay states.
NOTE: The support for X8 has been disabled in SIP-RAVA client
Graphically, inputs, relays and outputs are always numbered from 0 to 7. First input, output,
or relay (number 0) corresponds to the first Barix device input, output or relay.
5.2 DTMF commands
After a call is successfully established, the SIP-RAVA Client application can accept DTMF
commands.
NOTE: There must be no longer that 5 seconds between each key entry, otherwise the
sequence will be cleared, and the command must be re-entered.
The supported commands are listed in the table below:
BARIX AG | sip-rava_user_manual | 23/28
Command
Description
NNNN
Web UI configured DTMF door open
code.
#2*NNN*
Set relays state, NNN is the decimal
value (0 to 255), representing an 8 bit
bit-mask, to be applied.
Examples
1234
if the sequence match the preconfigured Web UI door
open code, the relay is closed for the preconfigured time
period.
#2*255*
255 mean binary “11111111” so the command set all
relays to “1” (all closed).
#2*2*
2 mean binary “00000010”
so the command set relay “1” to 1(closed) and all other
to 0 (open).
Remarks:
Using the DTMF command 2 may interfere with the configured relay behaviour, so use it
with caution:
•
If the relay is configured to be used for door open, and the DTMF command is used
to set the relay to ON, it will be automatically set to OFF if the door open code is
typed, and the door lock timeout expires;
•
If the relay is configured to switch ON at call answer, it will be automatically
switched OFF at call close independently of the whatever state has been set with
DFMF 2 command;
•
If the relay state is changed with a DTMF command 2, and the relay is set to switch
ON at call ring, it will be set to ON the next time the SIP client rings, and set to OFF
when the call is answered, thus overriding the relay state set with the DTMF
command 2.
5.3 Control interface
A special control interface allows for remote control of the device from the network, or
from a serial cable connection.
A set of commands is supplied for this purpose. Commands can be sent using one of
the following methods:
•
through an http cgi command, using the syntax:
http://IP_DEST/basic.cgi?command
•
through an RS-232 command
The available commands are shown in the table below.
Command
D[H][S]XXXX<CR>
Q<CR>
Description
Dial command,
[H] means high priority, XXXX is the SIP extension
to call.
[S] means stop the active call. In this case all the
remaining characters (if any) from the command
string are ignored
Query device status,
returns “UID,Sc,ii,oo,rr<CR>” with UID being the
UserID (phone number), “Sc” - the connection
state (0 = idle, 1 = calling,
2 = incoming call, 3 = connected, 4 = getting
notification message), ii,oo,rr being respectively
inputs , outputs and relays states as 2 digit hex
Examples
DH1001<CR>
the command dial the 1001
extension, with an high priority
[H] level.
DS<CR>
will stop the active call.
BARIX AG | 24/28
Command
Xhhhh<CR>
XS
Description
numbers.
Send data to serial port 1, as hex string (2 digits per
byte).
If this command is received over UDP or TCP, the
data received at the serial port will be forwarded as
Xhhhhhh<CR> to the same interface.
Examples
X148454c4c4f<CR>
Send an “HELLO” ascii string as
hexadecimal values through
serial port 1.
NOTE: no streamback for serial and CGI is
available. This command works only if the selected
serial port is not already used by accessories such
as X8, and if it is not issued from the SERIAL control
channel.
Stops the serial bridge, started by a previous X
command.
6 Common issues
6.1 SIP-RAVA client cannot initiate CIP enabled calls
The SIP-RAVA client does not support limited broadcast (sending to address
255.255.255.255), but only local broadcast. Make sure that the Barix SIP-RAVA client and
the remote RAVA capable SIP client reside on the same subnet.
6.2 SIP-RAVA client can receive SIP paging for group “ALL”, but cannot initiate
multiple INVITEs to that group
Check that the group name “ALL” has not been removed from the SIP Groups field in the
CIP PROTOCOL SETTINGS section. If this is the case add it to the SIP groups list
6.3 SIP-RAVA client sends CIP query messages even when configured in SIP Server
Mode
The SIP client sends a CIP SIP QUERY, or CIP SIP GROUP QUERY messages before
initiating the SIP call to find the IP addresses corresponding to the SIP IDs it is trying to
reach. This is a must for the SIP-RAVA client to work correctly in RAVA compliant P2P
mode, but not needed in standard SIP server mode. To prevent the SIP-RAVA client from
sending CIP query messages in this case set the CIP Port from the CIP PROTOCOL
SETTINGS to 0
6.4 SIP call starts 2-3 seconds after the call button is pressed
The SIP-RAVA Client performs a CIP discovery of all RAVA compatible devices before
sending a SIP INVITE to the discovered devices. This procedure may take 2-3 seconds
which delays the actual call start.
BARIX AG | sip-rava_user_manual | 25/28
7 Additional Information
This section contains details about operational and maintenance features:
7.1 Factory Defaults Page
This page helps you to revert to factory default if needed. To do so please click on
"Revert to defaults" link to restore all factory settings except "Network configuration".
While restarting the device a screen appears showing a number counting down. On
device start up a screen appears stating the successful reverting to factory defaults.
If you need to revert also the "Network configuration" settings to factory defaults please
press and hold the Reset button for about 10 seconds while the device is powered.
Illustration 8: Factory Defaults page
7.2 Update Page
This page enables you to do a full, or partial FW update of your device. For more details
how to do it please refer to the Error: Reference source not found chapter.
Illustration 9: SIP-RAVA Client FW Update Page
BARIX AG | 26/28
Updating files
Click on "Please click here to continue" to launch the update process. Please have in
mind that the update process can ONLY be cancelled by power cycling the device.
The device will display a countdown, and then restart in a special mode called
“Bootloader”.
Note: In this mode the standard http port 80 is always used.
To upload a resource click on "Browse..." to locate the file you want to update. Once
selected, click on "Upload".This upload process can take a few seconds.
After a successful upload the following text appears:
If you choose "update" you may upload another resource or click the "reboot" button.
If you choose to reboot the following text appears:
The device takes a few seconds to reboot. If you have a fixed IP address or DHCP resolves
to the IP address used before, the main page will appear.
7.3 Updating a device using the RS-232 serial port
Sometimes when the device is not accessible via the LAN, or the image in the flash memory
is corrupted for some reason, then a serial rescue may be needed to reset the device to the
factory defaults.
The steps to do a serial rescue:
▪
Disconnect the power from the device
▪
Connect the COM port of the device to the COM port of your computer via a null
modem serial cable
▪
Open a terminal in the update_rescue directory in your unzipped copy of the ABCL
SIP firmware. If using Linux or Mac, switch to update_rescue/linux or
update_rescue/mac directory
▪
Start the rescue process by executing ipamresX, where X is the number (1-4) of
the serial port on the computer
▪
If running on Linux /Mac execute the ipamresd.sh script, giving the device name of
your COM port as a parameter. For example:
./seriald.sh /dev/tty.UC-232AC
▪
Power on the device, and wait for the update to finish. The device will reboot
automatically.
NOTE: All other settings except the network settings will be lost !
BARIX AG | sip-rava_user_manual | 27/28
8 Document details
Document Name:
Application User Manual
Document Date:
09. Jul. 2013
Document Version:
1.02
Product Name / Version
SIP-RAVA Client / V02.12D
DOCUMENT REVISION TABLE
Date
Version
Who
Change
05/11/2012
1.00
ASI
Created the first draft
07/03/2013
1.01
ASI
Adapted for v2.12c and converted to the new template
04/07/13
1.02
ASI
Added SIP-RAVA System diagram and fixed all references to Annuncicom
100 to Annuncicom 200
9 Legal Information
© 2013 Barix AG, Zurich, Switzerland.
All rights reserved.
All information is subject to change without notice.
All mentioned trademarks belong to their respective owners and are used for reference
only.
Barix and SIP-RAVA Client are trademarks of Barix AG, Switzerland and are registered in
certain countries.
RAVA is a trademark of Crestron Electronics, Inc.
For information about our devices and the latest version of this manual please visit
www.barix.com.
Barix AG
Seefeldstrasse 303
8008 Zürich
SWITZERLAND
T
F
+41 43 433 22 11
+41 44 274 28 49
www.barix.com
[email protected]
[email protected]
BARIX AG | 28/28