1
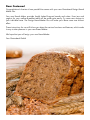
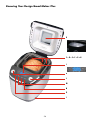
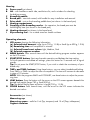
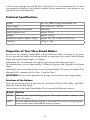
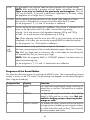
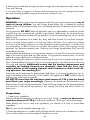
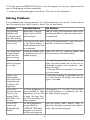
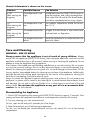
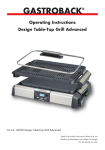
Operating Instructions
Design Bread Maker Plus
Art.-Nr. 42820 Design Brotbackautomat Plus
Read all provided instructions before first use!
Model and attachments are subject to change!
For domestic use only!
Carefully read all provided instructions before you start running
the appliance and pay attention to the warnings mentioned in
these instructions.
Table of Contents
Knowing Your Design Bread Maker Plus.................................................................36
Important Safeguards...........................................................................................38
General Safety Instructions................................................................................38
Important Safeguards for Electrical Appliances.....................................................40
High Temperatures – Risks of Burns.....................................................................40
Moving Parts – Risks of Injuries..........................................................................41
Non-Stick Coating............................................................................................41
Technical Specifications........................................................................................42
Properties of Your New Bread Maker.....................................................................42
Functions of the Buttons.....................................................................................42
Programs of the Bread Maker............................................................................43
Program Schedule............................................................................................44
Warming Function............................................................................................45
Memory Function.............................................................................................46
Using the Timer................................................................................................46
Tips for Best Results..............................................................................................46
Before First Use...................................................................................................47
Operation..........................................................................................................48
Preparations....................................................................................................48
Starting the Baking Program..............................................................................49
Applying Some Additional Baking Time...............................................................51
Taking out the Bread.........................................................................................51
Preparing Yoghurt............................................................................................52
Solving Problems.................................................................................................53
Care and Cleaning..............................................................................................54
Disassembling the Appliance.............................................................................54
Cleaning the Appliance....................................................................................55
Reassembling the Appliance..............................................................................55
Storage..............................................................................................................56
Notes for Disposal...............................................................................................56
Information and Service.......................................................................................56
Warranty...........................................................................................................56
Recipes..............................................................................................................57
Dear Customer!
Congratulations! A series of new possibilities comes with your new Gastroback Design Bread
Maker Plus.
Your new Bread Maker provides freshly baked fragrant breads and cakes. Even jam and
yoghurt for your well-set breakfast table will be made quite easily. Try some new recipes to
your individual taste. The Design Bread Maker Plus will make your ideas come true without
effort.
These instructions for use will inform you about the various functions and features, which make
it easy to take pleasure in your new Bread Maker.
We hope that you will enjoy your new Bread Maker.
Your Gastroback GmbH
Knowing Your Design Bread Maker Plus
B
C+D+E+F+G+H
J
K
L
M
N
O
I
36
Housing
A
B
C
D
E
F
G
H
I
Power cord (not shown)
Lid – with handles on each side, ventilation slits, and a window for checking
the baking process
Kneading paddle
Bread pan – non-stick coated, with handle for easy installation and removal
Drive shaft – put on the kneading paddle here (not shown in the bread pan)
Heating compartment
Coupling of the kneading works – for operation, the bread pan must be
locked tightly here (not shown in the bread pan)
Heating element (not shown in the bread pan)
Slip reducing feet – for a stable stand on smooth surfaces
Operating elements
J
K
L
M
N
O
LCD screen showing the following information:
(a) Selected total amount: Large (up to 750 g, 1.5 lb) or Small (up to 500 g, 1.0 lb)
(b) Remaining time until completion in minutes
(c) Selected bread crust colour: Light, Medium, Dark
(d) Selected program number
MENU button: Press several times until the desired baking program number appears
on the LCD screen.
START/STOP button: Starts and cancels operation and deletes the timer setting.
To finish operation and delete all settings, press this button for 2 seconds until a signal
sounds.
Tip: Do not press the START/STOP button, if you wish to check the consistency of your
bread only.
TIME+ and TIME– buttons: Using these buttons, you can select time-delayed baking.
Press TIME+ or TIME– to adjust the time of completion. The time will increase or decrease
in steps of 10 minutes.
NOTE: With the programs BAKE and YOGHURT, use these buttons to adjust the processing time.
LOAF button: Press the button until the arrow on the LCD screen appears beneath the
desired loaf weight (Large 750 g, Small 500 g).
Tip: The default setting upon activation is Large (750 g, 1.5 lb).
COLOR button: Press several times, until the arrow on the LCD screen indicates the
desired crust colour.
Accessories (not shown)
Measuring cup
Measuring spoon – wells for 5 ml (Tsp, teaspoon) and 15 ml (Tbsp, tablespoon)
Yoghurt container
37
Important Safeguards
Carefully read all instructions before operating this appliance and save for further reference.
Do not attempt to use this appliance for any other than the intended use, described in these
instructions. Any other use, especially misuse, can cause severe injuries or damage by electric
shock, moving parts, heat, or fire.
These instructions are an essential part of the appliance. Do not pass the appliance without
this booklet to third parties.
Any operation, repair and technical maintenance of the appliance or any part of it other than
described in these instructions may only be performed at an authorised service centre. Please
contact your vendor.
General Safety Instructions
• This appliance is for household use only and NOT intended for use in moving vehicles. Do
not operate or store the appliance in humid or wet areas or outdoors. Any use of accessories,
attachments or spare parts that are not recommended by the manufacturer or damaged in any
way may result in injuries to persons and/or damage.
• Check the entire appliance regularly for proper operation – especially the power cord (e.g.
check for distortion, discolouration, cracks, corroded pins of the power plug). Do not operate
the appliance, when the appliance or any part of it is likely to be damaged, to avoid risk of
fire, electric shock or any other injuries to persons and/or damage. The appliance or its parts
are likely to be damaged (e.g. lid is broken or cracked), if the appliance has been subject to
inadmissible strain (e.g. overheating, mechanical or electric shock), or if there are any cracks
excessively frayed or melted parts, or distortions, or if the appliance is not working properly. If
one of these cases occurs during operation, immediately unplug the appliance. Get in contact
with an authorized service centre for examination and/or repair.
• Operate the appliance on a well accessible, stable, level, dry, and suitable large table or
counter that is resistant against water, fat, and heat.
• Always keep the appliance and the table or counter clean and dry, and wipe off spilled
liquids immediately. Always remove the bread pan from the housing, before taking food out
or filling in any ingredients. Do not place any clothes or tissue or other foreign objects under
or on the appliance during operation, to avoid risk of fire, electric shock and overheating. Do
not place the appliance or any hot parts of it (e.g. bread pan) over a power cord or on any
surfaces sensitive to heat, fat, or moisture, or near the edge of the table or counter, or on wet
or inclined surfaces.
• During operation keep the appliance in an appropriate distance of at least 30 cm on each
side to the edge of the working space and furniture, walls, boards, curtains to avoid damage
due to heat. Leave at least 1 m of free space above the appliance. Do not operate the appliance under over hanging boards or drop lights.
• Exclusively use the appliance for domestic use and for processing food that is fit for consumption. Do not dry or store any food or foreign objects within the appliance. Immediately unplug
the appliance, if there is any kind of malfunction or problem (e.g. the motor gets stuck, liquid
or dough running out, overheating). Always unplug the appliance when not in use.
• This appliance is NOT intended for use by persons (including children) with reduced physical, sensory or mental capabilities, or lack of experience and knowledge, unless they have
38
been given supervision or instruction concerning the use of the appliance by a person responsible for their safety. Children must always be supervised to ensure that they do
not play with the appliance or any parts of the appliance or the packaging.
Always keep the appliance where it is dry, frost-free, and clean, and where young children
cannot reach it. Do not leave the appliance or any part of it unattended, when in reach of
young children.
• Do not place the appliance or any part of it in a range, or on or near hot surfaces (e.g.
burner, heater or oven). Do not use the appliance or any parts of the appliance with any
other device or for any other purpose (e.g. drying of foodstuffs or other materials). Before
operation, always ensure that the appliance is assembled and connected
completely and correctly according to the instructions in this booklet. Do not
handle the appliance or any part of it with violence. Do not place any clothes or other objects
on or under the appliance during operation. The ventilation slits in the housing must be always
unobstructed.
• Do not hold your hands or any foreign objects (e.g. clothes, cooking utensils) in the heating
compartment or bread pan, with the appliance connected to the power supply. Do not use any
hard, sharp or edged objects (e.g. knives, forks, metal scraper) with the appliance.
• Close the lid securely before operation. You should avoid opening the lid during operation.
During operation and shortly thereafter, hot steam could escape from under the lid or from
the ventilation slits even with the lid securely closed. Do not hold any parts of your body or
any delicate objects over the appliance during operation. Also, when opening the lid, always
ensure not to get scalded by steam.
• Do not overfill the bread pan. Otherwise, liquids or dough could run out and cause hazards
due to overheating and electric shock. Do not fill in more than 750 g. Ensure that
the bread pan is completely clean and dry before placing it in the heating
compartment. Always wipe off spilled liquids immediately. If liquids run out or are spilled
on the housing, immediately unplug the appliance.
• During operation and shortly thereafter, hot steam could escape from under the lid
• Always unplug the appliance, and wait until the motor comes to a standstill, and leave the
appliance cool down, before moving, or cleaning the appliance, or when the appliance is not
in use. Always hold the housing at both sides near the bottom for moving the appliance. Do
not hold the appliance at the lid or power cord for moving the appliance. Do
not place any hard and/or heavy objects on or in the appliance or any part of it.
• Do not use any abrasive cleaners, cleaning pads (e.g. metal scouring pads), or any corrosive chemicals (e.g. bleach) for cleaning. This is especially because small parts of scouring
pads could get into the appliance, causing hazard and damage due to overheating, fire and
electric shock.
• Do not place the appliance or any part of the appliance or the power cord
in an automatic dishwasher.
• Do not leave any food dry on the appliance. Always clean the appliance after each use
to prevent an accumulation of baked-on foods (see ›Care and Cleaning‹). Always keep the
appliance and its parts, where it is clean.
39
Important Safeguards for Electrical Appliances
The appliance is heated electrically. Place the appliance near a suitable wall power socket to
connect the appliance directly to a protected mains power supply with protective conductor
(earth/ground) connected properly. Ensure that the voltage rating of your mains power supply
corresponds to the voltage requirements of the appliance (230-240 V, 50 Hz, AC, rated for at
least 8 A) to avoid interference with other appliances.
The installation of a residual current operated circuit breaker (r.c.c.b.) with a maximum rated
residual operating current of 30 mA in the supplying electrical circuit is strongly recommended. If in doubt, contact your electrician for further information.
In various foreign countries, the specifications for power supplies are subject to incompatible
norms. Therefore it is possible that power supplies in foreign countries do not meet the requirements for safe operation of the appliance. Thus, before operating the appliance abroad,
ensure that safe operation is possible.
• Do not use any desk top multi socket outlet, external timer, or remote control systems
It is best to avoid using an extension cord, but if you wish to use one, only use an extension
cord rated for a maximum continuous current of at least 8 A with safety plug and safety
coupler plug and protective conductor (earth/ground) connected properly. Additionally, the
extension cord must be of sufficient length.
Always ensure that no one will step on power cords or gets entangled or trip over power
cords. Also, ensure that no tension is applied to any part of the power cords. Tie the extension
cord loosely onto the leg of the table using a separate cord, to ensure that no one will pull the
power cord. To connect: always connect the appliance to the extension cord first. To disconnect: Always unplug the extension cord from the power supply first.
• Always handle power cords with care. The pins of the power plug must be smooth and
clean. Always completely unwind the power cord before use. Do not place the appliance on
a power cord. Power cords may never be knotted, twisted, pulled, strained or squeezed. Do
not let the plug or power cord hang over the edge of the table or counter. The power cord may
not touch hot surfaces or sharp edges. Ensure that no one will pull the appliance by the power
cord. Take care not to entangle in the power cord. Always grasp the plug to disconnect the
power cord. Do not touch the appliance or power plug with wet hands when the appliance is
connected to the power supply.
• DO NOT drip or spill any liquids on or in the housing or power cord. Always ensure that
the exterior of the bread pan is clean and dry before placing the bread pan on/in the heating
compartment. Otherwise liquid could run into the housing, causing risk of electric shock or
fire. Do not immerse the appliance or power cord in water or other liquids. Do not pour or
spill any liquids on/in the housing or power cord. Do not place the appliance on wet surfaces.
When liquids overflowed or are spilled on the housing or power cord, immediately unplug
the appliance. Thereafter, clean the appliance and, leaving the lid open, let it dry for at least
1 day. (See: ›Care and Cleaning‹) Do not clean the appliance in an automatic dishwasher.
High Temperatures – Risk of Burns
The Design Bread Maker Plus is designed for baking bread and cakes and making jam and
yoghurt in a household environment. For this purpose, the appliance is heated electrically.
Thus, improper handling could cause severe injuries and damage. Please keep this in mind to
avoid scalds and damage.
• Except for the containing food, the lid, bread pan, and exterior of the appliance can get very
hot during operation and thereafter.
40
• Do not touch the hot surfaces with any parts or your body or any heat-sensitive or moisturesensitive objects during operation or while the appliance is still hot. Only touch the appliance
and its parts at the handles and operating elements during operation and thereafter. Beware
of hot steam and condensate, when opening the lid. If necessary, protect your hands and arms
with oven gloves.
• Do not move the appliance when still hot. Always leave the appliance cool down before
moving the appliance or cleaning the appliance. Do not place the appliance on heat-sensitive
surfaces, when hot.
• Even with the lid properly closed, steam could escape from the lid during operation and
thereafter. This holds especially for the ventilation slits in the lid. Condensate could accumulate
under the lid and drip, when opening the lid. Beware of hot steam and condensate when
opening the lid.
• Always take the bread pan out of the housing, before putting in any ingredients. Never use larger quantities than those specified in the recipes in
this booklet. Do not fill in more than 750 g in total. Otherwise ingredients
or dough can run out of the bread pan and reach the hot heating elements,
causing overheating, fire and/or electric shock.
• Do not operate the appliance close to inflammable, volatile materials (e.g. spirit, benzine, or
camping gas), or high-proof alcoholic beverages. Alcohol and benzine will quickly evaporate
due to the heat, thus building up an inflammable mixture that could be ignited by any source
of ignition (e.g. candles, cigarettes, heating elements of the appliance), causing severe injuries
to persons and serious damage. DO NOT cook any high-proof alcoholic liquid or alcoholic
foodstuffs (e.g. mulled wine, grog) within the appliance. Do not pour any alcoholic liquid on/in the appliance to avoid risk of explosion and fire.
Moving Parts – Risks of Injuries
Always unplug the appliance when not in use and before opening the lid to avoid injuries
due to the kneading works. Do not insert your hands, hair, clothes or any other objects (e.g.
cooking utensils) into the bread pan or heating compartment with the appliance connected to
the power supply. Always ensure that the bread pan is properly locked to the coupling of the
kneading works, before connecting the appliance to the power supply.
Non-Stick Coating
The bread pan and kneading paddle are provided with non-stick coatings. Even without using
additional fat, food will not stick to the coated surfaces. Due to the cooked food, some discolouration may occur. However, this will not affect the cooking performance.
Please adhere to the following precautions:
• Before first use, wipe the non-stick coatings of the bread pan and kneading paddle with
a little butter or marge. Thereafter, there is no need to add any further fat for baking.
• Do not use the appliance, if the non-stick coating is scratched, cracked or detached due to
overheating.
• Only use wooden or heat-resistant plastic cooking utensils with the appliance. Do not use
hard or sharp objects for scratching, stirring, or cutting on the coatings. We will not be liable
for damage to the non-stick coating, if metal utensils or similar objects have been used. Do not
use any spray-on non-stick coatings.
41
• The non-stick coatings minimise the effort of cleaning. Do not use abrasive scorers or abrasive cleaners for cleaning. Even stubborn residues can be removed via a soft sponge or soft
nylon brush and warm dishwater.
Technical Specifications
Model:
Art. No. 42820 Design Bread Maker Plus
Power supply:
230 - 240 V AC / 50 Hz
Maximum power consumption:
580 Watt
Length of power cord:
approx. 90 cm
Weight:
approx. 4.6 kg
Dimensions: (width x depth x height)
approx. 26.0 cm x 28.0 cm x 30.0 cm
Capacity:
750 g (1.5 lb)
Properties of Your New Bread Maker
You can use the automatic Bread Maker to bake bread and cakes according to your taste.
For this, you can use ready-to-use baking mixtures or create your own recipes. Also the Bread
Maker can knead noodle dough or roll dough.
Additionally, you can make jam and yoghurt. See: Recipes and Preparing Yoghurt.
For these purposes, you can select among 13 different programs. See: Programs of the Bread
Maker
Additionally, you can use the timer function of your Bread Maker. This way, your bread will be
ultimately fresh, whenever you like. (See: ›Using the Timer‹)
IMPORTANT: Do not use the appliance for drying or storing food or any foreign objects.
Functions of the Buttons
Each time you press a button, a signal sounds. The buttons COLOR, LOAF, TIME+, and TIME–
need only to be touched slightly.
Use the buttons of the Design Bread Maker Plus to operate the following functions:
Button
Function
MENU
Selection of the desired baking program. The program number is shown on top
of the LCD screen.
START
Starts the selected baking program or terminates the currently running program.
Use this button also to terminate the warming function.
42
STOP
For termination of a program, keep the button pressed until a signal sounds.
NOTE: After terminating a program with this button, all settings are deleted.
There is no way to continue the previously used program. Thus, do
NOT use this button, if you wish to add further ingredients. In this case, unplug
the appliance for no longer than 10 minutes.
COLOR
Use for selecting the desired colour of your bread: Light, Medium, or Dark.
Your choice is indicated via an arrow on the left side of the LCD screen.
For the programs 8, 9, 10, and 13 this button is ineffective.
LOAF
Use for setting the total amount of ingredients. Your choice is indicated via an
arrow on the right side of the LCD screen. Use the following settings:
• Large – for a total amount of all ingredients between 500 g and 750 g.
• Small – for a total amount of all ingredients up to 500 g.
Tip: When selecting Small for more than 500 g, your bread may not be done
completely. In this case, you can use the program BAKE for additional baking.
For the programs 7 to 13 this button is ineffective.
TIME+
und
TIME–
Use these buttons to set up the Timer in steps of 10 minutes.
Minimum: processing time of the currently selected program. Maximum: 13 hours.
Tip: With your finger kept on the button, after a short delay the time setting will
run automatically until you remove your finger.
NOTE: With the programs BAKE or YOGHURT selected, use these buttons to
adjust the processing time.
For the programs 6, 7, 10, and 11 these buttons are ineffective.
Programs of the Bread Maker
You select the desired program by pressing the MENU button. The corresponding program
number is shown on the LCD screen. The processing time depends on the selected program.
(See: ›Program Schedule‹)
Program No.
Display
Function
1
BASIC
For white and mixed breads mainly consisting of
wheat flour or rye flour. The bread has a compact
consistency.
2
FRENCH1
For light breads made from fine flour. Normally the
bread is fluffy and has a crispy crust. Not suitable for baking recipes requiring butter,
marge or milk.
3
WHOLE WHEAT1
For breads with heavy varieties of flour that require
a longer phase of kneading and rising (for example, whole wheat flour and rye flour). The bread will
be more compact and heavy.
1
43
4
QUICK1
Including time periods for kneading, rise and
baking, but rise with soda or baking powder.
5
SWEET1
For bread with additional ingredients (e.g. fruit
juices, grated coconut, raisins, dry fruits, chocolate, or sugar). Due to a longer phase of rising the
bread will be light and airy.
6
ULTR-FAST1
Kneading, rising and baking in a very fast way.
But the baked bread is the most rough among all
bread menus.
7
DESSERT
For making dessert
8
DOUGH
For preparing dough. In this program NO rising
and baking is done.
9
DOUGH & RISE
For preparing rising dough WITHOUT baking.
10
JAM
For making jam.
11
CAKE
Kneading, and baking to make cake.
12
BAKE
2
For additional baking of bread that is too light
or not baked through. In this program there is no
kneading or rising. Use the buttons TIME+ and
TIME– to adjust the desired baking time.
13
YOGHURT2
For preparing yoghurt. The yoghurt container is
required.
2
In programs 1, 2, 3, 4, 5, and 6, acoustic signals sound during running. If your recipe demands the addition of further ingredients (e.g. fruits or nuts), you should add these foodstuffs
immediately after the signal is heard.
1
With the programs BAKE and YOGHURT selected, you can use the buttons TIME+ and TIME–
to adjust the processing time.
2
To prematurely terminate a program or the warming function press the START/STOP button for
2 seconds, until one long acoustic signal is heard. To switch off the appliance, disconnect the
appliance from the power supply.
The bread will be kept warm for nearly an hour after the end of the baking operation. This
prevents the bread from becoming too moist. Take your bread out of the appliance during this
warm-keeping period.
Tip: If you have set the timer, you should put all the ingredients into the bread pan before
starting the program. In this case, however, fruits and nuts should be cut into smaller pieces.
Program Schedule
The following tables show the processing times of the programs in minutes. Two different time
entries for one single process indicate variations due to different settings of the LOAF function:
Small or Large.
44
Program
1
BASIC
2
FRENCH
3 WHOLE
WHEAT
4
QUICK
5
SWEET
6
ULTRA FAST
Complete
Cycle
2h 48 min/
2h 50 min
3h 18 min /
3h 20 min
3h 28 min /
3h 30 min
1h 55 min /
1h 58 min
2h 51 min /
2h 53 min
59 min /
1h 15 min
Knead 1
10
14
11
8
11
11 / 12
Rise 1
20
30
30
5
25
N/A
Knead 2
13
12
15
15
14
N/A
Rise 2
25
29
42
10
27
N/A
Rise 3
40
40
50
N/A
40
10 / 20
Bake
60 / 62
73 / 75
60 / 62
77 / 80
54 / 56
38 / 43
Keep warm
60
60
60
60
60
60
Time for
adding fruit
etc.
2 h 10 min /
2 h 12 min
2h 27 min /
2h 29 min
2h 42 min /
2h 44 min
1h 32 min /
1h 35 min
2h 9 min /
2h 11 min
54 min /
1h 10 min
Max. timer
delay
13 h
13 h
13 h
13 h
13 h
N/A
Program
7
DESSERT
8
DOUGH
Complete
Cycle
1h 20 min 15 min
9 DOUGH &
RISE
1h 30 min
10
JAM
11
CAKE
12
BAKE
1h 20 min 1h 38 min 10 min -1h
13
YOGHURT
6h – 12h
Knead 1
20
15
20
N/A
18
N/A
N/A
Rise 1
N/A
N/A
N/A
15
5
N/A
N/A
Knead 2
N/A
N/A
N/A
N/A
N/A
N/A
N/A
Rise 2
N/A
N/A
30
N/A
N/A
N/A
N/A
Rise 3
N/A
N/A
40
N/A
N/A
N/A
6h – 12h
Bake
60
N/A
N/A
65
75
10 min - 1h
N/A
Keep warm
60
N/A
N/A
60
60
60
N/A
Time for
adding fruit
etc.
N/A
N/A
N/A
N/A
N/A
N/A
N/A
Max. timer
delay
N/A
13 h
13 h
N/A
N/A
N/A
N/A
Warming Function
At the end of the program the appliance automatically switches to a warming function for up
to 60 minutes. In this mode, warm air circulates inside the oven compartment. Thus, the bread
is kept warm, and will not get moistened and soggy. You can terminate the warming function
at any time by keeping the START/STOP button pressed until an acoustic signal sounds.
45
Memory Function
When being live again after a power failure of up to approx. 10 minutes, the program will
continue from the same point. However, if the power cut lasts for more than 10 minutes, the
actual baking program will not be continued.
Tip: However, after you have cancelled the baking process by pressing the START/STOP
button for 2 seconds, all previously entered settings will be lost. In this case, you must start the
baking process again (see: ›Tips for Best Results‹). Thus, for short interruptions (e.g. for adding
further ingredients) it is best to unplug the appliance.
Using the Timer
The timer function enables delayed baking. The selected time is the time of completion for the
currently active baking program. The maximum delay is 13 hours, indicated via 13:00. The
minimum delay is the processing time of the currently selected baking program.
Tip: Do not use the timer function when working with quickly spoiling ingredients such as
eggs, milk, cream or cheese. The quality of these ingredients will degrade, when not cooled.
1. At first, select the program (MENU), loaf size (LOAF), and degree of browning (COLOR).
See: Starting the Baking Process
2. Thereafter, use the TIME+ and TIME– buttons to set the delay time shown on the LCD screen.
Press TIME+ to increase the delay time at the increment of 10 minutes. TIME– decreases the set
time at the increment of 10 minutes.
Example: Now it is 8:30 p.m., and you would like your bread to be ready in the next morning
at 7 o’clock. For this set the timer to 10:30.
Tip: The delay time is including the baking time of the chosen program. Thus, after the delay
time elapsed, there is hot bread in the Bread Maker ready for being served after leaving it
cool down for some minutes.
Thus the shortest selectable time is the pre-set duration of the baking program.
The programs 6, 7, 10, 11, 12, and 13 do not allow any timer operation.
NOTE: With the programs BAKE or YOGHURT, the buttons TIME+ and TIME– are used to set
up the processing time.
3. Press START/STOP to start the delay time.
The dots of the time display flash and the LCD screen will count down to show the remaining
time. You will get fresh bread at the desired time. (In this example: at 7:00 in the morning).
If you don’t wish to take out the bread immediately, the keeping warm time of 1 hour starts.
(See: ›Warming Function‹)
Tips for Best Results
For a successful baking process, please consider the following factors:
• Never use larger quantities than those specified in the recipes in this booklet. Do not fill in more than 750 g in total. Too much dough can rise out of
the bread pan and drop onto the hot heating elements, thus causing risk of
fire and electric shock.
• Take the bread pan out of the heating compartment, before filling in the ingredients. If ingredients reach the heating elements, a fire may be caused due to heating up on the heating
elements.
46
• You can set a delayed start of the program by using the timer. If you have set the timer, you
should put all the ingredients into the bread pan before starting the program. However, it is
good advice to cut fruits and nuts into smaller pieces.
• Do NOT use the timer function when working with quickly spoiling ingredients such as eggs,
milk, cream or cheese. The quality of these ingredients will degrade, when not cooled.
• In programs 1 to 6, short acoustic signals sound during running. Thereafter, you can add
ingredients such as fruits or nuts. This way, these ingredients will not be chopped during the
kneading process. Avoid any time delay when adding further ingredients.
• While putting the ingredients into the bread pan, observe the order stated in the recipes in
this booklet. Generally, you should first add all liquids, then sugar, salt, spices, and flavours,
and thereafter flour. Add yeast as the very last ingredient. Doing so, avoid the yeast coming
in contact with salt and any liquids.
• For preparing yeast dough, all ingredients should have room temperature to maintain an
optimal rising result of the yeast.
• Measure the ingredients precisely. Even small deviations from the quantities specified in the
recipe may affect the baking results.
• Immediately rinse the bread pan with warm water after removing the bread. This prevents
the kneading paddle from sticking to the drive shaft.
• If you remove the kneading paddle after the last kneading of the dough, the bread will
remain intact, when you remove it from the bread pan.
• In the case of having cancelled a running baking program unintentionally (e.g. when adding
further ingredients or removing the kneading paddle), you can bake the already prepared
dough choosing the programs DOUGH or DOUGH & RISE for further preparation and/or
BAKE for baking. Refer to the given data in section Program Schedule for the required processes. For baking, first select the BAKE program, than use the buttons TIME+ and/or TIME– for
selecting the required baking time (see: ›Applying Some Additional Baking‹).
Before First Use
WARNING: DO NOT let young children play with the appliance, or any part
of it, or the packaging!
1. Unpack the appliance and all accessories carefully.
2. Check that no parts are damaged or missing. (See: ›Knowing Your Design Bread Maker Plus‹)
3. Carefully remove all shipping materials and promotional materials, but DO NOT remove
any warning labels or the model label. Especially ensure that there are no foreign objects (e.g.
packaging material) in the bread pan or heating compartment. Remove the protective coat
that sticks to the display.
WARNING – RISK OF ELECTRIC SHOCK
Always switch OFF (press START/STOP button until a signal sounds), unplug, and wait for the
motor to come to a complete standstill, and leave the appliance cool down, before cleaning.
Do not immerse the housing, bread pan, or power cord in water or other liquids or spill any
liquids on/in the housing or power cord. Do not place the appliance or any part of it or power
cord in an automatic dishwasher.
47
4. Before first use and after a longer period of storage, clean the appliance and its parts. See:
Care and Cleaning
5. Put some butter or marge on a kitchen cloth and wipe the non-stick coatings of the bread
pan and kneading paddle to prepare the non-stick coatings for use.
Operation
WARNING: Always ensure that the appliance and all its parts and accessories are out of
reach of young children. Your new Design Bread Maker Plus is intended for cooking
edible food and is heated electrically. Thus, the heating elements will become very hot during
operation.
During operation DO NOT place the appliance near any inflammable or explosive liquids
or gases (e.g. spirit, propane gas cylinder or gas lighter). Additionally, do not place the appliance on heat-sensitive surfaces during operation, to avoid overheating and risk of fire and
electric shock.
Only place the appliance on a stable, dry, level, and clean surface. Do not place the appliance on inclined surfaces where it can fall over and/or fall down. Do not place any clothes
or tissue or other foreign objects on or under the appliance during operation, to avoid risk of
fire, overheating, or electric shock. Do not block the ventilation slots of the housing. During
operation, the operating elements (see: ›Knowing Your Design Bread Maker Plus‹) must be
accessible all the time.
Ensure to keep the appliance in an appropriate distance of at least 30 cm on each side to the
edge of the working space and any other objects. During operation leave at least 1 m of free
space above the appliance for unhindered access.
Before assembling the appliance, always ensure that all parts are in proper working order.
(See: ›General Safety Instructions‹) Do not use any damaged or unsuitable parts to avoid risk
of injuries and damage. Additionally ensure that the heating compartment and
especially the heating elements are absolutely clean and dry. Even very
small particles on the heating elements could overheat or short-circuit during operation, thus catching fire!
Exclusively use the appliance for baking bread and cakes, or for preparing desserts, jam, or
yoghurt according to the instructions in this booklet. The appliance is NOT suited for drying
or storing any other food or materials.
DO NOT fill more than the maximum total amount of 750 g into the bread
pan! Check your recipe accordingly. Otherwise, the bread pan could overflow, with
food running out onto the heating elements. Food and foreign objects on the heating elements
will be burnt to charcoal during operation, thus causing risk of fire and electric shock via
short-circuit.
Preparations
1. Prepare your ingredients.
Measure all required amounts according to your recipe. Doing so, ensure to observe the
maximum amount of 750 g including all ingredients. Check your recipe accordingly.
When adding nuts, fruit or other bulk ingredients, you should cut or chop or puree these
ingredients.
Tip: You can use the supplied measuring cups.
2. Place the appliance on a stable, level and heat-resistant surface with a distance of at least
30 cm to other objects and to the edge of the table or counter.
48
IMPORTANT: The bread pan is locked on the coupling of the kneading works. Do not use
violence when attempting to remove the bread pan to avoid damage.
3. Open the lid and pull the bread pan upward out of the appliance.
For this, turn the bread pan counterclockwise until you can lift it up easily.
4. Push the kneading paddle down onto the drive shaft in the bread pan. Press it down to the
stop. For this, turn the kneading paddle on the drive shaft until it slips down.
5. Put the ingredients for your recipe in the correct order into the bread pan. In general: first
add all liquids, then sugar, salt, spices and flavours. Then add the flour. Add yeast as the very
last ingredient.
Tip: Ensure that the yeast will not come in contact with salt and any liquids.
WARNING: Always avoid spilling any ingredients onto the heating elements in the heating
compartment, when placing the loaded bread pan back into the appliance. During the baking
process, even small particles on the heating elements would carbonize, thus causing risk of
fire! Ensure that the heating compartment and the exterior of the bread pan are clean and dry
when installing the bread pan in the heating compartment.
6. Place the bread pan back in the appliance. Doing so, ensure that the exterior of the bread
pan is clean and dry and no ingredients will be spilled into the heating compartment.
Place the bread pan on the coupling of the kneading works and turn it clockwise until it slips
down. Then turn the bread pan clockwise a little more to lock it on the coupling. When installed correctly, the walls of the bread pan lay parallel to the walls of the heating compartment
and the bread pan will stand stable.
7. Close the lid. The appliance is now prepared for starting a program.
Starting the Baking Program
IMPORTANT: Leave the appliance cool down, before starting a new baking process. With
the display showing H:HH after starting a new program, the temperature in the heating compartment has been too high. In this case, immediately unplug the appliance and open the lid
until the appliance has reached ambient temperature.
1. Before selecting the baking program, ensure that the heating compartment has cooled
down. Take out the bread pan, fill in the ingredients, and place the bread pan back in the
heating compartment. Then close the lid.
WARNING – Risk of Fire and Electric Shock!
Before each use, always ensure that the heating compartment is clean and free from foreign objects (e.g. fluffs, baked-on food). DO NOT fill more than the maximum total
amount of 750 g into the bread pan! Check your recipe accordingly. Otherwise, the bread pan could overflow, with food running out onto the heating elements. Food and
foreign objects on the heating elements will be burnt to charcoal during the baking process,
thus causing risk of fire and electric shock via short-circuit.
2. Insert the power plug into the wall power outlet. (See: ›Important Safeguards for Electrical
Appliances‹) An acoustic signal sounds and the LCD screen shows the program number 1 and
the duration of this baking program.
3. Select your desired program by pressing the MENU button. (See: ›Programs of the Bread
Maker‹) Each input is confirmed by an acoustic signal.
49
4. Use the COLOR button to select the desired colour of your bread. The arrow on the left side
of the LCD screen shows whether you have chosen Light, Medium, or Dark.
Tip: The buttons COLOR, LOAF, TIME+, and TIME– respond even to light touches. Slightly tip
on the buttons with your finger. A beep sounds with each entry.
The buttons of the appliance are inactive, whenever the respective function is not available
with the currently selected program, or while a program is running. Running programs must be
terminated first using the START/STOP button, when you wish to make new entries.
5. Use the LOAF button to select the used amount:
Place the arrow on the right side of the LCD screen beneath the denotation Small, if the total
amount of all ingredients is below 500 g.
Select Large, if the total amount of all ingredients is between 500 g and 750 g.
6. Thereafter you can set the finishing time of your program via the timer function. You can
enter a maximum delay of up to 13 hours. (See: ›Using the Timer‹)
IMPORTANT: If the display shows unusual information after the program has been started
(HHH, LLL, EE0, or EE1), then immediately unplug the appliance. See chapter Solving Problems for further information.
7. Now, you can start the baking program by pressing the START/STOP button.
The program will automatically run various operations. You can watch the process via the
window in the lid of your Bread Maker. Occasionally, during baking, condensate could accumulate on the window.
Tip: The appliance lid can be opened during kneading, for example, to add further ingredients. However, you should avoid opening the lid during operation if possible. This holds
especially during the baking process, because the bread would collapse.
Tip: If you remove the kneading paddle after the last kneading of the dough, the bread will
remain intact when you remove it from the bread pan.
CAUTION – Moving Parts!
Do NOT remove the bread pan or grasp into the bread pan or insert any objects (e.g. cooking
utensils) into the bread pan with the appliance live, to avoid injuries and damage due to the
kneading works.
8.
To remove the kneading paddle after kneading:
a. Pull the power plug out of the wall socket.
Note: When interrupting the power supply for no longer than approx. 10 minutes, the
current baking program is NOT terminated but will be continued as soon as you plug in
the power plug again. See: Tips for Best Results
b. Open the appliance lid and take out the bread pan. You can take the dough out with
floured hands and remove the kneading paddle.
c. Replace the bread pan containing the dough and close the appliance lid.
d. Push the power plug back into the wall power outlet. The baking program is continued.
WARNING – Hot Steam: Risk of Burns!
Hot air and condensate could escape at the ventilation slits in the lid. Do not hold your hands,
arms or face directly over the appliance during operation.
9. When the baking process has been completed, acoustic signals are issued and the LCD
screen shows 0:00. The appliance automatically switches to the warming function for 60
50
minutes at the maximum. (See: ›Warming Function‹) Thereafter, the appliance switches OFF
completely and the interior cools down.
WARNING – High Temperature: Risk of Burns!
The heating compartment and all parts within (e.g. bread pan) will get very hot during operation. Protect your hands with oven gloves when attempting to take out the bread pan while
the appliance is still hot.
10. You can terminate the backing program and warming function at any time by keeping the
START/STOP button pressed until an acoustic signal sounds.
Tip: You should avoid leaving the bread in the bread pan after the appliance has been switched OFF. When the appliance cools down, the bread could become moist due to condensate.
11. Check the consistency of the bread. If the bread is not done or too light, you can use the
BAKE program to bake the bread for some additional minutes. (See: ›Applying Some Additional Baking Time‹)
12. Take the bread out of the Bread Maker as described in section Taking Out the Bread.
Applying Additional Baking Time
If the bread has not reached the desired consistency or you have unintentionally terminated
the baking program prematurely, you can apply some additional baking of up to 1 hour. For
this, leave the bread in the Bread Maker and close the lid.
NOTE: Before making any new entries, you must terminate the warming function or any
running program. For this keep the START/STOP button pressed for approx. 2 seconds until
a signal sounds.
1. Press the MENU button to select the BAKE program (number 12). The pre-set baking time
(10 minutes) flashes on the LCD screen.
2. Using the buttons TIME+ and/or TIME– select the desired baking time.
You can select baking times from 10 minutes to 1 hour in steps of 1 minute.
3. Press the START/STOP button to start the program.
The Bread Maker will heat the heating compartment for the selected duration. Thereafter a
signal sounds and the Bread Maker switches automatically back to the warming function.
Taking Out the Bread
WARNING: Before opening the appliance lid, pull the power plug out of the wall socket.
When not in use, the appliance should never be plugged in! Do not touch any parts in the interior of the appliance with unprotected hands, when the appliance is still hot. Always protect
your hands with pot holders or oven gloves, when opening the lid and taking out the hot bread
pan after baking. Beware of hot steam coming out from under the lid, when opening the lid.
1. Unplug the Bread Maker. Then protect your hands with oven gloves. Then open the lid of the
Bread Maker. Doing so, keep in mind that hot steam could escape from under the lid.
2. Use pot holders or oven gloves for taking out the bread pan. For this, turn the bread pan
counterclockwise until you can easily lift it up.
3. Over a grid, carefully turn the bread pan upside down. If necessary, shake lightly until the
bread slides out of the bread pan.
51
Important: Do not use any hard or sharp-edged objects, because this may lead to scratches
on the non-stick coating.
4. Immediately rinse the bread pan with warm water, after removing the bread. This is important, because it prevents the kneading paddle from sticking to the drive shaft.
IMPORTANT: Do not cut the bread in the bread pan to avoid damage to the non-stick coating. Always take the bread out of the bread pan, before cutting into slices.
5. Leave the bread cool down for 15 to 30 minutes before eating. Before cutting the bread,
make sure that the kneading paddle does not stick in the bread.
Tip: Take out the baked bread in time. Store your bread for instance in a bread bin.
Preparing Yoghurt
The YOGHURT program (number 13) can be used to prepare your own yoghurt. For this, only
fresh milk and a small amount of living lactobacillus yoghurt is necessary.
1. Thoroughly clean the yoghurt container and all cooking utilities you wish to use. Thereafter
rinse with boiling water. Thereafter leave the yoghurt container to drain. Do not use any clothes for drying.
2. Pour up to 600 ml pure milk and the corresponding amount of living lactobacillus yoghurt
(approx. 1:10 proportion) into the supplied yoghurt container. Stir the mix evenly.
Example: With 600 ml milk add approx. 60 ml yoghurt.
Tip: You should add all other ingredients (e.g. sugar, juices, flavours) after preparing the pure
yoghurt.
3. Then close the yoghurt container lid. Lock the lid by folding the flaps on the lid down until
they snap into place.
WARNING: Always ensure to select the YOGHURT program, and pour some water in the
bread pan, when using the yoghurt container. Otherwise, the yoghurt container could overheat and melt. Additionally, with any other program but the YOGHURT program,
the milk could overflow and reach the heating elements, causing risk of fire
and electric shock.
4. Take the bread pan out of the appliance and remove the kneading paddle from the bread
pan.
5. Then, fill about 200 ml of clear tap water into the bread pan. The water prevents the
yoghurt container from overheating and guarantees a sufficient distribution of heat.
6. Place the yoghurt container into the bread pan. Then install the bread pan in the heating
compartment and close the lid.
7. Insert the plug into the wall power outlet. An acoustic signal sounds to indicate that the
appliance is ready for operation.
8. Use the MENU button to select the YOGHURT program (no. 13). Ensure, not to select
any other program!
9. Using the buttons TIME+ and TIME– select the desired processing time. A processing time
of 6 to 12 hours should be shown on the LCD screen. Each time you press a TIME button, the
processing time is changed by 10 minutes.
In general, the yoghurt will become creamier using a long processing time.
52
10. Shortly press the START/STOP button to start the program. An acoustic signal sounds as
soon as the program has been completed.
11. Leave your homemade yoghurt cool down. Then store in the refrigerator.
Solving Problems
If any problems occur during operation, you will find solutions in this section. Further information on processing your food is given in section Tips for Best Results.
Problem
Possible Reason
The Solution
The kneading
paddle sticks
inside the bread
pan after baking.
Remainders of dough
clog the drive shaft in
the bread pan.
Add hot water to the bread pan and turn the
kneading paddle to loosen encrusted material underneath.
The bread is moist If the bread cools down Take out the baked bread in time. Store your
and too soft.
in the Bread Maker, it bread for instance in a bread bin.
could become moist due
to condensate.
The dough does
not get stirred,
even with the
motor running.
Kneading paddle and/ Make sure that the kneading paddle and
or bread pan are not in- bread pan are positioned properly.
stalled properly.
The power fails
while a program
is running.
– In case of power failure for up to 10 minutes, the bread maker will run the last implemented program until completion, after
being live again.
– On power failure for more than 10 minutes,
you must re-start.
Raisins, chocolate pellets,
fruits and similar
ingredients get
crushed in the
appliance.
To avoid the chopping of ingredients such as
fruit, add these to the dough only after the
signal is sounded.
You cannot
activate the timer
function. The
buttons TIME+
and TIME– are
inactive.
You have selected a pro- The programs 6, 7, 10, and 11 do not allow
gram intended for fresh any timer operation. If suitable for your reciingredients, such as milk pe, select another program.
or eggs. The timer function is not available with
these programs.
On the LCD
screen, the
displayed time
flashes.
You have selected the
program BAKE or
YOGHURT. With these
programs, you can adjust the processing time.
Press the buttons TIME+ and/or TIME– to
adjust the desired processing time. Alternatively, select another program.
53
Unusual information is shown on the screen.
Problem
Possible Reason
The Solution
H:HH
(after starting the
program)
The temperature is too
high.
Immediately press the START/STOP button to
stop the program, and unplug the appliance.
Then open the lid and let the Bread Maker
cool down completely before using it again.
L:LL
(after starting the
program)
The temperature is too
low.
The ambient temperature should not be below 15 °C.
E:E0
(after starting the
program)
The temperature probe
failed.
Bringen Sie das Gerät in eine autorisierte
Fachwerkstatt zur Reparatur.
E:E1
The temperature probe
failed.
Send the appliance to an authorized service
centre for repair.
Care and Cleaning
WARNING – RISK OF BURNS
Always ensure that the appliance is out of reach of young children. Always
switch OFF the appliance (START/STOP button), then unplug the appliance, and wait until the
appliance cooled down (up to 40 minutes), before moving or cleaning the appliance. Do not
attempt to move the appliance during operation.
The surfaces of the bread pan and kneading paddle have a non-stick coating. Do not scratch
or cut on the non-stick coatings. Do not use any abrasive cleaners or corrosive chemicals (e.g.
bleach) for cleaning the appliance or any parts of it, to avoid damage to the surfaces. Do not
use any hard or sharp-edged objects for cleaning any surfaces of the appliance. Additionally,
particles derived from scoring pads could get into the interior of the appliance, causing hazard due to overheating, fire and/or electric shock.
Ensure to protect the appliance against splashing water and moisture. Do not immerse the
appliance, or power cord in water or any other liquid, to avoid hazards due to electric shock
and damage. Do not spill or drip any liquids on or in these parts to avoid risk of fire and
electric shock. Do not clean the appliance or any part of it in an automatic dishwasher. Do not use violence!
Disassembling the Appliance
1. Switch OFF the appliance by pressing the START/STOP button for approx. 2 seconds. Then
unplug and leave the appliance cool down to room temperature (at least 40 minutes).
2. For easy cleaning, you can remove the lid:
For this, open the lid and pull it upwards out of the hinges.
3. Take the bread pan out of the heating compartment.
For this, turn the bread pan counterclockwise until you can easily lift it out of the heating
compartment.
54
4. Take the kneading paddle out of the bread pan.
If the kneading paddle sticks to the drive shaft and is hard to remove, fill the bread pan with
hot dishwater for approx. 30 minutes. Then try again.
Cleaning the Appliance
IMPORTANT: Do not immerse the appliance, power cord or bread pan in water or other
liquids to avoid damage. Do not clean the appliance or any part of it in an automatic dishwasher to avoid damage. Do not use any chemical agents or thinners for
cleaning the Bread Maker.
1. Clean the heating compartment and lid using a wet cloth or a slightly wet soft sponge.
Ensure that no fluffs or other particles remain on the heating elements.
2. Wipe the exterior of the appliance and power cord with a soft damp cloth. Thereafter,
polish with a dry cloth.
IMPORTANT: Do not immerse the bread pan in water or other liquids to avoid damage.
3. Clean all surfaces of the bread pan and the kneading paddle with warm dishwater.
If the opening in the bottom of the kneading paddle is clogged, you should soak the kneading
paddle for some minutes in hot dishwater. Thereafter clean it carefully using a small bottle
brush. Do not use any chemical cleaning agents or thinners to clean the bread maker.
4. Dry all parts thoroughly. Thereafter leave all parts dry naturally for at least 1 hour, where
they are out of reach of young children.
5. Reassemble the appliance after cleaning as described below.
Reassembling the Appliance
It is good advice to reassemble the appliance after cleaning. This way, you avoid damage to
the parts of the appliance and the parts cannot get lost.
IMPORTANT: Before reassembling the appliance, always ensure that the parts of
the appliance are clean and completely dry. This is crucial especially for the heating
compartment and exterior of the bread pan. Otherwise, moisture could get onto the heating
elements and cause risk of overheating and electric shock.
1. Insert the kneading paddle into the bread pan.
2. Insert the bread pan into the heating compartment.
For this, put the bread pan into the centre of the heating compartment. Then turn the bread
pan until it settles down on the coupling of the kneading works. Turn the bread pan clockwise
until it locks on the coupling
3. Reassemble the lid: Insert the tappets on the hinges of the lid into the respective openings
at the upper side of the housing. Then press the lid down. When closing the lid, there may be
no slit between lid and housing.
4. You may store the accessories of the appliance (yoghurt container, measuring cup, measuring spoon) in the bread pan.
5. Close the lid.
55
Storage
WARNING: Young children must be supervised that they do not play with the appliance or
any part of it. When the appliance is not in use, always switch OFF: press START/STOP button
until signal sounds. Thereafter, unplug the appliance.
Always clean the appliance and all its parts before storing to avoid accumulation of dried-on
food. Additionally, this way, you avoid that the kneading paddle sticks to the driving shaft.
(See: ›Care and Cleaning‹)
Ensure to store the appliance where it is clean, dry and safe from frost, direct sunlight and inadmissible strain (mechanical or electric shock, heat, moisture) and where it is out of reach
of young children. Do not place any hard or heavy objects on or in the appliance or any
part of it.
Always handle power cords with special care. Electric cables may never be knotted, twisted,
pulled, strained, or squeezed.
1. For storage, grasp the appliance at the bottom of the housing and place the appliance on
a clean and stable surface, where it cannot fall.
2. Lay the power cord loosely around the appliance. Do not use any parts or accessories of
the appliance for any other purpose than operating the appliance. It is good advice to store
the parts and accessories of the appliance with the appliance. For this, completely reassemble the appliance after cleaning (see: ›Care and Cleaning‹), thus protecting all parts against
damage and loss.
Notes for Disposal
Dispose of the appliance and packaging must be effected in accordance with the corresponding local regulations and requirements for electrical appliances and packaging.
Please contact your local disposal company.
Information and Service
Please check www.gastroback.de for further information. For technical support, please contact
Gastroback Customer Care Center by phone: +49 (0)4165/22 25-0 or e-mail [email protected].
Warranty
We guarantee that all our products are free of defects at the time of purchase. Any demonstrable manufacturing or material defects will be to the exclusion of any further claim and
within warranty limits of the law free of charge repaired or substituted. There is no warranty
claim of the purchaser if the damage or defect of the appliance is caused by inappropriate
treatment, over loading or installation mistakes. The warranty claim expires if there is any
technical interference of a third party without an written agreement.
The purchaser has to present the sales slip in assertion-of-claim and has to bear all charges
of costs and risk of the transport.
56
Recipes
WARNING: Please keep the maximum capacity of the Bread Maker in mind (750 g). Do not
overfill the bread pan to avoid overflow and hazard of overheating, fire and electric shock.
Basic White Bread
Walnut or Pineseed Bread
Ingredients
Ingredients
Loaf size up to
Water
Salt
Oil
Sugar
Milk Powder
Bread Flour
Yeast
750 g 500 g
250
160
5
3
18
12
18
12
9
6
400
260
4
3
Loaf size up to
Water
Egg
Salt
Oil
Milk Powder
Sugar
Bread Flour
Yeast
Walnuts or Pineseed
Preparation
Fill the ingredients into the bread pan in the
stated order. Refine cooking oil is recommend. Program selection: BASIC.
Preparation
Fill the ingredients into the bread pan in the
stated order. Refine cooking oil is recommend. Chop the pine seeds or walnuts into pieces. Add the nuts/seeds into the bread pan
when the beeper sounds during the kneading
process. Program selection: BASIC.
Sesame Bread
Ingredients
Loaf size up to
Water
Salt
Oil
Sugar
Milk Powder
Bread Flour
Yeast
Sesame Seeds
750 g 500 g
230 g 140 g
1
1
5 g
3g
24 g
18 g
18 g
12 g
18 g
12 g
400 g 250 g
4 g
3g
45 g
30 g
750 g 500 g
250 g 160 g
6 g
4g
24 g
18 g
18 g
12 g
18 g
12 g
400 g 260 g
4 g
3g
22 g
15 g
Classic French Bread
Ingredients
Loaf size up to
Water
Salt
Oil
Sugar
Bread Flour
Yeast
Preparation
Fill the ingredients into the bread pan in the
stated order. Refine cooking oil is recommend. Add sesame into the bread pan when
the beeper sounds during the kneading process. Program selection: BASIC.
750 g 500 g
250 g 170 g
6 g
4g
24 g
18 g
12 g
8g
400 g 270 g
5 g
3g
Preparation
Fill the ingredients into the bread pan in the
stated order. Refine cooking oil is recommend. Program selection: FRENCH.
57
Corn Bread
Preparation
Fill the ingredients into the bread pan in the
stated order. Refine cooking oil is recommend. Program selection: WHOLE WHEAT.
Ingredients
Loaf size up to
Water
Salt
Oil
Milk Powder
Sugar
Bread Flour
Corn Flour
Yeast
750 g 500 g
240 g 160 g
5 g
3g
18 g
12 g
12 g
8g
12 g
8g
300 g 200 g
100 g
60 g
5 g
4g
Sweet Bread
Ingredients
Loaf size up to
Water
Ei
Salt
Oil
Milk Powder
Sugar
Bread Flour
Yeast
Preparation
Fill the ingredients into the bread pan in the
stated order. Refine cooking oil is recommend. Program selection: FRENCH.
Soda Bread
Ingredients
Loaf size up to
Milk + 1 egg
Salt
Butter
Sugar
Corn flour
All-purpose flour
Baking powder
Baking soda
Preparation
Fill the ingredients into the bread pan in the
stated order. Refine cooking oil is recommend. The corresponding amount of fresh
milk can be used instead of water and milk
powder. Program selection: SWEET.
750 g 500 g
160 g 125 g
3g
2g
24 g
18 g
50 g
38 g
90 g 65 g
180 g 130 g
5g
4g
7 g
5g
Pumpkin Bread
Ingredients
Preparation
Fill the ingredients into the bread pan in the
stated order. Program selection: QUICK.
Loaf size up to
Water
Salt
Pumpkin
Oil
Milk Powder
Sugar
Bread Flour
Yeast
Whole Wheat Bread
Ingredients
Loaf size up to
Water
Salt
Oil
Milk Powder
Brown Sugar
Bread Flour
Whole Wheat
Yeast
750 g 500 g
220 ml 140 ml
1
1
6 g
4g
24 g
18 g
9 g
6g
55 g
40 g
380 g 250 g
4 g
3g
750 g 500 g
250 g 170 g
8 g
5g
18 g
12 g
13 g
9g
18 g
12 g
150 g 100 g
260 g 180 g
5 g
4g
750 g 500 g
80 ml 50 ml
5 g
3g
210 g 150 g
27 g
15 g
18 g
10 g
55 g
40 g
300 g 190 g
5 g
4g
Preparation
Cut the pumpkin into 0.5 mm pieces. Then
steam it (about 20 min), drain the water out
after cooling down, than mash finely.
Thereafter, fill the ingredients into the bread
pan in the stated order. Refine cooking oil is
recommend.
Program selection: SWEET.
58
Coffee Bread
Bread Flour
Yeast
Raisin
Ingredients
Loaf size up to
Water
Ei
Salt
Oil
Milk Powder
Sugar
Instant Coffee Powder
small bags Bread Flour
Yeast
750 g 500 g
200 ml 120 ml
1
1
4 g
3g
20 g
13 g
8 g
5g
40 g
25 g
Preparation
Fill the ingredients into the bread pan in the
stated order. The corresponding amount of
fresh milk can be used instead of water. Add
the raisins as soon as the beeper sounds during the kneading process. Program selection: SWEET.
2 1 1/2
300 g 200 g
5 g
3g
Ultra-Fast Bread
Ingredients
Preparation
Fill the ingredients into the bread pan in the
stated order. The eggs may be stirred with
water to get a somewhat lighter consistency.
Program selection: SWEET.
Loaf size up to
Water (ca. 50 °C)
Ei
Salt
Sugar
Bread Flour
Yeast
Butter
Lettuce Bread
Ingredients
Loaf size up to
Ei
Salt
Oil
Milk Powder
Sugar
Chopped Lettuce
Bread Flour
Yeast
750 g 500 g
1
1
7g
4g
30 g 20 g
13 g 8g
40 g 25 g
210 g 130 g
350 g 210 g
4g
3g
750 g 500 g
230 ml 145 ml
1
1
7g
5g
22 g 14 g
380 g 260 g
9g
6g
24 g 18 g
Preparation
Fill the ingredients into the bread pan in the
stated order. Warm the water to approx.
50 °C before filling in. Add the butter 10 minutes after the knead process has started, to
produce a better loaf.
Program selection: ULTRA-FAST.
Apple Crisp
Preparation
Lettuce should be chopped and mashed with
a food processor. Fill the ingredients into the
bread pan in the stated order. Program selection: SWEET.
Ingredients
Medium cooked apples
Lemon juice
Packed brown sugar
All-purpose flour
Quick cooking oats
Softened Butter
Raisin Bread
Ingredients
Loaf size up to
Water
Ei
Salt
Oil
Milk Powder
Sugar
350 g 210 g
4g
2g
22 g 15 g
15
80
50
60
50
4
g
g
g
g
g
Preparation
Cook 4 medium sized apples and remove all
pips. Then chop the apples in small pieces
and mash them finely in the measure cup.
Then add the mash into the bread pan with
the other ingredients.
Program selection: DESSERT.
750 g 500 g
200 ml 120 ml
1
1
4g
3g
26 g 18 g
60 g 40 g
40 g 25 g
59
Rice Pudding
Pasta Dough
Ingredients
Beaten eggs
Milk
Soft Cooked Rice
Sugar
Raisin
Vanilla
Cinnamon
Ingredients
Water 260 ml
Flour 400 g
2
160 g
250 g
70 g
60 g
4g
4g
Preparation
Fill the ingredients into the bread pan. Water
and flour are the main ingredients, all others
are optional. However, do not fill in more
than 750 g in total.
Program selection: DOUGH.
Preparation
Beat the eggs. Then fill all ingredients into the
bread pan. Program selection: DESSERT.
Orange Jam
Ingredients
Oranges
Sugar
Starch flour
Lemon juice
Yeast Cake
Ingredients
Amount
Butter
Sugar
Ei
Self-rising Flour
Vanilla flavour
Lemon juice
Yeast
750 g 500 g
100 g
60 g
100 g
60 g
5 g
3g
250 g 150 g
3 g
2g
25 ml 15 ml
4 g
3g
300
180
10
5
g
g
g
g
Preparation
Wash and clean the oranges and lemons.
Cut them into thin slices. Then fill all ingredients in the bread pan.
Program selection: JAM.
Preparation
Mix eggs, sugar and butter in a mixer and
process to a frothy consistency. In portions,
add a self-rising flour and mix manually. At
least, add all other ingredients and mix thoroughly. Wipe the interior of the bread pan
with a little oil. Then, add the dough.
Program selection: CAKE.
Strawberry Jam
Ingredients
Fresh strawberries
Sugar
Starch flour
Lemon juice
300
180
10
5
g
g
g
g
Preparation
Wash and clean the strawberries. Then cut
them into small pieces or puree them. Then
fill all ingredients in the bread pan.
Program selection: JAM.
Yeast Dough
Ingredients
Water 260 ml
Bread Flour 400 g
Yeast
5g
Preparation
Fill the ingredients into the bread pan. Water,
flour and yeast are the main ingredients, all
others are optional. However, do not fill in
more than 750 g in total. Program selection:
DOUGH or DOUGH & RISE.
60
Notizen/Notes
61
Notizen/Notes
62
Notizen/Notes
63
GASTROBACK GmbH
Gewerbestraße 20 . D-21279 Hollenstedt / Germany
Telefon +49 (0)41 65/22 25-0 . Telefax +49 (0)41 65/22 25-29
20120119
[email protected] . www.gastroback.de