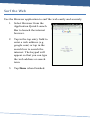
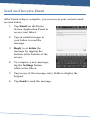
1
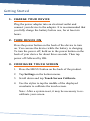
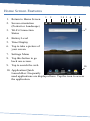
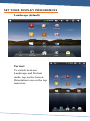
7” Mini Tablet Wireless Mobile Internet Device Model Number: SYNET7LP SYNET7LP Front View: 7.4” 6.1” 4.5” 3.7” Light Sensor Side Angle View: MicroSD Card Power Jack Host USB Port OTG USB Port Mini Headphones HDMI port The Host USB port is used primarily to connect USB devices such as a mouse or keyboard. The OTG USB port may not be user accessible until a software update has been performed. The Mini HDMI port is an “OUT” port designed to output HDMI. Note: The software on your Mini Tablet is updated frequently to ensure your Mini Tablet is always optimized. Make sure to check for updates frequently. The icons shown may be different than the icons of the actual product. Back View: Using your Stylus: Tap with the stylus or finger nail rather than the pad of your finger. Note that this product has a resistive touch screen. This machine senses pressure applied to it in specific areas and acts on this pressure. Please use a stylus or your nail when tapping the screen for optimal usage. Note that simply touching the screen with your finger will not produce optimal results. Getting Started 1. CHARGE YOUR DEVICE Plug the power adapter into an electrical outlet and connect your device to the adapter. It is recommended that you fully charge the battery before use, for at least six hours. 2. TURN DEVICE ON Press the power button on the back of the device to turn on. You can use the device while the battery is charging. To turn the power off, hold on to the power button on the back of your device for about three seconds. Then tap power off followed by OK. 3. CONFIGURE TOUCH SCRE EN 1. Press the MENU button on the back of the product. 2. Tap Settings on the bottom menu. 3. Scroll down and tap Touch Screen Calibrate. 4. Use the stylus to tap the middle of the displayed crosshairs to calibrate the touch screen. Note: After a system reset, it may be necessary to recalibrate your screen. 4. INSERT SD CARD Inserting an SD Card is an option for importing other files, downloading applications, and playing stored media. Insert a Micro SD Card (up to 16GB) into the SD Cart Slot. You will hear a click when the card is inserted properly. Many of the features included on your device will not function properly without the SD Card. Please note that this product is not a computer. It is a Wireless Internet Device with Android Operating system. Home Screen Features 1. Return to Home Screen 1 2 34 5 6 7 8 2. Screen orientation (Portrait or Landscape) 9 3. Wi-Fi Connection Status 4. Battery Level 5. Time Display 6. Tap to take a picture of your screen. 7. Settings Menu 8. Tap this button to go back one screen. 9. Tap to search the web. 10 10. Application Quick Launch Bar: Frequently used applications are displayed here. Tap the icon to access the application. SET YOUR DISPLAY PRE FERENCES Landscape (default) Portrait To switch between Landscape and Portrait mode, tap on the Screen Orientation icon on the top menu bar. SET DATE AND TIME 1. Tap Settings from the Home Screen to access the device settings. 2. To set up the current date and time, tap Date & time. 3. Tap the Automatic option to turn off the networkprovided values. 4. Tap Set date and enter the current date. 5. Tap Set when finished. 6. Tap Set time and enter the current time. 7. Tap Set when finished. 8. Change the way in which the date and time are displayed by tapping the Use 24-hour format and Select date format options. WI-FI SETUP 1. To set up Wi-Fi, tap Wi-Fi settings on the Application Home Screen Panel. 2. Tap Turn on Wi-Fi. The device will automatically scan and list local Wi-Fi networks that it finds. A lock image indicates a secure network that requires a password for access. 3. Tap the network that you would like the device to connect to. 4. If a password is required, a notification screen will appear to allow you to enter the password. Tap the Wireless password box to access the keyboard and enter the password. Tap Done when finished. 5. A wireless icon will appear in the toolbar to indicate that you are connected to the wireless network. 6. Tap the back arrow to exit to the Home Screen. EMAIL SETUP POP3, IMAP, and other common email accounts are supported. 1. To set up Email, tap Email on the Application Home Screen Panel. 2. Enter your email address and password. 3. Tap Next. This will be your default account unless you add another email address. After you have more than one account set up, you can select a different address as the default account. (optional) To select the account type, or modify individual account settings, tap Manual Setup after entering your email address and password. NAVIGATING THE HOME SCREEN PANELS Your device displays the Home Screen when there are no other applications or menus open on the screen. The Home Screen allows you to organize all of your favorite applications, widgets, and other tools for easy access. The Home Screen is divided into three panels: the Search Panel, The Widget Panel, and the Application Panel. Slide the stylus across the screen to the right or left to change panels. Search Panel Widget Panel Application Panel Use the Search Panel to quickly search the web. The Widget Panel allows you to customize a variety of tools, or “Widgets” that run right on the Home Screen, such as a calendar, mp3 player, and local weather updates. The Application Panel displays the Android® applications installed on the device. Tap an application icon to launch the application on your device. Other Settings ANIMATION: You can change your screen animation from 2D (default) to 3D. 1. Tap on Settings Menu. 2. Tap Animation to change the setting. ADDING APPLICATIONS You can easily add applications to your device. Note: A MicroSD card is required to install applications on your device. Use the SAM 3.5 application to search for and install Android applications to your device. MOVING ICONS To move any of the icons on your screen, touch and hold the stylus to the icon. The icon will highlight and then increase in size and allow you to drag and drop it anywhere on the screen, or into the trash bin. When you have selected an icon, the trash bin will pop-up on the side of the screen. Dropping an icon into the trash bin will simply remove it from view; it will not uninstall the application from your device. Included Widgets WIDGETS 1. Analog Clock Displays the time with an animated analog clock. 2. Calendar Displays the date in a monthly calendar view. 3. Latitude Displays your current location in a map view. (Requires Wi-Fi connection.) 4. Music Play and manage audio files (MP3, WAV, AAC, OGG). 5. Media Player Allows you to view photos, play videos and audio files. 6. Power Control Turn Wi-Fi, Account Sync, and Screen Brightness on and off to save batter life. 7. Weather Forecast Displays local weather conditions. (Requires Wi-Fi connection.) Included Applications APPLICATIONS 1. File Manager Manage files stored on the SD Card or on local memory. 2. Browser Access the internet and surf the web. 3. Email Send and receive email using your existing email accounts. 4. Media Player Allows you to view photos, play videos and audio files. 5. Alarm Clock Set and schedule alarms. 6. Settings View and change settings to personalize your device. 7. Contacts Create, view, and edit your personal contacts. 8. Calculator Perform simple mathematical equations. 9. YouTube View and share popular videos online. 10. Wi-Fi Settings View and update Wi-Fi settings and access points. 11. iReader Displays your digital media (Supports CHM, TXT, PDB, Mobipocket, and EReader books.) 12. Sound Recorder Record voice notes or sound using onboard microphone. Updating the Software Note: The software on your Mini Tablet is updated frequently to ensure your Mini Tablet is always optimized. Make sure to check for updates frequently. Important: Remove your MicroSD card from the device before continuing. Updating the software will clear all private data stored in your device. 1. Tap Settings Menu. 2. Tap Add Application. 3. Scroll to System Update and select. 4. Tap System Update from the Application screen. 5. Tap OK to continue. Surf the Web Use the Browser application to surf the web easily and securely. 1. Select Browser from the Application Quick Launch Bar to launch the internet browser. 2. Tap in the top entry field to enter a web address (e.g. google.com) or tap in the search box to search the internet. The keypad will appear so that you can type the web address or search term. 3. Tap Done when finished. Send and Receive Email After Email setup is complete, you can access your current email account Inbox. 1. Tap Email on the Home Screen Application Panel to access your Inbox. 2. Tap an email message in your Inbox to read the message. 3. Reply to or delete the message by tapping the buttons at the bottom of the screen. 4. To compose a new message, tap the Settings button while in the Inbox. 5. Tap in any of the message entry fields to display the keypad. 6. Tap Send to send the message. Customer Service If you are experiencing problems with this product, please contact customer service before contacting your retailer. Just call 888-571-0866 Or email [email protected] Digital Gadgets 21Englehard Dr. Monroe, NJ 08831 Customer Service: (888-571-0866) Notices and Disclaimer FCC Notices: The FCC requires that you will be advised of certain requirements involving the use of this equipment. This device complies with Part 15 of the FCC Rules. Operation is subject to the following two conditions: (1) This device may not cause harmful interference, and (2) this device must accept any interference received, including interference that may cause undesired operation. Privacy of communications may not be ensured when using this device. Changes or modifications not expressly approved in writing by the responsible party may void the user’s authority to operate this equipment. Note: This equipment has been tested and found to comply with the limits for Class B digital devise, pursuant to Part 15 of the FCC Rules. These limits are designed to provide reasonable protection against harmful interference in a residential installation. This equipment generates, uses, and can radiate radio frequency energy and, if not installed and used in accordance with the instructions, may cause harmful interference to radio communications. However, there is no guarantee that interference will not occur in a particular installation. If this equipment does cause harmful interference to radio or television reception, which can be determined by turning the equipment off and on, the user is encouraged to try to correct the interference b y one or more of the following measures: (1) Reorient or relocate the receiving antenna. (2) Increase the separation between the equipment and receiver. (3) Connect the equipment into an outlet on a circuit different from that to which the receiver is connected. (4) Consult the dealer or an experienced radio TV technician for help. SYLVANIA is a registered trademark of OSRAM SYLVANIA INC., used under license. Android is a trademark of Google Inc. Use of this trademark is subject to Google Permissions. All other trademarks are those of their respective owners.