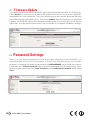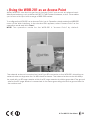
1
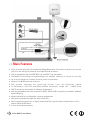
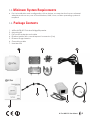
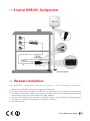
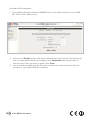
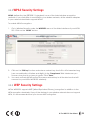
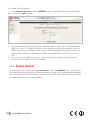
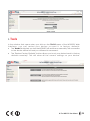
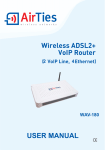
Wireless Outdoor Bridge (Repeater/Access Point) WOB-201 User Manual This manual has been prepared by AirTies Wireless Networks Corporation. All rights reserved. Manual Overview This manual guides you through the steps necessary for setting up and configuring your AirTies WOB-201. Please read this manual carefully before beginning the installation process. The Warranty does not cover failure or damage as a result of not following the instructions in the manual. AirTies will not be held responsible in such circumstances. The User Manual is an important resource you can refer to for safe and proper use of your device. Please retain it for future reference. Safety and Maintenance This equipment must be grounded. Never defeat the ground conductor or operate the equipment in the absence of a suitably installed ground conductor. Contact the appropriate electrical inspection authority or an electrician if you are uncertain that suitable grounding is available. Refer to national electrical codes or IEC 364, Parts 1 through 7. Do not locate the antenna near overhead power lines or other electric light or power circuits, or where it can come into contact with such circuits. Take extreme care not to come into contact with such circuits during installation. Failure to do so may cause serious injury or death. The pole or similar object that the WOB-201 is mounted onto should also be properly grounded. In order to prevent damage to your device, be sure to keep it in its original box during transportation. If you encounter any problems, do not open or disassemble the device. Instead, call AirTies Technical Support at +90 212 444 0 239. For information regarding the installation and configuration of the device consult the remainder of this manual. The average usage life of the device is 7 years as determined by the Authority of Industry and Trade. TABLE OF CONTENTS 1. .Introduction.......................................................................................................2 1.1.Main Features..........................................................................................3 1.2. Minimum System Requirements...............................................................4 1.3. Package Contents...........................................................................................4 2. WOB-201 Installation..................................................................................5 2.1. Safety Warnings......................................................................................5 2.2. A typical WOB-201 Configuration ...........................................................6 2.3. Hardware Installation..............................................................................6 2.3.1. Mounting and Grounding the WOB-201..........................................................7 2.3.2.Connecting the Ethernet Cable ......................................................................9 2.3.3.Making the indoor connections................................................................11 3. Configuring the WOB-201...........................................................................12 3.1. IP Settings.............................................................................................14 3.2. Wireless Network .........................................................................................15 3.2.1. Wireless Network Settings.........................................................................15 3.2.2. Operation Mode Selection...................................................................16 3.2.3. Point-to-point (P2P) Connection Settings............................................17 3.2.4. Configuring the WOB-201 as a Bridge..........................................................24 3.3. Wireless Security...................................................................................24 3.3.1. WPA Security Settings.......................................................................24 3.3.2. WPA2 Security Settings......................................................................26 3.3.3. WEP Security Settings........................................................................26 3.3.4. Access Control....................................................................................27 4. Tools...........................................................................................................28 4.1. Firmware Update....................................................................................29 4.2. Password Settings......................................................................................29 5. Using the WOB-201 as an Access Point....................................................30 6. Technical Specifications .....................................................................................31 7. Physical Specifications ...................................................................................31 1. Introduction AirTies WOB-201 is a wireless device that is designed for outdoor use as a Bridge or Repeater. It is optimized for setting up secure wireless networks between buildings that are far apart and provides high performance, low cost wireless communications outdoors under all weather conditions. With its internal 14dBi directional antenna, the WOB-201 enables you to set up point-topoint and point-to-multipoint (max. 16 points) connections. It is an ideal solution for campuses, industrial zones, and companies that spread out over multiple buildings ensuring enterprise and community-wide connectivity. Additionally, it is capable of mounting an external antenna, and can be used to create an outdoors hotspot through the use of an external omni-directional antenna. With the AutoMesh Technology developed by AirTies, you can easily configure the Mesh/Repeater settings. The only thing you need to do is to place the access point devices at those points where the signal is weak and assign the same AutoMesh ID to all of them. In this way, you can boost the signal wherever it is weak and expand your wireless network. If any of the access points fail, the AutoMesh technology routes the signal over a different access point, thus, you do not experience any wireless network interruptions. This also means you can expand your wireless network as much as you want without any network interruptions. For wireless network security, the WOB-201 supports the latest security standards, WPA2 and WPA (Wi-Fi Protected Access), as well as 64/128 bit WEP (Wired Equivalent Privacy) encryption. You can encrypt your wireless broadcast using one of these standards and keep your data and wireless network safe from outside intruders. Additionally, using the MAC Address filtering feature, you can allow only the computers you chose to access your wireless network. All of the WOB-201 electronics are sealed in a weather-proof enclosure for mounting outdoors. With the Power over Ethernet (PoE) feature, the power supply remains indoors and only a single Ethernet cable goes between the indoors and the outdoor unit. It also has two levels of surge protection for safety. WOB-201 is designed to transmit in the unlicensed 2.4 GHz band. It can be integrated into your existing Ethernet network seamlessly. AirTies WOB-201 User Manual 2 1.1.Main Features Point-to-point and point-to-multipoint Bridge/Repeater. Can also be used as an access point by mounting an external omni-directional antenna. Fully compatible with the IEEE 802.11b and 802.11g standards AutoMesh Technology for expanding your wireless network as much as you like Up to 4 km range for outdoor point-to-point connections Internal 14 dBi directional antenna PoE power adapter for receiving power over the Ethernet cable 13 channels in the ETSI specified wireless frequency range (2.4 - 2.4835 GHz) DHCP server for automatic IP address assignment Advanced Wireless Security: support for WPA, WPA2, WEP encryption and MAC Address based filtering Web interface for configuration and management Firmware updates through the Web interface 24x7 technical support by a highly trained AirTies support team, backed up by the expert AirTies R&D team 3 year extended warranty 3 AirTies WOB-201 User Manual 1.2. Minimum System Requirements For the installation and configuration of the device a computer that has an ethernet adapter and runs any one of the Windows, UNIX, Linux, or Mac operating systems is required. 1.3. 1. 2. 3. 4. 5. 6. 7. Package Contents AirTies WOB-201 Outdoor Bridge/Repeater Mounting Kit PoE power adapter and cable Ethernet cable with a weatherproof connector (3 m) Ethernet Surge Arrestor Grounding cable User Manual AirTies WOB-201 User Manual 4 2. WOB-201 Installation 2.1 Safety Warnings For your safety please pay attention to the following warnings and take the necessary precautions. This equipment must be grounded. Never defeat the ground conductor or operate the equipment in the absence of a suitably installed ground conductor. Contact the appropriate electrical inspection authority or an electrician if you are uncertain that suitable grounding is available. Refer to national electrical codes or IEC 364, Parts 1 through 7. Do not locate the antenna near overhead power lines or other electric light or power circuits, or where it can come into contact with such circuits. Take extreme care not to come into contact with such circuits during installation. Failure to do so may cause serious injury or death! The pole or similar object that the WOB-201 is mounted onto should also be properly grounded. Ethernet Surge Arrestor must be grounded to the building AC ground with the shortest possible ground wire. The Outdoor Ethernet cable must terminate on the Ethernet Surge Arrestor immediately after entering building. Maintain a clearance between the outdoor cable and other equipment or cables. 5 AirTies WOB-201 User Manual 2.2. A 2.3. typical WOB-201 Configuration Hardware Installation The WOB-201 installation should be done in the following sequence: 1. Mount the WOB-201 outdoors and ground it properly 2. Connect the Ethernet cable to WOB-201 and tighten the weatherproof connector 3. Connect the Ethernet cable to the Ethernet Surge Arrestor immediately after entering the building and ground the Ethernet Surge Arrestor. 4. Connect the PoE power adapter (located indoors) to the Ethernet Surge Arrestor 5. Connect the PoE power adapter to a Router or Switch 6. Connect power AirTies WOB-201 User Manual 6 2.3.1. Mounting and Grounding the WOB-201 The mounting kit that comes with the WOB-201 contains all the necessary parts for mounting the WOB-201 to a pole outdoors. First connect the mounting apparatus to the pole as shown below. Attach the mounting plate to the back of the WOB-201 as shown in the picture. 7 AirTies WOB-201 User Manual Connect the parts that you've attached to the pole and the WOB-201 as shown below Attach the grounding cable to the grounding stud on the WOB-201 enclosure and tighten. Attach the other end of the grounding cable to the ground conductor If you are using the WOB-201 with an external antenna, the antenna should be used with an RF surge arrestor and should be properly grounded. For more information about using an external antenna please refer to the section "Using the WOB-201 as an Access Point with an external antenna". AirTies WOB-201 User Manual 8 2.3.2. Connecting the Ethernet Cable First make sure that your Ethernet cable is long enough to connect from the indoor connection point to the WOB-201. The Ethernet cable provided in the box is 3 meters long. If you need to use a longer cable (max. 80 meters), move the weatherproof connector from the Ethernet cable provided to the longer one. The new cable should comply with the straight Ethernet standard. Remove the weatherproof connector from the first cable after cutting the RJ-45 connector off. The weatherproof connector consists of 5 pieces. Pay attention to the order of the pieces as you pull out the connector from the cable. Slide the pieces onto the new Ethernet cable in the same order. Attach and clamp the RJ-45 connector to the end of the new cable. Plug the RJ-45 connector and the weatherproof connector into the Ethernet port of the WOB-201 in the order shown below. 1 9 2 AirTies WOB-201 User Manual 3 4 5 6 ATTENTION! Please make sure that both weatherproof seals of the connector are firmly tightened. The first seal is the threaded connection on the WOB-201 outdoor unit. The second seal is where the Ethernet cable exits the weatherproof connector. Both must be firmly tightened to prevent water from entering the WOB-201 outdoor unit. AirTies WOB-201 User Manual 10 2.3.3. Making the indoor connections WARNING! All Ethernet and LAN+DC power connections should be made before plugging the power supply to the wall outlet. 1. Place the Ethernet Surge Arrestor close to the point where the Ethernet cable enters the building and insert the RJ-45 connector into the Ethernet Surge Arrestor. The Outdoor Ethernet cable must terminate on the Ethernet Surge Arrestor immediately after entering the building. Maintain a clearance between the outdoor cable and other equipment or cables. WARNING!. Ethernet Surge Arrestor must be grounded to the building AC ground with the shortest possible ground wire. 11 AirTies WOB-201 User Manual 2. Connect the other end of the Ethernet Surge Arrestor to the "LAN+DC" port of the PoE power adapter. 3. You can connect the "LAN" port of the PoE power adapter to a switch or router. Depending on how the WOB-201 will be used, the "LAN" port may or may not have anything connected to it. 4. Connect the Power Adapter to a grounded AC outlet. It is recommended that easy access be maintained at all times to the AC power socket. NOTE: The power adapter and the AC socket must be in close proximity. A power cord length of no more than 2 meters is recommended. WARNING! This equipment must be grounded. Never defeat the ground conductor or operate the equipment in the absence of a suitably installed ground conductor. Contact the appropriate electrical inspection authority or an electrician if you are uncertain that suitable grounding is available. Refer to national electrical codes or IEC 364, Parts 1 through 7. 5. Congratulations!!! You have successfully completed the hardware installation of the WOB-201. Next chapter will explain how to do the software configuration. 3. Configuring the WOB-201 This section describes how to configure your AirTies WOB-201 using the Web interface. Connect your computer to the WOB-201 before you start configuring the software. 1) Connect your computer to the "LAN" port of the PoE power adapter using the Ethernet cable. 2) Go to TCP/IP Properties and assign a local IP address to your computer within the 192.168.2.X IP address range (e.g. 192.168.2.5). Enter 255.255.255.0 as subnet mask. AirTies WOB-201 User Manual 12 3) Open your Web browser. Enter 192.168.2.254, the default address for the WOB-201, in the address field. 4) This will launch the web interface of your AirTies WOB-201. You will be prompted for a password to login. Initially, leave this field blank and continue by clicking "Submit". 13 AirTies WOB-201 User Manual In the screen that appears, the "WELCOME" screen, a summary of the current network and device settings are displayed. 3.1. IP Settings You can change the IP address, the subnet mask and the gateway address of the WOB201 by going to the IP Settings submenu under the LAN menu of the web interface. You can get the correct values for these from your network administrator. Note: If you change the IP address of the WOB-201, you must use the new IP address to connect to its Web interface. AirTies WOB-201 User Manual 14 3.2. Wireless Network Clicking on the WIRELESS menu on the left menu bar of the WOB-201 Web interface displays all the wireless devices connected to the WOB-201. You can check the "Block" box to the left of the MAC address of a device to block its access to the WOB-201. When all your modifications are done, click "Save". 3.2.1. Wireless Network Settings To configure your wireless network, go to Wireless Network Settings under the WIRELESS menu of the WOB-201 Web interface. 15 AirTies WOB-201 User Manual Checking the "Wireless Network Enabled" box enables/disables the wireless network. In the "Wireless Network Name (SSID)" field, you can enter a name (SSID) for your wireless network. Checking the "Hide" box hides the SSID in the WOB-201 broadcast. In the "Channel" field, you can select the channel in which you would like the WOB201 to broadcast. The "Data Rate" field lets you adjust the wireless data rate of the WOB-201. This value is selected automatically. Changing it is not recommended In the "Mode" field you can select the wireless mode the WOB-201 will be operating in. A mixed mode of 802.11b and 802.11g is selected by default so that devices that comply with either standard can communicate with the WOB-201. In the "Wireless Transmit Power" field, you can set the Transmit Power of the WOB-201. The lower the transmit power, the smaller your wireless range will be. IMPORTANT: The maximum RF transmit power for the WOB-201 is 17 dBm. By default the "Wireless Transmit Power" is set to 6 dBm, appropriate for the 14 dBm internal antenna. If you are using an external antenna with a different gain you should adjust this value accordingly. Click "Save" when you are done with all the settings. 3.2.2. Operation Mode Selection The WOB-201 can operate as a Bridge, a Repeater, or an Access Point. To set the operation mode, go to the Operation Mode submenu under the WIRELESS menu. The Operation Mode Selection window will appear. In this window, select the mode that you want your WOB-201 to operate in and click "Save". AirTies WOB-201 User Manual 16 3.2.3. Point-to-point (P2P) Connection Settings This section describes how to configure the WOB-201's on two ends of a point-to-point connection. We'll refer to the two end points as "point A" and "point B". Before you start with the configuration, the hardware installation of the WOB-201's at "point A" and "point B" should be completed. To set up a point-to-point connection with the WOB-201, you need to configure the Mesh settings. There is two ways to configure the Mesh settings: Manual or AutoMesh. To select the mode for Mesh configuration go to Mesh Settings under the WIRELESS NETWORK main menu. Point-to-point (P2P) Connection Settings Using AutoMesh Technology The WOB-201 is set up as an "Access/Mesh Point" by default. Initial Settings at Point A: 1) Login to the WOB-201 Web interface. Make a note of the MAC Address that you'll find on the "WELCOME" screen. 2) Go to IP Settings under the LAN menu. 17 AirTies WOB-201 User Manual 3) To avoid having the same IP address at both point A and point B, change the IP address of point A by enter a new IP address for the WOB-201 (e.g. 192.168.2.253) in the "IP Address" field. Click "Save". After the change, you should use the new IP address to access the Web interface of the WOB-201 at point A. 4) Go to Mesh Settings under the WIRELESS NETWORK main menu and check the "Activate Mesh Connections" checkbox. AirTies WOB-201 User Manual 18 5) In the "Select Mesh Mode" field, "AutoMesh" is selected by default. 6) Fill in the "AutoMesh ID" and "AutoMesh Password" fields. AutoMesh ID: In this field, enter a name for your Mesh network. The default is "AirTies Auto-Mesh". It is recommended that you change the default and enter a name of your choice as your AutoMesh ID.(e.g. WOB-201 Mesh) AutoMesh Password: In this field, enter a password for the Mesh network you are setting up. There is no default password.You must enter a password of your choice in this field. Important: AutoMesh password is not a wireless security password.This is a special password for a secure Mesh connection between Mesh points. For wireless security, you must configure one of wireless encryption methods as described later in this manual. When you are done, click "Save" to store your settings. 19 AirTies WOB-201 User Manual WOB-201 Configuration at Point B 1) Login to the WOB-201 Web interface (192.168.2.254). 2) Go to Mesh Settings under the WIRELESS NETWORK main menu and check the "Activate Mesh Connections" checkbox. 3) In the "Select Mesh Mode" field, "AutoMesh" is selected by default. 4) Fill in the "AutoMesh ID" and "AutoMesh Password" fields. AutoMesh ID: In this field, enter a name for your Mesh network. The default is "AirTies AutoMesh". It is recommended that you change the default and enter a name of your choice as your AutoMesh ID.(e.g. WOB-201 Mesh) You must use the same AutoMesh ID for all the WOB-201s on your Mesh Network. AutoMesh Password: In this field, enter a password for the Mesh network you are setting up. There is no default password.You must enter a password of your choice in this field. You must use the same AutoMesh Password for all the WOB-201s on your Mesh Network. When you are done, click "Save" to store your settings. AirTies WOB-201 User Manual 20 Congratulations! You have completed configuring the WOB-201s for a point-to-point connection. The devices that you have configured by entering a n AutoMesh ID and AutoMesh Password will detect each other automatically and set up a Mesh connection. When you add new Mesh points to your Mesh network, remember to use the same AutoMesh ID and AutoMesh Password. NOTE: You can use the above point-to-point configuration instructions for point-tomultipoint connections as well. The WOB-201s that are connected to each other should be broadcasting on the same channel. They should also use the same AutoMesh ID and AutoMesh Password. Point-to-point (P2P) Connection Settings Using Manual Mode Initial Settings at Point A: 1) Login to the WOB-201 Web interface. Make a note of the MAC Address that you'll find on the "WELCOME" screen. 2) Go to IP Settings under the LAN menu. 21 AirTies WOB-201 User Manual 3) To avoid having the same IP address at both point A and point B, change the IP address of point A by enter a new IP address for the WOB-201 (e.g. 192.168.2.253) in the "IP Address" field. Click "Save". After the change, you should use the new IP address to access the Web interface of the WOB-201 at point A. WOB-201 Configuration at Point B 1) Login to the WOB-201 Web interface (192.168.2.254). Make a note of the MAC Address on the "WELCOME" screen. 2) Go to Mesh Settings under the WIRELESS NETWORK main menu. 3) After checking the "Activate Mesh Connections" checkbox, select "Manual" in the "Se lect Mesh Mode" field. 4) In the window that appears, click "Scan For Access Points" to list the wireless networks in the area. Select the entry whose SSID and MAC address match those of the WOB-201 at point A. 5) Click "Save". Important!!! The signal level for the wireless access point you have selected should be between -80 dBm and -30 dBm. AirTies WOB-201 User Manual 22 WOB-201 Configuration at Point A 1) Login to the WOB-201 Web interface (192.168.2.253). 2) Go to Mesh Settings under the WIRELESS NETWORK main menu. 3) After checking the "Activate Mesh Connections" checkbox, select "Manual" in the "Select Mesh Mode" field. 4) In the window that appears, click "Scan For Access Points" to list the wireless networks in the area. Select the entry whose SSID and MAC address match those of the WOB-201 at point B. 5) Click "Save". Congratulations! You have completed configuring the WOB-201s for a point-to-point connection. NOTE: You can use the above point-to-point configuration instructions for point-tomultipoint connections as well. The WOB-201s that are connected to each other as repeaters should be broadcasting on the same channel. For connections made using the Manual mode, all the access points must use WEP wireless encryption protocol. The WOB-201s operating in Repeater mode can only use WEP encryption. WOB-201 WOB-201 WOB-201 23 AirTies WOB-201 User Manual 3.2.4. Configuring the WOB-201 as a Bridge To set the operation mode to Bridge mode, go to Operation Mode under the WIRELESS menu of the WOB-201 Web interface. Select Bridge in the "Operation Mode" field and click "Save". When you select Bridge as the operation mode, the "Access Point List" page will come up. (At the same time, "Access Point List" will appear as a submenu under the WIRELESS menu of the Web interface.) In this window, you will see a list of all the available wireless access points that the WOB-201 Bridge can connect to. Check the box next to the access point you would like to connect to and click "Save". 3.3. Wireless Security It is not necessary to configure wireless security to enable wireless communication. However, for your data and network security, it is recommended that you choose one of the security protocols described below that fits your needs. Wi-Fi Protected Access (WPA), WPA2, and Wired Equivalent Privacy (WEP) are wireless encryption protocols that can be used to encrypt the data traffic on a wireless network. The WOB-201 supports all three standards. Another security feature of the WOB-201 is MAC Address Filtering. Using this feature you can control which wireless computers can communicate with the WOB-201. For your wireless network security, it is recommended that both MAC Address Filtering and one of WPA, WPA2 or WEP wireless encryption protocols be used. 3.3.1 WPA Security Settings WPA (Wi-Fi Protected Access) is one of the most advanced wireless encryption standards today and provides you with the highest level of data protection. The biggest difference between WPA and the earlier encryption standards is that WPA uses the TKIP (Temporal Key Integrity Protocol) that changes the network key periodically. This makes breaking the password, or network key, almost impossible and protects your network from unauthorized access. All AirTies wireless products and the newly introduced 802.11g wireless communication devices support WPA. If you would like to use WPA in your wireless network, all the wireless adapters in your network should support WPA. AirTies WOB-201 User Manual 24 To enable WPA encryption: 1. Go to Wireless Security under the WIRELESS menu of the Web interface of your WOB201. Click on the "WPA" button. 2. 3. 25 Click on the "PSK key" button and enter a network key that is 8 to 63 characters long (use a combination of letters and digits) in the "Passphrase" field. Make sure you choose a key that is not easy to guess. Click "Save". You must activate WPA and set the same network key in all the devices that will connect to your AirTies WOB-201 wirelessly. AirTies WOB-201 User Manual 3.3.2 WPA2 Security Settings WPA2, defined by the IEEE 802.11i standard, is one of the latest wireless encryption methods. If you would like to use WPA2 in your wireless network, all the wireless adapters in your network should also support WPA2. To enable WPA2 encryption: 1. Go to Wireless Security under the WIRELESS menu of the Web interface of your WOB201. Click on the "WPA2" button. 2. Click on the "PSK key" button and enter a network key that is 8 to 63 characters long (use a combination of letters and digits) in the "Passphrase" field. Make sure you choose a key that is not easy to guess. Click "Save". You must activate WPA2 and set the same network key in all the devices that will connect to your AirTies WOB-201 wirelessly. 3. 3.3.3 WEP Security Settings AirTies WOB-201 supports WEP (Wired Equivalent Privacy) encryption in addition to the WPA encryption standards. If any of the devices in your wireless network does not support WPA, it is recommended that you choose WEP encryption. AirTies WOB-201 User Manual 26 To enable WEP encryption: 1. Go to Wireless Security under the WIRELESS menu of the Web interface of your WOB201. Click on the "WEP" button. 2. 3. There are three levels of WEP encryption. 64-bit encryption uses a key of 10 hexadecimal digits (A-F and 0-9). 128-bit encryption uses 26 digits, and 256-bit encryption uses 58 digits. A key with more digits is more secure. After selecting the key length, enter the appropriate number of hexadecimal digits, any combination of (0-9, A-F), for the key. You must activate WEP and set the same network key in all the devices that will connect to your AirTies WOB-201 wirelessly. 3.3.4. Access Control To enable Access Control, go to Access Control under the WIRELESS menu of the WOB201 Web interface and check the "Activate Access Control" box. Enter the MAC addresses of the devices that will be allowed to access your WOB-201. No device other than those permitted can connect to the WOB-201. 27 AirTies WOB-201 User Manual 4. Tools In the window that opens when you click on the TOOLS menu of the WOB-201 Web interface, you can restart your device or reset it to factory defaults. The "Restart" button lets you turn the WOB-201 off and then on remotely. The connection to the device will be lost and you will need to reconnect. The "Restore Factory Defaults" button allows you to set your device back to factory defaults remotely. This will clear all the current settings on your device. AirTies WOB-201 User Manual 28 4.1. Firmware Update 4.2. Password Settings To update the firmware on the WOB-201, go to Firmware Update under the TOOLS menu. Click "Browse". In the pop-up window that appears, locate the most recent WOB-201 firmware file on your computer. (You can download the most recent firmware file from the AirTies website www.airties.com ). Then click "Update".After the firmware is successfully installed, the WOB-201 will be automatically restarted and your connection to the device will be lost. You will need to reconnect if you would like to configure installation settings. There is no set default password to access the Web interface of the WOB-201. It is recommended that you set a password to block unauthorized access to the Web interface. To change the current password go to MANAGEMENT menu. Enter the current password in the "Current Password" field. (Leave this field blank for the initial setting.) Then enter your new password in the "New Password" and "Confirm New Password" fields. Click "Save". 29 AirTies WOB-201 User Manual 5. Using the WOB-201 as an Access Point AirTies WOB-201 can also be used as an Access Point if you mount an external omnidirectional antenna, such as AirTies ANT-207-O 7dBi Outdoor Antenna, onto it. This enables you to form a Hot Spot with a range of 800-1000 meters. To configure the WOB-201 as an Access Point, go to Operation Mode under the WIRELESS menu of the Web interface. In the window that appears, select "Access Point" as the operation mode and click "Save". NOTE: The operation mode for the WOB-201 is "Access Point" by default. The external antenna is mounted on the N-Type RF connector on the WOB-201. Mounting an external antenna bypasses the 14 dBi internal antenna. The external antenna should always be used with an RF surge arrestor which the RF surge arrestor should be grounded. The ground wire for the RF surge arrestor is connected to the same grounding stud as the ground wire for the outdoor unit. AirTies WOB-201 User Manual 30 6. Technical Specifications Ports: One 10/100 Auto MDI/MDIX Ethernet port 14 dBi directional internal antenna Maximum On-board Transmitter Output Power: 17 dBm (To meet ETSI maximum radiated power limits (20 dBm), the onboard transmitter can be set to no more than 6 dBm when used with the internal 14 dBi antenna.) 7. 31 N-Type RF connector Industrial grade weather-proof IP67 enclosure Weatherproof Ethernet connector RF surge arrestor Ethernet Surge Arrestor Wireless Standards: IEEE 802.11b, IEEE 802.11g Ethernet Standards: 802.3, 802.3u (CSMA/CD) Frequency range: From ETSI 2400MHz to 2483.5MHz (13 channels, 3 not overlapping) Wireless data rates: 1, 2, 5.5, 6, 9, 11, 12, 24, 36, 48, 54Mbps (auto speed adjustment) Wireless security: WPA2, WPA (TKIP & AES), 802.1x, WEP (64/128 bit), MAC Address filtering Power: PoE power adapter (100-240 VAC to 48 VDC) Class 2 Device Physical Specifications Dimensions: 250mm x 260mm x 70mm Weight: 900 g Outdoor Unit Power: 48V DC, 6.5 watts PoE Power Adapter Input: 100-240 VAC Operating Temperature: -30°C +65°C Storage Temperature: -20°C +70°C Humidity: maximum %95 AirTies WOB-201 User Manual Gülbahar Mah. Avni Dilligil sk. No:5 Çelik Ýþ Merkezi Mecidiyeköy / Ýstanbul Wireless Outdoor Bridge WOB-201 EN 300 328 V1.7.1(2006-10) EN 301 489-1 V1.6.1 (2005-09) EN 301 489-17 V1.2.1 (2002-08) EN 55022:2006 Class B EN 61000-3-2:2006(Not applicable) EN 61000-3-3:1995+A1:2001+A2:2005(Not applicable) EN 61000-4-2: 1995+A1:1998+A2:2001 EN 61000-4-3: 2002+A1:2002 EN 61000-4-4 :2004 EN 61000-4-5 :2006 EN 61000-4-6 :1996+A1: 2001 EN 61000-4-11: 2004(Not applicable) EN 50385:2002 Gülbahar Mah. Avni Dilligil sk. No:5 Çelik Ýþ Merkezi Mecidiyeköy / Ýstanbul Bülent Çelebi Chairman of The Board of Directors & CEO YM.WB.201.UM.EN.D00 REV.23012008