1
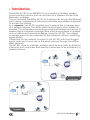
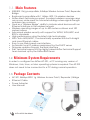
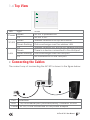
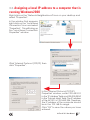
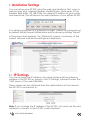
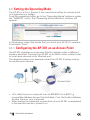
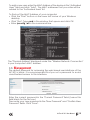
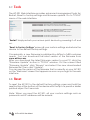
Wireless Access Point Repeater Bridge USER MANUAL Manual Overview This manual guides you through the steps necessary for setting up and configuring the AirTies AP-301 54Mbps 802.11g Wireless Access Point/Repeater/Bridge. Please read this manual carefully before beginning the installation process. The Warranty does not cover failure or damage as a result of not following the instructions in the manual. AirTies will not be held responsible in such circumstances. The User Manual is an important resource you can refer to for safe and proper use of your device. Please retain it for future reference. Safety and Maintenance In order to prevent damage to your device, be sure to keep it in its original box during transportation. The device must be used solely with its original power adapter. Please note that the adapter is 220V only. Do not use with 110V AC. Do not insert a PSTN (phone) plug into the LAN port. If you encounter any problems, do not open or disassemble the device. Instead, call AirTies Technical Support at +90 212 444 0239. In order to prevent electric shock, do not operate the device in wet or damp areas. Do not use the phones connected to the device during lightning storms. In the event of a gas leak, do not use the device. Do not turn the device on or off. Do not plug or unplug the power cord. Avoid using the device in dusty environments. If dust buildup should occur, use a dry cloth to remove the dust. To clean the exterior of the device use a dry cloth. Do not attempt to clean the interior. There are no user serviceable components inside. For information regarding the installation and configuration of the device consult the remainder of this manual. TABLE OF CONTENTS 1.Introduction...............................................................................................1 1.1.Main Features........................................................................................2 1.2. Minimum System Requirements........................................................2 1.3. Package Contents...............................................................................2 1.4. Top View...............................................................................................3 2. Connecting the Cables............................................................................3 3. Preparing For Installation....................................................................4 3.1. Assigning a local IP address to a computer that is running WindowsXP.....4 3.2. Assigning a local IP address to a computer that is running Windows98......5 3.3. Assigning a local IP address to a computer that is running Windows2000.....7 4.1. IP Settings...........................................................................................8 4.2. Wireless Network...............................................................................9 4.2.1. Wireless Settings...............................................................9 4.3. Setting the Operating Mode...............................................................10 4.3.1. Configuring the AP-301 as an Access Point...................................11 4.3.2. Configuring the AP-301 as a Repeater...........................................12 4.3.3. Configuring the AP-301 as a Bridge............................................14 4.4. Wireless Security Settings....................................................................15 4.1 WPA Security Settings...................................................................15 4.4.2 WPA2 Security Settings................................................................16 4.4.3 WEP Security Settings...........................................................................17 4.5. Access Control..................................................................................18 4.6. Management.......................................................................................19 4.7.Tools....................................................................................................20 4.8. Reset.................................................................................................20 5. Technical Specifications..........................................................................21 6. Physical Specifications............................................................................21 1. Introduction The AirTies AP-301 is an IEEE 802.11b/g compliant, 54 Mbps wireless communication device that can be used as a Wireless Access Point, Repeater, or Bridge. You can connect the AirTies AP-301 to a wired router through the Ethernet port to setup a wireless local network and enable your wireless computers to access the Internet. As a repeater, the AP-301 enables you to extend the coverage area of a wireless network. The AirTies Mesh Technology is what makes this possible. The AirTies Mesh Technology resolves problems such as loss of wireless signal or limited coverage area often encountered in multiplestory or reinforced concrete buildings. Using the AP-301, the wireless coverage area can be extended to the maximum without sacrificing signal quality. Computers on the network connect to the AP-301 with the strongest signal, and reach the router or the wired network through the AirTies Mesh Network. The AP-301, used as a bridge, enables wired devices (with an Ethernet interface) such as printers and desktop computers to be included in a wireless network. Access Point and Bridge Repeater AirTies AP-301 User Manual 1 1.1. Main Features IEEE 802.11b/g compatible, 54Mbps Wireless Access Point, Repeater, Bridge Backward compatible with 11Mbps 802.11b wireless devices AirTies Mesh Technology support to extend wireless coverage area across very wide areas or concrete buildings where signal strength problems are common Used as a "Wireless Bridge", ability to include wired devices with an Ethernet interface in the wireless network Wireless operating ranges of up to 400 meters outdoors and 100 meters indoors Advanced wireless security with support for WPA2, WPA,WEP, and 802.1x standards High performance using the latest chip technologies With "Auto MDI/MDIX", it automatically operates with both straight and cross Ethernet cables Easy to use Web-based user interface Automatic local IP address assignment by the DHCP server Firmware updates through the web interface 24x7 technical support by the highly trained AirTies Technical Support team backed up by the AirTies R&D team 1.2. Minimum System Requirements In order to configure the AirTies AP-301, a PC running any version of Windows, Unix, Linux, or Mac operating systems is required. The AP-301 does not need to be connected to a PC during normal operation. 1.3. Package Contents AP-301 54Mbps 802.11g Wireless Access Point / Repeater / Bridge Ethernet Cable Power Adapter User Manual Wir ele ss US ER 2 AirTies AP-301 User Manual MA NU AL Acc ess Rep Poin t e Bri ater dge 1.4 Top View LED Light Power Green Off WLAN LAN 2. State AP-301 is powered on. AP-301 is off. Green Wireless network is set up and active Green flashing Data exchange over the wireless LAN Off Wireless network not active No Wireless network Green There is a device connected to the LAN port Green flashing Data exchange over the LAN port Off No connection on the LAN port Connecting the Cables The correct way of connecting the AP-301 is shown in the figure below. Port LAN Interface 10/100 Ethernet port (auto MDI/MDIX); connects to LAN Power 5V DC; to be connected to the power adapter AirTies AP-301 User Manual 3 3. Preparing For Installation The installation settings of the AP-301 must be done from a PC that is directly, not wirelessly, connected to it. However, the AirTies AP-301 cannot assign an IP address to the PC connected to it for doing the installation settings since the DHCP feature is not enabled in the default factory settings. Therefore, an IP address will need to be assigned manually to the PC. 3.1. Assigning a local IP address to a computer that is running WindowsXP Double-click on the "Local Area Connection" icon on the bottom right corner of the WindowsXP desktop. This will bring up the "Local Area Connection Status" window. Click "Properties" to go to the "Local Area Connection Properties" window. Select "Internet Protocol (TCP/IP)" and click "Properties". 4 AirTies AP-301 User Manual In the "Internet Protocol (TCP/IP) Properties" window, enter 192.168.2.10 in the "IP Address" field and 255.255.255.0 in the "Subnet Mask" field. The IP address of the AP-301 is 192.168.2.254. Therefore, the IP address of the computer should be in the 192.168.2.x range. Click "OK" to save the values you have entered. 3.2. Assigning a local IP address to a computer that is running Windows98 Right click-on the "Network Neighborhood" icon on your desktop and select "Properties". This will take you to the "Network Connections" window. Select "TCP/IP" and click "Properties". AirTies AP-301 User Manual 5 In the "Internet Protocol (TCP/IP) Properties" window, go to "IP Address" tab. Enter 192.168.2.10 in the "IP Address" field and 255.255.255.0 in the "Subnet Mask" field. The IP address of the AP-301 is 192.168.2.254. Therefore, the IP address of the computer should be in the 192.168.2.x range. Click "OK" to save the values you have entered. 6 AirTies AP-301 User Manual 3.3. Assigning a local IP address to a computer that is running Windows2000 Right-click on the "Network Neighborhood" icon on your desktop and select "Properties". In the window that appears, right-click on the "Local Area Connection" icon and select "Properties". This will bring up the "Local Area Connection Properties" window. Click "Internet Protocol (TCP/IP) then click "Properties". In the "Internet Protocol (TCP/IP) Properties" window, enter 192.168.2.10 in the "IP Address" field and 255.255.255.0 in the "Subnet Mask" field. The IP address of the AP-301 is 192.168.2.254. Therefore, the IP address of the computer should be in the 192.168.2.x range. Click "OK" to save the values you have entered. AirTies AP-301 User Manual 7 4. Installation Settings You can setup your AP-301 using the web user interface. First, open a web browser (e.g. Internet Explorer, Mozilla Firefox, Netscape). In the Address field enter 192.168.2.254, the default IP address of your router, and press Enter. This will launch the web interface of your AirTies AP-301. You will be prompted for a password to login. There is no password set by default. Initially, leave this field blank and continue by clicking "Submit". In the screen that appears, the "Welcome" screen, a summary of the current network and device settings are displayed. 4.1. IP Settings You can change the IP address, the subnet mask and the gateway address of the AP-301 by going to the" IP Settings" submenu under the "LAN" menu of the web interface. These values can be obtained from the administrator of the network the AP-301 is connected to. Note: If you change the IP address of the AP-301, you must use the new address to connect to the AP-301's web interface. 8 AirTies AP-301 User Manual 4.2. Wireless Network As a wireless access point, the AP-301 enables mobile devices to access the local network. Clicking on the "WIRELESS " menu on the left menu bar of the AP-301 web interface displays all the wireless devices connected to the AP301. You can block a device's access to the AP-301 by checking the "Block" box to the left of the MAC address of the device. When all your modifications are done, click "Save". 4.2.1. Wireless Settings To configure your wireless network, go to "Wireless Settings" under the "WIRELESS " menu of the AP-301 web interface. Wireless Network Name (SSID) : In this field, you can assign a name to your wireless network and enable/disable the broadcasting of this name by the AP-301. Channel : Enter the broadcast channel number (frequency) in this field. Data Rate : You can adjust the wireless data rate of the AP-301. However, it is recommended that you leave this field as Auto. Mode : Select the wireless mode the AP-301 will be operating in. Wireless Transmit Power : You can set the Transmit Power of the AP301. The lower the transmit power, the smaller your wireless range will be. AirTies AP-301 User Manual 9 4.3. Setting the Operating Mode The AP-301 is a 3-in-1 device: it can operate as either an access point or a repeater or a bridge. To set the operating mode, go to the "Operating Mode" submenu under the "WIRELESS " menu. The "Operating Mode Selection" window will appear. In this window, select the mode that you want your AP-301 to operate in and click "Save". 4.3.1. Configuring the AP-301 as an Access Point The AP-301 operates as an Access Point by default unless a different mode is selected. Connect the AP-301 to an ADSL router, cable router or local area network via its Ethernet port. The diagram below is an example where the AP-301 is being used as an access point device. Access Point First verify that your computer has an IEEE 802.11b or 802.11g compatible Wireless Access Card installed. If not, first install a Wireless Access Card on your computer. After making the hardware connections of your AP-301 as explained in the previous section, power it on. 10 AirTies AP-301 User Manual On the computer(s) that will be connected to the AP-301 wirelessly, start the utility program for the Wireless Access Card (e.g. "Intel Proset" or "Wireless Network Connection" for Windows). Look for wireless networks in range in the "View Wireless Networks" window. Connect to the wireless network whose name (SSID) is "AIRTIES_AP-301", the default SSID of the wireless network set up by the AP-301. If you have assigned a different SSID to your wireless network during configuration, connect to that one. On your Windows computer, double-click the "Wireless Network" icon on the bottom right corner. In the "Wireless Network Connection Status" window that appears, click the "View Wireless Networks" button. The result will be similar to the one shown below. This example assumes your wireless network has the default SSID "AIRTIES_AP-301". 4.3.2. Configuring the AP-301 as a Repeater To use the AP-301 as a repeater, go to "Operating Mode" under the "WIRELESS" menu and select Repeater as the "Operating Mode". The following diagram is an example of the AP-301's use as a repeater. WLAN LAN POWER AP-301 Repeater WUS-300 WLAN LAN POWER INTERNET Phone Line / DSL AP-301 Repeater RT-211 PCC-2 PCC-2 WUS-300 AirTies AP-301 User Manual 11 Using more than one AP-301 as a repeater, and taking advantage of the AirTies Mesh Technology®, you can extend and strengthen your wireless network. AirTies Mesh Technology® helps resolve problems such as weak or lost signal, and limited signal range that is commonly seen in concrete buildings. The Mesh Network consists of a wireless AirTies router and multiple AirTies AP-301 devices. The AP-301s in repeater mode communicate with each other and the wireless AirTies router via the Mesh protocol. The wireless computers connect to the access point closest to them automatically. They reach the AirTies router via the other repeaters in between. In this manner, wireless coverage area can be expanded significantly. When you select Repeater as the "Operating Mode", the "Repeater Settings" page will come up. From then on, this title will also appear under the "Wireless Settings" menu of the web user interface. 12 AirTies AP-301 User Manual In the "Repeater Settings" page, you will find a list of available access points and repeaters the AP-301 can connect to. Check the box to the left of the access point / repeater you would like the AP-301 to connect to. The access point will appear in the list below, titled "Access Points to Connect to". Click "Save" to complete the Repeater Settings. Important: The repeaters and the access point must all be operating on the same channel for them to form a Mesh Network. They should also have a transmit power of at least -70dBm. (In the above example, 49dBm satisfies this requirement). You need to configure the access point that will form a Mesh Network with the AP-301 the same way as the AP-301. For example, to setup a Mesh Network between a RT-211 and an AP-301, the Mesh settings should be done the same way on both devices. The screenshot below shows the RT-211 Mesh setup screen. In this window, after you check the "Activate Bridge/Repeater Connections" box, check the box to the left of the AP-301 that you have already configured and click "Save". The RT-211 and the AP-301 will now recognize each other. At the point where the wireless signal from the RT-201 weakens, the AP-301 will boost the signal and extend the coverage area. Note: You can only use WEP encryption in a wireless network with a MESH structure. You can find more information about this in the Wireless Security section. AirTies AP-301 User Manual 13 4.3.3. Configuring the AP-301 as a Bridge You can include a wired device (e.g. printer) to your wireless network by connecting the device to the LAN port of an AP-301 operating in Bridge mode. The diagram below is an example of the AP-301's use as a bridge (connected to a printer). To set the bridge mode, go to "Operating Mode" under the "WIRELESS" menu of the web interface. Select Bridge in the "Operating Mode" field and click "Save". Note: The AP-301 does not do wireless broadcast in bridge mode. To configure and operate the AP-301 in bridge mode, you need to be directly connected to the Ethernet port. When you select Bridge as the "Operating Mode", the "Access Point List" page will come up. At the same time, "Access Point List" will appear under the "Wireless Settings" menu of the web interface. 14 AirTies AP-301 User Manual In this window, you will see a list of all the available wireless access points that the AP-301 bridge can connect to. Check the box next to the access point you would like to connect to and click "Save". 4.4. Wireless Security Settings It is not necessary to configure wireless security to enable wireless communication. However, due to growing importance of data security, it is recommended that you choose a suitable security protocol and configure the AP-301 to use it. WPA, WPA2 and WEP wireless encryption protocols can be used to encrypt traffic between the wireless terminals and the AP-301. MAC Address Filtering allows only the predefined authorized computers to exchange data with the AirTies AP-301 and blocks access by those that are not authorized. For your wireless network security, it is recommended that both MAC address filtering and one of the wireless encryption protocols WAP, WAP2, or WEP be activated. 4.4.1 WPA Security Settings Wi-Fi Protected Access (WPA) is one of the latest and most advanced wireless encryption standards and provides you with the highest level of data protection. All AirTies wireless products and the newly introduced 802.11g wireless communication devices support WPA. If you would like to use WPA in your wireless network, all the wireless terminals in your network need to support WPA. Go to "Wireless Security" under the "WIRELESS NETWORK" menu on the left menu bar of the AP-301 Web interface. AirTies AP-301 User Manual 15 To enable WPA encryption, click on the "WPA" button in the "Wireless Security" screen.Click on the "PSK" button and enter a network key that is 8 to 63 characters long (use a combination of letters and digits) in the "password" field. Make sure you choose a key that is not easy to guess. Click "Save". You must activate WPA and set the same network key in all the wireless devices that will communicate with the AP-301. 4.4.2. WPA2 Security Settings WPA2 is the latest encryption method defined by the IEEE 802.11i wireless security standard. If you would like to use WPA2 encryption in your wireless network, all the wireless terminals in your network need to support WPA2. If you have a Centrino laptop, in order to use WPA2 encryption you need to download the WPA2 updates for your Windows XP operating system. ( www.microsoft.com ). To enable WPA2 encryption, click on the "WPA2" button in the "Wireless Security" screen.Click on the "PSK" button and enter a network key that is 8 to 63 characters long (use a combination of letters and digits) in the "password" field. Make sure you choose a key that is not easy to guess. Click "Save". 16 AirTies AP-301 User Manual You must activate WPA2 and set the same network key in all the wireless devices that will communicate with the AP-301. 4.4.3.WEP Security Settings AirTies AP-301 supports the Wired Equivalent Privacy,WEP, encryption standard as well. If any of the devices in your wireless network does not support WPA, it is recommended that you choose WEP encryption. If the AP-301 device is being used in a MESH Network, i.e. communicating with other devices that operate in repeater mode via the MESH protocol, then you can only use WEP encryption. Click on the WEP button in the Wireless Security window. AirTies AP-301 User Manual 17 Check the Enable WEP Encryption box. Depending on which encryption level you choose, enter a network key in the corresponding field. 64-bit hexadecimal encryption : Enter a key of up to 10 hexadecimal haracters (0-9 and A, B, C, D, E, F) e.g. "4321abcdef" 64-bit ASCII encryption : Enter a key of up to 5 ASCII characters(all digits and letters) e.g. "sifre" 128-bit hexadecimal encryption : Enter a key of up to 26 hexadecimal characters (0-9 and A, B, C, D, E, F) e.g. "12a34b56c78d90e123456f7890" 128-bit ASCII encryption : Enter a key of up to 13 ASCII characters (all digits and letters) e.g. "kablosuzsifre" You must activate WEP and set the same network key in all the wireless devices that will communicate with the AP-301. 4.5. Access Control To enable Access Control go to "Access Control" under the "WIRELESS" menu of the AP-301 web interface. In the window that appears, you can enter the MAC addresses of the devices that are permitted to access the AP-301. No other device but those permitted can connect to the AP-301. 18 AirTies AP-301 User Manual To add a new user, enter the MAC Address of the device in the "Authorized Users" field and click "Add". The MAC addresses that you enter will be added to the "Authorized Users" list. To find out the MAC Address of your computer: Click the "Start" button on the lower left corner of your Windows desktop. Click "Run". Type cmd in the window that opens and click OK. Enter ipconfig /all in the command line. The "Physical Address" displayed under the "Wireless Network Connection" is your computer's MAC address. 4.6. Management The default password for accessing the web-based user interface of the AP-301 is blank. It is recommended that you set a password to avoid unauthorized access to this interface. Enter the current password in the "Current Password" field. (Leave this field blank for the first use.) Then enter your new password in the "New Password" and "Confirm New Password" fields. Click "Save". AirTies AP-301 User Manual 19 4.7. Tools The AP-301 Web interface provides advanced management tools for: Restart, Reset to factory settings and Firmware update. Go to "TOOLS" menu of the web interface. "Restart" simply restarts your access point device by powering it off and on. "Reset to Factory Settings" erases all your custom settings and returns the device to the default factory settings. Occasionally, a new firmware is published by AirTies to fulfill customer needs. You can download the latest version of the firmware from www.airties.com. After you download the latest firmware version to your PC, click the "Firmware Update" button in "TOOLS" window. On the screen titled "Firmware Update" click "Browse" and select the new downloaded firmware file. Then, click "Update". You can see the version of the firmware that is currently on your AP-301 on the "Welcome" screen that appears as soon as you login to the web interface. 4.8. Reset To reset the AP-301 to the default factory settings, press and hold the reset button at the bottom of the device with the tip of a pencil or similar pointed object for 5 seconds. Note: When you reset the AP-301, all your custom settings such as passwords and IP addresses will be erased. 20 AirTies AP-301 User Manual 5. Technical Specifications Ports: 1 Ethernet port (10/100, auto MDI/MDIX), 5V DC power in Wireless transmit power: 20dBm EIRP Wireless security: WPA (802.1x, TKIP, PSK), WPA2 (IEEE802.11i, AES, CCMP), WEP (64/128 bit), MAC filtering, SSID hiding Wireless standards: Compliant with IEEE 802.11b, 802.11g, 802.11d, 802.11e and 802.11i LEDs: Power, WLAN, LAN Wireless data rates: 1, 2, 5.5, 6, 9, 11, 12, 24, 36, 48, 54Mbps (auto speed adjustment) Frequency range: From ETSI 2400MHz to 2483.5MHz (13 channels, 3 not overlapping) Power: External 5V power adapter Mounting: wall or desktop Reset button to return the router to default factory settings 6. Physical Specifications Dimensions: 9cm x 7cm x 2.5cm Weight: 150 g Power: 5Volt DC Operating Temperature: 0°C - 40°C Storage Temperature: -25°C - 75°C Humidity: %10 - %90 AirTies AP-301 User Manual 21 YM.AP.301.UM.EN.D00 Rev 26072007