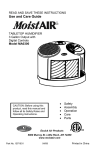
1
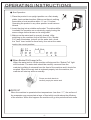
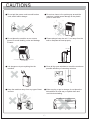
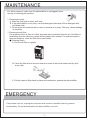
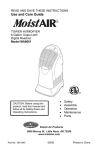
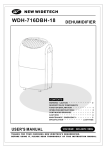
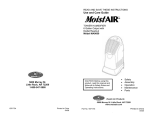
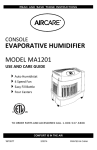
INDICE
AVVERTIMENTI/ATTENZIONE ………………………………………………… 0
DESCRIZIONE DEI COMPONENTI/FUNZIONI…
……………………………….. 1
ISTRUZIONI D’USO…
………………………………………………………………. 2
DRENAGGIO CONTINUO…
……………………………………………………….. 3
…………………………………………………………………… 4
AVVERTIMENTI…
MANUTENZIONE/EMERGENZA…
………………………………………………... 5
SPECIFICHE…
………………………………………………………………………. 6
CONTENTS
WARNING / CAUTION ................................................................................... 0
DESCRIPTION OF COMPONENTS / FUNCTION EXPLANATION............... 1
OPERATION INSTRUCTIONS …………………………………………………. 2
CONTINUOUS DRAINAGE …………………………………………………….. 3
CAUTIONS ………………………………………………………………………… 4
MAINTENANCE/EMERGENCY …………………………………………………. 5
SPECIFICATIONS........................................................................................... 6
WHEELS INSTALLATION
(only for ECODRYPRO 30)
Wheels installation is recommended to avoid damage to floors .
1. Remove the wheels from the bucket of the dehumidifier .
2. Position the dehumidifier on its side .
3. Locate the arrow on the bottom of the dehumidifier and insert
the wheel according to the arrow direction .
4. Slide the wheel in as far as it will go. The wheel will snap
into place.
5. Repeat steps 1 to 4 for the other 3 wheels.
WARNING
● Do not fold the power cord as
shown below!
● Make sure the plug is placed fully &
firm into the socket!
● Do not use multiple socket as
shown below!
● Make sure the plug is clean!
● After turning the unit off, please take
plug out of the socket.
● Do not have wet hands when
connecting the power plug.
● Do not place anything on top
of the control panel!
● Do not place anything over the inlet
or outlet points.
● Do not let children by play
with the unit or control!
● Do not wet the machine or
the control panel!
● Keep the flammable gas/oil away from
the machine!
● Ask professionals to do the
servicing!
CAUTION
-1-
DESCRIPTION OF COMPONENTS
CONTROL PANEL
HANDLE
MOISTAIR
INTAKE
DEHUMIDIFIED
DRYAIR VENT
AIR FILTER
DRAIN BUCKET
CONTINUOUS
DRAINAGE OUTLET
ROLL CASTORS
FUNCTION EXPLANATION
BUCKET FULL LAMP
Water tank is full,and
lamp lights.
FAN SPEED
High / Low
POWER
On / Off
DEFROST LAMP
CURRENT TEMP / TIMER SET DISPLAY
When low temperature,
unit gets into defrosting
mode and lamp lights.
When machine is running, it displays the current temperature. Press
the "Timer" button to set the machine to shut off automatically after a
specified amount of time. 10 seconds after displaying the timer, the
display will change back to current temperature.
TIMERS
SET HUMIDITY / CURRENT HUMIDITY DISPLAY
When unit operates, press
"TIMER" set hours unit will off
after set hours.
When unit stand-by, press
"TIMER" set hours unit will on
after set hours.
Setting timer from 1~24 hours.
To cancel the timer, proceed
as above but set the "timer off"
to zero hours.
When machine is running, it displays the current
humidity. Press "▲" or "▼ " to select humidity
setting. The humidity is adjusted in an increment
of 5% by each pressing of " ▲" or " ▼". Adjustable
range is within 30%RH to 90%RH. 10seconds
after setting humidity, the display will change
back to the current humidity.
-2-
Press the ℃/℉
switch buttons,
it will switch at
sequence of
℃ and ℉.
OPERATING INSTRUCTIONS
● Start Operation
1) Place the product in an upright position on a flat, steady,
stable, heat-resistant surface. Make sure there is nothing
flammable or heat sensitive within 100 cm (39 inches).
Operating the product in any other position could cause a
hazard.
2) Insert the plug into a suitable wall socket. The dehumidifier
is suitable for operation on an electricity supply having the
same voltage as that shown on its rating label.
3) Make sure the water tank is correctly located. (After
switching on the machine for the first time, if the "Bucket
Full" lamp illuminates, just pull out the water tank, check
the "float" lever is able to move freely, then return the water
tank to the correct position.)
● When Bucket Full Lamp Is On
When the water tank is full the machine will stop and the "Bucket Full" light
will illuminate. The water tank should be carefully removed from the
machine by sliding it outwards from the front of the machine and it should be
emptied. When the empty tank is replaced properly into the machine, the
machine will start up and run normally.
Please use both hands to
carefully empty the water tank.
● DEFROST
When the machine is operated at low temperatures (less than 12 ℃) the surface of
the evaporator may accumulate a layer of frost which would reduce the efficiency
of the machine. When this happens the machine will go into periodic defrost mode.
-4-
CONTINUOUS DRAINGE
The function of continuous drainage can be started in following steps
when there is a good condition of drainage near by the unit.
1. To save having to periodically empty the
water tank, this unit can be configured
for continuous drainage. You can use the
supplied drain hose to connect to the
continuous drainage connector.
Back of the unit
Drain hose
Drain cover
Drain cover
2. Unscrew and remove the drain cover at
the rear of the unit.
3. Remove the soft rubber stopper. Put it
into the water tank for safe keeping.
4. Insert the drain hose through the hole of
the drain cover.
Soft rubber
stopper
Drain cover
Drain cover
Drain hose
5. Connect the drain hose to the drain port.
6. Tighten the drain cover in clockwise
direction onto the rear of the unit.
Drain cover
Drain hose
Drain hose
7. Place the bucket on its original location.
Bucket
INSTALLING DRAINAGE PVC HOSE
When using the function of continuous drainage, the PVC hose must be placed horizontally
below the drainage hole. Must avoid uneven ground and folding the hose.
-5-
CAUTIONS
● Do not pull the power cord to avoid broken
cord, which lead to danger.
● Do not use insect, oil or paint spray around the
machine, it might cause damage to the plastic
parts or start a fire.
● Do not place the machine on an uneven
ground, to avoid shaking, noise and leakage
of water.
● Please always keep the unit 20 cm away from the
wall to dissipate the heat properly.
20 cm
● It is dangerous to put anything into the
machine.
● Close all the open windows to reach the maximum
possible efficiency of removing moisture.
● Keep the machine away from any type of heat
sources.
● When moving or put in storage, do not place the
dehumidifier on side way or upside down and
avoid violent shaking.
- 6-
MAINTENANCE
For safety reasons, make sure the dehumidifier is unplugged before
serving or cleaning the machine.
1) Cleaning the shell :
A. Wipe the shell with a clean, soft cloth.
B. If the dehumidifier is very dirty, use mild detergent then wipe off the detergent with
half dried cloth.
C. Do not wash the machine with a hose or immerse it in water. The may cause leakage
of electricity.
2) Cleaning the air filter :
The propose of the air filter is to filter dust and other materials from the air. If the filter is
blocked by dust the electricity usage will be greater than normal, For optimal moisture
removal efficiency, clean the filter every two weeks.
● Cleaning Steps:
A. Pull the air filter out gently.
B. Clean the filter with a vacuum cleaner or wash it with clean water and dry with
a dry cloth.
C. Put the clean air filter back in place and continue to operate the dehumidifier.
EMERGENCY
If a problem occurs, unplug the machine and contact a qualified serving center
immediately. Do not disassemble the dehumidifier yourself!
- 7-
SPECIFICATIONS
MODEL
ECODRYPRO 30 ECODRYPRO 50
POWER SUPPLY
220-240V / 50 Hz
MOISTURE REMOVAL
15 L/24h
(27° C - 60%RH)
30 L/24h
(30°C - 80% RH)
25 L/24h
(27°C - 60% RH)
50 L/24h (30° C 80% RH)
POWER INPUR
520 W
DIMENSIONS
( Height./Width./Depth.)
540x340x252
13.2 kg
WEIGHT
OPERATING LIMITS
740 W
600x388x282
19.5 kg
5°C ~ 35°C
F-GAS REGULATION (EC) no. 842/2006
Do not vent R410A into atmosphere: R410A is a fluorinated greenhouse gas, covered by Kyoto
Protocol, with a Global Warming Potential (GWP) = 1975.
x
x
x
Do not use the appliance if the cord or plug are damaged. If the power supply cord is damaged, it must be replaced by
the manufacturer, dealer or a similarly qualified person so as to avoid any safety risks.
This product is not a toy. Children should be adequately supervised to ensure that they do not play with the appliance.
This appliance is not suitable for use by persons (including children) with reduced physical, sensory or mental abilities, or
without the necessary experience and knowledge, unless they have been adequately supervised and instructed
concerning use of the appliance by a person responsible for their safety.
INFORMATION FOR CORRECT DISPOSAL OF THE PRODUCT IN ACCORDANCE WITH THE EUROPEAN DIRECTIVE
2002/96/EC
At the end of its working life this equipment must not be disposed of as an household waste. It must be taken to special local
community waste collection centres or to a dealer providing this service. Disposing of electrical and electronic equipment
separately avoids possible negative effects on the environment and human health deriving from an inappropriate disposal and
enables its components to be recovered and recycled to obtain significant savings in energy and resources. In order to
underline the duty to dispose of this equipment separately, the product is marked with a crossed-out dustbin.
www.argoclima.com
MADE IN CHINA