1
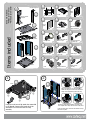
Easy Setup Guide GM 150 Items not included: - Phillips screw driver - Flat head screw driver F Camera support G Screen mount support H Back cover Screen support Shelf x1 M Front glass Acrylic platform Items included C O Top frame B Q A Philips head bolt 1/4"x 3/4" x6 T x2 V Base Rack Bolt and nut x1 x4 Glass hinge x11 U Lock Philips head bolt 5/16"x1 1/4" S R Flange nut 1/4" Side panels x4 x2 x4 P Philips flat head 1/4" Blind nut 1/4" Carriage bolt With break 2 Without break 2 x8 Multi wrench Hex key x1 2 A B Back M Using the multi wrench V, attach the casters M to the Base A. Casters with break should be assembled on front and Locked for easy assembly. Adjust the width of one side panel B to make the flanges fit in the front and back holes of the base A and press until click. Front N 1 x1 x1 Top x1 x1 L K D J I Screw the philips head bolts R in the base nuts. Then repeat these steps with the other side panel. Leave the sides lose until both the bottom and top frame are in place. Place the wider side of the top frame in the front of the cart and place the slot face down. C Follow these steps in one corner at a time. R To fit the lateral flange with the top frame C holes press until click and secure with bolt R. 4 B Note: hand tighten bolts then proceed to step 4, once glass door is installed then tighten the bolts for the top frame. Fit the hinge with the glass in the top frame hole. Place the other hinge S in the base A and slide the glass. Then secure the glass with the two set screws. K 5 Adjust the glass using the set bolts of each hinge to align it correctly. Attach one hinge S in the left top corner of the front glass K with two set screws with a flat head screw driver. Make sure the set screws are in the inside. Adjust the lateral width to make the flanges fit. 3 J D Q Q C Slide the four pins of the top D into the top frame C following the top square guides and screw with flange nut Q from the inside. 6 Fit the back cover J bracket into the side panel hole. J Slide the back cover J flanges into the base A. 7 Place the shelf I flanges into the rack squares. Secure the back cover with the philips head bolt R. First, insert the cage nut U into the rack squares at the desire height from the inside. Outside I Inside Screw the shelf with two bolts U into the cage nuts U. Compresing the padlock, slide the lock handle and the washer thru the cilinder as shown in the sequence. Then insert it in the glass with the flange outside and secure with the plastic nut. 8 9 F Place the screen mount support F in the top D, sliding the flange into the rectangular hole and fit two carriage bolts N in the squares. Q N 10 Fix the mount support F with flange nuts Q from the inside of the cart using the multi wrench V. 11 H Attach the acrylic L to the camera support G with the philips flat head bolts O. P O Attach the screen support H with four philips head bolts P at the desired height. Note: See instructions inside screen support box to mount flat screen on cart. 12 L G Attach the camera support G at the desired height with two philips bolts R. R NOTE: After finishing, tighten the nuts of the side panels carriage bolts from the inside.