1
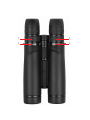
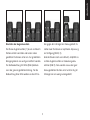
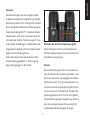
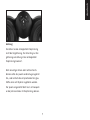
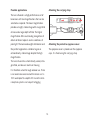
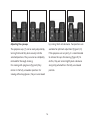
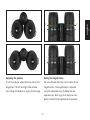
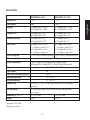
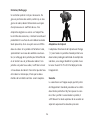
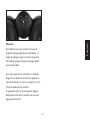
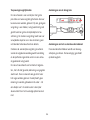
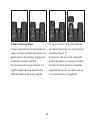
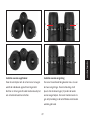
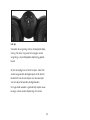
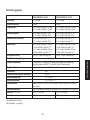
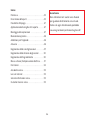
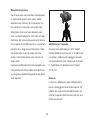
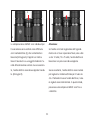
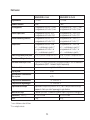
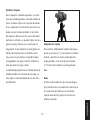
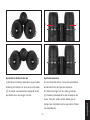
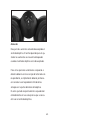
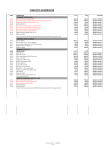
LEICA DUOVID 8+12 x 42/10+15 x 50
Anleitung, Instructions,
Notice d’utilisation, Gebruiksaanwijzing,
Istruzioni, Instrucciones
4
1a
1b
2
2
5
5
6
7
2
2
3
3
Bezeichnung der Teile
1. Okular-Augenmuscheln
Stellung a: herausgedreht für Beobachtung
ohne Brille
Stellung b: hereingedreht für Beobachtung
mit Brille
2. Drehringe für die Wahl der Vergrößerung mit
Index-Markierung
3. Feststehende Ringe mit Markierungen für die
beiden Vergrößerungen
4. Verriegelbarer Dioptrienring
5. Ösen für Tragriemen
6. Zentralfokussierungsring
7. Gelenkachse für Einstellung des Augenabstands
Der Name Leica steht weltweit für höchste
Qualität, feinmechanische Präzision bei äußerster
Zuverlässigkeit und langer Lebensdauer.
Wir wünschen Ihnen viel Freude und Erfolg mit
Ihrem neuen Leica Duovid. Die hervorragenden
optischen Eigenschaften und die variable Vergrößerung ermöglichen es Ihnen, dieses handliche Fernglas unterschiedlichen Beobachtungssituationen anzupassen.
Damit Sie es richtig einsetzen können, empfehlen wir Ihnen, zunächst diese Anleitung zu lesen.
1
deutsch
Vorwort
Sehr geehrte Kundin, sehr geehrter Kunde,
Inhaltsverzeichnis
Vorwort . . . . . . . . . . . . . . . . . . . . . . . . . . . . . . 1
Bezeichnung der Teile . . . . . . . . . . . . . . . . . . . 1
Anwendungsmöglichkeiten . . . . . . . . . . . . . . . 3
Anbringen des Tragriemens . . . . . . . . . . . . . . 3
Anbringen des Okular-Schutzdeckels . . . . . . . 3
Pflege/Reinigung . . . . . . . . . . . . . . . . . . . . . . 4
Stativadapter . . . . . . . . . . . . . . . . . . . . . . . . . . 4
Bereitschaftstasche . . . . . . . . . . . . . . . . . . . . 4
Einstellen der Augenmuscheln . . . . . . . . . . . . 5
Einstellen des Augenabstands . . . . . . . . . . . . 6
Einstellen der Vergrößerung . . . . . . . . . . . . . . 6
Einstellen der Schärfe/Dioptrienausgleich . . . 7
Technische Daten . . . . . . . . . . . . . . . . . . . . . 10
Leica Akademie . . . . . . . . . . . . . . . . . . . . . . . . 11
Leica im Internet . . . . . . . . . . . . . . . . . . . . . . . 11
Leica Infodienst . . . . . . . . . . . . . . . . . . . . . . . . 11
Leica Customer Service . . . . . . . . . . . . . . . . . 11
Warnhinweis
Vermeiden Sie, wie bei jedem Fernglas, den
direkten Blick mit Ihrem Leica Duovid in helle
Lichtquellen, um Augenverletzungen auszuschliessen.
2
Anbringen des Tragriemens
Anbringen des Okular-Schutzdeckels
Der Okular-Schutzdeckel wird über die Augenmuscheln gestülpt. Die Befestigung erfolgt am Tragriemen.
3
deutsch
Anwendungsmöglichkeiten
Das Leica Duovid ist ein Hochleistungs-Fernglas
mit zwei Vergrößerungen, die je nach Bedarf
gewählt werden können. Bei der geringeren
Vergrößerung steht ein helles, ruhiges Bild mit
großem Sehfeld und hoher Schärfentiefe zur
Verfügung. Die höhere Vergrößerung bietet eine
hervorragende Detailerkennbarkeit bei weit entfernten Gegenständen und in der Dämmerung.
Insbesondere die ausgewogene Gewichtsverteilung und die perfekte Ergonomie ermöglichen
zusammen eine erstaunliche Bildruhe trotz der
hohen Vergrößerung.
Das Leica Duovid besitzt ein hermetisch dichtes, stickstoffgefülltes, Aluminium-DruckgussGehäuse. Es eignet sich daher auch für den
rauhen Outdoor-Einsatz. Dabei muss auch auf
Nässe keine Rücksicht genommen werden – es
ist bis 5 m Wassertiefe absolut dicht und die
innenliegende Optik beschlägt nicht.
Pflege/Reinigung
Eine besondere Pflege ist nicht notwendig.
Grobe Schmutzteilchen, wie z. B. Sand, sollten
mit einem Haarpinsel entfernt oder weggeblasen
werden. Fingerabdrücke u. ä. auf Objektiv- und
Okularlinsen können mit einem weichen, sauberen Leder oder staubfreien Tuch abgewischt werden. Bei starker Verschmutzung, z. B. der OkularSchiebehülsen, kann eine Reinigung des Fernglases durch einfaches Abspülen unter fließendem
Wasser erfolgen. Salzwasser sollte ebenso abgespült werden.
In den Mitteltrieb eingedrungene Feuchtigkeit
(sichtbar im Skalenfenster), trocknet am schnellsten ab, wenn die Knopfhälften (4, 6) entkoppelt
sind.
Stativadapter
Der funktionelle Stativadapter mit 1/4” Gewinde
für alle Duovid Ferngläser ermöglicht lang andauerndes, verwacklungsfreies Beobachten.
Beim Leica Duovid 10+15x50 ist er bereits im
Lieferumfang enthalten.
Bereitschaftstasche
Die mitgelieferte Bereitschaftstasche aus weichem Nappaleder bietet Schutz vor Verschmutzung des Fernglases. Zum Durchstecken des Fernglas-Tragriemens ist am oberen Ende der Tasche
eine Klappe mit Druckknöpfen vorgesehen.
4
deutsch
A
B
C
Einstellen der Augenmuscheln
Die Okular-Augenmuscheln (1) lassen sich durch
Drehen einfach verstellen und rasten in den
gewählten Positionen sicher ein. Zur gründlichen
Reinigung können sie auch ganz entfernt werden.
Für die Beobachtung mit Brille (Bild A) bleiben
sie in der ganz eingedrehten Stellung. Für die
Beobachtung ohne Brille werden sie durch Dre-
D
hen gegen den Uhrzeigersinn herausgedreht. Es
stehen zwei Positionen zur optimalen Anpassung
zur Verfügung (Bild B, C).
Sind die Okulare stark verschmutzt, empfiehlt es
sich die Augenmuscheln zur Säuberung abzunehmen (Bild D). Dazu werden sie aus der ganz
herausgedrehten Position unter leichtem Zug im
Uhrzeigersinn ein wenig zurückgedreht.
5
2
Einstellen des Augenabstands
Durch Knicken des Fernglases um die Gelenkachse (7) wird der individuelle Augenabstand
eingestellt. Rechtes und linkes Sehfeld müssen
dabei zu einem kreisrunden Bild verschmelzen.
2
Einstellen der Vergrößerung
Das Leica Duovid bietet dem Anwender die Wahl
zwischen zwei Vergrößerungen. Die Umstellung
erfolgt mit den Drehringen (2) unterhalb der
beiden Okular-Augenmuscheln. Es müssen dazu
immer beide Ringe vollständig in die jeweiligen
Endstellungen gedreht werden.
6
deutsch
Hinweise:
Zwischenstellungen sind zwar möglich, jedoch
ist dabei eine identische Vergrößerung in beiden
optischen Systemen nicht sichergestellt. Darüber
hinaus erfolgt die automatische Übertragung der
Dioptrieneinstellung (ADC™ – Automatic Diopter
6
Compensation, siehe auch im nächsten Abschnitt
„Einstellen der Schärfe/Dioptrienausgleich“) nur
in den beiden Endstellungen. Fehlerhafte Einstellungen können deshalb schnell zur Belastung der
Augen und zur Ermüdung führen.
Da der linke Ring mit der automatischen Dioptrieeneinstellung gekoppelt ist, läuft er geringfügig schwergängiger als der rechte.
Einstellen der Schärfe/Dioptrienausgleich
Die Einstellung der Schärfe auf verschieden weit
entfernte Objekte erfolgt am Leica Duovid mit dem
Zentralfokussierungsring (6).
Hinweis:
Die Scharfeinstellung des Leica Duovid bleibt auch
nach dem Wechsel der Vergrößerung erhalten. In der
Praxis kann dennoch ein geringfügiges Nachstellen
erforderlich werden. Dies gilt insbesondere für den
Fall, wenn zunächst bei geringerer Vergrößerung fokussiert wurde und anschließend auf die höhere Vergrößerung gewechselt wird. Der Grund: Die größere
Schärfentiefe bei geringerer Vergrößerung, die oft zu
einer etwas weniger genauen Fokussierung führt,
und die Akommodationsfähigkeit der Augen.
7
4
A
B
Der Ausgleich individueller Fehlsichtigkeit für die
Beobachtung ohne Brille wird mit dem Dioptrienring (4) vorgenommen, der normalerweise verriegelt ist. (Bild A). Zuerst wird mit der Zentralfokussierung das rechte Rohr auf ein Objekt
scharf gestellt. Dann wird der Dioptrienring
durch Ziehen entkoppelt. (Bild B).
Achtung:
Befindet sich der linke Vergrößerungsverstellring
nicht in einer Endstellung, d. h. bei 8x oder 12x/
10x oder 15x, ist der Dioptrienring blockiert und
kann nicht entkoppelt werden.
Anschließend wird an dem Dioptrienring durch
Verdrehen für das linke Rohr auf optimale Schärfe eingestellt. Durch Herunterdrücken des Dioptrienrings wird der eingestellte Wert gespeichert.
Fehlsichtigkeits-Unterschiede bis zu ± 3 Dioptrien
lassen sich so ausgleichen.
8
deutsch
Achtung:
Verstellen Sie bei entkoppeltem Dioptrienring
nicht die Vergrößerung. Der linke Ring zur Vergrößerungsverstellung ist bei entkoppeltem
Dioptrienring blockiert.
Beim einseitigen linken oder rechten Durchblicken sollte das jeweils andere Auge zugekniffen-, oder einfach die entsprechende Fernglashälfte vorne am Objektiv zugehalten werden.
Der jeweils eingestellte Wert lässt sich bequem
an der präzisen Skala im Dioptrienring ablesen.
9
Technische Daten
Vergrößerung:
Objektivdurchmesser:
Austrittspupille:
Dämmerungszahl:
Geometrische Lichtstärke:
Sehfeld:
Naheinstellgrenze:
Einstellung der Vergrößerung:
Dioptrien-Ausgleich:
Augenabstand:
Prismenart:
Phasenkorrekturbelag auf Prismen:
Funktionstemperatur:
Lagertemperatur:
Wasserdichtigkeit:
Gehäusematerial:
Maße (B1 x H2 x T1):
Gewicht:
1
2
LEICA DUOVID 8+12 x 42
LEICA DUOVID 10+15 x 50
8-/12fach
10-/15fach
42 mm
50 mm
bei 8facher Vergrößerung: 5,25 mm,
bei 10facher Vergrößerung: 5,00 mm,
bei 12facher Vergrößerung: 3,5 mm
bei 15facher Vergrößerung: 3,3 mm
bei 8facher Vergrößerung: 18,33,
bei 10facher Vergrößerung: 22,36,
bei 12facher Vergrößerung: 22,45
bei 15facher Vergrößerung: 27,39
bei 8facher Vergrößerung: 27,56,
bei 10facher Vergrößerung: 25,00,
bei 12facher Vergrößerung: 12,25
bei 15facher Vergrößerung: 11,1
bei 8facher Vergrößerung: 118 m auf
bei 10facher Vergrößerung: 92 m auf
1.000 m Entfernung, in Grad 6,7°,
1.000 m Entfernung, in Grad 5,3°,
bei 12facher Vergrößerung: 90 m auf
bei 15facher Vergrößerung: 70 m auf
1.000 m Entfernung, in Grad: 5,1°
1.000 m Entfernung, in Grad: 4,0°
3,50 m, - 4,5 dptr. Überhub über ∞
3,80 m, - 4,5 dptr. Überhub über ∞
Einzelokular-Umschaltung
±3 Dioptrien, -4,5 Dioptrien Überhub, Einstellung des Dioptrieausgleiches bleibt bei
Umschaltung der Vergrößerung erhalten (ADC™ – Automatic Diopter Compensation)
auf 56–74 mm einstellbar
Dachkant
ja, P40
- 25° bis 55°
- 40° bis 85°
druckwasserdicht bis 0,5 bar = 5 m Wassertiefe, Stickstoff-Füllung für Beschlagfreiheit in jeder Situation
Aluminium-Druckguss, mit vollständiger, ergonomischer und griffiger Gummiarmierung
120 x 157 x 67 mm
126 x 195 x 67 mm
1045g
1250g
Bei Augenabstand 65 mm
Bei eingedrehten Augenmuscheln
10
e-mail: [email protected]
Leica Customer Service
Für die Wartung Ihrer Leica Ausrüstung sowie in
Schadensfällen steht Ihnen der Customer Service
der Leica Camera AG oder der Reparatur-Service
einer Leica Landesvertretung zur Verfügung
(Adressenliste siehe Garantiekarte).
Bitte wenden Sie sich an Ihren autorisierten Leica
Fachhändler (in Deutschland: Leica Repräsentanz).
Leica im Internet
Aktuelle Informationen zu Produkten, Neuheiten,
Veranstaltungen und dem Unternehmen Leica
erhalten Sie auf unserer Homepage im Internet
unter: http://www.leica-camera.com
Leica Camera AG
Reparatur-Service
Oskar-Barnack-Str. 11/D 35606 Solms
Tel:
+49(0)64 42-208 189
Fax: +49(0)64 42-208 339
e-mail: [email protected]
Leica Infodienst
Anwendungstechnische Fragen zum Leica Programm beantwortet Ihnen schriftlich, telefonisch,
11
deutsch
per Fax oder per e-mail der Leica InformationsService:
Leica Camera AG
Informations-Service
Postfach 1180/D 35599 Solms
Tel:
+49(0)64 42-208 111
Fax: +49(0)64 42-208 339
Leica Akademie
In den verschiedenen Seminaren wird dem Teilnehmer in praxisorientierter, zeitgemäßer Form
die Werte-Welt der Leica und die Faszination des
gekonnten Umgangs mit den Leica Produkten
vermittelt. Die Inhalte sind anwendungsorientiert
und bieten eine Fülle von Anregungen, Informationen und Ratschlägen für die Praxis.
Leica Camera AG
Leica Akademie
Oskar-Barnack-Str. 11/D 35606 Solms
Tel:
+49(0)64 42-2 08 421
Fax: +49(0)64 42-2 08 425
e-mail: [email protected]
Foreword
Dear Customer,
Nomenclature
1. Eyepiece cups
Position a: unscrewed for viewing without
glasses
Position b: screwed in for viewing
with glasses
2. Adjustable rings for selecting the magnification with indexed markings
3. Fixed rings with markings for the two magnifications
4. Lockable diopter adjustment ring
5. Eyelets for carrying strap
6. Central focusing ring
7. Hinged joint for adjusting the eyebase
Worldwide, the name Leica stands for superb
optical quality, close-tolerance precision
engineering, absolute reliability, and long product life.
We wish you a great deal of enjoyment and
success with your new Leica Duovid. The outstanding optical properties and the variable
magnification allow you to adjust these handy
binoculars to various viewing situations.
So that you can use them properly, we recommend that you first of all read these instructions.
12
Warning notice
As with all binoculars, avoid looking directly
at sources of bright light with your Leica
Duovid as this could cause eye damage.
13
english
Table of Contents
Foreword . . . . . . . . . . . . . . . . . . . . . . . . . . . . . 12
Nomenclature . . . . . . . . . . . . . . . . . . . . . . . . . 12
Possible applications . . . . . . . . . . . . . . . . . . . 14
Attaching the carrying strap . . . . . . . . . . . . . . 14
Attaching the protective eyepiece cover . . . . . 14
Care and maintenance . . . . . . . . . . . . . . . . . . 15
Tripod Adapter . . . . . . . . . . . . . . . . . . . . . . . . . 15
Carrying case . . . . . . . . . . . . . . . . . . . . . . . . . 15
Adjusting the eyecups . . . . . . . . . . . . . . . . . . . 16
Adjusting the eyebase . . . . . . . . . . . . . . . . . . . 17
Setting the magnification . . . . . . . . . . . . . . . . 17
Focusing/Diopter adjustment . . . . . . . . . . . . . 18
Technical Data . . . . . . . . . . . . . . . . . . . . . . . . . 21
Leica Academy . . . . . . . . . . . . . . . . . . . . . . . . 22
Leica in the Internet . . . . . . . . . . . . . . . . . . . . 22
Leica Information Service . . . . . . . . . . . . . . . . 22
Leica Customer Service . . . . . . . . . . . . . . . . . 22
Possible applications
The Leica Duovid is a high-performance set of
binoculars with two magnifications that can be
selected as required. The lower magnification
provides a bright, stable image with a large field
of view and a large depth of field. The higher
Attaching the carrying strap
magnification offers outstanding recognition of
details of distant objects and in conditions of
poor light. The balanced weight distribution and
the perfect ergonomics combine to give an
extraordinarily stable image despite the high
magnification.
The Leica Duovid has a hermetically sealed, nitrogen-filled, and die-cast aluminum housing.
It is therefore suited for rough outdoor use. There
is no need to be concerned with moisture as it is
100% waterproof to a depth of 5 m and the internal optical system is not subject to fogging.
Attaching the protective eyepiece cover
The eyepiece cover is placed over the eyepiece
cups. It is fixed using the carrying strap.
14
english
Care and maintenance
Your Leica binoculars need no special maintenance. Use a soft lens brush or a blower to remove large particles of dirt, sand, etc. To remove
fingerprints etc., first wipe the eyepiece and lens
with a damp cloth, then dry them with a piece of
clean, soft chamois leather or lint-free cloth. If
the binoculars, particularly the telescopic eyepieces tubes, are very dirty, rinse them in a basin
of water rather than under a running faucet.
Always rinse off salt water.
Moisture inside the central focusing unit (visible
through the scale window) will dry quickest when
the diopter adjustment ring (4) is pulled up, i. e.
unlocked.
Tripod Adapter
This practical tripod adapter is equipped with a
1
/4” thread for all Duovid models and allows
long-term shake-free viewing. In the case of the
Leica Duovid 10+15 x 50 it is included in the
scope of delivery.
Carrying case
The soft leather carrying case supplied with your
Leica binoculars protects them from dirt. A flap
with snap fasteners is provided at the top of the
case, through which the carrying case strap can
be fed.
15
A
C
B
Adjusting the eyecups
The eyepiece cups (1) can be easily adjusted by
turning them and they lock securely into the
selected positions. They can also be completely
removed for thorough cleaning.
For viewing with eyeglasses (Figure A) they
remain in the fully screwed-in position. For
viewing without eyeglasses, they are unscrewed
D
by turning them anticlockwise. Two positions are
available for optimum adjustment (Figure B, C).
If the eyepieces are very dirty, it is recommended
to remove the cups for cleaning (Figure D). To
do this, they are turned slightly back clockwise
and gently pulled while in the fully unscrewed
position.
16
Adjusting the eyebase
To set the eyebase, adjust the binoculars at the
hinged joint. The left and right fields of view
must merge and produce a single circular image.
2
Setting the magnification
The Leica Duovid offers the user a choice of two
magnifications. The magnification is adjusted
using the adjustable rings (2) below the two
eyepiece cups. Both rings must always be completely moved into the appropriate end position.
17
english
2
Notes:
Intermediate settings are possible, although
identical magnification in both optical systems
cannot be guaranteed in this case. Furthermore,
the automatic diopter setting (ADC™ – Automatic Diopter Compensation, see also the next
section “Focusing/Diopter compensation”) only
6
applies in the two end positions. Incorrect settings can therefore quickly lead to a strain on
the eyes and to fatigue.
As the left ring is linked to the automatic diopter
setting, its movement is slightly stiffer than that
of the right ring.
Focusing/Diopter adjustment
With the Leica Duovid the central focusing ring
(6) is used to set the focus for variously distant
objects.
Note:
The focusing of the Leica Duovid is retained after
the magnification is changed. However, a slight
adjustment can be required in practice. This is
especially true when changing to a higher magnification after having focused with a lower magnification. The reasons for this are the larger depth
of field at lower magnification, which often leads
to slightly less precise focusing, and the eyes’
accommodation capacity.
18
english
4
B
A
Compensation for individual defective vision for
viewing without eyeglasses is made using the
diopter ring (4), which is normally locked.(Figure
A). First of all, the central focusing ring is used to
focus the right barrel on an object. The diopter
ring is then released by pulling it up. (Figure B).
Attention:
If the left magnification adjustment ring is not in
an end position, i. e. at 8x or 12x/10x or 15x, the
diopter ring is locked and cannot be released.
The diopter ring is then twisted to set the optimum focusing for the left barrel. Pressing the
diopter ring back down locks the set value.
Defective vision differences of up to ± 3 diopters
can be compensated in this way.
19
Attention:
Do not adjust the magnification with the diopter
ring released. The left ring for adjusting the
magnification is locked when the diopter ring is
released.
For viewing on just the left or the right side, the
other eye should be kept closed or the appropriate half of the binoculars simply covered at
the front on the lens.
The set value can be conveniently read from the
accurate scale on the diopter ring.
20
Magnification:
Lens diameter:
Exit pupil:
Twilight factor:
Geometric light value:
Field of view:
Close focusing limit:
Adjusting magnification:
Diopter compensation:
Eyebase:
Type of prism:
Phase correction coating on prisms:
Operating temperature:
Storage temperature:
Waterproofing:
Housing material:
Dimensions (W1 x H2 x D1):
Weight:
1
2
LEICA DUOVID 8+12 x 42
LEICA DUOVID 10+15 x 50
8-/12x
10-/15x
42 mm
50 mm
for 8x magnification: 5.25 mm,
for 10x magnification: 5.00 mm,
for 12x magnification: 3.5 mm
for 15x magnification: 3.3 mm
for 8x magnification: 18.33,
for 10x magnification: 22.36,
for 12x magnification: 22.45
for 15x magnification: 27.39,
for 8x magnification: 27.56,
for 10x magnification: 25.00,
for 12x magnification: 12.25
for 15x magnification: 11.1,
for 8x magnification: 118 m at
for 10x magnification: 92 m at
1.000 m distance, in degrees 6.7°,
1.000 m distance, in degrees 5.3°,
for 12x magnification: 90 m at
for 15x magnification: 70 m at
1.000 m distance, in degrees: 5.1°
1.000 m distance, in degrees: 4.0°
3.50m, -4,5dptr. focussing above infinity 3.80m, -4,5dptr. focussing above infinity
single eyepiece setting
± 3 dptr., - 4.5 diopters focusing above infinity, setting is retained
when magnification is changed (ADC™ – Automatic Diopter Compensation)
adjustable between 56–74 mm
roof
yes, P40
- 25° C to 55° C
- 40° C to 85° C
waterproof up to 0.5 bar = 5 m water depth, nitrogen-filled to avoid fogging in
any situation
die-cast aluminum, completely rubber-armored and ergonomically shaped
for secure grip
120 x 157 x 67 mm
126 x 195 x 67 mm
1.045 g
1.250 g
With eyebase set to 65 mm
With eyecups screwed in
21
english
Technical Data
Leica Academy
Our seminars offer participants practical information on the Leica world of values and the fascination of skilled use of Leica products. Course
programs are application-oriented and informative. They offer a wealth of practical suggestions,
help, and advice.
Leica Camera AG
Leica Akademie
Oskar-Barnack-Str. 11/D 35606 Solms
Tel:
+49 (0)64 42-2 08 421
Fax: +49 (0)64 42-2 08 425
information service will be happy to answer in
writing or by phone, fax, or e-mail:
Leica Camera AG
Informations-Service
Postfach 1180/D 35599 Solms
Tel:
Fax:
+49 (0)64 42-2 08 111
+49 (0)64 42-2 08 339
e-mail: [email protected]
Leica Customer Service
For service of your Leica equipment and in case
of neccessary repairs please contact the customer services of Leica Camera AG or of any national Leica agency (see warranty card for address
list). Ask your authorized dealer and Leica specialist for advice.
e-mail: [email protected]
Leica in the Internet
You can find up to date information about products, novelties, special events, and the Leica
company on our home page in the internet:
http://www.leica-camera.com
Leica Camera AG
Reparatur-Service
Oskar-Barnack-Str. 11/D 35606 Solms
Tel:
+49 (0)64 42-2 08 189
Fax: +49 (0)64 42-2 08 339
e-mail: [email protected]
Leica Information Service
Should you have any technical questions regarding the use of Leica products, the Leica
22
Désignation des éléments
1. Œilletons
Position a: déployés pour une observation
sans lunettes de vue
Position b: rétractés pour une observation
avec lunettes de vue
2. Bagues rotatives de la sélection du grossissement avec marquage indexé
3. Bagues fixes avec marques de repère pour
les deux grossissements
4. Bague de réglage dioptrique à verrouillage
5. Œillets pour la courroie
6. Molette de mise au point centrale
7. Axe articulé pour le réglage de la distance
inter pupillaire
Le nom Leica est dans le monde entier synonyme du summum de qualité optique, de mécanique de haute précision extrêmement fiable et de
longévité légendaire.
Nous vous souhaitons beaucoup de plaisir et
une grande réussite avec vos nouvelles jumelles
Leica Duovid. Les caractéristiques optiques
exceptionnelles et le grossissement variable
vous permettront d’adapter ces jumelles aisément maniables aux différentes situations d’observation.
De manière à utiliser correctement ce nouvel
instrument, nous vous recommandons dans un
premier temps de lire la présente notice d’utilisation.
23
français
Avant-propos
Chère cliente, Cher client,
Table de matières
Avant-propos . . . . . . . . . . . . . . . . . . . . . . . . . . 23
Désignation des éléments . . . . . . . . . . . . . . . 23
Possibilités d’application . . . . . . . . . . . . . . . . 25
Attache de la courroie . . . . . . . . . . . . . . . . . . 25
Montage du bouchon de protection
des oculaires . . . . . . . . . . . . . . . . . . . . . . . . . . 25
Entretien/Nettoyage . . . . . . . . . . . . . . . . . . . . 26
Adaptateur de trépied . . . . . . . . . . . . . . . . . . . 26
Sacoche . . . . . . . . . . . . . . . . . . . . . . . . . . . . . 26
Réglage des œilletons . . . . . . . . . . . . . . . . . . . 27
Réglage de la distance interpupillaire . . . . . . . 28
Réglage du grossissement . . . . . . . . . . . . . . . 28
Réglage de la netteté/Correction dioptrique . . 29
Avertissement
De même manière qu’avec tout type de jumelles, évitez, avec votre Leica Duovid d’observer des sources lumineuses intenses afin
d’éviter de brûler la rétine de vos yeux.
Caractéristiques techniques . . . . . . . . . . . . . . 32
Leica Académie . . . . . . . . . . . . . . . . . . . . . . . . 33
Leica sur Internet . . . . . . . . . . . . . . . . . . . . . . 33
Service d’information Leica . . . . . . . . . . . . . . 33
Leica Customer Service . . . . . . . . . . . . . . . . . 33
24
Attache de la courroie
Montage du bouchon de protection des
oculaires
Le bouchon de protection des oculaires se coiffent sur les œilletons. Sa fixation s’effectue sur
la courroie.
25
français
Possibilités d’application
Les Leica Duovid sont des jumelles puissantes
à deux grossissements. Le grossissement plus
modeste permet d’obtenir une image claire et
homogène avec un grand champ visuel et une
forte profondeur de champ. Le grossissement
plus fort permet d’obtenir un excellent rendu des
détails dans le cas d’objets fortement éloignés
ou à la lumière du crépuscule. La répartition
équilibrée du poids et la parfaite ergonomie fournissent une étonnante homogénéité de l’image
malgré le fort grossissement.
Le boîtier des jumelles Leica Duovid est un
boîtier hermétique en aluminium coulé sous
pression et rempli d’azote. Il est par conséquent
également adapté aux rudes conditions d’une
utilisation en extérieur. Il ne craint pas non plus
l’humidité – il est parfaitement étanche jusqu’à
5 m de profondeur et l’optique intérieure ne
s’embue pas.
Entretien/Nettoyage
Un entretien spécial n’est pas nécessaire. De
grosses particules de saletés, comme p. ex. des
grains de sable, doivent être enlevés au moyen
d’un pinceau ou en soufflant dessus. Des
empreintes digitales ou autres sur l’objectif ou
les lentilles des oculaires, s’enlèvent en embuant
prudemment la surface du verre débarrassée de
toute poussière, et en essuyant avec un chiffon
doux en coton. Si la jumelle est fortement salie,
spécialement au niveau des oeillères coulissantes, le nettoyage de la jumelle peut être effectué
en la tentant sous le jet d’eau du robinet. Si la
jumelle a reçu de l’eau salée, il suffit de la rincer
à l’eau douce du robinet. Pour éviter que de l’eau
entre dans la mécanique, il faut que les deux
moitiés de la molette centrale soient couplées.
Adaptateur de trépied
L’adaptateur fonctionnel de trépied avec filetage
1
/4” pour toutes les jumelles Duovid permet une
observation prolongée commode et exempte de
vibration, sans danger d’abîmer la jumelle. Avec
le Leica Duovid 10+15 x 50 il fait déjà partie de
l’équipement.
Sacoche
La sacoche en cuir Nappa souple, qui fait partie
de l’équipement standard, possède sur les côtés
deux fentes permettant d’y faire passer la courroie. Pour y enfiler la courroie de la jumelle, il
suffit d’ouvrir le rabat supérieur de la sacoche en
séparant auparavant les boutons-pression.
26
B
C
Réglage des œilletons
Les œilletons (1) se règlent aisément par rotation et s’encliquètent fixement dans la position
souhaitée. Il est également possible de les retirer totalement afin de procéder à un nettoyage
minutieux.
Ils doivent demeurer en position rétractée pour
une observation avec lunettes de vue (image A)
et être déployés par rotation dans le sens inverse des aiguilles d’une montre pour une observa-
D
tion sans lunettes de vue. Deux positions sont
disponibles en vue d’une adaptation optimale
(image B, C).
Si les oculaires sont fortement encrassés, nous
vous recommandons de retirer les œilletons afin
de procéder à un nettoyage (image D). Pour cela,
il suffit, une fois qu’ils sont totalement déployés,
de les faire légèrement tourner dans le sens des
aiguilles d’une montre en exerçant une faible
traction.
27
français
A
2
Réglage de la distance interpupillaire
L’écartement pupillaire individuel est à régler en
écartant ou en rapprochant les deux tubes
autour de l’axe d’articulation (7). Les champs de
vision à droite et à gauche doivent se confondre
en une image circulaire unique.
2
Réglage du grossissement
Les Leica Duovid offrent la possibilité à l’utilisateur de choisir entre deux grossissements.
La sélection du grossissement s’effectue via les
bagues rotatives (2) situées au-dessous des deux
œilletons. Pour cela, les deux bagues doivent se
situer en position finale.
28
Remarques:
Des positions intermédiaires sont possibles, certes, mais un grossissement identique au sein des
deux systèmes optiques n’est alors plus garanti.
De plus, la transmission automatique du réglage
dioptrique (ADC™ – Automatic Diopter Compensation, voir également le paragraphe suivant
«Réglage de la netteté/Correction dioptrique»)
ne peut s’effectuer que dans les deux positions
finales. Les réglages incorrects peuvent rapidement entraîner une forte sollicitation oculaire et
une certaine fatigue.
Etant donné que la bague de gauche est couplée
au réglage dioptrique automatique, son maniement est légèrement plus dur que celui de la
bague de droite.
Réglage de la netteté/Correction dioptrique
Le réglage de la netteté sur des objets situés à
différentes distances s’effectue sur les Leica
Duovid avec la bague de mise au point centrale (6).
Remarque:
Le réglage de la netteté des Leica Duovid demeure
conservé après un changement de grossissement.
Dans la pratique, il se peut cependant qu’un léger
réajustement soit nécessaire. Et ce, particulièrement si vous passez du plus faible au plus fort
grossissement. Motif: la plus forte profondeur de
champ dans le cas d’un grossissement plus faible,
qui rend souvent la mise au point légèrement plus
imprécise, et la capacité de l’œil à s’accommoder
à cette situation.
29
français
6
4
A
B
La compensation d’une amétropie individuelle
dans le cas d’une observation sans lunettes de
vue s’effectue à l’aide de la bague de réglage
dioptrique (4) qui est verrouillée en temps normal (Image A). Procédez dans un premier temps
au réglage de la netteté pour le tube droit avec la
bague de mise au point centrale. Découplez
ensuite la bague de réglage dioptrique en tirant
sur celle-ci (Image B).
Attention:
Si la bague de réglage du grossissement de gauche ne se trouve pas en position finale, c.-à-d.
sur 8x ou 12x/10x ou 15x, la bague de réglage
dioptrique sera bloquée et ne pourra être découplée.
Procédez ensuite au réglage de la netteté optimale pour le tube gauche en faisant tourner la
bague de réglage dioptrique. Pour enregistrer la
valeur sélectionnée, pressez la bague de réglage
dioptrique vers le bas. Ce système permet de
compenser des amétropies jusqu’à ± 3 dioptries.
30
français
Attention:
Ne modifiez pas le grossissement lorsque la
bague de réglage dioptrique est découplée. La
bague de réglage du grossissement de gauche
est bloquée lorsque la bague de réglage dioptrique est découplée.
Lors d’une observation unilatérale via l’optique
de gauche ou de droite, fermez l’œil opposé ou
maintenez fermée, à l’avant sur l’objectif, la moitié correspondante des jumelles.
La graduation précise de la bague de réglage
dioptrique permet de lire aisément la valeur de
réglage sélectionnée.
31
Caractéristiques techniques
Grossissement:
Diamètre de l’objectif:
Pupille de sortie:
Indice crépusculaire:
Clarté géométrique:
Champ visuell:
Limite de mise au point sur les
objets rapprochés:
Réglage du grossissement:
Correction dioptrique:
Distance interpupillaire:
Type de prisme:
Revêtement de correction de phase
sur les prismes:
Température de fonctionnement:
Température de stockage:
Etanchéité à l’eau:
Matériau du boîtier:
Dimensions (L1 x H2 x E1):
Poids:
1
2
LEICA DUOVID 8+12 x42
LEICA DUOVID 10+15 x50
8x/12x
10x/15x
42mm
50mm
avec grossissement 8x: 5,25mm,
avec grossissement 10x: 5,00mm,
avec grossissement 12x: 3,5mm
avec grossissement 15x: 3,3mm
avec grossissement 8x: 18,33,
avec grossissement 10x: 22,36,
avec grossissement 12x: 22,45
avec grossissement 15x: 27,39
avec grossissement 8x: 27,56,
avec grossissement 10x: 25,00,
avec grossissement 12x: 12,25
avec grossissement 15x: 11,1
avec grossissement 8x: 118m à une
avec grossissement 10x: 92m à une
distance de 1.000m, en degrés: 6,7°,
distance de 1.000m, en degrés: 5,3°,
avec grossissement 12x: 90m à une
avec grossissement 15x: 70m à une
distance de 1.000m, en degrés: 5,1°
distance de 1.000m, en degrés: 4,0°,
3,50m, extension de -4,5 dioptries
3,80m, extension de -4,5 dioptries
au-delà de ∞
au-delà de ∞
réglage individuel pour chaque oculaire
±3 dioptries, extension de -4,5dioptries, le réglage demeure conservé lors d’un changement de grossissement (ADC™ – Automatic Diopter Compensation)
réglable entre 56 et 74mm
en toit
oui, P40
-25° C à 55° C
- 40° C à 85° C
étanche à l’eau sous pression jusqu’à 0,5bar = 5m de profondeur,
volume d’azote afin d’empêcher la formation de buée quelle que soit la situation
aluminium coulé sous pression avec gainage total en caoutchouc,
ergonomique et offrant une bonne prise en main
120 x 157 x 67mm
126 x 195 x 67mm
1045g
1250g
Pour une distance interpupillaire de 65 mm
Avec œilletons rétractés
32
Leica Académie
Les différents stages proposent aux participants
un programme complet sur la technique photographique et de nombreux conseils sur la pratique du Leica et la fascination à l’utilisation des
produits Leica.
Leica Camera AG
Leica Akademie
Oskar-Barnack-Str. 11/D 35606 Solms
Tel:
+49 (0)64 42-2 08 421
Fax: +49 (0)64 42-2 08 425
questions d’ordre technique se rapportant à la
gamme de produits Leica:
Leica Camera AG
Informations-Service
Postfach 1180/D 35599 Solms
Tel:
Fax:
+49 (0)64 42-2 08 111
+49 (0)64 42-2 08 339
Leica Customer Service
Pour l’entretien de votre équipement Leica et en
cas d’endommagement, le Customer Service
de Leica Camera AG ou celui d’une des représentations nationales Leica (liste d’adresses sur la
carte de garantie) se tiennent à votre disposition.
Veuillez consultez votre centre-conseil Leica.
e-mail: [email protected]
Leica dans l’Internet
Des informations d’actualité concernant le
matériel, les nouveautés, les activités et la
société Leica elle-même sont à votre disposition
sur notre Homepage dans l’Internet sous la
référence: http://www.leica-camera.com
Leica Camera AG
Reparatur-Service
Oskar-Barnack-Str. 11/D 35606 Solms
Tel:
+49 (0)64 42-2 08 189
Fax: +49 (0)64 42-2 08 339
Service d’information Leica
Le service Informations Leica répondra volontiers par écrit, par téléphone, fax ou e-mail à vos
e-mail: [email protected]
33
français
e-mail: [email protected]
Voorwoord
Geachte klant,
Benaming van de onderdelen
1. Oculair-oogschelpen
Stand a: volledig uitgedraaid voor observatie
zonder bril
Stand b: ingedraaid voor observatie met bril
2. Draairingen voor de keuze van vergroting met
index-markeringen
3. Vaststaande ringen met markeringen voor de
beide vergrotingen
4. Vergrendelbare dioptiering
5. Ogen voor draagriem
6. Ring voor centrale focussering
7. Scharnieras voor instelling van de oogafstand
De naam Leica staat wereldwijd voor hoogste
optische kwaliteit, voor fijnmechanische precisie
bij uiterste betrouwbaarheid en voor een lange
levensduur.
Met uw nieuwe Leica Duovid wensen wij u
daarom viel plezier en succes. De uitstekende
optische eigenschappen en de variabele vergroting maken het u mogelijk, deze handzame verrekijker aan verschillende observatiesituaties
aan te passen.
Om deze goed te kunnen gebruiken, adviseren
wij u eerst deze handleiding te lezen.
34
Inhoudsopgave
Voorwoord . . . . . . . . . . . . . . . . . . . . . . . . . . . 34
Benaming van de onderdelen . . . . . . . . . . . . . 34
Toepassingsmogelijkheden . . . . . . . . . . . . . . . 36
Aanbrengen van de draagriem . . . . . . . . . . . . . 36
Waarschuwing
Voorkom, zoals bij elke verrekijker, het direct
kijken met uw Leica Duovid in scherpe lichtbronnen om oogletsel te voorkomen.
nederlands
Aanbrengen van het oculair-beschermdeksel . . 36
Onderhoud/Reiniging . . . . . . . . . . . . . . . . . . . 37
Statiefadapter . . . . . . . . . . . . . . . . . . . . . . . . . 37
Paraattas . . . . . . . . . . . . . . . . . . . . . . . . . . . . . 37
Instellen van de oogschelpen . . . . . . . . . . . . . 38
Instellen van de oogafstand . . . . . . . . . . . . . . 39
Instellen van de vergroting . . . . . . . . . . . . . . . 39
Instellen van de scherpte/
dioptrie-compensatie . . . . . . . . . . . . . . . . . . . 40
Technische gegevens . . . . . . . . . . . . . . . . . . . 43
Leica Academie . . . . . . . . . . . . . . . . . . . . . . . 44
Leica op Internet . . . . . . . . . . . . . . . . . . . . . . . 44
Leica informatiedienst . . . . . . . . . . . . . . . . . . 44
Leica Customer Service . . . . . . . . . . . . . . . . . 44
35
Toepassingsmogelijkheden
De Leica Duovid is een verrekijker met grote
prestaties en twee vergrotingsfactoren die naar
keuze kunnen worden gebruikt. Bij een geringere
vergroting is een helder, rustig beeld met groot
gezichtsveld en grote scherptediepte ter beschikking. De sterkere vergroting biedt voor ver
verwijderde objecten en in de schemering een
uitstekende herkenbaarheid van details.
Ondanks de aanzienlijke vergroting resulteren
vooral de uitgebalanceeerde gewichtsverdeling
en de perfecte ergonomie samen in een verbazingwekkend rustig beeld.
De Leica Duovid bezit een hermetisch afgesloten, met stikstof gevulde, behuizing van gegoten
aluminium. Deze is daarom ook geschikt voor
het ruige outdoor gebruik. Daarbij hoeft geen
rekening te worden gehouden met water – tot
een diepte van 5 m onder water is de kijker
absoluut dicht en het inwendige optiek beslaat
niet.
Aanbrengen van de draagriem
Aanbrengen van het oculair-beschermdeksel
De oculairbeschermdeksel wordt over de oogschelpen geschoven. De bevestiging geschiedt
op de draagriem.
36
Onderhoud/Reiniging
Bijzonder onderhoud is niet nodig. Grove vuildeeltjes, zoals bijv. zand, moeten met een fijine
penseel verwijderd of weggeblazen worden.
Daarbij moeten de twee knophelften gekoppeld
zijn. Vingerafdrukken etc. op objectief- en oculairenzen kunnen met een zachte, schone zeem of
een stofvrije doek afgeveegd worden. Bij sterkere vervuiling, bijv. van de oculairschuifhulzen,
kan de verrekijker afgespoeld worden onder stromend water om hem schoon te maken. Ook
pekelwater moet afgespoeld worden.
In de middeninstelschroef binnengedrongen
vocht (zichtbaar in het schaalvenster) droogt het
snelst op als de knophelften ontkoppeld zijn.
en garandeert een langdurige schokvrije observatie. In het geval van de Leica Duovid
10+15 x 50 wordt de adapter standaard meegeleverd.
Paraattas
De meegeleverde paraattas van zacht nappaleer
zorgt dat de verrekijker niet vuil wordt. Om de
draagriem van de verrekijker er door te kunnen
steken is er aan de bovenkant van de tas een
klep met drukknop aangebracht.
37
nederlands
Statiefadapter
Deze praktische statiefadapter is uitgerust met
een 1/4” schroefdraad voor alle Duovid modellen
A
B
C
Instellen van de oogschelpen
De oculair-oogschelpen (1) zijn door draaien eenvoudig te verstellen en klikken betrouwbaar in de
gekozen posities. Voor grondige reiniging kunnen
ze ook helemaal worden verwijderd.
Voor observatie met bril (Figuur A) blijven ze in
de geheel ingedraaide stand. Voor observatie
zonder bril worden ze door draaien tegen de
D
richting van de wijzers van de klok uitgedraaid.
Voor optimale aanpassing staan twee posities ter
beschikking (Figuur B, C).
Als de oculairs sterk zijn vervuild, wordt geadviseerd de oogschelpen voor reiniging te verwijderen (Figuur D). Hiertoe worden ze uit de geheel
uitgedraaide positie onder lichte druk met de wijzers van de klok mee iets teruggedraaid.
38
Instellen van de oogafstand
Door de verrekijker om de scharnieras te buigen
wordt de individuele ogenafstand ingesteld.
Rechter en linker gezichtsveld moeten daarbij tot
een cirkelrond beeld versmelten.
2
Instellen van de vergroting
De Leica Duovid biedt de gebruiker keus tussen
de twee vergrotinge. De omschakeling vindt
plaats met de draairingen (2) onder de beide
oculair-oogschelpen. Hiervoor moeten beide ringen altijd volledig in de betreffende eindstanden
worden gedraaid.
39
nederlands
2
Opmerking:
Tussenstanden zijn weliswaar mogelijk, maar
hierbij is een gelijke vergroting in beide optische
systemen niet gegarandeerd. Bovendien vindt de
automatische overdracht van de dioptrie-instelling (ADC™ – Automatic Diopter Compensation,
zie ook het volgende gedeelte ”Instellen van de
scherpte/compensatie van oogafwijkingen”)
alleen in beide eindstanden plaats. Foutieve
instellingen kunnen daarom snel tot belasting
van de ogen en vermoeidheid leiden.
Omdat de linker ring aan de automatische dioptrie-instelling is gekoppeld, loopt deze iets zwaarder dan de rechter.
6
Instellen van de scherpte/dioptrie-compensatie
De instelling van de scherpte voor verschillende ver
verwijderde objecten vindt bij de Leica Duovid
plaats met de ring voor centrale focussering (6).
Opmerking:
De scherpte-instelling van de Leica Duovid blijft
ook na het omschakelen van de vergroting behouden. In de praktijk kan iets nastellen noodzakelijk
zijn. Dit is voornamelijk het geval wanneer men
overschakelt naar een sterkere vergroting na te
hebben scherpgesteld met een kleine vergroting.
Reden: De grotere scherptediepte bij geringere
vergroting, die vaak tot een iets minder precieze
focussering leidt, en het accommodatievermogen
van de ogen.
40
4
A
De compensatie van een individuele gezichtsafwijking voor observatie zonder bril wordt met de
dioptiering (4) gerealiseerd, die normaal gesproken vergrendeld is. (Figuur A). Eerst wordt met
de centrale focussering de rechter kijker op een
object scherp gesteld. Daarna wordt de dioptiering door trekken ontkoppeld. (Figuur B).
Let op:
Wanneer de linker instelring voor vergroting zich
niet in de eindstand bevindt, d.w.z. bij 8x of 12x/
10x of 15x, is de dioptiering geblokkeerd en kan
niet worden ontkoppeld.
Vervolgens wordt met de dioptiering door verdraaien voor de linker kijker op optimale scherpte ingesteld. Door de dioptiering naar beneden te
drukken, wordt de ingestelde waarde opgeslagen. Gezichtsafwijkingen-verschillen zijn op deze
wijze tot ± 3 dioptrieën te compenseren.
41
nederlands
B
Let op:
Verander de vergroting niet bij ontkoppelde dioptiering. De linker ring voor het wijzigen van de
vergroting is bij ontkoppelde dioptiering geblokkeerd.
Bij het eenzijdig links of rechts kijken, moet het
andere oog worden dichtgeknepen of de betreffende helft van de verrekijker aan de voorzijde
van het objectief worden dichtgehouden.
De ingestelde waarde is gemakkelijk op de nauwkeurige schaal van de dioptiering af te lezen.
42
Vergroting:
Diameter objectief:
Uitgangspupil:
Schemeringsgetal:
Geometrische lichtsterkte:
Gezichtsveld:
Instelgrens dichtbij:
Instellen van de vergroting:
Dioptrie-compensatie:
Pupillenafstand:
Prismasoort:
Fasencorrectiecoating op de prisma’s:
Gebruikstemperatuur:
Opslagtemperatuur:
Waterdichtheid:
Materiaal behuizing:
Maaten (B1 x H2 x D1):
Gewicht:
1
2
LEICA DUOVID 8+12 x 42
LEICA DUOVID 10+15 x 50
8-/12-voudig
10-/15-voudig
42 mm
50 mm
bij 8-voudige vergroting: 5,25 mm,
bij 10-voudige vergroting: 5,00 mm,
bij 12-voudige vergroting: 3,5 mm
bij 15-voudige vergroting: 3,3 mm
bij 8-voudige vergroting: 18,33,
bij 10-voudige vergroting: 22,36,
bij 12-voudige vergroting: 22,45
bij 15-voudige vergroting: 27,39
bij 8-voudige vergroting: 27,56,
bij 10-voudige vergroting: 25,00,
bij 12-voudige vergroting: 12,25
bij 15-voudige vergroting: 11,1
bij 8-voudige vergroting: 118 m op
bij 10-voudige vergroting: 92 m op
1.000 m afstand, in graden: 6,7°,
1.000 m afstand, in graden: 5,3°,
bij 12-voudige vergroting: 90 m op
bij 15-voudige vergroting: 70 m op
1.000 m afstand, in graden: 5,1°
1.000 m afstand, in graden: 4,0°
3,50 m, - 4,5 dptr. Oneindig via ∞
3,80 m, - 4,5 dptr. Oneindig via ∞
omschakeling individueel oculair
± 3 dioptrieën, - 4,5 dioptrieën oneindig, instelling blijft bij omschakeling
vergroting behouden (ADC™ – Automatic Diopter Compensation)
van 56–74 mm instelbaar
nok
ja, P40
- 25° C tot 55° C
- 40° C tot 85° C
drukwaterdicht tot 0,5 bar = 5 m onder water, stikstofvulling tegen beslaan in
elke situatie
gegoten aluminium, volledig in polyurethan gevat, ergonomisch en stevige grip
120 x 157 x 67 mm
126 x 195 x 67 mm
1045 g
1250 g
Bij pupillenafstand 65 mm
Bij ingedraaide oogschelpen
43
nederlands
Technische gegevens
Leica Academie
Op de verschillende seminars krijgt de deelnemer in een op de praktijk georiënteerde, moderne vorm informatie over de waardenwereld van
Leica en de fascinatie van de vakkundige omgang met de Leica producten. De inhoud is op
de gebruikgeoriënteerd en biedt een massa
inspiratie, informatie en advies voor de praktijk.
Leica Camera AG
Leica Akademie
Oskar-Barnack-Str. 11/D 35606 Solms
Tel:
+49 (0)64 42-2 08 421
Fax: +49 (0)64 42-2 08 425
worden schriftelijk, telefonisch of per e-mail
beantwoord door Leica Informations-Service.
Leica Camera AG
Informations-Service
Postfach 1180/D 35599 Solms
Tel:
Fax:
+49 (0)64 42-2 08 111
+49 (0)64 42-2 08 339
e-mail: [email protected]
Leica Customer Service
Voor het onderhoud van uw Leica-uitrusting alsmede in geval van schade kunt u gebruik maken
van de Customer Service van Leica Camera AG
of een nationale vertegenwoordiging van Leica
(voor adressenlijst zie garantiebewijs). Wendt
u zich tot een erkende Leica-speciaalzaak (in
Duitsland: Leica Repräsentanz).
e-mail: [email protected]
Leica op Internet
Actuele informatie over producten, wetenswaardigheden, evenementen en de onderneming
Leica krijgt u op onze homepage op Internet
onder: http://www.leica-camera.com
Leica Camera AG
Reparatur-Service
Oskar-Barnack-Str. 11/D 35606 Solms
Tel:
+49 (0)64 42-2 08 189
Fax: +49 (0)64 42-2 08 339
e-mail: [email protected]
Leica informatiedienst
Technische vragen over het Leica-programma
44
Premessa
Gentile cliente,
Descrizione delle parti
1. Conchiglie oculari
Posizione a: estratte per l’osservazione senza
occhiali
Posizione b: rientrate per l’osservazione con
occhiali
2. Anelli rotanti per la scelta dell’ingrandimento
con la marcatura indice
3. Anelli fissi con marcature per i due ingrandimenti
4. Anello diottrico bloccabile
5. Ganci per cinghia di trasporto
6. Anello di focalizzazione centrale
7. Asse articolato per la regolazione della
distanza degli oculari
italiano
In tutto il mondo, il nome Leica è sinonimo di
migliore resa ottica, meccanica di precisione
estremamente affidabile e di lunga durata.
Le auguriamo molte soddisfazioni e successo
con il suo nuovo Leica Duovid. Le eccellenti
proprietà ottiche e l’ingrandimento variabile
consentono di adattare questo pratico binocolo
alle più svariate situazioni di osservazione.
Per poterlo utilizzare in modo corretto, le consigliamo di leggere il presente manuale.
45
Indice
Premessa . . . . . . . . . . . . . . . . . . . . . . . . . . . . 45
Descrizione delle parti . . . . . . . . . . . . . . . . . . 45
Possibilità d’impiego . . . . . . . . . . . . . . . . . . . . 47
Applicazione della cinghia di trasporto . . . . . . 47
Montaggio del coprioculare . . . . . . . . . . . . . . 47
Manutenzione/pulizia . . . . . . . . . . . . . . . . . . . 48
Adattatore per Treppiede . . . . . . . . . . . . . . . . 48
Astuccio . . . . . . . . . . . . . . . . . . . . . . . . . . . . . 48
Regolazione delle conchiglie oculari . . . . . . . . 49
Regolazione della distanza degli oculari . . . . . 50
Regolazione dell’ingrandimento . . . . . . . . . . . 50
Messa a fuoco/Compensazione diottrica . . . . 51
Dati tecnici . . . . . . . . . . . . . . . . . . . . . . . . . . . 54
Accademia Leica . . . . . . . . . . . . . . . . . . . . . . . 55
Leica in Internet . . . . . . . . . . . . . . . . . . . . . . . 55
Servizio informazioni Leica . . . . . . . . . . . . . . . 55
Customer Service Leica . . . . . . . . . . . . . . . . . 55
Avvertenza
Non utilizzate mai il vostro Leica Duovid
per guardare direttamente verso il sole.
Come con ogni altro binocolo, potrebbe
causare gravi danni permanenti agli occhi!
46
Possibilità d’impiego
Il Leica Duovid è un binocolo ad alta prestazione
con due ingrandimenti, selezionabili a seconda
delle necessità. In caso di ingrandimento minore,
si dispone di un’immagine chiara e ferma con un
grande campo visivo ed elevata profondità di
campo. L’ingrandimento maggiore offre un’eccel-
Applicazione della cinghia di trasporto
lente fedeltà dei dettagli anche in caso di oggetti
molto distanti e durante il crepuscolo. In particolare la distribuzione equilibrata del peso consente
insieme alla perfetta ergonomia di ottenere
un’immagine incredibilmente ferma nonostante
l’elevato ingrandimento.
Il Leica Duovid è dotato di un corpo in alluminio
pressofuso ermetico e riempito di azoto, adatto
di conseguenza anche all’impiego in condizioni
esterne. Non è quindi necessario preoccuparsi
che non si bagni – sott’acqua è assolutamente
ermetico fino a 5 m e l’interno non si appanna.
italiano
Montaggio del coprioculare
Il coprioculare viene ribaltato al di sopra delle
conchiglie oculari e viene fissato alla cinghia.
47
Manutenzione/pulizia
Non è necessaria una particolare manutenzione.
Le particelle di sporco, come ad es. sabbia,
devono essere rimosse con un pennello o con
aria compressa. In questo caso, le due metà
della ghiera di messa a fuoco devono essere
unite. Le impronte digitali e simili sulle lenti dell’
obiettivo e dell’ oculare possono essere rimosse
con un panno in microfibra pulito. In caso di forti
impurità, ad es. degli oculari telescopici, il binocolo può essere lavato con acqua corrente.
Anche il sale marino deve essere rimosso con
acqua dolce.
Eventuale umidità penetrata nella manopola centrale (visibile nella finestra della scala diottrica),
si asciuga più rapidamente quando le due ghiere
sono separate.
Adattatore per Treppiede
Questo pratico adattatore per tutti i modelli
Duovid, dotato di innesto a vite 1/4” di pollice ed
una ampia e solida base di appoggio, consente
une visione duratatura e stabile priva di vibrazioni. L’adattatore è in dotazione con il Duovid
10+15 x 50.
Astuccio
L’astuccio in dotazione in pelle morbida contribuisce a proteggere il binocolo da impurità. Per
infilarlo alla cinghia a tracolla del binocolo, sull’estremità superiore dell’astuccio è prevista una
ribalta con pulsanti.
48
A
B
C
senza occhiali, vengono estratte mediante rotazione in senso antiorario. Si dispone di due posizioni
per un adattamento ottimale (Immagine B, C).
Se gli oculari sono estremamente sporchi, si
consiglia di asportare le conchiglie per la pulizia
(Immagine D). A questo scopo, ruotarle leggermente in senso orario dalla posizione più arretrata con un leggero sforzo.
italiano
Regolazione delle conchiglie oculari
Le conchiglie oculari (1) possono essere facilmente regolate mediante rotazione e si arrestano scattando nella posizione selezionata. Per
una pulizia approfondita possono essere rimosse
completamente. Per l’osservazione con occhiali
(Immagine A), le conchiglie rimangono nella posizione completamente rientrata. Per l’osservazione
D
49
2
Regolazione della distanza degli oculari
Per regolare la corretta distanza interpupillare
agite sullo snodo incernierato centrale (7). I
campi di visione dell’occhio destro devono fondersi e produrre un’unica immagine circolare.
2
Regolazione dell’ingrandimento
Il Leica Duovid offre all’utente la possibilità di
scegliere tra due ingrandimenti. Il passaggio
dall’uno all’altro viene eseguito con gli anelli
rotanti (2) al di sotto delle due conchiglie oculari.
Devono essere sempre ruotati completamente
tutti e due gli anelli nella rispettiva posizione
finale.
50
Nota:
Sono possibili anche posizioni intermedie, tuttavia non si assicura un ingrandimento identico in
entrambi i sistemi ottici. Inoltre, la trasmissione
automatica della regolazione diottrica (ADC™ –
Automatic Diopter Compensation, si veda anche
il paragrafo successivo «Messa a fuoco/Compensazione diottrica») avviene solo nelle due
posizioni finali. Eventuali errori di regolazione
possono quindi comportare uno sforzo eccessivo
per gli occhi e stanchezza.
6
Poiché l’anello sinistro è accoppiato con la regolazione diottrica automatica, si muove leggermente più faticosamente rispetto a quello destro.
Nota:
la messa a fuoco del Leica Duovid resta regolata
anche in caso di cambiamento dell’ingrandimento.
Nella pratica, si può tuttavia rendere necessaria
un’ulteriore regolazione. Questa è la situazione nel
caso di un cambiamento di ingrandimento, dopo
aver già messo a fuoco il soggetto con l’ingrandimento minore. Il motivo: la profondità di campo più
elevata con un leggero ingrandimento, che spesso
comporta una focalizzazione leggermente meno
esatta, e la capacità di adattamento degli occhi.
51
italiano
Messa a fuoco/Compensazione diottrica
Sul Leica Duovid, la messa a fuoco su oggetti
con distanza diversa viene effettuata con l’anello
di focalizzazione centrale (6).
4
A
B
La compensazione di difetti visivi individuali per
l’osservazione senza occhiali viene effettuata
con l’anello diottrico (4), che normalmente è
bloccato (Immagine A). Dapprima si mette a
fuoco il tubo destro su un oggetto mediante l’anello di focalizzazione centrale. Successivamente, l’anello diottrico viene disaccoppiato tirandolo. (Immagine B).
Attenzione:
Se l’anello sinistro di regolazione dell’ingrandimento non si trova in posizione finale, vale a dire
su 8 o 12 volte/10 o 15 volte, l’anello diottrico è
bloccato e non può essere disaccoppiato.
Successivamente, l’anello diottrico viene ruotato
per regolare la nitidezza ottimale per il tubo sinistro. Premendo in basso l’anello diottrico, il valore regolato viene memorizzato. In questo modo,
possono essere compensati difetti visivi fino a
± 3 diottrie.
52
Attenzione:
Non modificare l’ingrandimento con l’anello
diottrico sbloccato. L’anello sinistro per la regolazione dell’ingrandimento è bloccato se l’anello
diottrico è disaccoppiato.
italiano
Guardando nel lato sinistro o destro con un
occhio solo, l’altro occhio dovrebbe essere tenuto chiuso o la relativa metà del binocolo dovrebbe essere coperta sull’obiettivo.
Il valore rispettivamente regolato può essere
comodamente letto sulla precisa scala graduata
situata sull’anello diottrico.
53
Dati tecnici
Ingrandimento:
Diametro obiettivo:
Uscita pupillare:
Fattore crepuscolare:
Intensità luminosa geometrica:
Campo visivo:
Limite di regolazione primo piano:
Regolazione dell’ingrandimento:
Correzione diottrica per occhio:
Distanza oculari:
Tipo di prismi:
Rivestimento di correzione delle
fasi su prismi:
Temperatura di funzionamento:
Temperatura di magazzinaggio:
Impermeabilità all’acqua:
Materiale del corpo:
Dimensioni (L1 x A2 x P1):
Peso:
1
2
LEICA DUOVID 8+12 x 42
LEICA DUOVID 10+15 x 50
8-/12 volte
10-/15 volte
42mm
50mm
con ingrandimento di 8 volte: 5,25mm,
con ingrandimento di 10 volte: 5,00mm,
con ingrandimento di 12 volte: 3,5mm
con ingrandimento di 15 volte: 3,3mm
con ingrandimento di 8 volte: 18,33,
con ingrandimento di 10 volte: 22,36,
con ingrandimento di 12 volte: 22,45
con ingrandimento di 15 volte: 27,39
con ingrandimento di 8 volte: 27,56,
con ingrandimento di 10 volte: 25,00,
con ingrandimento di 12 volte: 12,25
con ingrandimento di 15 volte: 11,1
con ingrandimento di 8 volte: 118m
con ingrandimento di 10 volte: 92m
su 1.000 m di distanza, in gradi: 6,7°,
su 1.000m di distanza, in gradi: 5,3°,
con ingrandimento di 12 volte: 90m
con ingrandimento di 15 volte: 70m
su 1.000 m di distanza, in gradi: 5,1°
su 1.000m di distanza, in gradi: 4,0°
3,50m, -4,5 diottrie corsa speciale oltre ∞ 3,80m, -4,5 diottrie corsa speciale oltre ∞
commutazione ad oculare singolo
± 3 diottrie, -4,5 diottrie corsa speciale, la regolazione permane in caso di cambiamento
dell’ingrandimento (ADC™ – Automatic Diopter Compensation)
regolabile a 56–74mm
a tetto
si, P40
-25° C fino a 55° C
- 40° C fino a 85°C
impermeabile all’acqua sotto pressione fino a 0,5bar = 5m di profondità sott’acqua,
riempimento d’azoto per evitare l’appannaggio in ogni situazione
in alluminio pressofuso con armatura di gomma completa, ergonomica e maneggevole
120 x 157 x 67mm
126 x 195 x 67mm
1045g
1250g
In caso di distanza oculari di 65 mm
Con conchiglie rientrate
54
Tel:
+49(0)64 42-208 111
Fax: +49(0)64 42-208 339
e-mail: [email protected]
Accademia Leica
Nei diversi seminari, al partecipante viene presentato in forma practica e attuale il mondo Leica,
nonché il fascino dell’impiego coretta dei prodotti
Leica. I temi sono orientati a seconda dell’impiego e offrono molteplici impulsi, informazioni e
consigli sull’uso quotidiano dei prodotti.
Leica Camera AG
Leica Akademie
Oskar-Barnack-Str. 11/D 35606 Solms
Tel:
+49(0)64 42-2 08 421
Fax: +49(0)64 42-2 08 425
e-mail: [email protected]
Customer Service Leica
Per la manutenzione dei Vostri articoli Leica nonché in caso di danni, è a Vostra disposizione il
Customer Service della Leica Camera AG o il centro riparazioni di una delle rappresentanze nazionali Leica (per indirizzi si veda il certificato di
garanzia). RivolgeteVi al Vostro rivenditore autorizzato Leica (in Germania: Rappresentanza Leica).
Leica in Internet
Attuali informazioni sui prodotti, novità, manifestazioni e l’impresa Leica si possono trovare
sulla nostra Home Page in Internet all’indirizzo:
http://www.leica-camera.com
Polyphoto S.p.A.
Via Cesare Pavese 11/13
Leica & Minox Department
I-20090 Opera-Zerbo (Milano)
Tel:
+39 - 02 53 00 21
Fax: +39 - 02 5760 9141
e-mail: [email protected]
Servizio informazioni Leica
Il servizo informazioni Leica risponde per iscritto,
telefono o e-mail a domande tecniche riguardanti
l’applicazione del programma Leica:
Leica Camera AG
Informations-Service
Postfach 1180/D 35599 Solms
55
italiano
Leica Camera AG
Reparatur-Service
Oskar-Barnack-Str. 11/D 35606 Solms
Tel:
+49(0)64 42-208 189
Fax: +49(0)64 42-208 339
e-mail: [email protected]
Prólogo
Estimado cliente,
Denominación de los componentes
1. Anteojeras para ocular
Posición a: desenroscada para la observación
sin gafas
Posición b: enroscada para la observación
con gafas
2. Anillos giratorios para la elección de aumento
con marca de índice
3. Anillos fijos con marcas para los aumentos
4. Anillo de dioptrías enclavable
5. Corchetes para correas portadoras
6. Anillo de enfoque central
7. Eje de articulación para el ajuste de las
distancia del ojo
El nombre de Leica garantiza en todo el mundo
la mayor calidad óptica y una mecánica de precisión de gran fiabilidad y larga duración.
Deseamos que disfruten y tengan mucho éxito
con su nuevo Leica Duovid.
Las excepcionales características ópticas y el
aumento variable le permite adaptar estos manejables anteojos a diferentes situaciones de
observación.
Le recomendamos la lectura detenida de estas
instrucciones para que pueda utilizarlos correctamente.
56
Contenido
Prólogo . . . . . . . . . . . . . . . . . . . . . . . . . . . . . . 56
Denominación de los componentes . . . . . . . . 56
Posibilidades de aplicación . . . . . . . . . . . . . . . 58
Colocación de la correa . . . . . . . . . . . . . . . . . . 58
Nota de advertencia
Como con cualquier prismático, evite mirar
directamente fuentes de luz intensa con sus
Leica Duovid, para no sufrir lesiones en los
57
español
ojos.
Colocación de la tapa protectora del ocular . . . 58
Cuidado/Limpieza . . . . . . . . . . . . . . . . . . . . . 59
Adaptador de trípode . . . . . . . . . . . . . . . . . . . 59
Bolso . . . . . . . . . . . . . . . . . . . . . . . . . . . . . . . . 59
Ajuste de las anteojeras . . . . . . . . . . . . . . . . . 60
Ajuste de la distancia del ojo . . . . . . . . . . . . . 61
Ajuste del aumento . . . . . . . . . . . . . . . . . . . . . 61
Ajuste del enfoque/
Compensación de dioptrías . . . . . . . . . . . . . . 62
Datos técnicos . . . . . . . . . . . . . . . . . . . . . . . . 65
Academia Leica . . . . . . . . . . . . . . . . . . . . . . . . 66
Leica en Internet . . . . . . . . . . . . . . . . . . . . . . . 66
Servicio de información Leica . . . . . . . . . . . . . 66
Customer Service Leica . . . . . . . . . . . . . . . . . 66
Posibilidades de aplicación
Los Leica Duovid son anteojos de lato rendimiento con dos aumentos que se pueden seleccionar
según las necesidades. El aumento menor se
dispone de una imagen clara y tranquila con un
amplio campo visual y una elevada profundidad
de enfoque. El aumento mayor se ofrece una
excelente percepción de los detalles en objetos
muy lejanos y en el crepúsculo. En particular, la
distribución equilibrada del peso y la perfecta
ergonomía permiten conjuntamente un reposo
sorprendente de la imagen a pesar del elevado
aumento.
El Leica Duovid posee una carcasa de aluminio
fundida a presión herméticamente impermeable
y llena de nitrógeno. Por ello, también es apropiado para la ruda aplicación en el exterior. No
es necesario que se tenga una consideración
especial a la humedad – es absolutamente impermeable hasta una profundidad de 5 m y la
óptica situada en el interior no se empaña.
Colocación de la correa
Colocación de la tapa protectora del ocular
La tapa protectora del ocular se solapa sobre las
anteojeras. La fijación tiene lugar en la correa
portadora.
58
Cuidado/Limpieza
No se requieren cuidados especiales. Las partículas de suciedad grandes, como por ejemplo la
arena, se deben limpiar con un pincel de cerdas
finas o soplando. Para ello tienen que estar acopladas las dos mitades del botón. Si las lentes
del objetivo o del ocular están sucias de huellas
dactilares o similares, se pueden limpiar con uns
gamuza suave y limpia o con un paño que no
tenga polvo. Si, por ejemplo, los (manguitos corredizos del ocular) oculares corredizos están
muy sucios, los prismáticos se pueden limpiar
enjuagándolos con agua corriente. También se
tiene que aclarar el agua salada.
La humedad que penetre en el mando central de
enfoque (visible en la ventana de la escala), se
seca mejor si están desacopladas las dos mitadas del botón.
Adaptador de trípode
Este práctico adaptador de trípode está equipado con una rosca de 1/4” para todos los modelos
Duovid, y permite una visión estable durante
largos períodos. En el caso del Leica Duovid
10+15 x 50 está incluido en la entrega del pedido.
59
español
Bolso
El bolso suministrado de napa suave protege a
los prismáticos de la suciedad. Para hacer pasar
la correa de los prismáticos, en el extremo
superior del bolso hay prevista una tapa con
botones a presión.
A
B
C
Ajuste de las anteojeras
Las anteojeras oculares (1) se pueden ajustar simplemente girándolas y encastrándolas de forma
segura en las posiciones seleccionadas. Para efectuar una limpieza a fondo se pueden retirar por
completo. Para la observación con gafas (figura A)
permanecerán en la posición totalmente enroscada. Para la observación sin gafas se desenroscan
D
mediante un giro en el sentido contrario al de las
agujas del reloj. Hay disponibles dos posiciones
para una adaptación óptima (figura B, C).
Si los oculares están muy sucios, se recomienda
retirar las anteojeras para la limpieza (figura D).
Para ello, éstas se giran (hacia atrás) un poco
desde la posición totalmente desenroscada aplicando una ligera tracción.
60
Ajuste de la distancia del ojo
La distancia interocular individual se ajusta doblando los prismáticos en torno al eje articulado
(7). El campo visual derecho e izquierdo tienen
que fundirse en una imagen circular.
2
Ajuste del aumento
El Leica Duovid le ofrece al usuario la posibilidad
de elección entre dos tipos de aumentos.
El cambio tiene lugar con los anillos giratorios
(2) situados por debajo de las dos anteojeras del
ocular. Para ello, ambos anillos deben girarse
siempre por completo hasta las posiciones finales
correspondientes.
61
español
2
Notas:
Son posibles las posiciones intermedias, sin
embargo no puede garantizarse un aumento
idéntico en los dos sistemas ópticos. Además, la
transmisión automática del ajuste de las dioptrías (ADC™ – Automatic Diopter Compensation,
ver también en el apartado siguiente «Ajuste del
enfoque/Compensación de las dioptrías») tiene
lugar únicamente en las dos posiciones finales.
Por este motivo, unos ajustes incorrectos pueden producir rápidamente una sobrecarga de los
ojos y, consiguientemente, pueden provocar fatiga.
Ya que el anillo izquierdo está acoplado con el
ajuste automático de las dioptrías gira con una
insignificantemente mayor dificultad que el derecho.
6
Ajuste del enfoque/Compensación de dioptrías
El ajuste del enfoque sobre objetos situados a
diferentes distancias tiene lugar en el Leica
Duovid con el anillo de enfoque central (6).
Nota:
El ajuste del enfoque del Leica Duovid se mantiene también tras el cambio de los aumentos. En
la práctica puede ser necesario, no obstante, un
reajuste insignificante. Esto es especialmente
acertado cuando se cambia a un aumento mayor
una vez enfocado con un aumento inferior. La
razón: La mayor profundidad de enfoque con un
aumento menor, que a menudo produce un enfoque un poco menos exacto, y la capacidad de
acomodación de los ojos.
62
4
A
B
La compensación de una visión incorrecta individual para la observación sin gafas es llevada a
cabo por el anillo de dioptrías (4) que, normalmente, está bloqueado (figura a). En primer lugar
se enfoca nítidamente sobre un objeto con el
anillo de enfoque central para el tubo derecho.
Después se desacopla el anillo de dioptrías tirando de él (figura b).
Atención:
Si el anillo izquierdo de ajuste del aumento no se
encuentra en una posición final, es decir, en 8x ó
12x/10x ó 15x, el anillo de dioptrías está bloqueado y no puede ser desacoplado.
63
español
A continuación, en el anillo de dioptrías se ajustará el enfoque óptimo girándolo para el tubo
izquierdo. Al presionar hacia abajo el anillo de las
dioptrías queda almacenado el valor enfocado.
Des este modo se pueden compensar diferencias de visión incorrecta de hasta ±3 dioptrías.
Atención:
No ajuste los aumentos estando desacoplado el
anillo de dioptrías. El anillo izquierdo para el ajuste de los aumentos se encuentra bloqueado
cuando el anillo de dioptrías está desacoplado.
Para vistas parciales unilaterales a izquierda o
derecha debería cerrarse el ojo del otro lado correspondiente, o simplemente debería permanecer cerrada la correspondiente mitad de los
anteojos en la parte delantera del objetivo.
El valor ajustado respectivamente se puede leer
cómodamente en la escala precisa que se encuentra en el anillo de dioptrías.
64
Datos técnicos
Índice:
Luminosidad geométrica:
Campo visual:
Límite de enfoque a corta
distancia:
Ajuste de aumentos:
Compensación de dioptrías:
Distancia pupilar:
Clase de prisma:
Capa de corrección de fase en
prismas:
Temperatura de funcionamiento:
Temperatura de almacenamiento:
Impermeabilidad:
Material de la carcasa:
Dimensiones (A1 x A2 x F1):
Peso:
1
2
LEICA DUOVID 8+12 x42
8/12
42mm
para 8 aumentos: 5,25mm,
para 12 aumentos: 3,5mm
para 8 aumentos: 18,33,
para 12 aumentos: 22,45
para 8 aumentos: 27,56,
para 12 aumentos: 12,25
para 8 aumentos: 118m a una distancia
de 1.000m, en grados: 6,7°,
para 12 aumentos: 90m a una distancia
de 1.000m, en grados: 5,1°
LEICA DUOVID 10+15 x50
10/15
50mm
para 10 aumentos: 5,00mm,
para 15 aumentos: 3,3mm
para 10 aumentos: 22,36,
para 15 aumentos: 27,39
para 10 aumentos: 25,00,
para 15 aumentos: 11,1
para 10 aumentos: 92m a una distancia
de 1.000m, en grados: 5,3°,
para 15 aumentos: 70m a una distancia
de 1.000m, en grados: 4,0°
3,50 m, -4,5 dptr de carrera excesiva sobre ∞ 3,80 m, -4,5 dptr de carrera excesiva sobre ∞
Cambio a monocular
±3 dioptrías, -4,5 dioptrías de carrera excesiva, el ajuste se conserva al cambiar los
aumentos (ADC™ – Automatic Diopter Compensation)
ajustable a 56–74mm
Triangular de crystal
si, P40
de -25° C a 55° C
de - 40° C a 85° C
a prueba de agua a presión hasta 0,5bares = 5m de profundidad en el agua, carga de
nitrógeno para ausencia de empañamiento en cualquier situación
aluminio fundido a presión, con armadura de goma completa, ergonómica y de fácil agarre
120 x 157 x 67mm
126 x 195 x 67mm
1045g
1250g
Con una distancia de los ojos de 65 mm
Con anteojeras de ocular enroscadas
65
español
Aumentos:
Diámetro del objetivo:
Pupila de salida:
Servicio de Información Leica por escrito, por teléfono o por correo electrónico:
Leica Camera AG
Informations-Service
Postfach 1180/D 35599 Solms
Academia Leica
En los distintos seminarios, el participante aprende, de una forma adecuada y orientada a la práctica, el mundo de valores de la Leica y la fascinatión de saber manejar los productos Leica. Los
contenidos se orientan según las aplicaciones,
ofreciendo numerosas iniciativas, informaciones y
consejos para la práctica.
Leica Camera AG
Leica Akademie
Oskar-Barnack-Str. 11/D 35606 Solms
Tel:
+49 (0)64 42-2 08 421
Fax: +49 (0)64 42-2 08 425
e-mail: [email protected]
Tel:
Fax:
+49(0)64 42-208 111
+49 (0)64 42-208 339
e-mail: [email protected]
Customer Service Leica
Para el mantenimiento de su equipo Leica así como
en caso de desperfectos o averías está a sus disposición el Customer Service de Leica Camera AG o
el Servicio de reparaciones de una representación
de Leica (encontrará la lista de direcciones en la
tarjeta de garantía). Diríjase por favor a su proveedor autorizado de productos Leica.
Leica en Internet
Puede consultar informaciones actuales sobre
productos, novedades, eventos y sobre la empresa
Leica en nuestra portada de Internet:
http://www.leica-camera.com
Leica Camera AG
Reparatur-Service
Oskar-Barnack Str. 11/D 35606 Solms
Tel:
+49(0)64 42-208 189
Fax: +49 (0)64 42-208 339
Servicio de información Leica
Obtendrá respuesta a sus preguntas sobre
aplicaciones del programa Leica dirigiéndose al
e-mail: [email protected]
66
my point of view
XI/02/DX/B.
Leica Camera AG / Oskar-Barnack-Straße 11 / D-35606 Solms
www.leica-camera.com / [email protected]
Telefon + 49 (0) 64 42-2 08 -0 / Fax + 49 (0) 64 42-2 08 -3 33