1
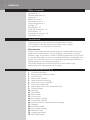
Register your product and get support at
www.philips.com/welcome
FC9179
English 4
Deutsch 16
1
1
2
3
4
5
8
6
7
9
10
11
12
14
13
15
17
16
18
19
20
21
22
26
23
24
27
25
28
29
4
English
Table of contents
Introduction 4
General description 4
Important 5
Before first use 6
Preparing for use 6
Using the appliance 9
Storage 10
Maintenance 10
Ordering accessories 13
Environment 14
Guarantee and service 14
Troubleshooting 14
Introduction
Congratulations on your purchase and welcome to Philips!
To fully benefit from the support that Philips offers, register
your product at www.philips.com/welcome.
Environment
Philips incorporates the latest technologies to create products that are
good for the environment in terms of energy consumption as well as
material usage. This product is made of 50% recycled plastics. Philips tries
to use recycled plastics as much as possible, resulting in considerably less
waste. For more information on this and other environmental efforts of
Philips, please visit www.asimpleswitch.com.
The Green Performer’s extremely efficient motor yields a high
performance at a lower power consumption.
General description (Fig. 1)
1 Cord rewind button
2 Suction power selection wheel
3 On/off button
4 Dustbag-full indicator
5 Hose connection opening
6 Hose with swivel connector
7 Dust cover release tab
8 Filter holder with motor protection filter
9 Dustbag holder
10Dustbag
11 Rear wheel
12 Small nozzle
13 Crevice tool
14 Easy release coupling
15 Combination nozzle
16 Rocker switch for carpet/hard floor settings
17Handgrip
18 Accessory holder
19 Easy release coupling
20 Telescopic tube
21 Hinging top handle
22 Filter grille (open)
English
5
23 Parking slot
24 Mains plug
25 Ultra Clean Air HEPA 13 filter
26 Front handle
27 Swivel wheel
28 Storage slot
29 Type plate
Important
Read this user manual carefully before you use the appliance and save it
for future reference.
Danger
-- Never suck up water or any other liquid. Never suck up flammable
substances and do not suck up ashes until they are cold.
Warning
-- Check if the voltage indicated on the appliance corresponds to the
local mains voltage before you connect the appliance.
-- Do not use the appliance if the plug, the mains cord or the appliance
itself is damaged.
-- If the mains cord is damaged, you must have it replaced by Philips, a
service centre authorised by Philips or similarly qualified persons in
order to avoid a hazard.
-- This appliance is not intended for use by persons (including children)
with reduced physical, sensory or mental capabilities, or lack of
experience and knowledge, unless they have been given supervision or
instruction concerning use of the appliance by a person responsible for
their safety.
-- Children should be supervised to ensure that they do not play with
the appliance.
-- Do not point the hose, the tube or any other accessory at the eyes
or ears nor put it in your mouth when it is connected to the vacuum
cleaner and the vacuum cleaner is switched on.
Caution
-- When you use the vacuum cleaner to vacuum ashes, fine sand, lime,
cement dust and similar substances, the pores of the dustbag become
clogged. As a result, the dustbag-full indicator will indicate that the
dustbag is full. Replace the dustbag, even if it is not full yet (see section
‘Replacing the dustbag’ in chapter ‘Maintenance’).
-- Never use the appliance without the motor protection filter. This could
damage the motor and shorten the life of the appliance.
-- Only use Philips s-bag ` synthetic dustbags.
-- During vacuum cleaning, especially in rooms with low air humidity, your
vacuum cleaner builds up static electricity. As a result you can experience
electric shocks when you touch the tube or other steel parts of your
vacuum cleaner. These shocks are not harmful to you and do not
damage the appliance. To reduce this inconvenience we advise you:
6
English
1 to discharge the appliance by frequently holding the tube against other
metal objects in the room (for example the legs of a table or chair, a
radiator etc.);
2 to raise the air humidity level in the room by placing water in the room.
For example, you can hang containers filled with water from your
radiators or place bowls filled with water on or near your radiators.
Electromagnetic fields (EMF)
This Philips appliance complies with all standards regarding electromagnetic
fields (EMF). If handled properly and according to the instructions in this
user manual, the appliance is safe to use based on scientific evidence
available today.
Before first use
1Take the appliance and its accessories out of the box.
2Remove any sticker, protective foil or plastic from the appliance.
Preparing for use
Hose
1To connect the hose, push it firmly into the appliance.
English
2To disconnect the hose, push the buttons (1) and pull the hose out
of the appliance (2).
Telescopic tube
1To connect the tube to the handgrip, insert the handgrip into the
tube. Fit the spring-loaded lock button into the opening in the tube
(‘click’).
-- To disconnect the tube from the handgrip, press the easy-release
button (1) and pull the handgrip out of the tube (2).
1
2
2Adjust the tube to the length you find most comfortable during
vacuuming.
7
8
English
Nozzles and accessories
1To connect a nozzle or accessory to the tube, insert the tube into
the nozzle or accessory. Fit the spring-loaded lock button into the
opening in the tube (‘click’).
Note:You can also connect the nozzles and accessories directly to the handgrip
in the same way.
2To disconnect a nozzle or accessory from the tube, press the easyrelease button and pull the tube out of the nozzle or accessory.
Combination nozzle (specific types only)
The combination nozzle can be used on either carpets or hard floors.
1To clean hard floors, push the rocker switch on top of the nozzle
with your foot.
,, The brush strip for cleaning hard floors comes out of the nozzle
housing.
2To clean carpets, push the rocker switch again.
,, The brush strip disappears into the nozzle housing.
Accessories
1You can connect the crevice tool (1) or the small nozzle (2) directly
to the handgrip of the hose or to the tube.
-- Use the crevice tool to clean narrow corners or hard-to-reach places.
-- Use the small nozzle to clean small areas, e.g. the seats of chairs
and sofas.
English
Accessory holder
1Snap the accessory holder onto the handgrip.
2Snap the crevice tool and small nozzle into accessory holder.
Using the appliance
1Pull the cord out of the appliance and put the mains plug in the
wall socket.
2Press the on/off button on top of the appliance with your foot to
switch on the appliance.
Adjusting suction power
During vacuuming, you can adjust the suction power with the selection
wheel on top of the appliance.
-- Use maximum suction power to vacuum very dirty carpets and
hard floors.
-- Use moderate suction power to vacuum carpets.
-- Use minimum suction power to vacuum curtains, table carpets, etc.
Tip: By reducing suction power, you can move the nozzle across the floor
more easily.
9
10
English
Pausing during use
1If you want to pause for a moment, insert the ridge on the nozzle
into the parking slot to park the tube in a convenient position.
Storage
1Switch off the appliance and remove the mains plug from the
wall socket.
2Slide the tube parts into each other to reduce the tube to its
shortest length.
3Press the cord rewind button to rewind the mains cord.
4To store the appliance in upright position, insert the ridge on the
nozzle into the storage slot.
Maintenance
Tip: For optimal performance, always use the Philips s-bag® ultra long
performance available under type number FC8027.
Always unplug the appliance before you clean the appliance, replace the
dustbag and before you replace the filters.
Note: In some cases, the dustbag-full indicator can indicate that the dustbag
is full, even though it is not.This may occur if the pores of the dustbag are
clogged (e.g. when you have vacuumed ashes, fine sand, lime, cement dust and
similar substances) or if something is blocking the nozzle, tube and/or hose.
If the pores of the dustbag are clogged, you have to replace the dustbag, even
if it is not full yet. If the dustbag is not clogged but not full either, something is
blocking the nozzle, tube and/or hose. In this case, do not replace the dustbag
but remove the obstruction.
Note: Only wipe the body of the appliance with a moist cloth.
English
11
Replacing the dustbag
-- Replace the dustbag as soon as the dustbag-full indicator has
changed colour permanently, i.e. even when the nozzle is not placed
on the floor.
1Pull the cover upwards to open it.
2Lift the dustbag holder out of the appliance.
Make sure you hold the holder with the dustbag in horizontal position
when you lift it out of the appliance.
3Pull at the cardboard tag to remove the full dustbag from the holder.
,, The dustbag is sealed automatically.
Note:You can dispose the old dustbag with the normal household waste.
4Slide the cardboard front of the new dustbag into the two grooves of
the dustbag holder as far as possible. Shake the holder with the new
dustbag until the dustbag is completely unfolded.
5Put the dustbag holder back into the vacuum cleaner.
Note: If you have not inserted a dustbag, you cannot close the cover.
Note: Make sure no part of the dustbag is clamped between the appliance
and the cover.
12
English
Motor protection filter
To guarantee optimal performance, replace the motor protection filter
once a year.
1Remove the dustbag holder with the dustbag.
2Press the filter holder release tab (1) and take the filter holder out
of the appliance (2). Take the motor protection filter out of the
filter holder.
3Put the new filter in the filter holder. Fit the two lugs of the filter
holder behind the ridge at the bottom to ensure that it fits properly
at the top (1). Then press home the filter holder (‘click’) (2).
4Place the dustbag holder with the dustbag back into the appliance.
HEPA 13 filter
The HEPA 13 filter is able to remove 99.95% of all particles down to
0.0003mm in size from the outlet air. This not only includes normal house
dust, but also harmful microscopic vermin such as dust mites and their
excrements, which are well-known causes of respiratory allergies.
Note:To guarantee optimal dust retention and performance of the vacuum
cleaner, always replace the HEPA filter every 2 years with an original Philips
filter of the correct type (see chapter ‘Ordering accessories’).You can dispose of
the old filter with the normal household waste.
Replacing the HEPA 13 filter
1Open the filter grille.
English
13
2Take out the HEPA 13 filter.
3Put the new filter in the appliance.
4Press the filter grille home to lock it (‘click’).
Note: Make sure that the filter grille is properly closed.
Tip: For optimal results, replace the HEPA 13 filter every 2 years. If you want
to minimise the impact on the environment, you can wash the HEPA 13 filter.
To wash the HEPA 13 filter, follow the instructions below.
1 Rinse the HEPA 13 filter under a hot slow-running tap.
Never clean the filter with a brush.
2 Carefully shake the water from the surface of the filter. Let the filter
dry completely for at least 2 hours before you put it back into the
vacuum cleaner.
Note: Cleaning does not restore the original colour of the filter, but does restore
its filtration power.
Ordering accessories
If you have any difficulties obtaining dustbags, filters or other accessories
for this appliance, please contact the Philips Consumer Care Centre in your
country or consult the worldwide guarantee leaflet.
Ordering dustbags
-- Philips s-bag® ultra long performance dustbag lasts 80% longer
than standard dustbags. Their 5 litres capacity and multi-layer, nonclogging material maintain excellent suction power throughout the
entire lifetime of the bag. Available under type number FC8027.
-- Philips s-bag® classic long performance dustbags last 50% longer
than standard dustbags, thanks their non-clogging material. Available
under type number FC8021.
14
English
-- Philips s-bag® anti-allergy dustbags reduce the exposure to allergens.
Their HEPA 10 filtration level gives you a clean and healthy home
environment. Available under type number FC8022.
-- Philips s-bag® anti-odour dustbags have an odour-absorbing coating.
This coating absorbs and neutralises unpleasant smells caused by
decomposing pet hair or food scraps. Available under type number
FC8023.
Ordering filters
-- Ultra Clean Air HEPA 13 filters are available under type number
FC8038.
-- Motor protection filters are available under service number
4822 480 10228*
* You can buy motor protection filters in the Philips online shop by clicking
‘accessories and spare parts’ or you can contact the Philips Consumer Care
Centre in your country.
Environment
-- Do not throw away the appliance with the normal household waste
at the end of its life, but hand it in at an official collection point for
recycling. By doing this, you help to preserve the environment.
Guarantee and service
If you need service or information or if you have a problem, please visit the
Philips website at www.philips.com or contact the Philips Consumer
Care Centre in your country. You find its phone number in the worldwide
guarantee leaflet. If there is no Consumer Care Centre in your country,
go to your local Philips dealer.
Troubleshooting
This chapter summarises the most common problems you could
encounter with the appliance. If you are unable to solve the problem with
the information below, contact the Consumer Care Centre in your country.
1The suction power is insufficient.
A The dustbag may be full.
-- Replace the disposable dustbag.
B The filters may be dirty.
-- Replace the filters.
C The suction power may be set to a low setting.
-- Set the suction power to a higher setting.
D The nozzle, tube or hose may be blocked up.
English
15
-- To remove the obstruction, disconnect the blocked-up item and
connect it (as far as possible) the other way around. Switch on the
vacuum cleaner to force the air through the blocked-up item in
opposite direction.
2When I use my vacuum cleaner I sometimes feel electric shocks.
A Your vacuum cleaner has built up static electricity. The lower the air
humidity in the rooms, the more static electricity the appliance
builds up.
-- Discharge the appliance by frequently holding the tube against other
metal objects in the room (for example the legs of a table or chair, a
radiator etc.).
-- Raise the air humidity level in the room by placing water in the room.
For example, you can hang containers filled with water from your
radiators or place bowls filled with water on or near your radiators.
16
Deutsch
Inhaltsangabe
Einführung 16
Allgemeine Beschreibung 16
Wichtig 17
Vor dem ersten Gebrauch 18
Für den Gebrauch vorbereiten 18
Das Gerät benutzen 21
Aufbewahrung 22
Wartung 22
Zubehör bestellen 26
Umwelt 26
Garantie und Kundendienst 27
Fehlerbehebung 27
Einführung
Herzlichen Glückwunsch zu Ihrem Kauf und willkommen bei Philips!
Um die Unterstützung von Philips optimal nutzen zu können, registrieren
Sie Ihr Produkt bitte unter www.philips.com/welcome.
Umwelt
Philips vereinigt die neuesten Technologien, um Produkte herzustellen,
die sowohl im Hinblick auf den Stromverbrauch als auch bezüglich der
verwendeten Materialien die Umwelt schonen. Dieses Produkt besteht
zu 50 % aus recycelten Kunststoffen. Philips ist bemüht, recycelten
Kunststoff einzusetzen, wo immer dies möglich ist, wodurch erheblich
weniger Abfall entsteht. Weitere Informationen zu diesen und anderen
Umweltschutzmaßnahmen von Philips finden Sie auf der Website
www.asimpleswitch.com.
Der besonders effiziente Motor dieses umweltfreundlichen Produkts liefert
eine hohe Leistung bei geringem Stromverbrauch.
Allgemeine Beschreibung (Abb. 1)
1Kabelaufwicklungstaste
2Saugleistungsregler
3Ein-/Ausschalter
4Staubfüllanzeige
5 Öffnung für Schlauchanschluss
6 360° drehbarer Saugschlauch
7 Entriegelung für Staubabdeckung
8 Filterhalter mit Motorschutzfilter
9Staubbeutelhalter
10Staubbeutel
11Hinterrad
12 Kleine Saugdüse
13Fugendüse
14 Leicht zu bedienende Verbindung
15Kombi-Düse
16 Kippschalter für Teppiche/Hartböden
17Handgriff
18Zubehörhalterung
19 Leicht zu bedienende Verbindung
20Teleskoprohr
Deutsch
17
21 Oberer klappbarer Tragebügel
22 Filtergitter (offen)
23Parkschlitz
24Netzstecker
25Ultra-Clean-Air-HEPA-13-Filter
26 Vorderer Tragegriff
27Schwenkrolle
28Aufbewahrungsschlitz
29 Typenschild
Wichtig
Lesen Sie diese Bedienungsanleitung vor dem Gebrauch des Geräts
aufmerksam durch, und bewahren Sie sie für eine spätere Verwendung auf.
Gefahr
-- Saugen Sie mit diesem Gerät niemals Wasser, andere Flüssigkeiten oder
leicht entzündbare Substanzen auf. Saugen Sie Asche erst auf, wenn sie
völlig ausgekühlt ist.
Warnhinweis
-- Prüfen Sie, bevor Sie das Gerät in Betrieb nehmen, ob die
Spannungsangabe auf dem Gerät mit der örtlichen Netzspannung
übereinstimmt.
-- Verwenden Sie das Gerät nicht, wenn der Netzstecker, das Netzkabel
oder das Gerät selbst defekt oder beschädigt sind.
-- Um Gefährdungen zu vermeiden, darf ein defektes Netzkabel nur
von einem Philips Service-Center oder einer von Philips autorisierten
Werkstatt durch ein Original-Ersatzkabel ausgetauscht werden.
-- Dieses Gerät ist für Benutzer (einschl. Kinder) mit eingeschränkten
physischen, sensorischen oder psychischen Fähigkeiten bzw. ohne jegliche
Erfahrung oder Vorwissen nur dann geeignet, wenn eine angemessene
Aufsicht oder ausführliche Anleitung zur Benutzung des Geräts durch
eine verantwortliche Person sichergestellt ist.
-- Achten Sie darauf, dass Kinder nicht mit dem Gerät spielen.
-- Richten Sie Saugschlauch, Saugrohr oder anderes Zubehör nicht auf
Augen oder Ohren, und stecken Sie keines der Teile in den Mund, wenn
es am Staubsauger angeschlossen oder der Staubsauger eingeschaltet ist.
Achtung
-- Beim Aufsaugen von Asche, feinem Sand, Kalk, Zementstaub
o. Ä. verstopfen die Poren des Staubbeutels. Deshalb wird die
Staubfüllanzeige angeben, dass der Staubbeutel voll ist. Wechseln Sie
den Staubbeutel aus, auch wenn er noch nicht voll ist (siehe Abschnitt
“Den Staubbeutel auswechseln” in Kapitel “Wartung”).
-- Betreiben Sie das Gerät keinesfalls ohne Motorschutzfilter, da dies den
Motor beschädigen und die Lebensdauer des Geräts verkürzen kann.
-- Verwenden Sie ausschließlich die synthetischen Staubbeutel Philips
S-Bag `.
-- Besonders in Räumen mit niedriger Luftfeuchtigkeit kann sich Ihr
Gerät beim Staubsaugen statisch aufladen. Dadurch kann es zu kleinen
elektrischen Schlägen kommen, wenn Sie das Saugrohr oder andere
Metallteile Ihres Staubsaugers berühren. Diese elektrischen Schläge
sind jedoch weder für Sie noch für das Gerät schädlich. Um diese
Unannehmlichkeit zu vermeiden, empfehlen wir Folgendes:
18
Deutsch
1 Entladen Sie das Gerät regelmäßig, indem Sie mit dem Saugrohr andere
metallene Gegenstände wie Tisch- oder Stuhlbeine oder Heizkörper
berühren.
2 Erhöhen Sie die Luftfeuchtigkeit des Raums, indem Sie Behälter mit
Wasser aufstellen. Sie können diese an Heizkörper hängen oder sie
darauf bzw. in der Nähe abstellen.
Elektromagnetische Felder
Dieses Philips Gerät erfüllt sämtliche Normen bezüglich
elektromagnetischer Felder (EMF). Nach aktuellen wissenschaftlichen
Erkenntnissen ist das Gerät sicher im Gebrauch, sofern es ordnungsgemäß
und entsprechend den Anweisungen in dieser Bedienungsanleitung
gehandhabt wird.
Vor dem ersten Gebrauch
1Nehmen Sie das Gerät und das Zubehör aus der Verpackung.
2Entfernen Sie Aufkleber, Schutzfolien und Verpackungsmaterial aus
Kunststoff vom Gerät.
Für den Gebrauch vorbereiten
Schlauch
1Um den Schlauch anzuschließen, schieben Sie ihn fest in das Gerät.
Deutsch
19
2Um den Schlauch abzunehmen, drücken Sie die Entriegelungstasten
(1) und ziehen Sie den Schlauch aus dem Gerät (2).
Teleskoprohr
1Um das Rohr mit dem Handgriff zu verbinden, stecken Sie den
Griff in das Rohr. Lassen Sie die Federtaste in die Öffnung im Rohr
einrasten (Sie hören ein Klicken).
-- Zum Lösen des Rohrs vom Handgriff drücken Sie die
Griffentriegelungstaste (1), und ziehen Sie den Griff aus dem Rohr
heraus (2).
1
2
2Sie können das Rohr auf die Länge einstellen, mit der Sie am
bequemsten saugen können.
20
Deutsch
Düsen und Zubehör
1Um eine Düse oder ein Zubehörteil am Rohr anzubringen, schieben
Sie das Rohr in die Düse oder das Zubehörteil ein. Lassen Sie die
Federtaste in der Öffnung im Rohr einrasten (Sie hören ein Klicken).
Hinweis: Auf dieselbe Weise können Sie die Düsen oder Zubehörteile auch
direkt am Handgriff anbringen.
2Um eine Düse oder ein Zubehörteil vom Rohr zu trennen, drücken
Sie die einfache Griffentriegelungstaste, und ziehen Sie das Rohr aus
der Düse oder dem Zubehörteil heraus.
Kombi-Düse (nur bestimmte Gerätetypen)
Mit der Kombi-Düse können Sie harte und weiche Böden saugen.
1Drücken Sie zum Saugen von Hartböden den Kippschalter oben auf
der Saugdüse mit dem Fuß nach unten.
,, Dadurch tritt der Bürstenstreifen aus dem Gehäuse hervor.
2Drücken Sie den Kippschalter zum Saugen von Textilböden in die
andere Richtung.
,, Der Bürstenstreifen wird wieder im Gehäuse der Saugdüse versenkt.
Zubehör
1Sie können die Fugendüse (1) oder die kleine Düse (2) direkt mit
dem Handgriff des Schlauchs oder dem Rohr verbinden.
-- Benutzen Sie die Fugendüse zum Reinigen enger und schwer
erreichbarer Stellen.
-- Die kleine Düse eignet sich zum Staubsaugen kleiner Flächen, z. B. von
Sitzpolstern und Sofas.
Deutsch
21
Zubehörhalterung
1Klemmen Sie die Zubehörhalterung an den Handgriff.
2Klemmen Sie die Fugendüse und die kleine Düse in
Zubehörhalterung.
Das Gerät benutzen
1Ziehen Sie das Netzkabel aus dem Gerät, und stecken Sie den
Stecker in eine Steckdose.
2Zum Einschalten drücken Sie mit dem Fuß den Ein-/Ausschalter auf
der Oberseite des Geräts.
Die Saugleistung einstellen
Sie können die Saugleistung während des Staubsaugens mit dem
Saugleistungsregler auf dem Gerät einstellen.
-- Saugen Sie sehr stark verschmutzte Teppiche und Hartböden bei
maximaler Saugleistung.
-- Verwenden Sie zur Reinigung von Teppichen eine mittlere Saugleistung.
-- Verwenden Sie minimale Saugleistung zum Absaugen von Vorhängen,
Tischläufern usw.
Tipp: Durch Verringern der Saugkraft lässt sich die Düse leichter über den
Boden führen.
22
Deutsch
Saugpausen
1Wenn Sie eine kleine Saugpause machen möchten, können Sie das
Saugrohr ganz bequem parken, indem Sie die Leiste an der Saugdüse
in den dafür vorgesehenen Parkschlitz stecken.
Aufbewahrung
1Schalten Sie das Gerät aus, und ziehen Sie den Netzstecker aus der
Steckdose.
2Schieben Sie die Rohrsegmente ineinander, um das Saugrohr auf seine
kleinste Länge zu verkürzen.
3Drücken Sie die Kabelaufwicklungstaste, um das Netzkabel
aufzuwickeln.
4Um das Gerät in aufrechter Stellung aufzubewahren, stecken Sie die
Leiste an der Düse in den dafür vorgesehenen Parkschlitz.
Wartung
Tipp:Verwenden Sie für eine optimale Leistung immer den Philips S-Bag®
Ultra Long Performance-Staubbeutel, der unter der Typennummer FC8027
erhältlich ist.
Ziehen Sie immer den Netzstecker, bevor Sie das Gerät reinigen bzw.
den Staubbeutel oder die Filter austauschen.
Hinweis: Manchmal zeigt die Staubfüllanzeige an, dass der Staubbeutel
voll ist, obwohl dies nicht der Fall ist. Dies kann geschehen, wenn die Poren
des Staubbeutels verstopft sind (z. B. wenn Sie Asche, feinen Sand, Kalk,
Zementstaub oder Ähnliches aufgesaugt haben) oder wenn die Düse, das
Rohr und/oder der Schlauch blockiert sind.Wenn die Poren des Staubbeutels
verstopft sind, müssen Sie den Staubbeutel austauschen, selbst wenn er noch
nicht voll ist.Wenn der Staubbeutel weder verstopft noch voll ist, sind die Düse,
das Rohr und/oder der Schlauch blockiert. In diesem Fall müssen Sie den
Staubbeutel nicht ersetzen, sondern den blockierenden Gegenstand entfernen.
Hinweis:Wischen Sie das Gehäuse des Geräts nur mit einem feuchten Tuch ab
Deutsch
23
Den Staubbeutel auswechseln
-- Wechseln Sie den Staubbeutel gegen einen neuen aus, sobald die
Staubfüllanzeige dauerhaft ihre Farbe geändert hat, auch wenn die
Düse nicht auf dem Fußboden steht.
1Ziehen Sie zum Öffnen des Geräts die Abdeckung nach oben.
2Nehmen Sie den Staubbeutelhalter mit dem Staubbeutel aus
dem Gerät.
Vergewissern Sie sich, dass Sie den Staubbeutelhalter beim
Herausnehmen waagerecht halten.
3Ziehen Sie an der Papplasche, um den vollen Staubbeutel aus dem
Halter zu nehmen.
,, Der Staubbeutel wird automatisch versiegelt.
Hinweis: Den gebrauchten Staubbeutel können Sie mit dem normalen
Hausmüll entsorgen.
4Schieben Sie die Pappscheibe des neuen Staubbeutels in den beiden
Führungsrillen bis zum Anschlag in den Staubbeutelhalter. Schütteln
Sie den Behälter mit dem neuen Staubbeutel, bis der Staubbeutel
vollständig aufgefaltet ist.
5Setzen Sie den Staubbeutelhalter wieder in den Staubsauger.
Hinweis:Wenn Sie keinen Staubbeutel eingesetzt haben, können Sie die
Abdeckung nicht schließen.
Hinweis:Vergewissern Sie sich, dass kein Teil des Staubbeutels zwischen dem
Gerät und der Abdeckung festklemmt.
24
Deutsch
Motorschutzfilter
Um eine ideale Leistung zu garantieren, ersetzen Sie den Motorschutzfilter
einmal pro Jahr.
1Nehmen Sie den Staubbeutelhalter mit dem Staubbeutel aus
dem Gerät.
2Drücken Sie die Entriegelungstaste (1) und nehmen Sie den
Motorschutzfilter-Halter aus dem Gerät (2). Nehmen Sie den
Motorschutzfilter aus dem Filterhalter.
3Setzen Sie den neuen Filter wieder in den Filterhalter. Die beiden
Vorsprünge müssen unten so hinter die Rippe gesteckt werden, dass
der Filterhalter oben einwandfrei sitzt (1). Drücken Sie ihn dann fest,
bis er hörbar einrastet (2).
4Setzen Sie den Staubbeutelhalter mit dem Staubbeutel zurück in das
Gerät.
HEPA-13-Filter
Der Filter HEPA-13 kann 99,95 % aller Staubteilchen bis zu einer Größe
von 0,0003 mm aus der Abluft herausfiltern. Dies betrifft nicht nur normale
Hausstaubpartikel, sondern auch gesundheitsschädigende mikroskopisch
kleine Schädlinge wie Hausstaubmilben und deren Exkremente, die
bekannte Auslöser für Atemwegsallergien sind.
Hinweis: Um eine optimale Staubaufnahme und Leistung des Staubsaugers zu
gewährleisten, ersetzen Sie den HEPA-Filter alle 2 Jahre durch einen Original
Philips Filter des richtigen Typs (siehe “Zubehör bestellen”). Den alten Filter
können Sie mit Ihrem normalen Hausmüll entsorgen.
Den HEPA-13-Filter ersetzen
Deutsch
25
1Öffnen Sie das Filtergitter.
2Nehmen Sie den HEPA-13-Filter heraus.
3Setzen Sie den neuen Filter in das Gerät ein.
4Das Filtergitter muss hörbar einrasten.
Hinweis:Vergewissern Sie sich, dass das Filtergitter ordnungsgemäß geschlossen
ist.
Tipp: Für optimale Ergebnisse ersetzen Sie den HEPA-13-Filter alle 2 Jahre.
Wenn Sie die Umweltbelastung möglichst gering halten möchten, können Sie
den HEPA-13-Filter auch waschen.
Um den HEPA-13-Filter zu waschen, folgen Sie den Anweisungen unten.
1 Spülen Sie den HEPA-13-Filter unter heißem, langsam fließendem
Wasser ab.
Reinigen Sie den Filter niemals mit einer Bürste.
2 Schütteln Sie das Wasser sorgfältig von der Oberfläche des Filters ab.
Lassen Sie den Filter mindestens zwei Stunden trocknen (er muss völlig
trocken sein), bevor Sie ihn wieder in den Staubsauger einsetzen.
Hinweis: Durch das Reinigen wird zwar die ursprüngliche Farbe des Filters
nicht wieder hergestellt, wohl aber dessen Filtrierleistung.
26
Deutsch
Zubehör bestellen
Sollten Sie Schwierigkeiten bei der Beschaffung von Staubbeuteln, Filtern
oder anderem Zubehör für diesen Staubsauger haben, wenden Sie sich
bitte an das Philips Service-Center in Ihrem Land. Beachten Sie auch die
Angaben in der internationalen Garantieschrift.
Staubbeutel nachbestellen
-- Philips S-Bag® Ultra Long Performance-Staubbeutel halten 80 %
länger als normale Staubbeutel. Dank der 5-Liter-Kapazität und dem
mehrschichtigen, nicht verstopfenden Material bietet der Staubbeutel
eine ausgezeichnete Saugwirkungskraft während seiner gesamten
Lebensdauer. Erhältlich unter der Typennummer FC8027.
-- Philips S-Bag® Classic Long Performance-Staubbeutel halten 50 %
länger als gewöhnliche Staubbeutel, da sie dank des Materials nicht so
leicht verstopfen. Sie sind erhältlich unter der Typennummer FC8021.
-- Philips S-Bag® Anti-Allergy-Staubbeutel reduzieren die Anzahl
der in der Luft befindlichen Allergene. Die HEPA-10 Filterung sorgt
für ein sauberes, gesundes Zuhause. Sie sind erhältlich unter der
Typennummer FC8022.
-- Philips S-Bag® Anti-Odour-Staubbeutel haben eine Geruchabsorbierende Beschichtung. Diese Beschichtung absorbiert und
neutralisiert unangenehme Gerüche, die durch Tierhaare oder
Speisereste verursacht werden. Sie sind erhältlich unter der
Typennummer FC8023.
Filter nachbestellen
-- Ultra-Clean-Air-HEPA-13-Filter sind unter der Typennummer FC8038
erhältlich.
-- Motorschutzfilter erhalten Sie unter der Servicenummer
4822 480 10228.*
* Sie können Motorschutzfilter im Philips Online-Shop kaufen, wenn Sie
den Bereich für Ersatzteile und Zubehör aufrufen, oder Sie können sich an
das Philips Service-Center in Ihrem Land wenden.
Umwelt
-- Werfen Sie das Gerät am Ende der Lebensdauer nicht in den
normalen Hausmüll. Bringen Sie es zum Recycling zu einer offiziellen
Sammelstelle. Auf diese Weise tragen Sie zum Umweltschutz bei.
Deutsch
27
Garantie und Kundendienst
Benötigen Sie weitere Informationen oder treten Probleme auf, besuchen
Sie bitte die Philips Website unter www.philips.com, oder setzen Sie
sich mit dem Philips Service-Center in Ihrem Land in Verbindung. Die
Telefonnummer finden Sie in der internationalen Garantieschrift. Sollte es
in Ihrem Land kein Service-Center geben, wenden Sie sich bitte an Ihren
Philips Händler.
Fehlerbehebung
In diesem Kapitel sind die häufigsten Probleme aufgeführt, die beim
Gebrauch Ihres Geräts auftreten können. Sollten Sie ein Problem mithilfe
der nachstehenden Informationen nicht beheben können, wenden Sie sich
bitte an das Philips Service-Center in Ihrem Land.
1Die Saugleistung ist unzureichend.
A Der Staubbeutel ist möglicherweise voll.
-- Wechseln Sie den Einweg-Staubbeutel.
B Die Filter sind möglicherweise verschmutzt.
-- Ersetzen Sie die Filter.
C Die Saugkraft ist möglicherweise auf eine niedrige Stufe eingestellt.
-- Stellen Sie die Saugleistung auf eine höhere Stufe.
D Die Düse, das Saugrohr oder der Schlauch sind möglicherweise
verstopft.
-- Die Verstopfung können Sie beseitigen, indem Sie – soweit
möglich – das Teil verkehrt herum anschließen. Saugen Sie dann in der
Gegenrichtung Luft hindurch.
2Wenn ich meinen Staubsauger verwende, bekomme ich manchmal
elektrische Schläge.
A Ihr Staubsauger hat sich statisch aufgeladen. Je niedriger die
Luftfeuchtigkeit im Raum, desto mehr statische Elektrizität bildet sich
am Gerät.
-- Entladen Sie das Gerät regelmäßig, indem Sie mit dem Saugrohr andere
metallene Gegenstände wie Tisch- oder Stuhlbeine oder Heizkörper
etc. berühren.
-- Erhöhen Sie die Luftfeuchtigkeit des Raums, indem Sie Behälter mit
Wasser aufstellen. Sie können diese an Heizkörper hängen oder sie
darauf bzw. in der Nähe abstellen.
4222.003.3579.1