Transcript
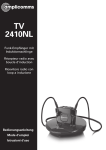
TA 10 comes with these items:
Phone amplifier TA 10
Manual
Short cord
2.
1.
6.
3.
Feature Identification:
1. Rotary volume
2. ON / OFF Indicator
3. Compatibility Switch
4. Tone Control Switch
5. Handset Jack
6. Boost Button and LED
7. Jack to phone
8. Jack for optional DC adapter
9. Battery cover
TA 10
Universal
Phone Amplifier
4.
5.
For operation a 9 V-batterie is necessary (not supplied).
User’s Guide
7.
Thank you for selecting the TA 10 phone amplifier. This unique amplifier is compatible with virtually any modular connected phone
system. It enhances the clarity and increases incoming volume for
louder and clearer conversations.
Safety instructions
Important: Your phone can produce very high sound when the amplifier is acitvated and the volume control is set to maximum.
Please take care if the handset is used by others.
•
•
•
•
•
•
•
•
•
Please make sure you read this user guide carefully and keep it
for further use.
Only use attachments recommended or sold by the manufacturer.
Do not use outdoors. Do not use near water, for example, near a
bath tub, wash bowl, kitchen sink or laundry tub, in a wet basement or near a swimming pool.
Do not unplug by pulling on cord. To unplug, grasp the plug, not
the cord.
Do not operate any appliance with a damaged cord or plug, or
after the appliance malfunctions or is dropped or damaged in any
manner. Return appliance to the nearest authorized service facility for examination, repair, or electrical or mechanical adjustment.
Use only the power cord (not supplied) and batteries indicated in
the manual. Do not dispose of batteries in fire. They may explode.
When using a power adapter (not supplied) plug it to the socketoutlet near the equipment and make sure it is easily accessible.
Avoid using any telephone product during an electrical storm.
There may be a remote risk of electric shock from lightning.
Do not use the telephone to report a gas leak in the vicinity of the
leak.
Intended use
The device is suitable for connection to a modular connected corded
phone. Any other use is considered unintended use. Unauthorised
modification or reconstruction is not permitted. Under no circumstances open the device or attempt any repair work yourself.
Installation and Operation
1. Install a 9-volt battery (not included) and connect the TA 10 to
your telephone handset as shown. Use a coin to ply open the battery door. Use only the provided “short cord” to connect TA 10 to
the phone base. (Note: Ignore the ON /OFF indicator while doing
any switch setting. It is not relevant at this time.)
For your safety, always disconnect TA 10 from the phone base before replacing its battery.
Compatibility
Switch
A. Set Compatibility switch to Position 1 (Note: This is the most
popular setting and is used by most phones. Ignore ON / OFF indicator status while setting this switch. It is not relevant at this
time.)
B. Lift up the handset and verify you can hear a clear dial tone.
C. If there is no clear dial tone, hang up the handset and move the
Compatibility switch to the next position and repeat Step B.
D. If you do get a clear dial tone, verify the dial tone loudness can
be changed by rotating the volume control. If there is change in
dial tone loudness, go to Step F.
E. If the dial tone loudness can not be changed by rotating the volume control, hang-up the handset and move the Compatibility
switch over to the next position. Repeat Step B.
F. Use the telephone keypad to make a call and verify you can hear
each other.
G. If you can hear each other, then the present Compatibility switch
setting is the correct one and you are done. Record this switch
setting for future reference. Go to Step 4.
H. If not, try the next Compatibility switch position until you can
hear each other clearly. (Note: Feel free to experiment with any
switching setting.)
4. While talking on the phone, verify you can vary the handset volume by rotating the volume control on the amplifier. (Caution:
Lower the volume control if you notice there is squeal sound in
the handset).
5. While on the phone, try different Tone control settings to find the
one with the best incoming sound clarity. Lower the volume if
you notice a squealing sound in the handset. Keep this setting for
all future calls. You do not need to change this tone setting again.
Record this tone setting for future reference.
Tone Control
6. Press and hold the BOOST button down. Verify the incoming
voice becomes louder and the BOOST LED is on. You must release this button when talking because your voice is muted if this
button is held down.
8.
9.
Help and support / Troubleshooting guide
If you need some help and you’re in the UK, please first check and
see if your problem can be solved using the troubleshooting guide
below. If it can’t , please call us on 0844 800 6503 (using a UK landline, at the time of going to print: calls cost 6p for connection charge
and then 5p a minute. Mobile costs may vary). Lines are open Monday to Friday, 9am to 5pm, excluding public holidays.
If you’ve a claim on your 2-year guarantee, please contact your supplier.
•
•
•
ON / OFF indicator is dim or does not ON: Replace the battery.
Can not hear dial tone or can not hear each other: Make sure the
Compatibility switch is at the proper setting. If necessary, repeat
A to D of installation Step 3 above.
There is a loud squealing sound in my handset: The volume or
tone is set too high, lower volume or tone setting to stop the
noise.
Specifications
Power source
Battery consumption
9 volt alkaline battery (not included)
10 mA typical; automatic shut-off if
there is no voice
Battery life
6-12 months depending on usage
Amplification without Boost 30 dB
Amplification with Boost
45 dB
Auto shut off time
10 - 20 seconds if no sound or voice
(to save battery)
Compatibility switch
(6 positions) + a “by-pass” position
Indicators
ON / OFF and BOOST
Controls
Volume, BOOST, Tone Control,
Compatibility
Optional AC adapter
9 V DC, 300 mA
ø 5,5 mm / –
(not provided)
ø 2,1 mm / +
Operating temperature
0 to 45° C
Storage temperature
-20 to 50° C
Disposal
You are obliged to dispose of consumable goods properly in
accordance with the applicable legal regulations.
The symbol on this product indicates that electrical and electronic apparatus and batteries must be disposed of separately
from domestic waste at suitable collection points provided by
the public waste authorities.
Batteries can also often be disposed of at the point of sale.
Packaging materials must be disposed of according to local
regulations.
Maintenance
• Please clean your equipment’s surfaces with a soft, fluff-free
cloth.
• Never use cleaning agents or solvents.
On-Off Indicator
Boost button
Phone jack on wall
7. The ON / OFF indicator light should be on while the phone is in
use. It will go off in 10 - 20 seconds after going on-hook (or if
there is no sound / voice for 10 - 20 seconds).
Phone
8. During normal usage, a 9-volt alkaline battery may last 6-12
months. Please replace the battery if the ON / OFF indicator becomes dim or if the receiver sound is distorted.
2. Set Volume control to its mid-point. Set Tone Control Switch to
Position 2.
Volume Control
9.
An optional 9-volt DC adapter (not included) may be installed at
this time. This adapter provides normal operating power while
the battery serves as a back-up in case of power outage. The battery should be changed once every two years or sooner if you
notice the ON / OFF indicator failed to come on during power outage.
Tone Control
3. Setting the Compatibility Switch: There are 7 positions on this
switch. Positions 1 to 6 are for compatibility setting use. Position
7 is a “by-pass” position and is not for normal setting use. Position 7 offers no amplification and should only be used in case of
emergency when there is a total power outage.
To Phone base
Jack for optional
DC adapter
Distribution: Audioline GmbH, D-41460 Neuss
July 2011 – Issue 1.1
Guarantee
AMPLICOMMS equipment is produced and tested according to the
latest production methods. The implementation of carefully chosen
materials and highly developed technologies ensure trouble free
functioning and a long service life.
The terms of the guarantee do not apply where the cause of the
equipment malfunction is the fault of the telephone network operator or any interposed private branch extension system. The terms of
the guarantee do not apply to the rechargeable batteries or power
packs used in the products. The period of guarantee is 24 months
from the date of purchase.
All deficiencies resulting from material of production faults which
occur during the period of guarantee will be eliminated free of
charge. Rights to claims under the terms of guarantee are annulled
following intervention by the purchaser or third parties. Damage
caused as a result of improper handling or operation, incorrect positioning or storing, improper connection or installation, Acts of God
or other external influence are not covered by the terms of guarantee.
In the case of complaints, we reserve the right to repair or replace
defect parts or provide a replacement device. Replacement parts or
devices become our property.
Rights to compensation in the case of damage are excluded where
there is no evidence or intent or gross negligence by the manufacturer.
If your equipment shows signs of defect during the period of guarantee, please return to the sales outlet in which you purchased the
AMPLICOMMS equipment together with the purchase receipt. All
rights to claims under the terms of guarantee in accordance with this
agreement must be asserted exclusively with regard to your sales
outlet.
Two years after the purchase of our products, claims under the
terms of guarantee can no longer be asserted.
Declaration of conformity
This device fulfils the requirements stipulated in the EU directive:
1999/5 EU directive on radio equipment and telecommunications terminal equipment and the mutual recognition of their conformity.
Conformity with the above mentioned directive is confirmed by the
CE symbol on the device.
To view the complete Declaration of Conformity, please refer to the
free download available on our website www.amplicomms.eu