1
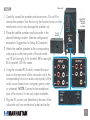
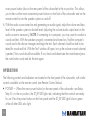
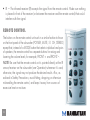
5100 series
5.1 multimedia
speaker system
USER MANUAL
MODEL 160858
MAN-160858-UM-1107-02
INTRODUCTION
Thank you for purchasing the MANHATTAN ® 5100 Series 5.1 Multimedia Speaker System,
Model 160858.
These speakers feature internally powered amplifiers, making them compatible with computers
and CD and DVD players, including portable versions of such devices. They are also completely
shielded in terms of magnetization, and so will not interfere with the performance or operation
of your computer or TV monitor. Follow the simple setup steps, and you’ll soon be able to enjoy
these great features:
• 2-way speakers offer vivid sound reproduction — ideal for games, movies and music
• Side-firing subwoofer radiates deep bass response
• Separate volume, bass and mute controls
• Distinctive styling complements flat-panel monitors and decor
• Full-function remote control adjusts settings from anywhere in the room
• Shielded to prevent distortion and maintain clear, crisp sound
• RMS power 10 W + 5 W x 5
• Front-mounted volume, bass and mute controls with indicator LEDs and remote control
• Black cloth speaker grilles
• Lifetime Warranty
safety precautions
Prior to the installation of your speakers, read the following safety guidelines to help prevent
damage to any electrical components or harm to users.
• Do not place this product or any of its parts near heat or potential heat sources, nor in any moist or damp environment.
• Do not hit, drop or mishandle electrical components in such a way as to loosen, break or otherwise render inoperative any interior or exterior parts.
• Do not remove the back panel except as directed by a qualified technician in order to minimize the possibility of electrical shock. If in need of repair or inspection, bring the speaker(s) to a
professional repair person.
• Should liquids or other materials (including fragments of broken parts) get inside the speaker cabinet, immediately shut power off to the speaker and have it professionally inspected and/
or repaired before further operation. NOTE: Avoid using liquid cleaners/detergents on the cabinet surfaces, as this can damage the finish. A soft and clean damp cloth will suffice for cleaning the system exteriors.
• Turn off the power and unplug from the power source when the system is not in use.
SETUP
Subwoofer
1.Carefully unpack the speakers and accessories. Do not lift or
remove the speakers from the box by the function knobs or other
attachments as this may damage the speaker unit.
2.Place the satellite speakers and subwoofer in the
desired listening location. (See the configuration
example in Suggestions for Setup & Operation.)
Right/left,
front/rear
satellite
speaker
Center
speaker
3.Attach the satellite speakers to the corresponding
output jacks on the rear panel of the subwoofer
unit: FR for front-right; FL for front-left; RR for rear-right;
RL for rear-left; CEN for center.
4. Using the included RCA cable, connect the input
jacks on the rear panel of the subwoofer unit to the
corresponding line out or audio output jack(s) of the
audio source (stereo tuner, computer, game system
or whatever). NOTE: Connect to the headphone
jack of the source if it’s the only output available.
POWER
AC
POWER
5. Plug the AC power cord (attached to the rear of the
subwoofer unit) into an electrical outlet and set the
main power button (also on the rear panel of the subwoofer) to the on position. This allows
you to then use the more convenient power buttons on the front of the subwoofer and on the remote control to turn the speaker system on and off.
6. With the audio source turned on and generating an audio signal, adjust the volume and bass level of the speaker system to desired levels (adjusting the volume/audio output level on the audio source as necessary). NOTE: If connecting to a computer, you may want to conduct a
sound card test. With the speakers properly connected and turned on, find the computer’s sound card in the device manager and begin the test. Each channel should be able to be tested for sound and link. With the “test” window still open, turn up the volume on each channel (speaker). Test sound should be audible: If not, check and deactivate the mute feature (press the mute button once) and do the test again.
operation
The following controls and indicators are located on the front panel of the subwoofer, with similar
controls available on the remote control (see Remote Control below).
• POWER — When the main power button (on the rear panel of the subwoofer; see Setup
Step 5) is in the on position, the ST_BY LED lights red, indicating that the controls are ready
for use. Press the power button on the front panel and the ST_BY LED lights blue or green while all other LEDs also light.
• UP/DOWN — Volume is controlled with the UP and DOWN buttons, with the corresponding LEDs flashing during volume adjustment. If the UP
or DOWN LED doesn’t flash while its volume button is pressed, the level
is at maximum. NOTE: To adjust the volume of individual and pairs of
speakers, use the UP and DOWN buttons in conjunction with the MODE
button (see below).
• STEREO/5.1 CH — Based on the current audio source, press the Stereo
button (CD mode) or the 5.1 Ch button (DVD mode) to match the speakers’
output to the system’s input. In the CD mode, the 5.1 CH/STEREO LED
lights red; in the DVD mode (which is also the default), it lights blue.
• MODE — Separate volume control for the subwoofer and the front, rear
and central speakers is available through the use of the MODE button.
Press it once and the SUB LED lights to indicate that the volume of the
subwoofer can now be raised or lowered using the UP and DOWN
buttons. Pressing the MODE button again allows you to cycle through the
CEN, REAR and FRONT LEDs, each corresponding to volume control of
those individual or pairs of speakers when lighted.
• MUTE — Press the MUTE button to interrupt/pause the audio output from
the speakers, indicated by the ST_BY LED flashing red. Press the MUTE
button again to resume audio.
MUTE
ST_BY
5.1 CH/STEREO
5.1 CH
FRONT
STEREO
REAR
CEN
MODE
SUB
IR
UP
UP_LED
DOWN
DW_LED
POWER
• IR — The infrared receiver (IR) accepts the signal from the remote control. Make sure nothing
is placed in front of the receiver (or between the receiver and the remote control) that could
interfere with the signal.
Remote control
The buttons on the remote control unit work in a similar fashion to those
on the front panel of the subwoofer (POWER, MUTE, 5.1 CH, STEREO)
except that, instead of a MODE button that selects individual and pairs
of speakers, the remote control has separate buttons for raising and
lowering the volume levels; for example, FRONT + and FRONT –.
NOTE: Be sure that the remote control unit is pointed directly at the IR
sensor/receiver on the subwoofer (see Operation) whenever it’s used;
otherwise, the signal may not produce the desired results. Also, as
advised in Safety Precautions, avoid hitting, dropping or otherwise
mishandling the remote control, and keep it away from sources of
excessive heat or moisture.
Suggestions for Setup & Operation
• Though featuring a magnetically shielded design so the speaker system is free from interference when placed near a monitor or TV, the subwoofer can cause interference in other components. Position the subwoofer at least 30 cm (1 ft.) away from monitors and TVs.
• If only one speaker emits CD audio when the system is plugged into a headphone jack, it’s because WAV files and games normally transmit only one track of audio.
• Check all appropriate connections and controls (including those on the audio source) should one or more of the speakers not be producing sound once power is on. NOTE: If adjusting
the SUB (subwoofer) volume control doesn’t affect the
audio output, it could simply be that the signal source
doesn’t include frequencies below 300 Hz (the upper
range of the subwoofer).
• Before using the remote control, verify that the two AAA
batteries (included) are properlyinserted in the unit.
• As the subwoofer (bass) is not directional, it can be
placed on the floor. Also, placing the subwoofer in the
corner of the room or close to a wall can increase the
bass effect. A suggested speaker configuration/
placement is presented at right.
SPECIFICATIONS
• RMS output power: 10 W + 5 W x 5
• Frequency response:
Satellites: 200 Hz – 18 kHz
Subwoofer: 40 Hz – 300 Hz
• Signal to noise ratio (S/N): ≥ 70 dB
• Total harmonic dstortion (THD): ≤ 0.3%
• Impedance:
Satellites (front, center, rear): 4 Ohms
Subwoofer: 4 Ohms
• Dimensions:
Satellites (front, center, rear): 9 x 17 x 8.6 cm (3.5 x 6.7 x 3.4 in.)
Subwoofer: 15.7 x 29 x 28 cm (6.2 x 11.4 x 11 in.)
• Diameter, driver(s):
Satellites (front, center, rear): 7.6 cm (3 in.)
Subwoofer: 12.7 cm (5 in.)
• Power: internal power supply
• Connectors: RCA cables and adapters (included)
10
MANHATTAN offers a complete line of PC Components, Peripherals, Cables
and Accessories. Ask your local computer dealer for more information
or visit us online at
®
www.manhattan-products.com
Copyright © MANHATTAN
All products mentioned are trademarks or registered trademarks of their respective owners.