1
Register your product and get support at
www.philips.com/welcome
DCB3070
EN User manual
3
IT
Manuale utente
89
DE Benutzerhandbuch
23
NL Gebruiksaanwijzing 111
ES
Manual del usuario
45
PT Manual do utilizador 133
FR
Mode d’emploi
67
SV Användarhandbok
153
Important notes for users in the U.K.
Mains fuse
This information applies only to products with a UK mains plug.
!"#$%
&!&'
Contact your dealer if you are not sure about what type of fuse to use.
()*(
+%,,-1",21)(4
power cord.
How to connect a plug
56+8456+94
1
2
3
(5'
8
5'
(5'
9
:'
)+4
+
4
'
5
;5
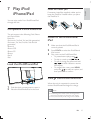
7 Play iPod/iPhone/iPad
1 Important
4
!
Notice
5
17
Compatible iPod/iPhone/iPad
Load the iPod/iPhone/iPad
Listen to the iPod/iPhone/iPad
Charge the iPod/iPhone/iPad
17
17
17
17
8 Other features
2 Your product
Introduction
What's in the box
>
>
7
7
7
2
?
18
!
!
MQ
X
"2
"2
"2
"2
9 Product information
3 Get started
Placement
Prepare the remote control
Connect power
Store DAB stations
!'
Turn on
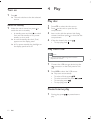
4 Play
Play disc
Play from USB
Pause/resume play
!''
!'
Display play information
H
J
M'
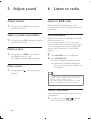
5 Adjust sound
&
;
!
)5
*
6 Listen to radio
9:&
9O*
10
10
10
11
11
""
12
19
!
Y!5
!
*M#
*
"?
"?
%,
%,
10 Troubleshooting
20
12
12
12
12
"#
"#
13
"#
"#
14
""""-
14
""$
EN
3
Englis h
Contents
1 Important
Safety
f Clean only with dry cloth.
g Do not block any ventilation openings.
Install in accordance with the
manufacturer's instructions.
h Do not install near any heat sources such
as radiators, heat registers, stoves, or
produce heat.
i Protect the power cord from being
walked on or pinched, particularly at
plugs, convenience receptacles, and the
point where they exit from the apparatus.
j Only use attachments/accessories
This 'bolt of lightning' indicates uninsulated
material within your unit may cause an electrical
'O
The 'exclamation point' calls attention to
features for which you should read the enclosed
maintenance problems.
Z&H88[
'
'
5Q
5;
\
5
apparatus.
(&Y>8'
5
Important Safety Instructions
a Read these instructions.
b Keep these instructions.
c Heed all warnings.
d Follow all instructions.
e Do not use this apparatus near water.
-
EN
k Use only with the cart,
stand, tripod, bracket,
manufacturer or sold with
the apparatus. When a cart
is used, use caution when
moving the cart/apparatus combination to
avoid injury from tip-over.
l Unplug this apparatus during lightning
storms or when unused for long periods
of time.
m personnel. Servicing is required when
the apparatus has been damaged in any
way, such as power-supply cord or plug
is damaged, liquid has been spilled or
objects have fallen into the apparatus, the
apparatus has been exposed to rain or
moisture, does not operate normally, or
has been dropped.
n Battery usage CAUTION – To prevent
battery leakage which may result in bodily
injury, property damage, or damage to
the unit:
5]
'
:Q5+
5
'4
o Apparatus shall not be exposed to
dripping or splashing.
p Do not place any sources of danger on
q Where the MAINS plug or an appliance
coupler is used as the disconnect device,
the disconnect device shall remain readily
operable.
Warning
8
85
8
\
^
'
J
8'5
)
the power.
Note
The type plate is located at the rear of the apparatus.
!
5
>
__
!
__
be loud and harmful to your hearing. To
5
it there.
To establish a safe volume level:
!
Slowly increase the sound until you can
5
distortion.
Listen for reasonable periods of time:
M
Q
__
hearing loss.
\5
'5'
Be sure to observe the following guidelines
when using your headphones.
95
reasonable periods of time.
;
hearing adapts.
:
you can't hear what's around you.
You should use caution or temporarily
discontinue use in potentially hazardous
situations. Do not use headphones while
j
'5
k
hazard and is illegal in many areas.
Hearing safety
Listen at a moderate volume.
Y
impair your hearing. This product can
produce sounds in decibel ranges that may
Q
higher decibel ranges are offered for those
Q
hearing loss.
Notice
&
Q
5
M(9
q
\
EN
5
Englis h
H5
used for a long time.
+5'5
45Q
Q
'
This product complies with the radio
\)
Community.
Your product is designed and manufactured
\
which can be recycled and reused.
Z
55
attached to a product it means that the product
5):%,,%1?$1
EC.
Please inform yourself about the local separate
collection system for electrical and electronic
products.
Please act according to your local rules and
do not dispose of your old products with your
normal household waste. Correct disposal of
\
human health.
{
5
5
):%,,$1$$1)(
cannot be disposed with normal household
waste.Please inform yourself about the local
rules on separate collection of batteries
5
\
and human health.
Environmental information
&'5
Z
''
5
+5Q4
6
EN
+54
+54
Your system consists of materials which can
be recycled and reused if disassembled by
j
M5
local regulations regarding the disposal of
'Q
5
\
'j
5
5
copyrights and constitute a criminal offence.
\
5
purposes.
|*
M
}|*
M}
|*
M
}
5
M
MM
5
5
Apple performance standards. Apple is not
5
or its compliance with safety and regulatory
standards. Please note that the use of this
M
MM
wireless performance.
M
MM
M
M
'&
Y!
and other countries.
Z
*
Z
'
'
*(Y
!
and/or other countries.
2 Your product
Englis h
This apparatus includes this label:
(
M~5
M
at www.philips.com/welcome.
Introduction
Z;
M
1M1M
Y!
Q
:!
(+:!(4
:+:4
sound.
What's in the box
('
'
*
Remote control
2 x AAA batteries
AC power cable
"Q*M#'5
'
User manual
Wall mounting instructions
*'+%
%4
EN
7
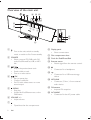
Overview of the main unit
l m n
MP3-LINK
h
i
d
e
f
g
j
o
p
k
a
5
)M
5
b SOURCE
!(::&
O*
M
1M1M
Y!*M#
'
c
d
e
i Disc compartment door
j Dock for iPod/iPhone/iPad
k Remote sensor
Detect signal from the remote control.
l
/
!'1Q'
!'
Tune to a radio station.
m
/OK
Start or pause play.
(
OO*
sound output.
n MP3 LINK
(+#4Q
/MENU
Stop play.
&M
1M
DAB menu.
f VOLUME + / &
;
g
Open/close the disc compartment.
2
h Display panel
Show current status.
EN
Connector for a headphone.
Connector for a USB mass storage
o FM antenna
O*
p AC MAINS
Connector for the AC power cable.
5
)M
5
b
*
c CD
Select disc source.
a
d
b
DAB
c
CD
FM
PRESET/ALBUM
s
r
q
d
OK
MP 3 LINK
e
DOCK
USB
o
RDS
g
h
VOL
2
3
4
5
6
7
8
9
j
PROG/
CLOCK SET
0
MODE/
SCAN
n
k
SLEEP/
TIMER
DSC
DBB
m
l
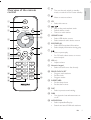
f RDS/DISPLAY
Select RDS broadcast information.
Select display information during play.
Start or pause play.
OO*
sound output.
h VOL +/ &
;
1
i
e USB/MP3 LINK
!Y!
!Q
g
MENU
DISPLAY
f
p
/
!'1Q'
!'
Tune to a radio station.
i Numeric keypad
!'
j PROG/CLOCK SET
Program radio stations.
!'
M'
k SLEEP/TIMER
Set the sleep timer.
Set the alarm timer.
l DSC
Select a preset sound setting.
m DBB
Turn dynamic bass enhancement on
or off.
n MODE/SCAN
!1J
Search and store DAB radio stations.
EN
?
Englis h
a
Overview of the remote
control
o
/MENU
Stop play.
&M
1M
DAB menu.
p DOCK
Select iPod/iPhone/iPad source.
3 Get started
Caution
Use of controls or adjustments or performance of
procedures other than herein may result in hazardous
radiation exposure or other unsafe operation.
q OK
(
r PRESET/ALBUM /
!'1Q5
Select a preset radio station.
8M
1M1M
s FM/DAB
!O*:&
Always follow the instructions in this chapter in
\
M5'
model and serial number of this apparatus. The
model number and serial number are on the
Z5
*
8
!8
Placement
{J
mount the unit on a wall.
Mount on a wall
separate sheet of wall mounting instructions.
Prepare the remote control
Caution
H'Q~^5
8
5
To insert the remote control battery:
10
EN
1
2
Open the battery compartment.
3
Close the battery compartment.
Insert 2 AAA batteries with correct
+]14
Press OK to start to search and store
DAB stations.
» 5:&
stations.
Englis h
2
» Z5:&
:&
is broadcast.
Note
Note
If you are not going to use the remote control for a
5
Do not use old and new or different types of batteries
in combination.
5
be disposed of properly.
Connect power
M5(H
other radiation source.
OQ
;
position of the antenna.
Set clock
Note
Caution
H'
~*'
the rear of the main unit.
&(
'
Note
{'
5
1
Press to switch the unit to standby.
*'+'4
+!
54
2
Press and hold PROG/CLOCK SET to
'
» SET CLOCK is displayed.
The type plate is located on the rear of the main unit.
1
(&(5
the AC MAINS connector on the rear
of the unit.
'
Store DAB stations
When you connect AC power and no DAB
5:&
1
Connect the unit to the power supply.
» OY99!(&8
+4
» "%%-
displayed.
3
Press
/ "%%-
hour format.
4
Press PROG/CLOCK SET.
» 55'
5
6
Press
7
8
/
to set the hour.
Press PROG/CLOCK SET.
» 55'
Press
/
to set the minute.
Press PROG/CLOCK SET
EN
11
Turn on
1
Press .
» The unit switches to the last selected
source.
Switch to standby
1
Z
to
switch the unit to standby.
5
to switch
from normal standby to Eco power
5
» 5'+4
appears on the display panel.
4 Play
Play disc
1
2
Press CD to select the disc source.
3
Insert a disc with the printed side facing
to close the disc
compartment.
4
_
.
» )
55'
the display panel turns off.
Press on the unit to open the disc
compartment.
.
Play from USB
Note
*'Y!
playable audio content.
1
(Y!
5'
unit.
2
Press USB to select the USB source.
» Play starts automatically.
.
.
.
/
Pause/resume play
1
12
EN
:
play.
to pause/resume
.
Englis h
Tip
Skip to a track
!J5
'
are played.
For CD:
1
Press
/ '
'
''
Program tracks
For MP3 disc and USB:
1
2
Press
Press
to select an album or folder.
/
1Q'
{Q%,'
1
(:1Y!
press PROG/CLOCK SET
program mode.
» MH>[
+4
'5
55'
2
O*M#'
album.
3
Press
/ '5
then press PROG/CLOCK SET
4
Repeat steps 2 to 3 to program more
'
5
Press
'
» :MH>[
+4
displayed.
Search within a track
1
2
:
/
.
Release to resume normal play.
Display play information
1
:DISPLAY repeatedly to
select different play information.
1
:MODE/SCAN
repeatedly to select a play option.
'
repeatedly.
'
repeatedly.
'
order.
2
MODE/
SCAN
1J
option is displayed.
You may also press to cancel repeat/
J
to select an
.
» [PROG] disappears on the display.
EN
13
5 Adjust sound
6 Listen to radio
Adjust volume
Listen to DAB radio
1
:&+:&
4
5
'
transmitters.
:VOL +/- to increase/
Select a preset sound effect
1
:DSC repeatedly to select
a preset sound setting.
Enhance bass
1
:DBB to turn dynamic
bass enhancement on or off.
» :
:
Store DAB stations
:&
:&
stations onto the unit.
If you connect the unit to AC power supply
:&
5:&
+[
!:&
4
Or
1
2
Press MODE/SCAN.
» The unit begins to perform a search.
» Z5:&
:&
is broadcast.
Mute sound
1
Press FM/DAB to turn on DAB radio.
: to mute/restore the
'
Tip
+4
a degree of signal strength. The further towards the
:&5:&
8>:&
+:&4
Tune to a DAB station
&:&
a DAB station.
1
"-
EN
:&
/
repeatedly
until a station name is displayed.
Press OK
» The radio immediately tunes to the
selected station.
Note
Use the DAB menu
1
:&
MENU.
» 2
Press
/
repeatedly to display the
OY99!(&8
+4
5:&
*&8Y&9
+4
a DAB station.
:H(
compensation for differences in the
dynamic range between DAB stations.
You may experiment with the options
on different source materials to decide
which option suits best.
!{!)*
+4:&
settings to the default settings made
k
k
software upgrade.
!&>8
+4
5:&
3
4
Press OK
M5(H
other radiation source.
OQ
;
position of the antenna.
Program DAB stations manually
You can program a maximum of 20 preset DAB
stations.
1
2
Tune to a DAB station.
Press PROG/CLOCK SET
program mode.
3
Press
5+"%,4
PROG/
CLOCK SET
4
H5
stations.
Englis h
2
Note
55%
and step 3.
:&
:&
the old DAB station.
:&
O*
Select a preset DAB station
After the DAB stations are programmed on the
:&
1
:&
preset number.
to select a
Display DAB information
:&
RDS/DISPLAY
repeatedly to select different information for
the current DAB station.
!"
!
55
in future.
How to know a software update:
register this unit at Philips website
+14
5>
M5'
To update software of your radio, follow these
steps strictly:
1
Read carefully the software update
instructions on Philips website.
EN
15
2
Download the software update to your
M(
M(
Y!
3
4
:&
MENU.
5
>M(
screen to complete upgrade.
!!{!)*
+4YM[H&:)
+
4
displayed to go to the upgrade stage.
/ k
OK.
1
O*
PROG/
CLOCK SET for more than 2 seconds to
» &Y>
+4
» &5
» broadcast automatically.
Program FM stations manually
{Q%,O*
stations.
Tune to a radio station.
Listen to FM radio
1
2
Tune to a FM station
3
1
2
Press
5+"%,4
PROG/
CLOCK SET
4
H
other stations.
Press FM.
Press and hold
/
for more than 2
seconds.
» !)&H(X
+4
» The radio tunes to a station with
strong reception automatically.
3
Repeat step 2 to tune to more stations.
' /
reception.
\
repeatedly to select stereo or mono
sound.
Press PROG/CLOCK SET
program mode.
» MH>[
+455'
Note
O*
O*
Select a preset FM station
1
O*
number.
to select a preset
Note
M5(H
other radiation source.
OQ
;
position of the antenna.
Program FM stations automatically
{Q%,O*
stations.
16
EN
FM stations with RDS
H
:!+H:!4
sends additional broadcast information along
O*
O*H:!
H:!
Display RDS information
1
OO*H:!RDS
5
information.
Install the rubber pad
55
'M
1M
%55
the iPad/iPad 2.
You can enjoy audio from iPod/iPhone/iPad
through this unit.
Compatible iPod/iPhone/iPad
M
M
and iPad models.
*
M
+"%
#
-4
M
+"%
#
-
$
4
MiPhone 3GS
iPhone 3G
iPhone
iPad 2
iPad
Load the iPod/iPhone/iPad
Listen to the iPod/iPhone/
iPad
1
*'M
1M1M
correctly placed.
2
Press DOCK to select the iPod/iPhone/
iPad source.
3
Play music on the iPod/iPhone/iPad.
1 .
'' / .
/ normal play.
MENU
and press
then press OK
Charge the iPod/iPhone/iPad
1
2
Z
'
M
1M1M
5
M
'
MM
1M1M
'
Note
M
5
M
M
M
)
5
5
EN
17
Englis h
7 Play iPod/
iPhone/iPad
8 Other features
Set the sleep timer
This unit can switch to standby automatically
after a set period of time.
1
Set the alarm timer
5
'
1
1Y!1
'
play at a preset time.
Z
SLEEP/
TIMER repeatedly to select a set period of
+4
» Z
is
displayed.
To deactivate sleep timer
1
*''
correctly.
2
Press to switch the unit to standby.
*''
+!
54
3
Press and hold SLEEP/TIMER.
» A prompt to select the source is
displayed.
Play from an external device
4
Press CDFMUSB or DOCK to select a
source.
5
{Q
through this unit.
Press SLEEP/TIMER
» '
55'
1
Press MP3 LINK*M#'
source.
6
7
8
2
Press
(
*M#'5
the MP3 LINK+#4
the unit.
the headphone connector on an
Q
3
!
+
_
4
/
to set the hour.
Press SLEEP/TIMER
Press
/
to set the minute.
» To deactivate or re-activate an alarm timer
1
2
Press
Press SLEEP/TIMER
» .
disappears on
Note
*M#'
5
1Y!1
'
5
EN
Press SLEEP/TIMER repeatedly until [OFF]
+4
» Z
disappears on the display.
to switch to standby mode.
» the display.
"2
1
Headphone
M
+
4
connector on the unit to listen through the
headphones.
Note
Product information is subject to change without prior
notice.
#
General information
AC power
Operation Power
Consumption
Eco Standby Power
Consumption
USB Direct
Dimensions
*Y
+ZQXQ:4
Weight
*Y
Englis h
9 Product
information
&(",,%-,
50/60 Hz
32 W
<1 W
Version 2.0/1.1
,,Q%"Q?2
%$"-'
$
Rated Output Power
O\H
Signal to Noise Ratio
*M#'
%Q%,ZH*!
$,Xj"$'Xj
±3 dB
$
&
,,%,'
Tuner
Tuning Range
Tuning grid
O*
*
:&
+)8,%-24
Total Harmonic
Distortion
Signal to Noise Ratio
Number of presets
O*2",2*Xj
:&"-?%2*Xj
%#?%,,*Xj+
4
50 KHz
26 dB
?
<2%
%,+O*4
Speakers
!'
!':
!
2
%%
2%
11Z
USB playability information
Compatible USB storage devices:
Y!J+Y!%,Y!""4
Y!J+Y!%,Y!""4
+\
'4
Supported formats:
Y!O&"%O&"$
O&#%+j"%54
*M#5+
4#%#%,^5
55
:Q2
8551
Q??
85'1Q???
:#%,
OY
YO2+Q
"%254
Unsupported formats:
)555
*M#
shown in the display.
Y
'
O
QZ
+
4*M#
Q
not played.
&&(Z&M(*
EN
"?
:H*
Z*&+-
--4
Z*&9
10 Troubleshooting
Warning
Supported MP3 disc formats
!>?$$,
*Q5???+
4
*Q55??
!
\#%'Xj
--"'Xj-2'Xj
!
#%%$+'54
55
Maintenance
Clean the cabinet
Use a soft cloth slightly moistened with
a mild detergent solution. Do not use a
5
Clean discs
Z
5
clean it with a cleaning cloth.
Wipe the disc from the
centre out.
:
5j
5
spray intended for analogue records.
Clean the disc lens
&
accumulate at the disc lens. To ensure good
\
M
CD lens cleaner or any commercially
5O
supplied with cleaner.
20
EN
8
'
the system yourself.
If you encounter problems when using this
'5
\5
M5+
14Z
M5
and the model number and serial number are
5
No power
%
Ensure that the AC power plug of the unit
is connected properly.
%
Ensure that there is power at the AC
outlet.
%
standby automatically 15 minutes after
a play reaches the end and no control is
operated.
No sound
%
&
;
No response from the unit
%
Disconnect and reconnect the AC power
Remote control does not work
%
5
select the correct source with the remote
control instead of the main unit.
%
Reduce the distance between the remote
control and the unit.
%
5+]1
4
%
Replace the batteries.
%
Aim the remote control directly at the
sensor on the front of the unit.
Englis h
No disc detected
%
Insert a disc.
%
('
side facing inward.
%
Wait until the moisture condensation at
the lens has cleared.
%
Replace or clean the disc.
%
Yj
(:
&!#(
%
5
Y!
Q
phenomenon is not a malfunction.
%
supported.
USB device not supported
%
Y!
5
unit. Try another one.
Poor radio reception
%
Increase the distance between the unit and
your TV or VCR.
%
OQ
;O*
Timer does not work
%
!'
%
Switch on the timer.
Clock/timer setting erased
%
Power has been interrupted or the power
cord has been disconnected.
%
H'1
EN
21
Specifications are subject to change without notice
© 2011 Koninklijke Philips Electronics N.V.
All rights reserved.
DCB3070_10_UM_V1.0