1
7760
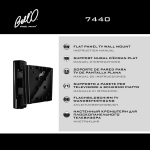
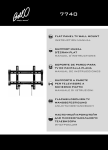
FLAT PANEL TV WALL MOUNT
INSTRUCTION MANUAL
SUPPORT MURAL
D'ÉCRAN PLAT
MANUEL D'INSTRUCTIONS
SOPORTE DE PARED PARA
TV DE PANTALLA PLANA
MANUAL DE INSTRUCCIONES
SUPPORTO A PARETE
PER TELEVISORE A
SCHERMO PIATTO
MANUALE DI ISTRUZIONI
FLACHBILDSCHIRM TV
WANDBEFESTIGUNG
ANLEITUNGSHANDBUCH
НАСТЕННЫЙ КРОНШТЕЙН
ДЛЯ ПЛОСКОПАНЕЛЬНОГО
ТЕЛЕВИЗОРА
ИНСТРУКЦИЯ
PRECAUTIONS
If at any time you are unclear about the directions and believe you need further
assistance, contact Bell’O® at: 1-888-235-7646 (US/Canada) or +1-732-972-1333
(International) from 9am – 5pm EST, Monday through Friday.
• NEVER EXCEED THE MAXIMUM LOAD CAPACITY OF 150 LBS (68 KG),
• This mounting bracket was designed to be installed and utilized ONLY as specified in this
manual. Bell’O International Corporation will not be responsible for failure to assemble as
directed or for the improper assembly, use, or handling of this product.
• Improper installation of this product may cause damage or serious injury. Bell'O
International Corporation cannot be liable for direct or indirect damage or injury caused
by incorrect mounting, incorrect use, or incorrect assembly.
• If the mounting bracket will be attached to any structure other than specified in this
manual, only a licensed professional contractor/installer should perform this
installation. The supporting structure must support, at minimum, four times the
combined weight of the mounting bracket and TV. It is the responsibility and liability of
the installer to ensure the suitability of the supporting structure.
• This mount with the included hardware is not intended for installation into metal studs
or brick. For the availability of UL listed metal stud mounting hardware, monitor weight
limit and installation instructions please check www.bello.com, your retailer, or an
installation professional.
• Check carefully to ensure that there are no missing or damaged parts. Never use
defective parts. To receive replacement or missing part(s) under this Warranty, visit our
website at www.bello.com or call our Customer Service Department at 1-888-779-7781.
Please have the model number, date code, part number(s) and your sales receipt or other
proof of purchase available for reference. Bell’O will ship you any necessary replacement
parts in the Continental United States or Canada.
• Specifications are subject to change without notice.
• The maximum weight of your television cannot exceed the maximum weight rating of your
mount or any attached Bell'O® UL listed adapters sold separately, whichever is lower.
2
AVERTISSEMENTS
Pour toutes questions concernant les instructions ou pour tout besoin d'assistance, veuillez
communiquer avec Bell’O® au : 1-888-235-7646 (USA/Canada) ou +1-732-972-1333
(International) de 9h00 à 17h00 (heure de l'Est), du lundi au vendredi.
• NE JAMAIS DÉPASSER LA CAPACITÉ DE CHARGE MAXIMALE DE 68 KG (150 LBS).
• Ce support de fixation est conçu pour être posé et utilisé UNIQUEMENT comme indiqué dans
ce manuel. Bell’O International Corporation décline toute responsabilité en cas de pose non
conforme aux instructions ou d'assemblage, utilisation ou manipulation incorrects de ce
produit.
• Une pose incorrecte de ce produit peut entraîner des dommages matériels ou des
blessures graves. Bell'O International Corporation ne saurait être tenu responsable de
dommages matériels ou corporels directs ou indirects résultant d'une pose incorrecte,
d'une utilisation incorrecte ou d'un assemblage incorrect.
• Si le support de fixation doit être attaché à un structure autre que celles indiquées dans ce
manuel, la pose doit impérativement être confiée à un entrepreneur/installateur
professionnel agréé. La structure porteuse doit être capable de soutenir, au minimum,
quatre fois le poids combiné du support de fixation et du téléviseur. L'installateur a pour
charge et responsabilité de s'assurer que la structure porteuse convient.
• Cette monture, y compris les pièces d’assemblage fournies, n’est pas destinée à être installée
dans des broches d'insertion en métal ou des briques. Pour connaître la visserie de fixation sur
montants métalliques homologuée UL disponible, la limite de poids d'écran et les instructions
de pose, veuillez consulter www.bello.com, le revendeur ou un installateur professionnel.
• Contrôler avec soin qu'il n'y a aucune pièce manquante ou endommagée. Ne jamais utiliser
de pièces défectueuses. Pour obtenir des pièces de rechange ou manquantes dans le cadre
de cette garantie, veuillez visiter notre site Web à www.bello.com ou appeler notre Service
après-vente au 1-888-779-7781. Veillez à avoir le numéro de modèle, le code de date, les
références des pièces et le reçu de la vente ou autre justificatif d’achat à disposition. Bell’O
expédiera toutes les pièces de rechange nécessaires aux États-Unis continentaux et au
Canada.
• Les caractéristiques sont sujettes à modification sans préavis.
• Le poids maximum du téléviseur ne doit pas dépasser la capacité de charge maximale
du support ni celle de tout adaptateur homologué UL Bell'O® vendu séparément
éventuellement fixé au téléviseur.
3
ADVERTENCIAS
Si en algún momento tiene dudas sobre las instrucciones y necesita asesoramiento
adicional, comuníquese con Bell’O®: 1-888-235-7646 (EE. UU. y Canadá) o
+1-732-972-1333 (desde otros lugares del mundo) de 9 a 17 hora del este, lunes a viernes.
• NUNCA EXCEDA LA CAPACIDAD MÁXIMA DE CARGA DE 150 LBS (68 KG).
• Este soporte fue diseñado para ser instalado y utilizado ÚNICAMENTE como se indica en el
presente manual. Bell’O International Corporation no se hará responsable si el producto no
se ensambla tal como se indica ni de su ensamblaje, uso o manejo incorrectos.
• La instalación incorrecta de este producto puede causar daños o lesiones graves. Bell'O
International Corporation no puede ser responsabilizada por los daños o lesiones directos
o indirectos causados por el montaje, uso o ensamblaje incorrectos.
• Si desea fijar el soporte a una estructura que no está especificada en este manual,
la instalación deberá realizarla un contratista o instalador profesional autorizado.
La estructura de soporte debe soportar, como mínimo, cuatro veces el peso
combinado del soporte y el TV. Es responsabilidad y obligación del instalador
garantizar la idoneidad de la estructura de soporte.
• Este soporte junto con el equipo incluido no está diseñado para su instalación en
montantes metálicos o ladrillo. Para verificar la disponibilidad de los elementos para el
montaje en montantes metálicos en la lista del UL, el límite de peso y las instrucciones de
instalación, ingrese a www.bello.com o consulte con su proveedor o instalador profesional.
• Revise cuidadosamente el sistema para asegurarse de que no haya piezas faltantes o
dañadas. Nunca utilice piezas defectuosas. Para recibir el reemplazo o la(s) parte(s) o
pieza(s) faltante(s) cubiertas por la presente garantía, ingrese a nuestro sitio web
www.bello.com o llame a nuestro Departamento de atención al cliente al
1-888-779-7781. Tenga a mano el número de modelo, código de fecha, número(s) de
la parte o pieza y su recibo de venta u otro comprobante de compra disponible como
referencia. Bell’O le enviará cualquier parte o pieza de reemplazo en el territorio
continental de Estados Unidos o Canadá.
• Las especificaciones están sujetas a cambios sin previo aviso.
• El peso máximo de su televisor no puede exceder la clasificación de peso máximo de su
soporte o cualquier adaptador Bell’O® adjunto y enumerado en la lista del UL que se
venda por separado, el que sea inferior.
4
PRECAUZIONI
Nel caso che, in qualsiasi momento, le istruzioni non dovessero risultare chiare
o si necessitasse di ulteriore assistenza, contattare Bell’O® al numero verde:
1-888-235-7646 (da USA/Canada) oppure al +1-732-972-1333 (da altri Paesi) dalle
9.00 - 17.00 (ora costa orientale USA), Lunedi a Venerdì.
• NON SUPERARE MAI LA MASSIMA CAPACITÀ DI CARICO, PARI A 68 KG.
• Questo supporto è stato progettato UNICAMENTE per essere installato e utilizzato come
specificato in questo manuale. Bell’O International Corporation non sarà responsabile nel
caso di incapacità a completare l'assemblaggio secondo le istruzioni fornite, o di
assemblaggio, uso o trasporto scorretto del prodotto.
• L'erronea installazione di questo prodotto può causare danni o seri incidenti. Bell'O
International Corporation non sarà responsabile di danni o incidenti diretti o indiretti
causati da un montaggio scorretto, utilizzo scorretto o assemblaggio scorretto.
• Se il supporto viene affrancato a una struttura diversa da quella specificata in questo
manuale, l'installazione deve essere effettuata esclusivamente da un tecnico/installatore
professionista autorizzato. La struttura di supporto deve essere in grado di sostenere almeno
quattro volte il peso combinato del supporto e del televisore. È responsabilità
dell'installatore assicurare l'idoneità della struttura di sostegno.
• Nel caso di installazione su montanti in metallo o mattoni, questo supporto e la ferramenta
relativa non sono conformi agli standard UL. Per verificare la disponibilità di ferramenta, il
peso limite dello schermo e le istruzioni di installazione del supporto su montanti in metallo
conformi agli standard UL, consultare il sito www.bello.com, il rivenditore o l'installatore.
• Verificare con attenzione che non vi siano pezzi mancanti o danneggiati. Non utilizzare mai
pezzi danneggiati. Per ottenere i pezzi mancanti o di sostituzione coperti da questa Garanzia,
visitare il nostro sito Web www.bello.com o chiamare il centro di assistenza clienti al numero
1-888-779-7781 (numero verde valido solo in Nord America). Si prega di avere a portata di
mano il numero del modello, il codice della data, i numeri dei pezzi in questione e la ricevuta
o altra prova d'acquisto. Bell’O invierà i pezzi di ricambio necessari, negli Stati Uniti
continentali o in Canada.
• Le specifiche sono soggette a modifiche senza preavviso.
• Il peso massimo del televisore non deve essere superiore alla classe di peso indicata per
il supporto o per qualunque adattatore per Bell'O® conforme agli standard UL venduto
separatamente, qualsiasi sia minore.
5
VORSICHTSMASSNAHMEN
Sollten Sie sich nicht ganz klar über die Anleitungen und der Ansicht sein, dass Sie
Unterstützung brauchen, setzen Sie sich bitte mit Bell’O® unter Telefonnummer
1-888-235-7646 (US/Kanada) oder + 1-732-972-1333 (International) zwischen 9 Uhr
und 17 Uhr (Ostzeit) in Verbindung, Montag bis Freitag.
• BITTE NIE DIE HÖCHSTBELASTBARKEIT VON 68 KG (150 PFD) ÜBERSCHREITEN.
• Diese Konsole darf NUR so wie in diesen Anleitungen beschrieben installiert und
verwendet werden. Bell’O International Corporation ist nicht verantwortlich für Ihr
Versäumnis, dieses Produkt ordnungsgemäß entsprechend den Anleitungen zu
montieren, unsachgemäße Montagen. Verwendungen oder einen unsachgemäßen Umgang.
• Die unsachgemäße Installation dieses Produkts kann zu Schäden oder ernsten Verletzungen
führen. Bell'O International Corporation kann nicht für unmittelbare oder mittelbare Schäden
oder Verletzungen verantwortlich sein, die durch den unsachgemäßen Einsatz
oder ein unsachgemäße Montage bewirkt wurden.
• Falls die Konsole an Strukturen angebracht wird, die nicht denen in diesen Anleitungen
aufgeführten Konsolen entsprechen, darf nur ein qualifizierter Fachmann bzw. Installateur diese
Installation vornehmen. Die Tragkonstruktion muss mindestens viermal das Gesamtgewicht des
Fernsehers und der Konsole tragen können. Der Installateur trägt die Verantwortung und ist
haftpflichtig in Bezug auf die Sicherstellung, dass die Tragkonstruktion angemessen ist.
• Diese Halterung sowie die mitgelieferten Montagematerialien sind nicht für eine Anbringung an
Metallständer- oder Ziegelwänden gedacht. Bitte sehen Sie bei www.bello.com nach, oder
fragen Ihren Einzelhändler oder Installateur fü r UL verzeichnete Eisenteile fü r Montagen,
Gewichtsbegrenzungen und Installationsanleitungen.
• Prüfen Sie sorgfältig, um sicherzustellen, dass keine Teile fehlen oder beschädigt sind. Bitte
nie beschädigte Teile einsetzen. Um Ersatzteile oder fehlende Teile gemäß dieser Garantie zu
erhalten, besuchen Sie bitte unsere Website www.bello.com oder rufen Sie unsere
Kundendienstabteilung unter 1-888-779-7781 an. Bitte haben Sie Ihre Modell-Nummer,
Datumscode, Teilenummer(n) und Ihre Verkaufsquittung oder sonstigen Kaufbeleg griffbereit
zum Verweis. Bell'O sendet Ihnen dann alle erforderlichen Ersatzteile in den kontinentalen
Vereinigten Staaten bzw. Kanada zu.
• Die Spezifikationen unterliegen Änderungen ohne vorheriger Ankündigung.
• Das Höchstgewicht Ihres TVs darf nicht das Höchstgewichtsklasse Ihrer Halterung oder
allen daran befestigten Bell'O® UL verzeichneten, getrennt erhältlichen Adaptern
ü bersteigen, wobei das niedrigerere Gewicht maßgeblich ist.
6
ПРЕДУПРЕЖДЕНИЕ
Если вам понадобится помощь или что–то непонятно в инструкции, обратитесь в
фирму Bell’O® по телефону 1-888-235-7646 (США/Канада) или +1-732-972-1333 (для
международных звонков) с 9 утра до 5 вечера (время — восточное стандартное), от
понедельника до пятницы.
• НИ ПРИ КАКИХ ОБСТОЯТЕЛЬСТВАХ НЕ ПРЕВЫШАТЬ МАКСИМАЛЬНУЮ НАГРУЗКУ
В 150 ФУНТОВ (68 КГ).
• Этот настенный кронштейн был сконструирован для установки и использования ТОЛЬКО в
соответствии со спецификациями, приведенными в этом документе. Фирма Bell’O
International Corporation не будет нести ответственности за невыполнение инструкций по
сборке или за неправильную сборку, использование или эксплуатацию этого продукта.
• Неправильная установка этого продукта может явиться причиной ущерба или серьезной
травмы . Фирма Bell'O International Corporation не может нести ответственность за прямой
или косвенный ущерб или травму из–за неправильной установки, эксплуатации или сборки.
• Если настенный кронштейн будет крепиться к любой структуре, которая не
специфицирована в этом документе, то его должен устанавливать только
лицензированный подрядчик, специалист по таким установкам. Опорная структура
должна выдерживать нагрузку, как минимум в четыре раза превышающую суммарный
вес кронштейна и телевизора. Установщик несет юридическую и материальную
ответственность за обеспечение соответствия опорной структуры таким требованиям.
• Данное крепление с входящими в комплект крепежными изделиями не
предназначено для установки в металлические стойки или кирпичи. Для того чтобы
выяснить, как можно приобрести внесенные в списки UL детали для установки на
металлические стойки, получить сведения об ограничениях на вес монитора и
инструкции по установке, обратитесь на сайт www.bello.com, к своему поставщику
или к профессиональному установщику.
• Тщательно проверьте, что все нужные детали имеются в наличии и что они не
повреждены. Никогда не используйте дефектные детали. Чтобы заменить
поврежденные детали или получить недостающие детали в соответствии с этой
Гарантией, обратитесь на наш сайт www.bello.com или позвоните в наш отдел
обслуживания по телефону 1-888-779–7781. Для этого нужно знать номер модели, код
даты, номер детали (деталей) и иметь квитанцию или другое доказательство покупки
для ссылок. Фирма Bell’O вышлет вам все необходимые для замены детали в
пределах континентальное Соединенных Штатов или Канады.
• Спецификации могут быть изменены без предварительного уведомления.
• Максимальный вес вашего телевизора не должен превышать наименьший вес
из следующих двух: максимальный вес, на который рассчитан ваш кронштейн,
или максимальный вес, на который рассчитаны любые крепящиеся
продающиеся отдельно внесенные в списки UL адаптеры Bell'O®.
7
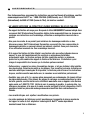
INCLUDED PARTS
PIÈCES INCLUSES
PARTES INCLUIDAS
PARTI INCLUSE
IM LIEFERUMFANG
ENTHALTENE TEILE
ПОСТАВЛЯЕМЫЙ
КОМПЛЕКТ
(WP)
Wall Plate, 1
Plaque murale, 1
Placa de pared, 1
Supporto a parete, 1
Wandplatte, 1
Настенная плата, 1
(MA-L) (MA-R)
(IT)
Installation Template, 1
Gabarit de pose, 1
Plantilla de instalación, 1
Schema di installazione, 1
Schablone für Installation, 1
Шаблон для установки, 1
Monitor Arms, 2
Bras de moniteur, 2
Brazos de la pantalla, 2
Snodi dello schermo, 2
Monitorarme, 2
Крепежные узлы
монитора, 2
(T) #14 x 65mm, 4
(U) TOGGLER® brand AF8
ALLIGATOR® Anchor, 4
8
TOGGLER® brand ALLIGATOR® SOLID-WALL
ANCHORS are patented under one or more of
US Patent numbers 5,161,296 and 5,938,385;
and foreign counterparts thereof and of
4,752,170. Other patents pending. TOGGLER
and ALLIGATOR are worldwide registered
trademarks of Mechanical Plastics Corp.
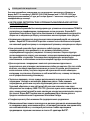
INCLUDED TV MOUNTING HARDWARE
VISSERIE DE FIXATION DE TÉLÉVISEUR INCLUSE
ELEMENTOS INCLUIDOS PARA EL MONTAJE DEL TV
FERRAMENTAINCLUSAPERL’INSTALLAZIONEDELTELEVISORE
EISENTEILE ZUR BEFESTIGUNG DES TVS
ПОСТАВЛЯЕМЫЕДЕТАЛИДЛЯУСТАНОВКИТЕЛЕВИЗОРА
(GL) M4 x 18mm, 4
(HL) M4 x 28mm, 4
(D) M4, 4
(JL) M6 x 18mm, 4
(KL) M6 x 28mm, 4
(Q) M6/M8, 4
(ML) M8 x 22mm, 4
(R) M4, 4
(NL) M8 x 32mm, 4
9
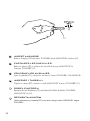
NECESSARY TOOLS
OUTILLAGE NÉCESSAIRE
HERRAMIENTAS NECESARIAS
ATTREZZI NECESSARI
ERFORDERLICHE WERKZEUGE
НЕОБХОДИМЫЕ ИНСТРУМЕНТЫ
Phillips-head Screwdriver
Tournevis à tête Phillips
Destornillador philips (cruz)
Cacciavite Phillips
Kreuzschlitzschraubenzieher
Крестообразная отвертка
Masking Tape
Ruban de masquage
Cinta de enmascarar
Nastro adesivo
Abdeckband
Маскировочная лента
Ratchet Set
Clé à cliquet à douilles
Equipo de trinquete
Strumento Del Cricco
Schaltklinke Hilfsmittel
Набор инструментов с храповиком
Stud Finder
Détecteur de montant
Localizador de montantes
Rilevatore di montanti
Bolzenfinder
Искатель стойки
Drill Bit: Wood: 5/32" (4mm), Masonry: 5/16" (8mm)
Foret Bois : 5/32 po (4 mm), Maçonnerie : 5/16 po (8 mm)
Broca para madera: 5/32" (4 mm), para mampostería: 5/16" (8 mm)
Punte trapano da legno: 4 mm; da muro: 8 mm
Bohrerspitze, Holz: 4 mm; Mauerwerk: 8 mm
Сверло – дерево: 5/32" (4 мм), каменная кладка: 5/16" (8 мм)
Tape Measure
Ruban à mesurer
Cinta métrica
Metro
Messband
Рулетка
10
Level
Niveau
Nivel
Pencil
Crayon
Lápiz
Matita
Bleistift
Карандаш
Drill
Perceuse
Taladro
Trapano
Bohrer
Дрель
Livella
Nivellierinstrument
Уровень
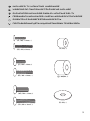
ATTACHING THE MONITOR ARMS (MA.L, MA.R)
FIXER LES BRAS DE MONITEUR (MA.L, MA.R)
CÓMO FIJAR LOS BRAZOS DE LA PANTALLA (MA.L, MA.R)
FISSAGGIO DEGLI SNODI DELLO SCHERMO (MA.L, MA.R)
BEFESTIGUNG DER MONITORARME (MA.L, MA.R)
ПРИКРЕПЛЕНИЕ КРЕПЕЖНЫХ УЗЛОВ МОНИТОРА (MA.L, MA.R)
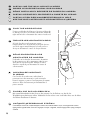
SELECT THE CORRECT SCREW
Before beginning, test several of the screws in your hardware kit to find the correct size and length
for your television.
SÉLECTIONNER LA VIS CORRECTE
Avant de commencer, essayer différentes vis du nécessaire de visserie pour trouver la section et la
longueur correctes pour le téléviseur.
ELIJA EL TORNILLO CORRECTO
Antes de comenzar, pruebe varios tornillos de su kit de accesorios para encontrar el de tamaño y
longitud indicados para su televisor.
SELEZIONARE LE VITI CORRETTE
Prima di iniziare, cercare tra le varie viti nel kit di ferramenta quelle di dimensione e lunghezza
corrette per il vostro televisore.
DIE RICHTIGE SCHRAUBE AUSWÄHLEN
Bevor Sie mit der Installation beginnen, sind mehrere der in Ihrem Eisenteil-Satz enthaltenen
Schrauben auszuprobieren, um die richtige Größe und Länge für Ihr TV zu ermitteln.
ВЫБЕРИТЕ НУЖНЫЙ ВИНТ
Перед тем как начать, проверьте несколько винтов из крепежного комплекта, чтобы выбрать
винт соответствующего размера и длины для вашего телевизора.
MONITOR ARM (MA)
BRAS DE MONITEUR (MA)
BRAZO DE LA PANTALLA (MA)
SNODO DELLO SCHERMO (MA)
MONITORARM (MA)
КРЕПЕЖНЫЙ УЗЕЛ МОНИТОРА (МА)
WASHER
RONDELLE
ARANDELA
RONDELLE
DISTANZSCHEIBE
ШАЙБА
SPACER
DOUILLE D'ESPACEMENT
ESPACIADOR
DISTANZIALI
ABSTANDSHALTER
ПРОМЕЖУТОЧНОЕ КОЛЬЦО
(MA-L, MA-R)
(MA-L, MA-R)
(MA-L, MA-R)
TELEVISION
TÉLÉVISEUR
TELEVISOR
TELEVISORE
FERNSEHER
ТЕЛЕВИЗОР
11
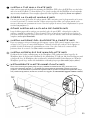
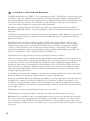
ATTACHING THE MONITOR ARMS (MA.L, MA.R)
Attach each Monitor Arm (MA-L, MA-R) to the back of your television as shown. (If you are
using M4 screws, make sure that each Washer "R" is placed between the Screw and the Monitor
Arm.) Don’t place the Washers between the Arms and the television.
FIXER LES BRAS DE MONITEUR (MA.L, MA.R)
Fixer les deux bras de moniteur (MA-L, MA-R) au dos du téléviseur comme sur l'illustration.
(Si vous utilisez les vis M4, assurez-vous que chaque rondelle « R » est placée entre la vis et le
bras de moniteur.) Ne pas placer de rondelle entre les bras et le téléviseur.
CÓMO FIJAR LOS BRAZOS DE LA PANTALLA (MA.L, MA.R)
Conecte cada brazo de la pantalla (MA-L, MA-R) a la parte trasera de su televisor tal como se
muestra. (Si usted está utilizando los tornillos M4, asegúrese de que cada lavadora “R” esté colocada
entre el tornillo y el brazo del monitor.) No coloque las arandelas entre los brazos y el televisor.
FISSAGGIO DEGLI SNODI DELLO SCHERMO (MA.L, MA.R)
Fissare ognuno dei due snodi dello schermo (MA-L, MA-R) al retro del televisore, come illustrato.
(Se state utilizzando le viti M4, assicuri che ogni rondella “R„ sia disposta fra la vite e lo snodo
dello schermo.) Non posizionare le rondelle tra lo snodo e il televisore.
BEFESTIGUNG DER MONITORARME (MA.L, MA.R)
Befestigen Sie jeden Monitorarm (MA-L, MA-R) an der Rückseite Ihres Fernsehers wie
abgebildet. (Wenn Sie Schrauben M4 benutzen, überprüfen Sie, ob jede Waschmaschine „R“
zwischen der Schraube und dem Monitorarm liegt). Legen Sie die Unterlegscheiben nicht zwischen
die Arme und den Fernseher.
ПРИКРЕПЛЕНИЕ КРЕПЕЖНЫХ УЗЛОВ МОНИТОРА (MA.L, MA.R)
Прикрепите каждый крепежный узел монитора к задней стенке телевизора как показано.
(Если вы используете винты M4, то убеждайтесь что каждая шайба «r» помещена между
винтом и рукояткой монитора.) Не устанавливайте шайбы между крепежными узлами и
телевизором.
MA-L
MA-R
12
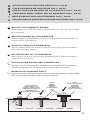
Use spacers if Monitor Arms (MA-L, MA-R) do not fit firmly against the back of the television,
such as when the back of the television is curved, contains larger recessed mounting holes, or
some other obstruction is in the way. Spacers also provide extra room for cables. The Arms must
rest securely on the spacers, and should not be loose.
Utiliser les douilles d'espacement si les bras de moniteur (MA-L, MA-R) n'appuient pas
fermement contre le dos du téléviseur, comme lorsque le dos du téléviseur est incurvé, qu'il
contient de grands trous de fixation en retrait ou qu'il y a d'autres obstacles. Les douilles
d'espacement offrent également plus d'espace pour les câbles. Les bras doivent appuyer fermement
sur les douilles d'espacement et ne pas avoir de jeu.
Use los espaciadores si los brazos de la pantalla (MA-L, MA-R) no encajan con firmeza contra la
parte trasera del televisor, como sucede cuando esta parte es curva, contiene orificios de montaje
embutidos más grandes o presenta alguna otra obstrucción. Los espaciadores también ofrecen
espacio adicional para cables. Los brazos deben apoyarse con firmeza sobre los espaciadores y no
deben quedar flojos.
Utilizzare i distanziali quando gli snodi dello schermo (MA-L, MA-R) non appoggiano
perfettamente al retro del televisore, ad esempio quando la parte posteriore del televisore è ricurva,
oppure è dotata di fori di montaggio infossati e di dimensioni maggiori, o quando è presente
qualche tipo di intralcio. I distanziali offrono anche spazio addizionale per l'alloggiamento dei cavi.
Gli snodi devono aderire fermamente ai distanziali, e non devono risultare allentati.
Verwenden Sie Abstandshalter, wenn die Monitorarme (MA-L, MA-R) nicht fest gegen die
Rückseite des TVs ansitzen, beispielsweise, wenn die Rückseite des Fernsehers gerundet ist,
größere ausgesparte Befestigungslöcher hat oder falls irgend eine andere Blockierung vorhanden
sein sollte. Die Abstandshalter bieten Ihnen auch zusätzlichen Platz für die Kabel. Die Arme
müssen sicher auf den Abtandshaltern liegen, und dürfen nicht locker sein.
Используйте промежуточные кольца, если крепежные узлы монитора (MA-L, MA-R) не
прилегают плотно к задней стенке телевизора, например, когда когда задняя панель
телевизора не плоская, с довольно большими глухими отверстиями для установки, или
имеются другие помехи. Промежуточные кольца также обеспечивают дополнительное место
для кабелей. Крепежные узлы монитора должны плотно прилегать к промежуточным
кольцам и не двигаться.
MA-L
MA-R
13
INSTALLING THE WALL MOUNT IN WOOD
POSER LE SUPPORT MURAL SUR DU BOIS
CÓMO INSTALAR EL SOPORTE DE PARED EN MADERA
INSTALLAZIONE DEL SUPPORTO A PARETE SU LEGNO
INSTALLATION DER WANDBEFESTIGUNG IN HOLZ
КРЕПЛЕНИЕ НАСТЕННОГО КРОНШТЕЙНА К ДЕРЕВУ
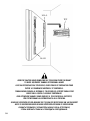
FIND THE WOOD STUDS
Using a stud finder, find the exact location of the studs
to which you want to attach the wall mount. Mark the
right and left side to determine the center of each stud.
TROUVER LES MONTANTS EN BOIS
À l'aide d'un détecteur de montant, trouver
l'emplacement exact des montants sur lesquels doit être
attaché le support mural. Marquer les bords gauche et
droit pour déterminer le centre de chaque montant.
CÓMO ENCONTRAR LOS
MONTANTES DE MADERA
Utilizando un localizador de montantes, determine
la ubicación exacta de los montantes sobre los que
desea fijar el soporte de pared. Marque los lados
derecho e izquierdo para determinar el centro de
cada montante.
INDIVIDUARE I MONTANTI
DI LEGNO
Con l'ausilio di un rilevatore, individuare la
posizione esatta dei montanti ai quali si intende
fissare il supporto a parete. Contrassegnare gli estremi
sinistro e destro dei montanti per determinarne il
punto centrale.
FINDEN SIE DIE HOLZBOLZEN
Mit einem Bolzenfinder finden Sie jetzt den genauen Ort des Bolzens, an den Sie die
Wandbefestigung befestigen wollen. Markieren Sie die rechte sowie auch linke Seite, um die Mitte
des Bolzens bestimmen zu können.
НАЙДИТЕ ДЕРЕВЯННЫЕ СТОЙКИ
С помощью искателя стойки найдите точное местоположение стоек, к которым вы хотите
прикрепить кронштейн. Отметьте правую и левую стороны, чтобы определить центр каждой
стойки.
14
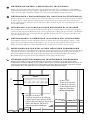
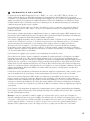
DETERMINE HEIGHT LOCATION OF TELEVISION
Measure the distance from the bracket holes to the top and bottom of the TV to determine the center mounting
position. Measure from the floor up, and make small marks on the wall to help you determine the desired TV height.
Using a level, line up the Installation Template (IT) with your pencil markings and tape it into place.
DÉTERMINER L'EMPLACEMENT EN HAUTEUR DU TÉLÉVISEUR
Mesurer la distance des mesurer la distance entre les trous du support et le haut et le bas du téléviseur pour déterminer
la position de pose centrale. Mesurer la hauteur depuis le sol et tracer de petits repères sur le mur pour marquer la
hauteur souhaitée pour le téléviseur. À l'aide d'un niveau, aligner le gabarit de pose (IT) sur les marquages et l'attacher
avec du ruban adhésif.
DETERMINE LA ALTURA EN LA QUE COLOCARÁ EL TELEVISOR
Para determinar el centro de la posición de montaje mida la distancia desde los orificios del soporte hasta las partes
superior y trasera del televisor. Mida desde el piso y haga pequeñas marcas sobre la pared para ayudarse a determinar la
altura deseada para el TV. Use un nivel para alinear la plantilla de instalación (IT) con las marcas del lápiz y sujete
con cinta adhesiva en el lugar.
DETERMINARE LA POSIZIONE IN ALTEZZA DEL TELEVISORE
Per determinare la posizione centrale di montaggio, misurare la distanza dai fori dei sostegni alla parte superiore e quella
inferiore del televisore. Misurare partendo dal pavimento, e fare un segno sul muro per indicare l'altezza desiderata. Con
l'ausilio di una livella, allineare lo schema di installazione (IT) al segno sul muro e fissarlo con nastro adesivo.
BESTIMMEN SIE DIE STELLE DER HÖHE DES FERNSEHERS
Messen Sie den Abstand von den Trägerlöchern zum oberen und unteren Teil des TVs, um die Mitte festzulegen. Messen Sie
vom Fußboden nach oben, und markieren Sie die Wand mit kleinen Bleistiftmarkierungen, um die gewünschte Höhe des
Fernsehers bestimmen zu können. Mit einem Nivellierinstrument wird die Installationsschablone (IT) mit Ihren
Bleistiftmarkierungen ausgerichtet und mit dem Abdeckband an der richtigen Stelle befestigt.
ОПРЕДЕЛИТЕ ПОЛОЖЕНИЕ ТЕЛЕВИЗОРА ПО ВЫСОТЕ
Измерьте расстояние от отверстий кронштейна до верха и низа телевизора, чтобы определить центр
установочного положения. Измерьте расстояние от пола вверх и сделайте карандашом пометки на стене, что
поможет вам определить желаемую высоту положения телевизора. Используя уровень, совместите шаблон
для установки (IT) с пометками на стене и закрепите шаблон маскировочной лентой.
IT
• Center of TV
• Centre de la télévision
• Centro de la televisión
• Centro della televisione
• Mitte des Fernsehens
• Центр телевидения
• Height to bottom of TV
• Hauteur jusqu'au bas du téléviseur
• Altura hasta la parte inferior del TV
• Altezza alla parte inferiore del televisore
• Höhe zum unteren Teil des TVs
• Высота до низа телевизора
15
FOR MASONRY INSTALLATIONS, SEE PAGE 19.
POUR UNE POSE SUR DE LA MAÇONNERIE, VOIR PAGE 19.
PARA INSTALACIONES EN MAMPOSTERÍA CONSULTE LA PÁGINA 19.
PER INSTALLAZIONI A MURO, VEDERE A PAGINA 19.
FÜR INSTALLATIONEN IN MAUERWERK, SIEHE SEITE 19.
КРЕПЛЕНИЕ К КАМЕННОЙ КЛАДКЕ, СМ. СТР. 19.
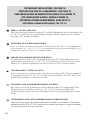
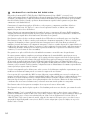
DRILL PILOT HOLES
Follow directions on the Installation Template (IT) carefully. Drill four holes into the slots marked as the
“A”, “B”, “C”, and “D” locations on the Installation Template. All holes should be made 2.5" (64mm)
deep using a 5/32" (or 4mm) size drill bit.
PERCER LES TROUS GUIDES
Suivre avec attention les instructions figurant sur le gabarit de pose (IT). Percez avec soin quatre trous à
travers les points « A », « B », « C » et « D » qui conviennent. Percer tous les trous de 64 mm (2,5 po)
de profond avec un foret de 5/32 po (ou 4 mm) de diamètre.
CÓMO TALADRAR ORIFICIOS GUÍA
Siga cuidadosamente las instrucciones de la plantilla de instalación (IT). Taladre cuatro orificios en las
ranuras marcadas como ubicaciones “A”, “B”, “C” y “D” en la plantilla de instalación. Todos los orificios
deben ser de 2,5" (64 mm) de profundidad, para ello use una broca de 5/32" (ó 4 mm) de tamaño.
TRAPANARE I FORI PILOTA
Seguire con attenzione le istruzioni contenute sullo schema di installazione (IT). Trapanare quattro fori
in corrispondenza dei punti “A”, “B”, “C” e “D” nello schema di installazione. Tutti i fori devono essere
profondi 64 mm ed effettuati con una punta da 4 mm.
FÜHREN SIE VORBOHRUNGEN DURCH
Bitte achten Sie darauf, dass die Anleitungen auf der Installationsschablone (IT) sorgfältig befolgt werden.
Werden vier Löcher in die Schlitze an den mit “A”, “B”, “C” und “D” bezeichneten Stellen auf der
Installationsschablone gebohrt. Alle Löcher sollten 64 mm tief mit einer 4 mm großen Bohrerspitze gebohrt
werden.
ПРОСВЕРЛИТЕ УСТАНОВОЧНЫЕ ОТВЕРСТИЯ
Аккуратно и точно следуйте инструкциям, написанным на шаблоне для установки (IT). Oтмеченных
овалами на участках “A”, “B”, “C” и “D” на шаблоне для установки. Просверлите все отверстия глубиной
2,5" (64 мм), используя сверло 5/32" (или 4 мм).
16
A
B
C
D
Use lines on Installation Template (IT) to align Template with stud pencil markings.
Se servir des lignes sur le gabarit de pose (IT) pour aligner le gabarit avec repères de montants au crayon.
Utilice líneas en la plantilla de instalación (IT) para alinear la plantilla con las marcas de lápiz en el montante.
Utilizzare le linee presenti nello schema di installazione (IT) per allineare lo schema stesso ai segni fatti in matita.
Verwenden Sie die Linien auf der Installationsschablone (IT), um die Schablone mit
Bolzenbleistiftmarkierungen auszurichten.
Используйте линии на шаблоне для установки (IT), чтобы совместить шаблон
с карандашными пометками на стойке.
2-1/2"
64mm
5/32"
4mm
17
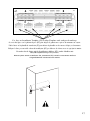
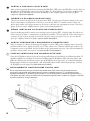
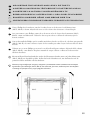
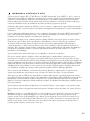
INSTALL THE WALL PLATE (WP)
After you have prepared the holes for mounting the Wall Plate (WP), place the Wall Plate over the holes in
the direction as shown below, and screw in the Lag Bolts (T) about half way. Use a level to make sure the
Wall Plate is level and make any necessary adjustments. Once straight, tighten all of the Lag Bolts
completely (do not over tighten!).
POSER LA PLAQUE MURALE (WP)
Une fois que les trous de fixation de la plaque murale (WP) sont prêts, poser la plaque murale sur les trous
dans le sens indiqué sur l'illustration ci-dessous et visser les tire-fond (T) à moitié environ. Utiliser un
niveau pour vérifier que la plaque murale est de niveau et effectuer tout ajustement nécessaire. Une fois la
plaque de niveau, serrer complètement les quatre tire-fond (ne pas forcer !).
CÓMO INSTALAR LA PLACA DE PARED (WP)
Luego de haber preparado los orificios para instalar la placa de pared (WP), colóquela sobre los orificios en
la dirección que se indica a continuación y atornille los tirafondos (T) hasta la mitad. Utilice un nivel para
asegurarse de que la placa de pared esté nivelada y haga los ajustes necesarios. Una vez que esté derecha,
ajuste por completo todos los tirafondos (¡no los ajuste demasiado!).
INSTALLAZIONE DEL SUPPORTO A PARETE (WP)
Dopo aver preparato i fori per il montaggio del supporto a parete (WP), porre il supporto sopra i fori nella
posizione indicata sotto, quindi avvitare le viti (T) fino a metà corsa. Utilizzare la livella per verificare che
il supporto a parete sia parallelo al suolo ed effettuare gli aggiustamenti necessari. Una volta determinata la
posizione corretta, finire di avvitare le viti (non serrarle eccessivamente!).
INSTALLIEREN SIE DIE WANDPLATTE (WP)
Setzen Sie die Wandplatte über die Löcher in der angezeigten Richtung und schrauben Sie die Schlüsselschrauben (T)
ungefähr zur Hälfte ein, nachdem Sie die Löcher zur Befestigung der Wandplatte (WP) vorbereitet haben. Mit
Hilfe einer Wasserwaage wird darauf geachtet, dass die Wandplatte eben ausgerichtet ist; eventuell erforderliche
Berichtigungen werden jetzt vorgenommen. Alle Schlüsselschrauben werden vollständig festgezogen, nachdem
die Wandplatte gerade ausgerichtet (bitte nicht zu fest ziehen!).
УСТАНОВИТЕ НАСТЕННУЮ ПЛАТУ (WP)
После подготовки отверстий для установки настенной платы (WP), поместите настенную плату на
отверстия в направлении, показанном ниже на рисунке, и ввинтите шурупы (T) с головкой под ключ
примерно наполовину. С помощью уровня убедитесь, что настенная плата установлена горизонтально, и,
если нужно, подгоните. Когда настенная плата установлена горизонтально, затяните все шурупы с головкой
под ключ полностью (не перетягивайте!)
WP
T
18
MOUNTING TO SOLID CONCRETE OR CINDER BLOCK
POSE SUR DU BÉTON PLEIN OU DES PARPAINGS
MONTAJE EN CONCRETO SÓLIDO O LADRILLOS DE ESCORIAS
MONTAGGIO SU CALCESTRUZZO O BLOCCHI IN CEMENTO
MONTAGE AN FESTBETON ODER SCHLACKENBETONBLOCK
КРЕПЛЕНИЕ К НЕАРМИРОВАННОМУ БЕТОНУ ИЛИ
ШЛАКОБЕТОННОМУ БЛОКУ
After you have determined your desired TV location, Line up the Installation Template (IT)
to ensure you will not drill into any mortar joints. Tape the Installation Template in place
securely on the wall with masking tape. Use a Level.
Après avoir déterminé l'emplacement souhaité pour le téléviseur, aligner le gabarit de pose
(IT) de manière à ne pas percer dans des joints de mortier. Bien attacher le gabarit au mur
avec du ruban de masquage. Utiliser un niveau.
Luego de haber determinado la ubicación deseada para su TV, alinee la plantilla de instalación
(IT) para asegurarse de que no necesitará perforar ninguna junta de argamasa. Utilice cinta
adhesiva para sujetar la plantilla de instalación (IT) a la pared de forma segura. Utilice un
nivel.
Dopo aver determinato la posizione più adatta per il televisore, allineare lo schema di installazione (IT) per assicurarsi di non trapanare in giunti di malta. Fissare lo schema al muro con
nastro adesivo. Utilizzare una livella.
Nachdem Sie den gewünschten Platz des Fernsehers bestimmt haben, wird die
Installationsschablone (IT) ausgerichtet, um sicherzustellen, dass Sie nicht in Mörtelfugen
bohren. Befestigen Sie die Installattionsschablone (IT) sicher an der Wand mit Hilfe von
Abdeckband. Verwenden Sie dazu Ihr Nivellierinstrument.
После того как вы определили желаемое положение телевизора, выравняйте шаблон для
установки (IT), чтобы быть уверенным, что вы не будете сверлить в швы каменной
кладки. Надежно закрепите шаблон для установки маскировочной лентой. Используйте
уровень для проверки.
19
Level
Niveau
Nivel
Livella
Nivellierinstrument
Уровень
IT
A
B
C
D
DO NOT DRILL INTO MORTAR JOINTS! DRILL HOLES AT LEAST 1" (25.4 MM) FROM THE JOINTS.
USE A NEW DRILL BIT TO ENSURE OPTIMUM HOLDING ABILITY. DO NOT USE A HAMMER DRILL!
NE PAS PERCER DANS LES JOINTS DE MORTIER ! PERCER LES TROUS À AU MOINS 25 MM (1 PO) DES
JOINTS. UTILISER UNE MÈCHE NEUVE POUR ASSURER UNE CAPACITÉ DE MAINTIEN
OPTIMALE. NE PAS UTILISER DE PERCEUSE À PERCUSSION !
NO PERFORE LAS JUNTAS DE ARGAMASA. TALADRE ORIFICIOS A UNA DISTANCIA DE, POR LO MENOS,
1” (25,4 MM) DE LAS JUNTAS. USE UNA BROCA NUEVA PARA GARANTIZAR UNA
CAPACIDAD ÓPTIMA DE SUJECIÓN. NO USE UN TALADRO PERCUTOR.
NON TRAPANARE DIRETTAMENTE NEI GIUNTI DI MALTA! TRAPANARE AD UNA DISTANZA DI ALMENO 25,4 MM
DA QUESTI. UTILIZZARE UNA PUNTA DI TRAPANO NUOVA PER ASSICURARE LA MIGLIORE CAPACITÀ DI
OSTEGNO POSSIBILE. NON UTILIZZARE UN TRAPANO A PERCUSSIONE!
BITTE NICHT IN DEN FUGEN BOHREN! DIE BOHRUNGEN SIND MINDESTENS 25,4 MM VON DEN FUGEN
ENTFERNT VORZUNEHMEN. VERWENDEN SIE EINE NEUE BOHRERSPITZE, UM EINE
OPTIMALE HALTEKAPAZITÄT ZU GEWÄHRLEISTEN. BENUTZEN SIE KEINEN BOHRHAMMER!
НЕ СВЕРЛИТЕ ПО ШВУ! СВЕРЛИТЕ ОТВЕРСТИЯ НА РАССТОЯНИИ ПО КРАЙНЕЙ МЕРЕ 1"
(25.4 ММ) ОТ ШВОВ. ИСПОЛЬЗУЙТЕ НОВОЕ СВЕРЛО ДЛЯ ОБЕСПЕЧЕНИЯ ОПТИМАЛЬНОЙ
УДЕРЖИВАЮЩЕЙ СПОСОБНОСТИ. НЕЛЬЗЯ ИСПОЛЬЗОВАТЬ УДАРНУЮ ДРЕЛЬ!
20
3"
(76mm)
DRILL PILOT HOLES
Follow directions on the Installation Template (IT) carefully. Carefully drill four holes using
a 5/16" (or 8mm) masonry drill bit in the “A”, “B”, "C", and "D" locations noted on the
Installation Template. Each hole should be at least 3" (76mm) deep.
PERCER LES TROUS GUIDES
Suivre avec attention les instructions figurant sur le gabarit de pose (IT). Percer soigneusement
quatre trous avec une mèche à maçonnerie de 5/16 po (ou 8 mm) de diamètre aux emplacements
notés « A », « B », « C » et « D » sur le gabarit de pose. Chaque trou doit être d'au moins 76 mm
(3 po) de profond.
CÓMO TALADRAR ORIFICIOS GUÍA
Siga cuidadosamente las instrucciones de la plantilla de instalación (IT). Taladre con cuidado
cuatro orificios con una broca para mampostería de 5/16” (8mm) en las posiciones “A”, “B”, “C”
y “D” indicadas en la plantilla de instalación. Cada orificio debe tener por lo menos 3" (76mm)
de profundidad.
TRAPANARE I FORI PILOTA
Seguire con attenzione le istruzioni contenute sullo schema di installazione (IT). Trapanare
quattro fori con una punta da muratura da 8 mm, nei punti “A”, “B”, “C” e “D” indicati sullo
schema di installazione. Ogni foro deve essere profondo almeno 76 mm.
FÜHREN SIE VORBOHRUNGEN DURCH
Bitte achten Sie darauf, dass der Installationsschablone (IT) sorgfältig gefolgt wird. Bohren
Sie sorgfältig vier Löcher mit einer 8 mm großen Bohrerspitze für Mauerwerk in die
“A”, “B”, “C”, und “D” Stellen auf Ihrer Installationsschablone. Jedes Loch sollte mindestens
76 mm tief sein.
ПРОСВЕРЛИТЕ УСТАНОВОЧНЫЕ ОТВЕРСТИЯ
Аккуратно и точно следуйте инструкциям , написанным на шаблоне для установки
(IT). Просверлите четыре отверстия, используя сверло 5/16" (или 8 мм) для каменной
кладки, в местах, обозначенных “A”, “B”, “C” и “D” на шаблоне для установки. Каждое
отверстие должно быть глубиной не менее 3" (76 мм).
21
U
INSERT ANCHORS
Remove Template (IT) and insert TOGGLER® brand ALLIGATOR® Anchors (U).
ENFONCER LES CHEVILLES
Enlever le gabarit (IT) et enfoncer des chevilles d'ancrage ALLIGATOR® de
la marque TOGGLER® (U).
COLOQUE LOS ANCLAJES
Quite la plantilla (IT) y coloque los anclajes (U) marca TOGGLER® Y ALLIGATOR®.
INSERIRE I TASSELLI
Togliere lo schema (IT) e inserire i tasselli ALLIGATOR® di marca TOGGLER® (U).
DÜBEL EINFÜGEN
Entfernen Sie die Schablone (IT) und führen Sie Dübel der Marke TOGGLER®
ALLIGATOR® ein (U).
ВСТАВИТЬ АНКЕРЫ
Снять шаблон для установки (IT) и вставить анкеры типа ALLIGATOR® марки
TOGGLER®.
22
INSTALL THE WALL PLATE (WP)
After you have prepared the holes for mounting the Wall Plate (WP), place the Wall Plate over the holes
and screw in the Lag Bolts (T) about half way. Use a level to make sure the Wall Plate is level and make
any necessary adjustments. Once straight, tighten all of the Lag Bolts completely (do not over tighten!).
POSER LA PLAQUE MURALE (WP)
Une fois que les trous de fixation de la plaque murale (WP) sont prêts, poser la plaque murale sur les trous
et visser les tire-fond (T) à moitié environ. Utiliser un niveau pour vérifier que la plaque murale est de
niveau et effectuer tout ajustement nécessaire. Une fois la plaque de niveau, serrer complètement les quatre
tire-fond (ne pas forcer !).
CÓMO INSTALAR LA PLACA DE PARED (WP)
Luego de haber preparado los orificios para instalar la placa de pared (WP), colóquela placa sobre los
orificios y atornille los tirafondos (T) hasta la mitad. Utilice un nivel para asegurarse de que la placa de
pared esté nivelada y haga los ajustes necesarios. Una vez que esté derecha, ajuste todos los tirafondos por
completo (no los ajuste demasiado).
INSTALLAZIONE DEL SUPPORTO A PARETE (WP)
Dopo aver preparato i fori per il montaggio del supporto a parete (WP), porre il supporto sopra i fori e
avvitare le viti (T) per circa metà della lunghezza. Utilizzare la livella per verificare che il supporto sia
parallelo al suolo ed effettuare gli aggiustamenti necessari. Una volta verificata la correttezza della
posizione, finire di avvitare le viti (non serrarle eccessivamente!).
INSTALLIEREN SIE DIE WANDPLATTE (WP)
Nachdem Sie die Löcher zur Befestigung an der Wandplatte (WP) vorbereitet haben, legen Sie die
Wandplatte über die Löcher und schrauben Sie die Ankerbolzen (T) halb ein. Mit dem Nivelliergerät wird
sichergestellt, dass die Wandplatte eben ist; führen Sie erforderlichenfalls Nachstellungen aus. Wenn die
Wandplatte gerade liegt, werden alle Ankerbolzen vollständig festgezogen (bitte nicht zu fest ziehen!).
УСТАНОВИТЕ НАСТЕННУЮ ПЛАТУ (WP)
После того как вы просверлили отверстия для установки настенной платы (WP), поместите ее на
отверстия и ввинтите шурупы (T) с головкой под ключ примерно наполовину. Используя уровень,
убедитесь, что настенная плата установлена горизонтально, и сделайте необходимые исправления. Когда
она установлена правильно, полностью затяните все шурупы (не затягивайте шурупы слишком сильно!).
WP
T
23
MOUNTING THE TELEVISION
POSE DU TÉLÉVISEUR
CÓMO INSTALAR EL TELEVISOR
MONTAGGIO DEL TELEVISORE
MONTAGE DES FERNSEHERS
УСТАНОВКА ТЕЛЕВИЗОРА
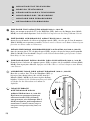
PREPARE THE MONITOR ARMS (MA.L, MA.R)
Before you attempt to attach the TV to the Wall Plate (WP), make sure the Monitor Arms (MA-L,
MA-R) are in an unlocked position. Push the Slide Lock up and rotate the Swing Tab down as shown.
PRÉPARER LES BRAS DE MONITEUR (MA.L, MA.R)
Avant d'essayer d'attacher le téléviseur à la plaque murale (WP), s'assurer que les bras de moniteur
(MA-L, MA-R) sont en position verrouillée. Pousser le verrou coulissant vers le haut et rabattre la patte
pivotante vers le bas comme sur l'illustration.
CÓMO PREPARAR LOS BRAZOS DE LA PANTALLA (MA.L, MA.R)
Antes de intentar fijar el TV a la placa de pared (WP), asegúrese de que los brazos para la pantalla
(MA-L y MA-R) estén destrabados. Empuje la traba deslizante hacia arriba y gire la pestaña oscilante
hacia abajo, tal como se muestra.
PREPARAZIONE DEGLI SNODI DELLO SCHERMO (MA.L, MA.R)
Prima di fissare il televisore al supporto a parete (WP), verificare che gli snodi dello schermo (MA-L,
MA-R) siano in posizione sbloccata. Spingere verso l’alto il blocco e ruotare la linguetta verso il basso,
come illustrato.
VORBEREITUNG DER MONITORARME (MA.L, MA.R)
Bevor Sie versuchen, dass TV an der Wandplatte (WP) zu
befestigen, bitte darauf achten, dass sich die Arme des
Monitors (MA-L, MA-R) in der unverriegelten Stellung
befinden. Schieben Sie die Schiebeverriegelung nach oben
und drehen Sie den Schwenkarm nach unten wie
abgebildet.
ПОДГОТОВЬТЕ
КРЕПЕЖНЫЕ УЗЛУ
МОНИТОРА (MA.L, MA.R)
Перед тем как крепить телевизор к
настенной плате (WP), убедитесь,
что крепежные узлы монитора (MA-L,
MA-R) находятся в разблокированном
положении. Толкните защелку вверх и
поверните поворотную лапку вниз, как
показано.
24
MA-L
MOUNT THE TELEVISION
With the help of an assistant, lift the television and guide the Monitor Arms (MA-L, MA-R) onto the
Wall Plate (WP) as shown. Make sure both Monitor Arms are securely on the Wall Plate before
releasing it.
POSER LE TÉLÉVISEUR
Avec l'aide d'au moins une autre personne, soulever le téléviseur et guider les bras de moniteur
(MA-L, MA-R) dans le bras articulé comme sur l'illustration. S'assurer que les deux bras de moniteur
sont solidement sur la plaque murale avant de la relâcher.
CÓMO MONTAR EL TELEVISOR
Con la ayuda de un asistente, levante el televisor y guíe los brazos para la pantalla (MA-L y MA-R)
sobre la placa de pared (WP), tal como se muestra. Asegúrese de que los dos estén bien fijados sobre
la placa de pared antes de liberarlos.
MONTAGGIO DEL TELEVISORE
Con l’aiuto di un assistente, sollevare il televisore e guidare gli snodi dello schermo (MA-L, MA-R)
sul supporto a parete (WP), come illustrato. Verificare che entrambi gli snodi siano posizionati
fermamente sul supporto a parete prima di rilasciarlo.
BEFESTIGUNG DES FERNSEHERS
Mit der Hilfe eines Gehilfen wird der Fernseher jetzt hochgehoben und die Monitorarme (MA-L,
MA-R) auf die Wandplatte (WP) wie abgebildet geführt. Achten Sie bitte darauf, dass beide
Monitorarme fest an der Wandplatte befestigt sind, bevor Sie den Fernseher loslassen.
УСТАНОВИТЕ ТЕЛЕВИЗОР
Вместе с помощником поднимите телевизор и вставьте крепежные узлы монитора (MA-L,
MA-R) в настенную плату (WP), как показано. Убедитесь, что оба крепежных узла монитора
надежно держатся на настенной плате, перед тем как отпустить телевизор.
MAKE SURE BOTH MONITOR ARMS (MA) ARMS ARE ENGAGED ON BOTH THE
TOP AND BOTTOM RAILS OF THE WALL PLATE (WP)!
S'ASSURER QUE LES DEUX BRAS DE MONITEUR (MA) SONT ENGAGÉS À LA FOIS SUR LES
RAILS SUPÉRIEUR ET INFÉRIEUR DE LA PLAQUE MURALE (WP).
ASEGÚRESE DE QUE AMBOS BRAZOS DE LA PANTALLA (MA) SE ENGANCHEN EN LOS
RIELES SUPERIOR E INFERIOR DE LA PLACA DE PARED (WP).
VERIFICARE CHE ENTRAMBI GLI SNODI DELLO SCHERMO (MA) SIANO INNESTATI SULLA
ROTAIA SUPERIORE E SU QUELLA INFERIORE DEL SUPPORTO A PARETE (WP)!
BITTE ACHTEN SIE DARAUF, DASS BEIDE MONITORARME (MA) AUF DER OBEREN UND
UNTEREN SCHIENE DER WANDPLATTE (WP) EINGERASTET SIND!
УБЕДИТЕСЬ, ЧТО ОБА КРЕПЕЖНЫХ ЭЛЕМЕНТА КРЕПЕЖНЫХ УЗЛОВ МОНИТОРА (МА)
ЗАКРЕПИЛИСЬ КАК НА ВЕРХНЕЙ, ТАК И НА НИЖНЕЙ РЕЙКАХ НАСТЕННОЙ ПЛАТЫ (WP)!
25
MA-L
WP
MA-R
EXERCISE CAUTION WHEN REMOVING THE TELEVISION FROM THE MOUNT
TO AVOID EQUIPMENT DAMAGE OR PERSONAL INJURY.
LORS DU DÉCROCHAGE DU TÉLÉVISEUR, FAIRE PREUVE DE PRÉCAUTION POUR
ÉVITER LES DOMMAGES MATÉRIELS ET CORPORELS.
TENGA MUCHO CUIDADO AL RETIRAR EL TELEVISOR DEL SOPORTE PARA EVITAR
DAÑOS EN EL EQUIPO O LESIONES CORPORALES.
FARE ATTENZIONE QUANDO VIENE RIMOSSO IL TELEVISORE DAL SUPPORTO,
PER EVITARE DANNI ALL'APPARECCHIO O ALLA PERSONA.
GEHEN SIE VORSICHTIG BEI DER ABNAHME DES TVS VON DER BEFESTIGUNG UM, UM DAS GERÄT
NICHT ZU BESCHÄDIGEN ODER UM KEINE KÖRPERVERLETZUNGEN ZU VERURSACHEN.
СНИМАТЬ ТЕЛЕВИЗОР С КРОНШТЕЙНА НУЖНО ОЧЕНЬ ОСТОРОЖНО,
ЧТОБЫ ИЗБЕЖАТЬ ТРАВМ И НЕ ПОВРЕДИТЬ ОБОРУДОВАНИЕ.
26
LOCK THE MONITOR ARMS (MA.L, MA.R)
Have an assistant hold the television in place while you carefully pull the bottom of the TV away from
the wall. Flip the Easy Access Support Stands, located at the lower back part of each Monitor Arm
(MA-L, MA-R), out and down toward the wall. These will allow for easier access to the back of the
television. Rotate the Swing Tab into an upright position, making sure it is securely engaged behind the
Wall Plate (WP). Press the Slide Lock down to secure the Swing Tab into place. A padlock
(not included) may be added for extra security.
VERROUILLER LES BRAS DE MONITEUR (MA.L, MA.R)
Faire tenir le téléviseur en place par une autre personne et, avec précaution, écarter le bas du téléviseur
du mur. Basculer les appuis d'accès, situés au bas de chaque bras de moniteur (MA-L, MA-R), vers le bas
et contre le mur. Ces appuis permettent d'accéder plus facilement au dos du téléviseur. Remettre la patte
pivotante en position verticale, en veillant à bien l'engager derrière la plaque murale (WP). Pousser le
verrou coulissant vers le bas pour bloquer la patte murale en place. Un cadenas (non fourni) peut être
ajouté pour plus de sécurité.
TRABE LOS BRAZOS PARA EL MONITOR (ML.L Y MA.R)
Pida a un asistente que sostenga el televisor en su lugar mientras usted jala con cuidado de la base del TV,
alejándola de la pared. Gire las bases de soporte de acceso fácil, ubicadas en la parte trasera inferior de cada
brazo para el monitor (MA-L y MA-R), hacia afuera y abajo, en dirección de la pared. Esto permitirá acceder
con más facilidad a la parte trasera del televisor. Gire la pestaña oscilante a una posición vertical, asegurándose
de que esté bien enganchada detrás de la placa de pared (WP). Presione la traba deslizante hacia abajo para
fijar la pestaña oscilante en su lugar. Se puede añadir un candado (no incluido) para mayor seguridad.
BLOCCARE GLI SNODI DELLO SCHERMO (MA.L, MA.R)
Farsi aiutare da un assistente a tenere il televisore in posizione mentre si allontana la parte inferiore del televisore dalla parete. Capovolgere i supporti ad accesso facilitato, posti nella parte inferiore e posteriore di ciascuno snodo dello schermo (MA-L, MA-R), verso l’esterno e verso il basso, in direzione della parete. Ciò
faciliterà l’accesso alla parte posteriore del televisore. Portare la linguetta in posizione eretta, verificando che
sia fermamente in posizione dietro al supporto a parete (WP). Premere il blocco verso il basso e fissare la
linguetta in posizione. Per garantire maggiore sicurezza, è possibile utilizzare anche un lucchetto (non incluso).
VERRIEGELN SIE DIE MONITORARME (MA.L, MA.R).
Bitten Sie einen Gehilfen, den Fernseher zu halten, während Sie vorsichtig den Unterteil des TVs von der
Wand wegziehen. Kippen Sie die sich im unteren Teil der beiden Monitorarme (MA-L, MA-R) befindlichen
Easy Access Support-Ständer nach außen und nach unten weg von der Wand. Dadurch wird Ihnen ein
leichterer Zugang zu der Rückseite des Fernsehers gewährt. Drehen Sie den Schwenkarm nach oben und
achten Sie dabei darauf, das er sicher hinter der Wandplatte (WP) eingerastet ist. Drücken Sie die
Schiebeverriegelung nach unten, damit der Schwenkarm einrastet. Ein (nicht im Lieferumfang enthaltenes)
Vorhängeschloss kann für zusätzliche Sicherheit angebracht werden.
ЗАФИКСИРОВАТЬ КРЕПЕЖНЫЕ УЗЛЫ МОНИТОРА (MA.L, MA.R)
Попросите помощника держать телевизор на месте, пока вы осторожно оттянете низ телевизора от
стены. Перебросьте поддерживающие стойки, находящиеся в нижней задней части каждого
крепежного узла монитора (MA-L, MA-R), наружу и вниз по направлению к стене. Они позволят
обеспечить более легкий доступ к задней части телевизора. Поверните поворотную лапку вверх и
убедитесь, что она надежно вставлена в нужное положение за настенной платой (WP). Толкните
защелку вниз, чтобы зафиксировать поворотную лапку в нужном положении. Висячий замок (не
входит в поставку) можно использовать для большей безопасности.
27
WP
MA-L
MA-R
MA-L
WP
28
ADJUSTING THE HEIGHT AND LEVEL OF THE TV
AJUSTER LA HAUTEUR DU TÉLÉVISEUR ET LE METTRE DE NIVEAU
AJUSTE DE LA ALTURA Y NIVELACIÓN DEL TV
REGOLAZIONE DELL’ALTEZZA E DEL LIVELLO DEL TELEVISORE
EINSTELLUNG DER HÖHE UND EBENE DES TVS
КОРРЕКТИРОВКА ПОЛОЖЕНИЯ ТЕЛЕВИЗОРА ПО ВЫСОТЕ И ПО ГОРИЗОНТАЛИ
Using a Phillips-head screwdriver, turn the Leveling Screws at the bottom of each Monitor Arm
(MA-L, MA-R) as shown. Adjust both screws to raise or lower the television to a desired height.
Avec un tournevis à tête Phillips, tourner la vis de niveau au bas de chaque bras de moniteur (MA-L,
MA-R) comme sur l'illustration. Utiliser les deux vis pour relever ou abaisser le téléviseur jusqu'à la
hauteur souhaitée.
Con un destornillador Phillips, gire los tornillos niveladores ubicados en la base de cada brazo para pantalla
(MA-L y MA-R), tal como se muestra. Ajuste los dos tornillos para subir o bajar el televisor hasta la altura
deseada.
Utilizzare un cacciavite Phillips per avvitare le viti di livello nella parte inferiore degli snodi dello schermo
(MA-L, MA-R), come illustrato. Regolare entrambe le viti per sollevare o abbassare il televisore fino
all’altezza desiderata.
Mit einem Kreuzschlitzschraubendreher werden die Horizontierschrauben unten auf jedem Monitorarm
(MA-L, MA-R) wie abgebildet gedreht. Stellen Sie beide Schrauben nach, um den Fernseher auf die
gewünschte Höhe anzuheben oder herabzulassen.
Используя крестообразную отвертку, поверните установочные винты в нижней части каждого
крепежного узла монитора (MA-L, MA-R), как показано. Для того, чтобы опустить или поднять
телевизор на нужную высоту, отрегулируйте оба винта.
MA-L
MA-R
29
LIMITED LIFETIME WARRANTY
This Bell’O International, Corp. (“Bell’O” or “we”) mounting product SKU # 7760 (“Product”) is warranted for the life
of the Product only to the original purchaser and limited to the original installation (“Warranty”). Re-installation of
the Product in a different location or with a different monitor or peripheral voids this Warranty. This Warranty is only
valid in the United States of America and Canada. For customers outside the United States and Canada, please
contact your country's distributor for country specific warranty information.
We warrant to the original purchaser that the Product and all parts and components thereof are free of defects in
material and workmanship. “Defects”, as used in this Warranty, is defined as any imperfections that impair the use of
the Product.
Our Warranty is expressly limited to replacement of mount parts and components. Bell’O will replace any part listed on
the enclosed mount parts sheet that is defective in material or workmanship only to the original owner within the
limitations stated herein.
This Warranty applies only under conditions of normal use. The Product is not intended for outdoor use. This
Warranty does not cover: 1) defects caused by improper installation or disassembly; 2) defects caused by shipping
(claims for damage during transit to you should be made immediately by you directly to the transportation company);
3) defects occurring after purchase due to modification, intentional damage, accident, misuse, abuse, negligence,
natural disaster, abnormal mechanical or environmental conditions, unauthorized disassembly, repair, modification or
exposure to the elements; 4) cosmetic damage and 5) labor or assembly costs.
This Warranty does not apply if the Product has been repackaged or resold as second-hand.
There are no warranties, express or implied, including without limitation merchantability or fitness for particular use,
except as (i) contained herein or (ii) required by applicable law in the state whose law governs. The substantive and
procedural law of the State of New Jersey shall govern this Warranty, absent controlling law imposing the law of
another state in lieu thereof as governing law. New Jersey Superior Court or the United States District Court for the
District of New Jersey, as appropriate, shall retain exclusive jurisdiction over enforcement of this Warranty and all
subject matter hereof. All warranties of whatsoever derivation shall be limited to the terms set forth herein, unless
otherwise required by applicable law.
You shall not rely on manufacturers’, employees’ or representatives’ statements, whether oral or written, which neither
modify this Warranty nor are they part of either your purchase contract or this Warranty.
Except as provided herein, Bell’O has no liability or responsibility to you or any other person or entity with respect to
any liability, loss or damage caused directly or indirectly by use of the Product, including, but not limited to, any
incidental or consequential damages. Some states do not allow limitation on how long an implied warranty can last
or the exclusion or limitation of incidental or consequential damages. Therefore, the above limitations and exclusion
may not apply to you.
This Warranty covers only repair or replacement for this mount as stated above.
This Warranty gives you specific legal rights. You may also have other rights, which vary from state to state.
Please note: You are responsible to inspect your mount thoroughly for missing or defective parts immediately after opening the
box. To receive replacement or missing part(s) under this Warranty, visit our website at www.bello.com or call our Customer
Service Department at 1-888-235-7646. Please have the model number, date code, part number(s) and your sales receipt or
other proof of purchase available for reference. We will ship you any necessary replacement parts in the United States or Canada
at our expense.
30
GARANTIE À VIE LIMITÉE
Ce produit de fixation Bell’O International, Corp. (« Bell’O » ou « nous ») de n° SKU 7760 (le « Produit ») est
garanti pendant la durée de vie du Produit uniquement à l'acheteur initial et dans les limites de la pose initiale
(« Garantie »). La réinstallation du Produit à un emplacement différent ou avec un téléviseur ou périphérique différent
annule cette Garantie. Cette garantie est valable uniquement aux États-Unis d’Amérique et au Canada. Les clients
en-dehors des États-Unis et du Canada sont invités à communiquer avec le distributeur national pour connaître les
conditions de garantie propres au pays considéré.
Nous garantissons à l’acheteur initial que ce Produit et l’ensemble de ses pièces et composants sont exempts de défauts de
matériau et de fabrication. Le terme « défaut », au sens de cette Garantie, fait référence à toute imperfection qui entrave
l’utilisation du Produit.
Notre Garantie se limite expressément au remplacement de pièces et composants du support. Bell’O remplacera toute
pièce figurant dans la nomenclature des pièces du support jointe et présentant un défaut de matériau ou de fabrication
exclusivement au propriétaire initial dans les limites établies aux présentes.
Cette Garantie s’applique uniquement dans des conditions d’utilisation normale. Ce Produit n’est pas destiné à une utilisation
en plein air. Cette Garantie ne couvre pas : 1) les défauts causés par une pose ou un démontage incorrects ; 2) les défauts
causés par le transport (les réclamations en cas de dommages dans le transport doivent être soumises par l'acheteur
directement à la société de transport) ; 3) les défauts se produisant après l’achat en raison de modification, dommages
intentionnels, accident, emploi abusif ou détourné, négligence, catastrophe naturelle, conditions mécaniques ou ambiantes
anormales, démontage, réparation ou modification non autorisés ou exposition aux intempéries ; 4) les dommages cosmétiques
et 5) les coûts de main-d’œuvre ou d’assemblage.
Cette Garantie ne s'applique pas si le produit a été reconditionné ou revendu d'occasion.
Il n’est offert aucune garantie, expresse ou implicite, notamment de qualité marchande ou d’adaptation à un emploi
particulier, à l’exception de (i) celle contenue dans les présentes ou (ii) ce qui est prévu par la réglementation en
vigueur dans l’état ou la province dont les lois s’appliquent. En l’absence de réglementation imposant l’application des
lois d’un autre état ou province, cette Garantie est régie par les dispositions de fond et de procédure de la loi de l'état
du New Jersey. La Cour supérieure du New Jersey ou la Cour de district des États-Unis pour le District du New Jersey,
selon le cas, a juridiction exclusive sur l'application de cette Garantie et sur toutes les matières y afférentes. Toutes les
garanties éventuellement dérivées sont limitées aux termes établis aux présentes, sauf dispositions contraires de la
réglementation en vigueur.
L'acheteur ne saurait s'en remettre aux déclarations des fabricants, employés ou représentants, orales ou écrites, qui ne
sont ni une modification de cette Garantie, ni une partie intégrante du contrat de vente ou de cette Garantie.
Sous réserve des présentes dispositions, Bell'O décline toute obligation ou responsabilité envers l’acheteur ou toute autre
personne ou entité concernant de quelconques obligations, pertes ou dommages causés directement ou indirectement par
l’utilisation du Produit, notamment, mais sans s’y limiter, de quelconques dommages accessoires ou consécutifs. Certains états
ou provinces n’autorisent pas la limitation de la durée d'une garantie implicite ou l’exclusion ou la limitation des dommages
accessoires ou consécutifs. Par conséquent, il est possible que les limites ou exclusions ci-dessus ne s'appliquent pas au présent
cas particulier.
Cette Garantie couvre uniquement les réparations ou remplacements pour ce support comme indiqué précédemment.
Cette Garantie confère à l’acheteur des droits juridiques particuliers. Il est possible qu’il ait d'autres droits, susceptibles
de varier d’une juridiction à l’autre.
Remarque : Vous êtes responsable de contrôler le support avec soin pour vérifier qu'il n'y a pas de pièce manquante ou
défectueuse immédiatement après avoir ouvert l'emballage. Pour obtenir des pièces de rechange ou manquantes dans le cadre de
cette garantie, veuillez visiter notre site Web à www.bello.com ou appeler notre Service après-vente au 1-888-235-7646. Veillez
à avoir le numéro de modèle, le code de date, les références des pièces et le reçu de la vente ou autre justificatif d’achat à
disposition. Bell’O expédiera toutes les pièces de rechange nécessaires à ses propres frais aux États-Unis et au Canada.
31
GARANTÍA LIMITADA DE POR VIDA
Este producto de montaje SKU # 7760 (“Producto”) Bell’O International, Corp. (“Bell’O” o “nosotros”) está
cubierto por la garantía durante la vida del Producto solo para el comprador original y está limitada a la instalación original
(“Garantía”). La Garantía solo es válida en los Estados Unidos de Norteamérica y Canadá. Los clientes que se encuentren
fuera de los Estados Unidos y Canadá y que deseen obtener información específica sobre la garantía en su país deben
comunicarse con el distribuidor local.
Garantizamos al comprador original que el Producto y todas sus partes y componentes están libres de defectos
materiales y de fabricación. Los “Defectos”, como se usa en la presente Garantía, se definen como cualquier
imperfección que afecte el uso del Producto.
Nuestra Garantía está expresamente limitada al reemplazo de partes y componentes del soporte. Bell’O reemplazará
cualquier parte listada en la hoja incluida de partes y piezas del soporte que tenga defectos materiales o de fabricación
solo al propietario original dentro de las limitaciones declaradas en esta garantía.
Esta Garantía se aplica solo bajo condiciones normales de uso. El Producto no está diseñado par su uso al aire libre.
Esta Garantía no cubre: 1) defectos causados por la instalación o desmontaje inapropiado; 2) defectos causados por el
transporte (las demandas por daños y perjuicios durante el transporte hasta su ubicación deben ser realizadas de
inmediato por usted directamente a la compañía de transporte); 3) defectos ocurridos después de la compra debidos a la
modificación, daño intencional, accidente, uso incorrecto, abuso, negligencia, desastre natural, condiciones mecánicas
o ambientales anormales, desmontaje no autorizado, reparación, modificación o exposición a los elementos; 4) daño
cosmético y 5) costos de mano de obra o ensamblaje.
Esta garantía no se aplica si el Producto ha sido embalado nuevamente o revendido como de segunda mano.
No existen garantías, explícitas o implícitas, que incluyan sin limitación la comerciabilidad o aptitud para un uso en
particular, con excepción de (i) lo aquí contenido o (ii) lo exigido por las leyes vigentes en el estado en el que rige dicha
legislación. El derecho procesal y sustantivo del estado de Nueva Jersey regirá esta Garantía en ausencia de una legislación
de otro estado que regule la aplicación de la ley. El Tribunal Superior de Nueva Jersey o el Tribunal de Distrito de los
Estados Unidos para el Distrito de Nueva Jersey, según corresponda, tendrán jurisdicción exclusiva sobre la ejecución de esta
Garantía y todo su contenido. Todas las garantías y cualquier derivación se deberán limitar a los términos aquí establecidos,
a menos que las leyes vigentes exijan lo contrario.
Usted no estará amparado por las declaraciones, orales o escritas, de los fabricantes, empleados o representantes, que no
modifican esta Garantía ni forman parte de su contrato de compra ni de esta Garantía.
Con excepción de lo aquí establecido, Bell'O no tiene obligación o responsabilidad para con usted o cualquier otra
persona o entidad con respecto a cualquier responsabilidad, pérdida o daño causado directo o indirectamente por el uso
del Producto, incluido, de manera taxativa, cualquier daño incidental o resultante. Algunos estados no autorizan
limitación sobre el tiempo de cobertura de una garantía implícita sobre la exclusión o limitación de daños incidentales
o resultantes. En consecuencia, las limitaciones y exclusiones antes mencionadas podrían no corresponder.
Esta Garantía cubre solo la reparación o reemplazo de este soporte tal como se declara arriba.
Esta Garantía le otorga derechos legales específicos. Usted también puede tener otros derechos, que variarán de estado
en estado.
Tenga en cuenta: Usted es responsable de inspeccionar meticulosamente su soporte en busca de partes o piezas faltantes o
defectuosas inmediatamente después de abrir la caja. Para recibir el reemplazo o la(s) parte(s) o pieza(s) faltante(s) cubiertas por
la presente garantía, ingrese a nuestro sitio web www.bello.com o llame a nuestro Departamento de atención al cliente al
1-888-235-7646. Tenga a mano el número de modelo, código de fecha, número(s) de la parte o pieza y su recibo de venta u
otra prueba de adquisición disponible como referencia. Bell’O le enviará cualquier parte o pieza de reemplazo sin cargo en los
Estados Unidos o Canadá.
32
GARANZIA LIMITATA A VITA
Questo prodotto di supporto SKU # 7760 (“Prodotto”) di Bell’O International, Corp. (“Bell’O” o “noi”) è coperto da
garanzia per la durata della vita del Prodotto unicamente per l'acquirente originale e solo per l'installazione originale
(“Garanzia”). La reinstallazione del Prodotto in posizione diversa, o con schermo o periferica diversi, rende questa
Garanzia nulla. Questa Garanzia vale unicamente negli Stati Uniti d'America e in Canada. Per clienti in altri paesi,
contattare il distributore locale per informazioni di garanzia specifiche per il paese in questione.
Garantiamo all'acquirente originale che il Prodotto e tutte le sue parti e componenti sono privi di difetti in materiale e
lavorazione. I “Difetti”, in questa Garanzia, sono definiti come imperfezioni che impediscono il corretto funzionamento
del Prodotto.
La nostra Garanzia è esplicitamente limitata a parti e componenti di montaggio da sostituire. Bell’O sostituirà qualsiasi
parte – indicata nell'elenco delle parti, accluso – che sia difettosa in materiale o lavorazione solo nel caso in cui il
richiedente sia l'acquirente originale, con le limitazioni qui indicate.
Questa garanzia si applica solo in condizioni di utilizzo normale. Il Prodotto non è inteso per un uso esterno. Questa
Garanzia non copre: 1) difetti dovuti a installazione o disinstallazione scorretta; 2) difetti dovuti a spedizione
(le richieste di danni avvenuti durante il trasporto devono essere inoltrate immediatamente dall'acquirente al
corriere/trasportatore); 3) difetti verificatisi dopo l'acquisto dovuti a modifiche, danno intenzionale, incidente, uso
improprio, abuso, negligenza, disastri naturali, condizioni meccaniche o ambientali fuori dalla norma, disassemblaggio
non autorizzato, riparazione, modifica o esposizione agli elementi atmosferici; 4) danni cosmetici, e 5) costi di
manodopera o di assemblaggio.
Questa Garanzia non è valida se il Prodotto è stato reimballato o venduto di seconda mano.
Non vi sono garanzie, esplicite o implicite, incluse senza limitazione la commerciabilità o idoneità per un uso
particolare, eccetto quanto (i) qui contenuto o (ii) richiesto dalla legge in vigore in uno Stato particolare. La legge
sostanziale e processuale dello Stato del New Jersey disciplina questa Garanzia in assenza di un’altra legge superiore che
assegni la giurisdizione a un altro Stato in veste di foro competente. Il Tribunale Superiore del New Jersey o il Tribunale
Distrettuale degli Stati Uniti per il Distretto del New Jersey, come meglio appropriato, avranno giurisdizione esclusiva
sull'applicazione di questa Garanzia e su tutto quanto in essa contenuto. Qualsiasi garanzia, di qualsiasi derivazione di
essa, sarà limitata ai termini qui contenuti, tranne quando diversamente richiesto dalla legge applicabile.
Non è consentito fare affidamento a dichiarazioni di produttori, dipendenti o rappresentanti, sia orali che scritte,
quando queste modificano questa Garanzia e non sono parte del contratto di acquisto o di questa Garanzia.
Salvo quanto qui indicato, Bell’O non è responsabile nei confronti dell'acquirente o di qualsiasi altra persona o entità
per qualsiasi rivendicazione, perdita o danno causati direttamente o indirettamente dall'uso del Prodotto, inclusi, ma non
limitatamente a, danni incidentali o indiretti. Alcuni Stati non consentono limitazioni sulla durata di una garanzia
implicita o l'esclusione o limitazione di danni incidentali o indiretti. Le sopramenzionate limitazioni potrebbero pertanto
non essere pertinenti.
Questa Garanzia copre unicamente le riparazioni e/o le sostituzioni relative a questo supporto, come specificato sopra.
Questa Garanzia conferisce al proprietario diritti legali specifici. Potrebbero esistere altri diritti, che variano da Stato a
Stato.
Nota bene: l'acquirente è responsabile dell'ispezione accurata del supporto, per poter denunciare le parti mancanti o difettose
immediatamente dopo aver aperto l'imballaggio. Per ricevere le parti di sostituzione o quelle mancanti coperte da questa
Garanzia, visitare il nostro sito Web www.bello.com o chiamare il nostro Reparto di Assistenza ai Clienti (Customer Service
Department) al numero verde 1-888-235-7646 (valido solo in USA e Canada). Si prega di avere sotto mano il numero del
modello, il codice di data, il numero delle parti e la ricevuta o altra prova di acquisto, per riferimento. Negli Stati Uniti e in
Canada le parti di sostituzione saranno inviate a nostre spese.
33
BESCHRÄNKTE GARANTIE AUF LEBENSZEIT
Eine Gewährleistung für dieses Montageprodukt SKU Nr. 7760 (das "Produkt") von Bell’O International Corporation
(“Bell’O” oder “wir”) wird für die Lebenszeit des Produkts nur dem ursprünglichen Käufer gegenüber zugesichert und
beschränkt sich auf die ursprüngliche Installation ("Gewährleistung"). Eine erneute Installation des Produkts an einer anderen
Stelle oder mit einem anderen Monitor oder an einer anderen Außenfläche macht diese Garantie ungültig. Diese Garantie ist
nur gültig in den Vereinigten Staaten von Amerika und Kanada. Kunden außerhalb der Vereinigten Staaten und Kanada setzen
sich bitte mit dem Vertriebsunternehmen ihres jeweiligen Landes für spezifische Garantieinformationen in Verbindung.
Wir garantieren dem ursprünglichen Käufer gegenüber, dass das Produkt samt aller Teile und Bestandteile mangelfrei ist
und keine Bearbeitungsschäden hat. Der in dieser Gewährleistung verwendete Begriff "Mangel" bzw. "Mängel" wird als
Unvollkommenheiten definiert, die den Gebrauch des Produkts beeinträchtigen.
Unsere Garantie beschränkt sich ausdrücklich auf den Ersatz der Montageteile und -bestandteile. Bell’O ersetzt nur
dem ursprünglichen Besitzer im Rahmen der hier aufgeführten Einschränkungen alle auf dem im Lieferumfang
inbegriffenen Bogen für Montageteile aufgeführten Teile, die mangelhaft sind oder Bearbeitungsschäden aufweisen.
Diese Gewährleistung findet nur Anwendung bei normalem Gebrauch. Dieses Produkt ist nicht für den Gebrauch im Freien
ausgeführt. Diese Garantie umfasst nicht das Folgende: 1) durch unsachgemäße Installationen oder Demontagen bewirkte
Mängel; 2) durch den Versand bewirkte Mängel (alle Ansprüche auf Schadenersatz während des Transports sollten umgehend
von Ihnen bei der Frachtgesellschaft erhoben werden); 3) nach dem Kauf auftauchende Mängel auf Grund vorgenommener
Änderungen, absichtlicher Beschädigung, Unfällen, falscher Anwendung, Missbrauch, Fahrlässigkeit, Naturkatastrophen,
unbefugter Demontage, Reparatur, Änderung am oder das Aussetzen des Produkts den Naturgewalten; 4) kosmetischer
Schaden, und 5) Arbeits- oder Montagekosten.
Diese Gewährleistung ist dann nicht gültig, wenn das Produkt wiederverpackt oder als Gebrauchtware wiederverkauft
wurde.
Es bestehen weder ausdrückliche noch stillschweigend mitgefolgerte Gewährleistungen, und zwar einschließlich und ohne
Einschränkungen von Gewährleistungen der Eignung für einen spezifischen Gebrach, ausgenommen des (i.), hier
Enthaltenen, oder (ii.), des von anwendbarem Gesetz in dem Staat Vorgeschriebenen, in dem dieses Gesetz Anwendung
findet. Das materielle und Verfahrensrecht des Bundesstaats New Jersey regelt diese Gewährleistung in Abwesenheit von
herrschendem Recht, welches das Gesetz eines anderen Staates statt dessen als herrschendes Recht auferlegt. Das
Kammergericht von New Jersey [Superior Court] oder das Bezirksgericht der Vereinigten Staaten [United States District
Court] für den Bezirk New Jersey wird soweit erforderlich ausschließlich für die Durchsetzung dieser Gewährleistung und
sämtliche diesbezügliche Sachen zuständig sein. Alle Gewährleistungen jeglicher Herkunft werden auf die hier aufgeführten
Bedingungen beschränkt, solange nichts Anderweitiges vom anwendbaren Recht vorgeschrieben wird.
Sie sollen sich nicht auf die mündlichen oder schriftlichen Aussagen des Herstellers, der Mitarbeiter oder Vertreter
verlassen, die weder diese Gewährleistung verändern noch einen Teil entweder Ihres Verkaufsvertrags oder dieser
Gewährleistung darstellen.
Ausgenommen dem hier Aufgeführten ist Bell’O Ihnen oder anderen Personen oder Unternehmen gegenüber in Bezug
auf eine Haftung, den Verlust oder Schaden weder haftpflichtig noch verantwortlich, der unmittelbar oder mittelbar
durch den Gebrauch dieses Produkts hervorgerufen wurde, jedoch nicht beschränkt auf irgendwelche beiläufig
entstandenen Schäden oder Folgeschäden. Bestimmte Staaten erlauben keine Einschränkung darauf, wie lange eine
stillschweigend mitgefolgerte Gewährleistung oder Einschränkung beiläufig entstandener Schäden oder Folgeschäden
dauern kann. Aus diesem Grund finden die weiter oben aufgeführten Einschränkungen unter Umständen keine
Anwendung auf Sie.
Diese Gewährleistung erstreckt sich nur auf die Reparatur oder den Ersatz dieser Befestigung, wie weiter oben
angegeben.
Diese Gewährleistungen gibt Ihnen besondere Rechte! Sie könnten u.U. auch andere Rechte haben, die von
Bundesstaat zu Bundesstaat unterschiedlich sein können.
Bitte beachten sie: Sie tragen die Verantwortung dafür, dass Ihre Befestigung ordnungsgemäß auf fehlende oder mangelhafte
Teile umgehend nach Öffnen des Kartons überprüft wird. Um Ersatzteile oder fehlende Teile gemäß dieser Garantie zu erhalten,
besuchen Sie bitte unsere Website www.bello.com oder rufen Sie unsere Kundendientsabteilung unter 1-888-235-7646 an. Bitte
haben Sie Ihre Modell-Nummer, Datumscode, Teilenummer(n) und Ihre Verkaufsquittung oder sonstigen Kaufbeleg griffbereit
zum Verweis. Bell’O wird Ihnen sämtliche erforderlichen Ersatzteile in den Vereinigten Staaten oder Kanada zu Bell’Os Kosten
zuschicken.
34
ОГРАНИЧЕННАЯ ПОЖИЗНЕННАЯ ГАРАНТИЯ
Фирма Bell’O International, Corp. (“Bell’O” или “мы”) дает гарантию на кронштейн SKU # 7760 (“Продукт”)
на время жизни Продукта только первоначальному покупателю и только на первую установку
(“Гарантия”). Повторная установка Продукта в другом месте, либо с другим монитором или с другой
периферийной аппаратурой аннулирует эту Гарантию. Эта Гарантия имеет силу только в Соединенных
Штатах Америки и Канаде. Мы просим клиентов за пределами Соединенных Штатов и Канады
обращаться к поставщику в вашей стране для получения информации о гарантии для вашей страны.
Мы даем гарантию первоначальному покупателю на отсутствие дефектов материала и дефектов
изготовления Продукта и всех его деталей и компонентов. Термин «Дефекты» в этой Гарантии означает
любые недостатки, влияющие на использование Продукта.
Наша Гарантия прямо предусматривает только замену деталей и компонентов кронштейна. Фирма Bell’O
произведет замену любой указанной в прилагаемом списке деталей кронштейна детали с дефектами
материала или изготовления, только первоначальному покупателю с учетом указанных в этом документе
ограничений.
Эта Гарантия действует только при условии нормальной эксплуатации. Продукт не предназначен для
использования на открытом воздухе. Эта Гарантия не распространяется: 1) на дефекты, возникшие из–за
неправильной установки или разборки; 2) на дефекты, возникшие при доставке (требования о
возмещении ущерба во время доставки Продукта вам должны быть сразу предъявлены вами
непосредственно транспортной фирме; 3) на дефекты, возникшие после покупки из–за модификации,
намеренного повреждения, аварии, неправильного использования, плохого обращения, неосторожности,
стихийного бедствия, ненормальных механических условий или условий внешней среды, неразрешенной
разборки, ремонта, модификации или из–за воздействия природных явлений; 4) на косметические
дефекты; и 5) на стоимость работы или сборки.
Эта Гарантия не действительна, если Продукт был переупакован или перепродан как бывший в
употреблении.
Не предоставляются явные или подразумеваемые гарантии, включая, без всяких ограничений, гарантии на
пригодность для продажи или соответствие определенному назначению, за исключением (i) того, что
указано в этом документе или (ii) требуется в соответствии с действующим законодательством штата, где
оно применимо. Материальное и процессуальное право штата Нью–Джерси будет применяться к этой
Гарантии, если только правовое регулирование не предусматривает в качестве применимого права
применение законодательства другого штата. Верховный суд штата Нью–Джерси или Окружной суд
Соединенных Штатов по округу Нью–Джерси будут иметь исключительную юрисдикцию над
принудительным выполнением этой Гарантии и всех вопросов, имеющих отношение к предмету этой
Гарантии. Любые производные гарантии будут ограничены оговоренными в этом документе условиями,
если только применимое законодательство не требует другого.
Вы не должны полагаться на заявления производителей, сотрудников или представителей, сделанные в
устной или письменной форме, которые не будут рассматриваться как модификация этой Гарантии и
которые не будут являться ни частью вашего контракта на покупку, ни этой Гарантии.
За исключением описанного в данном документе, фирма Bell’O не несет никакой ответственности ни перед
вами, ни перед другим физическим или юридическим лицом ни за какие обязательства, потери или ущерб,
прямо или косвенно вызванные использованием Продукта, включая, но не ограничиваясь ими, случайные
или косвенные убытки. Некоторые штаты не разрешают накладывать ограничения на то, сколько времени
может действовать подразумеваемая гарантия, либо исключать или ограничивать случайные или
косвенные убытки. Поэтому приведенные выше ограничения и исключения могут на вас не
распространяться.
Эта Гарантия распространяется только на ремонт или замену этого кронштейна, как указано выше.
Эта Гарантия предоставляет вам конкретные юридические права. У вас также могут быть другие права,
которые зависят от штата.
Внимание. Вы несете ответственность за тщательный осмотр настенного кронштейна сразу после
открытия коробки и за проверку того, что все детали имеются в наличии и что они без дефектов. Для
замены дефектных деталей по гарантии или получения отсутствующих деталей обратитесь на наш
сайт www.bello.com или позвоните в наш отдел обслуживания по телефону 1-888-235-7646. Для этого
нужно знать номер модели, код даты, номер детали (деталей) и иметь квитанцию или другое
доказательство покупки для ссылок. Фирма Bell’O за свой счет вышлет вам все необходимые для замены
детали в пределах Соединенных Штатов или Канады.
35
BELL'O INTERNATIONAL CORPORATION
711 Ginesi Drive, Morganville, NJ 07751
(888) 235-7646 • (732) 972-1333
www.bello.com
2E_0711A