1
Register your product and get support at
02
English
www.philips.com/welcome
Type HD8751
02
EN
OPERATING INSTRUCTIONS
READ THESE INSTRUCTIONS CAREFULLY BEFORE USING THE MACHINE.
IMPORTANT SAFEGUARDS
When using electrical appliances, basic safety precautions should always be
followed, including the following:
1. Read all instructions.
2. Do not touch hot surfaces. Use handles or knobs.
3. To protect against fire, electric shock and injury to persons do not immerse
cord, plugs, or appliance in water or other liquid.
4. Close supervision is necessary when the appliance is used by or near
children.
5. Unplug from outlet when not in use and before cleaning. Allow to cool
before putting on or taking off parts, and before cleaning the appliance.
6. Do not operate any appliance with a damaged cord or plug or after the
appliance malfunctions, or has been damaged in any manner. Return
appliance to the nearest authorized service facility for examination, repair
or adjustment.
7. The use of accessory attachments not recommended by the appliance
manufacturer may result in fire, electric shock or injury to persons.
8. Do not use outdoors.
9. Do not let cord hang over edge of table or counter, or touch hot surfaces.
10. Do not place on or near a hot gas or electric burner, or in a heated oven.
11. Always attach plug to appliance first, then plug cord into wall outlet. To
disconnect, turn any control to “off”, then remove plug from wall outlet.
12. Do not use appliance for other than intended use.
13. Save these instructions.
SAVE THESE INSTRUCTIONS
CAUTION
This appliance is for household use only. Any servicing, other than cleaning
and user maintenance, should be performed by an authorized service center.
Do not immerse machine in water. To reduce the risk of fire or electric shock,
do not disassemble the machine. There are no parts inside the machine
serviceable by the user. Repair should be done by authorized service personnel
only.
1. Check voltage to be sure that the voltage indicated on the nameplate
corresponds with your voltage.
2. Never use warm or hot water to fill the water tank. Use cold water only.
3. Keep your hands and the cord away from hot parts of the appliance during
operation.
4. Never clean with scrubbing powders or harsh cleaners. Simply use a soft
cloth dampened with water.
5. For optimal taste of your coffee, use purified or bottled water. Periodic
descaling is still recommended every 2-3 months.
6. Do not use caramelized or flavored coffee beans.
INSTRUCTIONS FOR THE POWER
SUPPLY CORD
A. A short power-supply cord (or detachable power-supply cord) is to be
provided to reduce risks resulting from becoming entangled in or tripping
over a longer cord.
B. Longer detachable power-supply cords or extension cords are available
and may used if care is exercised in their use.
C. If a long detachable power-supply cord or extension cord is used,
1. The marked electrical rating of the detachable power-supply cord or
extension cord should be at least as great as the electrical rating of the
appliance
2. If the appliance is of the grounded type, the extension cord should be a
grounding-type 3-wire cord, and
3. The longer cord should be arranged so that it will not drape over the
counter top or table top where it can be pulled on by children or tripped
over.
2
1
1
2
3
4
5
6
7
8
9
13
10
11 23
12
14
20
15
16
17
18 19
30
21
24
25
26
27
28
29
22
3
Contents
Introduction.................................................................................................... 4
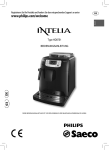
General Description (fig. 1) ............................................................................... 4
Important ....................................................................................................... 4
Intended Use ................................................................................................................................... 5
Power Supply - Power Cord ............................................................................................................. 5
For the Safety of Others................................................................................................................... 5
Danger of Burns .............................................................................................................................. 5
Machine Location - Suitable Location for Operation and Maintenance............................................ 5
Cleaning and Storing the Machine .................................................................................................. 6
Malfunction .................................................................................................................................... 6
Fire Safety Precautions .................................................................................................................... 6
First Use .......................................................................................................... 6
Packaging ....................................................................................................................................... 6
Preliminary Operations ................................................................................................................... 6
Circuit Priming ................................................................................................................................ 8
Rinse/Self-Cleaning Cycle................................................................................................................ 9
For a perfect Espresso: Rinse the coffee circuit if using the machine for the first time or
after a long period of inactivity. ...................................................................................................... 9
"INTENZA+" Water Filter (Optional)..................................................................11
"INTENZA+" Water Filter Installation ........................................................................................... 11
Measuring Water Hardness ..............................................................................12
Espresso Coffee: Brewing and Adjustments.......................................................14
Pre-brewing Technology: Enhancing the Aroma............................................................................ 14
Adjustable Ceramic Coffee Grinder: a Full Aroma Preservation ...................................................... 14
"Aroma" Adjustment: Select Your Favourite Amount ..................................................................... 15
Brewing Coffee ...............................................................................................16
Adjusting the Dispensing Spout .................................................................................................... 16
Using Coffee Beans........................................................................................................................ 17
Using Pre-ground Coffee ............................................................................................................... 17
Adjusting the Coffee Length (MEMO Function) ............................................................................. 18
Hot Water Dispensing .....................................................................................19
Steam Dispensing / Preparing a Cappuccino with Pannarello .............................20
Eco-friendly: Stand-by.....................................................................................21
Stand-by ....................................................................................................................................... 21
Cleaning and Maintenance ..............................................................................21
General Cleaning ........................................................................................................................... 21
Brew Group ....................................................................................................24
Brew Group - Weekly Cleaning ...................................................................................................... 24
Brew Group Cleaning with "Coffee Clean Tablets": ........................................................................ 26
Brew Group Lubrication ................................................................................................................ 28
Descaling .......................................................................................................29
Control Panel Display ......................................................................................32
Troubleshooting .............................................................................................34
Technical Specifications ..................................................................................35
Disposal .........................................................................................................35
Service ...........................................................................................................36
4
ENGLISH
Introduction
Congratulations on your purchase and welcome to Philips!
To fully benefit from the support that Philips offers, register your product at
www.philips.com/welcome.
In this user manual you will find all the information you need to install,
use, clean and descale your appliance. In case you need further support,
please contact the toll free Philips consumer care help line. You can find
the phone number on the last page of this document and in the warranty
booklet supplied with the appliance.
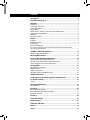
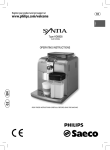
General Description (fig. 1)
1. Grinder adjustment knob
2. Pre-ground coffee compartment
3. Coffee bean hopper
4. Coffee bean hopper lid
5. Control panel
6. Dispensing spout
7. Cup holder grill
8. Full drip tray indicator
9. Drip tray
10. Coffee grounds drawer
11. Brew group
12. Service door
13. Grease for the brew group
14. Power cord
15. Wand protective gripper
16. Pannarello (for hot water/steam wand)
17. Water tank
18. Power cord socket
19. Power button
20. Coffee grinder adjustment key + Pre-ground coffee doser
21. Water hardness test
22. Cleaning brush
23. Coffee residues drawer
24. Espresso coffee brew button
25. Long Espresso brew button
26. Hot water/steam selection button
27. ON/OFF button
28. "Aroma" - Pre-ground coffee button
29. Descaling button
30. Descaling solution
Important
Read this user manual carefully before using the appliance and save it for
future reference.
Never allow water to come into contact with any of the electrical parts of
the machine: Danger of short circuit! Steam and hot water may cause scalding! Do not direct the steam or hot water jet towards body parts. Carefully
handle the steam/hot water spout by its grip: Danger of scalding!
ENGLISH
5
Intended Use
The coffee machine is intended for domestic use only. Do not make any
technical changes or use the machine for unauthorised purposes since this
would create serious hazards! The appliance is not to be used by persons
(including children) with reduced physical, mental or sensory abilities or
with scarce experience and/or expertise, unless they are supervised by a
person responsible for their safety, or they are instructed by this person on
how to properly use the machine.
Power Supply - Power Cord
Only connect the coffee machine to a suitable socket. The voltage must
correspond to that indicated on the machine label located on the inside of
the service door.
Never use the coffee machine if the power cord is defective or damaged.
If the power cord is damaged, it must be replaced by the manufacturer or
by its authorised service centre.
Do not pass the power cord around corners, over sharp edges or over hot
objects and keep it away from oil.
Do not use the power cord to carry or pull the coffee machine.
Do not pull out the plug by the power cord or touch it with wet hands. Do
not let the power cord hang freely from tables or shelves.
For the Safety of Others
Prevent children from playing with the machine. Children are not aware
of the risks related to electrical household appliances. Do not leave the
machine packaging materials within the reach of children.
Danger of Burns
Never direct the jet of hot steam and/or hot water towards yourself or others: Danger of scalding! Always use the handles or knobs provided.
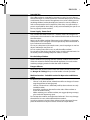
Machine Location - Suitable Location for Operation and Maintenance
For best use, it is recommended to:
• Choose a safe, level surface, where there will be no danger of overturning the appliance or being injured;
• Choose a location that is sufficiently well-lit, clean and near an easily
reachable socket;
• Provide for a minimum distance from the sides of the machine as
shown in the illustration;
• While switching on or off the machine, we suggest placing an empty
glass under the dispensing spout.
Do not keep the machine at temperatures below 0°C. Frost may damage
the machine. Do not use the coffee machine outdoors.
In order to prevent its housing from melting or being damaged, do not
place the machine on very hot surfaces and close to open flames.
6
ENGLISH
Cleaning and Storing the Machine
Keep the machine at its best, clean and store it properly.
Since the machine uses natural ingredients to brew beverages (coffee
beans, water, milk, etc.), some residues of ground coffee or condensed water could be present on its supporting surface. For this reason we recommend to periodically clean both the visible parts of the machine and the
area beneath it.
Before storing the machine we strongly recommend to clean it:
- Water left in the tank and/or the water circuit for several days should
not be consumed. If the machine is going to remain inactive for a long
time, dispense water from the steam wand and carefully clean the Pannarello (if supplied).
- Turn off the power button and clean the machine. Finally, remove the
plug from the socket. Wait for the machine to cool down.
Never immerse the machine in water! Store it in a dry place, out of the
reach of children. Keep it protected from dust and dirt.
It is strictly forbidden to tamper with the internal parts of the machine.
Malfunction
In case of failure, problems or a suspected fault resulting from the falling of
the machine, immediately remove the plug from the socket. Never attempt
to operate a faulty machine.
For further information on troubleshooting and service, please refer to the
"Troubleshooting" and "Service" chapters.
Fire Safety Precautions
In case of fire, use carbon dioxide (CO2) extinguishers. Do not use water or
dry powder extinguishers.
First Use
Packaging
The original packaging has been designed and constructed to protect the
machine during transport. We recommend keeping the packaging material
for possible future transport.
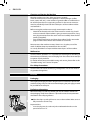
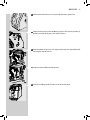
Preliminary Operations
Remove the drip tray with cup holder grill and the coffee machine from
the packaging. Place the machine in a place that meets the requirements
described in the safety regulations.
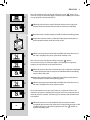
1 Place the drip tray with grill into its seat on the machine. Make sure it is
fully inserted to its limit stop.
Important Note:
- Insert the plug into the socket only when indicated and make sure the
power button is on "0".
ENGLISH
-
7
Carefully read the explanations of all the warnings the machine displays to
the user on the control panel LCD display (chapter "LCD Display Warnings").
NEVER remove the drip tray when the machine is on. Wait for a couple of
minutes after turning on/off, as the machine will be carrying out a rinse/
self-cleaning cycle (see section "Rinse/Self-Cleaning Cycle").
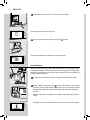
2 Remove the water tank from its seat.
2
1
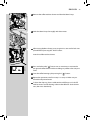
3 Rinse and fill it with fresh water, making sure that the (MAX) level
indicated in the tank is not exceeded. Place the tank back in its place
by pushing it until its limit stop (the external profiles must match).
Fill the tank only with fresh, non-sparkling water. Hot water or any other
liquid may damage the tank and/or the machine. Do not operate the machine without water. Make sure there is enough water in the tank.
4 Remove the coffee bean hopper lid.
Note: The hopper may be provided with different safety features according to
the regulations applicable in the country of use of the machine.
5 Slowly pour the coffee beans into the hopper.
Only coffee beans must be put into the coffee bean hopper. If ground
coffee, instant coffee or any other object is put in the coffee bean hopper, it
may damage the machine.
6 Reposition the coffee bean hopper lid.
7 Insert the plug into the socket on the back of the machine.
1
8 Insert the plug of the other end of the cable into a wall socket with
suitable power voltage.
2
ENGLISH
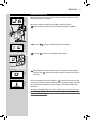
9 Switch the power button to "I" to turn on the machine.
Black
The display shows the Stand-by icon.
10 To turn on the machine simply press the "
" button.
Orange
The display indicates that the circuit must be primed.
Circuit Priming
In order to avoid that any water is left in the circuit for a long time, before
starting the machine for the first time, and after long periods of inactivity,
the water circuit needs to be primed. This is because we want to offer you a
perfect and fresh product.
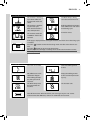
1 To prime the water circuit, place a container under the Pannarello.
2 Select "START" by pressing the "
" button. The machine starts the automatic priming of the circuit by letting out a pre-set quantity of water
through the Pannarello. The bar under the icon shows the operation
progress.
When the process is complete, the machine stops dispensing automatically.
Orange
8
The display shows the machine warm-up icon, as shown in the figure.
Green
Orange
ENGLISH
9
3 Once the warm-up is complete, the machine performs a rinse cycle of
the internal circuits.
During this phase, the icon indicated in the figure will be displayed.
4 When the operations described above are complete, the icon is displayed.
The machine is ready to brew beverages.
5 To brew coffee or dispense hot water or steam, and for a proper use of
the machine, carefully follow the instructions provided.
Note: If the machine is being used for the first time or after a long period of
inactivity, follow the procedures described in the following section.
Rinse/Self-Cleaning Cycle
Orange
After the automatic priming of the circuit, the machine will automatically
rinse/clean the circuit. This cycle allows rinsing the internal coffee circuits
with fresh water. The cycle is automatically performed also in the following
conditions:
• At machine start-up (with cold boiler)
• After priming the circuit (with cold boiler)
• During the Stand-by preparation phase (if a coffee product has been
brewed)
• During the turning off phase after pressing the ON/OFF button (if a
coffee product has been brewed).
A small amount of water will be dispensed to rinse and heat all the machine components; in this phase this icon is displayed.
We strongly recommend to wait for the cycle to finish automatically.
You can stop dispensing by pressing the “ ” button.
For a perfect Espresso: Rinse the coffee circuit if using the machine
for the first time or after a long period of inactivity.
Besides the rinse/self-cleaning cycle, we recommend you to run these
simple operations to always brew excellent espresso.
They have to be performed:
A) At first start-up;
B) When the machine remains inactive for a long time (more than 2
weeks).
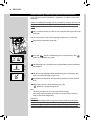
1 Place a large container under the dispensing spout.
Green
Green
ENGLISH
Before starting the procedure, check that the following icon is displayed.
2 Select the pre-ground coffee brewing function by pressing the "
"
button one or more times, until the following icon is displayed.
Note: Do not add pre-ground coffee into the compartment.
3 Press the "
" button. Wait until the dispensing procedure is complete
and empty the water tank.
4 Repeat the operations from step 1 to step 3 for 3 times, then continue
with step 5.
5 Place a container under the Pannarello.
Green
10
6 Press the "
" button. The following icon is displayed.
7 Press the "
" button to start dispensing hot water. Dispense water
until the no water signal appears.
8 At the end, fill the water tank again. Then the products can be brewed
as described in the following sections.
ENGLISH 11
"INTENZA+" Water Filter (Optional)
The "INTENZA+" water filter can improve the quality of water. Using the
"INTENZA+" filter will prevent limescale from building up and will ensure a
much more intense aroma to your espresso coffee. We therefore recommend you to install the "INTENZA+" water filter. You can purchase it at your
local dealer or on-line at the Philips on-line shop at http://shop.philips.com.
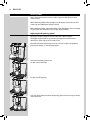
"INTENZA+" Water Filter Installation
1 Remove the small white filter from the tank and store it in a dry place
sheltered from dust.
2 Remove the "INTENZA+" water filter from its packaging, immerse it
vertically (with the opening positioned upwards) in cold water and
delicately press the sides so as to let the air bubbles out.
Measuring water hardness is very important in order to correctly manage
the "INTENZA+" water filter and the frequency with which the machine
must be descaled.
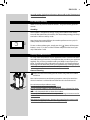
3 The filter should be set according to the measurements performed to
set the water hardness. Use the water hardness test strip provided with
the machine. Set the "Intenza Aroma System" as specified on the filter
packaging (see section "Measuring Water Hardness").
A = Soft water
B = Hard water (standard)
C = Very hard water
4 Put the filter into the empty tank. Press it until its limit stop.
5 Fill the tank with fresh drinking water and reinsert it into the machine.
6 Dispense the water in the tank by using the hot water function (see
section "Hot Water Dispensing”).
7 Fill the water tank again.
Orange
Orange
ENGLISH
8 Press the "
" button and scroll the pages by pressing the "
button until the following page is displayed.
9 Press the "
" button to select "ON" and press the "
"
" button to
confirm.
Orange
Orange
In this way the machine has been programmed to inform the user of
the need to replace the filter.
Green
12
Note: When an "INTENZA+" water filter must be replaced with a new one, the
function must be reset. Replace the filter as previously shown.
After that, enter the programming menu until the indicated page is displayed
" button. The machine is now
and select the "RESET" option. Then press the "
programmed to manage a new filter.
Note: If the filter is already installed and you want to remove - but not replace " button.
it, select the "OFF" option and then press the "
10 To exit, press the "
" button until the home page is displayed.
Note: If there is no "INTENZA+" water filter, insert the small white filter previously removed into the water tank.
Measuring Water Hardness
Measuring water hardness is very important in order to correctly manage
the "INTENZA+" filter and the frequency with which the machine must be
descaled.
1 Immerse in water the water hardness test strip provided with the
machine for 1 second.
Note: The test strip is only valid for one measurement.
2 Check how many squares change colour and refer to the table.
Note: The letters correspond to the references that are located in the base of
the Intenza filter. The filter must be adjusted according to this measurement.
ENGLISH 13
2
3
4
Machine water hardness setting
Orange
1
hardness adjustment, shown in the programming chapter.
More precisely:
1 = 1 (very soft water)
2 = 2 (soft water)
3 = 3 (hard water)
4 = 4 (very hard water)
4 Once you know this value, set the water hardness value.
" button and scroll the pages by pressing the "
Press the "
button until the following page is displayed.
"
Orange
Note: The machine is supplied with a standard adjustment suitable for most of
the uses.
5 Press:
The "
" button to increase the value
or
the "
Green
Intenza Aroma System
B
A
C
3 The numbers correspond to the settings that are found for the water
" button to reduce the value.
6 Press the "
" button to confirm the adjustment.
7 Press the "
" button to exit and brew the products.
14
ENGLISH
Espresso Coffee: Brewing and Adjustments
The machine you have bought works with coffee beans and/or pre-ground
coffee. It allows for certain adjustments that will permit you to use it to its
full potential and get a complete "Espresso experience".
Saeco Adapting System: An intelligent self-adjusting system that allows the
use of all types of coffee beans available on the market.
Coffee is a natural product and its characteristics may change according
to its origin, blend and roast. The Saeco coffee machine is equipped with a
self-adjusting system that allows the use of all types of coffee beans available on the market (non caramelised).
• The machine automatically adjusts itself in order to optimise the
extraction of the coffee, ensuring perfect compression of the tablet to
obtain a creamy espresso coffee that will release all the aromas, regardless of the type of coffee used.
• The optimisation process is a learning process that requires the brewing of a certain number of coffee cups to allow the machine to adjust
the compactness of the ground coffee.
• Attention should be given to special blends, which require grinder
adjustments in order to optimise the extraction of coffee - (see section
"Adjusting the Coffee Grinder").
Pre-brewing Technology: Enhancing the Aroma
Thanks to the Pre-brewing Technology, ground coffee is moistened before
the actual brewing process, ensuring that the aroma can unfold even better.
Adjustable Ceramic Coffee Grinder: a Full Aroma Preservation
The ceramic grinders always guarantee accurate grinding for every coffee
blend. In addition, this technology prevents the beans from overheating.
These two combined factors provide for a full aroma preservation, delivering the truly Italian taste in every cup.
Warning! The grinder adjustment knob, which is placed inside the coffee bean hopper, must be turned with the Coffee grinder adjustment
key only when the coffee grinder is working. Do not put any material
other than coffee beans into the hopper. Do not pour ground and/or
instant coffee into the coffee bean hopper.
Warning: The coffee grinder contains moving parts that may be dangerous.
Therefore, do not insert fingers and/or other objects. In case of malfunction, turn off the appliance by pressing the ON/OFF button and remove the
plug from the socket before carrying out any type of operation inside the
coffee bean hopper. Do not pour coffee beans when the coffee grinder is
working.
The machine allows you to make slight adjustments to the coffee grinder
to adapt it to the kind of coffee used.
The adjustment must be performed by means of the pin located inside the
coffee bean hopper. This must be pressed and turned using the supplied
key only.
ENGLISH 15
Press and turn the pin one notch at a time and brew 2-3 cups of coffee; this
is the only way to notice differences in grind.
The reference marks inside the coffee bean hopper indicate the grind setting. There are 5 different grind settings to choose from with the following
references:
1 - Coarse Grind: Lighter taste, for dark roasted coffee blends;
2 - Fine Grind: Bolder Taste, for light roasted coffee blends.
2
"Aroma" Adjustment: Select Your Favourite Amount
Choose your favourite coffee blend and adjust the amount of coffee to be
ground until they meet your personal taste. The machine is set-up to adjust
the amount according to the coffee to be ground.
Green
Four choices are possible by pressing and releasing the "
medium or strong aroma, and pre-ground coffee.
" button: Mild,
Selection can be made when the beans appear on the display.
Each time the " " button is pressed and released, the aroma changes by
one degree, according to the selected amount:
= Mild aroma
= Medium aroma
= Strong aroma
Note: Selection must be made prior to select coffee. The system sets the aroma
according to the personal taste of the user.
After selecting "Strong aroma", the function for brewing coffee with preground coffee is displayed.
Green
1
This selection is displayed by the icon on the side.
Refer to the relevant section to use this function.
16
ENGLISH
Brewing Coffee
Note: Should the machine not brew coffee, make sure that the water tank
contains water.
Before brewing coffee check the lights on the display and make sure the
water tank and coffee bean hopper are full.
Before brewing coffee, adjust the height of the dispensing spout according
to your needs and select the aroma or pre-ground coffee.
Adjusting the Dispensing Spout
Most cups on the market can be used with this coffee machine.
The height of the dispensing spout may be adjusted to better fit the
dimensions of the cups that you wish to use.
Manually move the dispensing spout up or down to adjust its height by
placing your fingers as shown in the figure.
The recommended positions are:
For the use of small cups;
For the use of large cups.
Two cups can be placed under the dispensing spout to brew two cups of coffee
at the same time.
ENGLISH 17
Using Coffee Beans
To brew a cup of espresso coffee, press and release:
1 The " " button to select the desired Aroma;
2 The "
Green
Green
or
the "
" button for a cup of espresso;
" button for a cup of long espresso.
The brewing cycle then starts:
To brew 1 cup of coffee, press the button once. This icon will be displayed.
To brew 2 cups of coffee, press the button twice consecutively. This
icon will be displayed.
Note: To brew 2 cups of coffee, the machine automatically grinds and doses the
correct amount of coffee. Brewing two coffees requires two grinding cycles and
two brewing cycles, which the machine carries out automatically.
3 Once the prebrewing cycle is complete, coffee begins to come out of
the dispensing spout.
4 The coffee brewing process stops automatically. It is nevertheless
possible to interrupt the coffee brewing process by pressing the “
"STOP" button.
”
Using Pre-ground Coffee
This function allows using pre-ground and decaffeinated coffee.
Green
Pre-ground coffee must be poured into the relevant compartment positioned next to the coffee bean hopper. Only use ground coffee for espresso
machines and never coffee beans or instant coffee.
Note:
If no pre-ground coffee is poured into the compartment, only water will be
dispensed.
If the dose is excessive and 2 or more measuring scoops of coffee are used, the
machine will not brew the product. Also in this case, the machine will run an
empty cycle and discharge any ground coffee into the coffee grounds drawer.
To brew coffee:
1 Press and release the " " button one or more times to select and
activate the pre-ground coffee function.
2 Lift the pre-ground coffee compartment lid.
Add only 1 scoop of pre-ground coffee to the compartment. Use only
the measuring scoop supplied with the machine to perform this operation. Then, close the lid.
ENGLISH
Warning: Add only pre-ground coffee to the compartment. Other substances and objects may cause severe damages to the machine. Such
damages will not be covered by warranty.
3 Press and release:
The "
or
the "
" button for a cup of espresso
" button for a cup of long espresso.
4 The brewing cycle then starts. Once the prebrewing cycle is complete,
coffee begins to come out of the dispensing spout.
5 The coffee brewing process stops automatically. It is nevertheless
possible to interrupt the coffee brewing process by pressing the “
"STOP" button.
”
After brewing the product, the coffee beans configuration of the machine is restored.
Note: Repeat the steps described above to brew other coffees.
Adjusting the Coffee Length (MEMO Function)
The machine allows you to adjust the amount of brewed coffee according
to your taste and/or the size of your cups.
Each time the “ ” or “ ” button is pressed and released, the machine
brews a pre-set amount of coffee. This amount may be reprogrammed
according to your taste. Each button may be individually programmed for a
specific brew setting.
Note: As an example, the following procedure describes the programming of
the " " button, which is usually associated with espresso coffee.
1 Place a cup under the dispensing spout.
Green
2 Press and hold the"
Green
18
" button until the "MEMO" icon is displayed. The
machine is now programming.
The machine begins the brewing phase. The "STOP" icon is displayed.
3 From now on, press the "
" button when the desired amount of cof-
fee is reached in the cup.
Now the " " button has been programmed; each time it is pressed and
released, the machine will brew the same amount that has just been set.
ENGLISH 19
Green
Hot Water Dispensing
Before dispensing hot water, check that the machine is ready to use and
the following icon is displayed.
Green
When the machine is ready to brew coffee, proceed as follows:
1 Place a container under the steam wand (Pannarello, if supplied).
2 Press the "
3 Press the "
" button. The following icon is displayed.
" button to start dispensing hot water.
Orange
Green
4 Pour the desired amount of hot water. To stop the hot water dispensing press the "
ing mode.
" button. The machine returns to the normal operat-
Note: It may happen that, even though the " " button has been pressed, hot
water does not come out and the following icon is displayed. Simply wait until
the end of the warm-up phase so that hot water can be dispensed from the
Pannarello.
Warning: At the beginning, short spurts of hot water may come out: Danger of scalding. The hot water wand may reach high temperatures: Do not
touch it with bare hands.
ENGLISH
Steam Dispensing / Preparing a Cappuccino with Pannarello
Steam may be used to froth milk for a cappuccino, as well as to heat other
beverages.
Danger of scalding! Dispensing may be preceded by small jets of hot water.
The steam wand may reach high temperatures: Never touch it with bare
hands.
1 Fill 1/3 of the container you wish to use to prepare the cappuccino with
cold milk.
Note: To ensure better results when preparing a cappuccino, use cold milk.
Orange
Green
2 Immerse the Pannarello in the milk.
3 Press the "
" button. The following icon is displayed. Press the "
button to start dispensing steam.
"
4 The following icon is displayed during the preheating time required by
the machine.
5 The dispensing will begin when the following icon is displayed; soon
Green
20
after only steam will begin to come out.
6 Rotate the container with slow upward movements to obtain uniform
froth.
7 After using steam for the desired time, press the
"
" button to stop dispensing steam.
Note:
- The same procedure can be used to heat other beverages.
- After using steam to prepare a beverage, it is possible to brew coffee or
dispense hot water straight after.
Important:
CLEANING: Immediately after using steam to froth milk, clean the steam
wand/Pannarello. When the machine is ready, dispense a small amount of
hot water in a glass and clean the steam wand (or Pannarello when supplied) externally. This allows to maintain all parts perfectly clean and free of
ENGLISH 21
any milk residue. For further information, please refer to the "Cleaning and
Maintenance" chapter.
Eco-friendly: Stand-by
Intelia is also very kind to the environment – for great taste in good conscience.
Stand-by
Black
The machine is designed for energy saving. The machine automatically
turns off after 30 minutes of inactivity. This feature keeps energy consumption below 1 Wh in stand-by mode.
Note: During the turning off phase, the machine performs a rinse cycle, if a
coffee product has been brewed.
To turn on the machine again, simply press the " " button (if the power
button is set to "I"). In this case the machine will perform the rinse cycle
only if the boiler is cold.
Cleaning and Maintenance
As some of the components of your appliance come in contact with water
and coffee during normal use, it is important that you clean your appliance
regularly. This is an easy procedure with your Philips-Saeco Espresso machine. Just follow the steps indicated on the display and described below.
Not doing this will ultimately make your appliance stop working properly,
and in this case repair is not covered under your warranty.
General Cleaning
1 Empty and clean the coffee grounds drawer daily, with the machine
turned on.
Note: Other maintenance and cleaning operations can only be carried out
when the machine is cold and disconnected from the electrical network.
Do not immerse the machine in water.
Do not wash any of its parts in the dishwasher.
Do not use sharp objects or harsh chemical products (solvents) for cleaning.
Use a soft, dampened cloth to clean the machine.
Do not dry the machine and/or its components using a microwave and/or
standard oven.
After brewing milk beverages, dispense hot water from the steam wand
(Pannarello, if supplied) to obtain a thorough cleaning.
22
ENGLISH
2 Every day, after heating the milk, remove the external part of the Pannarello (if supplied) and wash it with fresh drinking water.
3 Clean the steam wand weekly. In order to do this, perform the following operations:
- Remove the external part of the Pannarello (for standard cleaning);
- Remove the upper part of the Pannarello from the steam wand;
- Wash the upper part of the Pannarello with fresh drinking water;
- Wash the steam wand with a wet cloth and remove any milk residue;
- Reposition the upper part in the steam wand (make sure it is completely inserted);
- Reassemble the external part of the Pannarello.
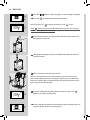
4 It is recommended to clean the water tank daily:
-
1
2
-
-
Remove the "INTENZA+" water filter (or remove the small white
filter if you have not yet installed the "INTENZA+" water filter) from
the water tank and wash it under running drinking water;
Reposition the "INTENZA+" water filter (or the small white filter if
you have not yet installed the "INTENZA+" water filter) in its housing by gently pressing and turning it at the same time;
Fill the water tank with fresh drinking water.
5 Empty and clean the drip tray daily. Perform this operation also when
the float is raised.
ENGLISH 23
6 When emptying the coffee grounds drawer it is also necessary to
empty and clean the coffee residues drawer. Open the service door,
remove the drawer and empty the coffee grounds.
After emptying the drawer, insert it again in its housing until it locks into place.
7 If you use the pre-ground coffee compartment, clean it every week
with the supplied brush.
8 Also clean the seat of the tray every week through the openings on the
bottom of the machine.
24
ENGLISH
Brew Group
Brew Group - Weekly Cleaning
The brew group should be cleaned every time the coffee bean hopper is filled or
at least once a week.
1 Turn off the machine by pressing the power button and remove the
plug from the socket.
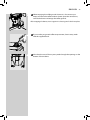
2 Remove the coffee grounds drawer. Open the service door.
3 Remove and clean the coffee residues drawer.
4 Remove the brew group: Pull it by the handle and press the «PUSH»
button. The brew group must be washed only with lukewarm water
with no detergent.
5 Wash the brew group with lukewarm water and carefully wash the upper filter. Before placing the Brew Group in its housing, make sure there
is no water left in the brewing chamber.
6 Make sure the Brew Group is in the rest position; the two reference
signs must match.
If they do no match, proceed as described in step (7).
ENGLISH 25
7 Make sure that the lever is in contact with the brew group base.
8 Make sure the hook to lock the Brew Group is in the correct position; to
check its position firmly press the "PUSH" button.
9 Insert the Brew Group in its seat again until it locks into place WITHOUT
pressing the "PUSH" button.
10 Insert the clean coffee residues drawer.
11 Insert the coffee grounds drawer. Close the service door.
ENGLISH
Brew Group Cleaning with "Coffee Clean Tablets":
Besides weekly cleaning, we recommend running the cleaning cycle with
"Coffee Clean Tablets" after approximately 500 cups of coffee or once a
month. This operation completes the maintenance process of the brew
group.
The "Coffee Clean Tablets" to clean the Brew Group and the "Maintenance
Kit" may be purchased at your local dealer, at the Philips on-line shop at
http://shop.philips.com or at authorised service centres.
Warning: The "Coffee Clean Tablets" has no descaling property. For descaling use the Saeco descaling solution and follow the procedure described in
the "Descaling" chapter.
1 Place a cup under the coffee dispensing spout.
2 Make sure the water tank is filled with clean water up to the "MAX"
level.
3 Put a Coffee Clean tablet in the pre-ground coffee compartment.
Green
26
4 Press and release the "
" button one or more times to select and
activate the pre-ground coffee function without adding any ground
coffee.
5 Start one coffee brew cycle pressing the "
" button.
6 When half a cup of water has been dispensed, turn off the appliance
using the power button and let the solution take effect for approximately 15 minutes. Make sure you discard the dispensed water.
7 Turn on the appliance and wait until the rinse cycle is complete.
ENGLISH 27
8 Remove the coffee residues drawer and then the Brew Group.
9 Wash the Brew Group thoroughly with clean water.
10 After rinsing the Brew Group, insert it again in its seat until it locks into
place WITHOUT pressing the "PUSH" button.
Insert the coffee residues drawer.
Green
11 Press and release the "
" button one or more times to activate the
pre-ground coffee function without adding any coffee to the compartment.
12 Start the coffee brewing cycle pressing the "
" button.
13 Repeat the operation twice from step 11 to step 12. Make sure you
discard the dispensed water.
14 To clean the drip tray, place a tablet inside and fill it up to 2/3rds full
with hot water. Let the cleaning solution take effect for about 30 minutes, then rinse abundantly.
28
ENGLISH
Brew Group Lubrication
Lubricate the Brew Group after approximately 500 cups of coffee or once a
month. The grease to lubricate the Brew Group and the complete "Service
Kit" may be purchased at your local dealer, at the Philips on-line shop at
http://shop.philips.com or at authorised service centres.
Before lubricating the Brew Group clean it under running water.
1 Lubricate the brew group guides using the Saeco grease only. Apply
the grease evenly on both side guides.
2 Lubricate also the shaft.
ENGLISH 29
3 Insert the Brew Group in its seat again until it locks into place WITHOUT
pressing the "PUSH" button.
Insert the coffee residues drawer.
4 Insert the coffee grounds drawer. Close the service door.
Descaling
Limescale is a natural part of the water used for the machine operation. It
needs to be removed regularly as it may clog the water and coffee circuit of
your appliance.
This is an easy procedure with your Philips-Saeco machine.
The advanced electronics tells you on the display of the machine (in clear
symbols) when descaling is needed. Just follow the steps described below.
Not doing this will ultimately make your appliance stop working properly,
and in this case repair is not covered under your warranty.
Note: In case of conflict, priority must be given to what is indicated in the
operation and maintenance manual over the instructions provided on
separately sold accessories and materials.
Note: Empty the drip tray before performing the descaling cycle.
Use the Saeco descaling product only. Its formula has been designed to
ensure better machine performance and operation for its whole operating
life. If correctly used, it also avoids alterations in the brewed product. The
descaling solution and the complete "Maintenance Kit" may be purchased
at your local dealer, at the Philips on-line shop at http://shop.philips.com or
at authorised service centres.
Warning! Never drink the descaling solution or any products dispensed
until the cycle has been carried out to the end. Never use vinegar as a
descaling solution.
1 Turn on the machine by pressing the "
" button. Wait for the machine
to finish its rinse and warm-up process.
Warning! Remove the "Intenza" filter before adding the descaling solution.
Note: Before descaling, perform the following operations:
- Remove the Pannarello (if supplied) from the steam wand as described in
the "Cleaning and Maintenance" chapter.
- Empty the drip tray.
Orange
ENGLISH
2 Press the "
3 Press the "
" button. Then, the page to start descaling is displayed.
" button to enter the descaling menu.
Red
Note: If you press the "
" button by mistake, press the "
" to quit.
If the " " button is pressed, the descaling cycle starts and it is necessary
to complete it before brewing coffee.
4 Pour the entire content of Saeco concentrated descaling solution into
the appliance water tank.
5 Fill with fresh drinking water up to the MAX level. Place the tank back
into the machine.
6 Place a container under the steam wand.
Note: Use a container of at least 1.5 litre capacity. If you do not have a container of this capacity, pause the cycle by pressing the espresso coffee button,
empty the container, place it under the dispensing spout and restart the cycle
by pressing the same button again.
Red
7 Only after adding the descaling solution in the tank, press the "
"
button to start the descaling cycle.
8 At this point the machine will start dispensing the descaling solution at
Red
30
intervals (the bar shows the cycle progress).
Red
ENGLISH 31
Note: The descaling cycle may be paused by pressing the " " button. To resume the cycle, press the button again. This allows you to empty the container
or to go away for a short period of time.
Red
9 When the solution in the tank is finished, the icon on the side is disCALC
CLEAN
....
played. The icon indicates that the tank must be rinsed and filled.
10 Rinse the water tank thoroughly and refill it with fresh drinking water.
11 Empty the container used to collect the liquid dispensed by the machine and place it back under the steam wand.
Red
Red
12 When inserting in the machine the tank filled with water, the icon on
Note: The rinse cycle may be paused by pressing the " " button.
To resume the cycle, press the button again. This allows you to empty the
container or to go away for a short period of time.
13 When the water in the tank is finished, the icon on the side is displayed
Red
CALC
CLEAN
....
the side is displayed. The rinse cycle of the machine starts.
to indicate that the tank must be rinsed and filled with fresh drinking
water to finish the cycle.
14 Empty the container used to collect the liquid dispensed by the maRed
The machine performs the rinse cycle with a pre-set amount of water. The
machine may require to refill the tank many times if the necessary amount of
water has not been reached. The following icon indicates that the tank needs
to be refilled.
the side is displayed. The rinse cycle continues.
16 When the amount of water needed for the rinse cycle has been
Red
CALC
CLEAN
....
15 When inserting in the machine the tank filled with water, the icon on
Red
chine and place it under the dispensing spout.
completely dispensed or the water tank has been inserted again in the
machine, the icon on the side is displayed. Press the " " button to
quit the descaling cycle.
32
ENGLISH
17 The machine now carries out the warm-up and rinse cycle to prepare
for product brewing.
The descaling cycle is complete.
Note: The descaling solution must be disposed of according to the manufacturer's instructions and/or regulations in force in the country of use.
Note: After completing the descaling cycle, wash the brew group as described
in the "Brew Group" section in the "Cleaning and Maintenance" chapter.
When the descaling cycle is complete, we recommend emptying the drip
tray.
Control Panel Display
This appliance is equipped with a colour-coded system to make the user's
understanding of the display signals easier.
For maximum convenience the icons are colour-coded according to the
traffic light principle.
The display colour-coded interface combined with buttons, directly forwards the key operating messages in a simple and easy way.
Ready Signals (green colour)
The machine is ready to
brew coffee from coffee
beans and to dispense
hot water.
The machine is brewing 1
cup of espresso coffee.
The machine is ready
for pre-ground coffee
brewing.
The machine is brewing 1
cup of coffee.
Hot water and steam
selection.
The machine is brewing 2
cups of espresso coffee.
Hot water dispensing.
The machine is brewing 2
cups of coffee.
Steam dispensing.
The machine is programming the amount of coffee
to be brewed.
ENGLISH 33
Warning Signals (orange colour)
The machine is warming
up to brew coffee and
dispense hot water and
steam.
The Brew Group is being
reset due to machine reset.
The machine is performing the rinse cycle.
Wait until the machine
stops the operation.
Refill the coffee bean hopper
with coffee beans and restart
the brewing cycle.
The machine needs the
"INTENZA+" filter to be
replaced.
Prime the circuit.
If this page is displayed after starting the machine, this means that a descaling cycle
is needed.
Press the "
" button to enter the descaling menu and refer to the relevant section.
Press the " " button to go on using the machine.
We remind you that damages caused by failure to descale the machine are not
covered by warranty.
Warning Signals (red colour)
Close the service door.
Insert the coffee grounds
drawer.
No coffee beans in the
coffee bean hopper.
After refilling the hopper, the cycle can be
restarted.
The Brew Group must
be inserted into the
machine.
Empty the coffee grounds
drawer and the liquid recovery tray.
Fill the water tank.
Turn off the machine. After 30 seconds, turn it on again. Try this 2 or 3 times.
If the machine does NOT start, contact an authorised service centre.
34
ENGLISH
Troubleshooting
For the most common issues, please refer to the table below or to the FAQ
section on www.philips.com/support for the latest updates. This will help
you identify the appropriate action.
Machine actions
Causes
Solutions
The machine does not switch on.
The machine is not connected to the electric
network.
The cups are cold.
The hole of the steam wand is clogged.
Connect the machine to the electric network.
Preheat the cups with hot water.
Clean the hole of the steam wand using a pin.
Make sure that the machine is off and cold before
performing this operation.
Clean the Pannarello.
Change coffee blend or adjust the grind as explained
in section "Adjusting the Coffee Grinder".
Descale the machine.
Coffee is not hot enough.
No hot water or steam is dispensed.
Coffee has not enough crema.
(See note)
The machine takes a long time to warm
up or the amount of water dispensed from
the wand is too little.
The Brew Group cannot be removed.
Pannarello is dirty (if supplied).
The blend is unsuitable, coffee is not freshly
roasted or the grind is too coarse.
The machine circuit is clogged by limescale.
The Brew Group is out of place.
The coffee grounds drawer is inserted.
The machine grinds the coffee beans but
no coffee comes out.
(See note)
Coffee is too weak.
(See note)
Coffee is brewed slowly.
(See note)
There is no water.
The Brew Group is dirty.
The circuit is not primed.
Rare event that occurs when the machine is
automatically adjusting the dose.
The dispensing spout is dirty.
Rare event that occurs when the machine is
automatically adjusting the dose.
The coffee grind is too fine.
The circuit is not primed.
Coffee leaks out of the dispensing
spout.
The Brew Group is dirty.
The dispensing spout is clogged.
Turn the machine on. Close the service door. The
brew group automatically returns to the initial
position.
Remove the coffee grounds drawer before removing
the brew group.
Fill the water tank and prime the circuit (section
"Using the Machine for the First Time").
Clean the Brew Group ("Brew Group" section).
Prime the circuit (section "Using the Machine for the
First Time").
Brew a few coffees as described in section "Saeco
Adapting System".
Clean the dispensing spout.
Brew a few coffees as described in section "Saeco
Adapting System".
Change coffee blend or adjust the grind as explained
in section "Adjusting the Coffee Grinder".
Prime the circuit (section "Using the Machine for the
First Time").
Clean the Brew Group ("Brew Group" section).
Clean the dispensing spout and its holes.
Note: These problems can be considered normal if the coffee blend has been changed or the machine is
being installed for the first time. In this case wait until the machine performs a self-adjusting operation as
described in section "Saeco Adapting System".
Please contact an authorised service centre for any problems not covered in the above table or when the
suggested solutions do not solve the problem.
35
Technical Specifications
The manufacturer reserves the right to make changes to the technical specifications of the product.
Nominal voltage - Power rating - Power supply . . . . . . . . . . . . . . . . . . . . . . . . . . . . . . . . . . . . . . . . . . . . . . . . . . . . . . . . See label on the inside of the service door
Housing material. . . . . . . . . . . . . . . . . . . . . . . . . . . . . . . . . . . . . . . . . . . . . . . . . . . . . . . . . . . . . . . . . . . . . . . . . . . . . . . . . . . . . . . . . . . . . . . . . . Thermoplastic material
Size (w x h x d) (mm) . . . . . . . . . . . . . . . . . . . . . . . . . . . . . . . . . . . . . . . . . . . . . . . . . . . . . . . . . . . . . . . . . . . . . . . . . . . . . . . . . . . . . . . . . . . . . . . . . . . . 256 x 340 x 440
Weight . . . . . . . . . . . . . . . . . . . . . . . . . . . . . . . . . . . . . . . . . . . . . . . . . . . . . . . . . . . . . . . . . . . . . . . . . . . . . . . . . . . . . . . . . . . . . . . . . . . . . . . . . . . . . . . . . . . . . . . . . . 9 kg
Power cord length . . . . . . . . . . . . . . . . . . . . . . . . . . . . . . . . . . . . . . . . . . . . . . . . . . . . . . . . . . . . . . . . . . . . . . . . . . . . . . . . . . . . . . . . . . . . . . . . . . . . . . . . . . . . . . . . 1.2 m
Control panel . . . . . . . . . . . . . . . . . . . . . . . . . . . . . . . . . . . . . . . . . . . . . . . . . . . . . . . . . . . . . . . . . . . . . . . . . . . . . . . . . . . . . . . . . . . . . . . . . . . . . . . . . . . . . . On the front
Pannarello (only available for certain models) . . . . . . . . . . . . . . . . . . . . . . . . . . . . . . . . . . . . . . . . . . . . . . . . . . . . . . . . . . . . . . . . . . . . . . . . . Special for cappuccinos
Water tank . . . . . . . . . . . . . . . . . . . . . . . . . . . . . . . . . . . . . . . . . . . . . . . . . . . . . . . . . . . . . . . . . . . . . . . . . . . . . . . . . . . . . . . . . . . . . . . . . . . .1.5 litres - Removable type
Coffee bean hopper capacity (g) . . . . . . . . . . . . . . . . . . . . . . . . . . . . . . . . . . . . . . . . . . . . . . . . . . . . . . . . . . . . . . . . . . . . . . . . . . . . . . . . . . . . . . . . . . . . . . . . . . . . . .300
Coffee grounds drawer capacity . . . . . . . . . . . . . . . . . . . . . . . . . . . . . . . . . . . . . . . . . . . . . . . . . . . . . . . . . . . . . . . . . . . . . . . . . . . . . . . . . . . . . . . . . . . . . . . . . . . . . . .10
Pump pressure. . . . . . . . . . . . . . . . . . . . . . . . . . . . . . . . . . . . . . . . . . . . . . . . . . . . . . . . . . . . . . . . . . . . . . . . . . . . . . . . . . . . . . . . . . . . . . . . . . . . . . . . . . . . . . . . . . 15 bar
Boiler . . . . . . . . . . . . . . . . . . . . . . . . . . . . . . . . . . . . . . . . . . . . . . . . . . . . . . . . . . . . . . . . . . . . . . . . . . . . . . . . . . . . . . . . . . . . . . . . . . . . . . . . . . . . . . Stainless steel type
Safety devices . . . . . . . . . . . . . . . . . . . . . . . . . . . . . . . . . . . . . . . . . . . . . . . . . . . . . . . . . . . . . . . . . . . . . . . . . . . . . . . . . . . . . . . . . . . . . . . . . . . . . . . . . . . . .Thermal fuse
Disposal
-
The packing materials can be recycled.
Appliance: Unplug the appliance and cut the
power cord.
Deliver the appliance and power cord to a service center or public waste disposal facility.
This product complies with eu directive 2002/96/ec.
EC DECLARATION OF CONFORMITY
YEAR 09
EC 2006/95, EC 2004/108,
SAECO INTERNATIONAL GROUP S.P.A.
Via Torretta, 240 - 40041 Gaggio Montano (BO) - Italy
We declare under our sole responsibility that the following product:
AUTOMATIC COFFEE MACHINE
HD8751
to which this declaration relates is compliant with the following directives:
on the product or on its packag- • Safety of household and similar electrical appliances - General requirements
The symbol
EN 60335-1 (2002) + A1(2004) + A2(2006) + A11(2004) + A12 (2006) +A13
ing indicates that this product may not be treated as
(2008)
household waste. Instead it shall be handed over to • Safety of household and similar electrical appliances - Part 2-15
Particular requirements for appliances for heating liquids
the applicable collection point for the recycling of
EN 60335-2-15 (2002) + A1(2005) + A2 (2008)
electrical and electronic equipment.
• Safety of household and similar appliances. Electromagnetic fields
By ensuring this product is disposed of correctly,
Methods for evaluation and measurement EN 62233 (2008)
you will help prevent potential negative conse• Safety of household and similar electrical appliances - Part 2-14
Particular requirements for powder conveyors and coffee grinders EN 60335-2quences for the environment and human health,
14 (2006) + A1 (2008).
which could otherwise be caused by inappropriate
• Limits and methods of measurement of radio interference characteristics of
waste handling of this product. For more detailed
electric motor operated and thermal household appliances, portable tools and
information about recycling of this product, please
similar electrical apparatus - EN 55014-1 (2006).
contact your local city office, your household waste • Electromagnetic compatibility (EMC) Part 3 Limits - Section 2:
Limits for harmonic current emissions (equipment input current ≤ 16A per
disposal service or the shop where you purchased
phase) - EN 61000-3-2 (2006)
the product.
• Electromagnetic compatibility (EMC) Part 3 Limits - Section 3:
Limitation of voltage fluctuations and flicker in low-voltage supply systems for
equipment with rated current ≤ 16A.
EN 61000-3-3 (1995) + current (1997) + A1(2001) + A2 (2005).
• Immunity requirements for household appliances, tools and similar apparatus.
Product family standard EN 55014-2 (1997) + A1 (2001)
according to the provisions of the directives: EC 2006/95, EC 2004/108.
Gaggio Montano
28.04.2009
R & D Manager
Eng. Andrea Castellani
Service
We want to ensure that you remain satisfied with your Philips Saeco Espresso coffee machine.
If not done already, please register your purchase on "www.philips.com/
welcome" so that we can stay in contact with you and send you cleaning
and descaling reminders.
For cleaning and descaling, use SAECO products only. You can purchase
these on-line at the Philips on-line shop at:
•
NL http://shop.philips.nl
•
BE http://shop.philips.be
•
FR http://shop.philips.fr
•
DK http://shop.philips.dk
•
DE http://shop.philips.de
•
ES http://shop.philips.es or http://tienda.philips.es
•
IT http://shop.philips.it
•
SE http://shop.philips.se
If you have questions about your appliance, e.g. about its installation, use,
cleaning or descaling, please refer to this user manual or go for the latest
updates to www.philips.com/support.
Alternatively you may contact our toll free consumer care help line at the
phone number listed on the last page of this document, for the closest
selling point near you.
Our qualified service staff will help you and, if needed, trouble shoot your
appliance by phone and where possible provide a solution during the call.
If this is not possible we will help you to initiate any necessary repair in the
shortest possible time and with maximum convenience.
CONSUMER RELATIONS DESKS
For Downloads & FAQs visit our Customer Support Website: www.philips.com/support
Argentina: 0800-888-7532 (toll free)
Australia: 1300 363 391 (toll free)
Bahrain: +973 17700424
België / Belgique: 0800 80 190 (toll free)
Brasil: 0800 701 0203 (Demais localidades)
(11) 2121 0203 (Grande São Paulo)
България: 00 800 11 544 24 (toll free)
Canada: (Montreal) - 1-514-385-5551
(Toronto) - 1-416-256-9191
(Vancouver) - 1-604-299-7555
Česká republika: 800 142840
China: 4008 800 008
Croatia: 0800 222 778
Danmark: 3525 8759
Deutschland: 0800 000 7520 (toll free)
España: 902 199 742
Estonia: 8000100288
France: 0805025510 (toll free)
Greece: 0 0800 3122 1280 (toll free)
Hong kong: 852 2619 9663
Israel: 03-6458844
Iran: +98 21 2227 9353
Ireland: 18007445477 (toll free)
Italia: 800 233 793 (toll free)
Korea: 080-600 6600 (toll free)
Kuwait: 1 80 35 35.
Latvia: 80002794
Lebanon: 961 1 684900
Lithuania: 880030483
Luxembourg: 0800 26 550
Magyarország: 06 80 018 189
Malaysia: 1800 880 180
Nederland: 0800 023 0076 (toll free)
Norge: 2270 8111
Österreich: 0800 180 016 (toll free)
Poland: 00800 3111318
Portugal: 800 780 903 (toll free)
Romania: 0800-894910 (available for free from the Romtelecom network)
Russia: +7 495 961-1111 - 8 800 200-0880
Singapore: +65 68823999
Slovenija: 080080254
Slovenská republika: 0800 004537 (toll free)
Suomi: (09) 2311 3415
South Africa: 08611-72326
Sverige: 0857929100
Switzerland: 0800 002 050 (toll free)
Ukraine: 0-800-500-697
United arab emirates (Dubai): +971 4 2310300
United kingdom: 08003316015 (toll free)
USA: 800.933.7876 (toll free)
Taiwan: 0800 231099
Thailand: +6626528652
EN
02
Rev.02
del 10-06-11
02
The manufacturer reserves the right to change the features of the product without prior notice.
www.philips.com/saeco