1
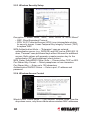
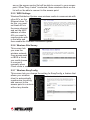
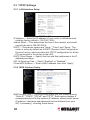
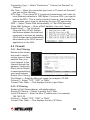
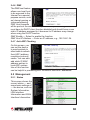
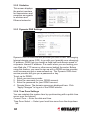
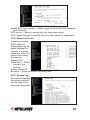
Wireless G
Broadband
Router
user
manual
Model 503693
INT-503693-UM-0608-01
Thank you for purchasing the INTELLINET NETWORK SOLUTIONS™
Wireless G Broadband Router, Model 503693.
The Wireless G Broadband Router allows you to conveniently share
your network connection with multiple users on your network — with
or without wires. It delivers 10/100 Mbps (auto-sensing) WAN and LAN
connections, and is interoperable with 54 Mbps (802.11g) and 11 Mbps
(802.11b) devices over a 2.4 GHz band wireless network. The WAN
connection wizard makes installation a snap.
Keeping intruders out of your network can be a challenge, and this
feature-rich wireless router is designed to make that challenge easier.
It includes a true firewall that secures your network against hackers.
With Network Address Translation (NAT) to shield your networked
devices from intruders, Denial of Service (DoS) attack prevention to
avert potential threats by scanning incoming traffic, and WEP, WPA and
WPA2 encryption to conceal your information on the wireless LAN from
eavesdroppers, you can rest assured that you’ve taken the necessary
precautions to protect the data on your network.
The easy-to-follow instructions in this user manual help make setup
and operation relatively simple, so you’ll soon be enjoying the benefits
of these additional features:
• Compatible with all common DSL and cable Internet service providers
• Easy wireless setup through integrated site survey function
• Supports Wi-Fi Protected Setup (WPS)
• Supports WMM function to meet the multi-media data bandwidth
requirement
• Supports MAC filtering for wireless clients
• Supports Access Point mode and WDS (Wireless Distribution
System) mode
• Integrated 10/100 Mbps LAN switch with Auto MDI/MDI-X support
• DHCP server assigns IP addresses for all LAN users
• Supports DDNS (dynamic DNS)
• 68 Mbps WAN-to-LAN throughput for wired networks
• Content control through URL, IP and Port filter
• Remote management function (enable/disable and management port)
• Easy installation and firmware updates through a Web-based user
interface
• Lifetime Warranty
NOTE: For a quick install procedure, refer to the printed quick install
guide enclosed with this product.
safety & compliance statements
This equipment has been tested and found to comply with the limits for
a Class B digital device, pursuant to Part 15 of Federal Communications
Commission (FCC) Rules. These limits are designed to provide
reasonable protection against harmful interference in a residential
installation. This equipment generates, uses and can radiate radio
frequency energy and, if not installed and used in accordance with the
instructions, may cause harmful interference to radio communications.
However, there is no guarantee that interference will not occur in a
particular installation. If this equipment does cause harmful interference
to radio or television reception, which can be determined by turning
the equipment off and on, the user is encouraged to try to correct the
interference by one or more of the following measures:
• Reorient or relocate the receiving antenna.
• Increase the separation between the equipment and the receiver.
• Connect the equipment to an outlet on a circuit different from the
receiver.
• Consult the dealer or an experienced radio/TV technician for help.
Contents
1hardware..................................................................................5
1.1 Front Panel / LEDs........................................ . .........................5
1.2Rear Panel / Ports & Jacks.......................................................5
1.3System Requirements................................... . .........................5
1.4Connection the Router................................... . .........................6
2configuration.........................................................................6
2.1Login.........................................................................................6
2.2Wireless Settings......................................................................7
2.2.1 Basic Settings..................................................................7
2.2.2 Wireless Advanced Settings............................................7
2.2.3 Wireless Security Setup..................................................8
2.2.4 Wireless Access Control..................................................8
2.2.5 WDS Settings..................................................................9
2.2.6 Wireless Site Survey.......................................................9
2.2.7 Wireless EasyConfig.......................................................9
2.3TCP/IP Settings......................................................................10
2.3.1 LAN Interface Setup......................................................10
2.3.2 WAN Interface Setup.....................................................10
2.4Firewall................................................................................... 11
2.4.1 Port Filtering................................................................... 11
2.4.2 IP Filtering..................................................................... 11
2.4.3 MAC Filtering................................................................. 12
2.4.4 Port Forwarding............................................................. 12
2.4.5 URL Filtering.................................................................. 12
2.4.6 DMZ............................................................................... 13
2.4.7 Anti-ARP Cheating......................................................... 13
2.5Management........................................................................... 13
2.5.1 Status............................................................................. 13
2.5.2 Statistics........................................................................ 14
2.5.3 Dynamic DNS Settings.................................................. 14
2.5.4 Time Zone Settings....................................................... 14
2.5.5 Denial of Service........................................................... 15
2.5.6 System Log.................................................................... 15
2.5.7 Upgrade Firmware.........................................................16
2.5.8 Saave/Reload Settings..................................................16
2.5.9 Password Setup.............................................................16
2.6Logout....................................................................................16
3specifications............................................... . ....................... 17
1 hardware
1.1 Front Panel / LEDs
The front panel of the Wireless G Broadband Router features several
LEDs for immediate indication of the device’s operational status.
LED
Status
PWR On
Off
CPU On
Flashing
Off
WL
Flashing
Off
WANOn
Flashing
Off
1/2/3/4On
Flashing
Off
Description
Power is on.
Power is off.
The router is initializing.
The router is operating properly.
The router is experiencing a hardware error.
The wireless radio function is enabled.
The wireless radio function is disabled.
There is a device linked to the port, but no activity.
There is an active device linked to the port.
There is no device linked to the port.
There is a device linked to the port, but no activity.
There is an active device linked to the port.
There is no device linked to the port.
1.2 Rear Panel / Ports & Jacks
The rear panel of the
Wireless G Broadband
Router features these ports
and jacks (left to right):
• Power adapter jack. NOTE: Only use the power adapter included
with the Wireless G Broadband Router, as a different adapter could
result in product damage.
• WAN RJ-45 port for connecting the router to a cable, DSL modem or
Ethernet.
• Four LAN 10/100 Mbps RJ-45 ports for connecting the router to local PCs.
• Factory default reset button (recessed). NOTE: To reset to factory
defaults, first turn the router on. Next, press in and hold the reset
button for approximately 20 seconds. Then release the reset button
and wait for the router to reboot.
1.3 System Requirements
Proper use of the Wireless G Broadband Router requires the following
system components and connections:
• Broadband Internet access service (DSL/cable/Ethernet)
• DSL/cable modem that has an RJ-45 connector (not needed if you
connect the router to the Ethernet)
• Each PC on the LAN needs a working Ethernet adapter and an
Ethernet cable with RJ45 connectors
• TCP/IP protocol must be installed on each PC
• Web browser, such as Microsoft Internet Explorer 5.0 or later,
Netscape Navigator 6.0 or later
Also, keep these guidelines in mind when positioning the router
before installation and operation:
•Don’t place it in direct sunlight or near a heater or heating vent.
• Keep at least 2 inches (5 cm) of space on all sides of the router.
• Keep the space well ventilated (especially if placed in a closet).
• Maintain the operating temperature and humidity as per specifications
listed at the back of this user manual.
1.4 Connecting the Router
Before installing the router, connect your PC to the Internet through
your broadband service. (If there is any problem, contact your ISP.)
Then proceed through the following steps.
1. Turn off your PC(s), cable/DSL modem and the router.
2. Adjust the antenna. Normally, upright is a good place to start.
3. Connect the PC(s) and each switch/hub on your local area network
to the LAN ports on the router.
4. Connect the DSL/cable modem to the WAN port on the router.
5. Connect the power adapter between the power socket on the router
and an electrical outlet. The router will start to work automatically.
6. Turn on your PC(s) and the cable/DSL modem.
2 configuration
2.1 Login
Connect to the Wireless G Broadband Router by entering http://192.168.1.254
in the address field of your Web browser. Once you’ve logged in, the
browser will display the administrator menu on the left-hand side of
the screen, with the five configuration options — Wireless (Settings),
TCP/IP Settings, Firewall, Management and Logout — explained in
detail in the following sections.
2.2 Wireless Settings
2.2.1 Basic Settings
Band — The three options in the drop-down menu are “2.4 GHz (G)”
for 54 Mbps (802.11g); “2.4G Hz (B)” for 11 Mbps (802.11b); and
“2.4 GHz (G+B),” which allows both 802.11g and 802.11b wireless
stations to connect to the router.
Mode — The default is “AP”; options are “Client,” “WDS,” “AP+WDS.”
Network Type — The default is “Infrastructure”; when Mode is set to
“Client,” this should be set to “Ad Hoc.”
SSID — Enter a value of up to 32 characters. The same name
(SSID) must be assigned to all wireless devices in your network.
NOTE: The default SSID is “Kingnet,” but it’s recommended that you
change your network’s SSID to a different (case-sensitive) value.
Channel — It isn’t necessary to change the channel (1-13) unless you
notice interference problems with another nearby access point.
Associated Clients — Click to show active clients.
2.2.2 Wireless Advanced Settings
These settings are
only for more
technically advanced
users who have
sufficient knowledge
of wireless LAN.
These settings
should not be
changed unless you
know what effect the
changes will have
on your access
point.
2.2.3 Wireless Security Setup
Encryption — Select “None,” “WEP,” “WPA,” WPA2” or “WPA2 Mixed.”
• WEP: Wired Equivalent Protocol.
• WPA: WI-FI Protected Access (WPA) is an intermediate solution
for security issues. It uses Temporal Key Integrity Protocol (TKIP)
to replace WEP.
WPA Authentication Mode — “Enterprise” uses an external
authentication server (e.g., RADIUS) and EAP just as IEEE 802.1X
does; “Personal” uses pre-shared keys without the need for additional
servers. Both options will generate a master session key for the
authenticator (AP) and supplicant (client station).
WPA Cipher Suite/WPA2 Cipher Suite — Choose either TKIP or AES. Pre-Shared Key Format — Select passphrase or hex characters.
Pre-Shared Key — Enter up to 128 characters.
Authentication RADIUS Server — Enter a port, IP address and
password.
2.2.4 Wireless Access Control
Wired Access Control Mode — If you choose “Allowed Listed” from the
drop-down menu, only those clients whose wireless MAC addresses
are on the access control list will be able to connect to your access
point. When”Deny Listed” is selected, these wireless clients on the
list will not be able to connect to the access point.
2.2.5 WDS Settings
Wireless Distribution System uses wireless media to communicate with
other APs, as the
Ethernet does. To
do this, you must
set these APs in
the same channel
and set the MAC
address of other
APs you want to
communicate with
in the table and
then enable the Wireless Distribution System.
2.2.6 Wireless Site Survey
This screen lets
you scan the
wireless network.
If any access point
or IBSS is found,
you could choose
to connect it
manually when
Client mode is enabled.
2.2.7 Wireless EasyConfig
This screen lets you change the setting for EasyConfig, a feature that
allows your wireless
client to automatically
synchronize its setting
and connect to the
access point in a minute
without any hassle.
2.3 TCP/IP Settings
2.3.1 LAN Interface Setup
IP Address — Enter the IP address of your router in dotted-decimal
notation (factory default = 192.168.1.254).
Subnet Mask — This determines the size of the network, and would
normally be set to 255.255.255.0.
DHCP — Drop-down options are “None,” “Client” and “Serve.” The
router is set up by default as a DHCP (Dynamic Host Configuration
Protocol) server, which provides the TCP/IP configuration for all the
PCs connected to the router on the LAN.
DHCP Client Range — Specify the first and final addresses in the IP
address pool range.
802.1d Spanning Tree — Select “Enabled” or “Disabled.”
Clone MAC Address — Enter a MAC address, then click “Apply.”
2.3.2 WAN Interface Setup
WAN Access Type — The drop-down menu lets you choose among
“Static IP,” “DHCP,” “PPPoE” and “PPTP.” Each option displays a
corresponding list of further options (IP address, subnet mask, server
IP address, username and password can be obtained from your
ISP, if necessary), including those below.
10
Connection Type — Select “Continuous,” “Connect on Demand” or
“Manual.”
Idle Time — When the connection type is set to “Connect on Demand,”
you can set the idle time.
MTU Size — The normal MTU (maximum transmission unit) value for
most Ethernet networks is 1492 Bytes. For some ISPs, you need to
reduce the MTU. This is rarely required, however, and shouldn’t be
done unless you’re sure it’s necessary for your ISP connection.
DNS — Select “Attain DNS Automatically” or “Set DNS Manually.”
Clone MAC Address — Enter a MAC address, then click “Apply.”
Enable UpnP — The Universal
Plug and Play (UPnP) feature
lets devices access the local host
resources or devices as needed.
UPnP devices can be automatically
discovered by the UPnP service
application on the LAN.
2.4 Firewall
2.4.1 Port Filtering
Entries on this screen
are used to restrict
certain types of data
packets from your
local network to the
Internet through the
gateway. Using such
filters can be helpful
in securing/restricting
your local network.
Enable Port Filtering — Select to modify the port filter.
Port Range — Enter the filter port range; for example, 20-220.
Protocol — Select “TCP,” “UDP” or “Both.”
Current Filter Table — This displays the list of port filters.
2.4.2 IP Filtering
Similar to Port Filtering (above), with similar options.
Enable IP Filtering — Select to modify the IP filter.
Local IP Address — Enter the filter IP address(es); for example,
192.168.1.23.
Protocol — Select “TCP,” “UDP” or “Both.”
Current Filter Table — This displays the list of IP filters.
11
2.4.3 MAC Filtering
Similar to Port and IP Filtering (above), with similar options.
Enable MAC Filtering — Select to modify the MAC filter.
MAC Address — Enter the MAC address; for example, 00:e0:4e:3f:2d:c5.
Protocol — Select “TCP,” “UDP” or “Both.”
Current Filter Table — This displays the list of MAC filters.
2.4.4 Port Forwarding
Entries on this
screen allow you
to automatically
redirect common
network services to
a specific machine
behind the NAT
firewall. These
settings are only
necessary if you
wish to host some sort of server, like a Web server or mail server on
the private local network behind your gateway’s NAT firewall.
Enable Port Forwarding — Select to enable the function.
IP Address — The IP address of the PC running the service application.
Protocol — Select “TCP,” “UDP” or “Both.”
Port Range — Enter the number(s) of the external port(s). Whether it’s
a single service port or a range of service ports, the format is XXX –
YYY, where XXX is the start port and YYY is the end port).
Current Port Forwarding Table — This displays the list of port
forwarding services.
2.4.5 URL Filtering
A URL filter is used
to deny LAN users
access to the
Internet. Once
selected, this filter
function lets you
use specific
keywords to block
associated URLs.
Enable URL Filtering — Select to enable the function.
URL Address — Enter a specific address to block; e.g., xxx.com.
12
2.4.6 DMZ
The DMZ host feature
allows one local host
to be exposed to the
Internet for a specialpurpose service, such
as Internet gaming or
videoconferencing.
DMZ Host forwards
all the ports at the same time. Any PC whose port is being forwarded
must have its DHCP client function disabled and should have a new
static IP address assigned to it because its IP address may change
when using the DHCP function.
DMZ Enable — Select to enable the function.
DMZ Host IP Address — Enter an IP address; e.g., 192.168.1.34.
2.4.7 Anti-ARP Cheating
On this screen, you
can set the device
to send packets to
other hosts to refresh
their ARP (address
resolution protocol)
cache. You can also
add static IP-MAC
address entries to
local ARP caches.
Use of this function
can be helpful in preventing ARP viruses or fake MAC addresses.
2.5 Management
2.5.1 Status
This screen shows the
current status — and
some basic settings of
— the device, such as
System Information,
LAN Interface
Information and WAN
Interface Information.
13
2.5.2 Statistics
This screen displays
the packet counters
for transmission and
reception as regards
to wireless and
Ethernet networks.
2.5.3 Dynamic DNS Settings
Dynamic DNS is a service that provides you with a valid, unchanging
Internet domain name (URL) to go with your (possibly ever-changing)
IP address. DDNS lets you assign a fixed host and domain name to
a dynamic Internet IP address. It is useful when you are hosting your
own Web site, FTP server or other server behind the router. Before
using this feature, you need to sign up with a DDNS service provider,
such as www.oray.net or www.comexe.cn. The Dynamic DNS client
service provider will give you a password or key.
To set up for DDNS:
1. Enter your service provider.
2.Enter the username for your DDNS account.
3.Enter the password for your DDNS account.
4.Domain Name: The domain names are displayed here. Click
“Apply Changes” to log out of the DDNS service.
2.5.4 Time Zone Settings
You can maintain the system time by synchronizing with a public time
server over the Internet.
Current Time — Enter the date and time.
Time Zone Select — Select your local time zone from the drop-down
list.
14
Enable NTP client update — Select to get the time from NTP (Network
Time Protocol).
NTP server — Select a server from the drop-down menu.
Click “Apply Change” to get the time from the Internet (if connected).
2.5.5 Denial of Service
A denial-of-service
(DoS) attack is
characterized by an
explicit attempt by
hackers to prevent
legitimate users of a
service from using
that service.
Enable DOS
Prevention — Select
to modify the
function.
Enable Source IP
Blocking — Enter a source IP blocking time.
2.5.6 System Log
This screen displays
the system log and
can be used to set
the remote log server.
15
2.5.7 Upgrade Firmware
This screen lets
you upgrade the
AP firmware.
NOTE: Do not
power off the
device during the
upload, as doing
so may crash the
system.
Browse...
2.5.8 Save/Reload Settings
This screen lets
you save current
settings to a file or
reload the settings
from the file which
was saved
previously. You
can also reset the
current configuration
to factory default settings.
2.5.9 Password Setup
On this screen, you
can set up the
account to access
the Web server of
the access point.
NOTE: Empty fields
for “User Name” or
“Password” disables
the protection.
2.6 Logout
This screen is used to log out.
16
Browse...
3 specifications
• NAT: Port forwarding
(11 Mbps, 50 mW max.)
• Firewall:
• Max. coverage distance:
- Port filter
100 m / 300 ft. (indoor),
- IP filter
300 m / 900 ft. (outdoor)
- Access control based on .. • Wireless security:
MAC address
- WEP encryption (64/128 bit)
- URL filter
- WPA (TKIP and AES)
- DMZ (demilitarized zone) - WPA2 (TKIP and AES)
- Anti-ARP Cheating
- Client access control thru
• Supports:
MAC filter
-UPnP (Universal Plug and • Antenna: single dipole,
Play)
2 dBi gain
-DHCP (client/server)
LEDs
-PPPoE (DSL), DHCP
• Power
General
(cable) and static IP
• CPU (operational status)
• LAN ports: 4 RJ-45 10/100
-VPN PPTP, L2TP and
• WL (Wireless)
Mbps data ports
IPsec pass-through
• WAN Link/Act
• LAN ports with Auto MDI/
Wireless
• LAN 1-4 Link/Act
MDI-X
• LAN to WAN throughput: • Chipset: RTL8225
Environmental
• Wireless frequency range: • Dimensions: 169 (W) x 108
68 Mbps
• Certifications: FCC Class B, 2.412 - 2.484 GHz
(L) x 180 (H) mm (6.6 x 4.3
• Modulation technologies: x 7.0 in.)
CE Mark, RoHS
- 802.11b: Direct Sequence • Weight: 0.8 kg (1.8 lbs.)
Router
Spread Spectrum (DSSS): • Operating temperature: 0 –
• Chipset: Realtek RTL8186
DBPSK, DQPSK, CCK 55°C (32 – 122°F)
• Supported WAN connection
- 802.11g: Orthogonal
• Operating humidity: 10 –
types:
Frequency Division Multi- 95% RH, non-condensing
- Dynamic IP (DHCP for
plexing (OFDM): BPSK,
• Storage temperature: 0 –
cable service)
QPSK, 16QAM, 64QAM 60°C (0 – 149°F)
- Static IP
• Number of channels: 11
- PPPoE (for DSL)
Power
• Data rates:
• Protocols:
- IEEE 802.11b (11 Mbps, • External power adapter:
- CSMA/CA
5.5 Mbps, 2 Mbps, 1 Mbps) 9.0 V DC, 0.8 A
- CSMA/CD
- IEEE 802.11g (54 Mbps, • Power consumption:
- TCP/IP
48 Mbps, 36 Mbps, 24 Mbps, 6.3 Watts max.
- UDP
18 Mbps, 12 Mbps, 9 Mbps, Package Contents
- ICMP
6 Mbps)
• Wireless G Broadband Router
- PPPoE
• Output power:
• User manual
- NTP
- OFDM: 15 dBm +/- 1 dBm • Power cord
- NAT
(54 Mbps, 50 mW max.) • Ethernet Cat5 RJ-45 cable,
- DHCP
- CCK: 15 dBm +/- 1 dBm 0.8 m (2.6 ft.)
- DNS
Standards
•IEEE 802.1d (Spanning
Tree Protocol)
•IEEE 802.1x (Wireless User
Authentication)
• IEEE 802.11b (11 Mbps
Wireless LAN)
• IEEE 802.11g (54 Mbps
Wireless LAN)
• IEEE 802.3 (10Base-T
Ethernet)
• IEEE 802.3u (100Base-TX
Fast Ethernet)
17
INTELLINET NETWORK SOLUTIONS™ offers a complete line
of active and passive networking products.
Ask your local computer dealer for more information or visit
www.intellinet-network.com.
Copyright © INTELLINET NETWORK SOLUTIONS
All products mentioned are trademarks or registered trademarks of their respective owners.


![Descargar - [ [ [ ANSEL ] ] ]](http://vs1.manualzilla.com/store/data/006281466_1-988b71a6dea3e24a758aa8f968c138c5-150x150.png)