1
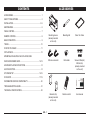
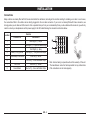
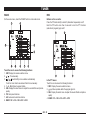
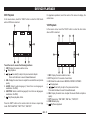
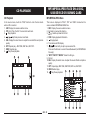
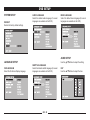
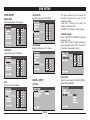
DRX 2002
RDS CAR RADIO WITH DVD/MPEG4/VCD/CD/MP3/USB/SD PLAYER
AM/FM STEREO
RDS FUNCTION (AF/TP/TA/PTY)
30 STATION MEMORY
MOTORIZED 7” TOUCH PANEL TFT LCD
MUSIC POWER 160 WATTS
USER MANUAL AND INSTALLATION INSTRUCTIONS
Contents
ACCESSORIES
ACCESSORIES..................................................................................... 1
SAFETY PRECAUTIONS...................................................................... 2
INSTALLATION...................................................................................3-5
MAINTENANCE..................................................................................... 6
PANEL CONTROL................................................................................. 7
REMOTE CONTROL............................................................................. 8
BASIC OPERATION.............................................................................. 9
Mounting sleeve
(already mounted
on the unit)
Mounting bolt
Outer trim frame
ISO wire connector
Bolt rubber
Screws: M5x6(4x)
M2,6x5 (4x)
(already mounted
on the unit)
Brackets (2x)
(already mounted
on the unit)
Remote control
User manual
TUNER................................................................................................. 10
DVD/VCD PLAYBACK......................................................................... 11
CD PLAYBACK.................................................................................... 12
MP3/MPEG4 FILES/JPEG FILES ON A DISC/USB
DEVICE OR SD/MMC CARD..........................................................12-13
ADVANCED PLAYBACK FUNCTIONS............................................... 14
AUX IN FUNCTION.............................................................................. 14
SYSTEM SETUP............................................................................15-16
DVD SETUP....................................................................................17-19
INFORMATION ON DISC COMPATIBILITY........................................ 20
TROUBLESHOOTING GUIDE............................................................. 21
TECHNICAL SPECIFICATIONS.......................................................... 22
GB - Safety PRECAUTIONS
1.Be sure to connect the color-coded leads according to the diagram. Incorrect connections may cause the unit to malfunction or damage the vehicle’s
electrical system.
2.Be sure to observe the correct polarity when connecting the speaker leads to the speaker terminals. Never connect the left and right speaker cables
to each other or to a metal part of the vehicle.
3. Make sure all the connections are correct before turning on your unit.
4. When replacing the fuse(s), the replacement must be of the same amperage indicated in the technical specifications.
5. Do not block ventilation openings. Blocking them will cause heat to build up inside the unit and may result in fire.
6. Do not use the unit for too long after the car has stopped in order to prevent the car battery from going flat.
7. Do not expose the unit to very high temperatures.
8.Do not use the unit in extreme temperatures, and avoid exposure to humidity and direct sunlight. Ensure that that the temperature inside the vehicle
is between –10°C and +60°C.
9. In order to avoid interference, stay away from the unit when using a mobile phone.
10.Do not expose the remote control to high temperatures or direct sunlight as this may cause it to malfunction.
If at any time in the future you should need to dispose of this product please note that waste electrical products should not be disposed of with
household waste. Please recycle where facilities exist. Check with your Local Authority or retailer for recycling advice (Waste Electrical and
Electronic Equipment Directive).
GB - INSTALLATION
Wiring Diagram
AUDIO IN-R (Red)
Antenna
AUDIO IN-L (White)
Fuse 15A
REAR AUDIO OUT-L (White)
REAR AUDIO OUT-R (Red)
ISO Connector
WIRE TO ACTIVATE REVERSING
CAMERA (Pink) +
PARKING BRAKE WIRE(Green) VIDEO OUT 1 (Yellow)
VIDEO OUT 2 (Yellow)
CAMERA IN (Yellow)
VIDEO IN (Yellow)
Purple
with
Black
Stripe
Gray
with
Black
Stripe
White
with
Black
Stripe
USB SLOT
Green
with
Black
Stripe
GB - INSTALLATION
Connections
Many vehicles are already fitted with ISO connectors behind the dashboard, including all the electrical cabling for installing a car radio. In such cases,
the connections fitted to the vehicle can be directly plugged into the car radio connectors. If your car is not already fitted with these connectors, we
strongly advise you to obtain an ISO connector from a specialist shop or from your car dealership. Once you have obtained the connector, you will only
need to connect your loudspeakers and the power supply to the ISO cable following the connection instructions below.
Location
Function
Connector A
Connector B
1
Rear Right (+) - Purple
2
Rear Right (-) - Purple with Black Stripe
3
Front Right (+) - Gray
4
Battery 12V(+)/yellow
5
Antenna/Amp control/blue
6
Front Right (-) - Gray with Black Stripe
Front Left(+) - White
Front Left(-) - White with Black Stripe
7
ACC+/red
Rear Left (+) - Green
8
Ground/black
Rear Left (-) - Green with Black Stripe
GB - Note: Incorrect wiring or operation will void the warranty of this unit.
The manufacturer cannot be held responsible for any malfunctions
if the connections are not made properly.
INSTALLATION
Installation procedure
1. If relevant, remove any other audio system from the car.
2.After unscrewing the four car radio attachment screws, insert the mounting sleeve into the
dashboard. Fix it firmly in place by folding down the metal tabs.
3. If this has not already been done, attach the brackets (2x) to the car radio.
In order to do this, use the supplied flat head screws (M5x6mm).
4. Perform the required electrical connections:
- If necessary, connect the hand brake wire to your hand brake contact in order to activate the
video display when playing a DVD (when the car is parked).
- Connect the wire that activates the reversing camera to the reversing sensor or to a reversing
light. If necessary, connect your reversing camera to the car radio’s reversing camera input using
a video cable (not supplied).
- Ensure that you now place the USB cable located at the back of the unit in such a way that it
comes out of the dashboard or the glove box.
5. Then check that everything works before installing the main unit in the mounting sleeve.
Note: if necessary, use the mounting screws and bolt rubber to complete installation of the unit.
6. Install the car radio in the dashboard using the supplied flat head screws (M2, 6x5mm).
7. Turn on the unit and slide down the panel, then attach the outer trim frame.
If you are not sure how to install this unit correctly, contact a qualified technician.
GB - MAINTENANCE
Replacing fuses
Make sure the amperage matches the specified value when replacing the fuses. If the fuse is blown, check the power connection and replace with a
new one. If the same problem occurs, there must be a malfunction. In such cases, please consult your retailer.
Warning:
Never use a fuse with a rated amperage over the one specified, otherwise you risk damaging the unit.
Replacing the battery
When the operation range of the remote control becomes shorter or if it no longer works, replace the lithium
battery with a new button cell (CR2025). Make sure the battery polarities match.
1. Open the battery compartment in the remote control unit.
2. Insert a CR2025 button-type battery with the plus sign (+) facing upward. Close the battery compartment.
Pull out
Replace
the battery
Push up
Warning:
Improper handling of the battery may lead to explosion. Do not charge the battery, disassemble it or throw it into a fire.
Precautions when using lithium batteries
Always keep the lithium battery out of the reach of children. If a battery is swallowed, see a doctor immediately. In order to ensure optimum performance,
clean the battery with a dry cloth.
Make sure that the polarities are correct when loading the battery. To prevent short circuits, do not use a metal object to insert the battery.
GB - Panel Control
Front Panel
1.
2.
3.
4.
Touch panel TFT LCD display
button: Turn the unit on/off
SRC (SOURCE) button: Select the following sources:
- Radio (“BAND”)
- “DISC” (when a disc is inserted)
- “USB” (when a USB device is connected)
- SD/MMC card (“SD”) (when an SD/MMC card is inserted)
- Aux in (“AUX”)
T/P (TA/PTY) button - Press briefly to turn the RDS TA (traffic announcement) on/off.
Press for more than 2 seconds to enter RDS PTY mode (select a program type).
5.MUTE ( ) button - Press briefly to turn off the sound. Press for more than 2 seconds
to switch off the LCD display.
6.Remote control sensor: Receive the infrared signal from the remote control.
7. VOL +/- button: Adjust the volume level.
8.
button: - Press briefly to open/close the panel
- Press for more than 2 seconds to enter the panel menu.
> Open the panel
> Eject the disc.
> Close the panel
> Adjust the panel angle (“TILT+/-“)
9.Reset button: Use a pointed object such as a pen to press this button in order to reset
the unit.
Front view of car radio after sliding down the front panel
10. button: Eject disc.
11.Disc slot: Insert disc.
12.Panel status indicator: This indicator will light up when you slide the panel down.
13.SD/MMC card slot.
GB - 10
11
12
13
Remote Control
1. S
RC (SOURCE): Select one of the following
sources:
- Radio (“Band”)
- “DISC” (when a disc is inserted)
- “USB” (when a USB device is connected)
-S
D/MMC card (“SD”) (when an SD/MMC card
is inserted).
- AUX (AV IN).
2.
: Eject disc.
3. MENU (in DVD mode): Display the root menu.
PBC (in VCD mode): Playback control on/off.
4. TITLE (in DVD mode): Display the title menu.
5. GOTO: Search.
6. BAND: FM1->FM2->FM3->MW1->MW2.
P/N: TV color system PAL/NTSC/AUTO.
7.SEL: Enter the select menu to adjust the sound
effects and picture quality.
8. DVD SETUP
9. TILT : Close the panel.
10.TILT : Open the panel.
11.ZOOM (DVD/VCD mode): Increase/reduce the
picture size.
12.OK: Confirm selection.
13. / / / direction buttons.
14. : Stop playback/Return to list of files (in
MPEG4 mode).
15.0 – 9, 10+ (number keys).
1
16
2
17
3
18
4
19
5
20
6
21
7
22
8
23
9
24
10
25
11
26
12
13
27
14
28
29
15
GB - 16.MODE: Enter source selection menu.
17. : Turn the unit on/off.
18.ANGLE (DVD mode).
19.SUBTITLE: select a subtitle language (DVD
mode).
20.REPT A-B: A-B repeat playback.
21.REPT: Repeat playback.
22.OSD: On Screen Display.
23.TIME: Time display.
24.
/
: In radio mode: Tuning.
In DVD mode: Press briefly to change chapter
or track, press and hold down to search
forward/backward.
25.PROG: Programmed playback.
26.VOL +/-: Adjust the volume.
27. : Play/Pause playback.
28.MUTE: - Press briefly to turn off the sound
-P
ress for more than 2 seconds to
switch off the LCD display
29.AUDIO:
DVD mode: Select audio language
VCD mode: Select audio channel (MONO L/
MONO R/ STEREO).
BASIC OPERATION
Source Select
Loading a disc or an SD/MMC card
Press the button to turn on
the unit. Then press the MODE
button on the remote control to
enter the source menu.
On the source menu:
Touch the corresponding icon to
access the desired source.
Touch the “EXIT” button to
return to the previous menu.
On the unit panel:
Press the SRC button to select the desired source.
To open the panel first, press the
button on the panel. Insert a disc
with label side facing up or an SD/MMC card into the corresponding slot.
When a disc is inserted, the panel will close automatically.
Note: You can control the panel using the touch panel control, refer to
previous section: “Panel Control”.
Panel Control
Hold down the
button on the
panel to display the [OPEN/
TILT] menu.
Touch the panel to carry out the
desired operations.
Inserting a USB device
Connect your USB device to the USB cable which you placed in the
dashboard or glove box during installation of the car radio.
Notes:
1.When connecting a USB device or inserting an SD/MMC card, the
unit will read the files automatically.
2.If more than one source is available, refer to the previous section –
“Source Select” to select the source of your choice.
3. To eject the disc, open the panel and press the
button.
4. To remove the card or USB device, you should first select another
source, in order to avoid damaging the card or USB device.
GB - TUNER
RADIO
RDS
On the source menu, touch the “BAND” button to enter radio mode.
Buttons on the car radio:
Press the T/P button briefly to turn AF (alternative frequencies) on/off.
Hold the T/P button more than 2 seconds to turn the PTY function
(selection of program type) on/off.
Touch the icon to access the following functions:
1. SRC: Display the source selection menu.
2. / : Tune manually.
3.
/
: Touch briefly to tune a station automatically.
Touch for more than 2 seconds and hold to tune manually.
4. 1 – 6, ..MHz: Select a preset station.
5.SEL: Display the select menu to adjust the sound effects and picture
quality.
6. PS: Scan preset stations.
7. AS: Auto search and store stations.
8. BAND: FM1->FM2->FM3->MW1->MW2
In the PTY menu:
Touch the icon to access the following functions:
1. SRC: Display the source selection menu.
2. / : Move up/down within the program type list.
3. SEL: Display the select menu to adjust the sound effects and picture
quality
4. BAND: FM1->FM2->FM3->MW1->MW2
GB - 10
DVD/VCD PLAYBACK
DVD Playback
In the source menu, touch the “DISC” button to enter the DISC mode
when a DVD disc is inserted.
For playback operations, touch the center of the screen to display the
control icons.
VCD Playback
In the source menu, touch the “DISC” button to enter the disc mode
when a VCD is inserted.
Touch the icon to access the following functions:
1. SRC: Display the source selection menu.
2. : Stop playback.
3.
/
: Press briefly to skip to the previous/next chapter.
Press and hold down to search forward/backward.
4. SEL: Display the select menu to adjust the sound effects and picture
quality.
5.AUDIO: Select audio language (if more than one language is
available on the DVD).
6.SUBTITLE: Select a subtitle language (if more than one language is
available on the DVD).
7.
: Play/Pause playback, Enter.
Press the REPT button on the remote control to choose a repeat play
mode: “REP CHAPTER”, “REP TITLE”, “REP OFF”.
1. SRC: Display the source selection menu.
2. INT: Play the first 15 seconds of each track.
3. L/R: Select the audio channel: MONO L/ MONO R/ STEREO
4. : Stop playback.
5.
/
: Press briefly to skip to the previous/next track.
Press and hold down to search forward/backward.
6.SEL: Display the select menu to adjust the sound effects and picture
quality.
7. RPT: Repeat play: “REP ONE”, “REP ALL”, “REP OFF”.
8. RDM: Random play.
9.
: Play/Pause playback
GB - 11
MP3/MPEG4/JPEG FILES ON A DISC,
USB DEVICE OR SD/MMC CARD
CD PLAYBACK
CD Playback
MP3/MPEG4/JPEG Menu
In the source menu, touch the “DISC” button to enter the disc mode
when a CD is inserted.
1. SRC: Display the source selection menu.
2. INT (intro): Play the first 15 seconds of each track.
3. : Stop playback.
4.
/
: Skip/ Seek previous/ next track.
5. SEL: Display the select menu to adjust the sound effects and picture
quality.
6. RPT: Repeat play – REP ONE, REP ALL, REP OFF.
7. RDM: Random play.
8.
: Play/Pause playback
This menu is displayed in “DISC”, “SD” and “USB” mode when the
source contains MP3/MPEG4/JPEG files.
1. SRC: Display the source selection menu.
2. : Back to previous file directory.
3. / : Search up/ down the file list.
4. OSD: Display playback information.
5. : Stop playback.
6. Track name and ID3 display.
7.
/
: Press briefly to skip to previous/next file.
Press and hold down to search forward/backward (for MP3/MPEG4
files only).
8. “MP3”/“PHOTO”/“MOVIE”: Select the file type.
9. File list.
10.SEL: Display the select menu to adjust the sound effects and picture
quality.
11. RPT: Repeat play: REP ONE, REP DIR, REP ALL, REP OFF.
12. RDM: Random play.
13. : Play/Pause playback
GB - 12
MP3/MPEG4/JPEG FILES ON A DISC, USB DEVICE OR SD/MMC CARD
MPEG4 playback
PHOTO playback (JPEG files)
During MPEG4 file playback, touch the center of the screen to display
the control icons.
During JPEG file playback, touch the center of the screen to display the
control icons.
1. SRC: Display the source selection menu.
2. : Stop playback.
3.
/
: Press briefly to skip to the previous/next file.
Press and hold down to search forward/backward.
4. SEL: Display the select menu to adjust the sound effects and picture
quality.
5.
: Play/Pause playback.
1. SRC: Display the source selection menu.
2.
/
: Rotate the picture clockwise/counterclockwise.
3. : Stop playback.
4.
/
: Skip to the previous/ next file.
5. SEL: Display the select menu to adjust the sound effects and picture
quality.
6.
: Play/Pause playback.
GB - 13
ADVANCED PLAYBACK FUNCTIONS
AUX (AV IN) FUNCTION
GOTO
You can use the search feature to select a title/chapter/track number or
go to a specific point in a title, chapter or track. First, press the GOTO
button on the remote control to display the search menu. Secondly,
press the arrow buttons / to highlight the title/chapter/ track (for
CD/VCD) number or the time option. Thirdly, use the number buttons
to enter the title/chapter/track you want to play or the elapsed time you
want to go to in that title, chapter or track. Finally, press the OK button to
start playback.
1.Connect an external A/V device to the AUDIO IN-R, AUDIO IN-L and
VIDEO IN jacks (connected from extension cables) on the unit.
2.In the source menu, touch the “AUX” button to enter the AUX (AV IN)
mode.
Note: You can also use the SRC button on the remote control to
select the source.
3. Operate the external A/V device to select and play a file.
4.Adjust the volume controls on both the external A/V device and this
unit to the desired volume level.
Repeat a specific segment
1.During normal playback, press the REPT A-B button once and
“REPEAT A-" will appear on the screen. This indicates that the
segment to be repeated will start at this point.
2.Press REPT A-B again and “REPEAT A-B” will be displayed on the
screen. This indicates that the segment to be repeated will end at this
point.
3.The unit will play from set point A to set point B until you turn off the
repeat function.
4. Press REPT A-B again to cancel the repeat function.
PROGRAM
Press the PROG button to display the program menu. Move the cursor
to select the title/chapter number (DVD) or track number (for CD/VCD).
If you want to clear all entries, move the cursor to “CLEAR” and press
the OK button. To start the programmed playback, move the cursor to
“PLAY” and press OK. During this process, press or press PROG to
cancel the programmed playback.
GB - 14
System Setup
SELECT Menu
SETUP Menu
SEL: Display the select menu to adjust the sound
effects and picture quality.
Sound effects
EQ: “Rock”, ”Pop”,“Classic”, “Flat”, “OFF”
BAS: Bass
TRE: Treble
BAL: Balance.
FAD: Fader.
Picture quality
BRI: Brightness
CON: Contrast.
COL: Color.
In the source menu, touch the “SET” button to enter the setup menu.
1. SRC: Display the source menu.
2. / : Search up/ down the list.
3.
/ : Adjust the settings.
LOUD ON/OFF: Turn loudness on/off.
BEEP ON/OFF: Turn button beep sound on/off.
12/24 HOURS: Select 12 -hour or 24-hour display.
/AM/PM: Touch the < button to set the hours and touch the > button
to set the minutes.
PARKING ON/OFF: Turn parking warning on/off.
When this function is switched on, the screen will show “DO NOT
WATCH VIDEO WHILE DRIVING”, during playback of a video if the
hand brake is not activated. The screen will be blank.
GB - 15
System Setup
CAMERA ON/OFF: Turn reversing camera on/off.
MIRROR ON/OFF: Turn mirror mode on/off. If this mode is on, the
camera image is a mirror image.
LCD CALIBRATE: Calibrate the touch screen.
TA SEEK/ALARM: Choose TA ALARM or TA SEEK mode.
(TA: traffic announcements)
TA ALARM mode: A beep sound warns you when a traffic announcement
is being broadcast.
TA SEEK mode: The car radio automatically searches for traffic
announcements.
RETUNE-L/S: (long/short retune) Select “RETUNE-S” or “RETUNE-L”.
“RETUNE-S” (Short retune): The car radio waits 45 seconds between
two searches for traffic announcements.
“RETUNE-L” (Long retune): The car radio waits 180 seconds between
two searches for traffic announcements.
Note: the setting for this function is only useful in “TA SEEK” mode.
AF ON/OFF: Turn the Alternative Frequency function on/off.
When reception is poor and the AF mode is activated, an RDS station
broadcasting the same program is tuned in automatically.
TA VOL: Adjust TA volume.
VOL LAST/ADJUST: Select “VOL LAST” so that the volume level when
the unit switches on is the same volume level before it was last switched
off. Select “VOL ADJUST” so that the unit always switches on at a predefined volume level using the “A VOL” function.
A VOL: Adjust the volume level when VOL ADJUST mode is active.
REG ON/OFF (region on/off): Turn RDS REG mode on/off.
Only regional versions of stations are received when the regional mode
is on.
RDS CT ON/OFF: Turn RDS CT mode on/off.
When receiving an RDS station, the CT (Clock Time) service
automatically adjusts the time when “RDS CT ON” is selected.
Safety Notes:
The DVD video display of the unit will not operate while the vehicle is
moving. This is a safety feature to prevent driver distraction. DVD video
functions will only operate when the vehicle is stopped and the parking
brake is engaged. It is illegal in most countries for the driver to view
videos while the vehicle is in motion.
DVD SETUP menu
In DVD mode, press the DVD SETUP button on the remote control to
display the setup menu on the screen. (A disc must be inserted in the
unit).
Use the / buttons to select one of the following setup items:
“SYSTEM” – “LANGUAGE” – “AUDIO” – “VIDEO” – “DIGITAL”.
Use the / /
/
buttons to select the setting and press the OK
button to confirm.
GB - 16
SYSTEM
LANGUAGE
AUDIO
VIDEO
DIGITAL
DVD Setup
SYSTEM SETUP
TV SYSTEM
Set the TV system: NTSC/PAL/AUTO.
“TV TYPE” (display format)
Select the display format to watch widescreen
movies.
4:3 PS (Pan Scan): For 4:3 screens, the left
and right edges will be cut.
4:3 LB (Letter Box): For 4:3 screens, black
bars will appear at the top and bottom.
16:9: For a widescreen TV.
PASSWORD
The default password is “0000”. To change
the password, enter the old password, and
then enter the new one.
RATING
The rating of the disc is from 1 to 8:
(1): with the maximum limit when playing.
(8): with the minimum limit when playing.
The default setting is “8”.
Note: The rating can only be selected in the
password unlocked status. The limit only
works when the password lock is activated ( ).
SCREENSAVER
Select “ON” (default setting) for the
screensaver to appear when the unit has
stopped for more than 3 minutes.
GB - 17
DVD Setup
SYSTEM SETUP
DEFAULT
Restore the factory default settings.
AUDIO LANGUAGE
Select the default audio language (if several
languages are available on the DVD).
MENU LANGUAGE
Select the default menu language (if several
languages are available on the DVD).
AUDIO SETUP
LANGUAGE SETUP
OSD LANGUAGE
Select the On Screen Display language.
SUBTITLE LANGUAGE
Select the default subtitle language (if several
languages are available on the DVD).
GB - 18
Use the
/
buttons to adjust the setting.
KEY
Use the
/
buttons to adjust the tone.
DVD Setup
VIDEO SETUP
BRIGHTNESS
Adjust the brightness of the display.
CONTRAST
Adjust the contrast of the display.
HUE
Adjust the hue of the display.
SATURATION
Adjust the saturation of the display.
SHARPNESS
Adjust the sharpness of the display.
DIGITAL SETUP
OP MODE
GB - 19
This option allows the user to adjust the
dynamic compression in order to limit
variations in volume.
“LINE OUT”: Compress the signal. The
variation in volume is small.
“RF MOD”: The variation in volume is large.
DYNAMIC RANGE
Select “LINE OUT” in OP MODE to adjust the
compression rate.
Select “FULL” to limit the volume variations as
much as possible. Select “OFF”, to switch off
the dynamic compression function.
DUAL MONO
Select the audio channel: STEREO, MONO L,
MONO R or MIX MONO.
INFORMATION ON DISC COMPATIBILITY
Disc formats supported by this DVD player:
DISC TYPE
DVD
DVD-R
DVD+R
DVD-RW
DVD+RW
SVCD
VCD
CD
HD-CD
MP3/JPEG
CONTENT
SIZE
MAXIMUM TIME
Audio + Video
12 cm
133 min (SS-SL)
242 min (SS-DL)
266 min (DS-SL)
484 min (DS-DL)
Audio + Video
Audio + Video
Audio
Audio
Audio / Image
12 cm
12 cm
12 cm
12 cm
12 cm
45 min
74 min
74 min
74 min
600 min
Chapter:
This is a smaller segment of picture or music within a DVD title. A title is
comprised of one or more chapters, each numbered for easy searching.
Some discs may not have chapters.
Track:
This is a segment of a picture or music on a CD or other disc. Each track
is numbered for easy searching.
Care of discs
• T
he operating characteristics of some DVD discs are specified by the
software maker. Please refer to the disc instruction manual for further
information.
•This DVD Player will play most recordable (CD-R) OR re-writable
(CD-RW) CDs, and most recordable (DVD-R, DVD+R) or re-writable
(DVD-RW, DVD+RW) DVDs. In some cases, discs created by a
computer require finalization of the disc to enable playback. Discs
created by some computers and/or software programs may not be
compatible. This will affect playback but is not the result of a defect in
this device.
Disc terminology:
Title:
Generally, DVDs are divided into several sections called “titles”.
1.Hold the disc on the outer edge and/or the center spindle hole. Do
not touch the disc surface.
2.Do not bend or press the disc.
3.Do not expose the disc to direct sunlight or sources of excessive
heat. Store discs vertically in a cabinet, in dry conditions.
Prevent exposure to:
- direct sunlight
- heat
- extreme humidity.
Clean the disc surface with a soft, dry cleaning cloth. Wipe the disc
surface gently, from the center towards the outer edge.
Do not apply thinner, alcohol, chemical solvent, or sprays to discs when
cleaning them. Such cleaning fluids will permanently damage the disc
surface.
GB - 20
TROUBLESHOOTING GUIDE
The following checklist can help you solve the problems which you may encounter when using the unit. Before consulting it, check the connections and
follow the instructions in the user manual.
Problem
General
The unit will not switch on.
No sound
Possible cause
Solution
Car ignition is not on.
Turn your car key in the ignition.
Cable is not properly connected.
Check cable connection.
Fuse is burnt.
Replace fuse with a new fuse of the same capacity.
Volume is set at minimum or the mute
Check the volume or switch the mute function off.
function is on.
The unit or screen does not function
The unit system is unstable.
normally.
DVD mode
The disc is inserted incorrectly.
The appliance will not play discs.
The disc is dirty or damaged.
Mounting angle is over 30˚.
Sound skips due to vibration.
Mounting is unstable.
TUNER mode
Unable to receive stations.
The antenna is not connected properly.
The antenna is not fully extended or it is
Poor quality reception of radio station.
broken.
The battery cable is not properly
Preset stations are lost.
connected.
USB/SD/MMC mode
Unable to insert USB device or SD/ The memory card or USB device has been
MMC card.
inserted the wrong way round.
Press the RESET button.
Disc must be inserted with the label side facing up. Clean the disc
and check for damage. Try another disc.
Adjust mounting angle to less than 30˚.
Mount the unit securely with the supplied parts.
Connect the antenna properly.
Fully extend the antenna and if broken, replace it with a new one.
Connect the permanent live on the unit to the permanent live on
the vehicle.
Insert it the other way around.
Check that the USB disk file system or memory card is in FAT or
FAT32 format. Due to different formats, some models of USB, SD/
MMC storage devices or MP3 players may not be read.
The USB device or SD/MMC card
NTFS format is not supported.
cannot be read.
Remote control
The remote control is not working or
The batteries are low or empty.
does not work properly
GB - 21
Change the batteries.
Specifications
General
Power supply
Music power output
RMS power output
Speaker impedance required
Pre-amp output voltage
Fuse
Dimensions (W x H x D)
Weight
DVD
12V DC (11V-16V allowable)
40W x 4
25W x 4
4 – 8 Ohm
4.0V (CD mode: 1 kHz, 0 dB, 10 k
load)
15 A
178 x 100 x 164mm
3 Kg
TFT LCD display
Size
Resolution
View angle
Contrast ratio
Brightness
Discs and files supported
Video system
Video output level
Frequency response
Signal to noise ratio
Channel separation
Distortion
DVD, DVD+R/RW, DVD-R/RW, CDDA, CD-R/RW, MP3, JPEG, SVCD,
VCD2.0, MPEG4, Xvid
PAL, AUTO, NTSC
1± 0.2V
20 Hz – 20 kHz
>80 dB
>60 dB
<0.2% (1kHz)
USB/SD/MMC
7” (diagonal), 16:9
480 x 234
130 ˚ (Horizontal), 105 ˚ (Vertical)
300:1
350 cd/m²
USB port type
USB port handling capacity
SD/MMC handling capacity
1.1 (supports 2.0)
2GB
2GB
FM Radio
Frequency range
IF range
Usable sensitivity
Frequency response
Stereo separation
Signal to noise ratio
87.5 – 108.0MHz
10.7MHz
8 dBμ
30 Hz – 15 kHz
30 dB (1 kHz)
>55 dB
MW Radio
Frequency range
Usable sensitivity
Note: Due to continuing improvements, these technical specifications
are subject to change without notice.
522 – 1620kHz
30 dBμ
GB - 22