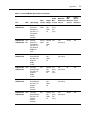
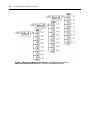
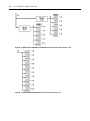
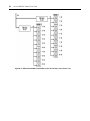
1
For Technical Support:
www.avocent.com/support
AVOCENT PM PDU
Installer/User Guide
590-860-501D
USA Notification
Warning: Changes or modifications to this unit not expressly approved by the party responsible
for compliance could void the user’s authority to operate the equipment.
Note: This equipment has been tested and found to comply with the limits for a Class A digital
device, pursuant to Part 15 of the FCC Rules. These limits are designed to provide reasonable
protection against harmful interference when the equipment is operated in a commercial environment. This equipment generates, uses and can radiate radio frequency energy and, if not installed
and used in accordance with the instruction manual, may cause harmful interference to radio communications. Operation of this equipment in a residential area is likely to cause harmful interference
in which case the user will be required to correct the interference at his own expense.
Canadian Notification
This digital apparatus does not exceed the Class A limits for radio noise emissions from digital
apparatus set out in the Radio Interference Regulations of the Canadian Department of Communications.
Le présent appareil numérique n’émet pas de bruits radioélectriques dépassant les limites applicables aux appareils numériques de la classe A prescrites dans le Règlement sur le brouillage
radioélectrique édicté par le Ministère des Communications du Canada.
Japanese Approvals
Safety and EMC Approvals and Markings
UL, FCC, cUL, ICES-003, CE, GOST-R, C-Tick, IRAM, MIC, CB
Avocent PM PDU
Installer/User Guide
Avocent, the Avocent logo, DSView and DSR are registered trademarks
of Avocent Corporation or its affiliates in the U.S. and other countries.
All other marks are the property of their respective owners.
© 2009 Avocent Corporation. 590-860-501F
Instructions
This symbol is intended to alert the user to the presence of important operating and maintenance (servicing)
instructions in the literature accompanying the appliance.
Dangerous Voltage
This symbol is intended to alert the user to the presence of uninsulated dangerous voltage within the product’s
enclosure that may be of sufficient magnitude to constitute a risk of electric shock to persons.
Power On
This symbol indicates the principal on/off switch is in the on position.
Power Off
This symbol indicates the principal on/off switch is in the off position.
Protective Grounding Terminal
This symbol indicates a terminal which must be connected to earth ground prior to making any other
connections to the equipment.
Functional Earthing Terminal
This symbol indicates a terminal which serves the purpose of establishing chassis ground equal potential.
iii
T A B L E O F C ON T E N T S
Table of Contents
Chapter 1: Introduction ................................................................................................... 1
Features and Benefits ........................................................................................................................ 1
Alarms and monitoring ............................................................................................................... 1
LED display ................................................................................................................................ 1
Power reset button...................................................................................................................... 2
In-rush current control ............................................................................................................... 2
Support for daisy chaining ......................................................................................................... 2
Integration with Avocent management products ........................................................................ 2
DSView 3 software plug-in ......................................................................................................... 2
External sensors.......................................................................................................................... 2
Hardware Configuration Options...................................................................................................... 2
Standalone configuration ........................................................................................................... 3
Daisy chained configuration....................................................................................................... 4
Chapter 2: Installation ..................................................................................................... 5
Getting Started ................................................................................................................................... 5
Supplied with the PM PDU......................................................................................................... 5
Additional items needed.............................................................................................................. 5
Rack Mounting the PM PDU ............................................................................................................. 5
Mounting a horizontal PM PDU ................................................................................................ 6
Mounting a vertical PM PDU..................................................................................................... 7
Rack mount safety considerations .............................................................................................. 9
Safety Precautions ............................................................................................................................. 9
Accessing the PM PDU.................................................................................................................... 10
Console access through a management device ........................................................................ 11
Configuring the PM PDU ................................................................................................................ 11
Default configuration parameters ............................................................................................ 11
Recovering the PM PDU password.......................................................................................... 11
Chapter 3: Accessing the PM PDU via the Web Manager .......................................... 13
Web Manager Overview for Administrators.................................................................................... 13
Wizard Mode.................................................................................................................................... 14
iv
Avocent PM PDU Installer/User Guide
Expert Mode..................................................................................................................................... 16
Access............................................................................................................................................... 16
System Tools .................................................................................................................................... 17
Power Management ......................................................................................................................... 17
PDUs......................................................................................................................................... 17
Settings...................................................................................................................................... 19
Outlet Groups ........................................................................................................................... 19
Data Logging ............................................................................................................................ 20
System .............................................................................................................................................. 20
Security ..................................................................................................................................... 20
Date and Time........................................................................................................................... 22
Help and Language................................................................................................................... 23
Boot Configuration ................................................................................................................... 23
Information ............................................................................................................................... 24
Usage ........................................................................................................................................ 24
Network ............................................................................................................................................ 24
Settings...................................................................................................................................... 24
Devices...................................................................................................................................... 24
IPv4 and IPv6 static routes....................................................................................................... 25
Hosts ......................................................................................................................................... 25
Firewall ................................................................................................................................... 26
SNMP Configuration ....................................................................................................................... 28
Authentication .................................................................................................................................. 29
Appliance authentication .......................................................................................................... 29
Authentication servers .............................................................................................................. 29
Users ................................................................................................................................................ 31
Local accounts .......................................................................................................................... 31
Authorization ............................................................................................................................ 32
Managing user groups.............................................................................................................. 34
Event and Logs................................................................................................................................. 36
Event List .................................................................................................................................. 36
Event Destinations .................................................................................................................... 37
Data Buffering .......................................................................................................................... 37
Appliance Logging.................................................................................................................... 38
Active Sessions ................................................................................................................................. 38
Table of Contents
v
Monitoring ....................................................................................................................................... 39
Change Password ............................................................................................................................ 39
Web Manager Overview for Regular Users .................................................................................... 40
Chapter 4: Accessing the PM PDU via the Command Line Interface........................ 43
Access Options and How to Log Into the CLI ................................................................................. 43
Configuration Tasks Performed With the CLI ................................................................................. 44
CLI Navigation ................................................................................................................................ 44
Autocompletion ................................................................................................................................ 45
Parameters....................................................................................................................................... 46
Command Line Syntax ..................................................................................................................... 46
CLI Command Set ............................................................................................................................ 47
help ........................................................................................................................................... 47
add ............................................................................................................................................ 48
delete......................................................................................................................................... 48
cd............................................................................................................................................... 48
pwd............................................................................................................................................ 49
exit/quit ..................................................................................................................................... 49
ftp .............................................................................................................................................. 49
scp ............................................................................................................................................. 49
set.............................................................................................................................................. 49
commit....................................................................................................................................... 50
revert......................................................................................................................................... 50
show/ls ...................................................................................................................................... 50
cycle, on, off, lock and unlock................................................................................................... 51
passwd ...................................................................................................................................... 51
opiepasswd................................................................................................................................ 51
CLI Equivalent Actions to Web Manager Checkbox Selection........................................................ 52
CLI Overview for Administrators .................................................................................................... 53
System .............................................................................................................................................. 53
System/Security ................................................................................................................................ 53
System/Boot Configuration....................................................................................................... 55
System/Date and Time .............................................................................................................. 55
System/Help and Language ...................................................................................................... 56
System/Information ................................................................................................................... 56
vi
Avocent PM PDU Installer/User Guide
System/Usage............................................................................................................................ 56
Network ............................................................................................................................................ 57
Network/Settings ....................................................................................................................... 57
Network/IPv4 and IPv6 Static Routes....................................................................................... 58
Network/Devices ....................................................................................................................... 58
Network/Hosts .......................................................................................................................... 59
Network/Firewall...................................................................................................................... 61
Network/SNMP ................................................................................................................................ 62
Wiz command............................................................................................................................ 62
Authentication .................................................................................................................................. 63
Users ................................................................................................................................................ 64
Events_and_Logs ............................................................................................................................. 65
Power Management ......................................................................................................................... 66
Active Sessions Information............................................................................................................. 67
Appendices..................................................................................................................... 69
Appendix A: Specifications .............................................................................................................. 69
Appendix B: Outlet Bank Assignment .............................................................................................. 76
Appendix C: Replacing the Fuses (For Service Personnel Only).................................................... 96
Appendix D: Technical Support....................................................................................................... 97
1
CHAPTER
Introduction
1
This guide enables you to install, configure and maintain your Avocent Power Management Power
Distribution Unit (PM PDU).
All Avocent PM PDUs (PM 1000, PM 2000 and PM 3000 PDUs) have strip level metering
capabilities. All attached units can also be managed through a Web Manager, Command Line
Interface (CLI), or serially in conjunction with several Avocent DSR® KVM over IP switches,
ACS 6000 advanced console servers or with DSView® 3 management software.
The 2000 and 3000 models both provide outlet level metering capability, while the 3000 model
also provides outlet level switching.
Metering capability on all Avocent PM units includes:
•
Current - Present, Maximum, Minimum, Average
•
Voltage - Present, Maximum, Minimum, Average
•
Power - Present, Maximim, Minimum, Average
•
Power Factor
•
Cumulative Watt Hour
Features and Benefits
Alarms and monitoring
The Avocent PM PDU delivers accurate, real-time global current monitoring of all connected
devices via the web manager, DSView 3 software or locally through an LED digital display. Users
can set a current alarm threshold that, once exceeded, will cause the PM PDU to sound an alarm or
send a notification message, or both.
LED display
The PM PDU has an LED that displays aggregate current, phase/bank current, outlet current or
temperature. You can use the Function 1 button to switch the type of display and use the Function 2
button to cycle through different targets. Pressing and holding any function button for two seconds
will reset the overcurrent protection.
2
Avocent PM PDU Installer/User Guide
Power reset button
The PM PDU has a power reset button that can be used to reset the PDU without affecting the
power supply to equipment plugged into the PDU.
In-rush current control
The PM PDU incorporates an in-rush current control feature that prevents all power outlet
receptacles from turning on at once, eliminating possible current surges that could render the
equipment inoperable. Together with the global current monitoring, the in-rush current control
feature lets users safely install more equipment on existing power circuits without the worry of
current overloads.
Support for daisy chaining
PM PDUs can be daisy chained to increase capacity by connecting the control interfaces of several
PM PDUs in a series.
Integration with Avocent management products
The PM PDU can be combined with an ACS 6000 console server or DSR KVM over IP switch to
provide power management capabilities and faster problem solving by integrating system access
and power control in a single interface. Please refer to the appropriate product documentation for
more information on how to use the PM PDU with your specific implementation.
DSView 3 software plug-in
The DSView 3 software may be used with the PM PDU to allow IT administrators to remotely
access, monitor and control target devices on multiple platforms through a single, web-based user
interface. For more information, see the DSView 3 Installer/User Guide or the Avocent PM PDU
Technical Bulletin (DSView 3 Software Plug-in).
External sensors
The PM PDU supports external sensors which can monitor a variety of states depending on the
model of the sensor. The PM PDU has two RJ-45 connectors which can be used to connect the
sensors. Contact your Avocent representative for more information about external sensors for the
PM PDU.
Hardware Configuration Options
The PM PDU may be used in one of two hardware configurations:
•
Standalone – Managed independently of any other hardware device.
•
Daisy chained - Multiple PDUs connected to one another and managed by one main Avocent
PM PDU.
Chapter 1: Introduction
3
Standalone configuration
In a standalone configuration, the PM PDU operates independently of any other hardware. The
following graphic displays a PM PDU with the console port connected to a computer running
terminal emulation.
Ethernet
Connection
5
6
3
2
5
1
4
Figure 1.1: Standalone Configuration
Table 1.1: Standalone Configuration Descriptions
Number
Description
Number Description
1
RJ-45 to DB-9F Adaptor (Optional)
4
Servers
2
CAT 5 Cable
5
Workstation
3
IN Port
6
Ethernet Port
NOTE: The installation shows the PM PDU being connected with the RJ-45 to DB-9F adaptor that is shipped
with the product. If your unit does not have a DB-9M COM port, you may use a USB serial adaptor and connect
to a USB port when possible.
4
Avocent PM PDU Installer/User Guide
Daisy chained configuration
In a daisy chained configuration, multiple PM PDUs are connected to one another and managed by
a single main PM PDU. The PM PDUs are linked together with CAT 5 cables connected through
the PM PDU’s IN and OUT ports. Avocent PM PDUs can be daisy chained with Cyclades® PDUs.
NOTE: You cannot daisy chain an Avocent PM PDU from a Cyclades PDU.
You may manage a maximum of five PDUs or a maximum of 128 outlets by connecting multiple
PM PDUs to the main PM PDU. The following example shows two PM PDUs operating in a daisy
chained environment.
Figure 1.2: Daisy Chained Avocent PM PDUs
To daisy chain a PM PDU:
1.
Connect one end of a CAT 5 cable to the OUT port of the main PM PDU, which is connected
to a workstation or management appliance.
2.
Connect the other end of the CAT 5 cable to the IN port of the secondary PM PDU.
Repeat these steps until you have connected the desired number of PM PDUs.
5
CHAPTER
2
Installation
Getting Started
Before installing your Avocent PM PDU, refer to the following list to ensure you have all items
shipped with the PDU, as well as other items necessary for proper installation.
Supplied with the PM PDU
•
PM PDU Quick Installation Guide (QIG)
•
Security Warning Card
•
Power Cord
•
RJ-45 to RJ-45 straight-through CAT 5 cable
•
RJ-45 to DB-9F straight-through adaptor
•
RJ-45 adaptor
•
Mounting brackets, screws and cord retention clips
•
Keyhole mounting kit
NOTE: If your PM PDU model does not have a fixed power input cable, it may ship with a modular cable.
Depending on your site’s location, the modular input power cables included in the box vary.
Additional items needed
If you are configuring the PM PDU in a standalone configuration, you will also need the following
items:
•
One or more RJ-45 to RJ-45 CAT 5 straight-through cables
•
An RJ-45 to DB-9F straight-through adaptor
•
A PC running a terminal emulation program
Rack Mounting the PM PDU
You may rack mount the PM PDU or place it on a desktop or other flat surface. A horizontal PM
PDU can be mounted in a 1U fashion using the included brackets. It can be mounted on either the
front or back to display outlets and LEDs on either the front or rear of the rack. A vertical PM PDU
6
Avocent PM PDU Installer/User Guide
can be mounted utilizing the side bars in the rack. When using the sidebars, the PM PDU can be
mounted with the outlets on either the top end or the bottom end of the PM PDU.
Mounting a horizontal PM PDU
Attach the supplied mounting brackets to the PM PDU using the four retaining screws provided for
each bracket. Align the mounting holes of the brackets with the notched holes on the vertical rail of
the rack and attach with the retaining screws. Attach the supplied retention clips (single retention
clip for 3-port PM PDU, dual retention clip for 6-port PM PDU) using the notches to the side of the
outlets on the PM PDU. Use the provided retention clips or VELCRO® strips to secure the power
cords to the PM PDU.
NOTE: Ensure each bracket is attached to the correct side of the PM PDU so that neither bracket is covering any
part of the air vents on the sides of the PDU.
Figure 2.1: Attaching Mounting Brackets to a Horizontal PM PDU
Figure 2.2: Attaching Retention Clips to a 3-port Horizontal PM PDU
Chapter 2: Installation
7
Figure 2.3: Attaching Retention Clips for a 6-port Horizontal PM PDU
Figure 2.4: Attaching VELCRO® Retention Strips for a Horizontal PM PDU
Mounting a vertical PM PDU
Rack mounting using the toolless keyed mounting hardware
Locate the two pre-installed round plastic keys on the far ends of the back of the PM PDU. Line up
each key with the large end of the keyhole-shaped mounting socket on each end of the rack. Insert
the keys and then pull down to lock the PM PDU in place. Use the provided retention clips or
VELCRO strips to secure the power cords to the PM PDU.
Rack mounting using the universal mounting brackets
Locate the four pre-installed machine screws on the ends of the back of the PM PDU. Remove
these four screws, leaving the the plastic keys installed. Using the same screws you just removed,
attach the L-shaped universal mounting brackets to the PM PDU, making sure they are in the
8
Avocent PM PDU Installer/User Guide
desired orientation. Using two screws (designed for your rack) for each bracket, attach the PM
PDU to the rack. Leave enough space at either end for cable connections. Attach the supplied
retention clips or VELCRO strips using the notches to the side of the outlets on the PM PDU.
NOTE: Ensure the positioning of the bracket does not interfere with equipment in the rack or doors.
Toolless
Mounting
Figure 2.5: Rack Mounting a Vertical PM PDU
Figure 2.6: Attaching Retention Clips for a Vertical PM PDU
Bracket
Mounting
Chapter 2: Installation
9
Figure 2.7: Attaching VELCRO Retention Strips for a Vertical PM PDU
Rack mount safety considerations
•
Elevated Operating Ambient Temperature: If the PM PDU is installed in a closed or multi-unit
rack assembly, the operating ambient temperature of the rack environment may be greater than
room ambient temperature. Therefore, consideration should be given to installing the
equipment in an environment compatible with the manufacturer’s maximum rated ambient
temperature.
•
Reduced Air Flow: Installation of the equipment in a rack should be such that the amount of air
flow required for safe operation of the equipment is not compromised.
•
Mechanical Loading: Mounting of the equipment in the rack should be such that a hazardous
condition is not created due to uneven mechanical loading.
•
Circuit Overloading: Consideration should be given to the connection of the equipment to the
supply circuit and the effect that overloading of circuits might have on overcurrent protection
and supply wiring. Appropriate consideration of equipment nameplate ratings should be used
when addressing this concern.
•
Reliable Grounding: Reliable grounding of rack mounted equipment should be maintained.
Particular attention should be given to supply connections other than direct connections to the
branch circuit, such as power strips or extension cords.
NOTE: Install a PM PDU model in a location where there is an adjacent and accessible socket outlet.
Safety Precautions
Read all the following safety guidelines to protect yourself and your PDU.
WARNING: All outlets of the PDU output high voltage. Necessary precautions should be taken.
10
Avocent PM PDU Installer/User Guide
WARNING: Do not push any objects through the openings of the PDU. Doing so may cause fire or electric shock
by shorting out interior components.
WARNING: There is a possibility of severe electrical shock from either the live or neutral side of any of the power
outlets or their wiring, even if one of the circuit breakers is disabled.
WARNING: The PDU is intended for indoor use only.
WARNING: To help protect the PDU from electrical power fluctuations, use a surge suppressor, line conditioner
or uninterruptible power supply.
WARNING: Be sure that nothing rests on the cables of the PDU and that it is not located where it may be
stepped on or tripped over.
WARNING: Do not spill food or liquids on the PDU. If it gets wet, disconnect the power immediately and contact
Avocent.
WARNING: Keep the PDU away from heat sources.
WARNING: Disconnect power from the product by unplugging the power cord from either the electrical outlet or
the PDU. The AC inlet is the main disconnect for removing power to the PDU. For PDUs that have more than one
AC inlet, to remove power completely, all AC line cords must be disconnected. The socket-outlet shall be
installed near the equipment and shall be easily accessible.
WARNING: The PDU relies on protective devices in building installations. Please refer to Appendix A for Listed
Branch Circuit type protection.
Accessing the PM PDU
Users and administrators may access the PM PDU either by making a direct console connection to
the PM PDU’s IN port or by connecting the PM PDU to an Avocent console server or KVM
switch.
To connect the PM PDU to a computer:
1.
Connect a CAT 5 cable to the IN port on the PM PDU.
2.
Connect the CAT 5 cable to a computer with a terminal emulation program using the RJ-45 to
DB-9F straight-through adaptor or a USB serial adaptor.
3.
Using a terminal emulation program, connect to the PM PDU with the following settings:
ANSI emulation, 9600 bps, 8 bits, no parity, 1stop bit and no flow control.
When prompted, log in either as admin with the default password avocent or as root with the
default password linux.
To connect a PM PDU to an Avocent DSR switch:
1.
Plug the male end of the included RJ-45 adaptor into the DSR switch’s SPC port.
Chapter 2: Installation
2.
11
Plug one end of a straight-through CAT 5 cable into the female end of the adaptor and plug the
other end of the CAT 5 cable into the PM PDU’s IN port.
To connect a PM PDU to an Avocent ACS 6000:
1.
Plug one end of a straight-through CAT 5 cable into one of the ACS 6000’s serial ports.
2.
Plug the other end of the CAT 5 cable into the PM PDU’s IN port.
Console access through a management device
By integrating the PM PDU with an Avocent ACS 6000 console server, DSR switch or DSView 3
software, remote users may access the PM PDU's console port through a menu-driven interface.
Please refer to the appropriate product documentation for more information.
Configuring the PM PDU
The PM PDU may be configured by either of two methods:
•
Command Prompt
•
Browser or text based menu
For information about integrated use with an Avocent management device visit, www.avocent.com
or refer to the appropriate product documentation.
Default configuration parameters
The PM PDU’s default configuration is as follows:
•
User is admin
•
Admin user’s password is pm8
NOTE: The pm8 password is valid only for the console and is used by the main PM PDU in a chain to log in to
chained PM PDUs.
•
All outlets are named. The default name is PDU id_<outlet number>
•
All outlets are unassigned to user
•
All outlets are turned on
•
All outlets are unlocked
Recovering the PM PDU password
To recover the PM root password:
1.
Connect directly to the PM PDU’s console port.
2.
Press the power reset button or power cycle the PM PDU.
3.
Type Ctrl-C to access the uboot prompt.
4.
Type hw_boot single and press Enter.
12
Avocent PM PDU Installer/User Guide
5.
The PM PDU will boot into single-user mode. Type passwd and press Enter.
6.
Enter the new password and confirm.
7.
Type reboot and let the unit boot normally.
13
CHAPTER
3
Accessing the PM PDU via the
Web Manager
Once you’ve connected your Avocent PM PDU to a network, you can access the PM PDU via the
Web Manager. The Web Manager provides direct access to the PM PDU via a graphical user
interface instead of a command-based interface.
NOTE: For instructions on accessing the PM PDU via the command line interface (CLI) or DSView 3 software,
see Chapter 4 beginning on page 43 or the DSView 3 Installer/User Guide.
Web Manager Overview for Administrators
NOTE: For an overview of the Web Manager for regular users, see Web Manager Overview for Regular Users
on page 40.
To log into the Web Manager:
1.
Open a web browser and enter the PM PDU’s IP address in the address field.
2.
Log in as either admin with the password avocent or as root with the password linux.
Figure 3.1 shows a typical Web Manager screen for an administrator and descriptions follow in
Table 3.1.
14
Avocent PM PDU Installer/User Guide
1
2
3
4
Figure 3.1: Administrator Web Manager Screen
Table 3.1: Web Manager Screen Areas
Number Description
1
Top option bar. The name of the appliance and of the logged in user appear on
the left side. Refresh, Print, Logout and Help buttons appear on the right.
2
Tab bar. Displays whether the admin is in Expert or Wizard mode.
3
Side Navigation Bar. Menu options for configuration, viewing of system
information and access to devices. The options change based on user rights.
4
Content area. Contents change based on the options selected in the side
navigation bar.
Wizard Mode
The Wizard mode is designed to simplify the setup and configuration process by guiding an
administrator through the configuration steps. An administrator can configure the Security Profile,
Network and Users Settings using the Wizard.
By default, the first time an administrator accesses the PM PDU through the Web Manager, the
Wizard will be displayed. Subsequent log-ins will open in Expert mode, and once the PM PDU has
Chapter 3: Accessing the PM PDU via the Web Manager
15
been configured, Expert mode becomes the default mode. An administrator can toggle between
Expert and Wizard modes by clicking the tab bar on the Web Manager administrator screen.
Figure 3.2 shows a typical screen when an administrator is in Wizard mode.
Figure 3.2: Wizard screen
The following procedures describe how to configure the PM PDU from the Wizard.
To configure security parameters and select a Security Profile:
1.
Select the Security link in the content area.
2.
Select the desired Security Profile. If using a Custom Security Profile, click the checkboxes
and enter values as needed to configure the services, SSH and HTTP and HTTPS options to
conform with your site security policy.
3.
If you are not using DSView 3 software to manage the appliance, uncheck the Allow Appliance
to be Managed by DSView 3 box.
4.
Click Next to configure the Network or click the Network or Users link to open the appropriate
screen.
To configure network parameters:
1.
Select the Network link in the content area.
2.
Enter the Hostname, Primary DNS and Domain in the appropriate fields.
16
Avocent PM PDU Installer/User Guide
3.
Select the IPv4 or IPv6 method for the ETH0 interface. If using Static, enter the Address, Mask
and Gateway in the appropriate fields.
4.
Click Next to configure Users or click on the Security or Users link to open the appropriate
screen.
To configure users and change the default user passwords:
WARNING: For security reasons, it is recommended you change the default password for both root and admin
users immediately.
1.
Select the Users link in the content area.
2.
Click a username (admin or root) and enter the new password in the Password and Confirm
Password fields.
-orClick Add to add a user. Enter the new username and password in the appropriate fields.
3.
(Optional) To force the user to change the default password, select the User must change
password at next login checkbox.
4.
Assign the user to one or more groups.
5.
(Optional) Configure account expiration and password expiration.
6.
Click Next.
7.
Repeat steps 3-6 as needed to configure new user accounts and assign them to default groups.
8.
Click Save, then click Finish.
Expert Mode
The following tabs are available in the Side Navigation Bar of the Web Manager when an
administrator is in Expert mode.
Access
Click Access to view all PM PDUs connected to the network. Click on a PM PDU’s name to
display its outlets. Click on the arrow next to a PM PDU to display a list of PDUs in a daisychained configuration.
NOTE: For PM 3000 models, you can turn on, turn off or cycle individual outlets from the Action column.
To view and connect to devices using the Web Manager:
1.
Select Access in the Side Navigation Bar. The content area displays the name of the PM PDU
and a list of names or aliases for all installed and configured devices the user is authorized to
access.
Chapter 3: Accessing the PM PDU via the Web Manager
2.
17
Select Appliance Viewer from the Action column. A Java applet viewer appears, which shows
the following:
Welcome to PM1024 <PM1000-24-1024000004>.
Type help for more information.
--:- / cli->
3.
Log in if prompted.
The following table describes the available buttons in the Java applet.
Table 3.2: Java Applet Buttons for Connecting to the Console Server
Button
Purpose
SendBreak
To send a break to the terminal
Disconnect
To disconnect from the Java applet
Select the left icon to reconnect to the server or device; or select the right icon to end
the session and disconnect from the Java applet
System Tools
Click System Tools to display icons which can be clicked to reboot or shut down the PM PDU,
upgrade its firmware, save or restore its configuration, restore it to factory default settings or open a
terminal session with the PM PDU.
NOTE: To upgrade firmware on a PM PDU, the PM PDU must be connected directly to the network and not
through an Avocent appliance or daisy-chained configuration.
Power Management
The following tabs are listed under Power Management in the Side Navigation Bar.
PDUs
To manage a PDU:
1.
Select Power Management - PDUs.
2.
Select the checkbox next to the PDU for which you want to manage power.
3.
Click On, Off, Cycle, Reboot PDU, Reset HW Overcurrent Protection or Factory Defaults if
desired. A confirmation appears. Click OK.
NOTE: The power controls (On, Off and Cycle) will be applied to all outlets of the PDU.
4.
To change the PDU ID, click Rename and enter the name in the New PDU ID field.
5.
Click Save.
18
Avocent PM PDU Installer/User Guide
To view a PDU’s information:
1.
Select Power Management - PDUs.
2.
Click the name of the PDU you want to view or manage.
3.
The Outlet Table with power controls window appears and the Side Navigation Bar displays a
list of options.
4.
To manage outlets of PDU:
a.
Check the box(es) of the outlet number(s) you want to manage.
b.
Click On, Off, Cycle, Lock or Unlock to perform that function for the selected outlet(s).
5.
Click Information in the Side Navigation Bar to view a PDU’s information.
6.
Click Overview, Current, Voltage, Power Consumption, Cumulative Power or Environment in
the Side Navigation Bar to view a table with appropriate information.
7.
To reset values, check the box next to the outlet you want to reset and click Reset Values to
clear Max, Min and Average values.
To manage outlets on a PDU:
1.
Select Power Management - PDUs and click on the name of the PDU you want to manage.
2.
Click Settings to expand the Side Navigation Bar.
3.
Click Outlets.
4.
Click on an outlet number to change its settings. You can change the Name, Post On Delay,
Post Off Delay, Current Critical Threshold, Current Warning Threshold and Current Low
Warning Threshold.Click Save, then click Close.
-orCheck two or more boxes next to the outlets for which you want to change settings. Click Edit.
You can change the Prefix Name (the outlet name will be the Prefix Name with an underscore
and the outlet number), Post On Delay, Post Off Delay, Current Critical Threshold, Current
Warning Threshold and Current Low Warning Threshold. Click Save.
5.
Click PDU to see PDU settings. You can configure Cold Start Delay and Current Threshold(s).
Click Save when finished.
6.
Click Phases or Banks.
7.
a.
Click on the name of a phase or bank to change its settings, or click one or more boxes
next to the phase(s) or bank(s) you want to change. You can change the Current Critical
Threshold, Current Warning Threshold and Current Low Warning Threshold.
b.
Click Save to save the settings and click Close to return to the Phases or Banks screen.
Click Environment.
a.
Click on the name of a sensor to change its settings. You can configure a sensor’s name
and its thresholds. Click Save.
Chapter 3: Accessing the PM PDU via the Web Manager
19
NOTE: The PDU model defines available parameters in the Settings window.
Settings
Select Power Management-Settings to view and configure power management settings.
To manage PDU settings:
1.
Select Power Management - Settings.
2.
In the Password field, enter the password an administrator can use to log in to the PDU from its
console port. This password is saved in plain text format and it is not the secure password of an
admin user, which by default is set as avocent. The password is also used by the PM PDU to
connect to any daisy-chained PDUs.
3.
Enter the polling rate (in seconds) the PM PDU will use to retrieve data from daisy-chained
PDUs.
4.
Enter the power cycle interval (in seconds) and then use the drop-down menus to enable or
disable syslog, buzzer and SW overcurrent protection. These settings will apply to all PDUs in
a daisy-chained configuration.
5.
To enable data logging, check the box next to Enable Data Logging.
6.
Click Save.
Outlet Groups
By selecting the Outlet Groups tab, you can view status, outlet and power consumption for outlet
groups. You can also turn on, turn off or cycle selected outlet groups.
To add an outlet group:
1.
Select Power Management - Outlet Groups. The Outlet Groups window appears.
2.
Click Add. The Add Group window appears.
3.
Enter the name of the Outlet Group in the Group Name field.
4.
Click Save.
To manage outlet groups:
1.
Select Power Management - Outlet Groups. The Outlet Groups window appears.
2.
Check the box next to the name of the Outlet Group you want to manage.
3.
Click Delete to remove the outlet group. Click On, Off or Cycle as desired.
NOTE: If the command fails for one outlet, the entire command is rejected so no outlets in the group will change.
To configure an outlet group:
1.
Select Power Management - Outlet Groups. The Outlet Groups window appears.
20
Avocent PM PDU Installer/User Guide
2.
Click the name of the outlet group you want to configure. The Outlet Group Details window
appears.
3.
Click Add. The Outlet Settings window appears.
4.
Click the radio button next to Select PDU to use a connected PDU. Enter the outlets to be part
of the group in the outlets field.
-orClick the radio button next to Custom and enter the PDU ID and outlets in the appropriate
fields.
5.
Click Save.
To view and change outlet group information:
1.
Select Power Management - Outlet Groups. The Outlet Groups window appears.
2.
Click on the name of the outlet group for which you want to view information. The Outlet
Group Information window appears displaying outlet, status and power consumption
information.
Data Logging
By selecting the Data Logging tab, you can clear or export data logging for PDU, phase, bank,
outlet or environment.
To clear data logging:
1.
Select Power Management - Data Logging. The Data Logging window appears.
2.
Select the checkbox next to the type you want to clear.
3.
Click Clear Data Logging. A confirmation box opens. Click OK.
To export data logging:
1.
Select Power Management - Data Logging. The Data Logging window appears.
2.
Select the checkbox next to the type you want to export.
3.
Click Export Data Logging. The Export Data Logging window appears.
4.
Select to export data logging to either an FTP Site or to a Local File, then click Save.
System
Click System to display information about the PM PDU and allow an administrator to configure the
PM PDU’s system parameters. The following tabs are listed under System in the Side Navigation
Bar.
Security
Security Profiles determine which network services are enabled on the PM PDU.
Chapter 3: Accessing the PM PDU via the Web Manager
21
During initial configuration, the PM PDU administrator must configure security parameters to
conform with the site security policy. The following security features can be configured either in
the Web Manager, CLI or the DSView 3 software:
•
Configure the session idle time-out
•
Enable or disable RPC
•
Enable outlet access control by authorized user groups.
•
Select a Security Profile, which defines:
•
Enabled services (FTP, ICMP, IPSec and Telnet)
•
SSH and HTTP/HTTPS access
The administrator can select either a preconfigured Security Profile or create a custom profile.
All the services and the SSH and HTTP/HTTPS configuration options that are enabled and disabled
for each Security Profile are shown in the Wizard - Security and the System - Security - Security
Profile pages.
To configure the Security Profile:
1.
Select System - Security - Security Profile.
2.
In the Idle Timeout field, enter the number of seconds before the PM PDU times out open
sessions.
NOTE: This value applies to any user session to the appliance via HTTP, HTTPS, SSH, Telnet or CONSOLE
port. The new idle time-out will be applied to new sessions only.
3.
Under the Enabled Services section, enable or disable the RCP checkbox.
4.
Under the Authorization heading, uncheck the box if you want to allow regular users to be able
to control outlets.
5.
Select the checkbox for Custom, Moderate, Open or Secure under the Security Profile heading.
6.
a.
If using a Custom security profile, to enable Telnet, FTP, SNMP or ICMP, check the
appropriate box(es) in the Enabled Servies field.
b.
Use the pull-down menu to set the version, check the box to allow root access and enter
the TCP Port number in the SSH field.
c.
Enable HTTP and HTTPS by checking the appropriate boxes in the WEB field.
d.
Enter the numbers for the HTTP and HTTPS ports in the appropriate fields.
e.
Use the pull-down menu to set the HTTPS SSL Version.
f.
Check the box to redirect HTTP/HTTPS.
Click Save.
You can also configure DSView 3 software security settings. When the PM PDU is managed by the
DSView 3 software, the DSView 3 server will supply the certificate to the PM PDU. Under normal
conditions, the DSView 3 software will manage the certificate to clear and replace it with a new
22
Avocent PM PDU Installer/User Guide
certificate as needed. If communication with the DSView 3 software is lost, the DSView 3 server
will be unable to clear the certificate and the PM PDU cannot be used. Click the Clear DSView 3
Certificate button to configure the PM PDU in Trust All mode.
To configure DSView 3 software security settings:
1.
Select System - Security - DSView 3.
2.
Click the Allow appliance to be managed by DSView 3 checkbox and click Save.
Date and Time
The PM PDU provides two options for setting the date and time. It can retrieve the date and time
from a network time protocol (NTP) server, or you can set the date and time manually so that the
PM PDU’s internal clock is used to provide time and date information.
NOTE: The Current Time displayed in the Date & Time screen shows only the time when the screen was
opened. It does not continue to update in real time.
To set the time and date using NTP:
1.
Click System - Date And Time.
2.
Select Enable network time protocol.
3.
Enter the NTP server site of your choice and click Save.
To set the time and date manually:
1.
Click System - Date And Time.
2.
Select Set manually.
3.
Using the drop-down menus, select the required date and time and click Save.
To set the time zone using a predefined time zone:
1.
Click System - Date And Time - Time Zone.
2.
Select Predefined.
3.
Select the required time zone from the drop-down menu and click Save.
To define custom time zone settings:
1.
Click System- Date And Time - Time Zone.
2.
Select Define Time Zone.
3.
Enter the Time Zone Name and Standard Time Acronym of your choice.
4.
Enter the GMT Offset.
5.
Select Enable daylight savings time if needed.
6.
Select or enter the required values for daylight savings time settings and click Save.
Chapter 3: Accessing the PM PDU via the Web Manager
23
Help and Language
Click System - Help And Language and use the drop-down menu to select the PM PDU’s language.
Enter the full URL of the online help, ending in /index.html, on the local web server in the Online
Help URL field. Click Save.
Online help
When the online help feature is configured for your PM PDU, clicking the Help button from any
form on the Web Manager opens a new window and redirects its content to the configured path for
the online help product documentation.
NOTE: Using the online help feature from the Avocent/Cyclades server is not always possible due to firewall
configurations, nor is it recommended. It is generally advisable for you to use the online help system provided
with the product or download the online help .zip file and run it from a local server.
The system administrator can download the online help from Avocent. For more information on
downloading the online help, contact Technical Support.
Once the online help file is obtained (in zip format), the files must be extracted and put in to a userselected directory under the web server’s root directory. The web server must be publicly
accessible.
Boot Configuration
Boot configuration defines the location from which the PM PDU loads the operating system. The
PM PDU can boot from its internal firmware or from the network. By default, the PM PDU boots
from Flash memory. Clicking System- Boot Configuration will display the Boot Configuration
screen.
If you need to boot from the network, make sure the following prerequisites are met:
•
A TFTP or BootP server must be available on the network
•
An upgraded PM PDU boot image file must be downloaded from Avocent and made available
on the TFTP or BootP server
•
The PM PDU must be configured with a fixed IP address
•
The boot filename and the IP address of the TFTP or BootP server is known
To configure boot configuration:
1.
Click System - Boot Configuration.
2.
Under Boot Mode, select From Flash, and select Image 1 or Image 2.
-orSelect From Network and enter the following information:
•
Appliance IP Address: Enter the fixed IP address or a DHCP assigned IP address to the
PM PDU.
24
Avocent PM PDU Installer/User Guide
•
TFTP Server IP: Enter the IP address of the TFTP boot server.
•
Filename: Enter the filename of the boot firmware.
3.
Using the drop-down menu, select whether the Watchdog Timer is enabled. If the Watchdog
Timer is enabled, the PM PDU reboots if the software crashes.
4.
Using the drop-down menu, select one of the following speeds for Ethernet 0: 100BT full,
100BT half, 10BT full, 10BT half or Auto. Click Save.
NOTE: Ethernet Mode will be affected after saving. The rest of the configuration will be applied after rebooting.
Information
Click System-Information to view the PM PDU’s identity, versions and CPU information.
Usage
Click System-Usage to view memory and Flash usage.
Network
Click Network to view and configure the network options for Hostname, DNS, IPv6, IPv4 and IPv6
static routes, Hosts, Firewall and SNMP.
Settings
Click Network - Settings to make changes to the configured network settings.
Devices
An administrator can select, enable and configure the IP addresses assigned to the network
interface and view the MAC address. A PM PDU has a single eth port and cannot have any plugged
in eth port.
To configure a network device:
1.
Select Network - Devices. The Devices screen appears with a list of network interfaces and
their status (enabled or disabled).
2.
Click the name of the network device to configure.
3.
Select the status (either Enabled or Disabled) from the drop-down menu.
4.
5.
Select one of the following IPv4 method options:
•
Select DHCP to have the IPv4 IP address set by the DHCP server.
•
Select Static to enter the IPv4 IP address and subnet mask manually.
•
Select IPv4 address unconfigured to disable IPv4.
Select one of the following IPv6 method options:
•
Select Stateless if the link is restricted to the local IP address.
•
Select DHCPv6 to have the IPv6 IP address set by the DHCP server.
Chapter 3: Accessing the PM PDU via the Web Manager
6.
•
Select Static to enter the IPv6 IP address and prefix length manually.
•
Select IPv6 address unconfigured to disable IPv6.
25
Select the Ethernet Mode for the built-in interface (ETH0).
NOTE: The MAC Address for the device will be displayed after this option.
IPv4 and IPv6 static routes
An administrator can select Network - IPv4 Static Routes or IPv6 Static Routes to configure static
routes.
To add static routes:
1.
Select Network - IPv4 Static Routes or IPv6 Static Routes. Any existing static routes are listed
with their Destination IP/Mask, Gateway, Interface and Metric values shown.
2.
Click Add.
3.
Select Default to configure the default route.
-orSelect Host IP Or Network to enter custom settings for Destination IP/Mask.
Enter the required Destination IP/Mask Bits with the syntax <destination IP>/<CIDR> in the
Destination IP/Mask Bits field.
4.
Enter the IP address of the gateway in the Gateway field.
5.
Enter the number of hops to the destination in the Metric field, then click Save
Hosts
An administrator can configure a table of host names, IP addresses and host aliases for the local
network.
To add a host:
1.
Select Network - Hosts.
2.
Click Add to add a new host.
3.
Enter the IP address, hostname and alias of the host you want to add, then click Save.
To edit a host:
1.
Select Network - Hosts.
2.
Click on the IP address of the hostname you want to edit.
3.
Enter a new hostname and alias, as applicable, then click Save.
26
Avocent PM PDU Installer/User Guide
Firewall
Administrators can configure the PM PDU to act as a firewall. By default, three built-in chains
accept all INPUT, FORWARD and OUTPUT packets. Select the Add, Delete or Change Policy
buttons to add a user chain, delete user added chains and to change the built-in chains policy.
Default chains can have their policy changed (Change Policy) to accept or drop, but cannot be
deleted. Clicking on the Chain Name allows you to configure rules for chains.
Firewall configuration is available by clicking Network - Firewall. Separate but identical
configuration screens are available from either the IPv4 Filter Table or IPv6 Filter Table menu
options.
Only the policy can be edited for a default chain; default chain policy options are ACCEPT and
DROP.
When a chain is added, only a named entry for the chain is created. One or more rules must be
configured for a chain after it is added.
Configuring the firewall
For each rule, an action (either ACCEPT, DROP, RETURN, LOG or REJECT ) must be selected
from the Target pull-down menu. The selected action is performed on an IP packet that matches all
the criteria specified in the rule.
If LOG is selected from the Target pull-down menu, an administrator can configure a Log Level, a
Log Prefix and whether the TCP sequence, TCP options and IP options are logged in the Log
Options Section.
If REJECT is selected from the Target pull-down menu, an administrator can select an option from
the Reject with pull-down menu; the packet is dropped and a reply packet of the selected type is
sent.
Protocol options
Different fields are activated for each option in the Protocol pull-down menu.
•
If Numeric is selected from the Protocol menu, enter a Protocol Number in the text field.
•
If TCP is selected from the Protocol menu, a TCP Options Section is activated for entering
source and destination ports and TCP flags.
•
If UDP is selected from the Protocol menu, the UDP section is activated for entering source
and destination ports.
Chapter 3: Accessing the PM PDU via the Web Manager
27
Table 3.3: Firewall Configuration - TCP and UDP Options Fields
Field/Menu Option
Definition
Source Port
- or Destination Port
A single IP address or a range of IP addresses.
TCP Flags
[TCP only] SYN (synchronize), ACK (acknowledge), FIN (finish), RST (reset),
URG (urgent) and PSH (push). The conditions in the pull-down menu for each
flag are: Any, Set or Unset.
•
If ICMP is selected from the Protocol menu, the ICMP Type pull-down menu is activated.
•
If an administrator enters the Ethernet interface (eth0 or eth1) in the input or output interface
fields and selects an option (2nd and further packets, All packets and fragments or
Unfragmented packets and 1st packets) from the Fragments pull-down menu, the target action
is performed on packets from or to the specified interface if they meet the criteria in the
selected Fragments menu option.
To add a chain:
1.
Select Network - Firewall.
2.
Select either IPv4 Filter Table or IPv6 Filter Table as needed.
3.
Click Add.
4.
Enter the name of the chain to be added.
5.
Click Save.
NOTE: Spaces are not allowed in the chain name.
6.
Add one or more rules to complete the chain configuration.
To change the policy for a default chain:
NOTE: User-defined chains cannot be edited. To rename a user-added chain, delete it and create a new one.
1.
Select Network - Firewall.
2.
Select either IPv4 Filter Table or IPv6 Filter Table as needed.
3.
Select the checkbox next to the name of the chain you want to change (FORWARD, INPUT,
OUTPUT).
4.
Click Change Policy and select Accept or Drop from the drop-down menu.
5.
Click Save.
To add a rule:
1.
Select Network - Firewall.
2.
Select either IPv4 Filter Table or IPv6 Filter Table as needed.
3.
From the chain list, click the name of the chain you want to add a rule to.
28
Avocent PM PDU Installer/User Guide
4.
Click Add and configure the rule as needed, then click Save.
To edit a rule:
1.
Select Network - Firewall.
2.
Select either IPv4 Filter Table or IPv6 Filter Table as needed.
3.
From the chain list, click the name of the chain with the rule you want to edit.
4.
Select the rule you want to edit and click Edit.
5.
Modify the rule as needed and click Save.
SNMP Configuration
An administrator can configure SNMP, which is needed if notifications are to be sent to an SNMP
management application.
To configure SNMP:
1.
Click Network - SNMP.
2.
Click the System button.
a.
b.
Enter the SysContact information (email address of the PM PDU’s administrator, for
example, [email protected]).
Enter the SysLocation information (physical location of the PM PDU, for example,
Avocent_pmpdu), then click Save to go back to the SNMP screen.
3.
Click Add to add a new community or v3 user.
4.
Enter the community name for SNMP v1/v2 or the user name for SNMP v3 in the Name field
and enter the OID.
5.
Select the desired permission from the pull-down menu. Choices are Read and Write or Read
Only.
6.
If the required SNMP version is v1 or v2, click the Version v1, v2 button, then enter the source
(valid entry is the subnet address).
-orIf the required SNMP version is v1 or v2 using an IPv6 network, click the Version v1,v2 for
IPv6 network button, then enter the source (valid entry is the subnet address).
-orIf the required SNMP version is v3, click the Version v3 button, then select the Authentication
Type (MD5 or SHA), enter the authentication passphrase or password, enter the privacy
passphrase for DES and select the Minimum Authentication Level (NoAuthNoPriv,
AuthNoPriv, AuthPriv).
7.
Click Save.
Chapter 3: Accessing the PM PDU via the Web Manager
29
Authentication
Authentication can be performed locally, with OTP, or on a remote Kerberos, LDAP, NIS, Radius
or TACACS+ authentication server. If the PM PDU is managed by a DSView 3 server, DSView 3
authentication is also supported. The PM PDU also supports remote group authorizations for the
LDAP, Radius and TACACS+ authentication methods.
Fallback mechanisms of the following types are available:
Local authentication can be tried first, followed by remote, if the local authentication fails (Local/
Remote_Method)
-orRemote authentication may be tried first, followed by local (Remote_Method/Local)
-orLocal authentication may be tried only if a remote authentication server is down
(Remote_Method_Down_Local).
An administrator can configure authentication using the CLI utility and the Web Manager. The
default authentication method for the PM PDU is Local. Any authentication method that is
configured for the PM PDU is used for authentication of any user who attempts to log in through
Telnet, SSH or the Web Manager.
Appliance authentication
Select Appliance Authentication to configure the authentication method used to log in to the PM
PDU with access to all allowed operations in the appliance, PDUs and outlets.
To set authentication for the PM PDU:
1.
Click Authentication - Appliance Authentication.
2.
Select the desired authentication server from the Authentication Type drop-down menu.
3.
Click Save.
Authentication servers
When using an authentication server, you must configure its IP address and in most cases other
parameters before it can be used. The following authentication servers require configuration:
RADIUS, TACACS+, LDAP(S)|AD, Kerberos, NIS and DSView 3 servers.
To configure a RADIUS authentication server:
1.
Select Authentication - Authentication Servers - RADIUS.
2.
Enter the IP addresses of the First Authentication Server and First Accounting Server.
3.
If used, enter the IP addresses for the Second Authentication Server and Second Accounting
Server.
30
Avocent PM PDU Installer/User Guide
4.
Enter your secret word or passphrase in the Secret field (applies to both first and second
authentication and accounting servers), then re-enter the secret word or passphrase in the
Confirm Secret field.
5.
Enter the desired number of seconds for server time-out in the Timeout field.
6.
Enter the desired number of retries in the Retries field.
7.
If you select the Enable Service-Type attribute to specify the authorization group checkbox,
enter the authorization group name for each of the following Service Types: Login, Framed,
Callback Login, Callback Framed, Outbound and Administrative.
8.
Click Save.
To configure a TACACS+ authentication server:
1.
Select Authentication - Authentication Servers - TACACS+.
2.
Enter the IP addresses for the First Authentication Server and First Accounting Server.
3.
If used, enter the IP addresses of the Second Authentication Server and Second Accounting
Server.
4.
Select the desired service (PPP or raccess) from the Service drop-down menu.
5.
Enter your secret word or passphrase in the Secret field (applies to both first and second
authentication and accounting servers), then re-enter the secret word or passphrase in the
Confirm Secret field.
6.
Enter the desired number of seconds for server time-out in the Timeout field.
7.
Enter the desired number of retries in the Retries field.
8.
If you select the Enable User-Level attribute of Shell and raccess services to specify the
authorization group checkbox, enter the authorization group name for up to 15 User-Levels.
9.
Click Save.
To configure an LDAP(S)|AD authentication server:
1.
Select Authentication - Authentication Servers - LDAP(S)|AD.
2.
Enter the IP address of the server.
3.
Enter the Base.
4.
At the Secure drop-down menu, select Off, On or Start_TLS.
5.
Enter the Database User Name.
6.
Enter your Database Password, then re-type the database password in the Confirm Password
field.
7.
Enter your desired Login Attributes.
8.
Click Save.
To configure a Kerberos authentication server:
1.
Select Authentication - Authentication Servers - Kerberos.
Chapter 3: Accessing the PM PDU via the Web Manager
2.
Enter the IP address (Realm) of the server.
3.
Enter the Realm Domain Name (example: avocent.com).
4.
Enter the Domain Name (example: avocent.com).
5.
Click Save.
31
To configure an NIS authentication server:
1.
Select Authentication - Authentication Servers - NIS.
2.
Enter the NIS Domain Name of the server (example: corp.avocent.com).
3.
Enter the NIS Server Address or broadcast (default is broadcast).
4.
Click Save.
To configure a DSView 3 authentication server:
1.
Select Authentication - Authentication Servers - DSView 3.
2.
Enter IP Address 1 - 4 for the DSView 3 servers in the relevant fields.
3.
Click Save.
Users
There are three standard local user account types supported on a PM PDU: admin, root and user.
Local accounts
The admin and root accounts are equivalent users but named differently to address users familiar
with either Avocent or Cyclades equipment. Regular users can be granted permissions by
administrators at any time. The PM PDU has three user account types:
•
admin: Performs the initial network configuration. The factory default password for admin is
avocent. The admin user is a member of the admin group and can configure the PM PDU as
well as user and group authorizations.
•
root: Has the same permissions as the admin user. The factory default password for root is
linux. In the PM PDU, the root user is a member of the admin group and shell-login-profile
groups. When a root user logs in via the CONSOLE port, SSH or telnet, the session is predefined by the login profile to go directly to shell. The login profile can be customized so that
it does not go directly to shell.
NOTE: Change the default passwords for root and admin before you put the PM PDU into operation.
•
Administrator-added regular users: Have limited access to the Web Manager features based on
the group(s) to which they are assigned. Users can change their own passwords.
To add new users:
1.
Click Users - Local Accounts - User Names. The User Names screen is displayed with a list of
all users.
32
Avocent PM PDU Installer/User Guide
2.
Click Add. The Local User Information screen is displayed.
3.
Enter the new username and enter a password, then confirm the password.
4.
Select or deselect User must change password at the next login checkbox.
5.
If you wish to add the user to an available user group, select the user group name in the box on
the left and click Add (user is the default group). You can remove a user group from the box at
right by selecting it and clicking Remove.
6.
Enter the desired parameters for Password Expiration.
•
Min Days: Enter the minimum number of days allowed between password changes.
Password changes attempted sooner will be rejected. If not specified, -1 is the default
which disables the restriction.
•
Max Days: Enter the maximum number of days a password is valid. After this period, a
password change will be forced. If not specified, -1 is the default which disables the
restriction.
•
Warning Days: Enter the number of days that a warning is issued to the user prior to
expiration. Entering 0 will cause the warning to be issued on the expiration day. A
negative value or no value means that no warning will be issued.
7.
Enter the desired Account Expiration date (YYYY-MM-DD).
8.
Click Save.
To delete users:
1.
Click Users - Local Accounts - User Names. The User Names screen is displayed with a list of
all users.
2.
Check the box next to the user to be deleted.
3.
Click Delete. A confirmation box appears. Click OK.
To configure password rules:
1.
Click Users - Local Accounts - Password Rules.
2.
If password complexity is desired (recommended), make sure Check Password Complexity is
selected.
3.
If password complexity is enabled, enter the desired values for password complexity.
4.
Enter the desired values for Default Expiration.
5.
Click Save.
Authorization
There are three default user groups on a PM PDU:
•
admin
•
admin-appliance
•
user
Chapter 3: Accessing the PM PDU via the Web Manager
33
User groups are given access and authorizations either by default or as assigned by an
administrator. Administrators can alter the permissions and access rights of users belonging to the
appliance-admin or user groups or create additional groups with custom permisssions and access
rights. Administrators can add, delete or modify permissions and access rights for users from any
group at any time.
admin group
Members of the admin group have full administrative privileges that cannot be changed.
Administrators can add users and manage outlets connected to the PM PDU.
NOTE: The only configuration allowed for the admin group is adding or deleting regular users.
To view admin Appliance Access Rights:
1.
Click Users - Authorization - Groups. The Group Names screen is displayed, showing the
three default user groups along with any groups that have been created.
2.
Click on admin under the Group Name heading. The content area will display the Members
screen listing all members belonging to the admin group (default members are admin and root
users).
NOTE: When any Group Name is selected, both the content area and Side Navigation Bar change. The Side
Navigation Bar will display specific menu options for Members and Access Rights (which include Power and
Appliance rights).
3.
In the Side Navigation Bar, click Power or Appliance to access the screens displaying the fixed
access rights and permissions for members of the admin group pertaining to power
management and appliance management.
NOTE: The Power screen is read-only and cannot be changed.
4.
In the Side Navigation Bar, click on Access Rights - Appliance. The Appliance Access Rights
screen appears and lists all access rights available to a member belonging to the admin group.
All appliance access rights are shown enabled (checked). Available appliance access rights are:
•
View Appliance Information
•
Disconnect Sessions and Reboot Appliance
•
Appliance Flash Upgrade and Reboot Appliance
•
Configure Appliance Settings
•
Configure User Accounts
•
Backup/Restore Configuration
•
Shell Access
•
Transfer Files
34
Avocent PM PDU Installer/User Guide
NOTE: The Appliance Access Rights screen for the admin and appliance-admin user groups is read-only and
cannot be changed. Unchecking any box and clicking Save will result in an error message. The PM PDU will
maintain all rights selected.
appliance-admin group
Members of the appliance-admin group have access restricted to tasks for managing only the
appliance. Appliance-admin user group members have no access to power management options,
and share all of the appliance access rights as admin except for Configure User Accounts and Shell
Access, which are permanently disabled for this group.
user group
Members of the user group have access to target devices unless they are restricted by an
administrator but have no access rights for the PM PDU. Administrators can add appliance access
rights and permissions, or can add users to custom user groups to add permissions and access rights
as needed. By default, all selections on the Appliance Access Rights screen will be disabled.
NOTE: The Appliance Access Rights screen for the user group can be changed at any time by an administrator.
This will change the access rights for all members of the PM PDU’s user group.
Managing user groups
Administrators and members of the admin group can create custom user groups that contain any
users. Permissions and access for custom user groups will be determined by the top-level user
group permissions.
To create a custom user group:
1.
Click Users - Authorization - Groups. The Groups screen is displayed and contains a list of the
three default user groups and any additional custom user groups that have been created.
2.
Click Add in the content area.
3.
Enter the name of the new user group you are creating.
4.
Click Save.
To add or remove members for a user group:
1.
Click Users - Authorization - Groups.
2.
Click the user group name.
3.
Click Add. The Members Assignment screen is displayed showing a list of available users in
the left box and an empty box on the right.
4.
Move users from the Available Users box on the left to the box on the right by double-clicking
on the username, or by selecting the name and clicking the Add button. You can remove any
names from the box on the right by double-clicking on the name or by selecting the name and
clicking the Remove button.
Chapter 3: Accessing the PM PDU via the Web Manager
5.
If you want to add remote users to the new user group (these must be valid names in your
remote authentication server), add them in the New Remote Users field.
6.
Click Save.
35
To delete members from a user group:
1.
Click Users - Authorization - Groups.
2.
Click the user group name.
3.
Check the box(es) of the member(s) you want to remove. Click Delete to delete the selected
members.
To configure a login profile for a user group:
1.
Click Users - Authorization - Groups.
2.
Click on the name of the group whose login profile you want to set. In the Side Navigation Bar,
click Login Profile.
3.
Check the Enable Log-In Profile box.
4.
Click CLI to use CLI when opening a session. Enter the CLI command in the CLI cmd field
and check the box if you want to exit after executing the command.
5.
Click Save.
NOTE: If the user belongs to multiple groups, the login profile used will be the first enabled login profile based on
alphabetical order of the group.
To assign PDU access for a user group:
NOTE: Assigning PDU access to a user group gives them full access to all power management functions for that
PDU. If you want the user group to have access to outlets only, use the next procedure.
1.
Click on Users - Authorization - Groups.
2.
Click on the user group name.
3.
In the Side Navigation Bar, click Access Rights - Power.
4.
In the content area, click Add. The PDU Assignment screen appears with the list of available
PDUs in the left box.
5.
Move PDU devices from the Available PDU box on the left to the box on the right by doubleclicking on the PDU name, or by selecting the PDU and clicking the Add button. You can
remove any PDUs from the box on the right by double-clicking on the PDU name or by
selecting the PDU and clicking the Remove button.
6.
You can specify a custom PDU ID in the field at bottom and assign it a custom PDU ID.
7.
Click Save.
36
Avocent PM PDU Installer/User Guide
To assign outlet access for a new custom user group:
NOTE: Assigning outlet access to user groups allows group members to turn outlets on or off, and enable locking
and power cycle capabilities on compatible PDUs.
1.
Click Users - Authorization - Groups.
2.
Click on the new user group name.
3.
In the Side Navigation Bar, click Access Rights - Power - Outlets.
4.
Click Add. The Add Outlet screen is displayed.
5.
For connected PDUs, click the Select PDU button to activate the Connected PDUs and Outlets
fields.
6.
Select Connected PDU from the pull-down menu.
7.
Enter the outlets assigned to the user group.
NOTE: Outlets can be specified individually, (for example 1,3,6,8) or as a range (for example 1-4) or a
combination of both, (for example 1-4,6,8 which assigns access to outlets 1, 2, 3, 4, 6 and 8).
8.
If a custom PDU ID has been created for future use, and you want to pre-assign outlets, click
the Custom button to enter the custom PDU ID name and specify the outlets.
9.
Click Save.
To assign appliance access rights for custom user groups:
1.
Click Users - Authorization - Groups.
2.
Click the new user group name.
3.
In the Side Navigation Bar, click Access Rights - Appliance.
4.
Select the desired appliance access rights and click Save.
Event and Logs
The PM PDU will generate notifications for a wide variety of events. You can configure it to direct
or store those event notifications to various destinations for immediate use or for analysis later.
Event List
The Event List screen lists PM PDU events, each of which can be configured for SNMP Traps,
Syslog, DSView 3 software, Email and SMS.
To configure Events:
1.
Click Events and Logs - Events.
2.
Locate the events for which you want notification sent and select the checkbox(es) next to the
event number(s).
3.
Click Edit.
Chapter 3: Accessing the PM PDU via the Web Manager
37
4.
If you want an event notification sent for any configured event destination type, click its
associated Send checkbox.
5.
Click Save. The Events page appears with an X in the column below the destination type if the
Send box was checked on the Events Settings screen.
Event Destinations
To configure Event Destinations:
1.
Click on Event and Logs - Event Destinations.
2.
Under the Syslog heading, use the drop-down menu to select the Facility.
3.
Select Remote Server - IPv4 to enable syslog messages to be sent to one or more remote IPv4
syslog servers, and enter the IPv4 Address or Hostname. Separate multiple server addresses by
commas.
-orSelect Remote Server - IPv6 to enable syslog messages to be sent to one or more remote IPv6
syslog servers, and enter the IPv6 Address or Hostname. Separate multiple server address by
commas.
4.
Select Appliance Console to send messages to the PM PDU’s console.
5.
Select Root Session to send syslog messages to all sessions where you are logged in as root
user.
6.
Under the SNMP Trap heading, enter the name of the community defined in one or more of the
SNMP trap servers in the Community field then enter the IP addresses of up to five servers in
the server fields.
7.
Under the SMS heading, enter the SMS Server, Port and Pager Number information in the
appropriate fields.
8.
Under the Email heading, enter the Server, Port and Destination Email information in the
appropriate fields.
9.
Under the DSView 3 heading, enter the IP address of the DSView 3 server where event
notifications will be sent in the DSView 3 server field. Enter the syslog server port number for
the DSView 3 server, the SSH information and the buffer warning information in the
appropiate fields.
10. Click Save.
Data Buffering
To configure Data Buffering:
1.
Select Events and Logs - Data Buffering.
2.
Enter the segment size in kilobytes and spare segments in the Local Data Buffering Settings
section.
38
Avocent PM PDU Installer/User Guide
3.
In the NFS Data Buffering Settings section, enter the following information: NFS Server, NFS
Path, Segment Size (Kbytes) and Spare Segments.
NOTE: RPC service must be enabled in the Security Profile screen before configuring NFS Data Buffering
Settings. NFS does not support IPv6.
4.
To configure data buffer storage on a syslog server in the Syslog Data Buffering Settings
section; select a facility number from the drop-down menu: Log Local 0, Log Local 1, Log
Local 2, Log Local 3, Log Local 4 or Log Local 5.
5.
Click Save.
Appliance Logging
To configure Appliance Logging:
1.
Click Enable appliance session data logging.
a.
Select the destination for appliance session data logs from the pull-down menu. Choices
are Local, NFS, Syslog and DSView 3.
b.
Enable or disable timestamping the appliance session data logs.
2.
Click Enable appliance session data logging alerts.
3.
Enter the desired alert strings (up to ten) in the fields provided.
4.
Click Save.
Active Sessions
The PM PDU allows multiple users to log in and run sessions simultaneously. The Active Sessions
feature allows you to view all active sessions and to kill any unwanted sessions. Click Active
Sessions to view all open sessions on the PM PDU.
NOTE: If you start another session with the PM PDU while viewing this screen, it will not be visible until you click
Refresh at the top of the Web Manager window.
To kill an active session:
1.
Click Active Sessions. The Active Sessions screen appears and lists all open sessions to the PM
PDU by the user’s workstation IP.
2.
Select the checkbox next to the session you want to kill, then click the Kill button. After a few
seconds, the Active Session screen will redisplay the open sessions, minus the one you killed.
Chapter 3: Accessing the PM PDU via the Web Manager
39
Monitoring
When you click Monitoring, a variety of network and console port information is available for
viewing. The screens are only for viewing and have no interactivity with the user. The following
table shows the types of information available.
Table 3.4: Monitoring Screens
Screen Name
Definition
Network - Devices
Shows Ethernet status (enabled/disabled), IPv4 Address, IPv4 Mask and IPv6
Address.
Network - IPv4 Routing Table
Shows Destination, Gateway, Genmask, Flags, Metric, Ref, Use and lface.
Network - IPv6 Routing Table
Shows Destination, NextHop, Flags, Metric, Ref, Use and lface.
Serial Ports
Shows Device Name, Profile, Settings, Signals, TX Bytes, RX Bytes, Frame
Error, Parity Error, Break and Overrun.
Change Password
An admin or user can change his or her own password from this screen.
To change your own password:
1.
Select Change Password.
2.
Enter the old password and new password in the appropriate fields.
3.
Confirm the new password, then click Save.
40
Avocent PM PDU Installer/User Guide
Web Manager Overview for Regular Users
The following figure shows features of the Web Manager for a regular user.
1
2
3
Figure 3.3: Web Manager Regular User Screen
Table 3.5: Web Manager Regular Users Screen Functional Areas
Number Description
1
Top option bar. The name of the appliance and the name of the logged in user appears on the left
side and Refresh, Print, Logout and Help buttons appear on the right.
2
Side Navigation Bar. Menu options appear that are available for regular users.
3
Content area. Contents change based on the options selected in the side navigation bar.
The following table provides an overview of the options for regular users.
Chapter 3: Accessing the PM PDU via the Web Manager
41
Table 3.6: Web Manager Options for Regular Users
Menu Option
Description
Access
Displays all the devices the user can access. Click Appliance Viewer in a device’s
Action column to launch a terminal session with that device.
Power Management
• PDUs
• Outlet Groups
•
•
Change Password
Click PDUs to turn on, turn off, cycle, reboot, reset the HW overcurrent
protection, returnt to factory defaults or rename PDUs connected to the PM
PDU.
Click Outlet Groups to manage groups of outlets on connected PDUs.
Change your own password.
42
Avocent PM PDU Installer/User Guide
43
CHAPTER
Accessing the PM PDU via the
Command Line Interface
4
Access Options and How to Log Into the CLI
The CLI utility can be accessed in the following ways:
•
Through a local terminal or a computer that has a terminal emulation program connected to the
console port of the console server with session settings of 9600, 8, N and 1, with no flow
control.
•
After the PM PDU is connected to the network and has an IP address, it can be accessed by one
of the following methods:
•
An SSH or Telnet client on a remote computer (if the SSH or Telnet protocol is enabled in
the selected Security Profile).
•
By selecting Web Manager - Overview - Appliance Session.
•
With DSView 3 software.
Administrators have full access to the CLI and to connected devices. An administrator can
authorize regular users to manage power, manage data buffer storage and use one or more PM PDU
administration tools. Users can always change their own passwords.
To start the CLI:
1.
Access the CLI through the console port, with Telnet or SSH or through the Web Manager.
2.
Enter the username and password at the prompt. The cli-> prompt appears.
Welcome to Avocent PM PDU <host name>.
Type help for more information
--:- / cli->
NOTE: The default password for admin is avocent and for root is linux. The password for these users may have
been changed during installation of the PM PDU. If not, change the default root and admin passwords to avoid
potential security breaches.
44
Avocent PM PDU Installer/User Guide
Configuration Tasks Performed With the CLI
The navigation structure of the CLI mirrors that of the Web Manager. Options and parameters are
also the same, except that spaces in Web Manager options and parameters are replaced with
underscores (_), as in: system_tools. Examples that show how to select an option in the Web
Manager use a dash surrounded by two spaces ( - ). In the CLI, two similar options in a path are
separated by a forward slash (/).
For example, in the Web Manager, user configuration is done when an administrator selects Users Local Accounts - User Names to get to the User Names screen. To navigate to the equivalent
configuration level in the CLI, an administrator would use the cd command followed by the path:
cd /users/local_accounts/user_names.
Administrators should log into the CLI in one window and log into the Web Manager in another
window to see how the menu options in the Web Manager map to the navigation options in the
CLI.
CLI Navigation
The CLI navigation options are in a nested tree configuration.
NOTE: When a command line is shown in an example, and the step starts with “Enter,” or when a syntax
example is given, the user should type the command as shown and then press Enter. The Enter key is not
shown in command line examples unless needed for clarity.
When a user logs in the CLI, the prompt indicates the user is at the / level.
--:- / cli->
No parameters can be set at this level of the navigation tree.
At any CLI prompt at any level, if you type cd and press Tab Tab, the navigation options (path
elements) for that level are listed. Different options appear for administrators and for authorized
users.
•
When an administrator types the cd command and then presses Tab Tab at the / prompt, the
following navigation options (path elements) appear.
--:- / cli-> cd<Tab><Tab>
access/
•
change_password/
network/
active_sessions/
events_and_logs/
power_management/
authentication/
monitoring/
system/
system_tools/
users/
When a regular user types the cd command and then presses Tab Tab at the / prompt, the
following navigation options appear.
--:- / cli-> cd<Tab><Tab>
access/
power_management/
change_password/
Chapter 4: Accessing the PM PDU via the Command Line Interface
45
Enter cd <one_or_more_path_elements> to move down one or more levels of the navigation tree.
--:- / cli-> cd system_tools
A prompt like the following appears at each level.
--:- system_tools cli->
NOTE: CLI commands are case sensitive.
At any level, you can press Tab Tab at the prompt to see the commands that can be entered at the
current level.
---:- system_tools cli-><Tab><Tab>
cd
passwd
shell
commit
pwd
show
exit
quit
shutdown
ftp
reboot
upgrade_firmware
help
restore_configuration
whoami
hostname
revert
wiz
ls
save_configuration
opiepasswd
scp
If you know the path, you can enter multiple path elements in a single command separated with
forward slashes (/).
--:- / cli-> cd network/devices/
--:- devices cli->
Enter cd .. to move up one level of the navigation tree. Enter cd ../..[/..] to move up multiple levels.
--:- devices cli-> cd ../..
--:- / cli->
Autocompletion
Autocompletion allows you to type the first few letters of a command or navigation option and then
press Tab. The rest of the name is filled in automatically if the letters typed are unique to one
command or to a navigation option at that level. If the letters match more than one of the
commands or navigation options for that level, the matching options are listed.
For example, if you type cd acc and press Tab at the CLI prompt from the / level, the access option
will be completed.
--:- / cli-> cd acc<Tab>
--:- / cli-> cd access
46
Avocent PM PDU Installer/User Guide
If you then press Enter, you are changed to the access level and the access level prompt appears.
--:- access cli->
The following example illustrates a case when more than one command matches the letters typed.
--:- / cli-> sh<Tab>
shell
show
Parameters
Some CLI commands take parameters. If you press Tab Tab after a command that requires a
parameter, you are prompted to enter the parameter.
Command Line Syntax
NOTE: Square brackets ([ ]) denote an optional element. Each element is separated by a space. There are no
spaces between sub-elements.
Command only (help, pwd):
--:- <current_level> cli-> <command>
Commands with paths only (cd, ls, add):
--:- <current_level> cli-> <command> [Path]
Commands with targets (del):
--:- <current_level> cli-> <command> [Path] <Targets>
Commands that require parameters (set):
--:- <current_level> cli-> <command> [Path] <Params>
Commands with values only (sendmsg, ftp...):
--:- <current_level> cli-> <command> [Path] <Values>
where:
Path
:= path_elem[/path_elem]*
path_elem
:= . | .. | Section_Label | ^/
Targets
:= Row_Label(,Row_Label)
Params
:= Param_Names=PValues
Param_Names
:= Param_Label(:Param_Label)*
PValues
:= Value_text(,Value_text)*
Values
:= Value_text Value_text
Section_Label
Chapter 4: Accessing the PM PDU via the Command Line Interface
47
Param_Label
Value_text
:= labels or data from the UIC.
Syntax used:
^
: beginning of the element
*
: 0 - many
|
: or
() : group
CLI Command Set
This section describes the general commands used when accessing the PM PDU via the command
line interface.
NOTE: Most of the commands work from any location when the path to the command parameter is included.
NOTE: The word “node” refers to an entity such as a route, host or user, which can be added, configured or
deleted.
help
Generate a help message about how to navigate the CLI.
Syntax:
--:- / cli-> help
- Thank you for using the cli -
This interface allows you to easily modify configurations
to customize and define the functionality of your unit.
Press <tab> <tab> to see the list of available commands.
Please refer to the Reference Guide for a description of
commands, special keys and additional information on how to
use this interface.
Some basic and useful keys are:
up/down arrow - navigates up/down in the command history
tab (once/twice) - shows the next possible option(s)
48
Avocent PM PDU Installer/User Guide
Other hints:
Use backslash '\' to escape spaces, '\' and other control
characters when assigning values to parameters.
add
Add a node.
Syntax:
--:- / cli-> add <Path>
Example:
--:- / cli-> add network/hosts
--:#- [hosts] cli->
delete
Delete a node.
Syntax:
--:- / cli-> delete <Path> <parameter>
cd
Change directory (level).
Syntax:
--:- / cli-> cd <Path>
Example:
--:- / cli-> cd access
Displays the following:
--:- access cli->
Example:
--:- access cli-> cd ..
-or--:- access cli-> cd ../
Moves up one directory level and displays the following:
--:- / cli->
Example:
Chapter 4: Accessing the PM PDU via the Command Line Interface
--:- access cli-> cd /
Moves to the top level and displays the following:
--:- / cli->
Example:
--:- access cli-> cd /information
Displays the following:
--:- information cli->
pwd
Display the path to the current level (print working directory).
Syntax:
--:- / cli-> pwd
exit/quit
Exit the CLI and return to the login prompt.
Syntax:
--:- / cli-> exit
-or--:- / cli-> quit
ftp
Connect to a remote FTP server.
Syntax:
--:- / cli-> ftp [<server_IP_address>|<hostname>]
NOTE: You must log into the CLI as root to have full control over the local directory path. All normal FTP
commands apply.
scp
Perform a secure shell copy.
Syntax:
--:- / cli-> scp [[user@]host1:]file1 [...] [[user@]host2:]file2
set
Set a parameter.
49
50
Avocent PM PDU Installer/User Guide
Syntax:
--:- / cli-> set <Path> <Parameter>=<Value>
After a parameter has been changed using the set command, a pair of asterisks appear at the
beginning of the CLI prompt.
**:- / cli->
Save the change:
**:- / cli-> commit
-orUndo the change:
**:- / cli-> revert
NOTE: After a commit or revert command, the asterisks at the beginning of the CLI prompt are replaced by
hyphens. Asterisks will not appear after the execution of the set command if using wizard mode, which can be
recognized by a prompt that has a pound sign after the colon and the current directory in square brackets
(example, --:#- [hosts] cli->).
commit
Save settings.
Syntax:
**:- settings cli-> commit
revert
Undo a previous parameter setting.
Syntax:
**:- / cli-> revert
show/ls
Show the available directories, commands or parameters at the current location.
Syntax:
--:- / cli-> show
-or--:- / cli-> ls
Example:
--:- / cli-> show user_profile
Chapter 4: Accessing the PM PDU via the Command Line Interface
51
user_profile
change_password/
--:- / cli->
cycle, on, off, lock and unlock
Control power on outlets on a PDU.
NOTE: Enter commas (,) between multiple outlets or use a hyphen to specify a range (1-4).
--:- / cli-> cd power_management/pdus/<PDU_ID>/outlets
--:- outlets cli-> [cycle|on|off|lock|unlock]
<outlet_number[,..,outlet_number]>
Examples:
--:- / cli-> cd power_management/pdus/myPDU/outlets
--:- outlets cli-> off 1,2,5,8
Are you sure you want to turn off the outlet(s)? y/n : y
The cycle, on and off commands can be used from the access level, where they are enabled and
configured with the Power Profile.
--:- / cli -> [cycle|on|off] access/<PDU_ID>
passwd
Configure the password for the current user. The terminal does not echo the password.
Syntax:
--:- / cli-> passwd
opiepasswd
Configure a one time password (OTP) for the local user. After you type the command, you will be
asked for the pass phrase to use for the OTP.
Syntax:
--:- / cli-> opiepasswd
Example:
opiepasswd -f -c teste
Adding teste:
Only use this method from the console; NEVER from remote. If you are
using telnet, xterm, or a dial-in, type ^C now or exit with no
password.
Then run opiepasswd without the -c parameter.
Using MD5 to compute responses.
52
Avocent PM PDU Installer/User Guide
Enter new secret pass phrase:
Again new secret pass phrase:
ID teste OTP key is 499 AC0241
FOOD HUGH SKI ALMA LURK BRAD
CLI Equivalent Actions to Web Manager Checkbox Selection
NOTE: The following example procedure, which configures IPv6, illustrates the actions to use in the CLI to
enable or disable an option when a checkbox would be selected or deselected in the Web Manager.
To configure IPv6 (example of how to perform the equivalent of Web Manager
checkbox selection/deselection):
1.
Log into the CLI and enter cd network/settings.
--:- / cli-> cd network/settings
2.
Enter show to view the status of IPv6 configuration.
--:- settings cli-> show
hostname = PM1000-24-1024000004
primary_dns = 172.26.29.4
secondary_dns =
domain = corp.avocent.com
enable_ipv6 = yes
get_dns_from_dhcpv6 = no
get_domain_from_dhcpv6 = no
NOTE: At this location, you can use '=' to change the value or '/' to select a parameter inside the section.
3.
Type set enable_ipv6= and press Tab to view the options for the parameter.
--:- ipv6 cli-> set enable_ipv6=<Tab>
no
yes
4.
Type set enable_ipv6: and press Tab to view the child parameters.
--:- ipv6 cli-> set enable_ipv6/<Tab>
get_dns_from_dhcpv6=
get_domain_from_dhcpv6=
5.
Enter set enable_ipv6=no to disable IPv6.
--:- ipv6 cli-> set enable_ipv6=no
-orEnter set enable_ipv6=yes to enable IPv6.
--:- ipv6 cli-> set enable_ipv6=yes
6.
(Optional) Enter either of the following commands to enable subparameters.
Chapter 4: Accessing the PM PDU via the Command Line Interface
53
**:- ipv6 cli-> set enable_ipv6/ get_dns_from_dhcpv6=yes
**:- ipv6 cli-> set enable_ipv6/ get_domain_from_dhcpv6=yes
7.
Enter show to verify the change.
**:- ipv6 cli-> show
enable_ipv6 = yes
get_dns_from_dhcpv6 = yes
get_domain_from_dhcpv6 = yes
enable_bonding = no
8.
Enter commit.
CLI Overview for Administrators
This section describes using the Command Line Interface for administrators. Only administrators
and authorized users can access the commands listed in this section. These procedures assume you
have logged into the CLI as an administrator and are at the --:- / cli-> prompt.
NOTE: In the tables that show output from the show command, when an option that is followed by an equal sign
(=) is left blank, that option is not assigned a value by default.
System
1.
Enter cd system to navigate to the System level.
--:- / cli-> cd system
2.
Enter show to view the available options.
--:- system cli-> ls
security/
date_and_time/
help_and_language/
boot_configuration/
information/
usage/
3.
Enter show followed by an option name to view information about each option.
--:- security cli-> show security_profile
System/Security
Enter cd security to navigate to the security level.
54
Avocent PM PDU Installer/User Guide
--:- / cli-> cd appliance_settings/security
Table 4.1: System/Security Options
System Navigation Tree
dsview
allow_appliance_to_be_managed_by_dsview =
security_profile
idle_timeout=
outlet_access_is_controlled_by_authorization_assigned_to_user_groups =
rpc=
security_profile=
security_profile/
custom
answer_icmp_message=
enable_ftp_service=
enable_http_session=
enable_https_sessions=
enable_snmp_service=
enable_telnet_service=
ssh_allow_root_access=
ssh_tcp_port=
ssh_version=
enable_http_session
http_port=
enable_https_session
https_port=
https_ssl_version=
redirect_http|https=
Chapter 4: Accessing the PM PDU via the Command Line Interface
System/Boot Configuration
Enter cd system/boot_configuration to navigate to the boot_configuration level.
--:- / cli-> cd system/boot_configuration
Table 4.2: System/Boot Configuration Options
Boot Configuration Navigation Tree
boot mode=
console_speed=
eth0_mode=
watchdog_timer=
boot_mode/
flash
image=image
System/Date and Time
Enter cd system/date_and_time to navigate to the date_and_time level.
--:- / cli-> cd system/date_and_time
Table 4.3: Date and Time Options
Date and Time Navigation Tree
date_and_time
date_and_time
settings
manual
day=
hour=
minute=
month=
second=
year=
time_zone
55
56
Avocent PM PDU Installer/User Guide
Table 4.3: Date and Time Options (Continued)
Date and Time Navigation Tree
predefined
zone=set
System/Help and Language
Enter cd system/help_and_language to navigate to the online_help level.
--:- / cli-> cd system/help_and_language
To set the online help URL:
Perform this procedure if you have downloaded the online help files to a web server that is
accessible to the console server.
1.
Enter the following command.
--:- / cli> cd system/help_and_language/
2.
Enter the following command.
--:- help_and_language cli> set url=<online_help_location>
A line similar to the following appears.
**:- help_and_language cli>
3.
Save your settings.
**:- help_and_language cli> commit.
Table 4.4: Help and Language Options
Help and Language Navigation Tree
appliance_language=
url=
System/Information
1.
Enter cd system/information to navigate to the Information level.
--:- / cli> cd system/information/
2.
Enter show to view the system information.
System/Usage
Enter cd system/usage to navigate to the Usage level.
Chapter 4: Accessing the PM PDU via the Command Line Interface
--:- / cli> cd system/usage/
Table 4.5: System/Usage Options
Usage Navigation Tree
flash usage
memory
Network
IPv4 addresses are always enabled. An administrator can also enable IPv6 addresses at the
appliance_settings/network/ipv6 level. A procedure to enable IPv6 is used as an example in CLI
Equivalent Actions to Web Manager Checkbox Selection on page 52.
1.
Enter cd network to navigate to the Network level
--:- / cli-> cd network/
2.
Enter ls to view the list of available options.
settings/
devices/
ipv4_static_routes/
ipv6_static_routes/
hosts/
firewall/
snmp/
Network/Settings
1.
Enter cd network/settings to navigate to the Network settings level.
--:- / cli-> cd network/settings/
2.
Enter show to view the list of available options.
Table 4.6: Network Options
Network Navigation Tree
settings
domain=
enable_ipv6=
57
58
Avocent PM PDU Installer/User Guide
Table 4.6: Network Options (Continued)
Network Navigation Tree
hostname=
primary_dns=
secondary_dns=
enable_ipv6
get_dns_from_dhcpv6=
get_domain_from_dhcpv6=
Network/IPv4 and IPv6 Static Routes
The following table displays options for configuring IPv4 and IPv6 Static Routes.
Table 4.7: Network/IPv4 and IPv6 Static Routes Options
IPv4 and IPv6 Static Routes Navigation Tree
ipv4_static_routes
default_3
gateway=
interface=
metric=
ipv6_static_routes
Network/Devices
The procedure to configure a static IP address for the primary Ethernet interface is usually
performed during installation so that administrators have a fixed IP address for access to the Web
Manager and can finish configuration.
To configure a IPv4 or IPv6 static IP address:
NOTE: This procedure configures either an IPv4 or IPv6 static IP address for the ETH0 (eth0) port. You can
configure an IPv6 static IP address only if IPv6 is enabled.
1.
Enter cd network/devices/<eth0>/settings to navigate to the Settings level for the desired
interface.
--:- / cli-> cd network/devices/eth0/
2.
Enter set ipv<4|6>_method=static to set the method to static for IPv4 or IPv6.
Chapter 4: Accessing the PM PDU via the Command Line Interface
59
**:- eth0 cli-> set ipv4_method=static
3.
Enter set ipv<4|6>_method/static/ address=<IP_Address> mask=<netmask> to set the IP
address and subnet mask then enter commit to save the change.
--:- eth0 cli-> set ipv4_method/static/ ipv4_address=172.26.31.10
ipv4_mask=255.255.255.0
**:- eth0 cli-> commit
4.
Enter show to view the changes.
--:- eth0 cli-> show
Table 4.8: Network/Devices Options
Devices Navigation Tree
devices
eth0
ipv4_method=
ipv6_method=
mode=
status=
Network/Hosts
The following procedure describes how to add a host to the hosts table.
To add a host to the host table:
1.
Enter cd network/hosts to navigate to the Hosts level.
--:- / cli-> cd network/hosts
2.
Enter show to view the current host settings.
--:- hosts cli-> show
ip
=====
127.0.0.1
3.
hostname
========
localhost
alias
=====
Type add then press Return.
--:- hosts cli-> add<Return>
--:#- [hosts] cli-> show
ip =
hostname =
60
Avocent PM PDU Installer/User Guide
alias =
--:#- [hosts] cli->
4.
Enter set hostname=<hostname> ip=<IP_address> to add the name of a host and the IP
address for the host.
NOTE: Each parameter that follows the add command is separated by a space.
--:#- [hosts] cli-> set hostname=sharedpmpdu ip=172.26.31.164
5.
Enter save
--:#- [hosts] cli-> save
6.
Enter show to verify the changes took place and to view the new host entry.
--:- hosts cli-> show
ip
=====
127.0.0.1
127.26.31.164
7.
hostname
========
localhost
sharedpmpdu
alias
=====
Enter cd <IP_address>/settings to navigate to the level where you can perform additional
configuration of the host entry.
--:- hosts cli-> cd 172.26.31.164/settings
8.
Enter show to view the additions to the host table and the Settings option.
ip
=====
hostname
========
127.26.31.164
sharedpmpdu
alias
=====
Chapter 4: Accessing the PM PDU via the Command Line Interface
Table 4.9: Network/Hosts Options
Hosts Navigation Tree
hosts
127.0.0.1
alias=
hostname=
Network/Firewall
Enter cd network/firewall to navigate to the firewall level.
--:- / cli-> cd network/firewall
NOTE: To set a rule, you must enable the interface, set the rule for the interface and physically connect the
interface to the network.
Table 4.10: Network/Firewall Options
Firewall Navigation Tree
firewall
ipv4_filter_table
FORWARD
INPUT
OUTPUT
ipv6_filter_table
FORWARD
INPUT
OUTPUT
61
62
Avocent PM PDU Installer/User Guide
Network/SNMP
Enter cd network/snmp to navigate to the snmp level.
--:- / cli-> cd network/snmp
Type add then press Return to start configuring a new snmp community:
--:- snmp cli-> add <Return>
--:#- [snmp] cli-> show
name =
oid =
permission =
version = version_v1|v2
source =
--:#- [snmp] cli-> set name=public
--:#- [snmp] cli-> save
--:- snmp cli-> show
name
version source oid
permission
====
=====
===== ====== ==========
public v1/v2
default
read and write
--:- snmp cli-> system
--:#- [snmp] cli-> show
syscontact = Avocent_Corporation
syslocation = Avocent_PM
Wiz command
The wiz command allows administrators to easily and quickly perform the initial network
configuration of the eth0.
At the command prompt at the / level, enter wiz to view the current IP configuration. To change the
IP configuration, press Tab to move through the parameters, and press Esc + Tab to edit the
selected parameter. When you are finished, enter yes to confirm that all parameters are correct and
to save the new parameters.
--:- / cli-> wiz
current ipv4 address: 172.26.30.249
current ipv6 address:
eth0:
Chapter 4: Accessing the PM PDU via the Command Line Interface
63
device_status = enabled
ipv4_method = dhcp
ipv4_address = 192.168.160.10
ipv4_mask = 255.255.255.0
ipv4_default_gateway =
ipv6_method = ipv6_address_unconfigured
ipv6_address =
ipv6_prefix_length =
ipv6_default_gateway =
mac address: 00:e0:86:21:67:72
dns:
primary_dns = 172.26.29.4
secondary_dns =
domain = corp.avocent.com
hostname = PM3000-10-0011223344
Some basic and useful keys are:
- tab (once/twice) - shows the next possible commands/option(s)
- cntrl e - gets the current parameter value for editing
Other hints:
- Use backslash '\' to escape spaces, '\' and other control
characters when assigning values to parameters.
current ipv4 address: 172.26.30.249
current ipv6 address:
eth0:
device_status (disabled, enabled) [enabled]:
Authentication
Enter cd authentication to navigate to the authentication level.
--:- / cli-> cd authentication
NOTE: Kerberos does not work unless the administrator copies the /etc/krb5.keytab file from the Kerberos server
and overwrites the /etc/krb5.keytab file in the PM PDU.
64
Avocent PM PDU Installer/User Guide
Table 4.11: Authentication Options
Authentication Navigation Tree
appliance_authentication
authentication_servers
radius
tacacs+
ldap(s)/ad
kerberos
nis
dsview
Users
Enter cd users to navigate to the users level.
--:- / cli-> cd users
Table 4.12: Users Options
Users Navigation Tree
local_accounts
user_names
root
admin
password_rules
password enforcement
default expiration
authorization
groups
admin
appliance-admin
user
Chapter 4: Accessing the PM PDU via the Command Line Interface
To add a user and password:
1.
Enter cd users/local_accounts/user_names to navigate to the user_names level.
--:- / cli-> cd users/local_accounts/user_names
2.
Enter add. Then enter set with the parameters all on one line separated by spaces as shown.
--:- user_names cli-> add
--:#- [user_name] cli-> set user_name=fred password=smith123abc
confirm_password=smith123abc
--:#- [user_names] cli->
3.
Enter save.
--:#- [user_names] cli-> save
4.
Enter show to verify that the new user has been added.
--:#- [user_names] cli-> show
Events_and_Logs
Enter cd events_and_logs to navigate to the events_and_logs level.
--:- / cli-> cd events_and_logs
Table 4.13: Events_and_Logs Options
Events_and_Logs Navigation Tree
event list
event destinations
syslog
snmp trap
sms
email
dsview
data_buffering
local_data_buffering_settings
segment_size_(kbytes) =
spare_segements=
nfs_data_buffering_settings
nfs_server =
65
66
Avocent PM PDU Installer/User Guide
Table 4.13: Events_and_Logs Options
Events_and_Logs Navigation Tree
nfs_path =
segment_size_(kbytes) =
spare_segments =
syslog_data_buffering_settings
syslog_facility =
Power Management
Enter cd power_management to navigate to the power_management level.
--:- / cli-> cd power_management.
Table 4.14: Power Management Options Descriptions
Option
Description
pdus
Allows an authorized user to reboot, restore factory default settings or to rename
PDU(s). Also allows the authorized user to view information about each PDU, monitor
sensors, clear sensor values, set up syslogging of events related to the PDU,
configure an alarm and the LED display mode, and to manage outlets on the PDU.
settings
Allows an authorized user to set the password used to log in to the PDU and to
connect to daisy-chained PDUs. Also allows an authorized user to set the polling rate
to retrieve data from daisy-chained PDUs, set the power cycle interval, syslog, buzzer
and SW overcurrent protection and enableor disable data logging.
outlet_groups
Lists all configured outlet groups that the current user is authorized to manage (to
manage outlet groups, the user must be in a user group that is authorized to manage
all the outlets in the outlet group). An administrator can configure outlet groups.
data_logging
Allows an authorized user to clear or export data logging for PDU, phase, bank, outlet
or environment.
To rename a PDU:
1.
Log onto the CLI as an administrator and enter cd power_management/pdus to navigate to
the pdus level.
--:- / cli-> cd power_management/pdus
2.
Type rename and press Tab Tab to expand the parameters.
--:- settings cli-> rename <PDU_ID> <Tab><Tab>
3.
Enter set newpdu_id=<new_PDU_ID>.
--:#- [settings] cli-> set new_pdu_id=mypdu
Chapter 4: Accessing the PM PDU via the Command Line Interface
67
--:#- [settings] save
To manage power for a selected outlet:
See cycle, on, off, lock and unlock on page 51 for how to manage power at the power_management
level.
Active Sessions Information
The Active Session information fields are described in Table 4.15. An authorized user can kill an
active session with the Kill command.
Table 4.15: Active Sessions Field Descriptions
Field
Description
user
Logged in user
client_ip
Source of the connection
creation_time
Time of the session creation
session_type
Type of session (console, http)
connection_type
Type of connection (cli, wmi - that is, Web Manager)
target_name
Target name or alias if session is an access session
id
Session ID
parent id
Parent ID if session is a subsession
To view and kill Active_Sessions:
1.
From the / level CLI prompt, enter cd active_sessions.
--:- / cli-> cd active_sessions
--:- active_sessions cli->
2.
Enter show. Information displays as shown about all active sessions.
--:- active_sessions cli-> show
37
user: admin
client_ip: none
creation_time: Tue Dec 18 03:31:01 2007
session_type: console
connection_type: cli
id: 37
68
Avocent PM PDU Installer/User Guide
parent_id:
--:- active_sessions cli->
3.
To kill a session (if authorized), enter kill followed by the session number.
--:- active_sessions cli-> kill_session 122
69
APP ENDICE S
Appendices
Appendix A: Specifications
Table A.1: Avocent PM PDU Specifications
Unit
CMN
Input Voltage
Bank
Outlet Bank Max
Max
Input
Output Max
Unbalanced Balanced
Current Voltage Current Current
Current
Listed
Branch
Circuit
Protection
1075PM1001V-401 773
US single
24A
phase 200-240
VAC 2W + PE
50/60 Hz
NEMA
L6-30P
200-240
VAC
50/60
Hz
16A
(C19)
12A
(C13)
16A
(see note 2)
12A
30A
PM1002V-401 1075755
24A per
US three
phase
phase
100-120/200208 VAC
3W+N+PE, 50/
60 Hz NEMA
L21-30P
200-208
VAC
50/
60Hz
16A
(C19)
12A
(C13)
16A
(see note 1)
13.85A
30A
1075PM1003V-401 776
US three
40A per
phase
phase
200-240 VAC
3W + PE 50/60
Hz
CS8365C
200-240
VAC
50/60
Hz
16A
(C19)
12A
(C13)
32A
(see note 4)
23A
50A
1075PM1004V-401 775
US three
48A per
phase
phase
200-240 VAC
3W + PE 50/60
Hz IEC309
460P9W
200-240
VAC
50/60
Hz
16A
(C19)
12A
(C13)
32A
(see note 5)
27.71A
60A
1075PM1005V-401 774
32A
EU single
phase 220-240
VAC 2W + PE
50/60 Hz
IEC309
332P6W
220-240
VAC
50/60
Hz
16A
(C19)
10A
(C13)
16A
(see note 3)
16A
40A
70
Avocent PM PDU Installer/User Guide
Table A.1: Avocent PM PDU Specifications (Continued)
Bank
Outlet Bank Max
Max
Input
Output Max
Unbalanced Balanced
Current Voltage Current Current
Current
Listed
Branch
Circuit
Protection
CMN
Input Voltage
PM1006V-401 1075772
EU three
phase 220240/381-415
VAC 3W + N +
PE 50/60 Hz
IEC309
516P6W
16A per
phase
220-240 16A
VAC 50/ (C19)
60 Hz
10A
(C13)
16A
16A
20A
PM1007V-401 1075777
EU three
phase
220-240/381415 VAC 3W +
N + PE 50/60
Hz
IEC309
532P6W
32A per
phase
220-240 16A
VAC 50/ (C19)
60 Hz
10A
(C13)
32A
32A
40A
PM1008V-401 1075797
US three
24A per
phase 200-240 phase
VAC 3W+PE,
50/60 Hz
NEMA L15-30
200-240 16A
VAC 50/ (C19)
60 Hz
12A
(C13)
16A
(see note 1)
13.85A
30A
PM2002H-401 1057PM3002H-401 211
US three
phase
200-240 VAC
3W + PE 50/
60Hz NEMA
L15-30P
24A per
phase
200-240 16A
VAC
50/60
Hz
16A
(see note 1)
13.85A
30A
PM2002V-401 1066PM3002V-401 200
US three
phase
200-240 VAC
3W + PE 50/
60Hz NEMA
L15-30P
24A per
phase
200-240
VAC
50/60
Hz
16A
(see note 1)
13.85A
30A
PM2004H-401 1058
PM3004H-401
EU three
phase 220240/381-415
VAC 3W + N +
PE 50/60Hz
IEC309
516P6W
16A per
phase
220-240 16A
VAC
50/60
Hz
16A
16A
20A
Unit
16A
(C19)
12A
(C13)
Appendices
71
Table A.1: Avocent PM PDU Specifications (Continued)
Bank
Outlet Bank Max
Max
Input
Output Max
Unbalanced Balanced
Current Voltage Current Current
Current
Listed
Branch
Circuit
Protection
CMN
Input Voltage
PM2004V-401 1068
PM3004V-401
EU three
phase 220240/381-415
VAC 3W + N +
PE 50/60Hz
IEC309
516P6W
16A per
phase
220-240
VAC
50/60
Hz
PM2006H-401 1057PM3006H-401 264
US three
phase 100120/200-208
VAC 3W + N +
PE, 50/60 Hz
NEMA L21L30P
24A per
phase
PM2001H-401 1059
PM3001H-401
Unit
16A
(C19)
10A
(C13)
16A
16A
20A
200-208 16A
VAC
50/60
Hz
16A
(see note 1)
13.85A
30A
US single
24A
phase 200-240
VAC 2W + PE
50/60 HZ
NEMA
L6-30P
200-240 16A
VAC
50/60
Hz
16A
(see note 2)
8A
30A
PM2001V-401 1065
PM3001V-401
US single
24A
phase 200-240
VAC 2W + PE
50/60 HZ
NEMA
L6-30P
200-240
VAC
50/60
Hz
16A
(see note 2)
8A
30A
PM2003H-401 1060
PM3003H-401
32A
EU single
phase 220-240
VAC 2W + PE
50/60 Hz
IEC309
332P6W
220-240 16A
VAC
50/60
Hz
16A
(see note 3)
10.66A
40A
PM2003V-401 1067
PM3003V-401
32A
EU single
phase 220-240
VAC 2W + PE
50/60 Hz
IEC309
332P6W
220-240
VAC
50/60
Hz
16A
(see note 3)
10.66A
40A
16A
(C19)
12A
(C13)
16A
(C19)
10A
(C13)
72
Avocent PM PDU Installer/User Guide
Table A.1: Avocent PM PDU Specifications (Continued)
Unit
CMN
Input Voltage
Bank
Outlet Bank Max
Max
Input
Output Max
Unbalanced Balanced
Current Voltage Current Current
Current
Listed
Branch
Circuit
Protection
PM2005H-403 1078PM3005H-403 185
US three
40A per
phase 200-240 phase
VAC 3W + PE
50/60 Hz
CS8365C
200-240 16A
VAC
50/60
Hz
32A
(see note 4)
23A
50A
PM2005V-403 1076PM3005V-403 185
40A per
US three
phase
phase
200-240 VAC
3W + PE 50/60
Hz CS8365C
200-240
VAC
50/60
Hz
32A
(see note 4)
23A
50A
PM2005H-406 1079
PM3005H-406
EU three
phase
220-240/381415 VAC 3W +
N + PE
50/60 Hz
IEC309
532P6W
32A per
phase
220-240 16A
VAC
50/60
Hz
32A
32A
40A
PM2005V-406 1077
PM3005V-406
EU three
phase
220-240/381415 VAC 3W +
N + PE
50/60 Hz
IEC309
532P6W
32A per
phase
220-240
VAC
50/60
Hz
32A
32A
40A
PM2005H-404 1078PM3005H-404 184
US three
phase
200-240 VAC
3W + PE
50/60 Hz
IEC309
460P9W
48A per
phase
200-240 16A
VAC
50/60
Hz
32A
(see note 5)
27.71A
60A
PM2005V-404 1076PM3005V-404 184
US three
48A per
phase 200-240 phase
VAC 3W + PE
50/60 Hz
IEC309
460P9W
200-240
VAC
50/60
Hz
32A
(see note 5)
27.71A
60A
16A
(C19)
12A
(C13)
16A
(C19)
10A
(C13)
16A
(C19)
12A
(C13)
Appendices
73
Table A.1: Avocent PM PDU Specifications (Continued)
Bank
Outlet Bank Max
Max
Input
Output Max
Unbalanced Balanced
Current Voltage Current Current
Current
Listed
Branch
Circuit
Protection
24A per
phase
CMN
Input Voltage
PM2006V-401 1066PM3006V-401 267
US three
phase 100120/200-208
VAC 3W + N +
PE, 50/60 Hz
NEMA L2130P
PM1012V-401 1084809
US single
24A
phase 200-240
VAC 2W + PE
50/60 Hz
NEMA L6-30P
PM1013V-401 1084810
PM1014V
Single phase
100-240 VAC
2W + PE
50/60 Hz
IEC320-C20
Unit
16A
(see note 1)
13.85A
30A
200-240 12A
VAC
50/60
Hz
16A
(see note 2)
12A
30A
32A
EU single
phase 220-240
VAC 2W + PE
50/60 Hz
IEC309
332P6W
220-240 10A
VAC
50/60
Hz
16A
(see note 3)
16A
40A
16A
100-240 10A
VAC
50/60
Hz
N/A
N/A
20A
PM2010V-401 1083PM3010V-401 806
24A
US single
phase 200-240
VAC 2W + PE
50/60 Hz
NEMA L6-30P
200-240 12A
VAC
50/60
Hz
16A
(see note 2)
12A
30A
PM2011V-401
PM3011V-401
1083807
32A
EU single
phase 220-240
VAC 2W + PE
50/60 Hz
IEC309
332P6W
220-240 10A
VAC
50/60
Hz
16A
(see note 3)
16A
40A
1083805
Single phase
100-240 VAC
2W + PE
50/60 Hz
IEC320-C20
100-240 10A
VAC
50/60
Hz
N/A
N/A
20A
PM2012V
PM3012V
1084808
16A
200-208
VAC
50/60
Hz
16A
(C19)
12A
(C13)
74
Avocent PM PDU Installer/User Guide
Table A.1: Avocent PM PDU Specifications (Continued)
Unit
CMN
Input Voltage
Bank
Outlet Bank Max
Max
Input
Output Max
Unbalanced Balanced
Current Voltage Current Current
Current
Listed
Branch
Circuit
Protection
PM1009H-401 1084799
US single
24A
phase 200-240
VAC 2W + PE
50/60 Hz
NEMA L6-30P
200-240 12A
VAC
50/60
Hz
16A
(see note 2)
12A
30A
PM1010H-401 1084800
32A
EU single
phase 220-240
VAC 2W + PE
50/60 Hz
IEC309
332P6W
220-240 10A
VAC
50/60
Hz
16A
(see note 3)
16A
40A
PM1011H
Single phase
100-240 VAC
2W + PE
50/60 Hz
IEC320-C20
16A
100-240 10A
VAC
50/60
Hz
N/A
N/A
20A
PM2007H-401 1083PM3007H-401 794
24A
US single
phase 200-240
VAC 2W + PE
50/60 Hz
NEMA L6-30P
200-240 12A
VAC
50/60
Hz
16A
(see note 2)
12A
30A
1083796
32A
EU single
phase 220-240
VAC 2W + PE
50/60 Hz
IEC309
332P6W
220-240 10A
VAC
50/60
Hz
16A
(see note 3)
16A
40A
1083792
Single phase
100-240 VAC
2W + PE
50/60 Hz
IEC320-C20
16A
100-240 10A
VAC
50/60
Hz
N/A
N/A
20A
1084798
PM2008H-401
PM3008H-401
PM2009H
PM3009H
NOTE 1: When one bank is at a maximum 16A, the other banks shall not exceed 12A per bank.
NOTE 2: When one bank is at a maximum 16A, the other bank(s) shall not exceed 8A total.
NOTE 3: When one bank is at a maximum 16A, the other bank(s) shall not exceed 16A total.
NOTE 4: When one bank is at a maximum 32A, the other banks shall not exceed 13A per bank.
NOTE 5: When one bank is at a maximum 32A, the other banks shall not exceed 23A per bank.
Appendices
75
Table A.2: Avocent PM PDU Information
Environmental
Operating Temperature
10ºC to 45ºC (50ºF to 113ºF)
Storage Temperature
-40ºC to 65ºC (-40ºF to 149ºF)
Relative Humidity
20% to 80% (non-condensing) across the operating
temperature range; 5% to 95% (non-condensing) across the
non-operating temperature range
Dimensions
Form Factor
0U, 1U rack mountable
Weight
7.3 lbs (horizontal high amperage models without power cord),
14.8 lbs (vertical high amperage models without power cord),
5.2 lbs (horizontal low amperage models without power cord),
11 lbs (vertical low amperage models without power cord)
Physical Dimensions (W x D x H)
17 x 8.272 x 1.719 in (horizontal high amperage models), 2.2
x 66 x 3.15 in (vertical high amperage models), 1.7 x 17 x 5.5
in (horizontal low amperage models), 2.2 x 3.2 x 52 in (vertical
low amperage models)
Network Connection
Number
1
Type
10/100/1000 Ethernet
Safety Markings and Approvals
UL, FCC, cUL, CE, VCCI, C-Tick, CB
Safety certifications and EMC certifications for this product are
obtained under one or more of the following designations:
CMN (Certification Model Number), MPN (Manufacturer’s Part
Number) or Sales Level Model designation. The designation
that is referenced in the EMC and/ or safety reports and
certificates are printed on the label applied to this product.
76
Avocent PM PDU Installer/User Guide
Appendix B: Outlet Bank Assignment
Table B.1: Outlet Bank Assignment
Unit
Bank 1
Bank 2
Bank 3
Bank 4
Bank 5
Bank 6
PM1001V-401 outlets 1, 9
and 17 FC22FC24
FC18-FC20
outlets 2-8,
10-16 and
18-24
FC21-FC23
FC17-FC19
N/A
N/A
N/A
N/A
PM1002V-401 outlets 1-8
PM1008V-401 FC22-FC24
PM2002V-401 FC18-FC20
PM2006V-401
PM3002V-401
PM3006V-401
outlets 9-16
FC14-FC16
FC10-FC12
outlets 17-24 N/A
FC6-FC8
FC2-FC4
N/A
N/A
PM1005V-401 outlets 1, 9
and 17
FC22-FC24
outlets 2-8,
10-16 and
18-24
FC21-FC23
N/A
N/A
N/A
N/A
PM2001H-401 outlet 1
PM3001H-401 FC5-FC6
FC7-FC8
outlet 2
FC13-FC14
FC15-FC16
outlet 3
FC21-FC22
FC23-FC24
N/A
N/A
N/A
PM2003H-401 outlet 1
PM3003H-401 FC5-FC6
outlet 2
FC13-FC14
outlet 3
FC21-FC22
N/A
N/A
N/A
PM2002H-401 outlets 1 and 2
PM3002H-401 FC5-FC6
PM2006H-401 FC7-FC8
PM3006H-401
outlets 3 and
4
FC13-FC14
FC15-FC16
outlets 5 and
6
FC21-FC22
FC23-FC24
N/A
N/A
N/A
outlets 1 and 2 outlets 3 and
PM2004H-401 FC5-FC6
4
PM3004H-401
FC13-FC14
outlets 5 and
6
FC21-FC22
N/A
N/A
N/A
PM2005H-404 outlet 1
PM3005H-404 FC1-FC2
PM2005H-403 FC3-FC4
PM3005H-403
outlet 2
FC5-FC6
FC7-FC8
outlet 3
FC9-FC10
FC11-FC12
outlet 4
FC13-FC14
FC15-FC16
outlet 5
FC17-FC18
FC19-FC20
outlet 6
FC21-FC22
FC23-FC24
PM2005H-406 outlet 1
PM3005H-406 FC1-FC2
outlet 2
FC5-FC6
outlet 3
FC9-FC10
outlet 4
FC13-FC14
outlet 5
FC17-FC18
outlet 6
FC21-FC22
Appendices
Table B.1: Outlet Bank Assignment (Continued)
Unit
Bank 1
Bank 2
Bank 3
PM2001V-401 outlets 1-8
PM3001V-401 FC22-FC24
FC18-FC20
outlets 9-16
FC14-FC16
FC10-FC12
PM2003V-401 outlets 1-8
PM3003V-401 FC22-FC24
Bank 4
Bank 5
Bank 6
outlets 17-24 N/A
FC6-FC8
FC2-FC4
N/A
N/A
outlets 9-16
FC14-FC16
outlets 17-24 N/A
FC6-FC8
N/A
N/A
PM1006V-401 outlets 1-8
PM2004V-401 FC22-FC24
PM3004V-401
outlets 9-16
FC14-FC16
outlets 17-24 N/A
FC6-FC8
N/A
N/A
PM1003V-401 outlet 1
PM1004V-401 FC22-FC24
PM2005V-404 FC18-FC20
PM3005V-404
PM2005V-403
PM3005V-403
outlets 2-8
FC21-FC23
FC17-FC19
outlet 9
FC14-FC16
FC10-FC12
outlets 10-16
FC13-FC15
FC9-FC11
outlet 17
FC6-FC8
FC2-FC4
outlets 18-24
FC5-FC7
FC1-FC3
PM1007V-401 outlet 1
PM2005V-406 FC22-FC24
PM3005V-406
outlets 2-8
FC21-FC23
outlet 9
FC14-FC16
outlets 10-16
FC13-FC15
outlet 17
FC6-FC8
outlets 18-24
FC5-FC7
PM1009H-401 outlets 1-5
PM2007H-401 FC1-FC5
PM3007H-401 FC4-FC8
outlets 6-10
FC2-FC6
FC3-FC7
N/A
N/A
N/A
N/A
PM1010H-401 outlets 1-5
PM2008H-401 FC4-FC8
PM3008H-401
outlets 6-10
FC3-FC7
N/A
N/A
N/A
N/A
PM1012V-401 outlets 1-10
PM2010V-401 FC1-FC5
PM3010V-401 FC4-FC8
outlets 11-20
FC2-FC6
FC3-FC7
N/A
N/A
N/A
N/A
PM1013V-401 outlets 1-10
PM2011V-401 FC4-FC8
PM3011V-401
outlets 11-20
FC3-FC7
N/A
N/A
N/A
N/A
PM1011H
PM2009H
PM3009H
outlets 1-5
(no fuses)
outlets 6-10
(no fuses)
N/A
N/A
N/A
N/A
PM1014V
PM2012V
PM3012V
outlets 1-10
(no fuses)
outlets 11-20
(no fuses)
N/A
N/A
N/A
N/A
77
78
Avocent PM PDU Installer/User Guide
Figure B.1: PM2003V-401/PM3003V-401, IEC-309 32A 1-Phase Power Cord
Appendices
Figure B.2: PM1005V-401, IEC-309 32A 1-Phase Power Cord
79
80
Avocent PM PDU Installer/User Guide
Figure B.3: PM2004-401/PM3004V-401/PM1006V-401, IEC-309 16A 3-Phase Power Cord
Appendices
Figure B.4: PM2005V-406/PM3005V-406/PM1007V-401, IEC 309 32A 3-Phase Power Cord
81
82
Avocent PM PDU Installer/User Guide
Figure B.5: PM2001V-401/PM3001V-401, L6-30P 24A 1-Phase Power Cord
Appendices
Figure B.6: PM1001V-401, L6-30P 24A 1-Phase Power Cord
83
84
Avocent PM PDU Installer/User Guide
Figure B.7: PM2002V-401/PM3002V-401/PM1008V-401, L15-L30P 3-Phase Power Cord
PM2006V-401/PM3006V-401/PM1002V-401, L21-30P 3-Phase 24A Power Cord
Appendices
Figure B.8: PM2005V-403/PM3005V-403/PM1003V-401, Hubbell CS8365C 40A 3-Phase Power Cord
85
86
Avocent PM PDU Installer/User Guide
Figure B.9: PM2005V-404/PM3005V-404/PM1004V-401, IEC-309 48A 3-Phase Power Cord
Appendices
Figure B.10: PM2003H-401/PM3003H-401, IEC-309 32A 1-Phase Power Cord
Figure B.11: PM2004H-401/PM3004H-401, IEC-309 16A 3-Phase Power Cord
87
88
Avocent PM PDU Installer/User Guide
Figure B.12: PM2005H-406/PM3005H-406, IEC309 32A 3-Phase Power Cord
Figure B.13: PM2001H-401/PM3001H-401, L6-30P 24A 1-Phase Power Cord
Appendices
Figure B.14: PM2002H-401/PM3002H-401, L15-L30P 24A 3-Phase Power Cord
PM2006H-401/PM3006H-401, L21-L30P 24A 3-Phase Power Cord
89
90
Avocent PM PDU Installer/User Guide
Figure B.15: PM2005H-403/PM3005H-403, Hubbell CS8365C 40A 3-Phase Power Cord
Appendices
Figure B.16: PM2005H-404/PM3005H-404, IEC-309 48A 3-Phase Power Cord
Figure B.17: PM1009H-401/PM2007H-401/PM3007H-401, L6-30P 24A 1-Phase Power Cord
91
92
Avocent PM PDU Installer/User Guide
Figure B.18: PM1001H-401/PM2008H-401/PM3008H-401, IEC309 32A 1-Phase Power Cord
Figure B.19: PM1011H/PM2009H/PM3009H, C20 16A 1-Phase Power Cord
Appendices
Figure B.20: PM1012V-401/PM2010V-401/PM3010V-401, L6-30P 24A 1-Phase Power Cord
93
94
Avocent PM PDU Installer/User Guide
Figure B.21: PM1013V-401/PM2011V-401/PM3011V-401, IEC 309 32A 1-Phase Power Cord
Appendices
95
Figure B.22: PM1014V/PM2012V/PM3012V, C20 16A 1-Phase Power Cord
NOTE: Hardware overcurrent protection is in place to protect fuses. All outlets in a bank, that are protected by a
common fuse or dual fuses, will turn off together in case the total current in that bank exceeds the fuse limits. The
Web Manager/CLI will show all outlets in that bank as tripped.
96
Avocent PM PDU Installer/User Guide
Appendix C: Replacing the Fuses (For Service Personnel Only)
This product contains replaceable fuses. To avoid serious injury and/or damage to your Avocent
PM PDU, make sure:
•
The PDU is disconnected from a power source and all connected devices are turned off before
replacing a fuse.
•
Fuses are replaced with an Avocent approved branch circuit fuse class G time delay type with
20A 600 VAC rating.
CAUTION: Avocent recommends using the Avocent fuse replacement kit. Avocent is not responsible for any
issues that may occur using any other vendor’s fuse replacement kit.
•
Fuses are replaced by qualified personnel.
•
Fuses are denoted with the following markings on the board: FC1-FC2, FC3-FC4, FC5-FC6,
FC7-FC8, FC9-FC10, FC11-FC12, FC13-FC14, FC15-FC16, FC17-FC18, FC19-FC20, FC21FC22, FC23-FC24, FC1-FC5, FC2-FC6, FC3-FC7, FC4-FC8 . Refer to Appendix B for fuse(s)
to outlet(s) correlation.
WARNING: There is a risk of explosion if the lithium battery is replaced with an incorrect type. Dispose of used
batteries according to the manufacturer’s instructions.
CAUTION: Double pole/neutral fusing.
Appendices
97
Appendix D: Technical Support
Our Technical Support staff is ready to assist you with any installation or operating issues you
encounter with your Avocent product. If an issue should develop, follow the steps below for the
fastest possible service.
To resolve an issue:
1.
Check the pertinent section of this manual to see if the issue can be resolved by following the
procedures outlined.
2.
Visit www.avocent.com/support and use one of the following resources:
Search the knowledge base or use the online service request.
-orSelect Technical Support Contacts to find the Avocent Technical Support location nearest you.
98
Avocent PM PDU Installer/User Guide
USA Notification
Warning: Changes or modifications to this unit
not expressly approved by the party responsible for
compliance could void the user’s authority to operate
the equipment.
Note: This equipment has been tested and found
to comply with the limits for a Class A digital device,
pursuant to Part 15 of the FCC Rules. These limits
are designed to provide reasonable protection
against harmful interference when the equipment
is operated in a commercial environment. This
equipment generates, uses and can radiate radio
frequency energy and, if not installed and used in
accordance with the instruction manual, may cause
harmful interference to radio communications.
Operation of this equipment in a residential area is
likely to cause harmful interference in which case the
user will be required to correct the interference at his
own expense.
Canadian Notification
This digital apparatus does not exceed the Class A
limits for radio noise emissions from digital apparatus
set out in the Radio Interference Regulations of the
Canadian Department of Communications.
Le présent appareil numérique n’émet pas de bruits
radioélectriques dépassant les limites applicables
aux appareils numériques de la classe A prescrites
dans le Règlement sur le brouillage radioélectrique
édicté par le Ministère des Communications du
Canada.
Japanese Approvals
Safety and EMC Approvals and Markings
EN55022 Class A, EN55024, EN61000-3-2,
EN61000-3-3, EN60950, FCC 47CFR Part 15
Class A, CSA C22.2 No. 60950, IEC 60950, FCC
Class A, UL 60950 3rd Edition, VCCI Class A
For Technical Support:
www.avocent.com/support
AVOCENT PM PDU
Installer/User Guide
590-860-501F