1
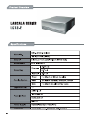
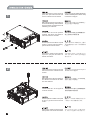
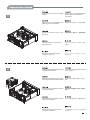
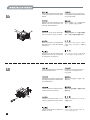
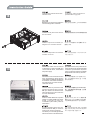
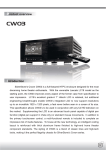
80 x 80 x 25mm FAN*2
80mm FAN OPTION
TOP COVER
5.25" BAY*2
FRONT I/O
(USB2.0*2,MIC,AUDIO,IEEE1394)
RESET BUTTON
3.5" BAY*3 HIDDEN INTERNAL
80 x 80 x 25mm or 92 x 92 x 25mm FAN OPTION
3.5" BAY*2 EXTERNAL
3.5" BAY*1 HIDDEN INTERNAL
FRONT I/O Pin Definition
AC'97 CONNECTOR
IEEE 1394 CONNECTOR
Yellow ~ TPATPA-
TPA+
GND
GND
TPB-
TPB+
+12V
+12V
AGNU
Black ~ VG
NC
MICPWR
Green ~ TPB+
NC
FPOUT~R
PIN
NC
NC
FPOUT~L
Blue ~ TPA+
GND
MIC2
Red ~ TPB-
White ~ VP
Pin
Black ~ SHIELD
Pin
Pin
USB2.0 CONNECTOR
HD AUDIO CONNECTOR
AUD GND
PORT1L
LP-
LP-
PRESENCE#
PORT1R
LP+
LP+
SENSE1_RETURN
GND
GND
USB+5V
USB+5V
NO PIN
SENSE2_RETURN
NC
Pin
PORT2R
SENSE_SEND
PORT2L
Pin
Pin
PARTS PACKAGE
ITEM
FRONT VIEW
POWER BUTTON
POWER LED
HDD LED
PART NAME
PURPOSE
1
SCREW
SECURE CASE FAN
2
SCREW
SECURE CASE FAN
3
SCREW
SECURE 5.25” DEVICES AND
MOTHERBOARD
4
SCREW
SECURE HARD DRIVE
5
MOTHERBOARD STANDOFF
SECURE MOTHERBOARD
6
PAD LOCK LOOP
FOR LOCK CHASSIS
7
EMI RING
REDUCE EMI
PHOTO
2
1
2
1
2
3
Please remove the 4 screws on the top
panel, then pull toward the back and
remove outward from the chassis
Открутите 4 шурупа на верхней панели,
затем потяните верхнюю панель назад
и выньте ее из корпуса.
Bitte entfernen Sie die 4 Schrauben an
der oberen Abdeckung, ziehen Sie diese
dann nach hinten und entfernen Sie die
Abdeckung vom Gehäuse.
請依圖示取下鎖固上蓋的4顆螺絲後,
將上蓋向後拉以取出機箱
Veuillez retirer les 4 vis du panneau
supérieur, puis tirez-le vers l'arrière et
sortez-le en dehors du boîtier.
请依图示取下锁固上盖的4颗螺丝后,
将上盖向后拉以取出机箱
Por favor quite los 4 tornillos en el panel
superior, entonces jale hacia atrás y
quítelos hacia fuera del chasis
上部パネルのネジ4本を外し、上部パ
ネルを後方に引いてケースから取り外
します。
Rimuovere le quattro viti del pannello
superiore, spingerlo al’indietro ed
estrarlo dal chassis
상부패널의 4개의 나사를 제거한 뒤
뒤로 당겨 케이스로부터 상부패널을
제거합니다.
Please remove the 4 screws on the prop
stand and remove it outward from the
chassis
Открутите 4 шурупа на опоре и
выньте ее из корпуса.
Bitte entfernen Sie die 4 Schrauben an
den Stützen und entfernen Sie diese
aus dem Gehäuse
請依圖示卸下補強桿上的四顆螺絲後
將其自機箱中取出機箱
Veuillez retirer les 4 vis du support et
sortez-le du boîtier
请依图示卸下补强杆上的四颗螺丝后
将其自机箱中取出机箱
Por favor quite los 4 tornillos en el soporte
de apoyo y quítelos hacia fuera del
chasis
補強ブレースのネジ4本を外してブレ
ースをケースから取り外します。
Rimuovere le quattro viti dal supporto
della pedana e rimuoverlo dal chassis
지지 스탠드의 4개의 나사를 제거한
뒤, 케이스 바깥쪽으로 제거합니다.
3
4
3
Remove the screw on the 5.25” device
bracket
Выньте шурупы, расположенные на
кронштейне 5,25-дюймового
устройства.
Entfernen Sie die Schrauben an der
Halterung für 5.25” Laufwerke
請依圖示卸下鎖固5.25"裝置架螺絲
Retirez le vis fixant le casier de la
baie 5.25”
请依图标卸下锁固5.25”装置架螺丝
Quite el tornillo en el soporte de
dispositivo 5.25"
5.25 ドライブブラケットのネジを外
します。
Svitare le viti dal supporto del
dispositivo da 5.25”.
5.25” 디바이스 브라켓의 나사를
제거합니다.
Pull the bracket toward back and remove
it outward from the chassis
Потяните кронштейн назад и выньте
его из корпуса.
Ziehen Sie die Halterung nach hinten
und entfernen Sie sie aus dem Gehäuse
請依圖示將裝置架向後拉以自機箱中
取出
Tirez le casier vers l'arrière et sortez-le
en dehors du boîtier
请依图标将装置架向后拉以自机箱中
取出
Tire del soporte hacia atrás y quítelo
hacia fuera del chasis
ブラケットを後方に引いて取り出します。
Spingere il supporto all’indietro e
rimuoverlo dal chassis
브라켓을 뒤로 당겨, 케이스 바깥쪽으로
제거합니다.
2
4
5
1
Remove the screws on the 5.25” device
cover and remove the covers from the
bracket
Открутите шурупы на крышке
5,25-дюймового устройства и выньте
ее из кронштейна.
Entfernen Sie die Schrauben an den
Blenden der 5.25” Einschübe und
entfernen Sie die Blenden
請依圖示將鎖固5.25"裝置擋板螺絲
卸下,並將檔板自裝置架中取下
Retirez les vis du cache de la baie
5.25” et sortez le cache du casier
请依图标将锁固5.25”装置挡板螺丝
卸下,并将文件板自装置架中取下
Quite los tornillos en la cubierta del
dispositivo 5.25 " y quite las cubiertas
del soporte
5.25 ドライブブラケットカバーのネジ
を外し、
ブラケットからカバーを取り外
します。
Rimuovere le viti della mascherina
del dispositivo da 5.25” e rimuovere
le mascherine dal supporto
5.25” 디바이스 커버의 나사를 제거한
뒤, 브라켓에서 커버를 제거합니다.
Insert your optical drive into the bracket
and secure with screws
Вставьте оптический привод в
кронштейн и закрепите его
шурупами.
Setzen Sie ihr optischen Laufwerke in
die Halterung ein und schrauben Sie
die Laufwerke fest
請將您的光碟裝置裝入裝置架中並以
螺絲鎖固
Insérez votre lecteur optique dans le
casier et fixez-le avec des vis
请将您的光盘装置装入装置架中并以
螺丝锁固
Inserte su dispositivo óptico en el
soporte y asegúrela con los tornillos
光学ドライブをブラケットに入れ、
ネジ
で固定します。
Inserire l’unitá ottica nel supporto e
fissare con le viti
광드라이브를 브라켓에 삽입한 후,
나사로 고정시킵니다.
2
1
6
5
7
1
3
8
Remove the 4 screws on the middle 3.5”
hard drive cage and pull it toward the
back to remove it outward from the
chassis
Открутите 4 шурупа на средней
корзине для 3,5-дюймового жесткого
диска, затем потяните корзину назад
и выньте ее из корпуса.
Entfernen Sie die 4 Schrauben an der
mittleren Festplattenhalterung, ziehen
Sie die Halterung nach hinten und
entfernen Sie sie aus dem Gehäuse
請依圖鎖固中間3.5"硬碟架螺絲卸下,
並將其向後拉以自機箱中取出
Retirez les 4 vis dans le casier à disque
dur du milieu et tirez-le en arrière
pour le sortir du boîtier
请依图锁固中间3.5”硬盘架螺丝卸下,
并将其向后拉以自机箱中取出
Quite los 4 tornillos en caja de disco
duro 3.5 " mediana y jale hacia atrás
para quitar del chasis
中央の3.5 ハードディスクドライブケ
ージのネジ4本を外し、後方に引いて
ケースから取り出します。
Svitare le viti che si trovano nel centro
del box dell’hard disk da 3.5” e
spingerlo indietro per rimuoverlo dal
chassis.
3.5” 하드 드라이브 케이지 중간의
4개의 나사를 제거한 뒤 뒤로 당겨
바깥쪽으로 드라이브 케이지를
제거합니다.
Insert your 3.5” hard drive into the cage
and secure with screws
Поместите 3,5-дюймовый жесткий
диск в корзину и закрепите
шурупами.
Setzen Sie ihre 3.5” Laufwerke in die
Halterung ein und befestigen Sie die
Laufwerke mit Schrauben
將您的3.5"硬碟安裝至硬碟架中,
並以螺絲鎖固
Insérez votre disque dur 3.5” dans le
casier et fixez-le avec des vis
将您的3.5”硬盘安装至硬盘架中,
并以螺丝锁固
nserte su disco duro 3.5 " en la jaula
y asegúrelos con los tornillos
3.5 ハードディスクドライブをケージ
に入れ、ネジで固定します。
Inserire l’hard disk da 3.5” nel box e
fissare con le viti.
3.5” 하드디스크를 드라이브 케이지에
삽입한 후, 나사로 고정합니다.
2
6
9
2
Remove the screw on the left 3.5” hard
drive cage, then pull it toward the back
and remove it outward the chassis.
Having removed it outward the chassis,
remove the screws on the cage covers,
then remove the covers.
Открутите 4 шурупа на левой корзине
для 3,5-дюймового жесткого диска,
затем потяните корзину назад и выньте
ее из корпуса. После этого выньте
шурупы на крышках корзин и снимите
крышки.
Entfernen Sie die Schrauben an der
linken 3.5” Festplattenhalterung, ziehen
Sie diese nach hinten und entfernen
Sie die Halterung aus dem Gehäuse.
Wenn Sie die Halterung rausgenommen
haben, entfernen Sie die Schrauben an
den Abdeckungen der Einschübe und
entfernen Sie dann die Abdeckungen
請依圖示將鎖固左邊3.5"硬碟架螺絲
卸下,並下後拉以自機箱中取出。在
將硬碟架取出後,請依圖示將鎖固檔
板的螺絲卸下以取下檔板
Retirez les vis du casier à disque dur 3.5”
situé à gauche, puis tirez-le en arrière
pour le sortir du boîtier. Après l'avoir sorti,
retirez les vis des caches du casier, et
ensuite retirez les caches.
请依图标将锁固左边3.5”硬盘架螺丝
卸下,并下后拉以自机箱中取出。在
将硬盘架取出后,请依图示将锁固文
件板的螺丝卸下以取下档板
Quite el tornillo en la caja de disco duro
3.5 " izquierda, entonces jale hacia
atrás y quítelo hacia fuera del chasis.
Quitándolo hacia fuera los chasis,
quite los tornillos en las cubiertas de
la caja, después quite las cubiertas.
左側3.5 ハードディスクドライブケー
ジのネジを外し、後方に引いてケース
から取り出します。取り出してからケー
ジカバーのネジを外し、
カバーを取り
外します。
Svitare le viti del box sinistro dell’hard
disk da 3.5” spingerlo all’indietro ed
estrarlo dal chassis. Quindi svitare le
viti delle mascherine del box e
rimuoverle.
왼쪽 3.5” 드라이브 케이지의 나사를
제거한 후 뒤로 당겨 케이스 바깥으로
제거합니다. 밖으로 제거한 후 케이지
커버의 나사를 제거합니다. 그후,
커버도 제거합니다.
3
2
1
7
10
11
Insert your 3.5” hard drive into the left
hard drive cage and secure with
screws
Вставьте 3,5-дюймовый жесткий
диск в левую корзину и закрепите
шурупами.
Setzen Sie ihre 3.5” Laufwerke in die
linke Halterung ein und befestigen Sie
die Laufwerke mit Schrauben
將您的3.5"硬碟裝入左邊硬碟架,
並以螺絲鎖固
Insérez votre disque dur 3.5” dans le
casier de gauche et fixez-le avec des
vis
将您的3.5”硬盘装入左边硬盘架,
并以螺丝锁固
Inserte su disco duro en la caja 3.5 "
izquierda de disco duro y asegúrelos
con los tornillos
3.5 ハードディスクドライブを左側ケ
ージに入れ、ネジで固定します。
Inserire l’hard disk da 3.5” nel box
sinistro e fissare con le viti.
왼쪽 하드 드라이브 케이지에 3.5”
하드 디스크를 장착한 후, 나사로
고정합니다.
Install your power supply and secure
with screws
Установите блок питания и закрепите
его шурупами.
Installieren Sie ihr Netzteil und schrauben 安裝您的電源供應器並以螺絲鎖固
Sie es fest
Installez votre alimentation et fixez-la
avec des vis
安装您的电源供应器并以螺丝锁固
Instale su fuente de alimentación y
asegúrelo con los tornillos
電源をケースに入れ、
ネジで固定します。
Installare l’alimentatore e fissare con
le viti.
파워 서플라이를 설치하고 나사로
고정합니다.
8
12
13
9
Fasten and secure motherboard stands
as required
Надежно закрепите опоры
материнской платы.
Plazieren Sie die Abstandshalter für
das Mainboard wie erforderlich
請依需求鎖固主機板螺柱
Serrez et fixez les plots selon les
besoins de votre carte mère
请依需求锁固主板螺柱
Sujete y asegure los soportes de la
placa madre como sea necesario
マザーボードの必要に合わせてスペ
ーサーを取り付けます。
Fissare i distanziatori della scheda
madre come richiesto.
필요한 만큼 메인보드 지지대롤 설치한
후 고정합니다.
Install your motherboard and secure
with screws
Установите материнскую плату и
закрепите ее шурупами.
Installieren Sie ihr Mainboard und
schrauben Sie es fest
安裝您的主機板並以螺絲鎖固
Installez votre carte mère et fixez-la
avec des vis
安装您的主板并以螺丝锁固
Instale su placa madre y asegúrelo
con los tornillos
マザーボードの位置を合わせてネジで
固定します。
Installare la scheda madre e fissare
con le viti
메인보드를 장착한 후, 나사로 고정합니다.
14
Remove the slot cover then install the
expansion card as required
Сняв заглушку слота, установите
плату расширения.
Bitte entfernen Sie die Abdeckungen
an den Einschüben für
Erweiterungskarten entsprechend
ihren Ansprüchen
請依需求將擴充槽檔片取下後安裝擴
充卡
Retirez les équerres PCI et ensuite
installez votre carte d'extension selon
vos besoins
请依需求将扩充槽档片取下后安装扩
充卡
Quite la cubierta de la ranura entonces
instale la tarjeta de la extensión como
sea necesario
必要に応じて拡張カードをインストー
ルする部分のスロットカバーを取り外
します。
Rimuovere le mascheirne dello slot
ed installare la expansion card come
richiesto
필요한 확장카드 만큼 슬롯 커버를
제거합니다
Reinstall 5.25” device bracket into
chassis and secure with screw (step 5)
Снова установите в корпус кронштейн
5,25-дюймового устройства и закрепите
шурупами (шаг 5).
Setzen Sie die 5.25” Halterung wieder
in das Gehäuse ein und schrauben
Sie die Halterung fest (Schritt 5)
請依圖示將5.25"裝置架裝回機箱內
並以螺絲鎖固
Réinstallez le casier pour appareils
5.25” dans le boîtier et fixez-le avec
des vis (étape 5)
请依图标将5.25”装置架装回机箱内
并以螺丝锁固
Reinstale el soporte 5.25 " del dispositivo
en chasis y asegúrelos con el tornillo
(paso 5)
5.25 ドライブブラケットをケースに入
れ、
ネジで固定します。
(ステップ5参照)
Reinstallare il supporto del dispositivo
da 5.25” nel chassis e fissare con le
viti(passo 5)
5.25” 디바이스 브라켓을 케이스에
장착한 후, 나사로 고정합니다.
(step 5).
10
2
1
15
16
Reinstall the 3.5” hard drive cages into
chassis and secure with screws
(step 8 and 10)
Вставьте в корпус корзины для
3,5-дюймовых жестких дисков и
закрепите шурупами (шаг 8 и 10).
Setzen Sie die 3.5” Halterungen wieder
in das Gehäuse ein und schrauben Sie
es fest (Schritt 8 und 10)
將3.5"硬碟架裝回機箱並以螺絲鎖固
(步驟8與步驟10)
Réinstallez les casier à disque durs
3.5” dans le boîtier et fixez-les avec
des vis (étape 8 et 10)
将3.5”硬盘架装回机箱并以螺丝锁固
(步骤8与步骤10)
Reinstalan las cajas 3.5 " de disco duro 3.5 ハードディスクドライブケージをケ
en chasis y asegure con los tornillos
ースに入れ、ネジで固定します。
(paso 8 y 10)
(ステップ8および10参照)
17
11
Reinstallare il box dell’hard disk da
3,5” nel chassis e fissare con le viti
(passo 8 e 10)
3.5” 하드 드라이브 케이지를 케이스에
재설치한 후, 나사로 고정합니다.
(Step 8 & 10).10)
Reinstall the prop stand and secure
with screws (step 2)
Снова установите опору и закрепите
шурупами (шаг 2).
Setzen Sie die Stützen wieder ein und
schrauben Sie sie fest (Schritt 2)
請將補強桿裝回機箱並以螺絲鎖固
(步驟2)
Réinstallez le support et fixez-le avec
des vis (étape 2)
请将补强杆装回机箱并以螺丝锁固
(步骤2)
Reinstale el soporte del apoyo y lo
asegure con los tornillos (paso 2)
補強ブレースを元に戻しネジで固定し
ます。
(ステップ2参照)
Reinstallare il supporto della pedana e
fissare con le viti(passo 2)
지지 스탠드를 재 설치한 후, 나사로
고정합니다. (Step. 2).
18
19
Install the lock pad and secure with
included screw
Установите замок и закрепите
прилагаемым шурупом.
Befestigen Sie das Schloss-Plätchen
mit den beiliegenden Schrauben
請依圖示安裝鎖頭片並以內附螺絲鎖固
Installez le lock pad et fixez-le avec
les vis incluses
请依图示安装锁头片并以内附螺丝锁固
Instale el cojín de la cerradura y lo
aseguran con el tornillo incluido
ロックパッドを図のように付属のネジで
固定します。
Installare il dispositivo di sicurezza
e fissare con le viti.
잠김 패드를 동봉된 나사(Screw D)로
고정 시킵니다.
All the front cables can be inserted
in the EMI ring to reduce the EMI, and
connect with all drivers, motherboard
and power supply.
Для уменьшения электромагнитных
помех проденьте все передние провода
и кабели в прилагаемое защитное
кольцо; подключите провода к приводам,
материнской плате и блоку питания.
Alle Kabel für die Vorderseite können
durch den EMI Ring geführt werden
um die elektro-manetischen Interferenzen
zu reduzieren, und mit allen Laufwerken,
dem Mainboard und dem Netzteil
verbunden werden
前方所有的傳輸線可穿入EMI環以減小
EMI,同時請連接所有的裝置,主機板
與電源的線材
Tous les câbles du panneau frontal
peuvent être passés dans l'anneau
EMI pour réduire les émissions EMI,
puis branchez les sur votre carte mère
et à votre alimentation.
前方所有的传输线可穿入EMI环以减小
EMI,同时请连接所有的装置,主机板
与电源的线材
Todos los cables delanteros se pueden
insertar en el anillo de EMI para reducir
la EMI, y conectan con todos los
controladores, placa madre y fuente de
alimentación.
全てのドライブ、
マザーボード、
電源に接
続されるケーブルにはEMIリングを通す
ことでEMIを減少させることができます。
È inoltre possibile inserire tutti i cavi
frontali nell’anello EMI per ridurre le
interferenze elettromagnetiche.
Connettere poi i cavi a tutti gli hard disk
alla scheda madre e all’alimentatore.
모든 전면케이블은 EMI 링에 끼워 EMI를
줄일 수 있으며, 모든 드라이브와 메인보드
파워 서플라이를 연결합니다.
12
20
21
13
Reinstall the top panel and secure with
screws
Установите на место верхнюю панель
и закрепите ее шурупами.
Setzen Sie die obere Abdeckung
wieder ein und schrauben Sie sie
fest
將上蓋裝回並以螺絲鎖固
Réinstallez le panneau supérieur et
fixez-le avec des vis
将上盖装回并以螺丝锁固
Reinstale el panel superior y asegúrelo
con los tornillos
上部パネルを取り付け、
ネジで固定します。
Reinstallare il pannello superiore e
fissare con le viti.
상부 판넬을 재설치한 후, 나사로
고정합니다.
Installation complete
Сборка завершена.
Installation abgeschlossen
安裝完成
Installation terminée
安装完成
Instalación completa
インストール完了
Installazione completata
설치가 완료되었습니다.