1
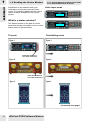
Table of Contents
1
English
Overview
1-1 Introduction ......................................................................1
1-2 Features ...........................................................................2
1-2-1 Multiple Video Processing ...................................2
1-3 Launch the Application ......................................................
3
1-4 Switch between Modes ....................................................3
1-5 Reading the Status Window ..............................................
4
1-5-1
1-5-2
1-5-3
1-5-4
1-5-5
1-5-6
2
Status Window in Video Input Mode ....................4
Status Window in TV Mode .................................4
Status Window in TimeShifting Mode .................5
5
Status Window in Video Playback Mode ..............
Status Window in FM Mode ................................6
Status Window in FM Playback Mode .................6
TV Mode
2-1 Control Panel ...................................................................7
2-2 Digital TV ..........................................................................9
9
Scan Channels .......................................................
9
Add a New Frequency ............................................
10
Video Capture Setting ...........................................
Change the Folder for Saved Media Files ...........10
Video Setting .......................................................11
General Setting ....................................................12
EPG ....................................................................13
Analog TV (Only Applicable for Specific Products) .......................
14
2-3-1 Scan Channels ....................................................14
2-3-2 Add a New Frequency .........................................14
2-3-3 Device Setting ......................................................15
16
2-3-3-1 Audio Setting ...........................................
17
2-3-4 Video Setting ........................................................
2-3-5 Analog Video Capture Setting .............................18
18
2-3-6 Change the Folder for Saved Media Files ............
19
2-3-7 Add a New Capture Profile ....................................
2-3-8 EPG ....................................................................22
23
2-3-8-1 Import XMLTV Data .................................
2-2-1
2-2-2
2-2-3
2-2-4
2-2-5
2-2-6
2-2-7
2-3
24
2-4 TimeShift Mode ................................................................
26
2-5 LiveBroadcast ...................................................................
27
2-6 DirectBurn ........................................................................
2-7 Fine Tune Channels .......................................................27
28
2-8 Capture File Popup Menu ................................................
28
2-9 Screen with Multi-language Selection ..............................
29
2-10 Schedule ........................................................................
30
2-11 Playback Mode ...............................................................
2-11-1 Control Panel ....................................................30
2-11-2 Twinview ........................................................... 30
2-12 Screen Popup Menu .......................................................
32
Table of Contents
3
FM Mode
English
(Only Applicable for Specific Products)
3-1 Control Panel ..................................................................33
34
3-2 Scan Channels ..................................................................
35
3-3 Audio Setting ....................................................................
35
3-4 Change the Folder for Sound Files ..................................
36
3-5 Channel List .....................................................................
3-6 Schedule ........................................................................37
38
3-7 FM Playback Control Panel ................................................
4
Other Source
39
4-1 Device Setting for Other Sources ....................................
5
Remote Control
5-1
5-2
5-3
5-4
6
40
Remote Model 1 ...............................................................
44
Remote Model 2 ................................................................
45
BIOS Setting for Power On/Off by Remote Control .........
47
Advanced Function for Remote Control ...........................
Hot Keys
48
6-1 Hot Keys ...........................................................................
1
1-1 Introduction
Before you start to read this manual, we have to remind you that Digital TV, Analog TV
input source and FM mode are applicable to specific products, please check that if your
products support these functions.
WinFast PVR2 is a powerful and easy-to-use application that comes with your WinFast
multimedia product to provide the most feature-rich video/audio entertainment. The
WinFast PVR2 application allows you to view and record live TV or video in picture-inpicture (PIP), picture-on-picture (POP) and picture-and-picture (PAP) style, as well as
control all available functions.
OVERVIEW
Thank you for choosing Leadtek product.
WinFast PVR2 with Channel Surf Screen
A complete WinFast PVR2 application
package provides all functions in 6 different
modes for your entertainment pleasure:
TV mode
Video Input mode
Video Playback mode
TimeShifting mode
FM Mode
FM Playback Mode
The WinFast PVR2 application displays a
virtual control panel under each mode as well
as a resizable virtual screen for viewing TV or
video.
You must first install a
WinFast capturing
device and follow
instructions (as
described in the user's
manual) on making
connections with other
external devices, before
you can enjoy the full
capabilities of WinFast
PVR2 application.
1
1
1-2 Features
1-2-1 Multiple Video Processing
OVERVIEW
Features
TimeShifting function allows users to view recorded video when the recording is still in
progress. Never again will you miss a second of your favorite show for taking a break to
get the popcorn.
Power-up scheduling of pre-set recording with auto power-on of PC in S3 (Standby) or
S4 (Hibernate) mode.
DirectBurn allows you to record programs directly into VCD/DVD in real time.
Delicately designed software saves time in running the application.
TV applications can record the video from any device connected with your capture card
and sound card such as CD-ROM, VCR, camcorder, and a LD/VCD/DVD player.
Supports MPEG1, MPEG2 codec, and MPEG4 compression format for analog video
settings.
Supports Multiple Video Processing. (Please refer to the section below.)
For Digital TV Only:
Supports HDTV & AC3 functions.
Supports digital FM radio reception (not
DAB type).
Picture-in-picture (PIP), Picture-on-Picture
(POP),and Picture-and-Picture (PAP)
Twinviews for viewing two TV programs
concurrently.
Note:
The MPEG4 codec can be
downloaded from
www.divx.com for free. You
can download the codec and
use it in your capture format
profile.
Multiple Video Processing
WinFast PVR2 can provide audio/video entertainment and surveillance functions
simultaneously.
With WinFast PVR2 and two TV tuner cards, you can enjoy two different TV shows or
watch your favorite TV show in the living room and watch your baby sleeping in the
bedroom on the same screen. (external camera required.)
How to Start
To run M.V.P, WinFast PVR2 has to be launched twice, (see page 3: Launch the
application) and there will be two independent control panel on the screen. (See Control
Panel related sections.) When using remote control, pressing TV button can switch
between the two applications.(see page 40: Remote Control)
The main functions are as follows:
1. Dual TV Display Watch 2 TV programs simultaneously
2. Watch A, record B Watch TV with Device A and Record TV with
Device B
3. Watch TV and Surveillance Watch TV with Device A and Surveillance with
CCD camera with Device B
Note:
Multiple Video Processing requires
two TV tuner cards and at least one
of them must be Digital one.
2
WinFast PVR2 Software Manual
1-3 Launch the Application
1. WinFast PVR2 shortcut is added to the
Program list in Start menu. You can
choose it to launch WinFast PVR2.
When you run the WinFast PVR2
application for the first time, the default is
set to TV mode.
You can identify which mode you are
currently in by reading the status window.
How to enter TV Mode
1
OVERVIEW
After the WinFast PVR2 application is
successfully installed, shortcuts are added
to provide several ways to launch the
application. They are:
1-4 Switching between Modes
If you are currently in Video Input mode,
click the Video Input button on the control
panel to switch to TV mode.
How to enter Video Input Mode
If you are currently in TV mode, click the
Video Input button on the control panel to
switch to either CVBS or S-Video input.
How to enter Video Playback
Mode
If you are currently in TV mode and there
is no recording in progress, clicking the
Open Media File button to play back a
media file will switch the system to Video
Playback mode.
How to enter TimeShifting Mode
If you are currently in TV mode, click the
TimeShifting button on the control panel.
2. The WinFast PVR2 shortcut icon
will also appear on the desktop.
To launch WinFast PVR2
immediately, double-click the icon.
How to enter FM Mode
If you are currently in TV mode or TV
Playback mode, clicking the FM button
on the control panel.
How to enter FM Playback Mode
If you are currently in FM mode and there
is no recording in progress, clicking the
Open File button on the control panel to
play back a recorded sound file will switch
the system to FM Playback mode.
3
1
1-5 Reading the Status Window
OVERVIEW
Indications on the status screen give
1-5-1 Status Window in Video Input Mode
1-5-2 Status Window in TV Mode
Video Input mode
information concerning currently active
mode. The following pages tell you how to
read the status windows on the control
panels.
CVBS
What is a status window?
The Status window is the part of control
panel that shows information on the current
status (refer to figures below).
TV mode
S-Video
TimeShifting mode
Type 1
Type 1
Click this button to
use other functions
Type 2
Type 2
Click this button to
use other functions
Type 3
Type 3
(Continued next page)
4
WinFast PVR2 Software Manual
1-5 Reading the Status Window
TimeShifting mode - Standby
There are 4 types of actions in TV mode:
1. With no recording in progress
2. With recording in progress
3. With TimeShifting standby
4. With TimeShifting playback
1
With no recording in progress
1
OVERVIEW
TV mode
1-5-3 Status Window in TimeShifting Mode
1-5-4 Status Window in Playback Mode
1 0:00:1'94"
Length of recorded
video of the ongoing TimeShifting
recording
2
TTV-1
TimeShifting mode - Playback
3
1
3
1 TTV-1
Channel Name
2 AC3
Icon AC3 (Dolby Digital)
indicator
3
Icon SAP indicator
1
With recording in progress
1
1 0:00:2'54"
2
2
3
1 0:00:3'42"
2
Length of recorded
video of the ongoing
recordings.
2
Length of played video of
the ongoing TimeShifting
recording
Quit Timeshifting
Indicates the system is
under TimeShifting mode
Video playback mode
Indicating the system is
busy recording
programs.
2
TTV-1
3
1
1 TTV-1
Channel Name
2 AC3
Icon AC3 (Dolby Digital)
indicator
3
Icon SAP indicator
5
1
1-5 Reading the Status Window
(Only Applicable to Specific Products)
OVERVIEW
FM mode
1-5-5 Status Window in FM Mode
1-5-6 Status Window in FM Playback Mode
FM Playback mode
With no recording in progress
With recording in progress
Channel Number of the
live FM radio broadcast.
Frequency of the current
live FM radio channel.
Indicates playback is in
progress.
Name of the sound file
that is being played
back.
Channel Number of the live
FM radio broadcast.
Frequency of the current live
FM radio channel.
Length of played video
of the ongoing playback.
Icon
Playback indicator. If it
lights blue, playback is in
progress. If it shows two
paralleled vertical lines,
playback is being
paused.
Icon
Recording indicator. If it
lights red, recording is in
progress.
Icon
Pause indicator. If the
status shows this icon
instead of
, the
playback of a recorded
sound file is being
paused.
Channel Name of the live FM
radio broadcast.
Clock that tells time.
Indicates there is ongoing
recording.
Name of the sound file that is
being recorded.
Length of recorded video of
the ongoing recording.
6
Icon
Playback indicator. If it lights
blue, playback is in progress.
If it shows two paralleled
vertical lines, playback is
being paused.
Icon
Recording indicator. If it
lights red, recording is in
progress.
Icon
Pause indicator. If the status
shows this icon instead of
, the playback of a recorded
sound file is being paused.
WinFast PVR2 Software Manual
2
2-1 Control Panel
Control Panel 1
14 Channel list
11 Channel
Controls
13 Signal Indicator
10 Record button
12 DirectBurn
button
3 LiveBroadcast Switch
9 TimeShifting
Button
2 FM Switch
TV MODE
1 Power
off
4 Various
functions
5 Video Input
1
7 Volume
5
Controls
6 Twinview
Controls
Power off
5
Click to close the application.
2
FM Switch
LiveBroadcast Switch
Click to broadcast on-going TV show
via internet.
4
Various functions:
Open Media File
Click to open an explorer window to
browse for the media file you want to
play. Double-click the file to play.
Snapshot
Click to take a snapshot and save it as
a .bmp, .JPG, .PNG and .TIFF formats
(it usually saves as a .jpg file in
Windows XP).
Switch Skin
Click to switch to different control
panels.
Switch audio
Click to switch between different
languages if multi-lanuages are
available.
Video Input
For some TV cards 3 input sources
are available: Digital TV, CVBS and
S-Video. And for some cards, an
Analog TV input source is also
included. Whether CVBS or S-Video
mode is shown is dependent on the
device used.
Click to switch to the FM radio mode.
3
8 Software
Settings
6
POP Twinview
Select this option to display two
different TV programs in picture-onpicture style. Users can select
various sub-channels in the subscreen.
PIP Twinview
Select this option to display two
different TV programs in picture-inpicture style.
PAP Twinview
Select this option to display two TV
different programs in picture-andpicture style. Use the scroll bar to
adjust the volumes of adjacent
screens.
Close Twinview
Click to close the Twinview windows.
For the three twinview modes,
only digital TV supports two live
TV programs. In analog TV, you
can only watch one live TV
program, and one playback video.
(Continued next page)
7
2
2-1 Control Panel
7
5
Volume Controls:
Control Panel 2
2
Click to turn the volume up/down.
The scroll bar indicates the status
of volume controls.
Mute button
TV MODE
Click to mute the audio. Click again
to resume system sound.
8
1
Software Settings
Configuration
Click to open the setup dialog box.
Turn the button right to increase
the volume. To decrease the
volume, turn the button towards
the left.
Schedule
Click to preset the recording
schedules.
EPG page button
Click to switch to the EPG mode.
9
Turn the button right to increase
the channel number. To decrease
the channel number, turn the
button towards the left.
TimeShifting button
Record button
The ring surrounding the Record
button turns orange when recording
is in progress. Right-click on the
button will show a Capture File
popup menu.
9
11
Channel Up/Down
2
Click to run TimeShifting.
8
10
Volume Up/Down
1
Refer to page 7 for detailed
descriptions on other functions.
Control Panel 3
Channel Controls
Click to switch the channel
up/down.
12
DirectBurn to Disc button
Click to record programs directly
onto VCD/DVD. Right-click on the
button will show a Capture file
popup menu.
2
13
1
Signal Indicator
14
On the indicator, the more lights
are on, the more stronger the
signal is. If you are receiving weak
signal, please adjust your antenna
to receive better signal.
Channel List
Move the mouse
cursor to the space
above the signal area
to display the
available channel list.
8
WinFast PVR2 Software Manual
1
Record button
The ring surrounding the Record
button turns orange when recording
is in progress. Right-click on the
button will show a Capture File
popup menu.
2
TimeShifting button
Click to run TimeShifting.
Refer to page 7 for detailed
descriptions on other functions.
2-2 Digital TV
2
2-2-1 Scan Channels
2-2-2 Add a New Frequency
Scan Channels
Scanning for channels is the first thing you need to do when you use the application
for the first time. Otherwise, there will not be any channels available for viewing.
To scan for channels, please click on
icon on the control panel, then click on
label
to open Scan Channel dialog box as picture below.
4. [Scan] button
Click the button to start scanning for all
available channels.
2. [City]
Select a city from the list for a specific
country.
Note: Users can now drag-and-drop a
specific channel to customize the
channel list.
3. [Sensitivity]
Set the sensitivity to "Slow (High
Sensitivity)".
6. [Exit] button
Press to exit the Scan Channel dialog box.
5. [View Style] button
Users can select the viewing style that
they wish to view the available channels.
TV MODE
1. [Country]
Choose the country where you
currently reside from the drop-down
list to help the system tune in the
channels at the precise frequencies,
and hence determine the appropriate
video standards.
Fig. 1
Add a New Frequency
To add a new frequency, please right click on
the channel list, a menu (as Fig. 2 shows) will
appear, then choose "Add a new
frequency".
Fig. 2
9
2
2-2 Digital TV
2-2-3 Video Capture Setting
2-2-4 Change the Folder for Saved Media Files
Digital Video Capture Setting
Click
on the control panel, then
label to open the Digital Video Capture Setting
dialog box as shown in the figure below.
WinFast DTV Dongle BDA Driver
TV MODE
Fig. 3
[Device]
By default the device used is WinFast
DTV1000 T. Or users can select other
available Leadtek devices.
[Image Format]
The formats available are: JPEG, BITMAP,
PNG, and TIFF.
[Transport Stream Type]
Two Transport Stream Types are available:
Capture all packets & Capture this program
only.
[Number of Images/Time Interval (ms)]
Select the number of images in a specified
time interval in ms.
[Capture Format]
Two types are available: Program Stream
(*mpg) and Transport Stream (*.ts).
When Program Stream is selected, by
default the transport stream type is set to
"Capture this program only ". Otherwise
when Transport Stream is selected, by
default the transport stream type is set to
"Capture all packets".
Note: In order to play Transport
Stream files, use either a VLC media
player (refer to www.videolan.org/vlc/),
or a moonlight-Elecard MPEG player
(refer to www.moonlight.co.il).
Change the Folder for Saved Media Files
[WorkArea Folder]
To change the folder for the saved media files, please click on the "Browse" button to
browse the directory for saving the recorded media files. All recorded media files will be
saved in the directory.
10
WinFast PVR2 Software Manual
2-2 Digital TV
2-2-5 Video Setting
2
Video Setting
Click
on the control panel then
shown in the figure below.
label to open the Video Setting dialog box as
Light Brown
TV MODE
Fig. 4
[MPEG-2 Codec]
The default value is Leadtek PVR2
Codec.
[Renderer]
Users can select either VMR, VMR 9 or
Overlay Mixer as renderer. The default
renderer is Overlay Mixer.
[Hardware Accelerator]
Users can turn on/off the hardware
accelerator. When Hardware
accelerator is turned on, the eagle
vision option is set to ON by default.
Otherwise users can choose the
various eagle vision options.
(Please note that some on-board VGA
does not support this feature).
[Eagle Vision]
When this function is turned on it will
emphasize the visual effect of WinFast
PVR2. There are three options available:
eagle vision-on, eagle vision-off, eagle
vision-half.
[Video Codec Setting] button
Depending on the specific MPEG-2
Codec used, different settings page is
shown.
[Custom Color Profile]
Users can save a customized color profile
with a specific name. By adjusting the
brightness, contrast & saturation, different
color profile can be added to the list.
[Brightness/Contrast /Saturation]
Click on Default button to reset to default
values.
11
2
2-2 Digital TV
2-2-6 General Setting
General Setting
Click
on the control panel, then
shown in the figure below.
label to open the General Setting dialog box as
TV MODE
Fig. 5
[Keep EPG Data for]
Users can choose the number of days
(0 to 7 days) he wishes to keep the EPG
data for.
[Time Mode]
The time mode can be either 12 hour or
24 hour mode.
[Quick Tune List]
Users can choose to view the submenu
by Auto Popup or Popup by clicking.
[Program Information Display]
The current program information will be
shown when it is turned on.
12
WinFast PVR2 Software Manual
[Switch Channels with Number Pad]
Users can switch the channels by
channel sequence or by channel number.
[Sleep Timer Mode]
Three options are available: Standby,
Hibernate & Power Off.
[Audio Codec Setting] button
All available formats are listed. We
suggest that you use a compressed
format for recording.
2-2 Digital TV
2
2-2-7 EPG
EPG-Electronic Program Guide
EPG is an on-screen guide for scheduled broadcast television programs, allowing users to
navigate and select content by time, channel, etc.
In areas where Electronic Program Guide is applied, you can use this function by clicking
on the
button on the Control Panel (See Fig.7 below). Users can view channel lists and
set recordings directly into WinFast PVR2 via the online channel guide.
TV MODE
1
2
3
4
Fig.6
Fig.7
1
2
3
Put this program into
scheduler
Click this button to add a program to
the scheduler.
Remove this program from
scheduler
When a program has been added to
the scheduler, click this button to
remove this particular program.
Home :
+-
Printing EPG
Now
:
Scroll up/down ( or use
middle key of mouse)
:
Zoom In/Out
:
Move EPG
Forwards/backwards
EPG Reload
Click to refresh existing EPG data. 4
Hot key
Page Up:
Previous EPG
Page Down: Next EPG
Click to print a specific EPG.
13
2
2-3 Analog TV
(Only Applicable to Specific Products)
2-3-1 Scan Channel
2-3-2 Add a New Frequency
Scan Channels
Scanning for channels is the first thing you need to do when you use the application
for the first time. Otherwise, there will not be any channels available for viewing.
First, click on
to switch to Analog input source.
To scan for channels, please click on
icon on the control panel, then click on
label
to open Scan Channel dialog box as picture below.
TV MODE
1. [Country]
Choose the country where you
currently reside from the drop-down
list to help the system tune in the
channels at the precise frequencies,
and hence determine the appropriate
video standards.
2. [Scan Mode]
Three modes are available: Normal,
Auto Fine Tune and Adaptive
Channel Scanning. The Adaptive
Channel Scanning will store all
channels (both from cable and from
antenna mode) with no need to
switch between the 2 modes.
3. [TV Source]
Select the TV source to be either Cable or
Antenna.
4. [Scan] button
Click the button to start scanning for all
available channels. When scanning is done
a tick is shown for the available service
names.
Note: Users can now drag-and-drop a
specific channel to customize the
channel list.
5. [Exit] button
Press to exit the Scan Channels dialog box.
Fig. 8
Add a New Frequency
To add a new frequency, please right click on
the channel list, a menu (as Fig. 9 shows) will
appear, then choose "Add a new
frequency".
Fig. 9
14
WinFast PVR2 Software Manual
2-3 Analog TV
(Only Applicable to Specific Products)
2-3-3 Device Setting
2
Device Setting
Click
on the control panel, then
shown in the figure below.
label to open the Device Setting dialog box as
TV MODE
Fig. 10
[Analog Video Device]
All available video devices are shown in
the list.
[Analog Audio Device]
Select an audio output device from the
drop-down list.
[Mixer Device(Playback)]
Select an audio output device from the
drop-down list.
[Mixer Device(Recording)]
Select an audio output device from the
drop-down list.
[Sound Card Type]
Users can choose to auto-select the sound
card type or choose sound card as CMedia HD Audio / Sound Blaster Audigy
(Audigy 2)
[Video Standard]
Video standards PAL, NTSC and SECAM
are available for specific countries.
[Recording Volume]
Move the scroll bar to turn up/down the
volume. What is set here will also affect
the playback volume. To prevent noise
during the playback, turn down the volume
during the recording process.
For "Audio-Out Control Line" & "Recording Control Line" setting, please refer to the
next section "Audio Setting" on the next page.
15
2
2-3 Analog TV
(Only Applicable to Specific Products)
2-3-3-1 Audio Setting
Audio Setting
Click
on the control panel, then
shown in the figure below.
label to open the Device Setting dialog box as
AUX-in
TV MODE
AUX-in
Fig. 11
Line in Connector (Blue)
Fig. 12
If you use the external connection (please refer to Fig. 12, connecting the audio cable to
the Line in connector of the motherboard/sound card.) for audio out, please change both
Audio-Out and Recording Control Line to Line In. If you use internal connection, please
connect the cable in Fig. 13 to the Aux-in/CD-in connector on your motherboard, and
change both setting to "Aux-in/CD-in". The Aux-in and CD-in connectors on the
motherboard show as Fig. 14, and you can find the indications on the board in most cases.
Fig. 14
Fig. 13
“H” Key for Video Format Switch / “A” Key for BG/DK Audio Switch
1. If some channels have strange colors or become black and white, press "H" on
the keyboard to change the video format (toggle SECAM/PAL).
2. If some channels do not sound correctly or are completely mute, press "A" on
the keyboard to change the sound format. When the format is correct, press "S"
to toggle Stereo/Mono.
When the setup is completed, the setting will be saved in the software.
16
WinFast PVR2 Software Manual
2-3 Analog TV
(Only Applicable to Specific Products)
2-3-4 Video Setting
2
Video Setting
Click
on the control panel, then
shown in the figure below.
label to open the Video Setting dialog box as
TV MODE
Fig. 15
[Renderer]
Users can select either VMR, VMR 9 or
Overlay Mixer as renderer. The default
renderer is Overlay Mixer.
Note: If your PC is connected to two
displays, please change the
Renderer to "VMR 9" to obtain
correct video for both displays.
[Time Shifting Quality Setting]
Three quality settings are available:
Normal, Good and Optimal.
[Brightness/Contrast/Hue/Saturation/
Sharpness/Luma]
Click on Default button to reset to default
values.
[Custom Color Profile]
Users can save a customized color
profile with a specific name. By
adjusting the brightness, contrast, hue,
saturation, sharpness and luma,
different color profile can be added to
the list. Click the Default button to
restore default settings.
17
2
2-3 Analog TV
(Only Applicable to Specific Products)
2-3-5 Analog Video Capture Setting
2-3-6 Change the Folder for Saved Media Flies
Analog Video Capture Setting
Click
on the control panel, then
label to open the Analog Video Capture Setting
dialog box as shown in the figure below.
TV MODE
Fig. 16
[Analog Capture Profile]
Please see Page 28 for detail.
[Add] button
Click to add a capture profile.
[Edit] button
Click to edit a capture profile.
[Delete] button
Click to delete a capture profile.
[Image Format]
The formats available are: JPEG,
BITMAP, PNG, and TIFF.
[Number of images/Time interval (ms)]
Users can select the number of
snapshots taken between a designated
time interval.
Change the Folder for Saved Media Files
[WorkArea Folder]
To change the folder for the saved media files, please click on the "Browse" button to
browse the directory for saving the recorded media files. All recorded media files will be
saved in the directory.
18
WinFast PVR2 Software Manual
2-3 Analog TV
(Only Applicable to Specific Products)
2-3-7 Add a New Capture Profile
2
Add a New Capture Profile
You can create your customized capture profile here for the function of Recording and
DirectBurn.
Click
on the control panel, then
label to open the Analog Video Capture Setting
dialog box as shown in the figure below.
Step
2-2
Step 1
TV MODE
Step
2-1
Fig. 17
Step 1
Click on the Setting button
, and then the fourth label as the picture showed above.
Step 2
Click on the Analog Capture Profile drop-down list, choose any profiles you want to
modify from the list, then click on "Add".
(Continued next page)
19
2
2-3 Analog TV
(Only Applicable to Specific Products)
2-3-7 Add a New Capture Profile
Step 3
Step 4
Step 6
TV MODE
Step 7
Step 5
Step 8
Fig. 18
Step 3
Name your own Capture Format Profile.
Step 4
Click on the Video Codec drop-down list to choose a codec you want to use.
Note: If the codec you want to use isn't in the list, please download it first, and
install it in your PC.
Step 5
Select the Capture Resolution you want to use.
Note: The resolution depends on the codec you choose at step 4.
Step 6
Select the Audio Codec you want to use, for example, if want it saved in MP3
format, please choose "MPEG Layer-3".
Step 7
Select the Audio Format you want.
Step 8
Click on "OK" to exit the setting box.
20
WinFast PVR2 Software Manual
2-3 Analog TV
(Only Applicable to Specific Products)
2-3-7 Add a New Capture Profile
2
Step 9
TV MODE
Step 10
Fig. 19
Step 9
Now you can choose the capture format you just created from the drop-down list.
Step 10
Click on "OK" to apply the setting you've made.
Now when you use the function of Record or DirectBurn the capture profile will be
automatically adopted. If you want to change the Capture Profile, you can go back to
the same setting page to make the changes.
21
2
2-3 Analog TV
(Only Applicable to Specific Products)
2-3-8 EPG
EPG-Electronic Program Guide
EPG is an on-screen guide for scheduled broadcast television programs, allowing users to
navigate and select content by time, channel, etc.
In areas where Internet Electronic Program Guide is applied (EX: USA and Japan), you
can click on the
button on the Control Panel (See Fig. 21 below), and directly link to
Internet Electric Program Guide web sites to view channel lists and programs.
TV MODE
In the areas where EPG is not available, please download the program guide in XML
format from your cable TV provider or other private web sites, and click on the button
to use the function of "Import XMLTV data" to view channel list and set recordings. Please
refer to page 23 for details.
1
2
3
4
Fig.20
Fig.21
1
2
3
Put this program into
scheduler
Click this button to add a program to
the scheduler.
Remove this program from
scheduler
When a program has been added to
the scheduler, click this button to
remove this particular program.
Printing EPG
Click to print a specific EPG.
22
Home :
+-
WinFast PVR2 Software Manual
Now
:
Scroll up/down ( or use
middle key of mouse)
:
Zoom In/Out
:
Move EPG
Forwards/backwards
Import XMLTV data
Click to import XMLTV data. 4
Hot key
Page Up:
Previous EPG
Page Down: Next EPG
2-3 Analog TV
(Only Applicable to Specific Products)
2-3-8-1 Import XMLTV Data
2
The figures bellow shows the steps of importing XMLTV data into WinFast PVR2.
1
2
TV MODE
Click on the Import XMLTV Data
button to start import.
3
Choose your downloaded program
guide and Open it.
Click on OK to load new program guide in
XML format.
4
Map each channel number to channel names
manually and click Apply. Click Exit to view
the programs of the mapped channels.
Note:
You have to map the channels
for only once, and the mapped
channels will be saved. The
program list will be shown only
under the mapped channels.
23
2
2-4 TimeShift Mode
Introduction
TimeShifting is a type of recording that enables you to view, rewind or stop the playback of
recorded video when its recording is still in progress. This function is used when there is
interruption during viewing of a TV broadcast and you do not want to miss any of it. By
clicking the Time Shifting button, you start recording the TV broadcast. When you return,
you can choose to view the part you have missed or search for what you want to view in
the TV broadcast while the recording continues.
TV MODE
To run TimeShifting, click the TimeShifting button on the TV control panel, and then the
control panel transforms and the TimeShifting recording begins.
Control Panel & Screen
*Refer to the Control
Panel section for
controls that are
identical with those on
the control panel of
Video Input mode.
1 Playback
Slider Knob
2
4 Rewind
Progress
Indicator Bar
5 Fast Forward
3 Control
Buttons
Go to the Beginning/End
Click to start playing back from the
beginning/end of the TimeShifting
recording.
Play
During TimeShifting, press this button
to start playback from the beginning.
Stop
Click this button to stop at the
beginning of the recording process
(ie. The playback slider knob will
move to the beginning). Press this
button twice to quit TimeShifting
mode.
1
Playback Slider Knob
The slider knob indicates the progress
of current TimeShifting playback. Users
can move it to control the playback
freely.
Progress Indicator Bar
2
This gives an indication of the current
playback/recording status.
3 Control buttons:
Pause
Click this button to pause at current
screen.
TimeShifting
Click this button to enter TimeShifting
mode.
24
WinFast PVR2 Software Manual
4
Rewind
Click this button to rewind to previous
recording.
5
Fast Forward
Click this button to Fast Forward to
next recording.
Introduction
2-4
TimeShift Mode
2
Features
How TimeShifting Works
The figure below shows the steps of entering TimeShifting mode.
TV MODE
2
1
Press the
TimeShifting
button
Playback/
recording
progress
bar
Play button
Stop button
TimeShifting button
TimeShifting is in progress. The
progress of playback/recording is
shown on the scroll bar at the
bottom of the screen.
In TV mode, the screen is
playing live TV.
3
4
First press
Stop, then
click the
Play button
Click the Quit
TimeShifting
button
Cursor is moved
to the beginning
Quit TimeShifting
button
TimeShifting is still in progress.
The video playback will start
playing from the beginning when
users press stop and then play
buttons.
Quit TimeShifting mode. Live
TV is shown on the screen.
25
2
2-5 LiveBroadcast
Live Broadcast allows clients from different IP to watch the same program as the host via
internet. Before using Live Broadcast, please make sure that the host and the clients are
already connected to the internet.
Control Panel
9
1
1 Live Broadcast Switch
Live Broadcast Switch
TV MODE
Click to start/stop Live Broadcast.
The icon lights on, when Live
Broadcast mode is on.
2
2 Stop
Stop
Click to stop Live Broadcast, and
turn back to TV mode.
How to Use Live Broadcast
Fig. 22
*Refer to the Control Panel section for
controls that are identical with those on
the control panel of TV mode.
For the Host:
Click the Live Broadcast button on the
control panel then a setting window will
appear (as Fig. 22).
First choose Media type and Video Multiple
bit rate from the drop-down list, and enter
the number of the clients (max. 5) to share
the program with.
When the function Silence Live Broadcast
is checked, TV screen of the host will not
show up after Live Broadcast starts.
Please provide the URL shown on the
window to the clients after click OK.
For the CLIENTS:
Please open the Windows Media Player
and click File and choose Open URL. (Fig.
23)
Enter the URL obtained from the host and
click OK. When the buffering percentage
shown at the bottom of the window
reaches 100%, the clients can enjoy Live
TV from the host.
Fig. 23
Note:
Live Broadcast requires the
host with a public IP, and
dose not support a virtual IP.
26
WinFast PVR2 Software Manual
2-6 DirectBurn
2
2-7 Fine Tune Channels
DirectBurn
Disc Output
Format choosing
drop-down list
TV MODE
Device choosing
drop-down list
Browse
button
Advance and Normal Mode switch
This popup menu is shown when users click on control panel's DirectBurn button.
There are two modes for DirectBurn setting, please click on the Advance and Normal
mode switch to switch to the advanced mode to make advanced setting.
First, please choose the Disc Output Format and the Device you want to use from the
drop-down list in the Initialize Setting box.
When the function Burn to hard drive when disc is full is checked, the system will
automatically burn the rest of the file into the hard disk when the disc is in full capacity. You
can change the Virtual dics path by clicking on the "Browse" button, and the file will be
saved in the folder you choose. You can also change the disc type and disc size by using
the drop-down list.
Fine Tune Channels
For better viewing, you can press
the two shortcut keys Ctrl + ' + ' or
Ctrl + ' - ' to increase/decrease
channel frequency in Analog TV
setting only.
Channel Frequency
27
2
2-8 Capture File Popup Menu
2-9 Screen with
Multi-language Selections
Capture File Popup menu
This popup menu is shown when users
right-click on control panel's Record
button. The user can customize the
captured file Size Limit, the Split File size,
and the recording Time Limit.
TV MODE
TV MODE
And you can check the box of "Silent
Recording" to proceed silently.
Screen with Multi-language Selections
If multi-language is available for a
particular program, the multilanguage indicator will be shown
both on the screen and on the
control panel.
Double-click the screen in order to
maximize the entire application.
The enlarged control panel will
disappear after a while so users
can watch TV while working in other
applications simultaneously.
The screen is shown as the picture
to the right.
Icon AC3
(Dolby Digital)
indicator
28
WinFast PVR2 Software Manual
The SAP indicator is
on if multi-language
is available
2
2-10 Schedule
Schedule
You can use this function by clicking on
the
button on the Control Panel (See
page 7). All scheduled events are listed
with their starting time, ending time,
channel name, lapse time and capture
format.
TV MODE
[Add] button
Click this button to open the TV
Schedule Setting dialog box as Fig. 25
and add a new event.
[Edit] button
Select an event and then click this
button to change its settings in the TV
Schedule Setting dialog box.
[Delete] button
Select an event first and then click this
button to remove it.
Fig.24
Schedule Setting
The Schedule Setting Dialog box (Fig. 25)
is shown when pressing the Add button in
Fig. 24.
[Device]
The system will automatically search for
the current device.
[Action]
When scheduling an event, select an
action from the options that include: TV
Record, TV Show, CVBS Record, and SVideo Record.
[Channel]
Select a channel name from the drop-down
list for the event being scheduled.
[Capture Format Profile]
Select a capture format profile for the
recording from the drop-down list.
[Audio]
Select either language 1 or language 2 for
the audio option.
[Captured Filename]
Type a desired name for the recorded
program in the box.
[Duration]
The length of the scheduled event.
[Weekly Task]
You can select a specific day for a
scheduled weekly event, such as to record
or view a particular TV program.
DIMO
Fig.25
[Starting/Ending Time]
You can preset the starting/ending time of
the recording and initializing live TV by
selecting appropriate time.
[Comments]
You can type in the program name,
comments, or notes as desired. Information
input here often serves as a reminder.
[Silent Record]
Tick this option to set a scheduled
recording to proceed silently.
[After the task is finished]
Tick this option to have your computer
automatically execute your preferred action
after the scheduled event is completed.
You can choose the following options: Log
off, Turn off monitor, Standby or Hibernate.
Note: Under Standby or Hibernate mode, the
computer will automatically awake for
pre-scheduled events.
29
2
Introduction
2-11
Playback Mode
In Video Playback mode, you can
playback recorded TV while live TV is still
playing on the screen in picture-in-picture
(PIP), picture-and-picture (PAP), and
picture-on-picture (POP) style.
2-11-1 Control Panel
Features
2-11-2 Twinview
Picture-And-Picture Twinview
Control Panel
TV MODE
1 Channel
Up/Down
3 Snapshot
Button
2 Control
Buttons
*Refer to the Control Panel section for
controls that are identical with those on
the control panel of Video Input mode.
1
7 Volume Control
5 Fast
Forward
6 Playback
Slider Knob
4 Rewind
8 Progress Indicator Bar
Channel Up/Down
Click to switch the live TV channel
up or down.
2
Last/Next File
Click these buttons to switch the
playback to the last or next file
saved on the hard drive.
Play/Pause
Click to start/pause the playback.
Stop Playback
Click to stop the ongoing playback.
3
Snapshot
Click to take a snapshot and save it
as a .bmp, .JPG, .PNG and .TIFF
formats (it usually saves as a .jpg
file in Windows XP).
30
PAP Twinview Close Twinview
Control buttons:
4
Rewind
Click this button to rewind to previous
recording.
5
Fast Forward
Click this button to fast forward to next
recording.
WinFast PVR2 Software Manual
Press the PAP Twinview
button on
the control panel to view two TV
programs in side-by-side style.
To close Twinview, click
7
.
Volume Control
Use the scroll bar on the screen
to adjust the volumes of each
program. When the scroll bar is
moved towards the right, the
volume of the program shown
on the right will be louder than
the volume of the left program,
and vice versa. When the scroll
bar is in the middle, the
volumes for both programs are
equally loud.
2-11 Playback Mode
2
2-11-2 Twinview
Picture-in-Picture Twinview
Screen Controls
Exit WinFast PVR2
Click to close the application.
Minimize
Click to maximize the viewing
window only.
Frameless
Click to hide the screen frame
and the control panel. Doubleclick the screen in order to
restore the control panel.
TV MODE
Maximize
Click to maximize the viewing
window.
Picture-on-Picture Twinview
Channel Up/ Down
PIP Twinview Close Twinview
Press the PIP Twinview
button to
view two TV programs in picture-inpicture style.
To close Twinview, click
.
Note:
For the three twinview modes
(PAP, PIP and POP), only
digital TV supports two live
TV programs. In analog TV,
you can only watch one live
TV program, and one
playback video.
POP Twinview
Close Twinview
Press POP Twinview
button to view
two TV programs in picture-on-picture
style. Use and buttons for program
selections on the sub-screen.
To close Twinview, click
.
31
2
Introduction
2-12
Screen Popup Menu
Features
Screen Popup Menu
Right-click on the virtual screen to open the popup menu as shown in the figure below.
TV MODE
[Use Favorite Channel List]
Add this channel to the Favorite Channel
list.
[Video Input]
Click to change video input.
[Always on Top]
Tick this item to keep WinFast PVR2 stays
on top of all other active applications.
[Explore WorkArea Folder]
Click to open the WorkArea folder explorer.
Drag-and-drop a saved media/snapshot file
and play it on the screen.
[Hide Control Panel]
Select this option to hide the control panel.
Users can then view TV and work on other
application simultaneously.
[Frameless Mode]
Click to hide the screen frame and the
Control panel.
[Video Stretch]
When this option is chosen, the viewing
screen will maximize proportionally with the
screen.
[Force Ratio to 4:3]
Tick this item to keep the width and height
ratio of the screen at 4:3.
32
WinFast PVR2 Software Manual
[Force Ratio to 16:9]
Tick this item to keep the width and height
ratio of the screen at 16:9.
[4:3 Pan &Scan]
Tick this option to display the full viewingscreen at 4:3.
[Skin Selection]
Users can select a preferred panel from 3
various styles of control panels.
[Channel Surf]
Tick this option to scan for all available
channels.
[Subtitle]
Select this function to show subtitle.
[LiveBroadcast]
Click to open LiveBroadcast setting
window.
[WinFast PVR2 Help File]
Click to access the online help file.
[About WinFast PVR2]
It provides current version number
information for WinFast PVR2.
[Language Selection]
Various languages are available for the
interface.
3
3-1 Control Panel
(Only Applicable to Specific Products)
Control Panel
Open Playback Panel
Click to go in FM Playback mode.
Record/Stop Recording
When no recording is in progress,
click this button to record the
current live FM radio broadcast.
Click it again to stop the
recording.
About WinFast FM
Press the hotspot to pop up an
information box. Click on the
Leadtek logo to log on its website.
Minimize
Click to minimize the application.
Add a New Channel
Clicking this button to pop up the
dialog box as shown in the figure
below.
WinFast FM Help
Click to open the online help.
Switch to TV
Click to switch to Video Input mode.
Channel Slider
You can slide the knob left and right
to surf through all frequencies
Channel Up/Down
Click to switch the channel up/down
the active favorite channel group.
Find Previous/Next Channel
Click to switch to the previous/
next channel available on the
channel list.
Fine Tune
Click these two buttons to fine tune
a channel by 0.05 MHz each click.
Configuration
Click to open the WinFast FM
setup dialog box of 3 tabs.
Open File
Click to browse for a recorded file
you wish to play.
Favorite Channels
Click one of the 10 buttons to listen
to a preset favorite channel.
FM MODE
Exit WinFast FM
Click to close the application.
Recording Indicator
This ring turns orange indicating
that the recording is in progress.
Name:
You can name the channel as
desired.
Frequency:
Type the frequency of the channel,
you can type it in this field.
Preset:
Type a number between 0-9 that
will be the number of the favorite
channel button.
Use Favorite Channel Group
Right click on the FM control panel to
open a popup menu as shown in the
figure below. Click Use Favorite
Channel Group and a submenu
appears with 4 options: All Channel,
Group 1, Group 2, and Group 3. Tick
one of the four options to use a certain
group of previously set favorite
channels. Only channels in the selected
group will be available when switching
the channel up and down.
Volume
Click on a level to change the
volume, which is indicated by
colors, ranging from blue (low) to
red (high).
Mute
Click to mute the audio.
33
2
3
3-2
Scan Channels
Introduction
(Only Applicable to Specific Products)
Features
Scan Channels
Scanning for channels is the first thing you need to do when you use the application
for the first time. Otherwise, there will not be any channels available for listening. To scan
for channels, please click
on the control panel, when the setting page appears, click on
the second label from the right go to the FM Channel List dialog box to start scan channels.
FM MODE
[Sensitivity] Sliding knob
You can set the sensitivity of the scanning by changing the sensitivity level between 1
and 3. If it is set too high, noise can be mistaken as a radio station.
[Scan] button
Click the button to start scanning for all available channels.
[Stop] button
Click to stop the scanning.
Progress bar
Shows the progress of scanning.
34
WinFast PVR2 Software Manual
3-3 Audio Setting
(Only Applicable to Specific Products)
3-4 Change the Folder for Saved Sound Files
(Only Applicable to Specific Products)
3
Audio Setting
FM MODE
Click
on the control panel, then the first tab from the left to open the Audio Setting
dialog box as Fig. 26 shows.
Fig. 26
[Audio-Out Control Line]&
[Audio Recording Control
Line]
If you use the external
connection (please refer to
Fig.12 on page 16) for audio
out, please change both
Audio-Out and Audio
Recording Control Line to
Line In. If you use the
internal connection, please
connect the cable in Fig. 27
to Aux-in/CD-in connector
on your motherboard, and
change both setting to "Auxin/CD-in". The Aux-in/CD-in
connector on the
motherboard shows as Fig. 28, and you
can find the indications on the board in
Fig. 27
most cases.
[Volume Setting]
The higher volume you adjust to, the
bigger sound output the file will be while
being played.
[File Prefix]
Type in the box the prefix of the file names
of your desire. For example, if you type
"music" in the box, the recorded file names
will be "music 1", "music 2", "music 3", etc.
[Compression Format]
The compression under the format of
PCM will generate a better sound effect
but take up bigger hard disk space than
MP3, whose quality is inferior.
[Compression Attributes]
The bigger value you select the better
sound quality the compressed file will be.
Fig. 28
Change the Folder for Saved Sound Files
[WorkArea Folder]
To change the folder for the saved sound files, please click on the "Browse" button to
browse the directory for saving the recorded files. All recorded media files will be saved
in the directory.
35
2
3
3-5
Channel List
Introduction
(Only Applicable to Specific Products)
Features
FM Channel List
Click
on the control panel, then the second tab to open the FM Channel List dialog box
as shown in the figure below.
FM MODE
[Edit] button
Highlight a channel and click this button to
edit the channel name.
[Delete] button
Select a channel and click this button to
delete it from the channel list.
[Insert]
Highlight a channel and click this button
to open the Setting Favorite Channel
dialog box as shown in the figure below.
[Save] button
Click this button after making any
changes to save them.
[Set Favorite Channel Group]
Right click on a channel to bring up a popup menu as shown in the figure. You can
click Set Favorite Channel Group to
categorize the channel in a certain group
which is indicated in the heart-shaped
icons as 1, 2 or 3.
For the Auto Scan function, please refer to
page 34.
36
WinFast PVR2 Software Manual
[Name]: You can name the channel as
desired.
[Frequency]: If you know the
frequency of the channel, you can type
it in this field.
[Preset]: The number set here will be
that of the favorite channel button on
the control panel.
3
3-6 FM Schedule
(Only Applicable to Specific Products)
FM Schedule
Click
on the control panel, then the third tab to open the FM Schedule dialog box as
shown in the figure below.
Click the Add button in the
main FM Schedule dialog
box to open this dialog as
shown in the figure in the
box.
[ADD] button
Click to open the Schedule
Setting dialog box and add
a new event.
[Action]
When scheduling an
event, select an action
from the options provided
here, which include: Radio
Record and Radio Show .
[DEL] button
Highlight an event on the
schedule table and click
this button to delete it.
[CHANGE] button
Highlight an event on the
schedule table and click
this button to make
changes to its event
details.
[CLEAR] button
Click this button to clear the
schedule table and delete
all events.
[Save] button
Click the button to save any
addition or changes.
[Channel]
Select a channel from the
drop down list for the
event being scheduled.
[Compression Format]
Select a compression
format from the drop down
list for the recording.
[Compression
Attributes]
The bigger value you
select the better sound
quality the compressed file
will be.
[File Prefix]
Type in the box the prefix
of the file names of your
desire. For example, if you
type "music" in the box, the
recorded file names will be
"music 1", "music 2",
"music 3", etc.
FM MODE
FM Schedule Setting
Schedule Table
All scheduled events are
listed here with its
references: starting time,
ending time, channel
number, duration and
comments.
[Comments]
You can type in the
program name, comments,
or notes as desired.
Information input here
often serves as a reminder.
[Time]
You can schedule a single
recording or power-on
event or set it as an weekly
event.
[Silent Record]
Tick this option to set a
scheduled recording to
proceed silently.
[After the task is
finished...]
Tick this option to enter
standby mode after the
scheduled event is
completed.
37
2
3
3-7
Playback Control Panel
Introduction
(Only Applicable to Specific Products)
Features
Playback Control Panel
FM Playback mode enables you to play audio files recorded from FM radio.
For controls identical with those of FM mode, refer back to that section.
FM MODE
Channel Slider knob
You can slide the knob left and right
to surf through all frequencies of live
FM radio.
Playback Slider Knob
Pull the knob left or right to control
the playback progress. It is very
useful when you wish to search for a
certain part of the recording.
Close Playback Panel
Click this button to go back in FM
mode.
Mute Playback
Click to mute the audio of the
sound file being played back.
Mute Live Radio
Click to mute the audio of the live
FM radio that's being
broadcasted.
Play/Pause
When playback is in progress,
click this button to pause the
playback. Click it again to
continue the playback again.
Previous/Next File
Click these buttons to switch the
playback to the last or next file
saved on the hard drive.
Stop Playback
Click this button to stop playback.
38
WinFast PVR2 Software Manual
4
4-1 Device Setting for Other Sources
Device Setting for Other Sources
Click
on the control panel, then the
shown in the figure below.
label to open the Device Setting dialog box as
Audio-Out Control Line
3
Recording Control Line
Recording Volume
Video Standard
2
4
1CVBS
Most of the device settings for other input sources are the same as the setting on page
15 and 16. However, to obtain correct sound and video from other input sources,
please double check the following setting:
1. First please make sure the you have using the "Video Input
" button on the
control panel (please refer to page 7) to switch the video input to the one you
want. You can check which input source you are using here.
OTHER SOURCES
Fig. 29
2. [Video Standard]
Please make sure that you have choose the right video standard depending on your
input device from the drop-down list.
3. [Audio-Out Control Line] & [Recording Control Line]
If you use the external connection (please refer to Fig.12 on page 16) for audio out,
please change both Audio-Out and Recording Control Line to Line In. If you use
internal connection, please connect the cable in Fig. 13 (on page 16) to the Auxin/CD-in connector on your motherboard, and change both setting to "Aux-in/CD-in".
The Aux-in and CD-in connectors on the motherboard show as Fig. 14 (on page 16),
and you can find the indications on the board in most cases.
4. [Recording Volume]
Move the slider knob on the indicating bar to turn up/down the volume. What is set
here will also affect the playback volume.
39
5
5-1 Remote Model 1
WinFast PVR2 Function
To use remote control, please make sure that the remote controller is enabled. To enable
remote control, please right-click on the icon on the toolbar at the bottom right of the screen
(as Fig.30 shows). Choose "Setting", then set Remote Controller to "Enable", then click
OK. (as Fig. 31 shows).
Capture Device
Remote Controller
Enable
MCE Remote
Fig. 31
Fig. 30
1
2
3
4
32
31
30
29
5
6
7
28
8
9
10
11
12
13
27
REMOTE CONTROL
40
26
25
24
14
23
22
21
WinFast PVR2 Software Manual
15
16
17
18
19
20
5-1 Remote Model 1
Button
Function
1 Power
Press to open WinFast PVR2 function choosing menu (as Fig.34
shows on page 47), or press to closeWinFast PVR2 application.
2 TV
3 FM (only
applicable to specific
products)
4 DVD
5 Boss Key
Change the input source in TV Input mode.
Change the Input source in FM Input mode.
Press to open PowerDVD.
Hide the application.
6 Mute
Press to mute the audio.
7 Full Screen
Press to display the video full- screen.
8 Enter
Press to execute your selection.
9 Channel Surf
10 CH+, CH-
Press to switch the channel up or down.
11 Subtitle
12 Rewind/
Fast Forward
Press to start channel preview.
In analog TV mode: Press to change the video format between
PAL and SECAM. In digital TV mode: Press to change the
display mode to Pan&Scan. When used as DVD function key,
press to show the DVD subtitle selections.
Press these buttons to Rewind/Fast Forward.
13 EPG
Press to switch to the EPG mode.
14 Video
Change the input source in Video Input mode.
15 Audio
16 Display
17 Snapshot/M
Used to switch between languages if more than one language is
available.
Display the current channel number on the screen.
In Video input mode, press to take a snapshot; in FM mode, to
add the current channel to the channel list.
18 Recall
19 TimeShifting
20 REC
Press to switch to the last-viewed channel.
21 REC Stop
Press to stop the recording.
Press to switch between PIP/POP/PAP display and a single
display.
Press to switch on/off TimeShifting.
Press to start recording.
23 Numeric Keys
For entering a TV channel number or radio frequency to switch
to that channel.
24 Stop
Press to stop playback.
25 Play/Pause
Press to start or pause the playback.
26 Previous/Next
Press these buttons to jump to previous/next selection.
27 Menu
Press once to adjust brightness; twice, contrast; thrice, saturation.
28 VOL-, VOL+
Press to decrease or increase the volume.
29 Cancel
Press to cancel the selection or close the dialog box.
30 Sleep
Press to select sleep mode. Once to set the timer at 30 minutes;
twice, 60; thrice, 90; four times, 120; five times, sleep mode off.
Keep pressing it will alternate the mode in the same order.
In areas where Teletext and/or close-captioning is provided by
the local cable company, press this button to switch between or
turn on/off whichever functions that are available.
Valid when Teletext is available. The colors of the button
32 Teletext Selection outlines correspond with those of the TV screen.
REMOTE CONTROL
22 PIP/POP/PAP
5
31 Teletext/c.c.
41
5
5-1 Remote Model 1
Windows Vista MCE Function
Remote Model 1 also supports Windows MCE. To enable MCE remote, please right-click
on the icon on the toolbar at the bottom right of the screen (as Fig. 32 shows). Choose
"Setting", then check the box in front of "MCE Remote" then click OK(as Fig. 33 shows).
The following keys are active only when MCE window is active or selected.
Capture Device
Remote Controller
Enable
MCE Remote
Fig. 33
Fig. 32
1
2
3
4
33
32
31
30
29
28
REMOTE CONTROL
42
27
26
25
5
6
7
8
9
10
11
12
13
24
23
22
21
20
WinFast PVR2 Software Manual
14
15
16
17
18
19
5
5-1 Remote Model 1
Button
Function
1 Power
Press to open/close MCE.
2 TV
3 FM (only
applicable to specific
products)
4 DVD
5 Setting
Switch MCE to My TV.
Change the Input source in FM Input mode.
Press to open DVD menu.
Press to open MCE setting page.
6 Mute
Press to mute the audio.
7 Full Screen
Press to display the video full- screen.
8 Enter
Press to execute your selection.
9 Return
10 Up/Down
Move the cursor up or down.
Return to the last screen.
11 Subtitle
(DVD function key) Press to show the DVD subtitle selections.
12 Rewind/
Fast Forward
Press these buttons to Rewind/Fast Forward.
13 Language
14 EPG
Press to show the DVD language selection.
15 Clear
Press to clear what you've entered.
16 Recall
Press to switch to the last-viewed channel.
Press to switch to EPG mode.
17
Press to enter a
18 REC
Press to start recording.
19 CH+, CH-
Press to switch the channel up/down.
20 VOL+, VOL-
Press to increase/decrease the volume.
21 REC Stop
Press to stop recording.
22 ]
Press to enter a ] .
23 Dot
Press to enter a dot.
For entering a TV channel number or radio frequency to switch to
that channel.
25 Stop
Press to stop playback.
26 Play/Pause
Press to start or pause the playback.
27 Previous/Next
Press these buttons to jump to previous/next selection.
28 Menu
Press to open MCE main menu.
29 Left/Right
Press to move the cursor left/right.
30 Cancel
Press to cancel the selection.
31 Standby
Press to switch to standby mode.
32 Teletext/c.c.
33 Record TV
My Music
My Picture
My Video
(Left to right)
Close caption.
Browse the Recorded TV folder.
Browse the My Music folder.
Browse the My Picture folder.
Browse the My Video folder
REMOTE CONTROL
24 Numeric Keys
.
43
5
5-2 Remote Model 2
TV/FM
(only applicable to specific products):
Press to switch between Video Input
mode and FM mode.
Channel Surf:
Press to start channel
preview.
Numeric Keys:
For entering a TV channel
number or radio frequency
to switch to that channel.
Full Screen:
Click to display the video
full-screen.
Boss Key:
Hide the application.
Power:
Press to open/close the
WinFast PVR2 application.
Display:
Display the current
channel number on the
screen.
PIP/POP/PAP:
Press to switch
between PIP/POP/PAP
display and a single
display.
Recall:
Press to switch to the
channel last viewed.
Enter:
Press to switch to a TV
channel number or FM
frequency (FM function is
only applicable to specific
products). When running
Time-Shifting, press this
button to start TimeShifting playback.
TimeShifting:
Press to switch on/off
TimeShifting.
REMOTE CONTROL
44
Snapshot:
In Video input mode,
press this button to take
a snapshot. In FM
mode, add the current
channel to the channel
list (FM function is only
applicable to specific
products).
Mute:
Press to mute the audio.
LEADTEK
LEADTEK
REC:
Press once to start recording,
twice to stop recording.
VOL-:
Press to decrease the volume.
WinFast PVR2 Software Manual
CH+:
Press to switch the
channel up.
CH-:
Switch the channel down.
VOL+:
Press to increase the volume.
5
5-3 BIOS Setting for Power
ON/Off by Remote Control
BIOS Setting for Power On/Off by Remote Control
WinFast PVR2 provides you a convenient function to use your remote control to power
on/off you computer. Please follow the instruction below to make sure that it can function
correctly.
Scenario 1
1. Turn on the computer. Before entering Windows, please press “Delete” to enter BIOS
settings. (Different motherboards may have different ways to enter BIOS settings.)
2. Locate “Power” settings, then “APM
3. After entering APM Configuration page,
please change “Power On By PCI
Devices” setting to “Enable”.
Configuration”.
4. Save the changes and restart the computer. After entering Windows, please power off
the computer from the “Start” menu.
Scenario 2
1. Turn on the computer. Before entering Windows, please press “Delete” to enter BIOS
settings. (Different motherboards may have different ways to enter BIOS settings.)
2. Locate “Power” settings, then “APM
Configuration page, please change “Resume by on PME#” setting
to “Enable”.
REMOTE CONTROL
3. After entering APM
Configuration”.
4. Save the changes and restart the computer. After entering Windows, please power off
the computer from the “Start” menu.
(Continued next page)
45
5
5-3 BIOS Setting for Power
ON/Off by Remote Control
Scenario 3
1. Turn on the computer. Before entering Windows, please press “Delete” to enter BIOS
settings. (Different motherboards may have different ways to enter BIOS settings.)
2. Locate “Power” settings, then “APM
3. After entering APM
Configuration”.
Configuration page, please change “Power On By PCIE Devices ”
setting to “Enable”.
4. Save the changes and restart the computer. After entering Windows, please power off
the computer from the “Start” menu.
REMOTE CONTROL
46
WinFast PVR2 Software Manual
2
5-4 Advanced Function
for Remote Control
Advanced Functions
After you finish the BIOS setting (please refer to the previous section) for the remote
control, you can use the advanced function of the remote control.
1. TV:
When the computer is on, pressing
the button will launch WinFast PVR2
application. When the computer is
off, pressing the button will turn on
the computer and launch WinFast
PVR2 application.
Power:
Turn the computer on.
FM:
When the computer is on, pressing
the button will launch WinFast FM.
When the computer is off, pressing
will turn on the computer and launch
WinFast FM.
DVD:
When the computer
is on, pressing the
button will launch
Power DVD. When
the computer is off,
pressing the button
will turn on the
computer and launch
Power DVD.
2. When WinFast PVR2/WinFast FM/Power DVD is on, pressing the “Power” button will
end the current application.
3. Pressing “Power” button again, one of the selection below (Fig. 34) will appear in turns
and you can use cursor on the remote control to choose the function you wish to use.
Note:
After turning off the computer, please do not turn the switch
of the master power (on the back of the computer) off, or
disconnect the power to the computer.
Without power supply the “Power” button will not function.
REMOTE CONTROL
Fig. 34
47
6
6-1 Hot Keys
You can use the hot keys as shortcuts to
control a variety of functions.
Hot keys
Controlled Functions
Number Pad 0-9: Channel Number
S:
Audio Switch
Spacebar:
Snapshot
Enter :
Display
ESC:
Stop/Quit
F / Alt + Enter:
FullScreen
M:
Mute
Ctrl + C:
Hide Control Panel
Ctr l+ E:
Explore WorkArea Folder
Ctrl + R:
Record
Ctrl + T:
Ctrl + S:
Record Transport Stream
Skin Selection Page
Ctrl + H:
TimeShifting
Ctrl + L:
Adjust the screen
Brightness, Saturation, etc.
Ctrl + D:
DirectBurn
Ctrl + P:
Sleep
Ctrl + I:
Live Broadcasting
V / Ctrl + V:
Video-in Switch
Ctrl + F3:
Switch different control
panels
Ctrl + F5:
Frameless mode
Analog TV Only:
Ctrl + ' + '/ ' - '
Fine Tune
A key:
Audio format change
(see page 16)
H key:
Video format change
(see page 16)
For WinFast PVR3000,
HOT KEYS
48
Ctrl + 3:
Open 3D YC setting page
For WinFast PVR2100/WinFast DVR3100 H
Ctrl +3:
Enable/disable 3D YC
WinFast PVR2 Software Manual
Hot keys
Controlled Functions
F1:
Help
F2:
Scan Page
F3:
POP/PIP/PAP
F4:
Frame Rate
F5:
Stretch
F6:
Channel Surf
F7:
(Teletext)
F8:
EPG Page
F9:
Schedule Page
F10:
Capture Setting Page
F11:
Video Setting Page
F12:
General Setting Page
:
Change channels
:
Change volume