1
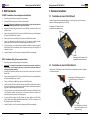
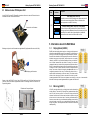
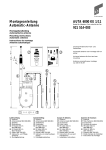
Bedienungsanleitung
EX-3455
Backup System
SATA 2 HDD
Hardware RAID 0/1
User Manual
V1.11 30.03.11
EX-3455
Backup System SATA2 RAID 0/1
Backup System SATA2 RAID 0/1
EX-3455
NOTES / NOTIZEN:
Inhaltsverzeichnis
_______________________________________________________________________________
1.
BESCHREIBUNG
3
2.
FRONT PANEL UND BOARD LAYOUT
4
_______________________________________________________________________________
3.
HARDWARE INSTALLATION
5-6
_______________________________________________________________________________
4.
LED ANZEIGE UND DIP-SCHALTER
7-9
_______________________________________________________________________________
5.
INFORMATIONEN ÜBER DEN RAID MODE
6.
RAID INSTALLATION
10
EZ-RAID 1, RAID 1, RAID 0 UND LARGE
10
_______________________________________________________________________________
MASSNAHMEN BEI DEFEKTEM RAID
12
_______________________________________________________________________________
7.
9
_______________________________________________________________________________
_______________________________________________________________________________
_______________________________________________________________________________
_______________________________________________________________________________
_______________________________________________________________________________
Index
_______________________________________________________________________________
13
_______________________________________________________________________________
4
_______________________________________________________________________________
1.
DESCRIPTION
2.
FRONT PANEL AND BOARD LAYOUT
3.
HARDWARE INSTALLATION
5-6
4.
LED DISPLAY AND DIP-SWITCH
7-9
5.
INFORMATIONEN RAID MODE
6.
RAID INSTALLATION
_______________________________________________________________________________
_______________________________________________________________________________
9
EZ-RAID 1, RAID 1, RAID 0 AND LARGE
10
10
7.
WHAT SHOLD I DU IF MY RAID SET ARE BROKEN
12
8.
TECHNICAL INFORMATION
12
_______________________________________________________________________________
_______________________________________________________________________________
_______________________________________________________________________________
_______________________________________________________________________________
_______________________________________________________________________________
Seite 2
Seite 23
EX-3455
7.
Backup System SATA2 RAID 0/1
What should I do if my RAID set is broken?
7.1 RAID 1 malfunction:
You will hear a warning tone which is always repeated, and a red LED lights up. The warning
tone you can cancel if the Dip-Switch you set short to ON and then to OFF
7.1.1
Important! Please don’t open the computer case immediately and tried to reconnect the
hard drives. Note which LED lights up (M0 or M1). This is important to replace the
defective hard disk later.
Backup System SATA2 RAID 0/1
1. Beschreibung
Vielen Dank für den Kauf des Backup System EX-3455. Er ist entwickelt worden um eine schnelle
und einfache Verbindung zwischen dem Mother-Board und zwei SATA2 Festplatten herzustellen.
Einstellbar sind RAID 0, 1, LARGE und EZ-RAID 1 Modes. Er verbindet den Host-Upstream-Port an
den SATA Port des PC‘s mit einer schnellen Datenübertragung mit einer RAID Einstellung. Alle RAID
Modes können über den Dip-Schalter eingestellt werden.
Die EX-3455 unterstützt zwei Einbaumöglichkeiten. Die erste wäre in ein 3.5- oder 5.25 zoll Einschub
des PC‘s oder in einen freien PCI-Express Slot. Nachfolgend die Hauptmerkmale der EX-3455:
Merkmale:
·
1-zu-2 SATA2 RAID für zwei SATA2 Festplatten
·
Unterstützt RAID 0, 1, LARGE und EZ-RAID 1 Mode
·
RAID Mode kann über den DIP Schalter eingestellt werden
7.1.2
PLEASE BACKUP YOUR DATA FIRST!
7.1.3
Replace the hard disk immediately:
System shutdown. Open the computer case. If the failed hard disk M0, you must connect
the functioning hard disk M1 to the connector M0. This is very important otherwise they
lose the data from the intact disk. Set the DIP switch to EZ RAID 1 and restart the computer. Now the data will be copied back from M0 to M1.
Replace the hard disk later:
The warning tone can following turn off. Tunr off the computer. Set all DIP Switches to ON
(CLR). If the hard disk M0 is defective, they must open the computer and the hard disk M1
must connect to M0. Then restart the computer. The RAID function is now turned off and
the warning tone is silenced. However, we advise you to make them as quickly as possible , replace the faulty drive.
·
7.1.4
As long as they create a backup of the data until they have installed a new hard disk.
7.2 RAID 0 or LARGE malfunction:
You will hear a warning tone which is always repeated, and a red LED lights up. If the two RAID
modes fails, it can no longer access the data.
7.2.1
For RAID 0 and LARGE mode, please always backup the data since you will lost all data
when the array is broken.
PLEASE IF YOU USE *RAID 0* OR *LARGE* ANYTIME YOU MUST MAKE A BACKUP!
Seite 22
EX-3455
·
·
Unterstützt Auto-Backup EZ-RAID 1 Mode zum hinzufügen von RAID 1 bei einer bestehenden
Festplatte
RAID 1 unterstützt Auto Re-Build im Hintergrund
Unterstützt zwei Einbaumöglichkeiten
- 3.5-zoll Front Einbau im PC
- PCI-Express Slot Einbau
·
Unterstützt Hot-Plug und Hot-Swap Merkmale
·
SATA2 kompatibel zu 1.5Gbps und 3.0Gbp
·
Unterstützt Festplatten über 2TB
·
LED Anzeige für RAID und Festplatten Status
·
Benötigt keine Treiber und kann für alle Betriebssysteme eingesetzt werden
Lieferumfang:
Ö
EX-3455
Ö
3 x 7 Pin zu 7 Pin SATA 2 Kabel
Ö
1 x Power Kabel zum Anschluss an PC Netzteil
Ö
3.5 Zoll Einbaurahmen
Ö
5.25 Zoll Einbaurahmen
Ö
Normaler und Low Profile Bügel
Ö
Handbuch
Seite 3
EX-3455
Backup System SATA2 RAID 0/1
Backup System SATA2 RAID 0/1
RAID 0 Installation (Only for two new hard drives)
2. Front Panel und Board Layout
1.
Achtung! Wichtige Information die vor der Installation beachtet werden muss.
1. Wenn sie den EX-3455 als EZ-RAID 1 Modus einstellen, müssen sie vorher von Ihrer
bestehenden Festplatte eine Sicherung erstellen.
2. Das SATA Kabel der bestehenden Festplatte muss immer in den Anschluss M0 eingesteckt werden.
Nachfolgend die Abbildungen der verschiedenen Einstellungen und Anschlüsse der EX-3455:
2.
3.
4.
5.
6.
7.
8.
9.
4-Pin NetzteilAnschluss
SATA Anschluss zum Mother-Board
oder einem eingebauten Controller
Oberer Anschluss:
Festplatte M1
Unterer Anschluss:
Festplatte M0 (Source Festplatte)
DIP Schalter für RAID
Mode Einstellungen
10.
11.
1.
2.
3.
5.
6.
7.
8.
9.
LED Anzeige für den
eingestellten RAID Mode
Seite 4
Attention! If the defective RAID 0 mode, they can not access the data. We recommend a daily to
create a backup
Power off you system before proceeding with any Installation.
Important !!! This mode will erase all data on the drives that connected to the RAID Controller to build up fresh a striping disk array set, please back up their data before proceeding
the following installation.
Review the DIP switch setting and make sure it is set in RAID 0 mode and the Pin 4 of the DIP
Switch is ON.
Connect the Upstream SATA HOST Connector of the RAID Controller to your motherboard’s or
SATA add-in card’s SATA Host Connector.
Connect one SATA drive to M0 (Down) Connector of the RAID Controller.
Connect the other SATA drive to M1 (Up) Connector of the RAID Controller. Please note that if the
two drives have different capacity, then the RAID Controller will automatically truncate the bigger
drive to the same capacity as the smaller one.
Power up the system, you will hear a beep from the RAID Controller and both M0 and M1 drive
are configured as the RAID 0 (striping) mode. In this mode, the disk array is blank and you need to
do partition and format by your operating system.
To partition a RAID set bigger than 2TB (Terabyte), you need to partition it with GPT (GUID Partition Table) format instead of MBR (Master Boot Record). The GPT can support up to 18 EB (Extra
-Byte, equals to 1,000 Terabytes).
Set the DIP switch Pin 4 to Off to prevent from changing the RAID mode accidentally.
Very important! In RAID 0 mode, they must always create a backup of the two hard
drives. If the RAID mode go broke, they immediately lose all data.
LARGE Mode Installation (Only for two new hard drives)
4.
LED Anzeige
(Strom und Anschluss)
für Host (Mother-Board),
M0 und M1 Festplatten
EX-3455
10.
11.
Attention! If the defective RAID LARGE mode, they can not access the data. We recommend a
daily to create a backup.
Power off your System before proceeding with any Installation.
Important !!! This mode will erase all data on the drives that connected to the RAID Controller to build up fresh a striping disk array set, please back up their data before proceeding the following installation.
Review the DIP switch setting and make sure it is set in LARGE mode and the Pin 4 of the DIP
Switch is ON.
Connect the Upstream SATA HOST Connector of the RAID Controller to your motherboard’s or
SATA add-in card’s SATA Host Connector.
Connect one SATA drive to M0 (Down) Connector of the RAID Controller.
Connect the other SATA drive to M1 (Up) Connector of the RAID Controller.
Power up the system, you will hear a beep from the RAID Controller and both M0 and M1 drive
are configured as the LARGE (JBOD) mode. In this mode, the M0 and M1 are simply added
into a big blank disk array and you need to do partition and format by your operating system.
To partition a RAID set bigger than 2TB (Terabyte), you need to partition it with GPT (GUID
Partition Table) format instead of MBR (Master Boot Record). The GPT can support up to 18
EB (Extra-Byte, equals to 1,000 Terabytes).
Set the DIP switch Pin 4 to Off to prevent from changing the RAID mode accidentally.
Very important! In RAID LARGE mode, they must always create a backup of the two hard
drives. If the RAID mode go broke, they immediately lose all data.
Seite 21
EX-3455
Backup System SATA2 RAID 0/1
Backup System SATA2 RAID 0/1
EX-3455
6. RAID Installation
3. Hardware Installation
EZ-RAID 1 Installation (If an existing hard disk with data)
3.1 Fronteinbau in einen 3.5-Zoll Schacht
1.
Power off your System before proceeding with any Installation.
2.
Install the EX-3455 according to the instructions on page 5 and 6
3.
Important !!! Please back up the data on your Source Drive to prevent from any data loss
caused by accidentally connecting it to any wrong connector.
4.
Review the DIP switch setting and make sure it is set in EZ-RAID 1 mode and the Pin 4 of the
DIP Switch is ON.
5.
Connect the Upstream SATA HOST Connector of the RAID Controller to your motherboard’s or
SATA add-in card’s SATA Host Connector.
6.
Connect your Source Drive to M0 (Down) Connector of the RAID Controller. Please
7.
Connect your Destination Drive (blank drive) to M1 (UP) Connector of the RAID Controller,
please make sure the Destination Drive has bigger capacity than the Source Drive.
8.
Power up the system, you will hear a beep from the RAID Controller and it will start copying the
data from M0 to M1 drive automatically. Since this operation was doing in the background, all
installation is finished.
9.
Set the DIP switch Pin 4 to Off to prevent from changing the RAID mode accidentally.
Da jedes Computer Gehäuse verschieden aufgebaut ist, können wir ihnen nur eine Information
geben wo die Befestigungslöcher der EX-3455 sind.
Befestigung im PC Gehäuse mit den
mitgelieferten Gewinde-Schrauben
Befestigung im PC Gehäuse mit den
mitgelieferten Gewinde-Schrauben
RAID 1 Installation (Only for two new hard drives)
1.
Power off your System before proceeding with any Installation.
2.
Important !!! This mode will erase all data on the drives that connected to the RAID Controller to build up a fresh mirroring disk array set, please back up their data before proceeding the following installation.
3.
Review the DIP switch setting and make sure it is set in RAID 1 mode and the Pin 4 of the DIP
Switch is ON.
4.
Connect the Upstream SATA HOST Connector of the RAID Controller to your motherboard’s or
SATA add-in card’s SATA Host Connector.
5.
Connect one SATA drive to M0 (Down) Connector of the RAID Controller.
6.
Connect the other SATA drive to M1 (Up) Connector of the RAID Controller. Please note that if
the two drives have different capacity, then the RAID Controller will automatically truncate the
bigger drive to the same capacity as the smaller one.
7.
Power up the system, you will hear a beep from the RAID Controller and both M0 and M1 drive
are configured as the RAID 1 (mirroring) mode. In this mode, the disk array is blank and you
need to do partition and format by your operating system.
8.
To partition a RAID set bigger than 2TB (Terabyte), you need to partition it with GPT (GUID
Partition Table) format instead of MBR (Master Boot Record). The GPT can support up to 18
EB (Extrabyte, equals to 1,000 Terabytes).
9.
Set the DIP switch Pin 4 to Off to prevent from changing the RAID mode accidentally.
Seite 20
3.2 Fronteinbau in einen 5.25-Zoll Schacht
Legen sie den 3.5-Zoll Rahmen in den 5.25-Zoll Rahmen und befestigen diesen mit den mitglieferten Gewinde-Schrauben
Befestigung den 3.5“ Einschub mit den vier
Gewinde-Schrauben am 5.25“ Rahmen
Den 5.25“ Rahmen wird dann mit
den vier Blech-Schrauben am PC
-Gehäuse befestigt
Seite 5
EX-3455
Backup System SATA2 RAID 0/1
3.3 Einbau in einen PCI-Express Slot
Backup System SATA2 RAID 0/1
Switch
Pin#
Switch
Positions
Um die EX-3455 in einen PCI-Express-Bus einzubauen müssen sie vorher die Platine mit den vier
Schrauben aus dem 3.5“ Einschub entfernen.
ON 1 2 3 4
1,2,3
Lösen sie die vier Schrauben
ON 1 2 3 4
EX-3455
Description
RAID 0 Mode (RAID 0 LED is on)
M0 and M1 are set in the RAID 0 (striping) mode, please note both M0
and M1 will be treated as blank disks, all data on the disks will be
erased to generate a new RAID 0 disk array.
EZ-RAID 1 Mode (EZ-RAID 1 LED is on), Factory Default
M0 (Source Drive) and M1 (Destination Drive) are set in the RAID 1
(mirroring) mode, and the M0 data will be copied (in sector level) to M1
automatically. Since the M1 disk will be overwritten by the M0 disk,
please make sure the connection of M0 and M1 is correct.
5. Information about the RAID Mode
Befestigen sie jetzt mit zwei Schrauben den mitgelieferten Bügel (Normale Höhe oder Low Profile).
Befestigung der Schrauben
Setzen sie jetzt die EX-3455 in einen freien PCI-Express-Slot ein. Das Power Kabel muss jetzt
nicht mehr an das PC-Netzteil angeschlossen werden. Der benötigte Strom wird über den PCIExpress Slot geliefert.
5.1
5.2
Rückseite des Computer System
EX-3455
Seite 6
Striping Mode (RAID 0)
RAID0 (block-level striping without parity or mirroring) provides improved
performance and additional storage but no redundancy or fault tolerance
(making it not true RAID, according to the acronym's definition). However,
because of the similarities to RAID (especially the need for a controller to
distribute data across multiple disks), simple stripe sets are normally
referred to as RAID 0. Any disk failure destroys the array, and the likelihood of failure increases with more disks in the array (at a minimum,
catastrophic data loss is twice as likely compared to single drives without
RAID). A single disk failure destroys the entire array because when data
is written to a RAID 0 volume, the data is broken into fragments called
blocks. The number of blocks is dictated by the stripe size, which is a
configuration parameter of the array. The blocks are written to their respective disks simultaneously on the same sector. This allows smaller
sections of the entire chunk of data to be read off the drive in parallel,
increasing bandwidth. RAID 0 does not implement error checking, so any error is uncorrectable.
More disks in the array means higher bandwidth, but greater risk of data loss
Mirroring (RAID 1)
In RAID1 (mirroring without parity or striping), data is written identically to
multiple disks (a "mirrored set"). Although many implementations create
sets of 2 disks, sets may contain 3 or more disks. Array provides fault
tolerance from disk errors or failures and continues to operate as long as
at least one drive in the mirrored set is functioning. Increased read performance occurs when using a multi-threaded operating system that supports split seeks, as well as a very small performance reduction when
writing. Using RAID 1 with a separate controller for each disk is sometimes
calledduplexing.
Seite 19
EX-3455
Backup System SATA2 RAID 0/1
Backup System SATA2 RAID 0/1
4. LED Anzeige und DIP Schalter
DIP Switch Layout:
Pin 1:
Pin 2: RAID Mode Settings
Pin 3:
Pin 4: Enable/Disable RAID Mode
Status der LED Anzeigen:
LED
Name
Farbe
LED Funktion
PWR
Grün
Immer an:
Aus:
Die Stromversorgung ist korrekt
Keine Stromversorgung
Grün
Immer an:
Blinkend:
Aus:
Der Host ist angeschlossen und die Verbindung ist OK
Der Host hat Zugriff auf den RAID
Der Host ist nicht angeschlossen
Rot
Immer an:
Blinkend:
Aus:
Disk Array Fehler
Disk Array Wiederherstellung
Disk Array ist in Ordnung
Grün
Immer an:
Blinkend:
Aus:
Die Festplatte ist angeschlossen und in Ordnung
Zugriff auf die Festplatte M0
Die Festplatte ist nicht angeschlossen oder ist defekt
Rot
Blinkend:
Aus:
Festplatte M0 wird wiederhergestellt
Festplatte M0 ist in Ordnung
Grün
Immer an:
Blinkend:
Aus:
Die Festplatte ist angeschlossen und in Ordnung
Zugriff auf die Festplatte M1
Die Festplatte ist nicht angeschlossen oder ist defekt
Rot
Blinkend:
Aus:
Festplatte M1 wird wiederhergestellt
Festplatte M1 ist in Ordnung
Immer
Immer
Immer
Immer
Immer
Der DIP-Schalter ist auf RAID 0 Mode geschaltet
Der DIP-Schalter ist auf RAID 1 Mode geschaltet
Der DIP-Schalter ist auf LARGE Mode geschaltet
Der DIP-Schalter ist auf EZ RAID 1 Mode geschaltet
Der DIP-Schalter ist auf CLEAR RAID Mode geschaltet.
Nach dem einschalte diese Modes werden die RAID einstellungen gelöscht und zwischen den beiden Festplatten
Werden keine Daten mehr ausgetauscht.
ON 1 2 3 4
Note :
1.
The pin 4 (if set it to Off) is used to prevent from the RAID modes were changed accidentally,
if you want to set or change the RAID mode, please set it to On. After the RAID was set and
configured, please set it to Off for safety reason.
2.
All RAID mode changing should turn the system power off first, the RAID controller will generate a beep when it recognizes the new RAID mode.
Switch
Pin#
Switch
Positions
HOST
M0
Description
M1
ON 1 2 3 4
Disable the DIP switch Pin 1~3 for RAID mode changing. The RAID
mode will be kept at the last setting. The Pin 1~3 settings were ignored
in this setting.
4
ON 1 2 3 4
ON 1 2 3 4
1,2,3
ON 1 2 3 4
ON 1 2 3 4
EX-3455
Enable the DIP switch Pin 1~3 to change the RAID mode settings, it
can be set to Off after the Controller recognized the new RAID mode
Clear RAID Mode (CLR LED is on)
Disk Member 0 (M0) and 1 are NOT in any RAID mode relationship,
the M0 will be the default drive shown in the system, the M1 will be
ignored.
LARGE Mode (LARGE LED is on)
M0 and M1 are combined into one large drive, please note that both
M0 and M1 will be treated as blank disks, all data on the disks will be
erased to generate a new large drive.
RAID 1 Mode (RAID 1 LED is on)
M0 and M1 are set in the RAID 1 (mirroring) mode, please note both
M0 and M1 will be treated as blank disks, all data on the disks will be
erased to generate a new RAID 1 disk array.
Seite 18
RAID 0
RAID 1
LARGE
EZ RAID 1
CLR
Grün
Grün
Grün
Grün
Grün
an:
an:
an:
an:
an:
Beispiele von verschiedenen LED Einstellungen :
·
·
·
Wenn die „Disk Array“ in Ordnung ist: Alle roten LED sind aus und alle grünen LED sind an
und sie flackern wenn das System auf die Festplatten zugreift.
Wenn die Festplatte M0 defekt ist (RAID 1): Die LED vom Host ist rot. Die grüne LED von M0
ist aus. Der Lautsprecher ist an.
Festplatte M0 wird wiederhergestellt (mit den Daten von M1): Die roten LEDs vom Host und
M0 blinken, dass heisst M0 wird jetzt wiederhergestellt. Die grünen LEDs von M0 und M1 flackern, weil jetzt die Daten von M1 auf M0 kopiert werden.
Seite 7
EX-3455
Backup System SATA2 RAID 0/1
Backup System SATA2 RAID 0/1
4. LED Display and DIP Switch
DIP Schalter Layout:
Pin 1:
Pin 2: RAID Mode Einstellungen
Pin 3:
Pin 4: RAID Mode Ein– oder Ausschalten
Status LED indicators:
LED
Name
Color
LED Function
PWR
Green
Steady On:
Off:
The EX-3455 is correctly powered
The EX-3455 is not powered and does NOT operate properly
Green
Steady On:
Blinking:
Off:
The Host is connected and linked OK
The Host is accessing the RAID
The SATA Host is disconnected
Red
Steady On:
Blinking:
Off:
Disk Array Error
Disk Array Rebuilding
Disk Array is OK
Green
Steady On:
Blinking:
Off:
The Disk Member 0 is connected and linked OK
The Disk Member 0 is being acessed
The Disk Member 0 is disconnected or Error
Blinking:
Off:
Disk Member 0 is Rebuilding
Disk Member 0 is OK
Steady On:
Blinking:
Off:
The Disk Member 1 is connected and linked OK
The Disk Member 1 is being acessed
The Disk Member 1 is disconnected or Error
Blinking:
Off:
Disk Member 1 is Rebuilding
Disk Member 1 is OK
Steady On:
Steady On:
Steady On:
Steady On:
Steady On:
The DIP Switch is set in RAID 0 mode
The DIP Switch is set in RAID 1 mode
The DIP Switch is set in LARGE mode
The DIP Switch is set in EZ RAID 1 mode
The DIP Switch is set in Clear RAID mode, after setting this
Mode, the M0 and M1 hard drives will not have any RAID
relationshio. The M0 will recognized by the system as a
singel drive and the M1 won’t be available for the system
ON 1 2 3 4
Anmerkung :
1. Der DIP-Schalter 4 ist vom Werkseitig auf „Off“ gestellt. Dies verhindert das beim installieren die
Daten eine bestehende Festplatte überschrieben werden. Möchten Sie einen RAID Mode einstellen müssen Sie den Schalter auf „ON“ setzen. Nach dem installieren des RAIDs empfehlen wir
Ihnen sicherheitshalber den Schalter wieder auf „OFF“ zu setzen
HOST
2. Bei jedem verändern des RAID Modes, muss das System neu gestartet. Der RAID Controller
wird dann ein akustisches Signal erzeugen, wenn ein neuer RAID Mode erkannt wurde.
M0
DIPSchalter
Schalter
Position
Beschreibung
Rot
M1
Green
Schaltet die Funktionen der DIP-Schalter 1-3 aus.
ON 1 2 3 4
4
Rot
ON 1 2 3 4
Schaltet die Funktionen der DIP-Schalter 1-3 ein. Jetzt können die verschiedenen RAID Modes eingestellt werden. Nachdem der Festplatten
Controller den RAID Mode festgelegt hat, kann der DIP-Schalter 4 wieder auf „OFF“ geschaltet werden.
ON 1 2 3 4
Clear RAID Mode (das LED CLR leuchtet auf)
Anschluss M0 und M1 haben keine RAID Funktion. Das Betriebssystem
wird normal starteten.
ON 1 2 3 4
LARGE Mode (das LED LARGE leuchtet auf)
M0 und M1 werden zu einer grossen Festplatte kombiniert. Beachten Sie
das in diesem Mode die Daten beider Festplatten zuerst gelöscht werden.
1,2,3
RAID 0
RAID 1
LARGE
EZ RAID 1
CLR
RAID 1 Mode (das LED RAID 1 leuchtet auf)
M0 und M1 werden in den RAID 1 (Spieglung) Mode gesetzt. Beachten Sie
das in diesem Mode die Daten beider Festplatten zuerst gelöscht werden.
Seite 8
Green
Green
Green
Green
Green
LED Examples of Special Events:
·
·
ON 1 2 3 4
EX-3455
·
If Disk Array is OK and Healthy: All Red LEDs are Off, all Green LEDs are steady On when idle
and blinking when they were being accessed.
If Disk Member 0 is Failed (RAID 1): The Host Red LED will On, M0 Green LED will Off, the
buzzer is turned On (the buzzer can be turned off by the RAID GUI).
If Disk Member 0 is Rebuilding (with the data from M1): The Red LEDs of HOST and M0 are
Blinking to indicate the M0 is Rebuilding, the Green LEDs of M0 and M1 are Blinking because it
is copying the data from M1 to M0.
Seite 17
EX-3455
Backup System SATA2 RAID 0/1
3.3 Install in a PCI-Express slot
Backup System SATA2 RAID 0/1
DIPSchalter
Schalter
Position
For install the EX-3455 in a PCI-Express slot, they must first remove the PCB with the four screws
from the 3.5-inch bay.
ON 1 2 3 4
1,2,3
Unscrew the four screws
ON 1 2 3 4
EX-3455
LED Funktion
RAID 0 Mode (das LED RAID 0 leuchtet auf)
M0 und M1 werden in den RAID 0 (Striping) Mode gesetzt. Beachten Sie
das in diesem Mode die Daten beider Festplatten zuerst gelöscht werden.
EZ-RAID 1 Mode (das LED EZ-RAID 1 leuchtet auf)
*Werkseinstellung*
M0 (Quell-Disk) und M1 (Ziel-Disk) werden in RAID 1 (Spieglung) Mode
gesetzt und die Daten von M0 werden im Hintergrund automatisch auf
die M1 Festplatte kopiert. Da die Daten von M1 werden immer durch M0
überschrieben. Beim Einstecken der Festplatten bitte nochmals überprüfen das die Kabel richtig verbunden sind.
5. Informationen über den RAID Modus
Now attach the supplied bracket with two screws (normal height or low profile).
5.1
Striping Mode (RAID 0)
Mit dem RAID 0 (Striping Mode) werden zwei oder vier Festplatten zu
einer einzigen Disk zusammengefasst. Lese und Schreib Sektoren von
Daten werden auf den verschiedenen Festplatten miteinander verschachtelt.
Tightening of screws
Now insert the EX-3455 board into a free PCI-Express slot and fix with a screw. The power cable
don‘t must connect to the computer power supply. The required power is supplied via the PCIExpress slot.
Die Datenblöcke werden entsprechend der eingestellten Streifengröße
(z.B. 16KB) und der vorhandenen Festplatten in Streifen (eng. stripes)
aufgeteilt, wobei jeder Streifen eines Datenblocks auf einer separaten
Festplatte gespeichert wird. Dadurch wird vor allem beim sequentiellen
Schreiben und Lesen von großen Dateien ein deutlich höherer Datendurchsatz erreicht. RAID 0 bietet keinerlei Redundanz. Beim Ausfall
einer Festplatte sind die Daten des gesamten RAID 0 Verbandes
verloren. Verwenden sie RAID 0 nicht für wichtige Daten und erstellen sie bitte immer eine
Sicherung ihrer Daten da ständig die Gefahr eines Datenverlusts besteht!
5.2
Spiegelung / Mirroring (RAID 1)
Back of the computer system
EX-3455
Seite 16
Die Daten werden jeweils auf zwei Festplatten gespeichert. Beim Ausfall
einer Platte sind die Daten identisch auf der zweiten Festplatte vorhanden. Beim Spiegeln von Festplatten an einem Kanal spricht man von Disk
Mirroring, beim Spiegeln an unabhängigen Kanälen von Disk Duplexing
(zusätzliche Sicherheit). RAID 1 ist eine einfache und schnelle Lösung zur
Datensicherheit und Datenverfügbarkeit, besonders geeignet für kleinere
Nutzkapazitäten. Lediglich die Hälfte der Gesamtkapazität steht als nutzbarer Bereich zur Verfügung.
Seite 9
EX-3455
Backup System SATA2 RAID 0/1
Backup System SATA2 RAID 0/1
EX-3455
6. RAID Installation
3. Hardware Installation
EZ-RAID 1 Installation (Bei einer bestehenden Festplatte mit Daten)
3.1 Front mounting in a 3.5-inch bay
1.
Schalten sie Ihren Rechner aus bevor sie mit der Installation beginnen.
2.
Installieren sie den EX-3455 gemäß der Anleitung auf Seite 5 und 6.
3.
Sehr Wichtig! Erstellen sie vorher eine Sicherung Ihrer bereits installierten Festplatte.
4.
Schalten Sie die DIP Schalter gemäß Anleitung auf der Seite 9 Schalter 1 und 4 auf „ON“.
5.
Schließen sie das SATA 2 Kabel vom HOST Anschluss der EX-3455 an den SATA 2 Anschluss
des Mother-Board oder eines SATA 2 Controller an.
6.
Schließen sie ihre bestehende Quell-Festplatte an den unteren Anschluss M0 der EX-3455 an.
7.
Schließen sie jetzt ihre neue und leere Ziel-Festplatte an den oberen Anschluss M1 der EX3455 an. Beachten Sie das die neue Ziel-Festplatte gleich oder grösser sein muss.
8.
Starten Sie das System. Sie hören jetzt ein akustisches Signal „Peep“ von der EX-3455. Er kopiert jetzt automatisch die Daten von M0 auf die M1 Festplatte. Das kopieren erfolgt im Hintergrund. Sie können aber mit Ihrem Computer weiterarbeiten.
9.
Nach der Installation empfehlen wir das sie den DIP-Schalter 4 wieder auf „OFF“ schalten, damit
versehentlich keine Daten gelöscht werden.
Since each computer casing has been different, we can give you only the information where the
mounting holes are by the EX-3455
Fixing in the PC case with the included
threaded screws
Fixing in the PC case with the included threaded screws
RAID 1 Installation (Nur für zwei neue Festplatten)
1.
Schalten sie Ihren Rechner aus bevor sie mit der Installation beginnen.
2.
Installieren sie den EX-3455 gemäß der Anleitung auf Seite 5 und 6.
3.
Sehr Wichtig! Dieser Mode löscht alle Daten der beiden Festplatten.
4.
Schalten Sie die DIP Schalter gemäß Anleitung auf der Seite 8 Schalter 1, 3 und 4 auf „ON“.
5.
Schließen sie das SATA 2 Kabel vom HOST Anschluss der EX-3455 an den SATA 2 Anschluss
des Mother-Board oder eines SATA 2 Controller an.
6.
Schließen sie ihre beiden Festplatten an die Anschlüsse M0 und M1 der EX-3455 an. Sollten die
Festplatten unterschiedlich Größen haben, wird der EX-3455 die kleinere Festplatte als Referenz nehmen und beide nach der Kleineren Festplatte formatieren.
7.
Starten Sie das System. Sie hören jetzt ein akustisches Signal „Peep“ von der EX-3455. Er konfiguriert einen RAID 1 Mode auf die M0 und M1 Festplatten. In diesem Mode sind die Festplatten jetzt leer und müssen von ihrem Betriebssystem neu Partitioniert und Formatiert werden.
8.
Wenn die RAID Partition grösser als 2TB ist, müssen sie die Partition mit GPT (GUID Partition
Table) Format partitionieren anstatt der MBR (Master Boot Record) Partition. Die GPT unterstützt bi zu 18EB (Extrabyte) dies entspricht ca. 1000Terabyet
9.
Nach der Installation empfehlen wir das sie den DIP-Schalter 4 wieder auf „OFF“ schalten, damit
versehentlich keine Daten gelöscht werden.
Seite 10
3.2 Front mounting in a 5.25-inch bay
Put the 3.5-inch frame into the 5.25-inch frame and secure it with the threaded screws
Fix the 3.5-inch frame with the four threaded
screws in the 5.25-inch frame
The 5.25-inch frame is then attached with the four sheet metal
screws on the PC case
Seite 15
EX-3455
Backup System SATA2 RAID 0/1
Backup System SATA2 RAID 0/1
EX-3455
RAID 0 Installation (Nur für zwei neue Festplatten)
2. Front Panel und Board Layout
1.
Achtung! Ist der RAID 0 Mode defekt, können sie nicht mehr auf die Daten zugreifen. Wir empfehlen täglich eine Sicherung zu erstellen.
1. If you set the EX-3455 as EZ-RAID 1 Modus, must make a backup with the existing
hard drive from you computer system.
2.
Schalten sie Ihren Rechner aus bevor sie mit der Installation beginnen.
3.
Installieren sie den EX-3455 gemäß der Anleitung auf Seite 5 und 6.
2. The SATA cable from the existing hard drive must connect to the port M0.
4.
Sehr Wichtig! Dieser Mode löscht alle Daten der beiden Festplatten.
5.
Schalten Sie die DIP Schalter gemäß Anleitung auf der Seite 9 Schalter 3 und 4 auf „ON“.
6.
Schließen sie das SATA 2 Kabel vom HOST Anschluss der EX-3455 an den SATA 2 Anschluss
des Mother-Board oder eines SATA 2 Controllers an.
7.
Schließen sie ihre beiden Festplatten an die Anschlüsse M0 und M1 der EX-3455 an. Sollten die
Festplatten unterschiedlich Größen haben, wird der EX-3455 die kleinere Festplatte als Referenz
nehmen und beide nach der Kleineren Festplatte formatieren.
8.
Starten Sie das System. Sie hören jetzt ein akustisches Signal „Peep“ von der EX-3455. Er konfiguriert einen RAID 0 Mode auf die M0 und M1 Festplatten. In diesem Mode sind die Festplatten
jetzt leer und müssen von ihrem Betriebssystem neu Partitioniert und Formatiert werden.
9.
Wenn die RAID Partition grösser als 2TB ist, müssen sie die Partition mit GPT (GUID Partition
Table) Format partitionieren anstatt der MBR (Master Boot Record) Partition. Die GPT unterstützt
bi zu 18EB (Extrabyte) dies entspricht ca. 1000Terabyet
Attention! Important information before you start with the installation.
Below the illustrations of the various settings and connections of the EX-3455
Small 4-pin Power
Input
Connector
from PC power
supply
10. Nach der Installation empfehlen wir das sie den DIP-Schalter 4 wieder auf „OFF“ schalten, damit
versehentlich keine Daten gelöscht werden. Sehr wichtig!! Bei RAID 0 Mode müssen sie immer
eine Datensicherung der beiden Platten erstellen. Sollte der RAID Mode kaputt gehen, verlieren sie sofort alle Daten.
LARGE Mode Installation (Nur für zwei neue Festplatten)
Upstream SATA Connector
from PC Host Port
4-pin DIP Switch for
RAID Mode Settings
LED Indicators for Host, M0
(Disk Array Member 0) and
M1 Ports and Power
RAID Mode LED Indicators
Seite 14
Up Connector: Disk M1
1.
Achtung! Ist der RAID LARGE Mode defekt, können sie nicht mehr auf die Daten zugreifen. Wir
empfehlen täglich eine Sicherung zu erstellen.
Down Connector: Disk M0
(Source Drive)
2.
Schalten sie Ihren Rechner aus bevor sie mit der Installation beginnen.
3.
Installieren sie den EX-3455 gemäß der Anleitung auf Seite 5 und 6.
4.
Sehr Wichtig! Dieser Mode löscht alle Daten der beiden Festplatten.
5.
Schalten Sie die DIP Schalter gemäß Anleitung auf der Seite 8 Schalter 2, 3 und 4 auf „ON“.
6.
Schließen sie das SATA 2 Kabel vom HOST Anschluss der EX-3455 an den SATA 2 Anschluss
des Mother-Board oder eines SATA 2 Controllers an.
7.
Schließen sie ihre beiden Festplatten an die Anschlüsse M0 und M1 der EX-3455 an. Sollten die
Festplatten unterschiedlich Größen haben, wird der EX-3455 die kleinere Festplatte als Referenz
nehmen und beide nach der Kleineren Festplatte formatieren.
8.
Starten Sie das System. Sie hören jetzt ein akustisches Signal „Peep“ von der EX-3455. Er konfiguriert einen LARGE RAID (JBOD) Mode auf die M0 und M1 Festplatten. In diesem Mode sind die Festplatten jetzt leer und müssen von ihrem Betriebssystem neu Partitioniert und Formatiert werden.
9.
Wenn die RAID Partition grösser als 2TB ist, müssen sie die Partition mit GPT (GUID Partition
Table) Format partitionieren anstatt der MBR (Master Boot Record) Partition. Die GPT unterstützt
bi zu 18EB (Extrabyte) dies entspricht ca. 1000Terabyet
10. Nach der Installation empfehlen wir das sie den DIP-Schalter 4 wieder auf „OFF“ schalten, damit
versehentlich keine Daten gelöscht werden. Sehr wichtig!! Bei RAID 0 Mode müssen sie immer
eine Datensicherung der beiden Platten erstellen. Sollte der RAID Mode kaputt gehen, verlieren sie sofort alle Daten.
Seite 11
EX-3455
7.
Backup System SATA2 RAID 0/1
Massnahmen bei defektem RAID?
7.1 RAID 1 Defekt:
Sie hören jetzt einen Warnton der sich immer wiederholt und ein rotes LED leuchtet auf. Den
Warnton können Sie ausschalten wenn Sie den Dip-Schalter 4 kurz auf On und dann auf
OFF schalten.
7.1.1
Wichtig!! Öffnen sich nicht gleich den Rechner und versuchen die Festplatte
umzuhängen. Notieren sie jetzt, welches rote LED aufleuchtet. Dies ist wichtig um später
die defekte Festplatte zu ersetzen.
7.1.2
ERSTELLEN SIE JETZT EINE SICHERUNG!
7.1.3
Festplatte sofort ersetzen:
System runterfahren. Computer System öffnen. Ist die defekte Festplatte M0, müssen
sie die funktionierende Festplatte M1 auf M0 um stecken. Dies ist sehr wichtig ansonsten
verlieren sie die Daten von der intakten Festplatte. Stellen sie die DIP-Schalter auf
EZ-RAID und starten sie den Rechner neu. Jetzt werden die Daten von M0 wieder auf M1
kopiert.
7.1.4
Festplatte zu einem späteren Zeitpunkt ersetzen:
Der Warnton kann folgendermaßen ausgeschaltet werden, da er mit der Zeit sehr störend
wirkt. Schalten sie den Rechner aus. Setzen sie alle DIP-Schalter auf ON (CLR). Wenn di
Festplatte M0 defekt ist, müssen sie den Rechner öffnen und die Festplatte M1 auf
M0 um stecken. Starten sie danach den Rechner neu. Die RAID Funktion ist jetzt
ausgeschaltet und der Warnton ist verstummt. Trotzdem empfehlen wir ihnen, dass sie
so schnell wie möglich, die defekte Festplatte ersetzten.
Erstellen sie solange eine Sicherung der Daten, bis sie eine neue Festplatte eingebaut
haben.
7.2 RAID 0 oder LARGE Defekt:
Backup System SATA2 RAID 0/1
EX-3455
1. Description
Thank you for purchasing this 1-to-2 SATA2 Hardware RAID Controller. It is designed to provide a
high performance link between a single SATA2 host port and 2 SATA2 hard drives that were configured in the RAID0, 1, LARGE and EZ-RAID 1 modes. It connects the host upstream port to the PC’s
SATA port by a high performance hardware RAID engine. All RAID configurations can be set by either the DIP switch or the Windows based Utility (GUI). It makes the RAID set be configured and
maintained more straightforwardly and easily.
It supports 2 mounting form factors to install in your system, PCI Express and 3.5-inch bay frame.
With the PCI Express form factor, you can plug it in your any PCI Express slot. With the 3.5-inch bay
form factor, you can install it on your front panel of your desktop computer’s floppy bay. It provides
very flexible install bases for many applications. Its major features as follows:
Features:
·
1-to-2 SATA2 RAID for two SATA 2 Hard Drives
·
Support RAID 0, 1, LARGE and EZ-RAID 1 Modes
·
RAID Modes can set by DIP Switches
·
Supports Auto-Backup EZ RAID 1 Mode for adding RAID 1 to an existed Hard Drive
·
RAID Supports Auto Re-Build in background
·
Supports two mounting form factors:
- 3.5-inch Bay Frame Form Factor
- PCI-Express Form Factor (standard and low profile)
·
Support Hot-Plug and Hot-Swap feature
·
SATA2 compliant at 1.5Gbps and 3.0Gbp
·
Support Hard Drives over 2TB
·
LED‘s to indicate the RAID and Drives status
·
True Hardware RAID, no device drives required, can use for all operating system
Packaging contents:
Sie hören jetzt einen Warnton der sich immer wiederholt und ein rotes LED leuchtet auf. Sind die
beiden RAID Modes defekt, können sie nicht mehr auf die Daten zugreifen.
•
EX-3455
7.2.1
•
3 x 7 pin to 7 pin SATA 2 cable
•
1 x small 4-pin to large 4-pin host power cable
•
3.5-inch front bay
•
5.25-inch front bay
•
Normal and Low Profile bracket
•
User manual
Wenn sie das System mit RAID 0 oder LARGE konfiguriert haben, empfehlen wir ihnen
täglich eine Sicherung zu erstellen.
BEI *RAID 0* UND *LARGE* IMMER DATENSICHERUNGEN ERSTELLEN!
Seite 12
Seite 13