1
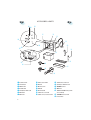
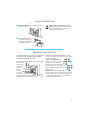
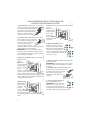
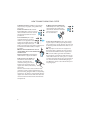
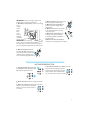
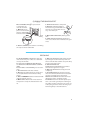
ACE 010
www.whirlpool.com
1
INSTALLATION
MOUNTING THE APPLIANCE
FOLLOW THE SUPPLIED separate mounting instructions when installing the appliance.
PRIOR TO CONNECTING
CHECK THAT THE VOLTAGE on the rating
plate corresponds to the voltage in your
home.
ENSURE THAT THE APPLIANCE IS NOT DAMAGED.
THIS APPLIANCE IS DESIGNED TO WORK
in ambient temperatures above
freezing point of water (0°C).
If residual water is allowed to
freeze, the appliance may be
damaged.
DO NOT OPERATE THIS APPLIANCE if it has a
damaged mains cord or plug, if it is not
working properly, or if it has been damaged or dropped. Do not immerse the
mains cord or plug in water. Keep the
cord away from hot surfaces. Electrical
shock, fire or other hazards may result.
AFTER CONNECTING
THE EARTHING OF THIS APPLIANCE is compulsory. The manufacturer will accept no responsibility for injury to persons, animals or damage to objects arising from
the non-observance of this requirement.
The manufacturers are not liable for any
problems caused by the user’s failure to observe these instructions.
2
IMPORTANT SAFETY INSTRUCTIONS
READ CAREFULLY AND KEEP FOR FUTURE REFERENCE
DO NOT HEAT, OR USE FLAMMABLE LIQUIDS in or
near the appliance. Fumes can create a
fire hazard or explosion.
DO NOT LEAVE THE APPLIANCE UNATTENDED
DO NOT USE corrosive chemicals or vapors
in this appliance. This type of appliance
is specifically designed to heat water. It
is not designed for industrial or laboratory use.
ONLY ALLOW CHILDREN to use the appliance
without adult supervision after adequate
instructions have been given, so that the
child is able to use the appliance in a safe
way and understands the hazards of improper use.
The appliance is not intended for use by
young children or infirm persons without
supervision. Young children should be supervised to ensure that they do not play
with the appliance.
Children should only use the appliance under adult supervision due to the high temperatures generated.
PRECAUTIONS
THIS APPLIANCE IS DESIGNED FOR DOMESTIC USE ONLY!
USE HOT PADS OR OVEN MITTS to prevent
burns, when touching hot parts.
THIS APPLIANCE IS DESIGNED TO MAKE COFFEE or heat
drinks. Be careful to avoid being scalded by
sprays of water or steam or due to improper
use of the appliance.
3
ACCESSORIES & PARTS
k
l
1(
w
q
t
j
r
i
2)
h
2!
o
e
y
s
a
g
u
f
d
q
w
e
r
t
y
u
4
CONTROL PANEL
STEAM KNOB
WATER TANK
POWER CABLE
STEAM/HOT WATER TUBE
DRIP MESH
DRIP TRAY
i
o
a
s
d
1#
g
CAPPUCCINO MAKER
NOZZLE
BOILER OUTLET
PRESSER
FILTER HOLDER
LARGE TWO-CUP FILTER
SMALL ONE-CUP OR POD FILTER
h
j
k
l
1(
2)
2!
STEAM SELECTOR BUTTON
COFFEE/HOT WATER BUTTON
ON/OFF BUTTON
ON LIGHT
TEMPERATURE OK LIGHT (COFFEE
OR HOT WATER)
STEAM INDICATOR LIGHT
LIGHT SWITCH
FILLING THE WATER TANK
q
w
REMOVE THE WATERTANK by pulling it out (towards the front).
NEVER USE THE APPLIANCE WITHOUT WATER IN
and always remember to top up
when the level drops to a couple of centimetres from the bottom.
THE TANK
FILL THE TANK with fresh
clean water taking care
not to exceed the MAX
level. Refit the tank.
PREHEATING THE COFFEE UNIT
1. TURN THE APPLIANCE on by pressing the ON/OFF
BUTTON AND ATTACH THE FILTER HOLDER TO THE APPLI ANCE WITHOUT ADDING GROUND COFFEE.
TO ATTACH THE FILTER HOLDER, position it under the
boiler outlet
with the handle towards
the left,
push it
1
upwards
and at the
2
same time rotate the
handle firmly towards the right.
Check that the steam knob is closed.
2. PLACE A CUP UNDER THE FILTER HOLDER. Use the
same cup as will be used to prepare the coffee
in order to preheat it.
3. WAIT FOR THE OK INDICATOR
LIGHT to come on, then immediately press the coffee knob.
Run the water off until the OK
indicator light goes out, then interrupt delivery by pressing the coffee
button again.
4. EMPTY THE CUP. Wait until the OK
indicator light comes on again then repeat the
same operation. (It is normal for a small and
harmless puff of steam to be given off when
removing the filter holder).
5
HOW TO PREPARE ESPRESSO COFFEE USING THE
FILTER HOLDER FOR GROUND COFFEE
1. AFTER PREHEATING the appliance as described
above, place the ground coffee filter
in the filter holder, making sure the
projection is correctly inserted in
the slot. Use the smaller filter to
make one coffee or the larger filter to make two coffees.
2. TO MAKE A SINGLE COFFEE ONLY, place one level
measure (about 7 g) of ground coffee in the filter. To prepare two coffees, place two loosely filled
measures (about 6+6 g)
of ground coffee in the filter. Fill the filter a little at a time to prevent the
ground coffee from overflowing.
IMPORTANT: for correct operation, before
adding the ground coffee to the filter holder,
clean the filter from residues of ground coffee
from the previous infusion.
3. DISTRIBUTE THE GROUND COFFEE evenly and press
lightly with the
presser
NB: Correct
pressing of the
ground coffee
is essential to
obtain a
good espresso. If pressing is excessive, coffee delivery will be slow and the
froth will be dark. If pressing is too light, coffee
delivery will be too rapid and the froth will be
skimpy and light coloured.
4. REMOVE ANY
EXCESS COFFEE
from the rim
of the filter hold1
er and
attach the fil2
ter holder to the appliance. Rotate firmly to avoid leaks of
water.
6
5. PLACE THE CUP or cups under the filter holder
spouts.
You are recommended to
heat the cups
before making the coffee by rinsing
them with a little
hot water.
6. MAKE SURE THE OK LIGHT IS ON
(if off, wait until it comes on),
then press the coffee button.
When the required quantity of
coffee has been run off, press
the same button again. (You should
not run off coffee for more than 45
seconds at a time).
7. TO REMOVE THE FILTER HOLDER, rotate the handle
from right to left.
IMPORTANT: to avoid splashes, never remove
the filter holder while the appliance is delivering coffee.
8. TO ELIMINATE THE USED COFFEE GROUNDS, block
the filter in place using the lever incorporated in the handle and empty
the coffee by turning the filter holder upside down and
tapping.
9. TO TURN THE COFFEE MACHINE OFF,
press the ON/OFF button.
IMPORTANT: the first time the
appliance is used, all accessories
and the internal circuits must be
washed through by making at least
five coffees without using ground coffee.
HOW TO PREPARE ESPRESSO COFFEE USING PODS
1. PREHEAT THE APPLIANCE as described in the section “PREHEATING THE COFFEE UNIT”, making
sure the filter holder is attached. This obtains a
hotter coffee.
NB: Use pods conforming to the
ESE standard indicated on the
pack with the following logo:
THE ESE STANDARD is a system accepted by leading pod producers
and enables espresso coffee to be prepared
simply and cleanly.
2. PLACE THE SMALL FILTER (1 cup or pods)
in the filter holder, making sure the
projection is correctly inserted in
the slot.
3. INSERT A POD, centring it as far as possible
on the filter. Always follow the instructions on the pod pack to position the
pod on the filter correctly.
4. ATTACH THE FILTER HOLDER to the appliance. Always rotate
as far as it will
go.
1
2
5. PROCEED AS in points 5, 6 and 7 in the previous paragraph.
7
HOW TO MAKE CAPPUCCINO COFFEE
1. PREPARE THE ESPRESSO COFFEES as described in
the previous paragraphs, using sufficiently
large cups.
2. PRESS THE STEAM BUTTON and wait
for the OK light to come on. This indicates that the boiler has reached
the ideal temperature for steam
production.
3. IN THE MEANTIME, fill a recipient with about 100 grams of
milk for each cappuccino to be
prepared. The milk must be at
refrigerator temperature (not
hot!). In choosing the size of the recipient, bear
in mind that the milk doubles or triples
in volume.
NB: YOU ARE RECOMMENDED TO USE
SEMISKIMMED MILK AT REFRIGERATOR
TEMPERATURE.
4. PLACE THE RECIPIENT containing the
milk under the cappuccino maker.
5. DIP THE CAPPUCCINO MAKER into
the milk for about 5 mm and
turn the steam knob anticlockwise, taking care not to
immerse the raised line on the
cappuccino maker (indicated by
the arrow).
Turn the steam knob at least a half turn anticlockwise. Steam is discharged from the cappuccino maker, giving the milk a creamy frothy
appearance. To obtain a creamier froth, dip the
cappuccino maker into the milk and rotate the
container with slow movements from the bottom upwards.
8
6. WHEN THE REQUIRED TEMPERATURE
(60°C is ideal), interrupt
steam delivery by rotating the
steam knob clockwise and at the
same time pressing
the steam button.
IS REACHED
7. POUR THE FROTHED MILK into the cups containing the espresso coffee prepared previously.
The cappuccino is ready. Sweeten to taste and,
if desired, sprinkle the froth with a little cocoa
powder.
NB: To prepare more than one cappuccino,
first make all the coffees then at the end prepare the frothed milk for all the cappuccinos.
NB: to make coffee again after the milk has
been frothed, cool down the boiler first or the
coffee will be burnt. To cool it, place a container under the boiler outlet, press the steam button and run off water until the OK light goes
out. Make the coffee as described in the previous paragraphs.
IMPORTANT: always clean the cappuccino
maker after use. Proceed as follows:
1. DISCHARGE A LITTLE STEAM for a few seconds by
rotating the
steam
knob.
This
empties any
milk left
inside the
steam spout.
IMPORTANT: To ensure hygiene, you are recommended to follow
this procedure each time you make cappuccino to avoid milk stagnating in the milk circuit.
3. REMOVE THE NOZZLE from the steam
tube by pulling it downwards.
4. WASH THE CAPPUCCINO MAKER and
steam nozzle thoroughly with
warm water.
5. MAKE SURE the two holes shown
in are not blocked. If necessary,
clean with a pin.
6. REPLACE THE STEAM NOZZLE by inserting it onto the steam tube
and rotating firmly towards the
top of the tube.
7. REPLACE THE CAPPUCCINO MAKER by
inserting it and rotating anticlockwise.
2. WITH ONE HAND, HOLD THE CAPand with the
other unscrew the cappuccino
maker itself by rotating clockwise and extracting downwards.
PUCCINO TUBE FIRMLY
HOT WATER PRODUCTION
1. TURN THE APPLIANCE ON by pressing
the ON/OFF button. Wait until the
OK indicator light comes on.
4. TO INTERRUPT DELIVERY OF HOT WATER, close the
steam knob by rotating clockwise
and press the coffee button again.
(You should not run off hot water
for more than 45 seconds at a time).
2. PLACE A RECIPIENT under the cappuccino maker.
3. PRESS THE COFFEE BUTTON and at the same time
turn the steam knob anticlockwise.
Water comes out of the cappuccino maker;
9
CLEANING AND MAINTENANCE
1. BEFORE PERFORMING ANY CLEANING operations,
leave the appliance to cool down and unplug
from the mains socket.
2. DO NOT USE SOLVENTS OR ABRASIVE cleaning
products to clean the appliance. A soft, damp
cloth is sufficient.
3. EMPTY AND WASH the drip tray and drip mesh
frequently.
4. CLEAN THE WATER TANK regularly.
IMPORTANT: Never immerse the appliance in
water. It is an electrical appliance.
CLEANING THE FILTER HOLDER
ABOUT EVERY 200 COFFEES, clean the filter holder
for ground coffee as follows:
Remove the filter with frother.
Clean the inside of the filter holder. Never
wash in a dishwasher.
Unscrew the cap of the frother
by turning anticlockwise.
Remove the frother from
the container by pushing it
from the cap end.
Remove the gasket.
RINSE ALL COMPONENTS and clean
the metal filter thoroughly in
hot water using a brush.
MAKE SURE the holes in the metal filter are not
blocked. If necessary, clean with a
pin.
10
Replace the filter and gasket on
the plastic disk. Make sure to insert the pin on the plastic disk into
the hole in the gasket indicated by
the arrow.
Replace the assembly in the steel
filter container, making sure the
pin is inserted in the hole in the
support.
Finally, screw on the cap by
turning clockwise. Failure to
clean as described above invalidates the guarantee.
CLEANING THE BOILER OUTLET
ABOUT EVERY 300 COFFEES, the espresso boiler outlet must be
cleaned as follows:
1. MAKE SURE the appliance is not hot and
that it is unplugged
from the mains.
3. CLEAN THE BOILER with a damp cloth
4. CLEAN THE OUTLET thoroughly in
hot water using a brush. Make sure
the holes are not blocked. If necessary, clean with a pin.
5. RINSE UNDER RUNNING WATER, rubbing all the
time.
6. SCREW THE BOILER OUTLET BACK ON. Failure to
clean as described above invalidates the guarantee.
2. USING A SCREWDRIVER, unscrew the screw fixing
the espresso boiler outlet filter
DESCALING
YOU ARE RECOMMENDED TO DESCALE the coffee machine about every 200 coffees or a maximum
of every two months.
YOU SHOULD USE A COMMERCIALLY AVAILABLE PRODUCT SPECIFICALLY FOR DESCALING ESPRESSO COFFEE MACHINES.
IF SUCH A PRODUCT IS NOT AVAILABLE, proceed as follows.
1. FILL THE TANK with half a litre of water.
2. DISSOLVE 2 spoonfuls (about 30 grams) of citric acid (obtainable from chemist’s or drug
stores)
3. PRESS THE ON/OFF BUTTON and wait for the OK
indicator light to come on.
4. MAKE SURE the filter holder is not attached
and position a recipient under the boiler outlet.
5. PRESS THE COFFEE BUTTON, half empty the tank
by turning the steam knob every now and
then to run off a little solution. Stop run-off by
pressing the button again.
6. TURN THE APPLIANCE OFF.
7. LEAVE THE SOLUTION TO WORK for 15 minutes
then turn the appliance on again.
8. PRESS THE COFFEE BUTTON to empty the tank
completely.
9. TO ELIMINATE RESIDUES of solution and scale,
rinse the tank well, fill with clean water (without citric acid) and replace in position.
10. PRESS THE COFFEE BUTTON and run the water
off until the tank is completely empty
11. INTERRUPT water run-off and repeat operations 9, 10 and 11 again. Repair of damage to
the coffee machine caused by scale is not covered by the guarantee unless descaling is performed regularly as described above.
11
PROBLEM
NO ESPRESSO COFFEE IS DELIVERED
POSSIBLE CAUSE
No water in the tank
The holes in the fil
THE ESPRESSO COFFEE DRIPS from
the edges of the filter holder
rather than the holes.
THE ESPRESSO COFFEE IS COLD
ter holder spouts are
blocked.
The espresso boiler outlet
is blocked
The filter is blocked
The tank is incorrectly inserted
SOLUTION
Fill the tank with water
Clean the spout holes.
Clean as described in the
The filter holder is insert- Attach the filter holder
correctly and rotate firmly
ed incorrectly
as far as it will go.
The espresso boiler gas Have the espresso boiler
ket has lost elasticity
gasket elasticity replaced
The holes in the filter
at a service centre
holder spouts
Clean the spout holes.
The espresso OK indicator Wait until the OK light
light was not on when the
coffe switch was pressed
No preheating performed
The cups were not preheated
THE PUMP IS EXCESSIVELY NOISY
The water tank is empty
The tank is incorrectly inserted.
12
chapter “Cleaning the
boiler outlet”
Clean as described in the
section “cleaning the filter
holder”.
Insert tank correctly.
comes on not on when
the coffee switch was
pressed.
Preheat as described in
the paragraph “Preheating the appliance”.
Preheat the cups by rinsing them in hot water.
Fill tank
Insert tank correctly.
PROBLEM
THE COFFEE FROTH IS TOO LIGHT
(delivered from the spout too
fast)
THE COFFEE FROTH IS TOO DARK
(delivered from the spout too
slowly)
SOLUTION
POSSIBLE CAUSE
The ground coffee is
not pressed down firmly
enough
There is not enough
ground coffee
The ground coffee is too
coarse
Incorrect type of ground
coffee.
The ground coffee is
pressed down too firmly
There is too much ground
coffee
The espresso boiler outlet
is blocked
The filter is blocked
The ground coffee is too
fine
The coffee is damp or
ground too fine
Incorrect type of ground
coffee.
Press the ground coffee
down more firmly).
Increase the quantity of
ground coffee
Use ground coffee for
Press the coffee down less
firmly.
Reduce the quantity of
ground coffee
Clean as described in the
NO MILK FROTH IS FORMED WHEN
MAKING CAPPUCCINO
Milk not cold enough.
Cappuccino maker dirty.
espresso coffee machines only
Change the type of
ground coffee.
chapter “Cleaning the
boiler outlet”
Clean as described in the
section “cleaning the filter holder”.
Use ground coffee for
espresso coffee machines
only
Use only ground coffee
for espresso coffee machines. Make sure it is not
damp
Change the type of
ground coffee.
Always use semi-skimmed
milk at refrigerator temperature.
Thoroughly clean the
holes in the cappuccino maker in
particular
those indicated by the
arrows.
13
14
15
TROUBLE SHOOTING GUIDE
WHEN CALLING FOR SERVICE, please give the serial number and type number of the appliance (see Service label). Consult your warranty
booklet for further advice.
IF THE MAINS CORD NEEDS REPLACING it should
be replaced by the original mains cord,
which is available via our service organization. The mains cord may only be replaced by a trained service technician.
SERVICE ONLY TO BE CARRIED OUT
BY A TRAINED SERVICE TECHNICIAN.
It is hazardous for anyone other than a trained person to carry out any service or repair operation, which involves the
removal of any cover.
DO NOT REMOVE ANY COVER.
ENVIRONMENTAL HINTS
THE SYMBOL on the product, or on the documents accompanying the
product, indicates that this
appliance may not be treated as household waste. Instead it shall be handed over
to the applicable collection
point for the recycling of electrical and electronic equipment.
DISPOSAL must be carried
out in accordance with local environmental regulations for waste disposal.
For more detailed information about treatment, recovery and recycling of this product, please contact your local city office, your
household waste disposal service or the shop
where you purchased the product.
Before scrapping, cut off the mains cord so
that the appliance cannot be connected to the
mains.
SUPPLY VOLTAGE
220 - 230 V/50 HZ
RATED POWER INPUT
1100 W
FUSE
10 A (UK 13 A)
OUTER DIMENSIONS (HXWXD) 382 X 595 X 305
GB
4619- 694- 61932
16
Whirlpool Sweden AB
THE PACKING BOX may be fully recycled as confirmed by the recycling symbol. Follow local
disposal regulations. Keep
potentially hazardous packaging (plastic bags, polystyrene etc.) out of the reach of children.
THIS APPLIANCE is marked according to the European directive 2002/96/EC on Waste Electrical
and Electronic Equipment (WEEE). By ensuring
this product is disposed of correctly, you will
help prevent potential negative consequences
for the environment and human health, which
could otherwise be caused by inappropriate
waste handling of this product.