1
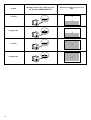
GB
Read this manual thoroughly before installing and
using the appliance.
This is the only way to ensure best results and
maximum safety for the user.
DESCRIPTION
(see figure on fig. 3)
The terminology below will be used repeatedly on the
following pages.
1. Power cable
2. Steam tube
3. Spray hood
4. Drip tray
5. Boiler filter disk for espresso coffee
6. Warming plate
7. ON/OFF switch for espresso coffee and
cappuccino
8. ON/OFF switch for drip coffee
9. ON light for drip coffee
10. ON light for espresso coffee and cappuccino
11. Small jug for espresso coffee
12. Two cup adapter for espresso coffee
13. Measure
14. Filter holder for espresso coffee
15. Filter for espresso coffee
16. Filter holder for drip coffee
17. Large jug for drip coffee
18. “Vario System” flavour selector for espresso coffee
19. "Flavour System" flavour selector for drip coffee
20. Water tank for drip coffee (removable)
21. Water tank lid
22. Boiler for espresso coffee
23. Boiler cap
24. Steam knob
25. Flavor savor
26. Filter for drip coffee
27. Milk tank
28. Milk frother
29. Milk tank lid
30. Steam ready light
SAFETY WARNINGS
• This appliance is designed to make coffee or heat
drinks. Be careful to avoid being scalded by sprays
of water or steam or due to improper use of the
appliance.
• This appliance is intended for domestic use only.
Any other use is considered improper and thus
dangerous.
• The manufacturer cannot be held responsible for any
damage caused through incorrect, wrong or
unreasonable use.
• When using the appliance, do not touch hot
surfaces. Use the knobs or handles.
• Never touch the appliance with wet or damp hands
or feet.
• Do not allow children or unfit persons to use the
appliance unsupervised.
12
• Young children should be supervised to ensure they
do not play with the appliance.
• In the event of failure or malfunction, unplug the
appliance from the mains.
For repairs, contact an authorized Service Centre only
and request original spare parts. Failure to respect the
above could reduce the safety of the appliance.
IMPORTANT INFORMATION FOR CORRECT DISPOSAL OF
THE PRODUCT IN ACCORDANCE WITH EC DIRECTIVE
2002/96/EC.
At the end of its working life, the product
must not be disposed of as urban waste.
It must be taken to a special local authority
differentiated waste collection centre or to a
dealer providing this service.
Disposing of a household appliance
separately avoids possible negative
consequences for the environment and
health deriving from inappropriate
disposal and enables the constituent materials to be recovered
to obtain significant savings in energy and resources.As a
reminder of the need to dispose of household appliances
separately, the product is marked with a crossed-out wheeled
dustbin.
INSTALLATION
• After removing the packaging, make sure the product is
complete. If in doubt, do not use the appliance and
contact a qualified professional.
• The packing elements (plastic bags, polystyrene foam,
etc.) should be kept out of reach of children as they are
a safety hazard.
• Place the appliance on a work surface far away from
water taps, basins and sources of heat.
• After positioning the appliance on the work top, leave a
space of at least 5 cm between the surfaces of the
appliance and the side and rear walls and at least 20
cm above the coffee maker.
• Never install the appliance in environments where the
temperature may reach 0°C or lower (the appliance
may be damaged if the water freezes).
• Check that the voltage of the mains power supply
corresponds to the value indicated on the appliance
rating plate. Connect the appliance to an efficiently
earthed socket with a minimum current rating of 10A
only. The manufacturer may not be considered liable for
possible incidents caused by the failure to adequately
earth the mains.
• If the power socket does not match the plug on the
appliance, have the socket replaced with a suitable type
by a qualified professional.
• The power cable on this appliance must not be replaced
by the user as this operation requires the use of special
tools. If the cable is damaged or requires replacing,
contact an authorised service centre only to avoid all
risks.
HOW TO PREPARE DRIP COFFEE
HOW TO PREPARE ESPRESSO COFFEE
• Lift the cover and remove the water tank (fig. 1).
• Fill the tank with cold clean water up to the level
corresponding to the number of cups of coffee you
want to make (fig. 2). You can leave the tank in the
appliance and fill using the drip coffee jug marked
with the levels (fig. 3).
• Replace the tank in the appliance and press gently.
• Open the filter holder by rotating towards the right
(fig. 4) and pulling by the handle.
• Position the filter in the filter holder (fig. 5).
• Place the ground coffee in the filter using the
measure supplied and level evenly (Fig. 6).
As a general rule, use one level measure of ground
coffee (about 7 grams) for each cup (for example
10 measures for 10 cups).
The quantity of ground coffee used may, however,
be varied according to personal taste.
Use good quality medium ground coffee for drip
coffee machines.
• Close the filter holder and place the jug on the
warming plate with the lid on.
• Choose the desired flavour as indicated in the
paragraph "HOW TO CHOOSE THE FLAVOUR OF
DRIP COFFEE".
• Press the ON/OFF switch for drip coffee (fig. 7).
The light (9) above the switch comes on.
• Delivery of coffee will start after a few seconds. It is
completely normal for the appliance to release a
little steam while the coffee is percolating.
• If you leave the ON/OFF switch for drip coffee
pressed after percolation has finished with the jug
on the warming plate, the coffee will be kept at the
ideal temperature.
1. Unscrew the boiler cap by turning it anticlockwise.
2. Fill the small jug for espresso coffee with the
quantity of water (fig. 9) corresponding to the
number of cups you want to make and using the
levels marked on the WATER LEVEL side of the jug
itself (see table at the end of the text).
3. Pour the water into the boiler (fig. 10).
4. Close the boiler cap by turning it firmly clockwise.
5. Place the filter for espresso coffee into the filter
holder (fig. 11).
6. Fill the filter with ground coffee, respecting the
quantities given in the table at the end of the text
and distribute evenly without pressing down (fig.
12). It is important to use top quality medium
ground coffee to avoid blocking the filter while
coffee is being delivered.
7. Remove excess coffee from the edge of the filter
(fig. 13).
8. To attach the filter holder, position it under the
boiler outlet with the handle towards the left (fig.
14), push it upwards and at the same time rotate
the handle firmly towards the right. Always rotate
as far as it will go.
9. Place the small jug for espresso coffee under the
filter holder (fig. 15). Make sure the filter holder
spouts are inside the opening in the jug lid.
10. Turn the Vario System selector to the type of coffee
you want to make - LIGHT for a light coffee or
STRONG for a strong coffee (fig. 16).
11. Make sure the steam knob is closed by turning it
clockwise.
12. Press the ON/OFF switch for espresso coffee. The
light above the switch comes on to indicate that the
espresso coffee maker is operating (fig. 17).
13. After about two minutes, the espresso coffee starts
to run out from the filter holder spouts (fig. 18).
IMPORTANT: to avoid splashes, never remove the
filter holder while the appliance is delivering
coffee.
14. When the coffee no longer runs out of the filter
holder, press the ON/OFF switch for espresso
coffee to turn the coffee maker off (fig. 7).
15. Pour the coffee into the cups.
16. To eliminate the used coffee grounds, unhook the
filter holder. Block the filter using the lever
incorporated in the handle and empty the grounds
by turning the filter holder upside down and
tapping (fig. 19).
HOW TO CHOOSE THE FLAVOUR OF THE
DRIP COFFEE
By turning the Flavour System knob (fig. 8), the coffee
machine can be set to make coffee with a strong
(STRONG position) or light (LIGHT position) aftertaste.
The Flavour System changes the strength of the
aftertaste of the coffee, while the actual taste remains
the same.
13
IMPORTANT: Before removing the filter holder, to
avoid puffs of steam, completely eliminate
residual steam left in the boiler by turning the
steam knob anticlockwise (fig. 20).
NB: For reasons of safety, when the boiler is hot, the
cap cannot be opened as it turns without catching.
If you need to remove it, vent all the steam in the boiler
using the steam knob as described above.
HOW TO USE THE TWO CUP ADAPTER
The adapter must be used whenever you want to make
coffee directly in the cups rather than in the small jug.
To mount, hook onto the bottom of the filter holder (fig.
21).
IMPORTANT: When you use the appliance for the first
time, all accessories and the internal circuits must be
washed as follows:
• FOR THE DRIP COFFEE MAKER: make at least two
jugs of coffee without using ground coffee
(following the instructions in the section HOW TO
PREPARE DRIP COFFEE).
• FOR THE ESPRESSO COFFEE MAKER: make at
least four cappuccinos without using ground
coffee and using water instead of milk (following
the instructions in the section HOW TO PREPARE
CAPPUCCINO COFFEE).
HOW TO PREPARE CAPPUCCINO COFFEE
1.To prepare two cappuccinos, make the espresso
coffee as described in the section “How to prepare
espresso coffee” from point 1 to point 11, but add
the quantity of water required to make two
cappuccinos up to the [steam] level on the WATER
LEVEL side of the jug as described in the table of
quantities at the end of the text. (Note that the
quantity of water to make cappuccinos is greater
than that needed to make coffees. The additional
water will be used to produce steam to froth the
milk).
2.Pour the milk into the tank (fig. 22) up to level 2
(corresponding to 2 cappuccinos) marked on the
inside of the tank and corresponding to the second
step as shown in the table of quantities at the end of
the text.
NB: Use semi-skimmed (or preferably completely
skimmed) milk at refrigerator temperature.
3.Press the ON/OFF switch for espresso coffee. The
light above the switch comes on to indicate that the
espresso coffee maker is operating (fig. 23).
4.Run off the coffee into the small jug. When the dark
coffee below the light coloured cream reaches the
14
level 2 on the “COFFEE LEVEL” side of the small jug
(fig. 24), position the Vario System selector on
“cappuccino” (fig. 16).
This must be done with great care. If the coffee goes
above level 2, there will not be enough steam left to
froth the milk at the end.
5.Pour the coffee into two sufficiently large cups.
6.Make sure the milk tank is correctly in position and
hooked to the appliance, then place a cup containing
the coffee made previously under the milk tank tube
(fig. 20).
7.Make sure the OK light (30) is on (if off, wait for it to
come on), then turn the steam knob anticlockwise.
The frothed milk starts to run out from the tube (fig.
20). Allow it to flow into the cup until the level of the
milk in the tank drops one step (corresponding to
level 1 marked on the inside of the tank itself).
8.Prepare the second cappuccino by repeating
operations 6 and 7.
NB: Each step of the milk tank indicates the quantity
of milk necessary to make one cappuccino.
NB: For optimum frothing of the milk, after making
one cappuccino, wait until the OK light comes on
before making another.
NB: If you are using small cups, to avoid splashes of
milk, fit the splash hood onto the milk tank tube (fig.
25).
9.When you have finished, turn the appliance off by
pressing the ON/OFF switch for espresso coffee and
cappuccino.
Important: After preparing the last cappuccino,
before turning the appliance off, lift the intake tube
in the tank above the level of any milk left (as
shown in fig. 26) and allow steam to vent for a few
seconds.
Close the steam knob with the tube raised.
To ensure hygiene, you are recommended to follow
this procedure each time you make cappuccino to
avoid milk stagnating in the milk circuit.
10.To make four cappuccinos, repeat the previous
operations, paying attention to the quantity of water,
milk and ground coffee indicated in the table of
quantities at the end of the text.
Before positioning the Vario System selector in the
cappuccino position, run off the coffee into the jug
until it reaches level 4 on the “COFFEE LEVEL” side
as shown in figure 27.
NB: When pouring milk into the tank, never exceed
level 4, otherwise the milk may continue to drip from
the tube after you have finished making the
cappuccino.
CLEANING AND MAINTENANCE
DESCALING
• Before performing any cleaning operations, leave
the appliance to cool down and unplug from the
mains socket.
• Never immerse the coffee maker in water. It is an
electrical appliance.
• Do not use solvents or abrasive cleaning products
to clean the appliance.
A soft, damp cloth is sufficient.
• Clean the filter holder, drip tray, boiler outlet, jug
and water tank regularly.
Never wash the filter holder in a dishwasher.
• From time to time, make sure the holes in the
espresso coffee filter are not blocked. If necessary,
clean with a pin (see fig. 28).
• Check the Flavor Savor regularly, remove it from
the filter holder cone by pulling it upwards (fig. 29).
Clean thoroughly and replace (fig. 29).
Over time, heating up of the water used to make the
coffee leads to lime scale building up in the inner
circuits of the appliance.
You should therefore descale the coffee maker for
espresso coffee about every 2-6 months (depending on
the hardness of the water and the frequency of use).
Proceed as follows:
1. Fill the small jug for espresso coffee with water up
to level 4 on the WATER LEVEL side;
2. Dissolve 1 spoonful (about 15-20 grams) of citric
acid (obtainable from chemist's or drug stores);
3. Pour the solution into the boiler and screw on the
cap;
4. Make sure the steam knob is closed and attach the
filter holder;
5. Place the small jug under the filter holder for
espresso coffee;
6. Position the Vario System selector to LIGHT and turn
the coffee maker on;
7. After a couple of minutes, the solution begins to run
off into the jug.
Every now and then, turn the steam knob to run off
a little of the solution from the milk tank tube.
8. When all the solution has been run off, turn the
appliance off and leave to cool down.
9. To eliminate residues of descaler, repeat operations
1 to 8 twice, using water only (without adding citric
acid).
You should descale the coffee maker for drip coffee
about every 40 jugs (depending on the hardness of the
water and the frequency of use). Proceed as follows:
1. Fill the jug with clean cold water up to the 4 cups
level;
2. Dissolve 2 spoonfuls (about 30 grams) of citric acid
(obtainable from chemist's or drug stores);
3. Pour the solution into the tank and place in the
appliance;
4. Remove the filter from the filter holder (to avoid
contamination);
5. Place the jug with the lid on the warming plate;
6. Press the ON/OFF switch for drip coffee and run
off one cup of solution into the jug, then turn the
appliance off.
7. Leave the solution to work for one hour;
8. Turn the appliance on and allow the rest of the
solution to percolate through;
9. To rinse, operate the appliance with water only (no
ground coffee) at least three times (three complete
water tanks).
Repair of damage to the coffee machine caused by
scale is not covered by the guarantee unless descaling
is performed regularly as described above..
CLEANING THE MILK TANK AND FROTHER
The milk tank and frother must be cleaned each time
you use the appliance. Proceed as follows:
1. Remove the milk tank by pressing the catch A (fig.
30) and at the same time pulling it upwards.
2. Remove the red frother by pressing the catch B and
at the same time pulling it upwards (fig. 30).
3. Remove the rubber mixer (fig. 32).
4. Wash and clean the tank, frother and mixer with
hot water.
Make sure the four holes in the frother shown in
figure 31, in particular the one indicated by the
arrow C, are not blocked. If necessary, clean with
the help of a toothpick.
5. Once clean, re-assemble all the components
correctly.
In particular, make sure the rubber mixer is fully
inserted and the milk tank and red frother are
inserted until you hear a click.
If the components are not cleaned each time the
appliance is used, the milk may not froth correctly, the
milk may not be drawn up or the milk may drip from
the milk tank tube.
15
To make
2 coffees
Quantity of water in the small jug to pour
into the boiler (WATER LEVEL side)
Quantity of coffee to place in the
filter
-4
-2
-4
2 cappuccinos
-2
-4
4 coffees
-2
-4
4 cappuccinos
16
-2
PROBLEM
No espresso coffee is
delivered
No milk froth is formed when
making cappuccino
POSSIBLE CAUSES
• The coffee is ground too finely.
• The holes in the filter holder spouts
are blocked.
• The filter is clogged.
• Milk not cold enough.
• Cappuccino maker dirty.
SOLUTION
• Use medium ground coffee or coffee
ground expressly for Moka coffee makers
• Clean the spout holes.
• Clean the filter and holes thoroughly
with a pin (see fig. 28).
• Use semi-skimmed (or preferably
completely skimmed) milk at
refrigerator temperature.
• Thoroughly clean the holes in the
cappuccino maker
The drip coffee takes longer
to percolate.
• The drip coffee machine needs to be
descaled.
• Descale as described in the
paragraph "DESCALING".
The coffee has an acid
flavour.
• Inadequate rinsing.
• Rinse the appliance as described in
the section "Descaling"
17