1
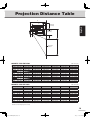
Installation Manual
POA-CH-EX06
Install the wall plate to the wall . . . . . . . . . . . . . . . . . . . . . . . . . . . . . . . . . . . . . . . . . . . . . . . . . 4
Attach the setting plate to the wall plate . . . . . . . . . . . . . . . . . . . . . . . . . . . . . . . . . . . . . . . . . . 5
Securing the projector to the setting plate . . . . . . . . . . . . . . . . . . . . . . . . . . . . . . . . . . . . . . . . . 6
Adjustment . . . . . . . . . . . . . . . . . . . . . . . . . . . . . . . . . . . . . . . . . . . . . . . . . . . . . . . . . . . . . . . . 7
Attach the drop-prevention wire to the projector . . . . . . . . . . . . . . . . . . . . . . . . . . . . . 9
Projection Distance Table. . . . . . . . . . . . . . . . . . . . . . . . . . . . . . . . . . . . . . . . . . . . . . . 10
Dimensions . . . . . . . . . . . . . . . . . . . . . . . . . . . . . . . . . . . . . . . . . . . . . . . . . . . . . . . . . . 11
Be sure to consult with a qualified installation specialist.
This installation manual describes how to mount the projector to a wall using
the setting plate (model POA-CH-EX06).
Português
Safety Instructions . . . . . . . . . . . . . . . . . . . . . . . . . . . . . . . . . . . . . . . . . . . . . . . . . . . . . 1
List of Accessories . . . . . . . . . . . . . . . . . . . . . . . . . . . . . . . . . . . . . . . . . . . . . . . . . . . . . 3
Installation Procedure . . . . . . . . . . . . . . . . . . . . . . . . . . . . . . . . . . . . . . . . . . . . . . . . . . . 4
日本語
Contents
Italiano
Deutsch
Español
Français
Model
English
Setting Plate for Wall Hanging
This setting plate is only for use with Sanyo projectors mentioned below.
¡ PDG-DWL2500, PDG-DXL2000 and other related models. (For details on available models,
please contact your nearest Sanyo dealer.)
POA-CH-EX06(IJAH).indb a
10.9.8 11:21:12 AM
Safety Instructions
■ Explanation of Symbols
The warning marks shown below are used in this manual to prevent personal injury or property damage. Make sure you understand these warnings when reading this installation manual.
WARNING
This symbol indicates information that, if ignored,
could possibly result in personal injury or even
death due to incorrect handling.
CAUTION
This symbol indicates information that, if ignored,
could possibly result in personal injury or physical damage due to incorrect handling.
This symbol indicates an action that must not be done.
This symbol indicates an action that should be done.
WARNING
This setting plate is only for use with specified Sanyo projector. Do not use for any other
equipment or purpose.
Never modify the setting plate.
Do not hang from the setting plate or hang heavy objects on the setting plate.
Be especially careful that children do not hang from it.
Do not install the setting plate in a place where it might be subjected to vibration or
shock.
Never loosen the screws, bolts or nuts after installation.
Do not use adhesives to prevent the screws loosening and do not use oils or lubricants
for moving parts.
If such substances are applied to the projector’s cabinet, the cabinet may crack and fall, causing
serious injury to people or serious damage to the projector.
1
POA-CH-EX06(IJAH).indb 1
10.9.8 11:21:13 AM
Safety Instructions
The installation work should be performed by at least two qualified service personnel.
If you need to loosen any screws during installation, be careful not to drop the setting
plate.
English
If mounting the projector on a wall with the setting plate, the wall must have enough
strength to hold the projector and setting plate. Confirm the weight of the projector and
the setting plate before installation, and check the strength of the wall. If the wall is not
strong enough, reinforce the wall before installation.
Tighten all screws firmly after adjustment.
Inspect the setting plate on a regular basis to ensure there are no broken parts or loose
screws.
Install the setting plate to a vertical wall. Do not install to a leaning wall.
Do not install the setting plate in greasy or smoky place to prevent breakdown or abrasion of the projector’s components.
Do not install the setting plate in steamy, smoky or highly humid places in order to prevent fire or electric shock.
Do not use a setting plate with damaged parts. The projector or setting plate may fall and
cause personal injury or property damage.
CAUTION
Do not install the setting plate in a location where the operating temperature for your
projector model may be exceeded. Such an environment may damage the projector.
Install the setting plate in a place free from excessive dust and humidity to prevent the
lens or optical components of the projector from becoming dirty.
2
POA-CH-EX06(IJAH).indb 2
10.9.8 11:21:13 AM
List of Accessories
q
r
e
w
t
y
!2
q Wall plate . . . . . . . . . . . . . . . . . . . . . . . . . . . . . 1
w Setting plate . . . . . . . . . . . . . . . . . . . . . . . . . . . 1
e Cover plate . . . . . . . . . . . . . . . . . . . . . . . . . . . . 1
r Adjustment unit . . . . . . . . . . . . . . . . . . . . . . . . 1
t Hexagon wrenches . . . . 2 (3 mm...1, 6 mm...1)
y Screws M4 x 18 mm
u
i
o
!0
!1
i M5 x 10 mm hexagon socket head cap bolt
(for securing cover plates) . . . . . . . . . . . . . . . 2
o Strap for binding cables . . . . . . . . . . . . . . . . .
!0 Drop-prevention wire . . . . . . . . . . . . . . . . . . . .
!1 Template sheet for installing the wall plate . .
!2 Installation Manual (this manual) . . . . . . . . . .
2
1
1
1
(for securing projector and adjustment unit). . 5
u M8 x 20 mm hexagon socket head cap bolt
(for securing setting plate and wall plate) . . . 4
3
POA-CH-EX06(IJAH).indb 3
10.9.8 11:21:13 AM
Installation Procedure
Install the wall plate to the wall
Determine the position of the wall plate using the template sheet.
English
1
¡ From the projection distance table (page 10) and dimensions (page 11), confirm the screen size and the
distance between the projection surface and wall plate.
¡ The wall plate and the projection surface have different vertical center lines.
Align the CTR line (printed on the template sheet) with the center line of the projection surface as shown in
the illustration.
¡ Confirm where the beams are within the wall,
0.27 inch
0.65 inch
(68 mm)
(164 mm)
and shift the position vertically or left and
right as necessary.
CTR line
D
Template sheet for
installing the wall plate
Center line of the
projection surface
Center line of
the wall plate
H
Projection
surface
2
3
4
5
Attach the template sheet to the wall.
Make mounting holes in the wall in the required locations.
Remove the template sheet.
Mount the wall plate on the wall.
6.77 (172)
5.15
(135)
0.51 x 1.30
(13 × 33)
1.06
(27)
Unit: inch (mm)
1.77 x 3.15
(45 × 80)
8.82 (224)
15.99 (406)
18.23 (463)
WARNING
¡ When you install the projector to the wall with the setting plate, the wall needs to be
strong enough to hold the projector and the setting plate. Confirm the weight of the projector and the setting plate before installation, and check the strength of the wall.
If the wall is not strong enough, reinforce the wall before installation.
(Example) The combined mass of the projector (PDG-DWL2500) and the setting plate is
approximately 14 kg (30.9 lb).
¡ Use commercially available anchors.
¡ Use M12 nuts, bolts and washers (26 mm outside diameter). Nuts and bolts smaller
than M12 could cause the setting plate to fall. (The wall plate must be secured in at
least four places.)
¡ Sanyo takes no responsibility for any damages or injury caused by incorrect installation.
4
POA-CH-EX06(IJAH).indb 4
10.9.8 11:21:13 AM
Installation Procedure
Attach the setting plate to the wall plate
1
Hang the setting plate hook onto the wall plate slits.
Wall plate
Setting plate
2
Tighten the four M8 x 20 mm hexagon socket head cap bolts supplied
with the setting plate. (Secure temporarily so that the adjustment mentioned on page 7 can be carried out.)
Bolts
Bolts
3
Attach the left and right cover plates to the setting plate using the two
M5 x 10 mm hexagon socket head cap bolts included. (Secure temporarily so that the adjustment mentioned on page 7 can be carried out.)
Bolts
5
POA-CH-EX06(IJAH).indb 5
10.9.8 11:21:13 AM
Installation Procedure
Securing the projector to the setting plate
1
Attach the adjustment unit to the
projector using the included 5
screws (M4 x 18).
English
Screws
Adjustment unit
Projector
2
Remove the two bolts (for drop-prevention)
from the setting plate. Loosen the four
bolts located on the top of the adjustment
unit and set the projector with the adjustment unit onto the setting plate.
Setting plate
Bolts
Loosen bolts
Projector with the adjustment unit
3
Tighten the four bolts which were loosened to secure the projector to
the setting plate. Attach the two bolts (for drop-prevention) to the setting
plate.
Bolts
6
POA-CH-EX06(IJAH).indb 6
10.9.8 11:21:14 AM
Installation Procedure
Adjustment
1
Adjust the forward/backward slide
(Adjustable range: 0 - 180 mm)
¡ Loosen the four bolts on the top of the setting
plate using a hexagon wrench (3 mm) and adjust
the slider of setting plate. After the adjustment,
tighten the four bolts which were loosened.
Bolts
0 - 7.09 inches
(0 - 180 mm)
2
Adjust the vertical slide (Adjustable range: +4° - –2°)
¡ Remove the left and right cover plates.
¡ Loosen the four bolts q located inside the setting plate using a hexagon wrench (6 mm).
¡ Adjust the vertical slide with the two bolts w located inside the setting plate using a hexagon wrench (6
mm) (Adjust the left and right bolts so that their ends touch equally against the wall plate.)
¡ Tighten the four bolts q which were loosened using the hexagon wrench (6 mm).
¡ After adjustment, attach the left and right cover plates again.
Bolts q
4°
Bolts w
2°
3
Adjust the horizontal rotation (Adjustable range: +5° - –5°)
¡ Loosen the two bolts q located on the top of the setting plate using a hexagon wrench (3 mm).
¡ Turn the adjustment knob w located on the left side of the setting plate to adjust the horizontal rotation.
¡ Tighten the two bolts q which were loosened using the hexagon wrench (3 mm).
Bolts q
Adjustment knob w
5°
5°
* “A” marks appear on the setting plate to indicate the locations of the bolts and adjustment knob.
7
POA-CH-EX06(IJAH).indb 7
10.9.8 11:21:14 AM
Installation Procedure
Adjust the vertical tilt (Adjustable range: +5° - –5°)
¡ Loosen the screw q located on the left side of the setting plate using the hexagon wrench (3 mm).
¡ Turn the adjustment knob w located on the left top side of the setting plate to adjust the vertical tilt.
¡ Tighten the screw q which was loosened using the hexagon wrench (3 mm).
English
4
Adjustment
knob w
5°
5°
Screw q
* “B” marks appear on the setting plate to indicate the locations of the screws and adjustment knob.
5
Adjust the horizontal roll (Adjustable range: +5° - –5°)
¡ Loosen the screw q located on the front right side of the setting plate using the hexagon wrench (3 mm).
¡ Turn the adjustment knob w located on the right top side of the setting plate to adjust the horizontal roll.
¡ Tighten the screw q which was loosened using the hexagon wrench (3 mm).
5°
Adjustment knob w
5°
Screw q
Right side
* “C” marks appear on the setting plate to indicate the locations of the screws and adjustment knob.
8
POA-CH-EX06(IJAH).indb 8
10.9.8 11:21:14 AM
Attach the drop-prevention wire to the projector
To prevent the projector from falling down, use the included drop-prevention wire to connect the projector
and the setting plate.
1
Pass the included drop-prevention wire through the drop-prevention
wire installation bar of the projector as shown in the illustration.
Drop-prevention wire
Drop-prevention wire installation bar
2
Pass the wire through the holes of the setting plate as shown in the illustration.
3
Secure the end of the wire at the bottom of the setting plate with the
screw (M4 x 10) supplied with the setting plate as shown in the illustration.
Screw (M4 x 10)
9
POA-CH-EX06(IJAH).indb 9
10.9.8 11:21:14 AM
Projection Distance Table
A
B
English
6.85 inch
(174 mm)
1.06 inch
(27 mm)
C
D
E
Projection
surface
H
●SANYO PDG-DWL2500
Display Size
110"
100"
97.5"
96"
90"
87"
80"
78"
74.6"
70"
60"
(16 : 10)
(16 : 10)
(16 : 10)*
(16 : 10)
(16 : 10)
(16 : 10)
(16 : 10)
(16 : 10)
(16 : 10)
(16 : 10)
(16 : 10)
A
Unit: inch (cm)
B
21.45" (54.5)
17.91" (45.5)
19.68" (50.0)
16.14" (41.0)
19.21" (48.8)
15.66" (39.8)
18.97" (48.2)
15.43" (39.2)
17.91" (45.5)
14.37" (36.5)
17.36" (44.1)
13.81" (35.1)
16.14" (41.0)
12.59" (32.0)
15.78" (40.1)
12.24" (31.1)
15.19" (38.6)
11.65" (29.6)
14.37" (36.5)
10.82" (27.5)
12.59" (32.0)
9.05" (23.0)
* 95"(16 : 9) White board
C
D
E
H
6.25" (15.9)
4.48" (11.4)
4.01" (10.2)
3.77" (9.6)
2.71" (6.9)
2.16" (5.5)
0.94" (2.4)
0.59" (1.5)
0.0" (0.0)
−0.82" (−2.1)
−2.55" (−6.6)
12.79" (32.5)
12.00" (30.5)
11.81" (30.0)
11.69" (29.7)
11.22" (28.5)
10.98" (27.9)
10.43" (26.5)
10.27" (26.1)
10" (25.4)
9.64" (24.5)
8.85" (22.5)
5.78" (14.7)
5" (12.7)
4.80" (12.2)
4.68" (11.9)
4.21" (10.7)
3.97" (10.1)
3.42" (8.7)
3.26" (8.3)
2.99" (7.6)
2.63" (6.7)
1.85" (4.7)
58.30" (148.1)
52.99" (134.6)
51.69" (131.3)
50.86" (129.2)
47.71" (121.2)
46.10" (117.1)
42.40" (107.7)
41.33" (105.0)
39.52" (100.4)
37.08" (94.2)
31.81" (80.8)
●SANYO PDG-DXL2000
Display Size
90"
87"
80"
78"
70"
64"
63.5"
63"
60"
55"
(4 : 3)
(4 : 3)
(4 : 3)
(4 : 3)
(4 : 3)
(4 : 3)
(4 : 3)
(4 : 3)
(4 : 3)
(4 : 3)
Unit: inch (cm)
A
B
C
D
E
H
20.74" (52.7)
20.11" (51.1)
18.66" (47.4)
18.22" (46.3)
16.53" (42.0)
15.27" (38.8)
15.19" (38.6)
15.07" (38.3)
14.44" (36.7)
13.42" (34.1)
17.20" (43.7)
16.57" (42.1)
15.11" (38.4)
14.68" (37.3)
12.99" (33.0)
11.73" (29.8)
11.65" (29.6)
11.53" (29.3)
10.90" (27.7)
9.88" (25.1)
5.55" (14.1)
4.92" (12.5)
3.46" (8.8)
3.03" (7.7)
1.33" (3.4)
0.078" (0.2)
0.0" (0.0)
−0.11" (−0.3)
−0.74" (−1.9)
−1.77" (−4.5)
13.62" (34.6)
13.30" (33.8)
12.55" (31.9)
12.36" (31.4)
11.53" (29.3)
10.86" (27.6)
10.82" (27.5)
10.78" (27.4)
10.47" (26.6)
9.92" (25.2)
6.61" (16.8)
6.29" (16.0)
5.55" (14.1)
5.35" (13.6)
4.52" (11.5)
3.85" (9.8)
3.81" (9.7)
3.77" (9.6)
3.46" (8.8)
2.91" (7.4)
54.01" (137.2)
52.20" (132.6)
47.99" (121.9)
46.81" (118.9)
42.00" (106.7)
38.38" (97.5)
38.11" (96.8)
37.79" (96.0)
35.98" (91.4)
32.99" (83.8)
* A, B and C show the distances from the projection surface. (If the projector screen is away from the wall, A, B and C show the
distances from the projector screen)
10
POA-CH-EX06(IJAH).indb 10
10.9.8 11:21:14 AM
Dimensions
Unit: inch (mm)
15.16 (385)
22.24 (565) max.
15.83 (402)
15.16 (385)
18.23 (463)
6.69 (170)
6.85 (174)
14.88 (378)
13.51 (321)
1.06
(27)
6.45 (164)
Center line of the projection surface
11
POA-CH-EX06(IJAH).indb 11
10.9.8 11:21:15 AM