1
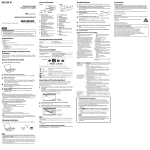
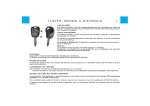
Turning the Player On and Off Quick Start Guide Guía de inicio rápido To turn on Press the button. To turn off Press and hold the button. System Requirements (for the player) Hint If song playback is paused and there is no operation for a certain period of time, the player turns off automatically. How to Use the Player The Home menu is the starting point of each application. NWZ-B152/B153/B152F/B153F To display the Home menu Press and hold the BACK/HOME button. To select an item Rotate the shuttle switch to / to select an item, and then press the button to confirm. To return to the previous screen Press the BACK/HOME button. Home menu ©2010 Sony Corporation Printed in China English *1 The icons appear in the Home menu and the color of the selected icon is inverted. About the Manual Quick Start Guide: Explains set up, enabling you to import songs to a computer, and to transfer them to the player. Operation Guide (PDF file): Explains advanced features of the player and offers troubleshooting information. The Operation Guide (PDF file) is stored in the memory of the player. To view the Operation Guide (PDF file), see “Supplied Items.” Plays back/deletes sound files recorded with the player’s built-in microphone. [Music Library] Plays back transferred songs on the player. * [FM] 1 Supplied Items [Settings] Headphones (1) Quick Start Guide (this manual) (1) *1 Items stored in the memory of the player The following items are stored in the [Storage Media] folder of the memory of the player. 1. Remove the USB cap of the player and connect the player directly to a USB connector on your computer. 2. Double-click [My Computer] or [Computer] - [WALKMAN] - [Storage Media]*1. The following folders are displayed. 3. Copy all data or the necessary data in the following folders to your computer. Storage Media [Voice] Operation Guide*2 PDF files stored in the Operation Guide. Support There are shortcut icons to “Customer Support” and “Customer Registration” in the country/region folders. PC_Application_ Software Hint To use the free space in the [Storage Media] folder more effectively, back up all necessary data in the above three folders to your computer, and then delete the folders. To format the built-in flash memory of the player, see “To initialize (format) the player.” Charging the Battery The player’s battery is recharged while the player is connected to a running computer. To Charging Fully charged 2 3 Connect the USB connector of the player to your computer. Insert the USB connector fully. Transfer songs from Windows Media Player 11 or 12 to the player. [DATA ACCESS] appears in the display while transferring songs to the player. 1 Choose albums, etc. To initialize (format) the player 2 Click here to transfer to the player. Note Parts and Controls Front 1 Press and hold the BACK/HOME button until the Home menu appears. Hint You can also transfer data to the player by dragging and dropping in Windows Explorer on your computer. 2 Select Connect the player to your computer, and then delete any unnecessary audio files using Windows Media Player 11, 12 or Windows Explorer. 1 Find the symptoms of the issue in “Troubleshooting” in the Operation Guide (PDF file), and try any corrective actions listed. 2 On connecting with the computer, see the following “System Requirements (for the player)” and tables. Connect the player to your computer to charge the battery. 3 RESET button You may be able to resolve some issues by charging the battery. Press the RESET button with a small pin, etc. Rear 4 5 If you press the RESET button while operating the player, stored data and settings on the player may be deleted. After resetting the player, press the button to turn on the player. Check information on the issue in the Help of each software. Look up information on the issue on one of the customer support Web sites. Headphones REC/STOP button Starts/stops recording. You can record sound using the player’s built-in microphone. You can also record the currently received FM program (NWZB152F/B153F only). VOL +/– button ZAP button Changes between normal playback and ZAPPIN playback. ZAPPIN playback sequentially plays back song clips at a preset duration. BASS/PLAY MODE button Emphasizes the low sound range (Bass function), or changes the play mode. button Starts/pauses song playback, or pauses/ restarts recording. Shuttle switch Rotate to find the beginning of a song, or fast-rewinds/forwards. When a menu appears on the display, rotate to select a menu item. (Headphone) jack Display BACK/HOME button See “How to Use the Player.” Power illuminator Illuminated by LED. MIC (Microphone) For recording sound by the player. Strap hole RESET button Use a small pin, etc. HOLD switch Disables the operation buttons to avoid accidental operation while carrying the player. USB cap When connecting with USB, remove the USB cap. You can format the memory of the player. If the memory is formatted, all shortcut icons and files including the Operation Guide (PDF file) will be erased and all setting values returned to their defaults. Be sure to verify the files stored in memory prior to formatting and export any necessary files to the hard disk of your computer or other device beforehand. Do not disconnect the player while files are being transferred. If you do, the file being transferred will be damaged. You cannot transfer contents with copyright protection since the player does not support them. If the player does not function as expected, try the following steps to resolve the issue. When you use the player for the first time, or if you have not used the player for a long time, recharge it fully. When charging a depleted battery, the power illuminator blinks clockwise and nothing appears in the display. If the player’s display remains blank for more than 5 minutes, press the RESET button to reset the player. If you turn on the computer, restart the computer, shut down the computer, or wake up from Sleep or Hibernate status while the player is connected to the computer, the player may malfunction. In this case, press the RESET button of the player to reset it. Disconnect the player from the computer before performing these operations. A USB hub is being used. Connect the player directly to a USB connector, as connection via a USB hub may not work. However, a USB hub that supplies power can be used. 2 Click here to start importing. Troubleshooting Note The player becomes unstable while it is connected to the computer. 1 Click “Rip.” To delete songs transferred to the player About 70 minutes The player’s USB connector is not connected to a USB connector on your computer properly. Disconnect the player, and then reconnect it. A USB hub is being used. Connect the player directly to a USB connector, as connection via a USB hub may not work. However, a USB hub that supplies power can be used. Another application is running on the computer. Disconnect the player, wait a few minutes, and reconnect it. If the problem persists, disconnect the player, restart the computer, and then reconnect the player. The USB connector on your computer may have a problem. Connect the player’s USB connector to another USB connector on your computer. The remaining battery power is insufficient. Charge the battery by connecting the player to a running computer for at least 5 minutes. When charging a depleted battery, the power illuminator blinks clockwise and nothing appears in the display. You can transfer songs to the player using Windows Media Player 11 or 12 on your computer. If you use Windows Media Player 10 or less on your computer, download Windows Media Player 11 from a shortcut icon in the memory of the player. For details on how to import songs from CDs, etc., refer to the Help of Windows Media Player 11 or 12. You do not need to re-import songs that have previously been imported to Windows Media Player 11 or 12. Cause/Remedy [CONNECTED USB] does not appear when the player is connected to the computer. Importing and Transferring Music Import songs from CDs, etc., to Windows Media Player 11 or 12 on the computer. Design and specifications are subject to change without notice. The player is not connected to a USB connector on your computer properly. Disconnect the player, and then reconnect it. The battery is charged in an ambient temperature out of the range of 5 °C (41 ºF) to 35 °C (95 ºF). icon appears. Charge the You cannot charge the battery when battery in an ambient temperature of 5 °C (41 ºF) to 35 °C (95 ºF). Your computer is not on. Turn on the computer. Your computer is in Sleep or Hibernate status. Disconnect the player from the computer, and then release the computer from Sleep or Hibernate status. Reconnect the player to the computer. and items related to the [FM] function appear on NWZ-B152F/B153F only. 1 We do not guarantee operation for all computers even if they meet the above System Requirements. Not supported by the following environments: –Personally constructed computers or operating systems –An environment that is an upgrade of the original manufacturer-installed operating system –Multi-boot environment –Multi-monitor environment –Macintosh The player cannot charge the battery. Sets the function for music, FM*1, voice recording, or player settings. Before Connecting the Player to Your Computer Make sure that the OS is Windows 7, Windows XP (Service Pack 2 or later) or Windows Vista (Service Pack 1 or later), and the installed Windows Media Player version on your computer is 11 or 12. Symptom Plays FM radio, or plays back/deletes FM radio programs recorded with the player. There is a shortcut icon to Windows Media Player 11 download site. *1Data hierarchy may differ, depending on your computer environment. *2PDF files named [xxx_NWZB150.pdf] in this folder are the Operation Guide. The language name is displayed in the place of “xxx.” Choose the manual of your language. To view the Operation Guide (PDF file), you need Adobe Reader or Acrobat Reader 5.0 in your computer. Adobe Reader can be downloaded from the Internet for free. Computer IBM PC/AT or compatible computer preinstalled with the following Windows operating systems*1: Windows XP Home Edition (Service Pack 2 or later) / Windows XP Professional (Service Pack 2 or later) / Windows Vista Home Basic (Service Pack 1 or later) / Windows Vista Home Premium (Service Pack 1 or later) / Windows Vista Business (Service Pack 1 or later) / Windows Vista Ultimate (Service Pack 1 or later) / Windows 7 Home Basic / Windows 7 Home Premium / Windows 7 Professional / Windows 7 Ultimate Supported 64 bit version OS for Windows Vista & Windows 7. Not supported by OSs other than above. *1Excluding OS Versions not supported by Microsoft. CPU: 300 MHz or more (For Windows Vista, 800 MHz or more. For Windows 7, 1 GHz or more) RAM: 128 MB or more (For Windows Vista, 512 MB or more. For Windows 7, 1 GB (32 bit) / 2GB (64 bit) or more) USB connector (Hi-Speed USB is recommended) Internet Explorer 6.0 or later, Windows Media Player 11 or 12 need to be installed. Broadband Internet connection is required to use Electronic Music Distribution (EMD) or to visit the web site. 6 About the customer support web sites, see “For the latest information.” If the approaches listed above fail to resolve the issue, consult your nearest Sony dealer. [Settings] – [Initialize] – [Format] – [OK], in this order. Rotate the shuttle switch to select the item, and then press the button to confirm. After selecting [OK] and confirming, [FORMATTING…] appears and formatting starts. When formatting is complete, [COMPLETE] appears. Note Do not format the memory of the player in Windows Explorer. If you format the player in Windows Explorer accidentally, do it again on the player. If you format the memory of the player by accident, download the Operation Guide (PDF file) from the web site mentioned in “For the latest information.” Precautions About the headphones Avoid playing the unit at so loud a volume that extended play might affect your hearing. At a high volume outside sounds may become inaudible. Avoid listening to the unit in situations where hearing must not be impaired, for example, while driving or cycling. As the supplied headphones are of open-air design, sounds go out through the headphones. Remember not to disturb those close to you. Notice for customers: the following information is only applicable to equipment sold in countries applying EU directives The manufacturer of this product is Sony Corporation, 1-7-1 Konan Minato-ku Tokyo, 108-0075 Japan. The Authorized Representative for EMC and product safety is Sony Deutschland GmbH, Hedelfinger Strasse 61, 70327 Stuttgart, Germany. For any service or guarantee matters, please refer to the addresses given in separate service or guarantee documents. Program ©2010 Sony Corporation Documentation ©2010 Sony Corporation For the latest information If you have any questions or issues with a Sony product, or would like information on compatible items with a Sony product, visit the following Web sites. For customers in the USA: http://www.sony.com/walkmansupport For customers in Canada: http://www.sony.ca/ElectronicsSupport/ For customers in Europe: http://support.sony-europe.com/DNA For customers in Latin America: http://www.sony-latin.com/index.crp For customers in other countries/regions: http://www.sony-asia.com/support For customers who purchased the overseas models: http://www.sony.co.jp/overseas/support/ Encendido y apagado del reproductor Español REPRODUCTOR DE MÚSICA DIGITAL POR FAVOR LEA DETALLADAMENTE ESTE MANUAL DE INSTRUCCIONES ANTES DE CONECTAR Y OPERAR ESTE EQUIPO. RECUERDE QUE UN MAL USO DE SU APARATO PODRÍA ANULAR LA GARANTÍA Acerca del manual Guía de inicio rápido: explica cómo configurar el reproductor de manera que pueda importar canciones al ordenador y transferirlas al reproductor. Guía de funcionamiento (archivo PDF): explica las características avanzadas del reproductor y ofrece información sobre la solución de problemas. La Guía de funcionamiento (archivo PDF) está almacenada en la memoria del reproductor. Para visualizar la Guía de funcionamiento (archivo PDF), consulte la sección “Artículos suministrados”. Artículos suministrados Para encenderlo Pulse el botón . Para apagarlo Mantenga pulsado el botón . Sugerencia Si se interrumpe la reproducción de la canción y no se realiza ninguna operación durante un período de tiempo concreto, el reproductor se apaga automáticamente. Cómo utilizar el reproductor El menú Inicio es el punto de partida de todas las aplicaciones. Para visualizar el menú Inicio Mantenga pulsado el botón BACK/HOME. Para seleccionar un elemento Gire el mando de avance/rebobinado hacia / para seleccionar un elemento y, a continuación, pulse el botón para confirmar la selección. Para volver a la pantalla anterior Pulse el botón BACK/HOME. Auriculares (1) Guía de inicio rápido (este manual) (1) Menú Inicio *1 Elementos almacenados en la memoria del reproductor Los elementos que se indican a continuación se almacenan en la carpeta [Storage Media] de la memoria del reproductor. 1. Quite la tapa del conector USB del reproductor y conecte el reproductor directamente en un puerto USB del ordenador. 2.Haga doble clic en [Mi PC] o [Equipo] - [WALKMAN] - [Storage Media]*1. Se muestran las carpetas siguientes. 3. Copie todos los datos o los datos necesarios de las carpetas siguientes en el ordenador. Storage Media Operation Guide*2 Los iconos aparecen en el menú Inicio y el color del icono seleccionado se invierte. Archivos PDF almacenados en la Guía de funcionamiento. [Voz] Permite reproducir/eliminar archivos de sonido grabados con el micrófono incorporado en el reproductor. [Biblioteca Música] Permite reproducir las canciones transferidas al reproductor. *1 [FM] Support PC_Application_ Software Hay iconos de acceso directo a “Asistencia al cliente” y “Registro del cliente” en las carpetas del país/región. Hay un icono de acceso directo al sitio de descarga del Reproductor de Windows Media 11. *1La jerarquía de datos puede variar en función del entorno del ordenador. *2Los archivos PDF con el nombre [xxx_NWZB150.pdf] que contiene esta carpeta corresponden a la Guía de funcionamiento. El nombre del idioma se muestra en lugar de las “xxx”. Seleccione el manual que corresponda a su idioma. Para visualizar la Guía de funcionamiento (archivo PDF), debe tener instalado Adobe Reader o Acrobat Reader 5.0 en el ordenador. Puede descargar Adobe Reader de Internet de forma gratuita. Sugerencia Para utilizar el espacio libre de la carpeta [Storage Media] con mayor eficiencia, realice una copia de seguridad de todos los datos necesarios de las tres carpetas anteriores en su ordenador y, a continuación, elimine las carpetas. Para formatear la memoria flash incorporada en el reproductor, consulte “Para inicializar (formatear) el reproductor”. [Ajustes] Permite reproducir radio FM, o reproducir/eliminar programas de radio FM grabados con el reproductor. Permite configurar los ajustes de la música, la radio FM*1, la grabación de voz o el reproductor. *1 y los elementos relacionados con la función [FM] aparecen solamente en los modelos NWZ-B152F/B153F. Importación y transferencia de música Puede transferir canciones al reproductor mediante el Reproductor de Windows Media 11 o 12 del ordenador. Si utiliza el Reproductor de Windows Media 10 o inferior en el ordenador, descargue el Reproductor de Windows Media 11 desde un icono de acceso directo de la memoria del reproductor. 1 2 Haga clic aquí para iniciar la importación. Cargando 2 3 Transfiera canciones del Reproductor de Windows Media 11 o 12 al reproductor. [ACCESO DATOS] aparece en la pantalla durante la transferencia de canciones al reproductor. Nota Parte frontal Parte posterior 2 Haga clic aquí para transferirlos al reproductor. Nota No desconecte el reproductor durante la transferencia de archivos. De lo contrario, podría dañarse el archivo que se esté transfiriendo. No se pueden transferir contenidos con protección de derechos de autor, ya que el reproductor no es compatible con ellos. Sugerencia También puede transferir datos al reproductor arrastrándolos y colocándolos en el Explorador de Windows en el ordenador. Para eliminar canciones transferidas al reproductor Conecte el reproductor al ordenador y, a continuación, elimine los archivos de audio innecesarios mediante el Reproductor de Windows Media 11 o 12, o bien, con el Explorador de Windows. Si el reproductor no funciona correctamente, siga estos pasos para resolver el problema. Botón REC/STOP Permite iniciar y detener la grabación. Puede grabar sonidos mediante el micrófono incorporado del reproductor. Asimismo, puede grabar el programa de radio FM que esté escuchando (sólo para los modelos NWZ-B152F/B153F). Botón VOL +/– Botón ZAP Permite alternar entre la reproducción normal y la reproducción ZAPPIN. La reproducción ZAPPIN permite reproducir fragmentos de canciones de forma secuencial con una duración preajustada. Botón BASS/PLAY MODE Permite realzar las frecuencias de sonido graves (función Bass) o cambiar el modo de reproducción. Botón Permite iniciar o interrumpir la reproducción de canciones, así como interrumpir o reiniciar una grabación. Mando de avance/rebobinado Gire este mando para ir al inicio de una canción, o bien, para rebobinar/avanzar rápidamente. Si aparece un menú en la pantalla, gire este mando para seleccionar un elemento del menú. Toma (de auriculares) Pantalla Botón BACK/HOME 1 Busque los síntomas del problema en la sección “Solución de problemas” de la Guía de funcionamiento (archivo PDF), e intente llevar a cabo las medidas correctivas que se indican. Para obtener información acerca de cómo realizar la conexión con el ordenador, consulte la sección “Requisitos del sistema (para el reproductor)” y las siguientes tablas. Consulte “Cómo utilizar el reproductor”. Iluminador de alimentación Iluminación por LED. MIC (Micrófono) Permite grabar sonido a través del reproductor. Orificio para la correa Botón RESET Utilice una aguja pequeña o un objeto similar. Interruptor HOLD Permite desactivar los botones y evitar un funcionamiento accidental al transportar el reproductor. Tapa del conector USB Si utiliza el tipo de conexión USB, retire la tapa del conector USB. Se está utilizando un concentrador USB. Conecte el reproductor directamente a un conector USB, ya que es posible que la conexión mediante un concentrador USB no funcione. Sin embargo, se puede utilizar un concentrador USB que proporcione alimentación. 2 Conecte el reproductor al ordenador para cargar la batería. 3 Botón RESET Es posible que algunos de los problemas se solucionen al cargar la batería. Pulse el botón RESET con una aguja pequeña o un objeto similar. 4 5 Si pulsa el botón RESET cuando el reproductor está en funcionamiento, es posible que se eliminen los datos y los ajustes almacenados en el reproductor. Tras restablecer el reproductor, pulse el botón para encender el reproductor. Compruebe la información sobre el problema en la sección de Ayuda del software. Busque información sobre el problema en uno de los sitios web de asistencia al cliente. 6 Para inicializar (formatear) el reproductor Puede formatear la memoria del reproductor. Si se formatea la memoria, se borrarán todos los iconos de acceso directo y archivos, incluida la Guía de funcionamiento (archivo PDF) y se restablecerán todos los ajustes predeterminados. Asegúrese de comprobar de antemano los archivos almacenados en la memoria antes de formatearla y exporte los archivos que sean necesarios al disco duro del ordenador o a otro dispositivo. 1 Mantenga pulsado el botón BACK/HOME hasta que aparezca el menú Inicio. Solución de problemas Auriculares El reproductor se vuelve inestable si está conectado al ordenador. Inserte el conector USB por completo. 1 Seleccione los álbumes, etc. Componentes y controles Causa/solución El conector USB del reproductor no está conectado correctamente a un conector USB del ordenador. Desconecte el reproductor y, a continuación, vuelva a conectarlo. Se está utilizando un concentrador USB. Conecte el reproductor directamente a un conector USB, ya que es posible que la conexión mediante un concentrador USB no funcione. Sin embargo, se puede utilizar un concentrador USB que proporcione alimentación. Se está ejecutando otra aplicación en el ordenador. Desconecte el reproductor, espere unos minutos y vuelva a conectarlo. Si el problema continúa, desconecte el reproductor, reinicie el ordenador y vuelva a conectar el reproductor. Es posible que el conector USB del ordenador tenga un problema. Conecte el conector USB del reproductor a otro conector USB del ordenador. El nivel de energía restante de la batería es insuficiente. Conecte el reproductor a un ordenador en funcionamiento durante al menos 5 minutos para cargar la batería. Cuando cargue una batería agotada, el iluminador de alimentación parpadeará en la dirección de las agujas del reloj y no aparecerá nada en la pantalla. Conecte el conector USB del reproductor al ordenador. Totalmente cargada Cuando utilice el reproductor por primera vez, o si no lo ha utilizado durante un período de tiempo prolongado, recárguelo por completo. Cuando cargue una batería agotada, el iluminador de alimentación parpadeará en la dirección de las agujas del reloj y no aparecerá nada en la pantalla. Si la pantalla sigue sin activarse transcurridos más de 5 minutos, pulse el botón RESET para reiniciar el reproductor. Si enciende el ordenador, lo reinicia, lo apaga, o reanuda la sesión desde el estado de Suspensión o Hibernación mientras el reproductor está conectado al ordenador, es posible que el reproductor no funcione correctamente. En tal caso, pulse el botón RESET del reproductor para restablecerlo. Desconecte el reproductor del ordenador antes de llevar a cabo dichas operaciones. El diseño y las especificaciones están sujetos a cambios sin previo aviso. No aparece [USB CONECTADO] cuando se conecta el reproductor al ordenador. 1 Haga clic en “Copiar”. Carga de la batería Para Problema Conector USB (se recomienda USB de alta velocidad) Es necesario disponer de Internet Explorer 6.0 o posterior, así como de Reproductor de Windows Media 11 o 12. Asimismo, se necesita una conexión de banda ancha a Internet para utilizar Electronic Music Distribution (EMD) o para visitar el sitio web. No se garantiza el funcionamiento con todos los ordenadores aunque cumplan los requisitos del sistema mencionados anteriormente. No es compatible con los siguientes entornos: –Ordenadores o sistemas operativos de creación propia –Entornos que sean actualizaciones de los sistemas operativos originales instalados por el fabricante –Entornos de arranque múltiple –Entornos con varios monitores –Macintosh El reproductor no El reproductor no está conectado correctamente al conector USB del puede cargar la batería. ordenador. Desconecte el reproductor y, a continuación, vuelva a conectarlo. La batería se carga a una temperatura ambiente fuera del intervalo de 5 ºC a 35 ºC. . Cargue la No se puede cargar la batería cuando aparece el icono batería a una temperatura ambiente de 5 ºC a 35 ºC. El ordenador no está encendido. Encienda el ordenador. El ordenador está en modo de Reposo o Hibernación. Desconecte el reproductor del ordenador y, a continuación, desactive el modo de Reposo o Hibernación del ordenador. Vuelva a conectar el reproductor al ordenador. Para obtener más información acerca de cómo importar canciones desde discos CD u otros dispositivos, consulte la Ayuda del Reproductor de Windows Media 11 o 12. No necesita volver a importar las canciones que ya haya importado al Reproductor de Windows Media 11 o 12 anteriormente. Asegúrese de que su sistema operativo sea Windows 7, Windows XP (Service Pack 2 o posterior) o Windows Vista (Service Pack 1 o posterior) y de que la versión del Reproductor de Windows Media instalada en su ordenador sea la 11 o la 12. Aproximadamente 70 minutos Ordenador IBM PC/AT u ordenador compatible preinstalado con los siguientes sistemas operativos Windows*1: Windows XP Home Edition (Service Pack 2 o posterior) / Windows XP Professional (Service Pack 2 o posterior) / Windows Vista Home Basic (Service Pack 1 o posterior) / Windows Vista Home Premium (Service Pack 1 o posterior) / Windows Vista Business (Service Pack 1 o posterior) / Windows Vista Ultimate (Service Pack 1 o posterior) / Windows 7 Home Basic / Windows 7 Home Premium / Windows 7 Professional / Windows 7 Ultimate Versión del sistema operativo de 64 bits para Windows Vista y Windows 7. No compatible con sistemas operativos distintos de los indicados anteriormente. *1Excluidas las versiones de sistema operativo no compatibles con Microsoft. CPU: 300 MHz o más (para Windows Vista, 800 MHz o más. Para Windows 7, 1 GHz o más) RAM: 128 MB como mínimo (para Windows Vista, 512 MB o más. Para Windows 7, 1 GB (32 bits)/2GB (64 bits) o más) Importe canciones desde discos CD u otros dispositivos al Reproductor de Windows Media 11 o 12 del ordenador. Antes de conectar el reproductor al ordenador La batería del reproductor se carga mientras éste está conectado a un ordenador en funcionamiento. Requisitos del sistema (para el reproductor) Para obtener información acerca del sitio web de asistencia al cliente, consulte la sección “Información más reciente”. Si las indicaciones anteriores no logran resolver el problema, consulte con su distribuidor Sony más cercano. 2 Seleccione [Ajustes] – [Inicializar] – [Formatear] – [Aceptar], en este orden. Gire el mando de avance/rebobinado para seleccionar el elemento y, a continuación, pulse el botón para confirmar la selección. Una vez que haya seleccionado [Aceptar] y confirmado la selección, aparecerá [FORMATEANDO…] y se iniciará el proceso de formateo. Una vez finalizado el formateo, se mostrará [COMPLETADO]. Nota No formatee la memoria del reproductor en el Explorador de Windows. Si formatea el reproductor en el Explorador de Windows sin pretenderlo, vuelva a formatearla en el reproductor. Si formatea la memoria del reproductor de forma accidental, descargue la Guía de funcionamiento (archivo PDF) del sitio web que se menciona en “Información más reciente”. Precauciones Acerca de los auriculares Evite escuchar la unidad a muy altos niveles ya que la escucha prolongada afectaría su oído. A altos niveles, el sonido exterior puede llegar a ser inaudible. Evite escuchar la unidad en situaciones en las que no deba perder la audición, por ejemplo, conduciendo un automóvil o en bicicleta. Como los auriculares suministrados son de construcción abierta, el sonido sale fuera. Tenga presente no molestar a las personas que estén cerca de usted. Fuente de alimentación Batería recargable de Iones de Litio incorporada, cc 3,7 V 170 mAh (1 Batería recargable de iones de litio) Alimentación USB (desde un ordenador a través de la clavija de Puerto Serial Universal USB A) de cc 5 V Aviso para los clientes: la información siguiente resulta de aplicación solo a los equipos comercializados en países afectados por las directivas de la UE. El fabricante de este producto es Sony Corporation, 1-7-1 Konan Minato-ku Tokyo, 108-0075 Japón. El representante autorizado para EMC y seguridad en el producto es Sony Deutschland GmbH, Hedelfinger Strasse 61, 70327 Stuttgart, Alemania. Para cualquier asunto relacionado con servicio o garantía por favor diríjase a la dirección indicada en los documentos de servicio o garantía adjuntados con el producto. Programa ©2010 Sony Corporation Documentación ©2010 Sony Corporation Información más reciente Si tiene alguna pregunta o problema relacionado con un producto de Sony, o bien, si desea obtener información acerca de los artículos compatibles con un producto de Sony, visite los siguientes sitios web. Para clientes de EE. UU.: http://www.sony.com/walkmansupport Para clientes de Canadá: http://www.sony.ca/ElectronicsSupport/ Para clientes de Europa: http://support.sony-europe.com/DNA Para clientes de Latinoamérica: http://www.sony-latin.com/index.crp Para clientes de otros países/regiones: http://www.sony-asia.com/support Para clientes que adquirieron modelos extranjeros: http://www.sony.co.jp/overseas/support/