1
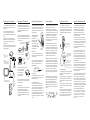
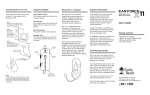
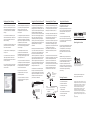
Configuring Xbox Settings
Tips
Using the X3 with a Plasma TV
Connecting Music Players
Important Information
To make sure that you can easily control
Xbox Live chat volume, please make sure
that the following settings are configured
on your Xbox (These are the default Xbox
settings).
1. When the headphones are powered on,
you can hear yourself speak into the mic,
which is a good way to test if the
headphones have shut down to save
battery power.
The X3 may be used for listening to other
audio sources, such as the output of your
TV, the output of your PC sound card, an
MP3 player, home theater system, etc.
Be careful when turning on the
headphones volume control.
Before placing the headphones over your
ears, set the volume control to minimum,
then slowly increase until you reach a
comfortable level.
1. From the Xbox 360 Dashboard, press
the Xbox Guide button (the X button in the
center of your controller) to access your
Xbox Live Settings.
2. Although the headphones will continue
to operate even on low battery power, the
performance will degrade as the batteries
begin to drop in voltage. Be sure to change
the batteries if you sense that the
headphones are less sensitive than usual,
or the sound is distorting, regardless of
volume settings.
Some plasma TVs generate IR signals that
can be picked up by the headphones as a
background "buzz" or "crackling". This is not
unique to the X3 headphones--all analog IR
headphones exhibit this problem with
plasma TVs. The noise is usually noticeable
when there is no audio playing through the
Xbox, such as when the game menu is
displayed or just before the game begins.
Once the game sound starts playing, the X3
IR signal overpowers the interference so it's
significantly reduced or completely
eliminated.
2. Navigate to the "Settings" selection, and
press the "A" button on your controller.
Then select “Preferences”.
3. Select "Voice" from the following menu,
and press "A".
4. On the Voice screen, make sure that
"Play Through Headset" is selected for
Voice Output selection and that volume is
set to 10 (see below).
5. You can fine tune game audio and chat
volumes using the X3 amplifier and chat
volume controls.
3. The headphones work best when
powered with 1.5V alkaline batteries.
Rechargeable batteries rated at 1.5V will
give a longer period of playing time than
those only rated at 1.2V.
4. If you stand too close to the transmitter,
the IR signal may overload the headphones
and the sound will be automatically muted.
For best performance, stand between 2'
and 20' from the transmitter.
5. If you hear hiss, turn down the
headphone volume and turn up the
transmitter input level.
6. If you hear distortion, turn down the
transmitter input level, then adjust the
headphone volume.
Because plasma IR interference decreases
as you move further away from the screen,
the noise may be more noticeable if your TV
is located in a small room. Also, if the X3
transmitter is placed too low, too high or too
far to the side of the plasma screen, its IR
signal will be reduced because it's not in
direct line-of-sight with the headphones. As
a result, the plasma IR interference may be
stronger than the X3 signal, causing the
background noise to occur.
To maximize the X3 transmitter IR signal
intensity and minimize the plasma noise,
place the transmitter either in direct line of
sight with the headphones, or closer to the
headphones and further away from the
plasma screen, as illustrated:
For example, the illustration below shows
how to connect the X3 to the output of a
home theater system. In this case, the
transmitter audio input would be
connected to the stereo line output on the
home theater receiver. In some systems,
this would be the recording line output,
typically used for a cassette recorder, while
on other systems it would be a
pre-amplifier line output. Refer to the
instructions included with your unit for
details.
The volume control on the X3 transmitter
should be set to maximum and the volume
control on the headphone should be
adjusted to a comfortable level. If the
sound is distorted because the audio
source output is too loud, then the volume
control on the transmitter should be
reduced to a lower level that better
accommodates the source volume.
Step 1:
Insert the mini plug into
the Line In jack on
the transmitter.
Use only the supplied power adapter.
Failure to use the correct power adapter
can result in fire and permanent damage
to the transmitter unit.
®
X3
Chat + Wireless Game Audio
Operating Instructions
Do not over-drive the headphones. Like any
speakers, playing the sound too loud on
the headphones may cause damage to
both the headphones and your ears.
Please take care to listen at moderate
levels.
WARNING: Long term exposure to loud
music or other sounds in headphones may
cause hearing damage. It is best to avoid
extreme volume levels when using
headphones, especially for extended
periods. Over time, your ears adapt to the
volume level, so a level that may not cause
initial discomfort might still damage
your hearing.
Package Contents
®
For more products, accessories, and our support
knowledge base, visit TurtleBeach.com
For warranty information please visit
http://support.turtlebeach.com
Transmitter
STRONG IR SIGNAL
X3 Transmitter
Plasma Screen
Direct line of sight to IR sensors
on X3 headphones maximizes
signal strength
Plasma Screen
Placing the X3 transmitter
closer to the headphones
maximizes signal strength
Step 2:
Insert the red and white male RCA plugs into
the line output jacks on the sound system.
Amp/Receiver
TV L
STRONG
IR SIGNAL
TV R
X3 Transmitter
• X3 wireless headphones
• X3 infrared transmitter
• Transmitter suction cup
• DC power adapter
• 2 AAA batteries
• Xbox controller connection cable
• Audio connection cable
• This user's guide
Copyright © 2009, Voyetra Turtle Beach, Inc. (VTB).
All rights reserved. No part of this document may be
reproduced without permission. Turtle Beach, the
Turtle Beach logo and Ear Force are registered
trademarks of VTB. Xbox and Xbox Live are
trademarks of Microsoft Corporation. All other
trademarks are properties of their respective
companies and are hereby acknowledged. Product
features, visual design, package contents and
specifications are subject to change without notice.
V2
Product# TBS-2065
Connecting the Transmitter
Setting up the Transmitter
Using the X3 Headphones
Volume Settings
Using Xbox Live Chat
Dynamic Talkback Expander
1. Insert the included DC power adapter
into the power jack on the back of the X3
transmitter.
The transmitter communicates with the
headphones via an infrared (IR) light beam,
so it is important that there is a direct line of
sight between the transmitter and the
headphones.
The IR light beam from the transmitter is
received by sensors on each side of the
headband, so the headphones must be
within sight of the transmitter in order to
operate properly.
You can adhere the included velcro pads or
suction cup to the bottom of the transmitter
to keep it in place on a smooth surface, such
as your Xbox or TV.
Installing the Batteries
The headphones are
powered by 2 AAA
batteries (included)
located in the right
ear cup. Lift the battery
cover and insert both
batteries before operating
the headphones.
The X3 system has three volume control
settings that operate as follows:
Transmitter Input Level: This sets the
maximum game signal level transmitted to
the headphones and should be set as loud
as possible without causing distortion. In
most games, you can leave this set to
maximum. If you hear distortion on loud
parts in the game, turn this control down a
bit to reduce the level.
The X3 microphone may be used to
communicate with other players during Xbox
Live multi-player gaming sessions. Use the
included cable to connect the headphones
to the Xbox 360 controller as illustrated
below.
The X3 headphones include a dynamic
talkback expander that automatically
amplifies Xbox Live chat during loud
moments in your game. Since this is a
revolutionary new feature in gaming
headphones, it takes a bit of getting used
to. Here's how it works:
2. Insert the power adapter into an AC
outlet. The red light on the front of the
transmitter will light up to indicate power is
active.
CAUTION: Use only the supplied power
adapter. Failure to use the correct adapter
can result in fire, damage to the unit or
other hazards.
Infrared light beam sensors are
located in each ear cup
Infrared
Sensor
3. Use the included cable to connect the X3
transmitter to your TV and Xbox as shown in
the diagram below.
Power Switch
To turn on the power, quickly press and
release the push button power switch on
the left ear cup.
Base unit transmits an infrared
light beam to the headphones
Step 1:
Insert the mini plug into
the Line In jack on the
transmitter.
+
LINE IN
SVCD
Each Velcro strip is
approximately
25mm x 15mm
–
Transmitter
Step 2:
Insert the male RCA plugs
into the audio input jacks
on the TV or sound system.
To turn off the power, quickly press and
release the push button power switch (or,
allow it to turn off automatically as
described below).
Suction Cup
Underside of Transmitter
Power Adapter
TV L
TV or Sound System
Setting the Transmitter Input Level
Set the transmitter input
level to maximum and
use the headphone
volume to adjust the
Input
game audio level.
Level
Power
Switch
Stereo
Expander
Switch
TV R
Step 3:
Insert the RCA plugs from the
Xbox into the female RCA jacks.
Xbox
Step 4:
Insert the
power
adapter
Push in cover
and slide down
Note: If you hear distortion, turn down the
transmitter input level and then adjust the
headphone volume.
Stereo Expander
The transmitter stereo expander provides a
"widening" effect on stereo signals.
Activate by placing the slide switch to the
"ON" position. The LED on the front of the
unit will light, indicating that the expander
effect is on.
Power Indicator
The Turtle Beach Palm Tree Logo on the left
ear cup will flash about once per second
when the power is on.
Automatic Power Shut-off
If there is no sound transmitted for more
than a few minutes, the light will flash
faster to indicate that the headphones are
about to "power down". After about two
minutes, the power will automatically shut
off to conserve the batteries. To turn on the
headphones after they have auto-shut
down, press the power switch as described
above.
Headphone Game Volume Control: The
volume control on the headphones also
controls the game signal level, but should
be turned down to a comfortable level. For
best audio quality, the transmitter volume
should be as loud as possible and the
headphone volume should be as low as
possible for optimum game sound.
Talkback Volume Control: Chat volume from
other players during an Xbox Live gaming
session is set by the volume control on the
"puck" inserted into the Xbox controller. The
game volume control on the headphones
has no effect on this chat volume level. In
other words, even if you turn down the
game volume control you will still hear the
chat signal if the "puck" volume is turned
up.
Bass Boost Switch: You can enhance the
game audio quality by turning on the Bass
Boost switch on the headphones. When
turned on, this will increase the low
frequency response of both the game and
talkback signals to enhance the sound of
explosions, gun shots and other deep-bass
sounds.
Bass
Boost
Switch
ON
OFF
Game
Volume
Control
Insert the gray plug into
the headphone jack labeled
with the Xbox controller
symbol.
Xbox Game
Controller
Insert the "puck" shaped
plug into the headphone
jack on the Xbox game
controller.
Use the Mic Mute switch to
prevent your voice from being
heard by other players.
The volume control on the "puck"
shaped plug may be used to adjust
the volume of the Xbox Live chat.
Using the Microphone
The microphone signal connects to the Xbox
controller via the cable plugged into the
headphones.
The mute switch on the "puck" plugged into
the Xbox controller can be used to silence
the microphone when you don't want to be
heard.
For optimum clarity, adjust the microphone
so that it is situated a few inches away from
your mouth.
A portion of the microphone signal is mixed
into the headphone signal when the puck
cable is plugged into the headphone Xbox
jack, so you can hear your voice along with
the online chatting and game audio.
If you were to turn down the headphone
volume control all the way and turn up the
chat volume on the "puck", there would be
no game volume, but you would hear chat.
In this mode, the dynamic talkback
expander is doing nothing because there's
no game audio.
If you turn up the game volume and the
game sound is soft, there won't be any
change in the chat level. However, if the
game volume gets louder, the chat sound
level would normally be drowned out by the
game. That's where the dynamic talkback
expander kicks in!
As the game audio increases, the expander
boosts the chat volume so it keeps up with
the game level and you can hear what
everyone is saying. When the volume quiets
down again, the chat level returns to the
lower volume setting.
To properly set the expander function, first
turn down the headphone game volume
control so there's no game audio. Then
adjust the talkback volume control on the
"puck" so you can hear the chat voices at a
comfortable level. Now, turn up the game
volume and the chat volume increases as
the game gets louder, just as if the talkback
volume control is being automatically
turned up along with the game level.
Note that if the talkback volume on the "puck" is
set too loud, the expander might increase the
volume so much that the voices will distort. If
that happens, just cut back on the talkback
"puck" volume to adjust the level below
distortion.