1
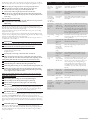
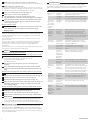
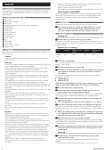
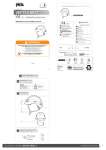
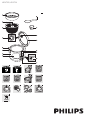
HD4729, HD4724 1 A I B J C K D L E F M N G H O P 2 3 4 5 6 7 8 9 10 11 12 13 (MAX) 14 Tiếng Việt Giới thiệu Chúc mừng bạn đã mua được sản phẩm Philips mới và chào mừng bạn đến với Philips! Để có được lợi ích đầy đủ từ sự hỗ trợ do Philips cung cấp, hãy đăng ký sản phẩm tại www.philips.com/welcome. Mô tả tổng quát (Hình 1) A Khay hấp B Chỉ báo mức nước C Nồi trong D Nắp thông hơi có thể tháo rời có miếng đệm kín bằng cao su E Bộ phận giữ muỗng F Cần mở G Thân chính H Đế nhiệt I Muỗng cơm J Cốc định lượng K Lỗ thông hơi L Nắp M Đèn báo nấu cơm N Đèn hâm nóng O Ổ nối dây điện P Cần điều khiển Lưu ý Hãy đọc kỹ hướng dẫn sử dụng này trước khi sử dụng thiết bị và cất giữ để tiện tham khảo sau này. Nguy hiểm -- Không nhúng phần vỏ của nồi vào trong nước, hay rửa dưới vòi nước. ------ ------------- ----- 2 Cảnh báo Kiểm tra xem điện áp ghi trên máy có tương ứng với điện áp nguồn nơi sử dụng trước khi bạn nối máy vào nguồn điện. Chỉ nối thiết bị này vào ổ cắm điện có dây tiếp đất. Luôn đảm bảo rằng phích cắm được cắm chặt vào ổ điện. Không sử dụng bếp nếu phích cắm, dây điện nguồn hay chính bếp bị hư. Nếu dây điện bị hư hỏng, bạn nên thay dây điện tại trung tâm bảo hành của Philips hoặc các trung tâm bảo hành do Philips ủy quyền hoặc những nơi có khả năng và trình độ tương đương để trành gây nguy hiểm. Thiết bị này không dành cho người dùng (bao gồm cả trẻ em) có sức khỏe kém, khả năng giác quan hoặc có dấu hiệu tâm thần, hoặc thiếu kinh nghiệm và kiến thức, trừ khi họ được giám sát hoặc hướng dẫn sử dụng thiết bị bởi người có trách nhiệm đảm bảo an toàn cho họ. Trẻ em phải được giám sát để đảm bảo rằng chúng không chơi đùa với thiết bị này. Để dây điện xa tầm tay trẻ em. Không để dây điện treo lơ lửng ngang cạnh bàn hay mặt bếp nơi đặt bếp. Đảm bảo đế nhiệt, công tắc từ và mặt ngoài của nồi trong luôn sạch sẽ và khô trước khi cắm phích cắm vào ổ điện. Không che lỗ thoát hơi nước và nắp trong khi nồi cơm điện đang hoạt động. Không cắm phích cắm của thiết bị vào ổ điện hay sử dụng cần điều khiển bằng tay ướt. Chú ý Không sử dụng bất kỳ phụ kiện hoặc bộ phận nào mà Philips không đặc biệt khuyên dùng. Nếu bạn sử dụng các phụ kiện hoặc bộ phận không pahỉ của Philips, việc bảo hành sẽ bị mất hiệu lực. Chỉ sử dụng thìa múc cơm đi kèm. Tránh sử dụng những dụng cụ sắc. Không để nồi dưới nhiệt độ cao, hay đặt nồi lên bếp hay dụng cụ nấu khác đang đun hoặc vẫn còn nóng. Luôn đặt nồi trong vào trước khi cắm phích cắm vào ổ điện. Luôn rút phích cắm của nồi cơm điện ra và để cho nồi nguội trước khi lau chùi. Không đặt nồi trong trực tiếp lên ngọn lửa để nấu cơm. Bàn ủi này được thiết kế chỉ để dùng trong gia đình. Nếu sử dụng thiết bị này không đúng cách hay dùng cho những mục đích chuyên nghiệp hay bán chuyên nghiệp hoặc nếu sử dụng thiết bị này không theo hướng dẫn, chế độ bảo hành sẽ bị mất hiệu lực và Philips sẽ không chịu trách nhiệm đối với bất cứ hư hỏng nào gây ra. Đặt nồi cơm điện này trên một mặt phẳng nằm ngang,vững chắc và bằng phẳng. Những bộ phận có thể tiếp xúc của thiết bị này có thể trở nên rất nóng khi thiết bị đang hoạt động. Cẩn thận với hơi nước thoát ra từ lỗ thoát hơi nước trong khi nấu hoặc hơi nước trực tiếp từ trong nồi khi mở nắp. Luôn rút phích cắm điện của máy ra sau khi sử dụng. -- Không nhấc và di chuyển nồi cơm điện trong khi nồi cơm đang hoạt động. Từ trường điện (EMF) Thiết bị Philips này tuân thủ tất cả các tiêu chuẩn liên quan đến các từ trường điện (EMF). Nếu được sử dụng đúng và tuân thủ các hướng dẫn trong sách hướng dẫn này, theo các bằng chứng khoa học hiện nay, việc sử dụng thiết bị này là an toàn. Trước khi sử dụng lần đầu Tháo tấm giữa nồi trong và bộ phận làm nóng. 1 Làm sạch kỹ các bộ phận của nồi cơm điện trước khi sử dụng lần đầu tiên (xem chương ‘Vệ sinh máy’). Đảm bảo tất cả các bộ phận khô hoàn toàn trước khi bắt đầu sử dụng. Cách sử dụng máy Cách nấu cơm 1 Lường gạo để nấu cơm bằng chén định lượng gạo cấp kèm. Thông thường mỗi chén lường gạo có thể cho ra 2 bát cơm. Không nấu nhiều hơn những số lượng được ghi ở trong nồi. 1 chén lường gạo có thể tích khoảng 180ml. Lượng gạo để nấu cơm: Menu Thể tích/L Lượng gạo (chén) Thể tích/L Lượng gạo (chén) Gạo trắng 1,0 1-5,5 1,8 2-10 2 Vo gạo thật sạch. Sử dụng một đồ đựng khác để vo gạo nhằm tránh làm hư hỏng lớp tráng chống dính ở nồi trong. 3 Cho gạo đã vo sạch vào nồi trong. 4 Cho nước vào đến mức nước hướng dẫn trên thang phân chia các mức nước ở nồi trong, chọn mức nước tương ứng với số lượng chén gạo sử dụng. Sau đó làm cho bề mặt gạo trong nồi bằng đều. Ví dụ, nếu bạn nấu 4 chén gạo, cho nước vào đến mức nước số 4 trên thang phân chia các mức nước. ,, HD4729 (Hình 2) ,, HD4724 (Hình 3) Lưu ý: Mức nước được đánh dấu ở nồi trong này chỉ là một mức nước chỉ báo tham khảo; bạn luôn luôn có thể điều chỉnh mức nước cho thích hợp với các loại gạo khác nhau và theo sở thích của riêng bạn. 5 Nhấn cần tháo để mở nắp. 6 Đặt nồi trong vào nồi cơm điện. Kiểm tra xem nồi trong có tiếp xúc tốt với bộ phận làm nóng của thiết bị (Hình 4). Đảm bảo rằng mặt ngoài của nồi trong khô ráo và sạch sẽ và không có vật gì hay cáu cặn bám dính trên bề mặt bộ phận làm nóng hay trên công tắc tử. 7 Đậy nắp nồi nấu cơm lại, cắm phích cắm vào ổ điện và bật công tắc chính của nồi cơm điện. ,, Đèn báo nấu cơm sẽ sáng để cho biết thiết bị đang được bật. (Hình 5) 8 Ấn cần điều khiển xuống để bắt đầu quá trình nấu (Hình 6). Nếu không ấn cần điều khiển xuống, nồi cơm điện sẽ tự động chuyển sang chế độ hâm nóng. Đèn báo nấu cơm sẽ tắt và đèn hâm nóng sẽ sáng. ,, Khi nấu xong cơm, đèn báo nấu cơm sẽ tắt và đèn hâm nóng sẽ sáng để báo rằng nồi nấu cơm đã tự động chuyển sang chế độ hâm nóng (Hình 7). 9 Mở nắp và đảo lên để làm tơi cơm (Hình 8). Để có kết quả tốt nhất, thực hiện bước này ngay sau khi nồi cơm điện chuyển sang chế độ giữ nóng. Sau đó đậy chặt nắp nồi lại. Đảo cơm cho phép hơi nước còn thừa thoát ra ngoài. Làm như vậy cơm sẽ xốp hơn. 10Để ngừng quá trình nấu cơm hoặc chế độ giữ ấm, gạt cần điều khiển lên, tắt công tắc chính, và rút phích cắm ra khỏi ổ điện (Hình 9). Hấp thức ăn 1 Đổ lượng nước bằng 3 chén lường vào nồi trong. Lượng nước có thể thay đổi tùy thuộc vào lượng thức ăn cần hấp. Sẽ mất khoảng 8 phút để đun sôi 3 chén nước. 2 Cho thức ăn cần hấp lên một cái đĩa hay cho vào trong khay hấp thức ăn. Để đảm bảo hấp đều, hãy trải đều thức ăn và không chất đống. 3 Đặt khay hấp vào nồi trong. 4222.200.0249.3 Khi kết hợp cả hấp và nấu cơm, đảm bảo rằng bạn đo lượng gạo vừa để có chỗ cho khay hấp. Thức ăn được hấp sẽ sẵn sàng để dùng khi nấu xong cơm. 4 Nếu sử dụng đĩa riêng, hãy đặt đĩa vào trong khay hấp thức ăn. 5 Thực hiện theo các bước từ 7 đến 10 trong mục ‘Nấu cơm’. ,, Đèn báo nấu cơm sẽ sáng và quá trình hấp sẽ bắt đầu. ,, Thức ăn hấp sẽ sẵn sàng khi quá trình nấu cơm kết thúc. Vấn đề Nguyên nhân Giải pháp Đèn báo nấu cơm không bật sáng. Có vấn đề về dây nối hay phích cắm điện. Kiểm tra xem nồi cơm đã được nối với nguồn điện và phích cắm đã được cắm chặt vào ổ điện chưa. Đèn báo bị trục trặc. Mang thiết bị đến đại lý Philips của bạn hoặc trung tâm dịch vụ được ủy quyền bởi Philips. Đèn hâm Đèn báo bị nóng không trục trặc. bật sáng khi quá trình nấu kết thúc. Mang thiết bị đến đại lý Philips của bạn hoặc trung tâm dịch vụ được ủy quyền bởi Philips. Nước chảy ra từ nồi trong khi nấu. Đã có quá nhiều nước được sử dụng để nấu cơm. Nhớ cho nước vào đến mức nước hướng dẫn trên thang phân chia các mức nước ở nồi trong, chọn mức nước tương ứng với số lượng chén gạo sử dụng. Đảm bảo nước không vượt quá mức tiếp theo trên thang, vì làm như vậy có thể làm cho nước trào ra ngoài trong khi nấu. Cơm không chín. Không có đủ nước. Cho thêm nước theo thang phân chia các mức nước ở nồi trong (xem chương ‘Cách sử dụng thiết bị’). 6 Mở nắp nồi ra và cẩn thận lấy thức ăn hấp ra khỏi đĩa hay khay hấp thức ăn. Sử dụng găng tay nhà bếp hay vải vì đĩa hay khay hấp thức ăn sẽ rất nóng. Hãy cẩn thận với hơi nước nóng. 7 Để ngừng quá trình hấp, hãy gạt cần điều khiển lên, tắt công tắc chính, và rút phích cắm ra khỏi ổ điện (Hình 9). Hâm nóng Chế độ này cho phép bạn giữ ấm cơm trong một khoảng thời gian dài. Khi nấu xong cơm, nồi cơm sẽ tự động chuyển sang chế độ hâm nóng. Đèn báo nấu cơm sẽ tắt và đèn hâm nóng sẽ sáng. Chúng tôi khuyên bạn không nên để chế độ hâm nóng cơm quá 12 tiếng để giữ cơm được ngon. Đèn báo nấu cơm thỉnh thoảng có thể bật sáng để cho biết nhiệt độ trong nồi nấu cơm đã xuống thấp và bộ phận làm nóng đã được bật để làm nóng nồi nấu cơm đến nhiệt độ hâm nóng thích hợp. Để ngừng quá hâm nóng, hãy gạt cần điều khiển lên, tắt công tắc chính, và rút phích cắm ra khỏi ổ điện. Quá trình nấu Bạn quên không ấn cần điều khiển xuống không bắt để bắt đầu quá trình nấu. đầu. Vệ sinh máy Rút phích cắm của nồi cơm điện ra khỏi ổ cắm điện trước khi làm sạch nồi. Chờ cho tới khi nồi cơm điện đủ nguội trước khi làm sạch. Để bảo vệ lớp chống dính của nồi trong, không: -- sử dụng nồi trong để rửa chén; -- đổ giấm vào nồi. 1 Lấy khay hấp và nồi trong ra khỏi thân chính của thiết bị. 2 Dùng vải ẩm để lau sạch nắp trong và phần bên ngoài cũng như bên ngoài của thân nồi cơm điện. Lau sạch bộ phận làm nóng bằng vải khô. Không nhúng phần thân nồi vào trong nước, hay rửa dưới vòi nước. 7 Lắp lại miếng đệm kín bằng cao su vào bộ phận thông hơi. 8 Vặn nắp thông hơi vào lại bộ phận thông hơi. (Hình 13) 9 Đặt bộ phận thông hơi trở lại nắp ngoài và ấn chặt xuống. Môi trường -- Không vứt thiết bị cùng chung với chất thải gia đình thông thường khi ngừng sử dụng nó. Hãy đem nó đến điểm thu gom chính thức để tái chế. Làm như thế, bạn sẽ giúp bảo vệ môi trường (Hình 14). Mang thiết bị đến đại lý Philips của bạn hoặc trung tâm dịch vụ được ủy quyền bởi Philips. Cơm quá mềm. Đã có quá nhiều nước được sử dụng để nấu cơm. 5 Tháo miếng đệm kín bằng cao su ra khỏi bộ phận thông hơi (Hình 12). Không sử dụng những chất làm sạch có tính ăn mòn, máy rửa chén hay dụng cụ kim loại để làm sạch nồi trong vì những thứ này sẽ làm hỏng lớp chống dính của nồi trong. Bộ phận làm nóng bị hư hỏng. Cho nước vào nhiều hơn một chút so với Đã không dùng đủ nước mức nước được chỉ báo trên thang phân để nấu cơm. chia các mức nước ở nồi trong, chọn mức nước tương ứng với số lượng chén gạo sử dụng. Đảm bảo nước không vượt quá mức tiếp theo trên thang, vì làm như vậy có thể làm cho nước trào ra ngoài trong khi nấu. 4 Tháo nắp thông hơi ra khỏi bộ phận thông hơi (Hình 11). hơi và miếng đệm kín bằng cao su bằng miếng xốp hoặc giẻ lau trong nước nóng với một ít nước rửa chén. Đảm bảo rằng không có vật lạ trên bộ phận làm nóng. Cơm quá cứng. 3 Kéo bộ phận thông hơi lên để tháo nó ra khỏi nắp ngoài. (Hình 10) 6 Vệ sinh nồi trong, khay hấp, thìa cơm nắp thông hơi, bộ phạn thông Nồi trong không tiếp xúc tốt với bộ phận làm nóng. Cơm bị khét. Gạo chưa được vo sạch tốt. Nồi nấu cơm không tự động chuyển sang chế độ hâm nóng. Bộ điều khiển nhiệt độ bị hư hỏng. Nhớ đổ nước theo thang phân chia các mức nước ở nồi trong (xem chương ‘Cách sử dụng thiết bị’). Rửa sạch gạo đến khi nước vo gạo trong hoàn toàn. Mang thiết bị đến đại lý Philips của bạn hoặc trung tâm dịch vụ được ủy quyền bởi Philips. Bảo hành & dịch vụ Nếu bạn cần biết dịch vụ, thông tin hay gặp trục trặc, vui lòng vào website của Philips tại www.philips.com hoặc liên hệ với Trung Tâm Chăm Sóc Khách Hàng của Philips ở nước bạn (bạn sẽ tìm thấy số điện thoại của Trung tâm trong tờ bảo hành khắp thế giới). Nếu không có Trung Tâm Chăm Sóc Khách Hàng tại quốc gia của bạn, hãy liên hệ với đại lý Philips tại địa phương bạn. Cách khắc phục sự cố Nếu nồi cơm điện không hoạt động bình thường hoặc chất lượng nấu không tốt, hãy tham khảo bảng sau đây. Nếu bạn không thể giải quyết được vấn đề, vui lòng liên hệ với Trung Tâm Chăm Sóc Khách Hàng của Philips trong nước của bạn. 3 4222.200.0249.3 Indonesia Pendahuluan Selamat atas pembelian Anda dan selamat datang di Philips! Untuk memanfaatkan sepenuhnya dukungan yang ditawarkan Philips, daftarkan produk Anda di www.philips.com/welcome. Gambaran umum (Gbr. 1) A Baki kukusan B Indikator ukuran air C Panci bagian dalam D Tutup lubang uap yang dapat dilepas dengan bantalan segel karet E Tempat sendok nasi F Tuas pembuka G Kabel alat H Elemen pemanas I Sendok nasi J Gelas ukur K Lubang uap L Tutup M Lampu Cook [masak] N Lampu Warm [hangat] O Sambungan kabel listrik P Tuas kontrol Penting Bacalah petunjuk pengguna ini secara saksama sebelum Anda menggunakan alat dan simpan untuk referensi di kemudian hari. Bahaya -- Jangan sekali-kali merendam wadah penanak nasi di dalam air, atau membilasnya di bawah keran. Peringatan -- Periksalah apakah voltase pada alat sesuai dengan voltase listrik di rumah Anda, sebelum menghubungkan alat. -- Alat hanya boleh dihubungkan ke stopkontak dinding yang telah dibumikan. Selalu pastikan steker masuk dengan pas ke stopkontak dinding. -- Jangan gunakan alat ini jika steker, kabel listrik atau alatnya sendiri rusak. -- Jika kabel listrik rusak, maka harus diganti oleh Philips, pusat servis resmi Philips atau orang yang mempunyai keahlian sejenis agar terhindar dari bahaya. -- Alat ini tidak dimaksudkan untuk digunakan oleh orang (termasuk anakanak) dengan cacat fisik, indera atau kecakapan mental yang kurang, atau kurang pengalaman dan pengetahuan, kecuali jika mereka diberikan pengawasan atau petunjuk mengenai penggunaan alat oleh orang yang bertanggung jawab bagi keselamatan mereka. -- Anak kecil harus diawasi untuk memastikan mereka tidak bermain-main dengan alat ini. -- Jauhkan kabel listriknya dari jangkauan anak-anak. Jangan biarkan kabel listrik tergantung di tepi meja atau tempat alat berada. -- Pastikan elemen pemanas, sakelar magnet dan bagian luar panci dalam, bersih dan kering sebelum menancapkan steker ke stopkontak dinding. -- Jangan menutupi lubang uap sewaktu penanak nasi sedang bekerja. -- Jangan tancapkan steker pada alat atau mengoperasikan tuas kontrol dengan tangan basah. -- ------- -4 Perhatian Jangan sekali-kali menggunakan aksesori atau komponen apa pun dari produsen lain atau yang tidak secara khusus direkomendasikan oleh Philips. Jika Anda menggunakan aksesori atau komponen tersebut, garansi Anda menjadi batal. Hanya gunakan sendok nasi yang disediakan. Hindari menggunakan peralatan yang tajam. Jangan biarkan penanak nasi terkena suhu yang tinggi atau menempatkannya di atas kompor atau alat memasak lainnya yang sedang bekerja atau masih panas. Selalu masukkan pot bagian dalam sebelum Anda menancapkan steker ke stopkontak dinding. Sebelum membersihkannya, selalu cabut steker penanak nasi dan tunggu sampai dingin. Jangan menempatkan panci bagian dalam secara langsung di atas nyala api untuk memasak nasi. Alat ini dimaksudkan untuk penggunaan rumah tangga saja. Jika alat ini digunakan tidak sebagaimana layaknya atau untuk tujuan profesional atau semi-profesional, atau digunakan dengan cara yang tidak sesuai dengan petunjuknya, maka garansi menjadi tidak berlaku dan Philips tidak bertanggung jawab atas setiap kerusakan yang disebabkannya. Tempatkan penanak nasi pada permukaan yang stabil, horisontal dan rata. -- Permukaan alat akan menjadi panas pada saat dioperasikan. -- Hati-hati, ada uap panas yang keluar dari lubang uap penanak nasi sewaktu memasak atau sewaktu Anda membuka tutupnya. -- Selalu mencabut steker setiap kali selesai menggunakan alat. -- Jangan mengangkat dan memindahkan penanak nasi dengan menggenggam pegangannya saat alat masih bekerja. Medan elektromagnet (EMF) Alat Philips ini mematuhi semua standar yang berkenaan dengan medan elektromagnet (EMF). Jika ditangani dengan benar dan sesuai dengan instruksi petunjuk pengguna ini, alat tersebut aman digunakan berdasarkan pada bukti ilmiah yang kini tersedia. Sebelum menggunakan alat pertama kali. Lepaskan lapisan antara panci bagian dalam dan elemen pemanas. 1 Bersihkan tiap-tiap bagian penanak nasi dengan saksama sebelum menggunakan alat pertama kali (lihat bab ‘Membersihkan’). Pastikan semua bagian benar-benar kering sebelum Anda mulai menggunakan alat ini. Menggunakan alat Memasak nasi 1 Takar nasi dengan gelas ukur yang sudah disediakan. Tiap cangkir beras biasanya menghasilkan 2 cangkir nasi. Jangan melewati takaran yang ada pada panci bagian dalam. 1 cangkir beras sekitar 180 ml. Takaran beras untuk menanak nasi: Menu Volume/L Takaran beras (cangkir) Volume/L Takaran beras (cangkir) Beras putih 1,0 1-5,5 1,8 2-10 2 Cuci beras sampai bersih. Gunakan wadah lain untuk mencuci beras agar tidak merusak lapisan anti lengket pada panci bagian dalam. 3 Masukkan beras yang sudah dicuci sebelumnya ke panci bagian dalam. 4 Tambahkan air sampai ukuran yang ditunjukkan pada skala di bagian dalam panci sesuai dengan jumlah cangkir beras yang dipakai. Lalu ratakan permukaan beras. Misalnya, untuk 4 cangkir beras, tambahkan air hingga seukuran 4 cangkir yang ditunjukkan pada skala. ,, HD4729 (Gbr. 2) ,, HD4724 (Gbr. 3) Catatan: Ukuran yang tertera pada panci bagian dalam hanya sebagai panduan saja; Anda boleh saja menyesuaikan ukuran air dengan jenis beras yang berbeda sesuai selera. 5 Tekan tuas pelepas untuk membuka tutupnya. 6 Masukkan panci bagian dalam ke penanak nasi. Periksa apakah panci bagian dalam sudah pas menempel ke elemen pemanas (Gbr. 4). Pastikan bagian luar panci bagian dalam sudah kering dan bersih dan tidak ada benda apa pun pada elemen pemanas atau saklar magnetik. 7 Tutup kembali penanak nasi, pasang steker ke stopkontak dinding dan hidupkan alat. ,, Lampu masak menyala yang menandakan bahwa alat bekerja. (Gbr. 5) 8 Tekan tuas kontrol ke bawah untuk memulai proses memasak (Gbr. 6). Jika Anda tidak bisa menekan tuas kontrol, penanak nasi akan secara otomatis beralih ke modus keep-warm. Lampu cook [masak] akan padam dan lampu warm menyala. ,, Apabila proses memasak sudah selesai, lampu cook padam dan lampu warm yang menandakan bahwa penanak nasi sudah secara otomatis beralih ke fungsi keep-warm (Gbr. 7). 9 Buka tutupnya dan aduk-aduk agar nasi tidak lengket (Gbr. 8). Untuk hasil terbaik, lakukan ini setelah penanak nasi beralih ke fungsi keepwarm. Kemudian tutup kembali rapat-rapat. Dengan mengaduk-aduk nasi, uap yang berlebih akan keluar. Dengan cara ini, nasi bisa menjadi lebih pulen. 10Untuk mengakhiri proses memasak atau fungsi keep-warm, naikkan tuas kontrol, matikan listrik dan lepaskan steker dari stopkontak di dinding (Gbr. 9). Mengukus 1 Takar 3 cangkir air dengan gelas ukur dan tuangkan ke panci bagian dalam. Banyaknya air bervariasi, tergantung banyaknya makanan yang akan dikukus. 4222.200.0249.3 Ini akan berlangsung sekitar 8 menit untuk 3 cangkir air hingga mendidih. 2 Letakkan makanan yang akan dikukus pada piring atau baki kukusan. Untuk memastikan pengukusan yang merata, sebarkan makanan hingga merata dan jangan menumpuknya. 3 Taruh baki kukusan di dalam panci. Apabila Anda mengkombinasikan mengukus dan menanak nasi, pastikan takaran beras Anda akan menyisakan ruang untuk baki kukusan. Makanan yang dikukus akan siap apabila proses menanak nasi sudah selesai. 4 Jika Anda menggunakan piring lain, letakkan piring itu dalam baki kukusan. 5 Ikuti langkah 7 hingga 10 dalam bagian ‘Menanak nasi’. ,, Lampu cook [masak] akan menyala dan memulai proses pengukusan. ,, Makanan yang dikukus akan siap setelah proses menanak nasi selesai. 6 Buka tutup lalu dengan hati-hati, keluarkan makanan yang dikukus dari baki kukusan atau piring. Gunakan sarung tangan dapur atau kain, karena baki kukusan dan piring sangat panas. Garansi & servis Jika Anda butuh servis atau informasi atau mengalami masalah, harap kunjungi situs web Philips di www.philips.com atau hubungi Pusat Layanan Konsumen Philips di negara Anda (Anda dapat menemukan nomor teleponnya dalam leaflet garansi internasional). Jika tidak ada Pusat Layanan Konsumen di negara Anda, kunjungi dealer Philips setempat. Pemecahan Masalah Jika penanak nasi tidak berfungsi sebagaimana mestinya atau jika kualitas masakan kurang baik, lihat tabel di bawah. Jika Anda tidak dapat mengatasi masalah, harap hubungi Pusat Layanan Pelanggan Philips di negara Anda. Masalah Penyebab Solusi Lampu cook tidak menyala. Ada masalah sambungan. Periksa apakah penanak nasi sudah terhubung ke listrik dan steker sudah dimasukkan dengan pas ke dalam stopkontak dinding. Lampu rusak. Bawalah alat ke dealer Philips Anda atau pusat servis resmi Philips. Lampu rusak. Lampu warm [hangat] tidak menyala ketika proses memasak sudah selesai. Bawalah alat ke dealer Philips Anda atau pusat servis resmi Philips. Hati-hati dengan uap panas. 7 Untuk mengakhiri proses mengukus, naikkan tuas kontrol, matikan listrik dan cabut steker dari stopkontak dinding (Gbr. 9). Menghangatkan Dengan fungsi ini Anda dapat selalu menghangatkan nasi untuk jangka waktu yang lebih lama. Apabila proses menanak nasi selesai, penanak nasi secara otomatis beralih ke fungsi tetap hangat. Lampu cook [masak] padam dan lampu keep-warm, menyala. Kami sarankan Anda tidak menghangatkan lebih dari 12 jam agar rasanya tidak hilang. Lampu cook [masak] mungkin akan menyala sesekali untuk menandakan bahwa suhu di dalam penanak nasi sudah terlalu rendah dan pelat pemanas telah dinyalakan untuk memanaskan penanak nasi ke suhu tetap-hangat. Untuk mengakhiri mode keep-warm, naikkan tuas kontrol, matikan listrik dan lepaskan steker dari stopkontak dinding. Membersihkan Cabut steker penanak nasi sebelum membersihkannya. Air menciprat dari alat selama menanak nasi. Terlalu banyak air yang digunakan selama menanak nasi. Pastikan menambahkan air sampai ukuran yang ditunjukkan pada skala di bagian dalam panci sesuai dengan jumlah cangkir beras yang dipakai. Pastikan air tidak melebihi ukuran berikutnya pada skala karena hal ini dapat menyebabkan meluap selama menanak. Nasi tidak matang. Air yang ditambahkan kurang banyak. Tambahkan air sesuai skala pada panci bagian dalam (lihat bab ‘Menggunakan alat’). Proses memasak belum dimulai. Anda tidak menekan ke bawah tuas kontrol untuk memulai proses memasak. Panci bagian dalam kurang menempel ke elemen pemanas. Pastikan tidak ada benda asing pada elemen pemanas. Elemen pemanas rusak. Bawalah alat ke dealer Philips Anda atau pusat servis resmi Philips. Nasi yang ditanak terlalu keras. Tidak cukup air yang digunakan selama menanak nasi. Tambahkan sedikit air lagi sampai ukuran yang ditunjukkan pada skala di bagian dalam panci sesuai dengan jumlah cangkir beras yang dipakai. Pastikan air tidak melebihi ukuran berikutnya pada skala karena hal ini dapat menyebabkan meluap selama menanak. Nasi yang ditanak terlalu lembek. Terlalu banyak air yang digunakan selama menanak nasi. Pastikan menambahkan air sesuai skala pada panci bagian dalam (lihat bab ‘Menggunakan alat’). Nasi gosong. Beras belum dicuci dengan baik. Cuci beras hingga air bekas cucian habis. Penanak nasi tidak secara otomatis beralih ke fungsi keepwarm. Kontrol suhu rusak. Bawalah alat ke dealer Philips Anda atau pusat servis resmi Philips. Tunggu sampai penanak nasi sudah cukup dingin sebelum membersihkannya. Untuk melindungi lapisan anti-lengket panci bagian dalam, jangan: -- menggunakan panci bagian dalam untuk mencuci piring; -- menuangkan cuka ke dalam panci. 1 Keluarkan baki kukusan dan panci bagian dalam dari badan alat. 2 Gunakan kain lembab untuk mengelap bagian dalam penutup dan bagian luar dan dalam wadah penanak nasi. Lap elemen pemanas dengan kain kering. Jangan sekali-kali merendam wadah penanak nasi di dalam air, atau membilasnya di bawah keran. 3 Tarik tutup lubang uap ke atas untuk melepasnya dari tutup luar. (Gbr. 10) 4 Putar tutup lubang uap untuk melepaskannya dari lubang uang (Gbr. 11). 5 Lepaskan bantalan segel karet dari lubang uap (Gbr. 12). 6 Bersihkan panci bagian dalam, baki kukusan sendok nasi, dan tutup lubang uap dengan spons atau kain yang dibasahi air panas dengan cairan pembersih. Jangan gunakan bahan pembersih yang keras, sabut gosok atau perkakas logam untuk membersihkan panci bagian dalam karena bisa merusak lapisan anti-lengketnya pada panci bagian dalam. 7 Pasang kembali bantalan segel karet dari lubang uap. 8 Putar kembali tutup tangki uap ke dalam lubang uap. (Gbr. 13) 9 Tempatkan lubang uap kembali ke tutup luar dan dorong ke bawah hingga terpasang erat. Lingkungan -- Jangan membuang alat bersama limbah rumah tangga biasa jika alat sudah tidak bisa dipakai lagi, tetapi serahkan ke tempat pengumpulan barang bekas yang resmi untuk didaur ulang. Dengan melakukan hal ini, Anda ikut membantu melestarikan lingkungan (Gbr. 14). 5 4222.200.0249.3 English Introduction Congratulations on your purchase and welcome to Philips! To fully benefit from the support that Philips offers, register your product at www.philips. com/welcome. General description (Fig. 1) A Steam tray B Water level indication C Inner pot D Detachable steam vent cap with rubber sealing pad E Scoop holder F Release lever G Main body H Heating element I Rice scoop J Measuring cup K Steam vent L Lid M Cook light N Warm light O Mains cord connection P Control lever Important Read this user manual carefully before you use the appliance and save it for future reference. Danger -- Never immerse the housing of the rice cooker in water, nor rinse it under the tap. ------ ------ Warning Check if the voltage indicated on the appliance corresponds to the local mains voltage before you connect the appliance. Only connect the appliance to an earthed wall socket. Always make sure that the plug is inserted firmly into the wall socket. Do not use the appliance if the plug, the mains cord or the appliance itself is damaged. If the mains cord is damaged, it must be replaced by Philips, a service centre authorised by Philips or similarly qualified persons in order to avoid a hazard. This appliance is not intended for use by persons (including children) with reduced physical, sensory or mental capabilities, or lack of experience and knowledge, unless they have been given supervision or instruction concerning use of the appliance by a person responsible for their safety. Children should be supervised to ensure that they do not play with the appliance. Keep the mains cord out of the reach of children. Do not let the mains cord hang over the edge of the table or worktop on which the appliance stands. Make sure the heating element, the magnetic switch and the outside of the inner pot are clean and dry before you put the plug in the wall socket. Do not cover the steam vent and the lid while the rice cooker is operating. Do not plug in the appliance or operate the control lever with wet hands. Caution -- Never use any accessories or parts from other manufacturers or that Philips does not specifically recommend. If you use such accessories or parts, your guarantee becomes invalid. -- Only use the rice scoop provided. Avoid using sharp utensils. -- Do not expose the rice cooker to high temperatures, nor place it on a working or still hot stove or cooker. -- Always insert the inner pot before you put the plug in the wall socket. -- Always unplug the rice cooker and let it cool down before you clean it. -- Do not place the inner pot directly over an open fire to cook rice. -- This appliance is intended for household use only. If the appliance is used improperly or for professional or semi-professional purposes or if it is not used according to the instructions in this user manual, the guarantee becomes invalid and Philips refuses liability for any damage caused. -- Place the rice cooker on a stable, horizontal and level surface. -- The accessible surfaces may become hot when the appliance is in operation. 6 -- Beware of hot steam coming out of the steam vent during cooking or out of the rice cooker when you open the lid. -- Always unplug the appliance after use. -- Do not lift and move the rice cooker by its handle while it is operating. Electromagnetic fields (EMF) This Philips appliance complies with all standards regarding electromagnetic fields (EMF). If handled properly and according to the instructions in this user manual, the appliance is safe to use based on scientific evidence available today. Before first use Remove the sheet between the inner pot and the heating element. 1 Clean the parts of the rice cooker thoroughly before you use the appliance for the first time (see chapter ‘Cleaning’). Make sure all parts are completely dry before you start using the appliance. Using the appliance Cooking rice 1 Measure the rice with the measuring cup provided. Each cup of uncooked rice normally gives 2 bowls of cooked rice. Do not exceed the quantities indicated on the inside of the inner pot. 1 cup of rice is approx. 180ml. Quantity for rice cooking: Menu Volume/L Quantity of rice (cups) Volume/L Quantity of rice (cups) White rice 1.0 1-5.5 1.8 2-10 2 Wash the rice thoroughly. Use a separate container to wash the rice to avoid damaging the non-stick coating of the inner pot. 3 Put the pre-washed rice in the inner pot. 4 Add water to the level indicated on the scale inside the inner pot that corresponds to the number of cups of rice used. Then smooth the rice surface. For instance, if you cook 4 cups of rice, add water up to the 4-cup level indicated on the scale. ,, HD4729 (Fig. 2) ,, HD4724 (Fig. 3) Note:The level marked inside the inner pot is just an indication; you can always adjust the water level for different types of rice and your own preference. 5 Press the release lever to open the lid. 6 Put the inner pot in the rice cooker. Check if the inner pot is in proper contact with the heating element (Fig. 4). Make sure that the outside of the inner pot is dry and clean and that there is no foreign residue on the heating element or the magnetic switch. 7 Close the lid of the rice cooker, put the plug in the wall socket and switch on the mains. ,, The cook light goes on to indicate that the appliance is on. (Fig. 5) 8 Press the control lever down to start the cooking process (Fig. 6). If you fail to press down the control lever, the rice cooker automatically switches to the keep-warm mode. The cook light goes out and the warm light goes on. ,, When the cooking process is finished, the cook light goes out and the warm light goes on to indicate that the rice cooker has automatically switched to the keep-warm mode (Fig. 7). 9 Open the lid and stir the rice to loosen it (Fig. 8). For the best results, do this just after the rice cooker has switched to keepwarm mode. Then close the lid firmly. Stirring the rice allows excess steam to escape. This gives fluffier rice. 10To end the cooking process or keep-warm mode, pull up the control lever, switch off the mains and remove the mains plug from the wall socket (Fig. 9). Steaming 1 Measure 3 cups of water with the measuring cup and pour the water into the inner pot. The amount of water varies according to the quantity of food being steamed. It takes approx. 8 minutes for 3 cups of water to come to the boil. 4222.200.0249.3 2 Put the food to be steamed on a plate or in the steam tray. To ensure even steaming, spread out the food evenly and do not pile it up. 3 Put the steam tray in the inner pot. When you combine steaming and rice cooking, make sure you measure out an amount of rice that leaves enough room for the steam tray. The steamed food will be ready when the rice cooking process is finished. 4 If you use a separate plate, put it in the steam tray. 5 Follow steps 7 to 10 in section ‘Cooking rice’. ,, The cook light goes on and the steaming process starts. ,, The steamed food is ready when the rice cooking process is finished. 6 Open the lid and carefully remove the steamed food from the plate or steam tray. Use a kitchen glove or a cloth, as the plate and the steam tray are very hot. Beware of the hot steam. 7 To end the steaming process, pull up the control lever, switch off the mains and remove the mains plug from the wall socket (Fig. 9). Keeping warm This mode allows you to keep your rice warm for a longer period of time. When the rice cooking process is finished, the rice cooker automatically switches to the keep-warm mode. The cook light goes out and the keepwarm light goes on. We advise you to keep rice warm for not more than 12 hours so as to preserve its taste. The cook light may go on occasionally to indicate that the temperature inside the rice cooker has become too low and the heating element has switched on to heat up the rice cooker to the right keep-warm temperature. To end the keep-warm mode, pull up the control lever, switch off the mains and remove the mains plug from the wall socket. Troubleshooting If the rice cooker does not function properly or if the cooking quality is insufficient, consult the table below. If you are unable to solve the problem, please contact the Philips Consumer Care Centre in your country. Problem The cook There is a light does not connection go on. problem. The light is The warm light does not defective. go on when the cooking process is finished. Take the appliance to your Philips dealer or a service centre authorised by Philips. Water spills out of the appliance during rice cooking. Too much water was used for cooking rice. Make sure that you add water to the level indicated on the scale inside the inner pot that corresponds to the number of cups of rice used. Make sure the water does not exceed the next level on the scale as this may cause overflow during cooking. The rice is not cooked. Not enough water has been added. Add water according to the scale on the inside of the inner pot (see chapter ‘Using the appliance’). The cooking process has not started. You have failed to press down the control lever to start the cooking process. The inner pot is not properly in contact with the heating element. Make sure that there is no foreign residue on the heating element. The heating element is damaged. Take the appliance to your Philips dealer or a service centre authorised by Philips. The rice is cooked too hard. Not enough water was used for cooking rice. Add slightly more water to the level indicated on the cale inside the inner pot that corresponds to the number of cups of rice used. Make sure the water does not exceed the next level on the scale as this may cause overflow during cooking. The rice is cooked too soft. Too much water was used for cooking rice. Make sure you add water according to the scale on the inside of the inner pot (see chapter ‘Using the appliance’). The rice is scorched. The rice has not been rinsed well. Rinse the rice until water runs clear. The rice cooker does not automatically switch to keep-warm mode. The temperature control is defective. Take the appliance to your Philips dealer or a service centre authorised by Philips. To protect the non-stick coating of the inner pot, do not: -- use the inner pot for washing dishes; -- put vinegar in the pot. 2 Use a damp cloth to wipe the inner lid and the outside and inside of the body of the rice cooker. Wipe the heating element with a dry cloth. Never immerse the body of the rice cooker in water, nor rinse it under the tap. 3 Pull the steam vent upwards to remove it from the outer lid. (Fig. 10) 4 Unscrew the steam vent cap from the steam vent (Fig. 11). 5 Remove the rubber sealing pad from the steam vent (Fig. 12). 6 Clean the inner pot, steam tray, rice scoop, steam vent cap, steam vent and rubber sealing pad with a sponge or a cloth in hot water with some washing-up liquid. Do not use abrasive cleaning agents, scourers or metal utensils to clean the inner pot, as they damage the non-stick coating of the inner pot. 7 Reattach the rubber sealing pad to the steam vent. 8 Screw the steam vent cap back onto the steam vent. (Fig. 13) 9 Put the steam vent back into the outer lid and push it down firmly. Check if the rice cooker is connected to the mains and if the plug is inserted firmly into the wall socket. Take the appliance to your Philips dealer or a service centre authorised by Philips. Wait until the rice cooker has cooled down sufficiently before you clean it. appliance. Solution The light is defective. Cleaning Unplug the rice cooker before you clean it. 1 Take the steam tray and the inner pot out of the body of the Cause Environment -- Do not throw away the appliance with the normal household waste at the end of its life, but hand it in at an official collection point for recycling. By doing this, you help to preserve the environment (Fig. 14). Guarantee & service If you need service or information or if you have a problem, please visit the Philips website at www.philips.com or contact the Philips Consumer Care Centre in your country (you find its phone number in the worldwide guarantee leaflet). If there is no Consumer Care Centre in your country, go to your local Philips dealer. 7 4222.200.0249.3 ปริมาณขาวสำ�หรับการหุง: ภาษาไทย เมนู ปริมาณ/ลิตร ปริมาณขาว (ถวย) ปริมาณ/ลิตร ปริมาณขาว (ถวย) บทนำ� ขาวสวย 1.0 1-5.5 1.8 2-10 ขอแสดงความยินดีที่คุณสั่งซื้อและยินดีตอนรับสผลิตภัณฑของ Philips! เพื่อใหคุณไดรับประโยชนอยางเต็มที่จากบริการที่ Philips มอบให โปรดลงทะเบียนผลิตภัณฑของคุณที่ www.philips.com/welcome A B C D E F G H I J K L M N O P ไมควรใชหมอในซาวขาว เพราะผิวเคลือบอาจเสียหายได ถาดสำ�หรับนึ่งอาหาร 3 เทขาวที่ซาวเรียบรอยแลวลงในหมอใน ขีดแสดงระดับน หมอภายใน ฝาปดชองไอนถอดออกไดพรอมแผนซีลยาง ชองสำ�หรับใสทัพพี ----- หมายเหตุ: ระดับนที่แสดงภายในหมอเปนการคาดคะเนเทานั้น สามารถเติมนไดตามความตองการหรือตามชนิด ทัพพีตักขาว ถวยตวง ชองระบายไอน ฝาปด สัญญาณไฟแสดงการหุงขาว สัญญาณไฟแสดงการอน ชองเชื่อมตอสายไฟ ปุ่มควบคุม อันตราย หามจมหมอหุงขาวลงในนหรือเปดกอกนลาง คำ�เตือน กอนใชงานโปรดตรวจสอบแรงดันไฟที่ระบุบนผลิตภัณฑวาตรงกับแรงดันไฟที่ใชภายในบานหรือไม เสียบปลั๊กไฟหมอหุงขาวเขากับเตารับบนผนังที่ตอสายดินไวเรียบรอยแลว จากนั้นตรวจดูใหแนใจอีกครั้งวาเสียบปลั๊กไฟ เขากับเตารับบนผนังเรียบรอยแลวหรือไม หามใชเครื่อง หากปลั๊กไฟ สายไฟ หรือตัวเครื่องเกิดการชำ�รุด ไมควรใหบุคคล (รวมทั้งเด็กเล็ก) ที่มีสภาพรางกายไมแข็งแรงหรือสภาพจิตใจไมปกติ หรือขาดประสบการณและความ รความเขาใจ นำ�อุปกรณนี้ไปใชงาน เวนแตจะอยในการควบคุมดูแลหรือไดรับคำ�แนะนำ�ในการใชงานโดยผที่รับผิดชอบ ในดานความปลอดภัย ตรวจดูใหแนใจวาแผนทำ�ความรอน เทอรโมสตัท และดานนอกของหมอในสะอาดและแหงกอนเสียบปลั๊กไฟเขากับเตา -- ควรเก็บสายไฟใหพนมือเด็ก ไมควรปลอยใหสายไฟหอยลงมาจากขอบโตะหรือบริเวณที่วางเครื่องตมกาแฟอย รับบนผนัง หามปดชองระบายไอนและฝาหมอในขณะที่หมอหุงขาวทำ�งาน ไมควรใชมือเปยกเสียบปลั๊กไฟเครื่องหรือใชงานปุ่มควบคุม ขอควรระวัง หามใชอุปกรณเสริม หรือชิ้นสวนที่ผลิตโดยผผลิตรายอื่น หรือบริษัทที่ฟลิปสไมไดแนะนำ� การรับประกันจะเปนโมฆะ ถอดปลั๊กไฟออกทุกครั้งหลังเลิกใชงาน แลวปลอยใหเย็นลงกอนทำ�ความสะอาด หามตั้งหมอในไวบนเตาไฟเพื่อหุงขาวโดยตรง หมอหุงขาวเครื่องนี้ใชภายในครัวเรือนเทานั้น หากนำ�ไปใชในทางการคาหรือกึ่งการคา หรือนำ�ไปใชโดยไมถูกตองตามคำ� แนะนำ�การใชงานในคมือนี้ การรับประกันถือวาเปนโมฆะ และทางบริษัทฟลิปสจะไมรับผิดชอบคาเสียหายใดๆ ทั้งสิ้น -- วางหมอหุงขาวไวบนพื้นผิวที่เรียบและมั่นคง -- ควรระวังไอนพงออกจากชองระบายในระหวางหุงขาวหรือเมื่อเปดฝาหมอหุงขาว ---- ,, สัญญาณไฟแสดงการหุงขาวจะสวางขึ้น เมื่อหมอหุงขาวเริ่มทำ�งาน (รูปที่ 5) 8 กดปุ่มควบคุมลง เพื่อเริ่มการหุงขาว (รูปที่ 6) หากไมสามารถกดปุ่มดังกลาวได หมอหุงขาวจะเขาสโหมดอนโดยอัตโนมัติ สัญญาณไฟแสดงการหุงขาวจะดับลงและสัญญาณ ไฟแสดงการอนจะสวางแทน ,, เมื่อหุงขาวเสร็จเรียบรอยแลว สัญญาณไฟหุงขาวจะดับลงและสัญญาณไฟอนขาวจะสวางขึ้นแทน เพื่อ ใหทราบวาหมอหุงขาวเขาสโหมดอนรอนโดยอัตโนมัติเรียบรอยแลว (รูปที่ 7) 9 เปดฝาและคนขาวไมใหติดกัน (รูปที่ 8) เพื่อใหไดผลดีที่สุด ควรคนขาวทันทีหลังจากหมอหุงขาวเขาสโหมดอนรอน จากนั้นปดฝาใหสนิท การคนขาวนี้เปนการระบาย ไอนสวนเกิน ซึ่งจะชวยใหขาวสวยรวนซุยยิ่งขึ้น 10 เมื่อหุงขาวเสร็จเรียบรอยแลวหรือออกจากโหมดอน ใหดันสวิตชควบคุมการทำ�งานขึ้น ปดสวิตชและถอดปลั๊ก ไฟออกจากเตารับ (รูปที่ 9) การนึ่งอาหาร 1 ตวงน 3 ถวยตวง แลวเทใสลงในหมอใน ปริมาณนจะแตกตางกันโดยขึ้นอยกับปริมาณอาหารที่นึ่ง น 3 ถวยตวงจะเดือดในเวลาประมาณ 8 นาที 2 วางอาหารที่ตองการนึ่งลงในจานหรือบนถาดสำ�หรับนึ่งอาหาร เพื่อการนึ่งอยางทั่วถึง ควรจัดอาหารใหกระจายออกเสมอกัน และไมควรกองอาหารทับกัน 3 วางถาดสำ�หรับนึ่งอาหารลงในหมอใน หากใชตัวเลือกการนึ่งอาหารและหุงขาวพรอมกัน ตรวจดูวาปริมาณขาวนั้นยังพอมีเนื้อที่วางเหลือพอสำ�หรับการนึ่งหรือไม อาหารที่นึ่งจะสุกพรอมกับขาวที่หุง 4 หากใชจานแยกตางหาก ใหวางจานบนถาดสำ�หรับนึ่ง ,, ใสหมอในทุกครั้งกอนเสียบปลั๊กไฟเขากับเตารับบนผนัง -- ตรวจสอบใหแนใจวาดานนอกของหมอในแหงสะอาดและปราศจากสิ่งแปลกปลอมบนแผนความรอนหรือบนเทอรโมสตัท 7 ปดฝาหมอหุงขาว เสียบปลั๊กไฟแลวเปดสวิตชการทำ�งาน ไมควรวางหมอหุงขาวลงบนบริเวณที่มีอุณหภูมิสูง หรือวางบนเตาไฟหรือเครื่องหุงตมที่กำ�ลังใชงานหรือที่มีความรอน --- 6 วางหมอในลงในหมอหุงขาว ตรวจดูวาวางหมอในตรงกับแผนความรอนแลวหรือยัง (รูปที่ 4) 5 ทำ�ตามขั้นตอนที่ 7 ถึง 10 ในบท ‘วิธีหุงขาว’ ใชทัพพีตักขาวที่ใหมาเทานั้น ไมควรใชอุปกรณอื่นๆ ที่มีความคม -- ของขาวที่หุง ทันที หากคุณใชอุปกรณเสริม หรือชิ้นสวนดังกลาว --- HD4724 (รูปที่ 3) 5 กดปุ่มคลายล็อคเพื่อเปดฝา นการอบรมจากฟลิปสดำ�เนินการเปลี่ยนให เพื่อหลีกเลี่ยงอันตรายที่อาจเกิดขึ้นได -- -- ,, หากสายไฟหลักของเครื่องเสียหาย ควรนำ�ไปเปลี่ยนที่บริษัทฟลิปส, ศูนยบริการที่ไดรับอนุญาตจากฟลิปส หรือบุคคลที่ผา เด็กเล็กควรไดรับการดูแลเพื่อปองกันไมใหเด็กนำ�อุปกรณนี้ไปเลน -- HD4729 (รูปที่ 2) แผนทำ�ความรอน ตัวหมอ --- กัน ตัวอยางเชน ถาหุงขาว 4 ถวยตวง ควรเติมนถึงระดับนเลข 4 ,, ควรอานคมืออยางละเอียดกอนใชงานและเก็บไวเพื่อใชอางอิงในครั้งตอไป -- 4 เติมนตามระดับนที่แสดงอยภายในหมอตามจำ�นวนขาวที่ตวง จากนั้นเกลี่ยขาวที่จะหุงใหอยในระดับที่เสมอ ปุ่มคลายล็อค ขอควรจำ� -- 2 ซาวขาวใหสะอาด สวนประกอบ (รูปที่ 1) ,, หามยกและเคลื่อนยายหมอหุงขาวโดยดึงดามจับขณะหมอหุงขาวทำ�งาน Electromagnetic fields (EMF) ผลิตภัณฑของฟลิปสไดมาตรฐานดานคลื่นแมเหล็กไฟฟา (EMF) หากมีการใชงานอยางเหมาะสมและสอดคลองกับคำ�แนะนำ� ในคมือนี้ คุณสามารถใชผลิตภัณฑไดอยางปลอดภัยตามขอพิสูจนทางวิทยาศาสตรในปจจุบัน กอนใชงานครั้งแรก ลอกแผนรองระหวางหมอในและแผนทำ�ความรอนออกกอน 1 ควรทำ�ความสะอาดหมอหุงขาวและอุปกรณตางๆ กอนใชงานในครั้งแรก (ดูไดจากบท ‘การทำ�ความสะอาด’) และควรเช็ดใหแหงกอนใชงาน การใชงาน วิธีหุงขาว 1 ตวงขาวดวยถวยตวงที่จัดให ขาวสาร 1 ถวยสามารถหุงขาวสวยได 2 ชาม ทั้งนี้ไมควรตวงขาวสารเกินตำ�แหนงที่ระบุไวภายในหมอ ขาวสาร 1 ถวยจะมี ปริมาณราว 180 มิลลิลิตร อาหารจะนึ่งเสร็จพรอมกับขาวที่หุงสุก 6 เปดฝาแลวนำ�อาหารที่นึ่งออกจากแผนทำ�ความรอนหรือออกจากถาดสำ�หรับนึ่งอยางระมัดระวัง ควรใชถุงมือ กันความรอนหรือผานำ�อาหารออกมา เพราะแผนทำ�ความรอนและถาดสำ�หรับนึ่งอาหารมีความรอนมาก ระวังไอนรอน 7 เมื่อนึ่งอาหารเสร็จเรียบรอยแลว ดันสวิตชควบคุมการทำ�งานขึ้น ปดสวิตช และถอดปลั๊กไฟออกจากเตา รับ (รูปที่ 9) ขณะที่เครื่องกำ�ลังทำ�งานอย บริเวณรอบๆ พื้นที่วางหมออาจจะมีความรอน ถอดปลั๊กไฟออกทุกครั้งหลังเลิกใชงาน เมื่อสัญญาณไฟแสดงการทำ�อาหารสวางขึ้น โหมดการนึ่งอาหารจะเริ่มขึ้น การอน โหมดนี้สามารถอนขาวใหรอนไดนานขึ้น เมื่อหุงขาวสุกแลว หมอหุงขาวจะเปลี่ยนไปที่โหมดอนโดยอัตโนมัติ สัญญาณไฟแสดงการหุงจะดับลงและสัญญาณไฟการอน จะสวางขึ้น ขอแนะนำ�ไมใหอนขาวนานเกิน 12 ชั่วโมง เพื่อคงรสชาติที่ดีไว สัญญาณไฟแสดงการหุงขาวจะสวางเปนครั้งคราว เพื่อแจงวาอุณหภูมิภายในหมอหุงขาวตเกินไป และแผนความรอนจะทำ�งาน เพื่อเพิ่มอุณหภูมิภายในหมอใหถึงระดับอุณหภูมิสำ�หรับการอน เมื่อใชงานโหมดอนอาหารเสร็จเรียบรอยแลว ดันสวิตชควบคุมการทำ�งานขึ้น ปดสวิตชแลวถอดปลั๊กไฟออกจากเตารับ การทำ�ความสะอาด ถอดปลั๊กไฟหมอหุงขาวออกกอนเริ่มทำ�ความสะอาด รอจนกวาหมอหุงขาวเย็นลงกอนเริ่มทำ�ความสะอาด เพื่อปองกันสารเคลือบกันอาหารติดของหมอใน คุณไมควร: --- ใชหมอในลางจานชาม ใสนสมสายชูลงในหมอ 1 นำ�ถาดสำ�หรับนึ่งอาหารและหมอในออกจากตัวหมอหุงขาว 2 ใชผาชุบนบิดพอหมาดเพื่อเช็ดทำ�ความสะอาดฝาใน ดานนอกและดานในของตัวหมอหุงขาว ควรเช็ด แผนทำ�ความรอนดวยผาแหง 8 4222.200.0249.3 หามจมหมอหุงขาวลงในนและหามเปดนกอกลางเปนอันขาด 3 ดึงฝาปดชองไอนขึ้นเพื่อถอดออกจากฝาดานนอก (รูปที่ 10) 4 คลายเกลียวฝาปดชองไอนจากชองระบายไอน (รูปที่ 11) 5 ถอดแผนซีลยางออกจากชองระบายไอน (รูปที่ 12) 6 ทำ�ความสะอาดหมอใน ถาดสำ�หรับนึ่งอาหาร ทัพพีตักขาว ฝาปดชองไอน ชองระบายไอน และแผนซีลยา งดวยฟองนหรือผาชุบนอนที่ผสมนยาลางจานเล็กนอย ไมควรใชสารขัดถู ใยขัดถูหรือฝอยขัดหมอ หรือเครื่องใชที่เปนโลหะทำ�ความสะอาดหมอใน เพราะอาจทำ�ลายสาร เคลือบภายในหมอได 7 ใสแผนซีลยางกลับเขาชองระบายไอน 8 หมุนฝาปดชองไอนกลับเขาที่ตามเดิม (รูปที่ 13) 9 วางชองระบายไอนกลับเขาที่ฝาดานนอกแลวกดลงใหแนน สภาพแวดลอม -- หามทิ้งไดรรวมกับขยะในครัวเรือนทั่วไป เมื่อเครื่องหมดอายุการใชงานแลว ควรทิ้งลงในถังขยะสำ�หรับนำ�กลับ ไปใชใหมได (รีไซเคิล) เพื่อชวยรักษาสภาวะสิ่งแวดลอมที่ดี (รูปที่ 14) การรับประกันและการบริการ หากคุณตองการขอรับบริการหรือตองการทราบขอมูล โปรดเขาชมเว็บไซตของ Philips ไดที่ www.philips.com หรือติดตอ ศูนยบริการดูแลลูกคาของบริษัท Philips ในประเทศของคุณ (หมายเลขโทรศัพทของศูนยบริการฯ อยในเอกสารแผนพับเกี่ยว กับการรับประกันทั่วโลก) หากในประเทศของคุณไมมีศูนยบริการ โปรดติดตอตัวแทนจำ�หนายผลิตภัณฑของบริษัท Philips ใน ประเทศ การแกปญหา หากหมอหุงขาวทำ�งานผิดปกติ หรือประสิทธิภาพการทำ�งานไมดีพอ โปรดอานขอมูลในตารางดานลาง หากไมสามารถแกไขปญ หาได โปรดติดตอศูนยบริการลูกคาของ Philips ในประเทศของทาน ปญหา สาเหตุ สัญญาณไฟแสดงกา มีปญหาเกี่ยวกับการตอสายไฟ รหุงขาวไมทำ�งาน สัญญาณไฟแสดงกา รอนอาหารไมทำ�งาน การแกปญหา ตรวจดูวาตอสายไฟหมอหุงขาวเรียบรอยแลวหรือยัง หรือปลั๊ก ไฟเสียบเขากับเตารับที่ผนังแนนดีแลวหรือยัง สัญญาณไฟทำ�งานบกพรอง นำ�หมอหุงขาวไปที่ตัวแทนจำ�หนายฟลิปสหรือศูนยบริการที่ได สัญญาณไฟทำ�งานบกพรอง นำ�หมอหุงขาวไปที่ตัวแทนจำ�หนายฟลิปสหรือศูนยบริการที่ได เติมนมากเกินไปสำ�หรับกา ตรวจดูใหแนใจวาคุณเติมนใหไดปริมาณตรงกับขีดระดับน เมื่อขาวหุงเสร็จเรียบ รับอนุญาตจากฟลิปส รับอนุญาตจากฟลิปส รอยแลว นหกออกจากหมอหุง ขาวขณะหุงขาว รหุงขาว ที่แสดงอยภายในหมอซึ่งสอดคลองกับจำ�นวนขาวที่ตวง ตรวจ ดูใหแนใจวาระดับนไมสูงเกินขีดระดับถัดไป ซึ่งอาจเปนสาเห ตุใหนลนออกมาขณะหุงขาว หมอหุงขาวไมทำ�งาน เติมนไมเพียงพอ ควรเติมนตามที่กำ�หนดไวภายในหมอในโดยดูที่ขีดบอกระดับ หมอหุงขาวไมทำ�งาน ไมไดกดปุ่มควบคุมการทำ�งานเพื่อเริ่มการหุง หมอในไมแนบสนิทกับแผนท ตรวจดูวาไมมีสิ่งแปลกปลอมอยบนทำ�แผนทำ�ความรอน แผนทำ�ความรอนชำ�รุดเสียหาย นำ�หมอหุงขาวไปที่ตัวแทนจำ�หนายฟลิปสหรือศูนยบริการที่ได เติมนไมเพียงพอสำ�หรับกา เติมนใหมากกวาปริมาณตรงกับขีดระดับนที่แสดงอยภาย ำ�ความรอน ขาวที่หุงแข็งเกินไป รหุงขาว น (ดูไดจากหัวขอ ‘การใชงาน’) รับอนุญาตจากฟลิปส ในหมอซึ่งสอดคลองกับจำ�นวนขาวที่ตวงเพียงเล็กนอย ตรวจ ดูใหแนใจวาระดับนไมสูงเกินขีดระดับถัดไป ซึ่งอาจเปนสาเห ตุใหนลนออกมาขณะหุงขาว ขาวที่หุงนิ่มเกินไป เติมนมากเกินไปสำ�หรับกา ตรวจดูใหแนใจวาคุณเติมนตามที่กำ�หนดไวภายในหมอในโดย ขาวไหมเกรียม ซาวขาวไมดีพอ ซาวขาวจนกระทั่งนใสขึ้น หมอหุงขาวไมเปลี่ย ปุ่มควบคุมอุณหภูมิมีความ นำ�หมอหุงขาวไปที่ตัวแทนจำ�หนายฟลิปสหรือศูนยบริการที่ได นไปที่โหมดอนโดยอั ตโนมัติ 9 รหุงขาว ผิดปกติ ดูที่ขีดบอกระดับน (ดูไดจากหัวขอ ‘การใชงาน’) รับอนุญาตจากฟลิปส 4222.200.0249.3