1
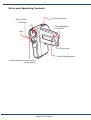
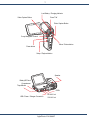
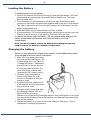
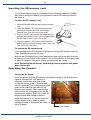
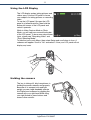
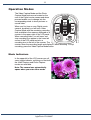
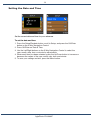
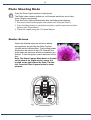
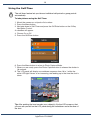
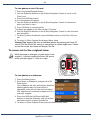
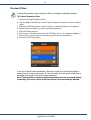
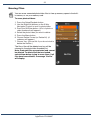
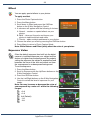
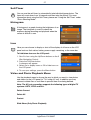
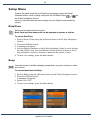
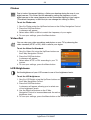
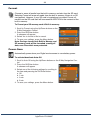
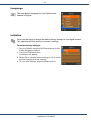
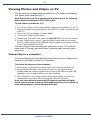
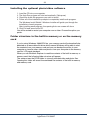
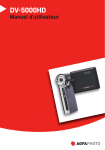
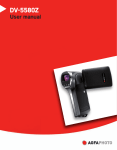
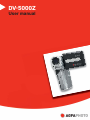
DV-5000Z
User manual
2
Precautions
• Do not point the camera directly at the sun or other intense light sources
which could damage your eyesight.
• Do not try to open the case of the camera or attempt to modify this camera in
any way. Highvoltage internal components create the risk of electric shock
when exposed. Maintenance and repairs should be carried out only by
authorized service providers.
• Do not fire the flash too close to the eyes of animals or people - especially
young children - as this may damage their eyes. In particular, maintain a
distance of at least one meter from infants when using the flash.
• Keep the camera away from water and other liquids. Do not use the camera
with wet hands. Never use the camera in the rain or snow. Moisture creates
the danger of electric shock.
· Keep the camera and its accessories out of the reach of children and animals
to prevent accidents or damage to the camera.
• If you notice smoke or a strange odor coming from the camera, turn the
power off immediately. Take the camera to the nearest authorized service
center for repair. Never attempt to repair the camera on your own.
• Use only the recommended power accessories. Use of power sources not
expressly recommended for this equipment may lead to overheating,
distortion of the equipment, fire, electrical shock or other hazards.
Disclaimer
We assume no responsibility over and above the provisions of the Product
Liability Law for damages suffered by the user or third parties as a result of the
inappropriate handling of the product or its accessories, or by their operational
failure and by their use. We reserve the right to make changes to this product
and its accessories without prior notice.
Warning!
Never try to open the camera or to take it apart. This will invalidate all guarantee
claims. Danger of explosion if batteries are not changed properly. Only replace
the batteries with the same type or another type approved by the manufacturer.
Used batteries must be disposed of in accordance with the manufacturer’s
guidelines and local regulations.
AgfaPhoto DV-5000Z
3
Table of Contents
Precautions ................................................................................................ 2
Disclaimer........................................................................................................................ 2
Warning! .......................................................................................................................... 2
Table of Contents ...................................................................................... 3
Introduction ............................................................................................... 5
Getting Ready ................................................................................................................. 5
What’s inside the box? .................................................................................................... 5
Parts and Operating Controls .......................................................................................... 6
Loading the Battery ......................................................................................................... 8
Charging the battery ........................................................................................................ 8
Cautions: ......................................................................................................................... 9
Inserting the SD memory card ....................................................................................... 10
Operating the Camera ................................................................................................... 10
Using the LCD Display .................................................................................................. 11
Holding the camera ....................................................................................................... 11
Operation Modes ..................................................................................... 12
Mode Indicators ............................................................................................................. 12
Navigating the Main Menu ............................................................................................. 13
Setting the Date and Time ............................................................................................. 14
Recording Video ...................................................................................... 15
Photo Shooting Mode ............................................................................. 16
Shutter Release............................................................................................................. 16
Using the Flash ............................................................................................................. 17
Setting the White Balance ............................................................................................. 17
Using the Self-Time ....................................................................................................... 18
Playback ........................................................................................................................ 19
To zoom out to the original view: ................................................................................... 20
Protect Files .................................................................................................................. 21
Erasing Flies.................................................................................................................. 22
AgfaPhoto DV-5000Z
4
Video and Photo Menu ............................................................................ 23
Video Quality ................................................................................................................. 23
Image Size .................................................................................................................... 23
Night Shot ..................................................................................................................... 24
White Balance ............................................................................................................... 24
Flash ............................................................................................................................. 25
Effect ............................................................................................................................. 26
Exposure Value ............................................................................................................. 26
Self-Timer ...................................................................................................................... 27
Histogram ...................................................................................................................... 27
Icon ............................................................................................................................... 27
Video and Photo Playback Menu .................................................................................. 27
Setup Menu .............................................................................................. 28
Date/Time ...................................................................................................................... 28
Beep .............................................................................................................................. 28
Flicker ............................................................................................................................ 29
Video-Out ...................................................................................................................... 29
LCD Brightness ............................................................................................................. 29
Format ........................................................................................................................... 30
Power-Save ................................................................................................................... 30
Language ...................................................................................................................... 31
Initialize ......................................................................................................................... 31
Viewing Photos and Videos on TV ......................................................... 32
Connecting to a computer ............................................................................................. 32
Installing the optional photo/video software ................................................................... 33
Folder structure in the built-in memory or on the memory card ..................................... 33
Specifications .......................................................................................... 34
Customer care ......................................................................................... 35
Disposal of Waste Equipment by Users in Private Households in the European Union 36
FCC Compliance and Advisory...................................................................................... 36
AgfaPhoto DV-5000Z
5
Introduction
Thank you for purchasing this AgfaPhoto digital camera. Please read these
operating instructions carefully in order to use the digital camera correctly. Keep
the instructions in a safe place after reading so that you can refer to them later.
Getting Ready
Take some time to become well acquainted with your new AgfaPhoto DV-5000Z
camera before using it. Also pay special attention to the instructions that follow
that explain how to set it up for first use.
What’s inside the box?
Your digital camera is bundled with the following accessories:
• AgfaPhoto DV-5000Z
• CD (containing installation drivers for connecting camera to a PC, additional
photo/video software for use with your digital camera, and user manual)
• Pouch
• Strap
• Battery
• Quick Start Guide
• Power adapter (for charging the battery)
• USB cable (for connecting the camera to a personal computer)
• 3 RCA YPbPr cables and 2 RCA audio cables
AgfaPhoto DV-5000Z
6
Parts and Operating Controls
Ext. Microphone Jack
1. Auto-focus LED
2. Video-Light
Lens
1. Recording indicator
2. Power LED
Flash
LCD Panel (open)
Built-in Single Microphone
Infrared remote control sensor ( remote
control optional )
AgfaPhoto DV-5000Z
7
Low Battery / Charging Indicator
Zoom T/W
Video Capture Button
Photo Capture Button
5-way Navigation Control
Menu / Return button
Power button
Setup / Playback button
Speaker
Battery/SD Card
Compartment
Tripod Mount
YPbPr
USB / Power / Charger Connection
RCA A/V-out
YUV A/V-out
AgfaPhoto DV-5000Z
8
Loading the Battery
To load the battery into the camera:
1. Position the camera with the lens facing you and open the battery / SD card
compartment by pressing the cover and sliding it towards you. The cover
door will snap open.
2. Turn the battery so that the label is facing to the right and the three gold
contacts on the battery are positioned upwards and to the rear of the camera.
The side of the battery with the three gold contacts will slide directly into the
battery compartment first.
3. Slide the battery into the compartment until fully inserted.
4. Close the battery / SD card compartment by pressing down on the cover and
sliding it towards the rear of the camera. The cover will snap shut.
To remove the battery, open the battery / SD card compartment and push the
battery compartment clip upwards; then slide the battery out of the
compartment.
Note: You do not need to remove the battery for charging but you may
need to remove the battery to replace it in the future.
Charging the battery
Before you can operate your Digital movie camera, the included battery needs
to be charged for 6 hours without interruption.
1. Make sure your battery has been
fully inserted with the Battery / SD
Compartment door shut. Refer to
"Loading the Battery." Additionally
you may want to ensure that the
SD card has been inserted. (For
more information, please read
"Inserting the SD memory card.")
2. Carefully open the protective
rubber cover below the main
controls of the camera with your
thumb or finger.
3. Connect the power adapter cord
to the camera and the transformer
plug to a power outlet.
4. Charging should commence and
the charging indicator LED will
light red. When charging is
finished you will see that the charging indicator has turned green. At this point
you may safely disconnect the power adapter cord and the transformer plug
and use the camera.
5. Charge the battery for 6 hours for the initial charge or charge for 1 hour if
subsequently recharging the battery.
AgfaPhoto DV-5000Z
9
Cautions:
• To protect and prolong the life of the battery pack, do not charge it for more
than 24 hours at a time.
• This is a Lithium-Ion battery pack; there is no need to completely use or
discharge it before recharging.
• It takes approximately 60 minutes to bring a fully discharged battery pack to
full charge. Charging it within a temperature range of 5 to 40 degrees Celsius
(41 to 104 degrees Fahrenheit) is recommended. Charging times will vary
according to the surrounding humidity and battery pack charge state.
• You may hear a noise during charging. This is not a malfunction.
• Do not place the battery near a heat source, expose it to direct flame or heat,
or immerse it in water. Such exposure may damage the battery and lead to
the leakage of corrosive liquids, fire, electrical shock, explosion or serious
injury.
• Do not attempt to disassemble, alter or apply heat to the batteries. There is
serious risk of injury due to an explosion. Immediately flush with water any
area of the body (including the eyes and mouth) or clothing that comes into
contact with the inner contents of a battery. If the eyes or mouth come into
contact with these substances, immediately flush with water and seek
medical assistance.
• Avoid dropping or subjecting the battery to severe impacts that could damage
the casing.
• Do not short-circuit the battery terminals with metallic objects. This could lead
to overheating, burns and other injuries.
• Use only the designated battery / SD compartment to charge the battery
pack. Use of other battery chargers may cause the unit to overheat and
distort, resulting in fire or electrical shock.
AgfaPhoto DV-5000Z
10
Inserting the SD memory card
If your photo/video storage will exceed the built-in memory capacity of 32MB,
then prior to using this camera you will need to load an SD memory card into
the camera.
To insert the SD memory card
1. Hold the camera with the lens facing towards
you.
2. Open the battery / SD card compartment by
pressing the cover upwards and sliding it
towards you. The cover will snap open.
3. Position the SD card so that the edge with the
gold-pin connectors faces right and gently push
the SD card in until it locks into place.
4. Close the battery / SD card compartment by
pressing the cover and sliding it away from you.
The cover will snap shut.
To remove the SD memory card
Push the edge of the SD card until it springs out from the SD memory card slot.
Then, carefully remove the SD card.
Without the SD memory card, video and photos taken will be saved to the builtin memory of your Digital movie camera. Look at the indicator on the upper-right
of the LCD screen to see where videos and photos will be stored.
Note: Removing the SD memory card during camera operation will power
down the camera.
Operating the Camera
Turning on the Power
Install the battery and the SD memory card before turning on the Digital movie
camera. Flip open the LCD panel in a
leftwards motion then take hold of the
bottom-left corner of the LCD panel and
swivel it upwards. The Power button can be
seen on the inner top right side of your
Digital movie camera. Press and hold the
Power button for 3 seconds to turn on the
Digital movie camera. The LCD screen will
display a recording screen by default.
When the camera is on you can check the
battery power level or external power
indicator located in the bottom-left corner of
the LCD panel.
Power indicator
AgfaPhoto DV-5000Z
11
Using the LCD Display
The LCD display makes taking pictures and
videos easy. Use the LCD panel to frame
your subjects for taking pictures or recording
video.
To use the LCD panel, flip open the LCD
panel in a leftwards motion, then hold the
bottom-left corner of the LCD panel and
swivel it upwards.
While in Video Capture Mode or Photo
Mode, you will see icons around the border
of the LCD panel. To learn more about these
icons, please see "Recording Video" and
"Photo Shooting Mode."
To hide the icons, push Menu, then select Setup and scroll down to Icon. A
submenu will appear. Scroll to "No" and select it. Now your LCD panel will not
display any icons.
Holding the camera
The key to taking still, blur-free pictures is
holding the camera steadily and properly.
Because of its compact size and light
weight you can single-handedly operate
this Digital movie camera by gripping the
camera with your right hand while using
your right thumb to press buttons and
access other controls.
AgfaPhoto DV-5000Z
12
Operation Modes
The Video Capture Mode and the Photo
Capture Mode buttons are located on the
rear of the Digital movie camera and when
pressed enable you to change into the
corresponding mode to shoot pictures or
record video.
When you first turn on your Digital movie
camera, by default you will be in Video
Capture Mode with the remaining recording
time available in the memory displayed as a
counter in the upper-right of the LCD panel.
When recording video, you will see a red
stop recording icon appear in the lower-left
corner of the LCD panel and also a
recording icon to the left of the counter. The
counter times the recording length and displays it while recording. To stop
recording, press the Video Capture Mode button.
Mode Indicators
In the upper-left of the LCD screen you will
see a toggle indicator, notifying you that both
the Video Capture and Photo Capture
modes are available.
Note: The camera lens automatically
opens when you enter either mode.
AgfaPhoto DV-5000Z
13
Navigating the Main Menu
Whether you are in the Video Capture or Photo Capture Mode, press the Menu
button to open the main menu for that mode. When you are in a menu, use the
5 Way Navigation Control (Up, Down, Left, Right, Enter/OK) buttons to navigate
through the menu.
To navigate through the menus:
1. Press the Menu button.
Menu items are listed vertically. As you scroll, each item will be highlighted in
blue.
2. Press the Enter/OK button on the 5 Way Navigation Control to select an item.
3. A submenu will appear allowing you to specify settings.
4. After making the settings you desire, exit the main menu by pressing the
Menu Button.
AgfaPhoto DV-5000Z
14
Setting the Date and Time
Set the current date and time for your reference.
To set the date and time:
1. Press the Setup/Playback button, scroll to Setup, and press the OK/Enter
button on the 5 Way Navigation Control.
2. Press OK/Enter on Date & Time.
3. Use the Left/Right buttons on the 5 Way Navigation Control to select the
year, month, date, hour or minute for adjustments.
4. When each item has been selected, press the Up/Down button to increase or
decrease the values of the year, month, day, hour and minute.
5. To save your settings and exit, press the Menu button.
AgfaPhoto DV-5000Z
15
Recording Video
Enable Video Capture Mode to shoot video. Your recordings will all be stored in
H.264 video stream format, which is the latest quality video stream format
offering better quality video than MPEG-4.
Video Recording Mode
Press the Video Capture button to enter video recording mode; you will see live
video on the LCD panel.
Recording Video
To record a live Video:
Press the Video Capture button after considering the following:
1. Press the Menu button.
2. Select the desired video quality for your recording.
3. Specify the video resolution for your recording:
A. 1280 x 720
B. 720 x 480
C. 352 x 240
For other video effects, please see Video and Photo Menu below.
4. Position your subject within the LCD monitor.
5. If the background environment is brighter than that of your subject, this may
cause your video to be underexposed. To help offset this, use the backlight
compensation feature of your camera. (See the user guide on the CD for
details.)
6. Press the Zoom T button to zoom in on your subject or the Zoom W button to
obtain a wider-angle shot.
7. When you are ready to record video, press the Video Capture button. To stop
recording press the Video Capture button once again.
AgfaPhoto DV-5000Z
16
Photo Shooting Mode
Press the Photo Capture button to take photos.
The Digital video camera doubles as a still camera and allows you to take
sharp, vibrant color pictures.
Press the Photo Capture Mode button after considering the following:
1. Ensure you have set the proper flash mode (see "Using the Flash").
2. Press the Menu button to set picture resolution, quality, exposure and other
options (see "Photo Menu").
3. Frame the subject using the LCD panel display.
Shutter Release
Obtain the ultimate exposure and focus before
taking pictures by pressing the Photo Capture
(shutter) button halfway down. The focusing guides
displayed in the center of the LCD Panel will turn
green when the exposure and focus conditions are
optimal. To take the picture, press the button all the
way.
Note: The Photo Capture Mode button is located
on the back of the Digital movie camera. It is
located on the right side of the Zoom T/W control. Press the Photo Capture button to shoot
pictures.
AgfaPhoto DV-5000Z
17
Using the Flash
Use the camera flash for indoor shots where there is low ambient light.
To activate the Flash
1. Press the Menu button.
2. Scroll to Flash and press OK/Enter on the 5 Way Navigation Control.
3. A submenu will appear. Use the Up and Down keys on the 5 Way Navigation
Control to choose the flash mode needed: on, off or automatic.
Alternatively, to turn on the flash, press the Flash Hotkey button (Left button on
the 5 Way Navigation Control) while in Photo Capture Mode to cycle through the
flash modes needed: On, Off or Auto (automatic). Press the OK/Enter button to
select a mode, and Menu to save the setting and exit the menu.
Note: The current flash mode will be displayed in the lower-right side of
the LCD panel.
Setting the White Balance
Setting the White Balance is the key element in accurately reproducing colors.
To set the White Balance
1. Press the Menu button.
2. Scroll down to WB (White Balance) using the Down button on the 5 Way
Navigation Control.
3. Press OK/Enter.
4. A submenu appears listing the following White Balance settings:
a. Auto
b. Sunny
c. Cloudy
d. Fluorescent
e. Tungsten
5. Scroll to a setting and press OK/Enter on the 5 Way Navigation Control to
choose the desired setting.
6. Press Menu to save the setting and return to Photo Capture Mode.
7. The White Balance setting indicator is displayed in the lower-right corner of
the LCD panel.
Note: You can also use the Hotkey to set the
White Balance. While in Photo Capture Mode,
press the Right button on the 5 Way Navigation
Control to toggle and activate White Balance
settings. To add further enhancements you can
add Photo Effects. (For more information see
"Photo Menu" below.)
AgfaPhoto DV-5000Z
18
Using the Self-Time
The self-timer feature lets you take an individual self-portrait or group-portrait
automatically.
To take pictures using the Self-Timer:
1. Mount the camera on a tripod or flat surface.
2. Press the Menu button.
3. Navigate down to Self-Timer and press the OK/Enter button on the 5 Way
Navigation Control.
A submenu will appear.
4. Choose On or Off.
5. Press the OK/Enter button.
6. Press the Menu button to return to Photo Capture Mode.
7. When you are ready, press the Photo Capture button to release the shutter in
10 seconds.
8. The LCD panel will display a countdown sequence from 10 to 1 while the
white LED light flickers at an increasing rate leading up to the time the shot is
taken.
Tip: After pointing the lens towards your subject(s), flip the LCD screen so that
you can see yourself on the LCD panel during the countdown and at the time of
the shot.
AgfaPhoto DV-5000Z
19
Playback
In playback mode you can play back video and view pictures you have taken.
To play back video on the LCD panel:
1. Press the Setup/Playback button.
2. Use the Right/Left/Up/Down buttons on the 5-Way Navigation Control to
scroll to the Video Icon.
3. Press the OK/Enter button.
A list of video thumbnails will appear.
4. Use the Right/Left buttons on the 5-Way Navigation Control to choose the
video you want to play.
5. Press the OK/Enter button to watch the video.
6. While the video is playing, press the OK/Enter button to pause or resume
video playback. Pause/Play indicators will display in the top and bottom bars
of the LCD panel. To control the volume, use the Up/Down buttons on the 5Way Navigation Control. (To mute, turn volume down all the way.)
7. To exit the video while it’s playing, press the Menu button.
A list of video thumbnails will appear.
8. To return to Video Capture Mode, press Menu twice.
Tip: During video playback, use the Right/Left buttons on the 5 Way Navigation
Control to fast forward or rewind the video and the Up/Down buttons to
increase/decrease the volume respectively. If there are currently no videos in
the memory, a message will display reading "No file".
AgfaPhoto DV-5000Z
20
To view photos on the LCD panel:
1. Press the Setup/Playback button.
2. Use the Right/Left buttons on the 5 Way Navigation Control to scroll to the
Photo Icon.
3. Press the OK/Enter button.
A list of thumbnails will appear.
4. Use the Right/Left buttons on the 5 Way Navigation Control to choose the
photo you want to view.
5. Press OK/Enter to view the photo.
The photo will appear in full view on the LCD panel.
6. Use the Right/Left buttons on the 5 Way Navigation Control to view the next/
previous photo.
7. To return to photo thumbnails, press the Menu button or the Zoom (W) control.
8. To return to Photo Capture Mode press Menu twice.
Viewing Tips: Magnify the view of individual photos by pressing the Zoom (T)
control. Use the Zoom (W) control to view photos in a wider-angle view. If there
are no files saved, the screen will display "No file".
To zoom out to the original view:
While an image is enlarged, you can return to the
original 1:1 view by holding the Zoom (W) control
down until the original 1:1 ratio is in view.
To view photos as a slideshow:
1. Press the Menu button.
2. Scroll down to Slideshow and press the OK/
Enter button.
Your slideshow will start and will play back the
opening photo/video first then follow in
sequential order with all other photos/videos.
The slideshow will continue to repeat until it is
manually stopped.
3. Press the OK/Enter/Up/Down/Left/Right
buttons to stop the slideshow and you will be
returned to the list of photo thumbnails.
4. To return to Photo Capture Mode, press the Menu button twice.
AgfaPhoto DV-5000Z
21
Protect Files
Locking files protects video and photo files from being accidentally deleted.
To Protect /Unprotect files:
1. Press the Setup/Playback button.
2. Use the Right/Left buttons on the 5 Way Navigation Control to scroll to photo/
video.
3. Press the OK/Enter button. (A list of photo or video thumbnails will appear.)
4. Select the photo/video you want to protect/unprotect.
5. Press the Menu button.
6. Scroll down to Protect and press the OK/Enter button. (A submenu appears.)
7. Choose Yes. (Choose No to unprotect a previously protected file.)
8. Press the OK/Enter button.
In the list of photo/video thumbnails, the file you have just locked will display a
locked icon in its upper-left corner. If it is not locked, you will see no such icon in
the upper-left corner of the photo/video thumbnail.
Note: Protected files cannot be deleted manually, but can be erased during
formatting. You must unlock a file first before it can be manually deleted.
AgfaPhoto DV-5000Z
22
Erasing Flies
You can erase unwanted photo/video files to free up memory space in the builtin memory or on your memory card.
To erase photos/videos:
1. Press the Setup/Playback button.
2. Use the Right/Left buttons on the 5 Way
Navigation Control to scroll to photo/video.
3. Press the OK/Enter button. (A list of photo or
video thumbnails will appear.)
4. Select the photo/video you want to delete.
5. Press the Menu button.
6. Choose Delete Current (or Delete All). (A
submenu will appear.)
7. Choose Yes. (Choose No if you do not wish to
delete the file/files.)
The file or files will be deleted and you will be
returned to the photo/video thumbnail list.
Note: Protected files are protected and cannot
be deleted. To delete files that are locked,
unlock them before trying to erase them. If all
files have been deleted, a message "No file"
will display.
AgfaPhoto DV-5000Z
23
Video and Photo Menu
When using Video recording and Photo Shooting mode, you can use the factory
default settings for video recording or go into the menus and specify your own
custom settings. You may want to change settings such as the video quality or
the backlight compensation (among other settings) to go with the subject and
the needs of your recording. Press the Menu button, then use the Up/Down
buttons on the 5 Way Navigation Control to go through the settings and press
the OK/Enter button to enter a submenu and make adjustments.
###
Video Quality
###
Image Size
###
Night Shot
###
White Balance
###
Flash
###
Flashlight
###
Effect
###
Exposure Value
###
Self-Timer
###
Histogram
Video Quality
Video quality determines the video size and speed to be used for recording
video. The higher the quality, the better the recorded video will be, but fewer
recordings can be stored on the memory card.
###
1280x720
###
720x480
###
352x240
Image Size
The resolution of your photo is determined by the image size (the number of
pixels comprising both the height and width of the photo). If you are planning to
print, then use a higher image resolution to preserve the clarity and detail. The
larger your image size, the more intense the resolution and file size will be and
the fewer the number of pictures that can be stored on your memory card.
You can select from the following image sizes:
Icon
Resolution
Description
###
3M
3 megapixel resolution
###
5M
5 megapixel resolution
###
8M
8 megapixel resolution
AgfaPhoto DV-5000Z
24
Image Quality
Image Quality is directly affected by the picture resolution you choose. Photos
taken with a higher resolution have lower compression and are clearer than
standard quality resolutions when printed.
Night Shot
Ideal for taking night views or dark indoor shots.
White Balance
Pictures taken indoors without the flash often experience color imperfections.
This is because the whites in the photo will not appear pure white when
shooting under fluorescent lighting or photos may appear orange under
domestic incandescent lighting. Use white balance to give accurate lighting to
your shots.
Auto White Balance
Automatically set the white balance levels for all your shots under normal
lighting conditions.
Sunny
Use this setting for outdoor photography in bright sunny conditions. The colors
in your photos will be balanced generally.
Cloudy
Ideal for outdoor shooting when it’s cloudy or rainy. Your pictures will end up
both more realistic and brighter in tone.
Fluorescent
By reducing the green cast normally captured under fluorescent lighting, this
setting serves to neutralize and enhance the lighting in the captured photo.
Tungsten
Perfect for indoor shots under tungsten/incandescent lighting. Optimally corrects
the orange casts existing under typical household light bulbs.
Note: White Balance and Effect both jointly affect the color of your photos.
AgfaPhoto DV-5000Z
25
To set the White balance:
1. Press the Menu button.
2. Scroll down to WB (White Balance) and press the OK/Enter button on the 5
Way Navigation Control.
3. A submenu will appear.
4. Choose from the following settings:
A. Auto
B. Sunny
C. Cloudy
D. Fluorescent
E. Tungsten
5. Press the Menu button to return to camera operation.
Note: You can use a hotkey to toggle between white balance settings.
Simply press the Right button on the 5 Way Navigation Control to toggle
through the above White balance settings and release to select a setting.
A White balance icon will appear on the lower-right side of the LCD panel
for the current setting.
Flash
By using the camera flash, more lighting is provided for subjects in dark
conditions. The added lighting can help remove or reduce shadows, or help
emphasize the subject.
The camera provides three flash modes:
Auto Flash
When insufficient lighting exists, the flash fires automatically when taking
pictures.
Flash On
The flash always fires regardless of lighting conditions. Use this feature when
your subject is under backlit conditions or in shadows.
Flash Off
Disables the flash. Use this feature when taking close-up shots or when
photographing outdoors under bright sunlight.
AgfaPhoto DV-5000Z
26
Effect
You can apply special effects to your photos.
To apply an effect
1. Press the Photo Capture button.
2. Press the Menu button.
3. Scroll down to Effect and press the OK/Enter
button on the 5 Way Navigation Control.
4. A submenu will appear with the following 3 choices:
A. Normal – creates no special effects on your
photos.
B. B&W – takes out the color and leaves your
photos in traditional black and white.
C. Classic – adds nostalgic ambience to your photos.
5. Choose the effect you want by pressing the OK/Enter button.
6. Press Menu to return to Photo Capture Mode.
Note: White Balance and Effect jointly affect the color of your photos.
Exposure Value
Often the default exposure time built into the digital
camera is insufficient because your subject may be
darker or brighter than the background. By properly
setting the exposure the subject is emphasized and
becomes the focus of the shot and stands out from
the overexposed or underexposed background.
To set the exposure
1. Press the Menu button.
2. Scroll to Exposure with the Up/Down buttons on the
5 Way Navigation Control.
3. Press the OK/Enter button.
4. Use the Left/Right buttons on the 5 Way Navigation
Control to select the level of exposure for your
needs.
Note: You may increase or decrease the value of
your exposure by a value of 1 within the following
ranges:
###
+2.0
###
+1.0
###
0.0 (Default)
###
-1.0
###
-2.0
AgfaPhoto DV-5000Z
27
Self-Timer
You can use the self-timer to automatically take individual/group photos. The
timer will count down from 10 seconds and then take the picture. For more
information about using the Self-Timer, please see "Using the Self Timer" under
"Photo Shooting Mode".
Histogram
A histogram is a graph showing the brightness of an
image. The histogram is useful to check the
exposure during recording and playback when the
screen is difficult to see.
Icon
Here you can choose to display or shut off the display of all icons on the LCD
panel such as flash status, battery power supply remaining, or the zoom bar.
To hide/show Icons on the LCD panel:
1. Scroll to Icon using the Up/Down buttons on the 5
Way Navigation Control.
2. Press the OK/Enter button.
A submenu will appear.
3. Select On to display icons or Off to hide icons on
the LCD panel.
4. To save your settings, press the Menu button.
Video and Photo Playback Menu
Use the playback menu to choose the way in which you want to view photos
and videos on the LCD panel (or TV if using A/V out). In addition you may
choose to delete files or lock them to prevent them from being deleted.
Note: The A/V out connection supports the following types of digital TV
systems: HDTV, NTSC and PAL.
Delete Current
Delete All
Protect
Slide Show (Only Photo Playback)
AgfaPhoto DV-5000Z
28
Setup Menu
To enter the setup mode for your Digital movie camera, press the Setup/
on
Playback button, scroll to Setup, and press the OK/Enter button
the 5 Way Navigation Control.
Here you can customize the main settings for your Digital movie camera as
follows:
Date/Time
Set the current date and time for files.
Note: Date and time stamps will not be stamped on photos or videos.
To set the Date/Time:
1. Scroll to Date & Time using the Up/Down buttons on the 5 Way Navigation
Control.
2. Press the OK/Enter button.
3. A submenu will appear.
4. Use the Right/Left buttons on the 5 Way Navigation Control to scroll through
the Year, Month, Day, Hour and Minute and the Up/Down buttons on the 5Way Navigation Control to increase or decrease the values of each.
5. To save your settings, press the Menu button.
Beep
You may choose to enable a beeping sound when you press a button or when
errors occur.
To activate/deactivate the Beep:
1. Scroll to Beep using the Up/Down buttons on the 5 Way Navigation Control.
2. Press the OK/Enter button.
A submenu will appear.
3. Select ON or OFF.
4. To save your settings, press the Menu button.
AgfaPhoto DV-5000Z
29
Flicker
Due to indoor fluorescent lighting, a flicker can develop during the use of your
digital camera. This flicker can be reduced by setting the frequency of your
digital camera to the same frequency as the fluorescent lighting in your region.
(The default frequency is 60Hz but you can change this setting to 50Hz.)
To set the Flicker rate:
1. Scroll to Flicker using the Up/Down buttons on the 5 Way Navigation Control.
2. Press the OK/Enter button.
A submenu will appear.
3. Select either 50Hz or 60Hz to match the frequency of your region.
4. To save your settings, press the Menu button.
Video-Out
You can view your video recordings and photos on your TV by choosing the
video standard (NTSC or PAL) that is used in your region.
To set the Video-Out Standard:
1. Scroll to Video-Out using the Up/Down buttons on
the 5 Way Navigation Control.
2. Press the OK/Enter button.
A submenu will appear.
3. Select either NTSC or PAL according to your TV
system.
4. To save your settings, press the Menu button.
LCD Brightness
Set the brightness of your LCD screen to one of four brightness levels.
To set the LCD brightness:
1. Scroll to LCD Bright using the Up/Down buttons on
the 5 Way Navigation Control.
2. Press the OK/Enter button.
A submenu will appear allowing you to select one
of four brightness levels.
3. Use the Right/Left buttons on the 5 Way
Navigation Control to increase/decrease the active
brightness level.
4. To save your settings, press the Menu button or the OK/Enter button.
AgfaPhoto DV-5000Z
30
Format
Choose to erase all media from the built in memory and also from the SD card.
Selecting Format will erase all media from the built-in memory if there is no SD
card present. However, if your SD card is inserted and you select Format, all
media from the SD card itself will be erased IN ADDITION to the contents of the
built-in memory.
To Format your SD memory card & Built-in memory:
1. Scroll to Format using the Up/Down buttons on the
5 Way Navigation Control.
2. Press the OK/Enter button.
A submenu will appear.
3. Select Yes to format or No to cancel.
4. To save your settings, press the Menu button.
Note: During a format, both Built-in Memory and
SD memory cards will be formatted, erasing all
data, even files which were protected.
Power-Save
Automatically power down your Digital movie camera to save battery power.
To activate/deactivate Auto-Off:
1. Scroll to Auto Off using the Up/Down buttons on the 5 Way Navigation Control.
2. Press the OK/Enter button.
A submenu will appear
3. Select one of the following settings by scrolling to
the item and pressing the OK/Enter button:
a. Off
b. 1 min
c. 3 min
d. 5 min
4. To save your settings, press the Menu button.
AgfaPhoto DV-5000Z
31
Language
The main default language for your Digital movie
camera is English.
Initialize
Gives you the option to assign the default factory settings to your digital camera.
This operation will fully reset your camera’s settings.
To restore factory settings:
1. Scroll to Default using the Up/Down buttons on the
5 Way Navigation Control.
2. Press the OK/Enter button.
A submenu will appear.
3. Select On to activate factory settings or Off to allow
custom changes to these settings.
4. To save your settings, press the Menu button.
AgfaPhoto DV-5000Z
32
Viewing Photos and Videos on TV
You can view your recorded videos and photos on a TV screen by connecting
your Digital movie camera to the TV.
Note: Ensure that your TV is compliant with at least one of the following
digital playback standards: HDTV, NTSC or PAL.
To view videos or photos on a TV:
1. Turn off your Digital movie camera before making any connections to the TV.
2. Connect the video and audio plugs of the USB A/V-In cable to the input jacks
of the TV.
3. Turn on the TV and change it to Video Mode.
4. Turn on your Digital movie camera.
5. Connect the other end of the cable to the MIC/AV-OUT port on your camera
6. On your Digital movie camera , press the Menu button and scroll to either
Photo or Video and press the OK/Enter button located in the central position
of the 5-Way Navigation Control.
You are now able to view recorded video and photos on your TV. Follow the
same steps in "Playing Video and Photos" to browse, select and play videos
and photos.
Connecting to a computer
To store and backup your recorded videos and photos from your Digital movie
camera you will need to connect it to a computer.
To connect the camera to your computer:
1. Ensure that your Digital movie camera and your computer are both ON.
2. Plug the 8-pin USB cable into the A/V-Out port on your digital camera
(located under the rubber protective flap) and plug the other end (the USB
connector) to an available USB port on your computer.
3. The LCD panel of your Digital movie camera should black out and your
stored photos and videos will be detected by Windows Explorer.
Note: You can choose to remove the SD memory card from the Digital
movie camera and use a memory card reader connected to a computer to
store and backup your videos and photos as well.
AgfaPhoto DV-5000Z
33
Installing the optional photo/video software
1.
2.
3.
4.
Load the CD into your computer.
The Auto-Run program will start automatically. (Setup.exe)
Check/Un-check the programs you wish to install.
Follow all of the installation prompts to completely install each program.
The Windows Install Shield / Windows Installer will guide you through the
installation of each program.
After installing each program, the opening Auto-run screen will show.
5. Click Exit and remove the CD.
You will be asked to restart your computer now or later. Choose the option you
prefer.
Folder structure in the built-in memory or on the memory
card
If you’re using Windows 2000/XP/Vista, your memory card will automatically be
detected as a removable disk drive which means Windows will be able to read
the contents from your memory card and you can backup those files to your
computer or transfer other video and photos from your computer to the memory
card for LCD panel playback.
When you use Windows Explorer to read the contents of the built-in memory or
memory card, the following folder structure will appear:
The camera uses the DCIM folder to store all recorded video and photo files.
Opening this folder will reveal the combined file contents of the built-in memory
and memory card.
AgfaPhoto DV-5000Z
34
Specifications
ITEM
DESCRIPTION
Lens
F:W=F/3.6, T=F/6.7; f=7.5~22.5mm; VA=50.78°~18.77°; Focus
distance: Macro (5~10cm @1.4X), 1X (30cm ~ ? ), 2X (40 cm~∞), 3X
(55cm~∞), Shutter Speed: 2~1/1000 sec.
Image Sensor
5 megapixel CMOS sensor
LCD Display
2.5" LTPS Output Interface
USB 2.0, DC in, AV-out/Earphone, AV-in/ext. Mic, YPbPr
Image Compression
JPEG (DCF, Exif)
Digital Still Camera
3MP(2048 x 1536), 5M (2592 x 1944), 8M (3264 x 2448)
Digital Camcorder
Quality
HD
D1
CIF
Video Size
1280x720
720x480
352x240(NT
SC)
352x288(PA
L)
Frame Rate
30
30
30
Bit Rate
5Mb
3Mb
700kb
Digital Voice Recorder 48KHz sampling rate
Flash Strobe
GN<=4, 1GBT
Movie Format
MPEG4 (MOV, H.264)
AV-OUT
HDTV with YPbPr output, NTSC/ PAL with CVBS AV-out
Power Requirements
Rechargeable Lithium-ion battery with internal charging
Mass storage with
Internal memory
Build in 32MB External Memory
interface
SD/SDHC Card Slot (up to 8 GB)
Image Processing
Exposure Control: AE, -2EV ~ +2EV, Step 1/3 (Backlight
Compensation for Video Recording)
White Balance: AWB, Adjustable WB (Sunny, Cloudy, Tungsten,
Fluorescent)
Picture Effect : Normal, B&W, Classic
Accessories
USB cable, 3RCA/YPbPr video out cable, 2RCA cable, pouch, NP-60
battery, power adapter, CD, quick guide
OS Platform Supported Windows 2000 / XP, Vista
Storage Temperature
Range
-20° C~+60°C (4° F~140 °F)
Operating Temperature 0° C ~ 40°C ( 32°F ~ 104°F )
Range
Weight
Less than 200g
Dimensions
116 x (72~55) x (36~30) mm
Technical details and product design can be changed without notice.
AgfaPhoto DV-5000Z
35
Customer care
More information on the complete AgfaPhoto digital camera product range can
be found under www.plawa.com / www.plawausa.com
Service & Repair (USA/ Canada):
1-866 475 2605
www.plawausa.com – live chat available
Online Service USA/ Canada:
[email protected]
Service & Repair Hotline (EU):
00800 752 921 00 (from a landline only)
Service & Support Hotline (Germany):
0900 1000 042 (1.49 Euro/ min. from a German landline only)
Online Service / International contact (Not USA/ Canada):
[email protected]
Manufactured by
plawa-feinwerktechnik GmbH & Co. KG
Bleichereistraße 18
73066 Uhingen
Germany
AgfaPhoto is used under license of Agfa-Gevaert NV & Co. KG. Agfa-Gevaert
NV & Co. KG. does not manufacture this product or provide any product
warranty or support. For service, support and warranty information, contact the
distributor or manufacturer.
Contact: AgfaPhoto Holding GmbH, www.agfaphoto.com
AgfaPhoto DV-5000Z
36
Disposal of Waste Equipment by Users in Private
Households in the European Union
This symbol on the product or on its packaging indicates that this product must
not be disposed of with your other household waste. Instead, it is your
responsibility to dispose of your waste equipment by handing it over to a
designated collection point for the recycling of waste electrical and electronic
equipment. The separate collection and recycling of your waste equipment at
the time of disposal will help to conserve natural resources and ensure that it is
recycled in a manner that protects human health and the environment. For
more information about where you can drop off your waste equipment for
recycling, please contact your local city office, your household waste disposal
service or the shop where you purchased the product.
FCC Compliance and Advisory
This device complies with Part 15 of the FCC Rules. Operation is subject to the
following two conditions: 1.) this device may not cause harmful interference,
and 2.) this device must accept any interference received, including
interference that may cause unsatisfactory operation. This equipment has been
tested and found to comply with the limits for a Class B peripheral, pursuant to
Part 15 of the FCC Rules. These limits are designed to provide reasonable
protection against harmful interference in a residential installation. This
equipment generates, uses, and can radiate radio frequency energy and, if not
installed and used in accordance with the instructions, may cause harmful
interference to radio communication. However, there is no guarantee that
interference will not occur in a particular installation. If this equipment does
cause harmful interference to radio or television reception, which can be
determined by turning the equipment off and on, the user is encouraged to try
to correct the interference by one or more of the following measures.
• Reorient or relocate the receiving antenna.
• Increase the separation between the equipment and receiver.
• Connect the equipment to an outlet on a circuit different from that to which
the receiver is connected.
• Consult the dealer or an experienced radio/TV technician for help.
Any changes or modifications not expressly approved by the party responsible
for compliance could void the user’s authority to operate the equipment. When
shielded interface cables have been provided with the product or when
specified additional components or accessories have elsewhere been
designated to be used with the installation of the product, they must be used in
order to ensure compliance with FCC regulations.
AgfaPhoto DV-5000Z