1
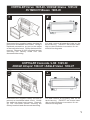
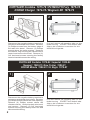
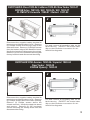
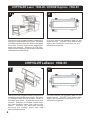
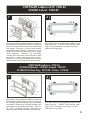
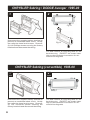
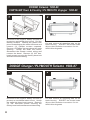
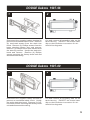
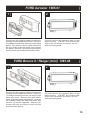
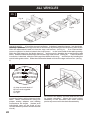
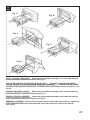
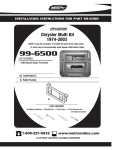
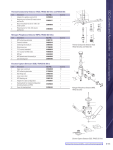
INST 6501
KIT FEATURES
Recessed
DIN opening
for flush mount
KIT COMPONENTS
Radio Housing
2-Shaft Faceplate
99-6501
INSTALLATION
INSTRUCTIONS
APPLICATIONS
CHRYSLER / DODGE / EAGLE / FORD / JEEP
LINCOLN / MERCURY / PLYMOUTH 1974-2003
(SEE INSIDE FOR SPECIFIC APPLICATIONS)
ISO-DIN Faceplate
Snap Spacers
Spacer
(4) 5mm Flathead Screws
(2) #6 Selftapping
Screws
ISO-DIN
Brackets
TOOLS REQUIRED
Phillips screwdriver
KNOWLEDGE IS POWER
Enhance your installation and fabrication skills
by enrolling in the most recognized and respected
mobile electronics school in our industry.
Log onto www.installerinstitute.com
or call 800-354-6782 for more information
and take steps toward a better tomorrow.
Cutting tool
1-800-221-0932
Socket wrench
www.metraonline.com
© COPYRIGHT 2001-2009 METRA ELECTRONICS CORPORATION
TABLE OF CONTENTS
CAR
PAGE
CHRYSLER
Cirrus 1995-00..........................1
Concorde 1993-97................... 1
Cordoba 1975-78......................2
Cordoba 1979-83......................2
E-Class 1984-93.......................3
Fifth Avenue 1984-93............... 3
Imperial 1982-83.......................2
Imperial 1990-94.......................3
Laser 1984-89...........................4
LeBaron 1976-81......................5
LeBaron 1984-85......................3
LeBaron 1986-95......................4
LeBaron GTS 1985-94..............5
LHS 1995-98............................ 1
Newport 1977-81...................... 2
New Yorker 1980-81.................2
New Yorker 1983-87.................3
New Yorker 1994-96.................3
Prowler 1997-02...................... 3
Sebring 1995-00....................... 6
Sebring (conv.) 1996-00........... 6
Town & Country 1990-95..........7
Town & Country 1999-00..........8
DODGE
Aries 1981-89........................... 3
Aspen 1976-80......................... 5
Avenger 1995-00...................... 6
Caravan 1984-90......................7
Caravan 1991-95......................7
Caravan 1996-00......................8
Charger 1974-78.......................2
Charger 1981-83.......................8
Dakota 1987-96........................ 9
Dakota 1997-00........................ 9
Daytona 1984-89...................... 4
Daytona 1990-93...................... 10
Diplomat 1976-89..................... 5
Durango 1997-00......................10
Dynasty 1988-93.......................3
Intrepid 1993-97........................1
Lancer 1985-89.........................5
Magnum XE 1978-79................2
Mirada 1979-82.........................2
Neon 1994-99...........................11
Omni 1978-90...........................11
Pickup 1974-80.........................12
Pickup 1981-93.........................12
Ram 1994-01............................13
Ram 2500/3500 2002...............13
Ramcharger 1974-80................12
Ramcharger 1981-93................12
CAR
PAGE
DODGE (cont.)
Rampage 1978-82....................11
Shadow 1987-93...................... 13
Spirit 1989-95........................... 14
St. Regis 1979-81.....................2
Stratus 1995-00........................ 1
Van 1978-03............................. 14
024 1978-82............................. 11
400 1982-83............................. 3
600 1983-87............................. 3
EAGLE
Vision 1993-97......................... 1
FORD
Aerostar 1985-91......................15
Bronco II 1985-88..................... 15
Crown Victoria 1979-90............ 16
LTD 1979-90.............................16
Ranger (mini) 1985-88..............15
Thunderbird 1985-88................ 16
JEEP
Cherokee 1997-01................... 17
Grand Cherokee 1993-95.........17
Grand Cherokee 1996-98.........18
Wrangler 1997-02.....................18
LINCOLN
Continental 1985-87................. 19
Mark VII 1984-89...................... 19
MERCURY
Cougar 1985-88........................16
Grand Marquis 1979-90............16
Marquis 1979-90.......................16
PLYMOUTH
Acclaim 1989-95.......................14
Breeze 1996-99........................ 1
Caravelle 1985-87.................... 3
Fury 1975-78............................ 2
Gran Fury 1975-85................... 5
Horizon 1978-82....................... 11
Neon 1994-99...........................11
Reliant 1981-89........................ 3
Scamp 1983-84........................ 11
Sundance 1987-94................... 13
TC3 1978-82.............................11
Trailduster 1974-80...................12
Trailduster 1981........................12
Turismo 1983-87.......................8
Van 1978-97............................. 14
Volare 1976-80......................... 5
Voyager 1984-90...................... 7
Voyager 1991-95...................... 7
Voyager 1996-00...................... 8
CHRYSLER Cirrus 1995-00 / DODGE Stratus 1995-00
PLYMOUTH Breeze 1996-99
1
2
Disconnect the negative battery terminal to
prevent an accidental short circuit. Using a
flat-blade screwdriver, pry out on the edges
of the radio trim bezel. Unclip the bezel and
remove. Remove (2) 3/8" hex-head screws
securing the factory head unit and
disconnect the wiring.
Cut and remove all mounting tabs on the
Radio Housing EXCEPT the shaded tabs.
Skip to the Installation Instructions for ALL
VEHICLES on Page #20.
CHRYSLER Concorde / LHS 1995-98
DODGE Intrepid 1993-97 / EAGLE Vision 1993-97
1
Disconnect the negative battery terminal to
prevent an accidental short circuit. Unclip
the radio trim bezel and remove. Remove
(2) 3/8" hex-head screws securing the
factory head unit and disconnect the wiring.
2
Cut and remove all mounting tabs on the
Radio Housing EXCEPT the shaded tabs.
Skip to the Installation Instructions for ALL
VEHICLES on Page #20.
1
CHRYSLER Cordoba 1975-78 / PLYMOUTH Fury 1975-78
DODGE Charger 1974-78 / Magnum XE 1978-79
1
2
Disconnect the negative battery terminal to
prevent an accidental short circuit. Remove
(4) Phillips screws from the bottom edge of
the radio trim bezel. Remove (2) Phillips
screws above the radio opening. Unscrew
the retainer ring securing the remote mirror
control and remove the bezel. Remove (2)
3/8" hex-head screws securing the factory
head unit and disconnect the wiring.
Cut and remove all mounting tabs on the
Radio Housing EXCEPT the shaded tabs.
Skip to the Installation Instructions for ALL
VEHICLES on Page #20.
CHRYSLER Cordoba 1979-83 / Imperial 1982-83
Newport 1980-81 / New Yorker 1980-81
DODGE Mirada 1980-83 / St. Regis 1979-81
1
Disconnect the negative battery terminal to
prevent an accidental short circuit. Remove
(2) Phillips screws above the radio opening.
Remove (2) Phillips screws above the
climate controls. Unclip the dash trim bezel
and remove. Remove (2) 3/8" hex-head
screws securing the factory head unit and
disconnect the wiring.
2
2
Cut and remove all mounting tabs on the
Radio Housing EXCEPT the shaded tabs.
Skip to the Installation Instructions for ALL
VEHICLES on Page #20.
CHRYSLER E-Class 1983-84 / LeBaron 1982-85 / New Yorker 1983-87
DODGE Aries 1981-89 / 400 1982-83 / 600 1983-87
PLYMOUTH Caravelle 1985-87 / Reliant 1981-89
1
2
Disconnect the negative battery terminal to
prevent an accidental short circuit. Remove
(3) Phillips screws from the top edge of the
dash trim bezel. Remove (3) Phillips screws
from the bottom edge of the dash trim bezel.
Unclip the bezel and disconnect the wiring.
Remove (2) 3/8" hex-head bolts securing the
factory head unit and disconnect the wiring.
Cut and remove all mounting tabs on the
Radio Housing EXCEPT the shaded tabs.
Skip to the Installation Instructions for ALL
VEHICLES on Page #20.
CHRYSLER Fifth Avenue 1990-94 / Imperial 1990-94
New Yorker 1988-95
DODGE Dynasty 1988-93
1
Disconnect the negative battery terminal to
prevent an accidental short circuit. Remove
(2) Phillips screws above the radio opening.
Remove (2) Phillips screws above the
climate controls. Unclip the dash trim bezel
and remove. Remove (2) 3/8" hex-head
screws securing the factory head unit and
disconnect the wiring.
2
Cut and remove all mounting tabs on the
Radio Housing EXCEPT the shaded tabs.
Skip to the Installation Instructions for ALL
VEHICLES on Page #20.
3
CHRYSLER Laser 1984-89 / DODGE Daytona 1984-89
1
2
Disconnect the negative battery terminal to
prevent an accidental short circuit. Remove
(2) Phillips screws from the base of the dash
trim bezel. Pull out on the lower edge of the
bezel and remove. Remove (2) 3/8" hexhead screws securing the factory head unit
and disconnect the wiring.
Cut and remove all mounting tabs on the
Radio Housing EXCEPT the shaded tabs.
Skip to the Installation Instructions for ALL
VEHICLES on Page #20.
CHRYSLER LeBaron 1984-95
1
Disconnect the negative battery terminal to
prevent an accidental short circuit. Remove
(1) Phillips screw from the lower corner of
the dash trim bezel. Unclip the bezel and
remove. Remove (2) Phillips screws from
the right console panel and remove the
panel.
Remove (2) hex-head screws
securing the factory head unit and
disconnect the wiring.
4
2
Cut and remove all mounting tabs on the
Radio Housing EXCEPT the shaded tabs.
Skip to the Installation Instructions for ALL
VEHICLES on Page #20.
CHRYSLER LeBaron GTS 1985-94
DODGE Lancer 1985-89
1
2
Disconnect the negative battery terminal to
prevent an accidental short circuit. Remove
(5) torx-head screws from the top of the dash
trim bezel. Remove (2) torx-head screws
below the radio opening. Remove (1) torxhead screw from the upper-left corner of the
radio opening.
Remove (4) torx-head
screws from the lower-left area of the dash
trim bezel. Unclip the bezel and remove.
Remove (2) 3/8" hex-head bolts securing the
factory head unit and disconnect the wiring.
Cut and remove all mounting tabs on the
Radio Housing EXCEPT the shaded tabs.
Skip to the Installation Instructions for ALL
VEHICLES on Page #20.
CHRYSLER LeBaron 1976-81
DODGE Diplomat 1976-89 / Aspen 1976-80
PLYMOUTH Gran Fury 1975-85 / Volare 1976-80
1
Disconnect the negative battery terminal to
prevent an accidental short circuit. Remove
(4) Phillips screws from the top of the dash
trim bezel. Remove (4) Phillips screws from
the bottom of the dash trim bezel. Remove
(2) 3/8" hex-head screws securing the
factory head unit and disconnect the wiring.
2
Cut and remove all mounting tabs on the
Radio Housing EXCEPT the shaded tabs.
Skip to the Installation Instructions for ALL
VEHICLES on Page #20.
5
CHRYSLER Sebring / DODGE Avenger 1995-00
1
2
Fig. A
Disconnect the negative battery terminal to
prevent an accidental short circuit. Unclip
the radio trim bezel and remove. Remove
(2) #10 Phillips screws securing the factory
head unit and disconnect the wiring.
Fig. B
Cut and remove all mounting tabs on the
Radio Housing EXCEPT the shaded tabs.
Skip to the Installation Instructions for ALL
VEHICLES on Page #20.
CHRYSLER Sebring (convertible) 1995-00
1
Disconnect the negative battery terminal to
prevent an accidental short circuit. Unclip
the radio trim bezel and remove. Remove
(2) 3/8" hex-head screws securing the
factory head unit and disconnect the wiring.
6
2
Cut and remove all mounting tabs on the
Radio Housing EXCEPT the shaded tabs.
Skip to the Installation Instructions for ALL
VEHICLES on Page #20.
CHRYSLER Town & Country 1990-95
DODGE Caravan 1984-90 / PLYMOUTH Voyager 1984-90
1
2
Disconnect the negative battery terminal to
prevent an accidental short circuit. Reach
behind the ashtray and release the rear tab
on the ashtray housing. Remove (2) screws
from the bottom edge of the dash trim bezel.
Remove (3) screws from the top edge of the
dash trim bezel. Unsnap the left edge of the
bezel and remove. Remove (2) 3/8" hexhead screws securing the factory head unit
and disconnect the wiring.
Cut and remove all mounting tabs on the
Radio Housing EXCEPT the shaded tabs.
Skip to the Installation Instructions for ALL
VEHICLES on Page #20.
DODGE Caravan / PLYMOUTH Voyager 1991-95
1
Disconnect the negative battery terminal to
prevent an accidental short circuit. Remove
the cigarette lighter. Using a panel removal
tool, pry out on the dash trim bezel and
remove. Remove (2) 3/8" bolts securing the
factory head unit and disconnect the wiring.
2
Cut and remove all mounting tabs on the
Radio Housing EXCEPT the shaded tabs.
Skip to the Installation Instructions for ALL
VEHICLES on Page #20.
7
DODGE Caravan 1996-00
CHRYSLER Town & Country / PLYMOUTH Voyager 1996-00
1
Disconnect the negative battery terminal to
prevent an accidental short circuit. Pull the
ashtray forward. Unsnap the plastic trim
piece located below the radio trim bezel and
remove (2) Phillips screws exposed.
Remove (2) Phillips screws above the radio
opening.
Unclip the dash trim bezel,
disconnect the climate control wiring and
remove the bezel. Remove (2) 3/8" hexhead screws securing the factory head unit
and disconnect the wiring.
2
Cut and remove all mounting tabs on the
Radio Housing EXCEPT the shaded tabs.
Skip to the Installation Instructions for ALL
VEHICLES on Page #20.
DODGE Charger / PLYMOUTH Turismo 1983-87
1
Disconnect the negative battery terminal to
prevent an accidental short circuit. Unclip
the radio trim bezel and remove. Remove
(2) 3/8" hex-head screws securing the
factory head unit and disconnect the wiring.
8
2
Cut and remove all mounting tabs on the
Radio Housing EXCEPT the shaded tabs.
Skip to the Installation Instructions for ALL
VEHICLES on Page #20.
DODGE Dakota 1987-96
1
2
Disconnect the negative battery terminal to
prevent an accidental short circuit. Remove
(8) torx-head screws from the dash trim
bezel. Remove (2) Phillips screws from the
lower steering column trim and remove.
Remove (1) Phillips screw from each side of
the steering column. Unclip the dash trim
bezel and remove. Remove (2) Phillips
screws securing the factory head unit and
disconnect the wiring.
Cut and remove all mounting tabs on the
Radio Housing EXCEPT the shaded tabs.
Skip to the Installation Instructions for ALL
VEHICLES on Page #20.
DODGE Dakota 1997-00
1
Disconnect the negative battery terminal to
prevent an accidental short circuit. Unclip
the entire dash trim bezel. Remove (2) 3/8"
hex-head screws securing the factory head
unit and disconnect the wiring.
2
Cut and remove all mounting tabs on the
Radio Housing EXCEPT the shaded tabs.
Skip to the Installation Instructions for ALL
VEHICLES on Page #20.
9
DODGE Daytona 1990-93
1
2
Disconnect the negative battery terminal to
prevent an accidental short circuit. Pull out
on the dash trim bezel and remove.
Remove (2) screws from each side of the
lower console (this will allow easier radio
removal). Remove (2) screws securing the
factory head unit and disconnect the wiring.
Cut and remove all mounting tabs on the
Radio Housing EXCEPT the shaded tabs.
Skip to the Installation Instructions for ALL
VEHICLES on Page #20.
DODGE Durango 1997-00
1
Disconnect the negative battery terminal to
prevent an accidental short circuit. Unclip
the entire dash trim bezel. Remove (2) 3/8"
hex-head screws securing the factory head
unit and disconnect the wiring.
10
2
Cut and remove all mounting tabs on the
Radio Housing EXCEPT the shaded tabs.
Skip to the Installation Instructions for ALL
VEHICLES on Page #20.
DODGE Neon 1994-99 / PLYMOUTH Neon 1994-99
1
2
Disconnect the negative battery terminal to
prevent an accidental short circuit. Remove
the ashtray. Unclip the radio trim bezel and
remove. Remove (2) 3/8" hex-head screws
securing the factory head unit and
disconnect the wiring.
Cut and remove all mounting tabs on the
Radio Housing EXCEPT the shaded tabs.
Skip to the Installation Instructions for ALL
VEHICLES on Page #20.
DODGE Omni / 024 / Rampage 1978-82
PLYMOUTH Horizon / TC3 1978-82
Scamp 1983-84
1
Disconnect the negative battery terminal to
prevent an accidental short circuit. Remove
(7) Phillips screws from the dash trim bezel
and remove the bezel. Remove (2) 3/8" hexhead screws securing the factory head unit
and disconnect the wiring.
2
Cut and remove all mounting tabs on the
Radio Housing EXCEPT the shaded tabs.
Skip to the Installation Instructions for ALL
VEHICLES on Page #20.
11
DODGE Pickup / Ramcharger 1974-80
PLYMOUTH Trailduster 1974-80
1
2
Disconnect the negative battery terminal to
prevent an accidental short circuit. Remove
(4) Phillips screws from the top edge of the
dash trim bezel. Remove (7) Phillips screws
from the face of the dash trim bezel.
Remove (3) Phillips screws under the dash
trim bezel. Unclip the bezel and remove.
Remove (2) 3/8" hex-head screws securing
the factory head unit and disconnect the
wiring.
Cut and remove all mounting tabs on the
Radio Housing EXCEPT the shaded tabs.
Skip to the Installation Instructions for ALL
VEHICLES on Page #20.
DODGE Pickup / Ramcharger 1981-93
PLYMOUTH Trailduster 1981
1
Disconnect the negative battery terminal to
prevent an accidental short circuit. Remove
(5) Phillips screws from the edge of the dash
trim bezel. Remove (1) Phillips screw above
the radio opening. Pry out on the bottom
edge of the bezel and remove. Remove (2)
3/8" hex-head screws securing the factory
head unit and disconnect the wiring.
12
2
Cut and remove all mounting tabs on the
Radio Housing EXCEPT the shaded tabs.
Skip to the Installation Instructions for ALL
VEHICLES on Page #20.
DODGE Ram 1994-01,Ram 2500/3500 2002
1
Disconnect the negative battery terminal to
prevent an accidental short circuit. Remove
the ashtray. Remove (2) Phillips screws
exposed in the ashtray cavity and remove
the ashtray bracket. Remove the cupholder.
Remove (2) Phillips screws exposed in the
cupholder cavity and remove the cupholder
bracket. Unclip the dash trim bezel, pull the
bezel over the steering column and remove.
Remove (2) 3/8" hex-head screws securing
the factory head unit and disconnect the
wiring.
2
Cut and remove all mounting tabs on the
Radio Housing EXCEPT the shaded tabs.
Skip to the Installation Instructions for ALL
VEHICLES on Page #20.
DODGE Shadow / PLYMOUTH Sundance 1987-94
1
Disconnect the negative battery terminal to
prevent an accidental short circuit. Remove
the ashtray. Unclip the dash trim bezel and
remove. Remove (1) Phillips screw from the
console side trim and remove. Remove (2)
3/8" hex-head bolts securing the factory
head unit and disconnect the wiring.
2
Cut and remove all mounting tabs on the
Radio Housing EXCEPT the shaded tabs.
Skip to the Installation Instructions for ALL
VEHICLES on Page #20.
13
DODGE Spirit / PLYMOUTH Acclaim 1989-95
1
2
Disconnect the negative battery terminal to
prevent an accidental short circuit. Unclip
the dash trim bezel and remove. Remove
the screws securing the side console trim
pieces. Pull the right trim piece out and
remove (1) hex-head bolt exposed.
Remove (1) hex-head bolt securing the
bottom-left corner of the factory head unit
and disconnect the wiring.
Cut and remove all mounting tabs on the
Radio Housing EXCEPT the shaded tabs.
Skip to the Installation Instructions for ALL
VEHICLES on Page #20.
DODGE Van / PLYMOUTH Van 1978-03
1
Disconnect the negative battery terminal to
prevent an accidental short circuit. Open
the glove box and remove (2) Phillips screws
exposed. Remove (5) Phillips screws from
the bottom of the dash trim bezel. Unclip the
top edge of the bezel and remove. Remove
(2) 3/8" hex-head screws securing the
factory head unit and disconnect the wiring.
14
2
Cut and remove all mounting tabs on the
Radio Housing EXCEPT the shaded tabs.
Skip to the Installation Instructions for ALL
VEHICLES on Page #20.
FORD Aerostar 1985-91
1
2
Disconnect the negative battery terminal to
prevent an accidental short circuit. Remove
(2) Phillips screws from the base of the dash
panel. Pry down on the (2) tabs located at
the top of the radio trim bezel and remove
the bezel. Remove (4) screws securing the
factory head unit and disconnect the wiring.
Cut and remove all mounting tabs on the
Radio Housing EXCEPT the shaded tabs.
Skip to the Installation Instructions for ALL
VEHICLES on Page #20.
FORD Bronco II / Ranger (mini) 1985-88
1
Disconnect the negative battery terminal to
prevent an accidental short circuit. Remove
(4) Phillips screws from the top edge of the
dash trim bezel. Remove the light switch
knob, cigarette lighter and ashtray. Unsnap
the molding under the dash trim bezel and
remove (4) screws exposed. Remove (4)
screws securing the factory head unit and
disconnect the wiring.
2
Cut and remove all mounting tabs on the
Radio Housing EXCEPT the shaded tabs.
Skip to the Installation Instructions for ALL
VEHICLES on Page #20.
15
FORD Crown Victoria / LTD 1979-90
MERCURY Grand Marquis / Marquis 1979-90
1
Disconnect the negative battery terminal to
prevent an accidental short circuit. Open
the ashtray and remove (2) Phillips screws
exposed. Remove the dash trim bezel.
Remove (4) screws securing the factory
head unit and disconnect the wiring.
2
Cut and remove all mounting tabs on the
Radio Housing EXCEPT the shaded tabs.
Skip to the Installation Instructions for ALL
VEHICLES on Page #20.
FORD Thunderbird / MERCURY Cougar 1985-88
1
Disconnect the negative battery terminal to
prevent an accidental short circuit. Remove
(2) screws from the top of the dash trim
bezel. Open the ashtray and remove (2)
screws exposed in the ashtray cavity.
Remove the dash trim bezel. Remove (4)
screws securing the factory head unit and
disconnect th wiring.
16
2
Cut and remove all mounting tabs on the
Radio Housing EXCEPT the shaded tabs.
Skip to the Installation Instructions for ALL
VEHICLES on Page #20.
JEEP Cherokee 1997-01
1
2
Disconnect the negative battery terminal to
prevent an accidental short circuit. Unclip
the dash trim bezel. Remove (2) #10 hexhead screws securing the factory head unit
and disconnect the wiring.
Cut and remove all mounting tabs on the
Radio Housing EXCEPT the shaded tabs.
Skip to the Installation Instructions for ALL
VEHICLES on Page #20.
JEEP Grand Cherokee 1993-95
1
Disconnect the negative battery terminal to
prevent an accidental short circuit. Remove
(2) Phillips screws from the bottom of the
dash trim bezel. Remove (2) Phillips screws
above the radio opening. Remove (2)
Phillips screws to the left of the steering
column. Remove (1) Phillips screw to the
right of the steering column. Unclip the dash
trim bezel and disconnect the wiring.
2
Cut and remove all mounting tabs on the
Radio Housing EXCEPT the shaded tabs.
Skip to the Installation Instructions for ALL
VEHICLES on Page #20.
17
JEEP Grand Cherokee 1996-98
1
2
Disconnect the negative battery terminal to
prevent an accidental short circuit. Unsnap
the climate control/wiper control trim panel
and remove. Remove (5) Phillips screws
from the top of the radio/instrument cluster
trim bezel. Remove (4) Phillips screws from
the bottom of the radio/instrument cluster
trim bezel. Pry out on the bottom edge of the
bezel and remove. Remove (2) 3/8" hexhead screws securing the factory head unit
and disconnect the wiring.
Cut and remove all mounting tabs on the
Radio Housing EXCEPT the shaded tabs.
Skip to the Installation Instructions for ALL
VEHICLES on Page #20.
JEEP Wrangler 1997-02
1
Disconnect the negative battery terminal to
prevent an accidental short circuit. Remove
the ashtray and (1) Phillips screw exposed in
the ashtray cavity. Pry out on the top cover
of the instrument panel and remove (2)
Phillips screws exposed. Pry out on the
bottom edge of the dash trim bezel and
remove. Remove (2) 3/8" hex-head screws
securing the factory head unit and
disconnect the wiring.
18
2
Cut and remove all mounting tabs on the
Radio Housing EXCEPT the shaded tabs.
Skip to the Installation Instructions for ALL
VEHICLES on Page #20.
LINCOLN Continental 1985-87
1
2
Disconnect the negative battery terminal to
prevent an accidental short circuit. Remove
(2) #8 Phillips screws below the radio
opening. Open the ashtray and remove (2)
#8 Phillips screws (it is NOT necessary to
remove the center screw). Unclip the dash
trim bezel and remove. Remove (4) hexhead screws securing the factory head unit
and disconnect the wiring.
Cut and remove all mounting tabs on the
Radio Housing EXCEPT the shaded tabs.
Skip to the Installation Instructions for ALL
VEHICLES on Page #20.
LINCOLN Mark VII 1984-89
1
Disconnect the negative battery terminal to
prevent an accidental short circuit. Pry out
on the dash trim bezel and remove.
Remove (4) 5mm hex-head sheet metal
screws securing the factory head unit and
disconnect the wiring.
2
Cut and remove all mounting tabs on the
Radio Housing EXCEPT the shaded tabs.
Skip to the Installation Instructions for ALL
VEHICLES on Page #20.
19
ALL VEHICLES
2b
Fig. A
Fig. B
Fig. C
DIN HEAD UNITS:
If a surface-mount installation is desired, insert the Spacer into the Radio
Housing. Slide the DIN cage into the kit and secure by bending the metal locking tabs down.
Slide the aftermarket head unit into the cage until secure. (see Fig. A). If an intermediatemount installation is desired, attach the Snap Spacers to the outer walls of the radio opening.
Slide the DIN cage into the Radio Housing and secure by bending the metal locking tabs
down. Slide the aftermarket head unit into the cage until secure. (see Fig. B). If a flush-mount
installation is desired, slide the DIN cage into the Radio Housing and secure by bending the
metal locking tabs down. Slide the aftermarket head unit into the cage until secure. (see Fig.
C)
3
A
4
B
C
D
A) Strip wire ends back ½"
B) Twist ends together
C) Solder
D) Tape
Locate the factory wiring harness in the
dash. Metra recommends using the
proper mating adaptor and making
connections as shown. (Isolate and
individually tape off the ends of any
unused wires to prevent electrical short
circuit).
20
Re-connect the battery terminal and test the unit
for proper operation. Mount the head unit/kit
assembly to the sub-dash with those screws
previously removed in the dash disassembly.
5
Fig. A
Fig. B
Fig. C
Fig. D
Fig. E
FORD / LINCOLN / MERCURY: Mount the head unit/kit assembly to the sub- dash with (4)
screws previously removed in step #1.(see Fig. A)
CHRYSLER / DODGE / PLYMOUTH / EAGLE / JEEP
(Excluding GRAND CHEROKEE
Mount the head unit/kit
1993-95, CIRRUS, STRATUS, BREEZE, SEBRING, AVENGER):
assembly to the sub-dash with (2) 3/8" hex-head screws previously removed in step #1. (see
Fig. B)
GRAND CHEROKEE 1993-95: Mount the head unit/kit assembly to the sub-dash with (2)
screws previously removed in step #1. (see Fig. C)
CIRRUS, STRATUS, BREEZE: Mount the head unit/kit assembly to the sub-dash with (2)
screws previously removed in step #1.(see Fig. D)
SEBRING, A VENGER: Remove the top-left screw from the metal dash housing. Mount the
head unit/kit assembly to the sub-dash with (2) screws previously removed in step #1.
(see Fig. E)
21
REV. 08-06-09