1
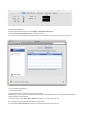
Removing iTunes from Windows XP
1. Quit iTunes.
2. On the Start menu, click Control Panel.
3. In Control Panel, open Add or Remove Programs.
4. Select iTunes from the list of currently installed programs, then click Remove.
5. When asked if you would like to remove iTunes, select Yes.
6. After the uninstallation is complete, do not restart if you are prompted to.
7. If other entries were present for iTunes remove those as well.
8. In Add or Remove Programs, remove any iPod Updater applications that are listed in the same
fashion as iTunes was removed.
9. Restart your computer.
10. After the computer restarts, open Local Disk (C:) in Computer or whichever disk programs are installed
on.
11. Open the Program Files folder.
12. Right-click the iTunes folder and select Delete and choose Yes when asked to confirm the deletion.
Note: This folder may have already been deleted.
13. Right-click the iPod folder and select Delete and choose Yes when asked to confirm the deletion. Click
Continue if Windows needs permission to continue.
14. Right-click on the Recycle Bin and on the shortcut menu, click Empty Recycle Bin.
15. Restart your computer.
16. Install the compatible version of iTunes listed at:
http://www.tripplite.com/EN/products/model.cfm?txtModelID=3906 and
http://www.tripplite.com/EN/products/model.cfm?txtModelID=4035
Removing iTunes from a Mac
1. Quit iTunes.
2. In the Finder, choose Go > Applications.
3. Locate iTunes and then drag it to the Trash.
4. Choose Go > Utilities. If Utilities is not available under Go, then choose Go > Go to Folder, type in
/Applications/Utilities/, and then click Go.
5. Open Activity Monitor.
6. In the process list locate and select iTunes Helper. Click Quit Process. When asked if you really want to
quit the process, click Quit.
7. Quit Activity Monitor.
8. Open System Preferences (choose Apple > System Preferences).
9. Choose View > Accounts and then click Login Items.
10. Look for the iTunesHelper entry and select it, then click the "-" button to remove it from the list.
11. Quit System Preferences.
12. Restart your Mac.
13. Empty the Trash. This should fully remove iTunes.
Additionally, you may need to remove files and folders associated with iTunes. Use the following steps to
remove these files and folders.
1. In the Finder, choose Go > Go to Folder and type in ~/Library/ and click Go.
2. Locate the iTunes folder and then drag it to the Trash.
3. Choose Go > Go to Folder and type in ~/Library/Preferences/ and click Go.
4. Locate the preference files that have names beginning with com.apple.iTunes and move them to the
Trash.
File Names should be:
com.apple.iTunes.eq.plist
com.apple.iTunes.plist
com.apple.iTunesHelper.plist
5. Choose Go > Go to Folder and type in /Library and click Go.
6. Locate the iTunes folder, and then move it to the Trash.
7. Choose Go > Go to Folder and type in ~/Library/Preferences/ByHost/ and click Go.
8. Locate the preference files that have names beginning with com.apple.iTunes and move them to the
Trash.
9. Empty the Trash. This should fully remove the files and folders associated with iTunes.
Removing iTunes from Vista
1. Quit iTunes.
2. From the Start menu, click Control Panel.
3. In Control Panel, click Uninstall a program. The Programs and Features control panel opens.
Alternately, in Classic Panel of Control Panel, click Programs and Features.
4. Select iTunes from the list of currently installed programs, then click Uninstall.
5. When asked if you would like to remove iTunes, select Yes.
6. After the uninstallation is complete, do not restart if you are prompted to.
7. If other entries were present for iTunes remove those as well.
8. In Programs and Features, remove any iPod Updater applications that are listed in the same fashion as
iTunes was removed.
9. Restart your computer.
10. After the computer restarts, open Local Disk (C:) in Computer or whichever disk programs are installed
on.
11. Open the Program Files folder.
12. Right-click the iTunes folder and select Delete and choose Yes when asked to confirm the deletion.
Note: This folder may have already been deleted.
13. Right-click the iPod folder and select Delete and choose Yes when asked to confirm the deletion. Click
Continue if Windows needs permission to continue.
14. Right-click on the Recycle Bin and on the shortcut menu, click Empty Recycle Bin.
15. Restart your computer.
16. Install the compatible version of iTunes listed at:
http://www.tripplite.com/EN/products/model.cfm?txtModelID=3906 and
http://www.tripplite.com/EN/products/model.cfm?txtModelID=4035