1
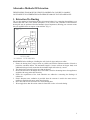
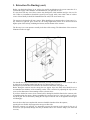
CAN52.2ME
Canopy cooker hood
User Manual for your Baumatic
CAN52.2ME
Canopy cooker hood
NOTE: This User Instruction Manual contains important
information, including safety & installation points, which will
enable you to get the most out of your appliance. Please keep it in
a safe place so that it is easily available for future reference; for you
or any person not familiar with the operation of the appliance.
DD 24/09/07
2
Contents
1. Contents
2. Environmental note
3. Alternative Methods Of Extraction
4. Installation - Ducted Out
5. Installation – Recirculating
6. Operating Your Extractor
7. Care & Cleaning
8. Electrical Connections
9. Not Working Properly?
10. Contact details
This appliance complies with all relevant legal safety requirements.
Inappropriate use can, however, lead to personal injury and damage to property.
To avoid the risk of accidents and damage to the appliance, please read these instructions
carefully before using it for the first time. They contain important information on the safety,
installation, use and maintenance of the appliance.
Keep these operating instructions in a safe place and ensure that all users are familiar with the contents.
Pass them on to any future owner of the appliance.
3
Environmental note
o The packaging materials that Baumatic uses are environmentally friendly and can be recycled.
o Please discard all packaging material with due regard for the environment.
4
Alternative Methods Of Extraction
THESE INSTRUCTIONS MUST BE STRICTLY ADHERED TO. FAILURE TO COMPLY
COULD RESULT IN OVERHEATING AND SERIOUS DAMAGE TO YOUR APPLIANCE.
1. Extraction Via Ducting
The very best method of cleaning the kitchen of unwanted odours is by connecting the appliance to an
exhaust duct that vents to the outside atmosphere via an exterior wall. (Suitable 125 mm diameter
ducting kits may be purchased from the Baumatic Spares Department). Ducting your extractor means
that your appliance does not require a charcoal filter. (Fig. 1).
FIG. 1
DUCTING MODE
(NO CHARCOAL FILTER REQUIRED)
REMEMBER: Before drilling or chiselling the wall, check for pipes and power cables.
1. Ensure the ducting hose is kept as short as possible and with the minimum number of bends to
permit the smoothest airflow. The maximum length is 3 metres with one 90 degree bend, each
additional 90 degree bend, means that the maximum length will reduce by 1 metre.
2. The ducting hose must not be bent more than 90 degrees.
3. Ducted air must not be discharged into a flue which is used for exhausting fumes from appliances
supplied with energy other than electricity.
4. Ensure the requirements of the local authorities are adhered to concerning the discharge of
exhaust air.
5. Ensure adequate room ventilation is provided when the extractor is used in the same room as
appliances supplied with energy other than electricity.
6. Never duct into a hot air flow such as a central heating duct.
7. We strongly advise that all exterior outlets be fitted with a valve or louvred slatting.
5
1. Extraction Via Ducting (cont.)
Before you think about fixing, it's as well to give careful consideration to the power connection. It is
vital that the supply cable should be well shielded from your grill, hob or oven.
If it isn't, heat from any one of these sources may damage the cable insulation and give rise to a fire
risk. Under no circumstances should the exposed power supply cable come within 70cm of a direct
source of heat. Ideally it should be channelled into the wall, well out of harm's way.
The extractor is designed to fit into a canopy. When installing your extractor above a heat source, i.e.,
any electrical or gas hob, grill, cooker etc., the fixing height must THAN 70 cm between the hob
highest point of the hob top (including the burners) and the bottom of the extractor.
The first step is to cut an aperture centrally in the base of the canopy. The dimensions of the cutout are
illustrated on the next page.
You should now decide which method of extraction you wish to incorporate i.e. via an external wall or
by using the re-circulating method with the use of a charcoal filter (see page 7).
Ensure prior provisions have been made for the electrical connections (see pages 9-10).
Before fitting the extractor into the canopy the two support clips (one either side) should be set to
accommodate the thickness of the mounting surface. This is achieved by adjusting the clip (via the
screw) to the dimension of the mounting surface as shown above.
If you have decided to extract via an external wall, a ducting kit should be fitted to the extractor prior
to installation into the canopy. Before assembling the extractor, however, it may be easier to remove
the fascia grill. This is achieved by sliding the two clips towards the rear of the appliance and the grill
will disengage.
Once the above has been completed the extractor should be introduced into the aperture,
ensuring the two flexible clips support the canopy on either side.
When the extractor is in position, it is important to secure the extractor to the canopy by the use of
four screws (not provided) through the four pre-drilled holes in the extractor flange. (two front and
two rear)
6
2. The Re-circulation Mode (fig 2.)
When there is no easy access to an outside wall, the extractor can easily be adapted to clean air,
polluted by cooking smells, by the use of a charcoal filter. This can be purchased from the Baumatic
Spares Department under reference CFM1. Remember that the appliance cannot be used in
re-circulation mode without the use of a charcoal filter.
The Charcoal Filter
Filters do have a limited life. We advise you to change them when there is a noticeable drop in
performance. The intervals between changing the filters will depend entirely upon the amount of
cooking you do, but on average they will last about 6 months. To fit the new filter, remove the fascia
grill by pressing down the two clips towards the face of the grill, it will disengage. Then simply locate
the charcoal filter on the two lugs on the motor and turn in an clockwise direction. To remove the
charcoal filter repeat the process but in an anti-clockwise direction.
The Grease Filter
The grease filter is made of a metallic material and can be cleaned in hot soapy water. It is important
to clean the grease filter on a regular basis. To remove the filter mat simply remove the facia grille and
then unclip the two wire retainers which hold the filter mat in place. Clean the filter and then replace
securing with wire retainers.
IMPORTANT:
You should never attempt to use the extractor without the grease filter since a grease build-up could
prevent the motor working properly and create a fire hazard. If the filter is not cleaned regularly, the
risk of fire will be increased.
Always switch off the electricity supply before cleaning or changing the filters.
7
Operating Your Extractor
The light can be switched on or off regardless of fan / motor operation to illuminate the cooking area.
The extractor fan has three speed settings for light, medium or heavy extraction of cooking vapours.
The different levels of extraction are numbered I, II & III and can also be recognised by the changes in
noise level of the extractor fan when operating.
I
II
II
For Your Safety
In order to protect your appliance and minimise the risk of fire, don't barbecue food directly under the
extractor. Similarly, do not prepare flambé dishes immediately under the extractor. If you use a gas
hob, don’t remove pots without first turning off the flame.
Your extractor is designed to draw gases up and away from your hob. This means that exposed flames
may behave unpredictably in the vicinity of the appliance whilst it is switched on. When frying take
particular care to prevent the oil from catching fire and never leave the hob unattended.
General Cleaning
Always switch off the electricity supply prior to cleaning.
Wipe the external surfaces of the extractor regularly using warm water and mild detergent.
Never use abrasives or wire wool since these will damage the appliance.
Changing The Light Bulb
Always switch off the electricity supply prior to changing the bulb. To replace a bulb simply
remove the fascia grille , unscrew the bulb and replace with one of an identical wattage. Replace the
facia grille.
8
Electrical Connections
IMPORTANT: ENSURE THAT THE ELECTRICITY SUPPLY IS SWITCHED OFF BEFORE
CONNECTING.
Your appliance must be connected to fixed wiring via the use of a double pole switched fused spur
outlet with at least 3mm contact separation, and preferably with a pilot lamp. (The fuse must have a 3
amp fuse rating). We strongly recommend the appliance is connected by a qualified electrician who is
a member of the N.I.C.E.I.C or CORGI. This will ensure that the I.E.E wiring regulations and any
local regulations are complied with.
NOTE: The terminology "DOUBLE POLE" means that both the live and neutral supplies are
switched and disconnected at the same time.
The terminations labelled SUPPLY are for the connection for the internal house wiring and the
terminations labelled LOAD are for the connection of the appliance.
Important:
The wires in the mains lead are coloured in accordance with the following code:
BLUE-NEUTRAL
BROWN-LIVE
As the colours of the wires in the mains lead of this appliance may correspond with the colours
markings identifying the terminals in your spur box, proceed as follow:
The wire which is coloured blue must be connected to the terminal which is marked with the letter "N"
or coloured black. The wire which is coloured brown must be connected to the terminal which is
marked with the letter "L" or coloured red.
WARNING
This appliance has such technical particulars that it belongs to Class II insulation and therefore
neither wire should be connected to the terminal marked with the letter E or by the earth
symbol
9
Not Working Properly?
Before you assume the worst, check this simple fault-finding guide to get to the root of the problem:
Light bulb doesn't come on
A replacement is probably necessary, but check first that the bulb is firmly screwed in to its holder. If
the filament is broken, remember that the light bulbs are not covered by our guarantee. Remember to
disconnect the power supply to the appliance before removing the bulb.
Motor is on but fan doesn't seem to be as efficient as usual
Check the grease filter mat. If it hasn't been cleaned recently, it might be clogged with grease. If the
filter mat is relatively clean, check the charcoal filter (if the appliance is set for recirculation mode). If
this hasn't been replaced for more than six months, remove and insert a new one. As time goes by,
accumulated grease will stop the charcoal filter from operating correctly. This will reduce the
efficiency of both the fan and the filter itself.
Works normally but cooking smells linger
If you're using the unit in re-circulation mode, change the charcoal filter. It is obviously past its prime.
Controls fail to switch motor on
Check the plug, socket and fuses. If these are in order and fault persists, it could be that an
accumulation of grease has impaired the efficiency of the switch mechanism. Try rapidly moving
switch on and off several times in succession to clear grease deposit. If the fault continues, call the
Baumatic Service Department.
Appliance does not work at all
Check your extractor is switched on at the mains. Next, check for an unexpected power cut by
switching on adjacent lights etc.
Still not working? Call the service agent.
If, having consulted the above diagnostic chart you are still unable to remedy the situation, please call
the Baumatic Service Department.
IMPORTANT: If your appliance appears not to be operating correctly, then you
should disconnect it from your mains supply and then contact the Baumatic
Technical Department on telephone number (0118) 933 6933.
DO NOT ATTEMPT TO REPAIR THE APPLIANCE YOURSELF.
Please refer to the conditions of guarantee that appear on the warranty card that you receive with the
appliance.
10
United Kingdom
Baumatic Ltd.,
Baumatic Buildings,
6 Bennet Road,
Reading, Berkshire
RG2 0QX
United Kingdom
Sales Telephone
(0118) 933 6900
Sales Fax
(0118) 931 0035
Service Telephone
(0118) 933 6911
Service Fax
(0118) 986 9124
Spares Telephone
(01235) 437244
Technical Advice Telephone
(0118) 933 6933
Czech Republic
Baumatic CR spol s.r.o.
Amperova 495
46215, Librec
Czech Republic
+420 800 185 263
www.baumatic.cz
Slovak Republic
Baumatic Slovakia, s.r.o.
Skultetyho 1
831 04 Bratislava 3
Slovakia
+421 255 640 618
Germany
Baumatic Gmbh
Janderstrasse 9
Mannheim, 68199
Germany
+4962 112 9190
E-mail:
[email protected]
[email protected]
Website:
www.baumatic.co.uk
Republic of Ireland
01- 6266 798
www.baumatic.de
Italy
Baumatic Italia S.R.L.
Via Caltana 129
Campodarsego (Padova), 35011
Italy
+3904 9920 2297
www.baumatic.it
Holland
Baumatic Benelux B.V.
Grindzuigerstraat 22
1333 MS ALMERE
The Netherlands
+3136 549 1555
www.baumatic.nl
11
12