1
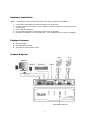
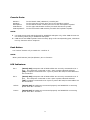
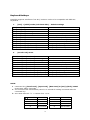
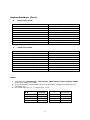
Hardware Installation:
NOTE:
All hardware must power-OFF before and during hardware installation.
1. Connect all KVM cables to the KVM switch and computers.
2. Connect monitor, keyboard, mouse, speaker and microphone to the KVM switch’s
console port.
3. Power-ON all hardware.
4. Do not switch between computers during boot-up process.
5. Hardware installation is now completed. Your KVM3332 is now ready to operate.
Package Contents:
z
z
z
One KVM3332
One Installation Guide
Two sets of KVM w/Audio cable
Product Diagram:
1
Console Ports:
Monitor:
Speaker:
Microphone:
USB Mouse:
USB Keyboard:
To
To
To
To
To
the
the
the
the
the
female VGA (HDDB-15) console port
top audio console port next to the speaker symbol
bottom audio console port next to the microphone symbol
right USB female console port with the Mouse symbol
left female USB console port with the keyboard symbol
NOTE:
1
2
Use USB mouse and USB keyboard for KVM3332 USB port only, other USB devices are
not working while plug in KVM3332 USB ports.
USB mouse and USB keyboard must correctly plug in the corresponding port, otherwise
hot key function will no response.
Push Button
Use “Select” button only to switch PC 1 and PC 2.
NOTE:
Other push buttons (PC1/PC2/Power) are no function.
LED Indicators:
PC 1:
[Steady ON] Computer and all KVM cables are securely connected to PC 1
port. The computer connected on PC 1 port is power-ON and selected.
[Off] Computer connected to PC 1 port is power-OFF and/or KVM cables are
not connected
PC 2:
[Steady ON] Computer and all KVM cables are securely connected to PC 2
port. The computer connected on PC 2 port is power-ON and selected.
[Off] Computer connected to PC 2 port is power-OFF and/or KVM cables are
not connected
Select:
[Steady ON] All cables are connected properly and KVM3332 is receiving
power from PC 1 and PC 2
Power:
[Steady ON] All cables are connected properly and KVM3332 is receiving
power from PC 1 and PC 2
2
Keyboard Hotkeys:
KVM3332 supports 4 different “Hot Key” modes in order to be compatible with different
keyboards.
1.
[Ctrl] + [Shift] mode (Left-hand side) – default settings
[Ctrl]
[Ctrl]
[Ctrl]
[Ctrl]
[Ctrl]
[Ctrl]
[Ctrl]
[Ctrl]
[Ctrl]
[Ctrl]
[Ctrl]
++
++
++
++
++
++
++
++
++
++
++
2.
[Scroll Lock] mode
[Scroll
[Scroll
[Scroll
[Scroll
[Scroll
[Scroll
[Scroll
[Scroll
[Scroll
[Scroll
[Ctrl]
[Shift]
[Shift]
[Shift]
[Shift]
[Shift]
[Shift]
[Shift]
[Shift]
[Shift]
[Shift]
Lock]
Lock]
Lock]
Lock]
Lock]
Lock]
Lock]
Lock]
Lock]
Lock]
++
++
++
++
++
++
++
++
++
++
+
+
+
+
+
+
+
+
+
+
Go to next PC
Go to PC 1
Go to PC 2
Go to the next PC (Ex: 1 Î 2 Î 1)
Go to the previous PC (Ex: 2 Î 1 Î 2)
Turn ON/OFF beep sound
Enter Auto-Scan mode (“ESC” to cancel)
Set Auto-Scan interval (“ESC” to cancel)
Change to [Caps Lock] mode
Change to [Num Lock] mode
Change to [Scroll Lock] mode
1
2
Î or Ð
Í or Ï
B
S
S+n
[Caps Lock]
[Num Lock]
[Scroll Lock]
[Scroll
[Scroll
[Scroll
[Scroll
[Scroll
[Scroll
[Scroll
[Scroll
[Scroll
[Scroll
Lock]
Lock]
Lock]
Lock]
Lock]
Lock]
Lock]
Lock]
Lock]
Lock]
+
+
+
+
+
+
+
+
+
+
1
2
Î or Ð
Í or Ï
B
S
S+n
[Caps Lock]
[Num Lock]
[Ctrl]
Go to PC 1
Go to PC 2
Go to the next PC (Ex: 1 Î 2 Î 1)
Go to the previous PC (Ex: 2 Î 1 Î 2)
Turn ON/OFF beep sound
Enter Auto-Scan mode (“ESC” to cancel)
Set Auto-Scan interval (“ESC” to cancel)
Change to [Caps Lock] mode
Change to [Num Lock] mode
Change to [Ctrl]+[Shift] mode
NOTE:
1
2
3
Command key, [Scroll Lock], [Caps Lock], [Num Lock] & [Ctrl]+[Shift], MUST
press twice within 2 seconds.
The command will automatically cancel in 5 seconds if nothing is entered after the
command key.
Auto-Scan Interval: “n” = number from 1 to 9.
【n】= number
Interval
5
25 seconds
1
5 seconds
6
30 seconds
2
10 seconds
7
35 seconds
3
15 seconds
8
40 seconds
20 seconds
9
60 seconds
4
3
Keyboard Hotkeys: (Con’t)
3.
[Caps Lock] mode
[Caps
[Caps
[Caps
[Caps
[Caps
[Caps
[Caps
[Caps
[Caps
[Caps
Lock]
Lock]
Lock]
Lock]
Lock]
Lock]
Lock]
Lock]
Lock]
Lock]
++
++
++
++
++
++
++
++
++
++
[Caps
[Caps
[Caps
[Caps
[Caps
[Caps
[Caps
[Caps
[Caps
[Caps
Lock]
Lock]
Lock]
Lock]
Lock]
Lock]
Lock]
Lock]
Lock]
Lock]
4.
[Num Lock] mode
[Num
[Num
[Num
[Num
[Num
[Num
[Num
[Num
[Num
[Num
Lock]
Lock]
Lock]
Lock]
Lock]
Lock]
Lock]
Lock]
Lock]
Lock]
++
++
++
++
++
++
++
++
++
++
[Num
[Num
[Num
[Num
[Num
[Num
[Num
[Num
[Num
[Num
Lock]
Lock]
Lock]
Lock]
Lock]
Lock]
Lock]
Lock]
Lock]
Lock]
+
+
+
+
+
+
+
+
+
+
1
2
Î or Ð
Í or Ï
B
S
S+n
[Scroll Lock]
[Num Lock]
[Ctrl]
Go to PC 1
Go to PC 2
Go to the next PC (Ex: 1 Î 2 Î 1)
Go to the previous PC (Ex: 2 Î 1 Î 2)
Turn ON/OFF beep sound
Enter Auto-Scan mode (“ESC” to cancel)
Set Auto-Scan interval (“ESC” to cancel)
Change to [Scroll Lock] mode
Change to [Num Lock] mode
Change to [Ctrl]+[Shift] mode
+
+
+
+
+
+
+
+
+
+
1
2
Î or Ð
Í or Ï
B
S
S+n
[Caps Lock]
[Scroll Lock]
[Ctrl]
Go to PC 1
Go to PC 2
Go to the next PC (Ex: 1 Î 2 Î 1)
Go to the previous PC (Ex: 2 Î 1 Î 2)
Turn ON/OFF beep sound
Enter Auto-Scan mode (“ESC” to cancel)
Set Auto-Scan interval (“ESC” to cancel)
Change to [Caps Lock] mode
Change to [Scroll Lock] mode
Change to [Ctrl]+[Shift] mode
NOTE:
1
2
3
Command key, [Scroll Lock], [Caps Lock], [Num Lock] & [Ctrl]+[Shift], MUST
press twice within 2 seconds.
The command will automatically cancel in 5 seconds if nothing is entered after the
command key.
Auto-Scan Interval: “n” = number from 1 to 9.
【n】= number
Interval
5
25 seconds
1
5 seconds
6
30 seconds
2
10 seconds
7
35 seconds
3
15 seconds
8
40 seconds
4
20 seconds
9
60 seconds
4
Troubleshooting Tips:
1.
2.
3.
4.
Make sure all KVM cables are connected securely, properly and well-seated.
Suggested to label all KVM cables accordingly to avoid confusion.
Do not move or press any mouse buttons when switch between PC ports.
Do not move or press any keys on keyboard when switch between PC ports. It may
cause keyboard error.
5. What should I do if keyboard is not working or keyboard error during computer boot-up
process?
a. Make sure you are using 101-, 102-, and 104- keyboards.
b. Check if the keyboard functions properly when connects to computer directly.
6. What should I do if mouse is not detected or not working properly?
a. Check if the mouse functions properly when connects to computer directly.
5