1
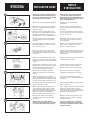
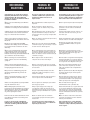
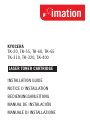
KYOCERA
TK-20, TK-55, TK-60, TK-65
TK-310, TK-320, TK-400
LASER TONER CARTRIDGE
INSTALLATION GUIDE
NOTICE D´INSTALLATION
BEDIENUNGSANLEITUNG
MANUAL DE INSTALACIÓN
MANUALE DI INSTALLAZIONE
KYOCERA
1
2
3
4
5
6
7
INSTALLATION GUIDE
NOTICE
D´INSTALLATION
Thank you for choosing our Imation High Quality Remanufactured Toner Cartridges. Listed
below are the simple instructions for installing
the cartridge into your laser printer.
Nous vous remercions d‘avoir acheté notre
cartouche toner Imation remanufacturée
haute qualité. Nous allons maintenant vous expliquer le moyen le plus simple pour l‘installer
dans votre imprimante laser.
Open the top cover (A) of the printer completely.
Ouvrez le couvercle supérieur (A) de
l‘imprimante.
Move the lock lever (B) to the right and remove
the old toner cartridge by pulling it carefully in
an upward direction.
Poussez le levier de verrouillage (B) vers la
droite pour déverrouiller la cartouche de toner
et retirez la.
Shake the new toner cartridge (D) vigorously
ten times or more, holding it with the label side
downwards (in the direction of the arrow), to
ensure that the toner is evenly distributed inside.
Secouez vigoureusement la nouvelle cartouche
de toner une dizaine de fois en la tenant avec les
inscriptions vers le bas.
Carefully peel the protective seal (E) from the
new toner cartridge and insert the cartridge in
the printer.
Enlevez délicatement la bande de protection
orange située sous la cartouche et placez la
dans l’imprimante.
Press firmly on the toner cartridge at the point
marked PUSH HERE until you hear it click into
place. Close the top cover.
Appuyez sur les endroits marqués PUSH HERE
jusqu’à ce que la cartouche s’enclenche.
Refermez le couvercle supérieur.
First open the side cover (F) on the left side of
the printer. Holding the toner reservoir, press
the lock lever (G) and carefully remove the toner
reservoir (H).
Ouvrez le couvercle latéral de l’imprimante. Tout
en maintenant le bac de récupération de toner,
appuyez sur le levier (G) retirez doucement le
bac et fermez-le.
Open the cap of the new toner reservoir. Insert
the new toner reservoir as shown in the diagram.
If positioned correctly, the reservoir will sit firmly
in place.
Retirez le capuchon du nouveau bac et inserez-le
comme indiqué sur le schéma.
Slowly move the cleaning button (L) in and out a
few times. This procedure cleans the corona wire
in the printer. After cleaning the corona wire,
press the cleaning button back in firmly.
Tirez doucement le bouton de nettoyage vert
et faites le rentrer et sortir plus-ieurs fois.
Remettez-le ensuite dans sa position initiale
Insert the grid cleaner (M) into the printer
with the pad right at the top as shown in the
diagram.
Fixer l’outil de nettoyage de la grille (M) à
l’imprimante comme indiqué sur le schéma.
After inserting the grid cleaner, repeat the
process of slowly pulling out and pushing in and
finally pushing right back into the main loading
unit (P) at least five times. Close the side cover.
Tirez et poussez ensuite l’unité de corona
principale (P) environs 5 fois. Refermez ensuite
le couvercle
Pull back the release lever (Q) of the paper feed
and remove the paper feed (R).
Extraire l’unité d’alimentation de papier (R) en
tirant sur le levier (Q).
Wipe the paper dust from the alignment roller
(S) and the paper feed (T) using the cleaning
cloth in the toner kit. Do not touch the black
transfer roller (U) while cleaning the paper feed.
After cleaning, replace the paper feed in its
original position.Close the front and top covers.
Avec le chiffon de nettoyage, enlever la poussière
du rouleau de synchronisation (S) et de la
lamelle de guidage (T). Faites attention de ne
pas toucher le rouleau noir (U).Remettez ensuite
l’unité dans sa posotion initiale.
Replace the old cartridge in the empty box
and return the box to us as indicated on the
instructions.
Emballez la cartouche usagée dans le carton
vide. Merci de nous la renvoyer en suivant les
instructions de retour.
You will now be able to judge the perfect
quality of our toner cartridge for yourself. We
are certain it will provide results you expect.
Laissez-vous convaincre par le fonctionnement irréprochable de notre cartouche de
toner. Elle vous permettra d´obtenir la qualité
d´impression désirée.
BEDIENUNGSANLEITUNG
MANUAL DE
INSTALACIÓN
MANUALE DI
INSTALLAZIONE
Vielen Dank, dass Sie sich für unsere Imation
High Quality Remanufactured Toner Cartridges
entschieden haben. Wir werden Ihnen nun
erklären, wie Sie diese am einfachsten in Ihren
Laserdrucker einbauen.
Gracias por elegir nuestro cartucho de alta
calidad. A continuación le explicamos cómo
instalarlo de la manera más fácil en su
impresora láser.
Vi ringraziamo per aver scelto le cartucce toner
rigenerate High Quality Imation. Di seguito troverete le semplici istruzioni per l‘installazione
della cartuccia nella vostra stampante laser.
Öffnen Sie die obere Abdeckung (A) des Druckers
vollständig.
Abra completamente la cubierta superior de la
impresora.
Aprite il coperchio superiore (A) della stampante.
Schieben Sie den Sperrhebel (B) nach rechts und
entnehmen Sie vorsichtig den alten Tonerbehälter.
Deslice la palanca de bloqueo (B) hacia la
derecha y saque con cuidado el viejo colector
del tóner.
Spingere a destra la levetta di bloccaggio (B)
e prelevare la vecchia cartuccia sollevandola
prudentemente.
Schütteln Sie den neuen Tonerbehälter kräftig mit
der beschilderten Seite nach unten (in Pfeilrichtung) ca. 10 mal um der Toner zu verteilen.
Agite fuertemente el nuevo colector del tóner con
la parte señalizada hacia abajo (en dirección a
la flecha) unas 10 veces para que le reparta bien
el contenido.
Scuotete energicamente la nuova cartuccia, con
la dicitura sia rivolto verso il basso, per circa
dieci volte o più.
Ziehen Sie vorsichtig das Schutzsiegel (E) vom
neuen Tonerbehälter ab, und setzen Sie ihn in den
Drucker ein.
Retire con cuidado el sello protector (E) del tóner y
colóquelo en la impresora.
Togliete prudentemente il sigillo di protezione dalla nuova cartuccia e inseritela nella stampante.
Drücken Sie an die beiden mit PUSH HERE
markierten Stellen kräftig auf den Tonerbehälter,
bis er hörbar einrastet. Schließen Sie die obere
Abdeckung.
Apriete en los dos sitios donde pone PUSH HERE
con fuerza hasta que oiga cómo encaja el colector
del tóner. Cierre la cubierta superior.
Öffnen Sie die Seitenabdeckung auf der linken
Seite des Druckers. Halten Sie den Resttonerbehälter, und drücken Sie den Sperrhebel (G).
Entfernen Sie Vorsichtig den Resttonerbehälter (H)
und schließen Sie diesen mit der Kappe.
Abra la cubierta lateral de la parte izquierda de
la impresora, mantenga apretado el colector del
tóner usado y apriete la palanca de bloqueo (G).
Retire con cuidado el colector del tóner usado (H)
cerrándolo con la tapa.
Aprite prima il coperchio laterale (F) sul lato
sinistro della stampante. Tenete fermo il raccoglitoner, premete la levetta di bloccaggio (G) e
quindi toglietelo piano.
Öffnen Sie die Kappe des neuen Resttonerbehälters. Setzen Sie diese wie in der Abbildung
gezeigt ein.
Abra la tapa del nuevo colector del tóner y
colóquela como se indica en la imagen.
Una volta tolto il raccogli-toner dalla stampante,
chiudete quest‘ultima con il coperchio. Aprite il
coperchio del nuovo raccogli-toner. Inserite il nuovo raccogli-toner come raffigurato sul disegno.
Ziehen Sie zuerst den Reinigungskopf (L) ein
paar mal rein und raus. Drücken Sie danach den
Reinigungskopf gänzlich und fest rein.
Primero, saque y meta un par de veces le botón
limpiador (L) y luego apriételo del todo fuertemente hacia dentro.
Tirate fuori e fate rientrare lentamente per un
paio di volte il tasto di pulizia (L). Una volta
pulito il filo, premete il tasto completamente e
solidamente.
Bringen Sie wie in der Abbildung gezeigt den
Grid Cleaner (M) mit dem Pad ganz oben am
Drucker an.
Coloque la rejilla limpiadora (M) con la almohadilla hacia arriba en la impresora, como se
muestra en la imagen.
Applicate il pulitore reticolo (M) come raffigurato
sul disegno insieme al pad sul lato superiore
della stampante.
Ziehen Sie die Hauptladeeinheit (P) 5 mal rein
und raus. Sie können die Seitenabdeckung
schließen.
Saque y meta la unidad de carga principal (P) 5
veces. Ya puede cerrar la cubierta lateral.
Una volta applicato il pulitore reticolo, ripetere
il processo di pressione lenta (dentro e fuori) e
poi d‘innesto nell‘unità di carico principale (P)
almeno per cinque volte come raffigurato.
Ziehen Sie am Freigabehebel (Q) der Papierzuführung und entnehmen Sie diese.
Tire de la palanca de desbloqueo (Q) del alimentador de papel y sáquelo.
Tirate la levetta di sbloccaggio (Q)
dell‘alimentatore carta e prelevatelo (R).
Mit dem Reinigungstuch, wischen Sie den
Papierstaub von der Ausrichtwalze (S) und Papierführung. Achten Sie, daß Sie die schwarze Walze
(U) nicht berühren. Setzen Sie die Papierzuführung in ihre ursprüngliche Position.
Limpie el polvo del papel con un trapo que
se acumuló en el rodillo de alineación (S) y el
alimentador de papel. Procure no tocar el rodillo
negro (U) y coloque el alimentador en su posición
original.
Pulite il rullo allineatore (S) e la guida della carta
(T) con il panno. Avvertenza: pulendo la guida
della carta non toccare il rullo di trasferimento
nero (U).Una volta eseguita la pulitura inserite
di nuovo l‘alimentatore carta nella sua posizione
originaria.
Packen Sie bitte die verbrauchte Kartusche in den
leeren Karton und senden Sie das Paket gemäß
Anleitung zurück.
Guarde el cartucho usado en el envoltorio
vacío y mande el paquete de vuelta según las
instrucciones.
Mettere la cartuccia usata nella scatola vuota
e preparate la spedizione secondo le istruzioni
indicate per la restituzione.
Lassen Sie sich nun von der einwandfreien
Funktion unserer Tonerkartusche überzeugen.
Sie wird die von Ihnen gewünschten Druckergebnisse liefern.
Convénzase del perfecto funcionamiento de
nuestros cartuchos: ofrecen los resultados de
impresión que usted desea.
Adesso giudicherete voi, il livello qualitativo
della nostra cartuccia toner. Siamo certi che
il risultato di stampa soddisferà pienamente le
vostre esigenze.
Premete forte sul punto della cartuccia dove
c‘è scritto PUSH HERE. Chiudete il coperchio
superiore.
Einige Cartridgetypen erfüllen die Anforderungen des Nordic
SWAN Umweltzeichens. Die Anforderungen dafür wurden vov SIS
Ecolabeling AB aufgestellt und sind im Web unter www.svanen.
nu abrufbar. Imation erfüllt mit einer Vielzahl von Tonercartridges unter der Lizenz # 308028 die entsprechenden Anforderungen. Für welche Typen dies gegeben ist, ist ebenfalls auf der
obigen Website abrufbar.
www.collecture.com
Some cartridge types fulfills the requirement of Nordic SWAN
environment label. The requirements for it are set up by SIS Ecolabeling AB and can be downloaded from the web under www.
svanen.nu. Imation meets these requirements under licence #
308028 for most of the toner cartridges. For which types this is
actually the case can as well be read from the above web page.
Registered Trademarks are property of their respective holders and for prescriptive purposes only. Any liabilities for misprints excluded.