1
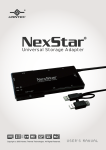
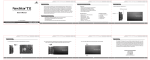
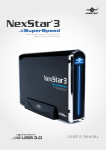
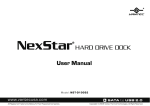
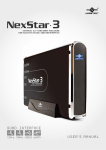
eSATA Bracket Included
RoHS
USER’S MANUAL
Package Contents:
®
NexStar DX EXTERNAL 5.25” SATA ENCLOSURE
USB 2.0/eSATA INTERFACE
1
2
3
4
5
6
7
8
5.25” NexStar® DX Enclosure
Power Cable
eSATA Cable
USB Cable
SATA to eSATA Bracket
CD Driver
Installation Screws
User’s Manual
1
2
SATA
SATA
4
3
6
5
7
8
USER’S MANUAL
TRADEMARKS
MS-DOS, Microsoft, Windows NT/2000/ME/XP/Vista are trademarks of Microsoft Corporation.
Apple, Macintosh and Mac are trademarks of Apple Computer
*All other third-party brands and names are the property of their respective owners.
Table of Contents:
1. Introduction ................................................................................................................02
2. Specifications / Features
NexStar® DX EXTERNAL 5.25” SATA ENCLOSURE USB 2.0/eSATA INTERFACE ............................. 03
3. System Requirements ......................................................................................04
4. Parts Layout
NexStar® DX EXTERNAL 5.25” SATA ENCLOSURE USB 2.0/eSATA INTERFACE...............................05
5. Installation
NexStar® DX EXTERNAL 5.25” SATA ENCLOSURE USB 2.0/eSATA INTERFACE
5.1. Hardware Installation................................................................................................06
5.2 Driver Installation......................................................................................................09
7. Warranty .........................................................................................................................10
8. Contact .............................................................................................................................10
Table of Contents
1
1. Introduction:
With the Vantec NexStar® DX External 5.25" Enclosure,
you can easily add any 5.25" optical drive to your
existing system. The NexStar® DX connects to your
computer through USB 2.0 & eSATA, offering speeds
up to 480Mbps-1.5Gbps and even supports Blu-Ray
drives! The NexStar® DX is perfect for anyone looking
to add any 5.25" device, such as a DVD burner, to any
notebook or desktop computer. Because you don't
have to open your computer, you will not have to
worry about voiding your existing warranty or dealing
with messy wires. The integrated fan and aluminum
case keeps your device cool and operating at optimum
conditions. The NexStar® DX External 5.25" Enclosure
is the smart way to upgrade any computer.
NST-530SU
Introduction
2
2. Specifications/Features:
®
NexStar DX EXTERNAL 5.25” SATA ENCLOSURE
USB 2.0/eSATA INTERFACE
Features:
• Transfer Rates Up to 480Mbps w /USB 2.0
• Transfer Rates Up to 1.5Gbps w /eSATA
• Easily Add a 5.25” SATA Device to Any System with USB or eSATA
• Blu-Ray Drive Compatible
• Hot-Swappable: Plug & Play Without Rebooting
• Integrated Cooling Fan
• Easy Installation Without Opening Your Computer
• Aluminum Casing
Specifications:
•
•
•
•
•
•
•
Model:
Device Support:
Device Size:
Internal Interface:
External Interface:
Power Supply:
Transfer Rate:
• Material:
• Dimensions:
NST-530SU
CD-ROM /R /RW, DVD-ROM / R / RW, Blu-Ray
5.25”
Serial ATA
USB 2.0 / eSATA
AC Adapter
USB 2.0 (Up to 480Mbps)
eSATA (Up to 1.5Gbps)
Aluminum
252 x 172 x 49 mm
Power Connection
Power Switch
Fan
SATA
eSATA Port
Audio Port
USB 2.0 Port
Specifications / Features
3
3. System Requirements:
Mac G3 processor & greater
Mac OS 9.x & greater
1. 64MB RAM or higher
2. USB-equipped system with available
USB port
3. eSATA-equipped system with available
eSATA port
4. For USB 2.0 speeds, the system must
support USB 2.0 specifications.
5. For SATA, the system must support SATA
specifications.
Intel Pentium II 266 MHz-compatible
Microsoft Windows 2000/XP/Vista.
1. 64MB RAM or higher
2. USB-equipped system with available
USB port
3. eSATA-equipped system with available
eSATA port
4. For USB 2.0 speeds, the system must
support USB 2.0 specifications.
5. For SATA, the system must support SATA
specifications.
System Requirements
4
4. Parts Layout:
®
NexStar DX EXTERNAL 5.25” SATA ENCLOSURE
USB 2.0/eSATA INTERFACE
SATA Cable
Aluminum Housing
Power Cable
Audio Cable
Parts Layout
5
5. Installation:
®
NexStar DX EXTERNAL 5.25” SATA ENCLOSURE
USB 2.0/eSATA INTERFACE
5.1. Hardware Installation:
(1) Remove the back plate from the enclosure.
( Figure 5.1-A )
( Figure 5.1-A )
(2) Slide the tray out from the housing.
( Figure 5.1-B )
5.25” Device
( Figure 5.1-B )
(3) Insert the 5.25" device into the enclosure.
( Figure 5.1-C )
( Figure 5.1-C )
Installation
6
SATA Port
Audio Port
(4) Connect the SATA and power cable to the device
as shown. ( Figure 5.1-D )
SATA Cable
( Figure 5.1-D )
(5) Tighten the 4 screws on both sides of 5.25” device.
( Figure 5.1-E )
( Figure 5.1-E )
(6) Align the device so that the front of the device
is flushed with the front of the NexStar® DX.
( Figure 5.1-F )
( Figure 5.1-F )
Installation
7
Audio Cable
(7) Slide the housing back onto the tray and attach
with the screws provided. ( Figure 5.1-G )
( Figure 5.1-G )
Using the Audio Jack:
1) If you have connected the audio cable to your 5.25"
device, you can access the audio through the Audio
Jack, labeled "AUDIO" as pictured on the right. Using
a standard 3.5mm plug, you can connect the
Nexstar® DX to a pair of headphones or to a speaker
setup. ( Figure 5.1-H )
( Figure 5.1-H )
Installation
8
5.2 Driver Installation:
Windows XP/2000/VISTA:
(1) No drivers are necessary when using Windows
XP/2000/VISTA. If the device does not
appear under My Computer, you may need
to install drivers for the 5.25” device
(not Nexstar® DX). Please refer to the 5.25” device’s
instructions on how th install its drivers.
Mac OS 8.6 :
(1) Unplug the Nexstar® DX if you currently
have it connected.
(2) USB Mass Storage Support 1.3.5 must be
installed on your system. If it is not, you may
download the USB Mass Storage Support 1.3.5
update from the Apple software website :
http : // www.apple.com/support
(3) Follow the direction associated with the USB
Mass Storage Support driver to install.
(4) Repeat the steps listed under “Connecting
the Nexstar® DX to your computer.”
Mac OS 9.0 or later :
(1) No drivers are necessary when using Mac
9.0 or later. If the hard drive does not appear
on the desktop, be sure to partition your
hard drive.
Disconnecting the Nexstar® DX
9
6. Warranty:
The NexStar® DX comes with a 1 year limited
warranty ( 90 day parts ) . If your unit should
become defective within that time frame, please
go to http://www.vantecusa.com for information
on how to receive warranty exchange or repair.
Cosmetic defects and missing parts are not
covered under this warranty. Please check
the contents of the unit to make sure you received
all parts. Also, check for any cosmetic flaws.
If any parts are missing or if there are cosmetic
defects, please contact the retailer from which
you purchased the unit immediately and ask for
a replacement.
7. Contact :
Vantec Thermal Technologies
43951 Boscell Rd.
Fremont, CA 94538
tel: 510-668-0368
fax: 510-668-0367
website: www.vantecusa.com
Copyright © 2009 Vantec Thermal Technologies. All Right Reserved.
All Registered Trademarks Belong To Their Respective Companies.
Warranty /Contact
10