1
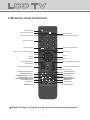
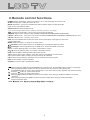
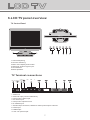
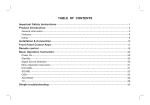
For more information and support, please visit www.lenco.eu
TFT-2277
USER MANUAL
GEBRUIKSAANWIJZING
BENUTZERHANDBUCH
For more information and support, please visit www.lenco.eu
TO THE CUSTOMER:
Thank you for purchasing this LCD TV. When opening the box for the first time, please
check whether all the accessories are present. Before connecting parts and power, please
carefully read the user manual and always keep these instructions handy and close by your
LCD TV.
Contents
Safety precaution...........................................................................................2
Accessories...................................................................................................3
Remote control manual...................................................................................4
Remote control functions................................................................................5
TELETEXT function buttons............................................................................6
LCD TV panel overview...................................................................................7
Connecting to external devices.......................................................................8
OSD manual..................................................................................................9
Trouble shooting...............................................................................................32
Maintenance.....................................................................................................33
Specifications...................................................................................................34
1.Safety precaution
Notes:
WARNING
RISK OF ELECTRIC SHOCK
DO NOT OPEN
The lightning flash with arrowhead symbol, within an equilateral
triangle, is intended to alert the user to the presence of insinuated
dangerous voltage within the product's enclosure that may be
of sufficient magnitude to constitute a risk of electric shock
CAUTION:
TO REDUCE THE RISK OF ELECTRIC SHOCK, DO NOT
REMOVE COVER(OR BACK). REFER SERVICING TO
AUTHORISED SERVICE PERSONNEL.
The exclamation point within an equilateral triangles is intended
to alert the user to the presence of important operating and
maintenance (servicing) instructions in the literature
accompanying the product.
WARNING:
TO REDUCE THE RISK OF FIRE OR ELECTRIC SHOCK, DO NOT EXPOSE THIS PRODUCT TO RAIN
OR MOISTURE.
DO's and DON'T's
DO's
Always power this product from an outlet with the same rating (voltage and
frequency) as indicated on the rating label on the back of the product.
If this product has been damaged (including cord or plug) take it to an authorised
service technician for inspection, and if necessary, repair.
Turn off and disconnect the power cable before cleaning or storing this product.
Ensure this product does not get wet or splashed.
Only use the A/C power adapter supplied with your product, or a replacement
recommended by an authorised technician.
DON'T's
Do not place naked flames, such as lighted candles on or near the product.
Do not place objects filled with liquids, such as vases on or near the product.
Do not install this product on top of other electrical equipment or on uneven surfaces.
Do not use or store this product in a place where it is subject to direct sunlight, heat,
excessive dust or vibration.
Do not use this product with wet hands.
Do not clean this product with water or other liquids.
Do not block or cover the slots and holes in the product.
Do not push foreign objects into the slots or holes in the product.
The screen surface is easily scratched. Do not touch the screen with your hands or
any hard object.
Do not pull the power cord when disconnecting power. Turn off the switch on the
socket and pull the plug not the cord.
Do not attempt to open this product yourself. There are no user serviceable parts
inside.
2
SAFETY WARNINGS
Before using this product, read and follow all warnings and instructions.
This product is not intended for use by young children. Young children should
be properly supervised.
This product is intended for household use only and not for commercial or
industrial use.
Do not expose to dripping or splashing.
No naked flame sources, such as lighted candles, should be placed on the product.
Allow suitable distances around the product for sufficient ventilation.
Ventilation should not be impeded by covering ventilation openings with items
such as newspapers, table cloths, curtains and the like.
Make sure the LCD TV stand is adjusted to a stable position. Damage caused by
using this product in an unstable position or by failure to follow any other warning
or precaution contained within this user manual will not be covered by warranty.
2.Accessories
Check the accessories
P
EE
SL
(TV accessories)
OD
S.M
E
3
E
OD
P.M
2
1
6
5
4
9
8
7
0
NU
ME
UR
SO
CE
OK
IT
EX
E
MUT
INFO
CH
+
L
VO
CT
PE
AS
EP
OD
G/IP
DIO
TV.RA
ITLE
SUBT
V
/FA
E
SIZ
EX
IND
NCEL
/CA
X
/TT
X
/REVEA
L
AGE
SUBP
LD
/HO
User manual
Remote control/batteries
Power Cord
Component cable
3
3.Remote control manual
Power button
P.MODE
SLEEP
S.MODE
Picture mode button
Sleep button
Sound mode button
Numeric button
1
2
3
4
5
6
7
8
9
NICAM function button
0
Channel set up
Return channel button
Signal source selection button
Main menu
SOURCE
MENU
Up
Right
OK
LEFT
ENTER
Down
INFO
EXIT
Information button
Exit the OSD menu button
MUTE
Mute button
Volume adjusting button
+
VOL
CH
Channel selection button
Aspect button
ASPECT
STOP/ Favourite button
/FAV
TV.RADIO
/TTX
/CANCEL
SIZE
SUBTITLE
/HOLD
/REVEAL
SUBPAGE
INDEX
EPG/IPOD
EPG/IPOD button
PLAY/PAUSE button
REWIND/CANCEL button
PREV/TTX/MIX button
FORWARD/REVEAL button
HOLD/NEXT button
TV.RADIO button
X
RED button
Size button
SUBTITLE button
SUBPAGE button
INDEX button
BLUE button
GREEN button
YELLOW button
Bright sunlight or lighting may cause erratic remote operation
4
4.Remote control functions
POWER: Power on/off button , press once to turn the TV on and press again to turn the TV off.
SLEEP: Sleep button , setting TV power off time.
MUTE: Mute button , press once to disable the audio and press again to enable the audio.
0,1-9: TV channel selection button.
ASPECT:ASPECT button,display format.
-/--:TV channel range selection button, select TV channel by entering 1,2 or 3 digits.
: Previous channel button , return to the previous channel watched.
SOURCE: Signal source selection button (ATV/DTV/YPBPR/SCART/VGA/HDMI/S-VIDEO/IPOD).
P.MODE: P.MODE button , setting the picture mode for ATV/DTV/YPBPR/SCART/VGA/HDMI/S-VIDEO/IPOD input mode.
S.MODE: S.MODE button , setting the sound mode.
INFO: Press the INFO button to view the current channel information. Press again to remove the
channel information.
MENU: OSD menu button , to enter the TV setup menu.
/ (UP/Down): Up and down buttons of the OSD menu. To change the OSD menu items
/ (Left/Right): Left and right buttons of the OSD menu. To select the OSD menu items
VOL+/-: Volume adjusting button, to increase or decrease the volume.
CH / : Channel selection button, to increase or decrease channel.
EPG: Press the EPG to detail information about the channel.
TTX: Press the TTX to open Teletext, press TTX enter TV and Teletext mix mode twice.
I/II: Press the I/II to switch modes of sound processing A2 or NICAM.
FAV: Press the FAV to start the "Favourite List" for select your favourite program.
EXIT: Press the EXIT to exit the operation.
SUBTITLE: Press the SUB to enable/disable subtitle.
:When playing the IPOD,press PLAY/PAUSE once to pause,Press PLAY/PAUSE again to return to normal play.
:When playing IPOD,press STOP once,the unit will memorize the previous ending point.Press
PLAY/PAUSE button to resume play. Press STOP for the second time to stop playback and clear the memory.
:Press the
button for quick forward search.
:Press the
button for quick rewind search.
:When playing a IPOD,press NEXT to play the next chapter .when playing a IPOD,press NEXT to PLAY the
next track.
:When playing a IPOD,press PREV to play the previous chapter.when playing a IPOD,press PREV
to play the previous track.
IPOD
IPOD:
IPOD
5
5.TELETEXT function buttons
Press this button once, turn on the teletext function,
Press twice, enter picture and text mix mode.
Press once more, turn off the teletext function.
After searching for some page, press this key once to
go back to the text mode.
While the searching result will be displayed at the top
of the TV picture, press again to go back to the text
mode.
Press this key to change the size of the character of
the current text page as following:
Normal Display the upper half Display the bottom
half Normal.
SUBTITLE
Press this key to turn on or off the subtitle of TV
programs.
Keep the current page not to refreshed and press
again to cancel the holding state.
Reveal/Conceal the concealed information of the
current text page.
To enter the subpage.
To show teletext index.
RED
GREEN
YELLOW
BLUE:Fast teletext buttons
6
6.LCD TV panel overview
TV Control Panel
6
6
1.Volume adjusting.
2.Channel selecting.
3.Main menu display and confirm.
4.Selecting exterior signal input.
5.On/off button.
6.Bass speakers.
TV Terminal connections
LINE OUT
YPBPR
AUDIO
PR
PB
Y
1. Audio out.
2. Antenna input (75 Ohm VHF/UHF).
3. Component audio input .
4. PC audio input.
5. Component input terminal.
6. S-VIDEO input.
7. SCART input terminal ,suitable for a European export machine.
8. VGA input.
9. HDMI input.
10. DC 12V power input.
7
7.Connecting to external devices
RCA terminal is used to connect the output device of DVD
HDMI
The rear of TV
YPBPR
S Video
LINE OUT
YPBPR
AUDIO
PR
PB
Y
VCR
Notes:
1.VGA/YPBPR/S-Video use a common PC Audio in.
2.SCART to SCART from a VCR.
3.YPBPR from a DVD.
4.HDMI signal is from a DVD
8
DVD
9
10
INFO
11
12
Equailizer Mode
Standard
13
Netherlands
OK
14
15
YPBPR
16
17
18
19
Hotel Lock
20
Hotel Lock
Hotel Lock
LOCK SETTING
Hotel Lock
Source Lock
Default Source
OFF
Default Prog
1
Max Volume
100
Clear Lock
Hotel Lock
Press / button to selec t Hotel Lock on/off.
Source Lock
Press button to select Source Lock.In this setting those ports will be locked.For example, ATV,
SCART,S-VIDEO,YPBPR,VGA, HDMI,DTV,IPOD.
Default Source
Press / button to select Default Source on/off.
In this choice the default port boot.
Default Prog
Press / button to select Default Prog.When Default Source is ATV or DTV.
Max Volume
Press / button to selec t Max Volume on/off.
In this volume will be set up to the maximum.
Clear Lock
Press / button to enter Clear Lock setting to restore Hotel Mode default.
21
22
SOURCE
YPBPR
23
OK
OK
OK
24
OK
25
26
27
OK
28
OK
IPOD
29
OK
IPOD
OK
OK
OK
IPOD
OK
OK
IPOD
30
IPOD
OK
IPOD
31
Trouble shooting
Before contrast the service technician, perform the following simple checks. If any program still persists,
unplug the LCD TV and calling for serving.
PROBLEM
POSSIBLE SOLUTION
No sound and picture
- Check that the main plug has been connected to a wall let.
- Check that you have pressed the POWER button on the front of TV set.
- Check the picture contrast and brightness settings.
Normal picture but no
sound
-
The remote control does
not work
Check the volume.
Sound muted? Press the MUTE button.
Try another channel the problem may be with the broadcast.
Are the audio cables installed properly.
- Check to see if there any object between the product and remote control
Causing obstruction.
- Are batteries installed with correct polarity(+ to +,- to -).
- Correct remote operating mode set: TV, VCR etc.?
- Install new batteries
Power is suddenly turned
off
- Is the sleep timer set.
- Check the power control settings. Power interrupted.
- No broadcast on station tuned with auto activated.
Picture appears slowly
after switching on
- This is normal, the image is muted during the product startup process. Please
contact your service center, if the picture has not appeared after five minutes.
No or poor color or poor
picture
Horizontal/vertical bars
or picture shaking
- Adjust the color in menu option.
- Keep a sufficient distance between the product and the VCR.
- Try another channel, the problem may be with the broadcast.
- Are the VIDEO cables installed properly?
- Activate the any function to restore the brightness of the picture.
- Check for local interference such as an electrical appliance or power tool.
Poor reception on some
channels
- Station or cable product experiencing problems. Tune to another station.
Lines or streaks in pictures
- Check the antenna(Change the direction of the antenna).
No output from one of the
speakers
- Adjust balance in menu option.
- Station signal is weak, reorient antenna to receive weaker station.
- Check for sources of possible interference.
32
NOTE: There is a problem in VGA mode.(Only VGA mode applied)
PROBLEM
The signal is out of range.
Vertical bar or stripe on
back ground&Horizontal
Noise&Incorrect position.
Screen color is unstable
or single color.
POSSIBLE SOLUTION
- Adjust resolution, horizontal frequency, or vertical frequency.
- Check it whether the signal cable is connected or loose.
- Check the input source.
- Work the auto configure or adjust clock, phase, or H/V position.
- Check the signal cable.
- Reinstall the PC video card.
Maintenance
Early malfunctions can be prevented. Careful and regular cleaning can extend the amount of time you will have
your new TV. Be sure to turn the power off and unplug the power cord before you begin any cleaning.
Cleaning the screen
1. Here’ s a great way to keep the dust off your screen for a while. Wet a soft cloth in a mixture of lukewarm
water and a little fabric softener or dish washing detergent. Wring the cloth until it’s almost dry, and then
used it to wipe the s- creen.
2. Make sure the excess water is off the screen, and then let it air-dry before you turn on your TV.
Cleaning the cabinet
To remove dirt or dust, wipe the cabinet with a soft, dry, lint-free cloth. Please be sure not to use a wet cloth.
Extended Absence
If you expect to leave your TV dormant for a long time(such as a vacation), it’s a good idea to
unplug the power cord to protect against possible damage from lightning or power surges.
33
Specifications
Panel Features
Screen Size
Active Area
Aspect Ratio
21.6 inch
477.417mm(H) X 268.416mm(V)
Panel Resolution
Brightness
1366 X 768
400 cd/m²
Contrast Ratio
Viewing Angle
800:1
16:9
170º(H) X 160º (V)
0.1165mm(H) X 0.3495mm(V)
Dot Pitch
Maximum Colour
16.7M
Response Time Black-White (R&D)
5ms
OSD Languages
English, French Spanish
German
Dutch
TV Function
Broadcast System
PAL/SECAM
BG,D/K,I,L,andL
Receiving Channel
Video Standards Supported
S-Video Input
NTSC / PAL / SECAM
PAL / SECAM
Antenna (RF)
Maximum Audio Output
Audio Output
2 x 4W(R/L)+8W()
Input Connections
TV Input (Analogue /Digital TV Antenna)
1 (RF - 75 Ohm)
YPBPR
1 (3 pin)
S-Video Input
1 ( 4 pin DIN )
VGA Input
1 (15 pin D-Sub)
SCART Input
1 (21 pin SCART)
PC Audio in(for VGA)
YPBPR AUDIO(for S-VIDEO/YPBPR)
HDMI
Stereo Mini Phono Jack Input (3.5mm)
Stereo Mini Phono Jack Input (3.5mm)
1 (19 pin )
VGA Resolutions Supported
640x480 @ 60Hz
800x600 @ 60Hz
1024x768 @ 60Hz
1360x768@ 60Hz
Power
Power Adapter
TV Power Input
Power Consumption
AC 100V - 240V ~ 50 / 60Hz
DC 12V 6A
< 72W
34