1
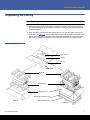
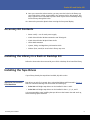
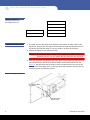
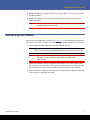
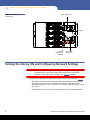
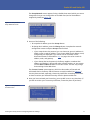
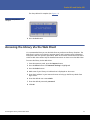
Scalar i40 and Scalar i80
Contents
Required Tools and Equipment .............. 2
Environmental Requirements ................ 2
Taking ESD Precautions .......................... 2
Unpacking the Library............................ 3
Scalar i40 and Scalar i80
Quick Start Guide
Accessory Kit Contents .......................... 5
Installing the Library in a Rack or
Desktop Kit............................................. 5
Installing the Tape Drives ....................... 5
Connecting the Cables ........................... 7
Turning the Library ON and Configuring
Network Settings ................................... 8
Accessing the Library Via the Web
Client .................................................... 13
This quick start guide provides basic installation and configuration
instructions for the Scalar® i40 and Scalar i80 libraries. For more
information, see the Quantum Scalar i40 and Scalar i80 User’s Guide
located on the documentation CD provided with your library.
Configuring Partitions.......................... 14
This instruction uses the following conventions:
Saving the Library Configuration ........ 17
Running the Installation and Verification
Test ....................................................... 14
Importing Tape Cartridges ................... 15
Configuring the Host Software............ 17
Caution: Cautions indicate potential hazards to equipment and are
included to prevent damage to equipment.
Registering the Library......................... 17
WARNING: Warnings indicate potential hazards to personal safety and
are included to prevent injury.
Scalar i80
Scalar i40
www.quantum.com
Scalar i40 and Scalar i80 Quick Start Guide
Required Tools and Equipment
• Ethernet cable
Environmental Requirements
The installation site must have the following environmental conditions:
• Humidity 20% – 80% non-condensing
• Temperature: 50°F – 95°F (10°C – 35°C)
• Altitude: –500 to 10,000 feet (–152 to 3048 meters)
These environmental conditions apply when the Scalar i40 and Scalar i80 libraries are in
operation. For additional specifications, refer to the Quantum Scalar i40 and Scalar i80
User’s Guide.
In addition, install the library in a location that is as free from dust as possible. Dust can
damage or degrade performance of library components and media.
Taking ESD Precautions
Some components within the Scalar i40 and Scalar i80 libraries contain static-sensitive
parts. To avoid damaging these parts while performing installation procedures, always
observe the following precautions:
• Use an antistatic wrist strap. If you do not have one, touch the outside of the library
on the sheet metal before touching any components to discharge static from your
body.
• Keep static-sensitive parts in their original shipping containers until ready for
installation. Look for the ESD sticker to identify static sensitive parts.
• Avoid touching connectors and other components.
Note: Dry climates and cold-weather heating environments have lower relative
humidity and are more likely to produce static electricity.
2
Required Tools and Equipment
Scalar i40 and Scalar i80
Unpacking the Library
Note: Unpack the library as close to the installation location as possible.
1 Inspect the outer library packaging for damage. If there is any damage evident on
the library packaging, do not continue with the installation and contact Quantum
customer support.
2 Open the library packing box and remove the kit tray containing the accessory kit
and rail kit (see Figure 1). Some configurations come with tape drives installed in the
library, and some come with tape drives packaged separately. If yours comes with
tape drives packaged separately, remove them and set aside for installation later.
Figure 1 Packaging
Accessory kit
Rail kit
Kit tray
Media labels
Top foam
Bottom foam
Shipping carton
Bottom tray (Scalar i80 only)
Scalar i40
Pallet (Scalar i80 only)
Scalar i80
Unpacking the Library
3
Scalar i40 and Scalar i80 Quick Start Guide
3 Remove the top foam.
4 Scalar i80 only: Remove the shipping carton by lifting it straight up out of the
bottom tray.
5 With the help of a second person, lift the library chassis out of the bottom foam and
place it on a table approximately waist high.
WARNING: Two people are required to safely lift the library out of its packaging
or into a rack.
Caution: Lift the library chassis at the sides. Avoid putting the weight of the
library chassis on the front bezel.
6 Remove the anti-static wrapping from the library. Keep the anti-static wrapping
intact so that you can use it later if needed.
7 Save the packing box, packaging material, and anti-static wrapping in case you need
to move or ship the library in the future.
8 Remove the robot restraint. The robot restraint consists of four (4) thumbscrews, a
plastic sheet, and a small metal clip, located on the top cover of the library. (See
Figure 2.)
a Unscrew and remove the four thumbscrews from the top cover (see Figure 2).
Save the thumbscrews in case you need to move or ship the library in the future.
Note: The robot may stay at the top of the library, or it may move downward
toward the floor of the library. If it moves downward, you will hear the
gears turning as it moves. This is normal.
b Remove the plastic sheet and metal clip and discard. You will not need to use
them again.
Figure 2 Removing the Robot
Restraint
4
Plastic
sheet
Metal
clip
Unpacking the Library
Scalar i40 and Scalar i80
9 Once you remove the robot restraint, you may cover the holes in the library top
cover with stickers, which are provided in the accessory kit for this purpose. This
step is optional and is intended to prevent small objects from accidentally falling
into the library through the holes.
10 Remove the protective plastic sheet covering the front panel display.
Accessory Kit Contents
• Power cord(s) – one for each power supply
• Scalar i40 and Scalar i80 Documentation and Training CD
• Scalar i40 and Scalar i80 Quick Start Guide
• China RoHS statement
• System, Safety, and Regulatory Information Guide
• Stickers (clear, round) to cover holes in library top cover
Installing the Library in a Rack or Desktop Kit
Follow the instructions that came with your rail kit or desktop kit to install the library.
Installing the Tape Drives
If your library already has tape drives installed, skip this section.
Tape Drive Slot Location
Considerations
Tape drives can only fit in certain slots, as described below and illustrated in Figure 3.
Slots are numbered starting from the bottom and moving up.
• Scalar i40: Half-height tape drives can be installed in slots 1 and 2.
• Scalar i80: Half-height tape drives can be installed in slots 1, 2, 3, 4, and 5.
It is recommended to start installing the tape drives at the bottom slot and work up,
without leaving spaces between.
Accessory Kit Contents
5
Scalar i40 and Scalar i80 Quick Start Guide
Figure 3 Acceptable
Installation Locations for
Half-Height Tape Drives
Tape Drive Slot 5
Tape Drive Slot 4
Tape Drive Slot 3
Tape Drive Slot 2
Tape Drive Slot 2
Tape Drive Slot 1
Tape Drive Slot 1
Scalar i40
Installation Instructions
Scalar i80
1 If needed, remove filler plates from the back of the library to make room for the
tape drives. Unscrew the two captive thumbscrews and pull the filler plates out of
the library. Save the filler plates in case you need to use them in the future.
2 Unpack the tape drive and tape drive cable.
Caution: The tape drive always resides in a drive sled, and together they are
effectively one unit. Do not remove the tape drive from the drive sled.
3 Insert the tape drive into the drive slot. The “shelf” on the bottom of the drive sled
fits into the notch in the library chassis and slides on the plastic guide rails (see
Figure 4). The tape drive must be level to slide in smoothly. At the very end of the
slide, you will feel a slight “click” as the tape drive sled connector connects into its
mating connector in the library chassis.
Figure 4 Installing a Tape Drive
Notch in library
chassis
Drive sled “shelf”
slides in notch
6
Installing the Tape Drives
Scalar i40 and Scalar i80
4 Tighten the tape drive’s captive thumbscrews finger tight to secure the tape drive to
the library chassis.
5 Install a filler plate over any open tape drive slot. If you need more filler plates,
contact Quantum.
Caution: Filler plates are required to maintain proper library cooling. Do not run
the library with uncovered slots.
Connecting the Cables
Connect the cords and cables as follows (see Figure 5). It is recommended that you leave
some slack in the cables to allow you to perform replacement procedures in the future.
1 Connect the tape drive cables from the tape drives to the host.
Note: Cables for full-height Fibre Channel tape drives must be installed in the
LEFT port as you view the installed tape drive from the rear of the library.
Caution: Use care when handling the fibre optic cables. Do not crimp or bend
the cables. Do not exceed the bend radius specified by the
manufacturer.
2 Connect an Ethernet cable (not supplied) into the LEFT port on the system control
board (SCB). The right SCB port is for service use only; do not use. Connect the other
end of the Ethernet cable into a live Ethernet jack connected to your network.
3 Connect the power supply cord into the power supply connector. Plug the other end
of the cord into a grounded AC outlet.
Connecting the Cables
7
Scalar i40 and Scalar i80 Quick Start Guide
Figure 5 Reinstalled
Components
Power supply cord
Filler plate
Ethernet
cable in LEFT
SCB port
Service port –
do not use
Turning the Library ON and Configuring Network Settings
Caution: Before turning the library on, make sure you removed the shipping restraint
(4 thumbscrews, mylar sheet, metal clip) from the top of the library!
Otherwise, the library will not initialize. See Figure 2 on page 4.
1 Turn the library ON by pressing the power button on the front bezel (see Figure 6).
• The green power LED on the front panel above the power button illuminates,
and the LCD screen turns on. The library goes through a connection and
initialization sequence. This can take 5 to 17 minutes, depending on the size of
your library.
• The status LED on the rear of each drive sled turns green during initialization.
8
Turning the Library ON and Configuring Network Settings
Scalar i40 and Scalar i80
Figure 6 Turning on the Library
Power LED
Power
button
When initialization completes, the Setup Wizard screen appears on the operator
panel (see Figure 7). The operator panel screen contains a menu bar with operations
that correspond to the four physical buttons below it. The menu operations and
button functions change with each screen.
Figure 7 Setup Wizard – Initial
Screen
Menu bar
Navigation/selection
buttons
2 Before proceeding, verify the Ethernet cable is connected and all of your tape drives
are installed.
3 Do one of the following:
• To configure basic network settings using the Setup Wizard, press the button
corresponding to Next on the menu bar. You will be guided through a series of
screens where you can accept or change the default configuration settings
(date, time, IP address, licenses, partitions, I/E station slots, and cleaning slots).
Once you accept a setting, you move to the next one. Remember that you can
always change the configuration later if needed.
• To cancel out of the Setup Wizard and begin using the library immediately, press
the button corresponding to Cancel on the menu bar. This accepts the library’s
default configuration, including an IPv4 address assigned by DHCP. The Setup
Wizard will not appear on the operator panel again, but you can change any of
the configuration settings later using the Setup menus on the operator panel or
the Web client. It is easier to configure the library using the Web client, so you
may wish to cancel now. To access the Web client immediately, skip the rest of
this section and go to Accessing the Library Via the Web Client on page 13.
Turning the Library ON and Configuring Network Settings
9
Scalar i40 and Scalar i80 Quick Start Guide
The Setup Date/Time screen appears (see Figure 8).
Figure 8 Setup Wizard –
Date/Time Screen
4 Do one of the following:
• To accept the date and time, press the Accept button.
• To change the date or time, press the Change button. The Date field becomes
available to edit and the menu bar button designations change. Use the Left
and Right buttons to move through the date field, one segment at a time. Use
the Up and Down buttons to change each segment of the date value. You can
press the Up or Down button repeatedly to change the value, or you can hold
the button in for fast scrolling. As you press Right, each segment of the date
fills in. Continue to press the Right button to go to the Time field and edit it the
same way. See Figure 9. When you reach the last segment of the Time field, the
Right button designation changes to Apply. Press the Apply button. The new
date and time display, and you can Accept or Change. Once you press Accept,
you move to the next step.
Figure 9 Changing the Date
and Time
Note: You cannot change the time zone on the operator panel. You can change it
later using the Web client.
10
Turning the Library ON and Configuring Network Settings
Scalar i40 and Scalar i80
The Setup Network screen appears, listing a default host name (which you cannot
change here but you can change later on the Web client) and an IPv4 address
assigned by DHCP (see Figure 10).
Figure 10 Setup Wizard –
Setup Network Screen
5 Do one of the following:
• To accept the IP address, press the Accept button.
• To change the IP address, press the Change button. Complete the network
configuration screens and press Accept when finished.
• If you accept IPv4 as the protocol, you can choose to get an IP address via
DHCP or enter a static IP address. If you choose DHCP, the IP address, mask,
and gateway are displayed. If you choose not to use DHCP, use the
directional buttons as described in Step on page 10 to enter a static IP
address, mask, and gateway.
• If you choose IPv6 as the protocol, the library supplies a stateless IPv6
address and displays it, along with other network settings, on two screens.
Use the Next and Back buttons to view the screens. You can only change
these settings via the Web client.
The Current Licenses screen appears, which lists the number of licensed and
unlicensed slots in the library and the licenses currently installed (see Figure 11).
You may have received, separately, License Key Certificates containing instructions
on how to retrieve your desired license key from the Quantum Web site.
6 Once you have retrieved your license key, you may add it now or any time later. (If
you did not receive your License Key Certificate, contact the place of purchase.)
Figure 11 Setup Wizard –
Licenses Screen
Turning the Library ON and Configuring Network Settings
11
Scalar i40 and Scalar i80 Quick Start Guide
7 Do one of the following:
• To accept the settings and go to the next step, press Accept.
• To change the settings, press Change. You can only change the settings if you
have a new license key to enter. If you have a license key, press Add, then enter
the license key using the directional buttons as described in Step on page 10
and press Accept when complete. If you need to add another license key,
perform the Change operation again.
The Current Configuration screen appears, displaying the default number of
partitions, I/E station slots, and cleaning slots (see Figure 12).
Figure 12 Setup Wizard –
Current Configuration Screen
8 Do one of the following:
• To accept the current settings, press Accept.
• To change any of the settings, press Change. This will delete the current
partitions, and you are asked to confirm you want to do this. If you agree, the
library deletes the partitions, which takes about 30 seconds. When the
partitions are deleted, you are guided through several more screens to change
the number of partitions, I/E station slots, and cleaning slots. Use the directional
buttons as described in Step on page 10 and press Accept when complete.
• Partitions — The minimum number of partitions you can create using the
operator panel is equal to the number of distinct combinations of tape drive
interface type (Fibre Channel or SAS) and media generation (LTO-4, LTO-5)
of the currently installed tape drives. The maximum number of partitions
you can create is equal to the number of tape drives installed in the library.
The library assigns resources proportionately among the partitions. You can
change resource allocation and configure partitions with more flexibility
later via the Web client. For details, see the Scalar i40 and Scalar i80 User’s
Guide.
• I/E Station Slots — You can create a maximum of five I/E station slots on a
Scalar i40 and a maximum of ten on a Scalar i80. The minimum is zero. Be
aware that if you configure zero I/E station slots, you will not be able to
import and export tape cartridges.
• Cleaning Slots — You can configure a minimum of zero and a maximum of
four cleaning slots. For more information about cleaning slots, see the
Scalar i40 and Scalar i80 User’s Guide.
12
Turning the Library ON and Configuring Network Settings
Scalar i40 and Scalar i80
The Setup Wizard is complete (see Figure 13).
Figure 13 Setup Wizard
Complete
9 Press the Exit button.
Accessing the Library Via the Web Client
It is recommended that you use the Web client to perform most library functions. The
Web client is easier to use than the operator panel, and it presents more information
and options than the operator panel does. Refer to the Scalar i40 and Scalar i80 User’s
Guide or Web client online help for detailed instructions on how to use the Web client.
To access the library via the Web client:
1 From the operator panel, press the Reports button.
2 Press the Down button until Network Settings is highlighted.
3 Press the Select button.
4 Make note of your library’s IP address that is displayed on the screen.
5 Enter the IP address in your Internet browser to bring up the library’s Web client
login screen.
6 Enter the default user name: admin
7 Enter the default password: password
8 Click OK.
Accessing the Library Via the Web Client
13
Scalar i40 and Scalar i80 Quick Start Guide
Installing the Latest Firmware
1 Go to http://www.quantum.com/ServiceandSupport/
SoftwareandDocumentationDownloads/SI40/Index.aspx and click the Firmware tab
to view a listing of the current version of library firmware.
2 Check your library’s installed firmware version by selecting Reports > About
Library from the operator panel or Reports > About > Scalar i40/i80 from the
Web client.
3 If the firmware installed on your library is not at the current level, download the
current firmware. Follow the instructions in the Scalar i40 and Scalar i80 User’s
Guide to upgrade firmware.
Configuring Partitions
At least one partition is necessary for proper setup. You may wish to configure partitions
via the Web client if the Setup Wizard could not set them up exactly as you want them.
To configure partitions via the Web client, select Setup > Partitions. Follow the
instructions in the online help or the Scalar i40 and Scalar i80 User’s Guide.
Running the Installation and Verification Test
The Installation and Verification Test (IVT) is used to evaluate a newly installed library. It
calibrates the robot to the library, verifies that the robot is functioning properly, and
verifies that the magazines and tape drives are installed correctly and reachable by the
robot. The test also verifies that barcode labels can be read by the robot scanning
operation. See the Scalar i40 and Scalar i80 User’s Guide for more details.
To run the IVT:
1 Unlock the I/E station.
a From the operator panel, press the Actions button, then press the Down button
to select I/E, then press Select.
b Select Unlock I/E Station and press the Select button.
c If the library contains more than one I/E station, select the top right I/E station
and press Unlock.
The robot moves to the I/E station and unlocks it.
2 When the operator panel display prompts you, pull out on the magazine door until
it stops. If you wait more than 30 seconds, the I/E station re-locks.
14
Installing the Latest Firmware
Scalar i40 and Scalar i80
3 Insert a scratch tape cartridge in the top I/E station slot. Make sure the cartridge is
properly labeled and right-side-up.
Note: All tape cartridges must have a unique, external barcode label that is
machine readable. Quantum-supplied barcode labels provide the best
results (labels are packaged along with your library). Barcode labels
supplied by other sources can be used, but they must meet specific
requirements (for details, see the “Barcode Requirements” section of the
Scalar i40 and Scalar i80 User's Guide).
4 Close the magazine by pushing it in until it stops.
The robot moves to the I/E station and scans the newly installed tape cartridge.
When finished, the operator panel asks you to assign the cartridges to a partition.
5 Assign the cartridge to the System partition. Use the Up and Down buttons to
select System, then press the Apply button.
6 Select Tools > IVT.
7 Press Yes to start the test.
The test progress and pass/fail status display on the operator panel screen. Refer to
the Scalar i40 and Scalar i80 User’s Guide if any of the tests fail.
Importing Tape Cartridges
The following instructions describe how to import tape cartridges via the operator
panel. You may also import tape cartridges via the Web client (see the online help or the
Scalar i40 and Scalar i80 User’s Guide). The Web client allows you to import multiple
tape cartridges while the operator panel only allows you to import one at a time.
You need to use the I/E station to import tape cartridges.
Note: If you configured zero I/E station slots, you cannot import tape cartridges and
will need to bulk load tape cartridges instead. See the Scalar i40 and Scalar i80
User’s Guide for instructions.
Locations of the I/E stations:
• Scalar i40 — The I/E station is located in the first column of the right magazine.
• Scalar i80 — If you have five I/E station slots configured, the I/E station is located in
the first column of upper right magazine. If you have 10 I/E station slots configured,
the I/E stations are located in the first column of both the upper right and lower
right magazines.
Importing Tape Cartridges
15
Scalar i40 and Scalar i80 Quick Start Guide
To import tape cartridges:
1 Unlock the I/E station.
a From the operator panel, press the Actions button, then press the Down button
to select I/E, then press Select.
b Select Unlock I/E Station and press the Select button.
c If the library contains more than one I/E station, select an I/E station and press
Unlock.
The robot moves to the I/E station and unlocks it.
2 When the operator panel display prompts you, pull out on the magazine door until
it stops. If you wait more than 30 seconds, the I/E station re-locks.
3 Insert tape cartridges into the I/E station slots. Make sure the cartridges are properly
labeled and right-side-up.
Note: All tape cartridges must have a unique, external barcode label that is
machine readable. Quantum-supplied barcode labels provide the best
results (labels are packaged along with your library). Barcode labels
supplied by other sources can be used, but they must meet specific
requirements (for details, see the “Barcode Requirements” section of the
Scalar i40 and Scalar i80 User's Guide).
4 Close the magazine by pushing it in until it stops.
The robot move to the I/E station and scans the newly installed tape cartridges.
When finished, the operator panel asks you to assign the cartridges to a partition.
5 Assign the cartridges to a partition. Use the Up and Down buttons to select a
partition, then press the Apply button.
Note: You must assign all the newly installed tape cartridges to the same
partition. If you want to assign them to different partitions, you need to
disable manual cartridge assignment and use the Web client. See the Scalar
i40 and Scalar i80 User’s Guide for details.
6 Import the tape cartridges.
a Press the Down button to select I/E and press the Select button.
b Press the Down button to select Import Tape and press the Select button.
c Use the Up and Down buttons to select a single tape cartridge or ALL tape
cartridges and press the Import button. (The ALL option is only available if there
are enough empty slots in the selected partition to accommodate all the
cartridges.)
The robot imports the tape cartridge(s) into the partition you selected.
d When the operator displays an “import complete” message, press the OK
button.
e Repeat steps a through c for any remaining tape cartridges in the I/E station.
7 Repeat the above steps until all your tape cartridges are imported.
16
Importing Tape Cartridges
Scalar i40 and Scalar i80
Saving the Library Configuration
Save the library configuration every time you change the configuration or firmware.
From the Web client, select Tools > Save/Restore Configuration > Save System
Configuration. Click Apply. Save the file to a known location.
Configuring the Host Software
Before you can use the library for backup, you need to configure your host application.
Refer to your host software documentation for instructions on configuring your host.
Refer to the Scalar i40 and Scalar i80 User’s Guide for instructions on how to obtain
information from the library, such as host name, WWPN, and so on.
Registering the Library
Registering the library activates the warranty. After completing the initial setup of the
library, choose Setup > Register Library from the Web client to access the online
product registration form.
Saving the Library Configuration
17
Scalar i40 and Scalar i80 Quick Start Guide
*6-66546-05*
18
For assistance, contact the Quantum Customer Support Center:
USA:
800-284-5101 (toll free) or 949-725-2100
EMEA: 00800-4-782-6886 (toll free) or +49 6131 3241 1164
APAC:
+800 7826 8887 (toll free) or +603 7953 3010
Worldwide: http://www.quantum.com/ServiceandSupport
Preserving the World’s Most Important Data. Yours.™
©2010 Quantum Corporation. All rights reserved. Quantum, the Quantum logo, and all
other logos are registered trademarks of Quantum Corporation or of their respective owners.
Protected by Pending and Issued U.S. and Foreign Patents, including U.S. Patent No. 5,990,810.
6-66546-05 Rev A, September 2010
About Quantum
Quantum Corp. (NYSE:QTM) is the leading global storage company
specializing in backup, recovery and archive. Combining focused
expertise, customer-driven innovation, and platform independence,
Quantum provides a comprehensive range of disk, tape, media and
software solutions supported by a world-class sales and service
organization. This includes the DXi™-Series, the first disk backup
solutions to extend the power of data deduplication and replication
across the distributed enterprise. As a long-standing and trusted
partner, the company works closely with a broad network of
resellers, OEMs and other suppliers to meet customers’ evolving
data protection needs.