1
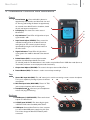
User Guide
MicroTrack II
User Guide
1
Table of Contents
1 – Introduction . . . . . . . . . . . . . . . . . . . . . . . . . . . . . . . . . . . . . . . . . . . . . . . . . . . . . . 3
What’s in the Box. . . . . . . . . . . . . . . . . . . . . . . . . . . . . . . . . . . . . . . . . . . . . . . . . . . . . . . . . . 3
Product Features . . . . . . . . . . . . . . . . . . . . . . . . . . . . . . . . . . . . . . . . . . . . . . . . . . . . . . . . . . 4
Minimum System Requirements . . . . . . . . . . . . . . . . . . . . . . . . . . . . . . . . . . . . . . . . . . . . . . . . . . 4
PC. . . . . . . . . . . . . . . . . . . . . . . . . . . . . . . . . . . . . . . . . . . . . . . . . . . . . . . . . . . . . . . . 4
Mac . . . . . . . . . . . . . . . . . . . . . . . . . . . . . . . . . . . . . . . . . . . . . . . . . . . . . . . . . . . . . . . . 4
2 - Setup and Charging. . . . . . . . . . . . . . . . . . . . . . . . . . . . . . . . . . . . . . . . . . . . . . . . 5
Connecting to a Computer . . . . . . . . . . . . . . . . . . . . . . . . . . . . . . . . . . . . . . . . . . . . . . . . . . . . . 5
Charging the Battery with the USB Power Supply . . . . . . . . . . . . . . . . . . . . . . . . . . . . . . . . . . . . . . . . . 5
Power Saving (Hibernation Mode) . . . . . . . . . . . . . . . . . . . . . . . . . . . . . . . . . . . . . . . . . . . . . . . . . 5
Formatting the Recording Media . . . . . . . . . . . . . . . . . . . . . . . . . . . . . . . . . . . . . . . . . . . . . . . . . . 6
Formatting Using MicroTrack II . . . . . . . . . . . . . . . . . . . . . . . . . . . . . . . . . . . . . . . . . . . . . . . . . . . 6
3 - Hardware Controls and Indicators . . . . . . . . . . . . . . . . . . . . . . . . . . . . . . . . . . . 7
Front. . . . . . . . . . . . . . . . . . . . . . . . . . . . . . . . . . . . . . . . . . . . . . . . . . . . . . . . . . . . . . . . . 7
Top . . . . . . . . . . . . . . . . . . . . . . . . . . . . . . . . . . . . . . . . . . . . . . . . . . . . . . . . . . . . . . . . . 7
Bottom . . . . . . . . . . . . . . . . . . . . . . . . . . . . . . . . . . . . . . . . . . . . . . . . . . . . . . . . . . . . . . . 7
Left . . . . . . . . . . . . . . . . . . . . . . . . . . . . . . . . . . . . . . . . . . . . . . . . . . . . . . . . . . . . . . . . . 8
Right . . . . . . . . . . . . . . . . . . . . . . . . . . . . . . . . . . . . . . . . . . . . . . . . . . . . . . . . . . . . . . . . 8
Main Menu . . . . . . . . . . . . . . . . . . . . . . . . . . . . . . . . . . . . . . . . . . . . . . . . . . . . . . . . . . . . . 9
Files Menu . . . . . . . . . . . . . . . . . . . . . . . . . . . . . . . . . . . . . . . . . . . . . . . . . . . . . . . . . . . . . 9
Record Settings Menu. . . . . . . . . . . . . . . . . . . . . . . . . . . . . . . . . . . . . . . . . . . . . . . . . . . . . . . . 9
Options Menu. . . . . . . . . . . . . . . . . . . . . . . . . . . . . . . . . . . . . . . . . . . . . . . . . . . . . . . . . . . . 11
Backlight . . . . . . . . . . . . . . . . . . . . . . . . . . . . . . . . . . . . . . . . . . . . . . . . . . . . . . . . . . . . 11
Contrast . . . . . . . . . . . . . . . . . . . . . . . . . . . . . . . . . . . . . . . . . . . . . . . . . . . . . . . . . . . . . 11
Playback EQ . . . . . . . . . . . . . . . . . . . . . . . . . . . . . . . . . . . . . . . . . . . . . . . . . . . . . . . . . . . 12
Scrub Audio . . . . . . . . . . . . . . . . . . . . . . . . . . . . . . . . . . . . . . . . . . . . . . . . . . . . . . . . . . . 12
Rec Time Display. . . . . . . . . . . . . . . . . . . . . . . . . . . . . . . . . . . . . . . . . . . . . . . . . . . . . . . . . 12
Record Button . . . . . . . . . . . . . . . . . . . . . . . . . . . . . . . . . . . . . . . . . . . . . . . . . . . . . . . . . . 12
Verify Delete . . . . . . . . . . . . . . . . . . . . . . . . . . . . . . . . . . . . . . . . . . . . . . . . . . . . . . . . . . . 12
MicroTrack II
User Guide
2
System Menu. . . . . . . . . . . . . . . . . . . . . . . . . . . . . . . . . . . . . . . . . . . . . . . . . . . . . . . . . . . . 13
Connect to PC. . . . . . . . . . . . . . . . . . . . . . . . . . . . . . . . . . . . . . . . . . . . . . . . . . . . . . . . . . 13
Format Media. . . . . . . . . . . . . . . . . . . . . . . . . . . . . . . . . . . . . . . . . . . . . . . . . . . . . . . . . . . 13
Test Media . . . . . . . . . . . . . . . . . . . . . . . . . . . . . . . . . . . . . . . . . . . . . . . . . . . . . . . . . . . . 13
Firmware Update. . . . . . . . . . . . . . . . . . . . . . . . . . . . . . . . . . . . . . . . . . . . . . . . . . . . . . . . . 14
Factory Defaults . . . . . . . . . . . . . . . . . . . . . . . . . . . . . . . . . . . . . . . . . . . . . . . . . . . . . . . . . 14
Version. . . . . . . . . . . . . . . . . . . . . . . . . . . . . . . . . . . . . . . . . . . . . . . . . . . . . . . . . . . . . . 14
Date & Time . . . . . . . . . . . . . . . . . . . . . . . . . . . . . . . . . . . . . . . . . . . . . . . . . . . . . . . . . . . 14
Language . . . . . . . . . . . . . . . . . . . . . . . . . . . . . . . . . . . . . . . . . . . . . . . . . . . . . . . . . . . . 15
4 - Operating Instructions. . . . . . . . . . . . . . . . . . . . . . . . . . . . . . . . . . . . . . . . . . . . . 16
Recording. . . . . . . . . . . . . . . . . . . . . . . . . . . . . . . . . . . . . . . . . . . . . . . . . . . . . . . . . . . . . . 16
Playback. . . . . . . . . . . . . . . . . . . . . . . . . . . . . . . . . . . . . . . . . . . . . . . . . . . . . . . . . . . . . . 18
Loop Playback . . . . . . . . . . . . . . . . . . . . . . . . . . . . . . . . . . . . . . . . . . . . . . . . . . . . . . . . . . . 19
5 - Using MicroTrack II with a Computer. . . . . . . . . . . . . . . . . . . . . . . . . . . . . . . . . 20
Charging MicroTrack II from the Computer. . . . . . . . . . . . . . . . . . . . . . . . . . . . . . . . . . . . . . . . . . . . . 20
Transferring Audio Files to a Computer . . . . . . . . . . . . . . . . . . . . . . . . . . . . . . . . . . . . . . . . . . . . . . 20
Using MicroTrack II as a Portable Data Drive. . . . . . . . . . . . . . . . . . . . . . . . . . . . . . . . . . . . . . . . . . . . 21
Formatting CompactFlash cards or Microdrives using a Computer . . . . . . . . . . . . . . . . . . . . . . . . . . . . . . . . 21
Disconnecting MicroTrack II from Your Computer . . . . . . . . . . . . . . . . . . . . . . . . . . . . . . . . . . . . . . . . . 21
Disconnecting from Windows . . . . . . . . . . . . . . . . . . . . . . . . . . . . . . . . . . . . . . . . . . . . . . . . . . 21
Disconnecting from Mac OS X . . . . . . . . . . . . . . . . . . . . . . . . . . . . . . . . . . . . . . . . . . . . . . . . . . 22
Swapping CompactFlash or Microdrive Media . . . . . . . . . . . . . . . . . . . . . . . . . . . . . . . . . . . . . . . . . . . 22
6 - Warranty Terms and Registration. . . . . . . . . . . . . . . . . . . . . . . . . . . . . . . . . . . . . 23
Warranty Terms. . . . . . . . . . . . . . . . . . . . . . . . . . . . . . . . . . . . . . . . . . . . . . . . . . . . . . . . . . . 23
Warranty Registration. . . . . . . . . . . . . . . . . . . . . . . . . . . . . . . . . . . . . . . . . . . . . . . . . . . . . . . . 23
7 - Appendix . . . . . . . . . . . . . . . . . . . . . . . . . . . . . . . . . . . . . . . . . . . . . . . . . . . . . . . . . 24
Recording Time vs. Media Chart . . . . . . . . . . . . . . . . . . . . . . . . . . . . . . . . . . . . . . . . . . . . . . . . . . 24
MicroTrack II
User Guide
3
1 – Introduction
Congratulations on your purchase of M-Audio MicroTrack II.
The redesigned MicroTrack II brings even more professional features to the original high-fidelity mobile digital recorder
that’s been embraced by audio and film professionals worldwide. With an extended input gain range, analog input limiter,
48V phantom power, faster file transfer rate and other enhancements, MicroTrack II delivers the highest quality mobile
recording experience available today. Record WAV files, WAV files with embedded Broadcast Wave Format data and
MP3 files to CompactFlash (CF) cards or Microdrives through balanced line inputs or built-in microphone preamps. Then
drag and drop recordings to your computer via high-speed USB 2.0 for immediate editing or Web posting. MicroTrack
II is perfect for a wide variety of applications including field recording, capturing live shows, songwriting, education and
more.
MicroTrack II takes your mobile recording experience to the next stage. Drop in markers* while recording WAV files and
easily find your place when editing your content. Organize and locate your files in the field with a user-created folder
structure. Overcome the limitations of the FAT32 file system and create virtually seamless WAV file** recordings beyond
2GB in size. Dim the backlight to save battery life and be discreet in a dark room. Add a USB-compatible battery pack
(sold separately) and capture extra-long sessions. Let the recorder hibernate, then wake it up to record on a moment’s
notice. With MicroTrack II, you’re always ready to go.
Even with its long list of features, MicroTrack II remains simple to use. However, we still suggest that you read through this
entire User Guide to familiarize yourself with all the functions contained within this portable unit.
*Markers follow the Broadcast Wave Format (BWF) standard. BWF files are files stored in WAV format, containing
additional embedded data beyond basic WAV audio information, such as position markers. The audio software you are
using on your computer must be capable of reading BWF information to take advantage of this feature. If your software
does not recognize BWF data, the file will be treated as a standard WAV file and the markers will be ignored.
** When recording an MP3 file, the recording will stop when a 2GB file size is reached, and the recorded 2GB MP3
will be saved.
What’s in the Box
<MicroTrack
<USB
cable
<stereo
<1/8”
II unit
“T” microphone
female to 1/8” male extension cable with plastic lapel clip
<earbuds
<protective
<USB
bag
power supply
<printed
Quick Start Guide
<CD-ROM
containing this User Guide, test tones, and Audacity editing software
MicroTrack II
User Guide
Product Features
<records
<16-bit
stereo WAV, BWF, and MP3 files
or 24-bit recording and playback
<analog
input limiter
<supports
common sample rates from 44.1kHz to 96kHz
<built-in
rechargeable battery †
<back-lit
LCD display
<2
x 1/4” TRS mic/line inputs with 48V phantom power
<1
x 1/8” stereo mic input capable of providing 5V power for electret microphones
<1
x 1/8” headphone output
<2
x RCA line outputs
<1
x S/PDIF input
<1
x USB connector
<uses
CompactFlash cards or Microdrives (64MB minimum)
† Battery life is dependent on the usage scenario. For example, a stereo recording from two condenser mics with
phantom power switched on will deplete the battery quicker than just listening to audio playback.
Minimum System Requirements
PC:
<
Windows XP (SP2)†† or Windows Vista
<
Available USB port
<
CompactFlash card or Microdrive
†† Home and Professional Edition only. Windows Media Center Edition is not currently supported.
Mac:
<
Mac OS X 10.2.8
<
Available USB port
<
CompactFlash card or Microdrive
4
MicroTrack II
User Guide
5
2 - Setup and Charging
Connecting to a Computer
No drivers are required. MicroTrack II is class compliant, meaning you do not need to install any special drivers when
connecting MicroTrack II to your computer.
Charging the Battery with the USB Power Supply
The MicroTrack II built-in battery ships with only a minimal charge and you must charge it from a power source (your
computer’s USB connection or the included power supply) before you can use it.
It is essential that you fully charge the MicroTrack II battery before using your new recorder. Failure to fully charge the
battery before first use can limit the capacity of the battery, lowering the total recording time of MicroTrack II.
To charge the battery, follow the steps below:
<
Plug the smaller end of the supplied USB cable into the USB connector on the bottom of MicroTrack II.
<
Plug the large end of the USB cable into the supplied USB power supply.
<
Plug the USB power supply into a power outlet.
< An
animated battery symbol will be displayed in the right upper corner of the LCD on MicroTrack II to indicate
that the device is being charged.
< When
the battery is fully charged, the animation will stop, the battery symbol will appear solid, and a check
mark will be displayed next to the battery symbol, indicating that the charging process has finished.
<
You can now disconnect MicroTrack II from the USB cable.
You will have to recharge the battery from time to time as you use the device. There is a battery meter icon in the upperright corner of the MicroTrack II screen that shows the estimated battery power remaining. When the battery power
is nearly depleted, “battery low” will be shown on the LCD display. When this message appears, you should recharge
MicroTrack II immediately. If you continue to run MicroTrack II on battery power after seeing this message, the unit will
eventually turn off. You will then have to recharge the battery before MicroTrack II can be turned on again.
If you recharge the battery before the unit becomes inoperable, the charge time will be approximately 2.5 hours. If you
drain the battery to a point where MicroTrack II will no longer turn on, a full charge can take approximately 6.5 hours.
Power Saving (Hibernation Mode)
When MicroTrack II is on, not plugged into a power source, and has been inactive for 10 minutes, it will enter hibernation
mode. This feature will turn off all non-essential components to minimize power consumption and maintain battery life. A
brief press of the power key will instantly return the device to the last state it was in before hibernation, allowing you to
start a new recording immediately. If the battery drains completely while in hibernation mode, MicroTrack II will save its
preferences before powering itself off.
MicroTrack II
User Guide
6
Formatting the Recording Media
MicroTrack II records directly to CF cards or Microdrives. In both cases, these mediums must be formatted before they
can be used. MicroTrack II can format media with the following procedure:
Formatting a CF card or Microdrive will erase all of its data. Thus, formatting
can be used as a method for deleting the entire contents of a card or drive.
► N
OTE:
Formatting Using MicroTrack II
1. Turn on MicroTrack II.
2. Insert your media, either a CF card or Microdrive, into MicroTrack II. The unit will reboot.
3.After MicroTrack II has rebooted, press down on the [NAV] wheel until “System” is selected, then press in on
the [NAV] wheel.
4. Press down on the [NAV] wheel until “Format Media” is selected, then press in on the [NAV] wheel.
5. When prompted with a confirmation message, press the [NAV] wheel again.
6. MicroTrack II will restart after the formatting process has completed.
You can also use your computer to format your MicroTrack II CF card or Microdrive. See Chapter 5, “Using
MicroTrack II with a Computer” for more information.
MicroTrack II
User Guide
7
3 - Hardware Controls and Indicators
Front
1.Power Button
: Press and hold this button for
approximately one second to turn MicroTrack II on and
off. Pressing and holding this button for approximately
ten seconds forces MicroTrack II to shutdown, should
the unit ever become unresponsive
2.LCD Display: This shows the current status of
MicroTrack II.
3.Clip Indicators: These LEDs will light when an input
signal exceeds -1dB.
4.Input Levels Adjust (LEVELS): These control the
individual recording levels of the MicroTrack II left
and right inputs. The current input level setting is
represented by triangles in the L/R level meters on
the main screen.
5.Signal Indicators: These LEDs will light when a
signal greater than -40dB is detected at the selected
input.
6.Delete Button (DEL): In normal player/recorder
operation, the delete button deletes the current
(or selected) audio file. The delete button is also used to stop the MicroTrack II USB drive mode (known as
“host mode”) and return to normal player/recorder functionality.
7. Output Level Adjust (VOLUME): This controls the output volume of MicroTrack II.
8. Record Button (REC): This button is used to start and stop recordings.
Top
9.Stereo Mic Input Jack (MIC): This 1/8” stereo jack is used for connecting a mono or stereo microphone.
This input is capable of providing 5V power for electret
microphones.
10.Mic/Line Input Jacks (MIC/LINE): These 1/4” TRS
jacks accept microphone and line-level signals.
11.Headphone Jack
: Connect a pair of headphones
with an 1/8” plug for monitoring.
Bottom
12.RCA Outputs (L-LINE-R OUTS): These are line-level
outputs from MicroTrack II.
13.S /PDIF Input (S/PDIF): This allows digital signals
in S/PDIF format to be recorded by MicroTrack II.
14.USB Input: Connect MicroTrack II to a host computer
or to the included USB power supply using this input.
This will also charge the MicroTrack II battery when
connected.
MicroTrack II
User Guide
8
Left
15.Menu Button (MENU): This button toggles between the Main Menu and record screen, or acts as an exit
button when in a sub menu. Pressing this button while recording a WAV file will write a location Marker in
Broadcast Wave Format (BWF) at the current position.
16.Hold Switch (HOLD): When active, all buttons on MicroTrack II will be disabled. If you attempt to operate
MicroTrack II while the Hold switch is on, “HOLD switch is on” will be shown on the LCD display.
17.Dimmer Switch
: This is a three-position slide switch that controls the brightness of both the LCD
backlight and the LED indicators on the front panel. The three positions are Full, Dim, and Off.
If the backlight has been turned off in the Options menu, this switch will only
control the brightness of the front-panel LEDs.
► N
OTE:
18.Phantom Power Switch (+48V): This switches on the phantom power for the 1⁄4” TRS inputs. When
active, “48V” will be will be shown on the LCD display. Phantom power should only be used with condenser
microphones.
Phantom power should be disengaged when connecting or
disconnecting microphones to prevent possible damage to the microphone’s internal
electronics.
► I MPORTANT:
Right
19.[NAV] Wheel: This is a multi-function control that is dependent on the current screen you are viewing.
a. In a menu, pushing up or down navigates the selections on the screen, and pressing in selects the
current function.
b. In the main playback screen, pressing in toggles between play and pause. Pushing down or up will skip
ahead or backwards through the songs in the current folder. Holding down or up will fast-forward or
rewind the current song.
20. Memory Slot: Insert a CF card or Microdrive here.
21.Eject Button: This button folds flat into the housing of MicroTrack II to prevent it from breaking or being
pressed accidentally. (The hinge is on the Memory Slot side.) Flip this button out and press it to remove the CF
card and/or Microdrive.
MicroTrack II
User Guide
9
Main Menu
Pressing the [MENU] button will display a list of menu categories (the Main Menu) on the MicroTrack II display. You can
then push up and down on the [NAV] wheel to move through the selections (the selected menu item will be shown in bold
print). Pressing in on the [NAV] wheel will activate the current selection or enter a sub-menu. The [MENU] button is used
to exit a sub-menu.
When first entering the Settings menu, you will be presented with the following options, each explained in detail in the
following sections:
1. Files: This will present a list of all stored files and folders. You can choose a file to play or delete from this list.
2. Record Settings: This is used to set the recording parameters for MicroTrack II.
3. Options: This contains display, playback, and button-function options for the Microtrack II.
4. System: This provides access to advanced features and settings of MicroTrack II.
Files Menu
This menu displays a list of all the folders and files contained on the current CF card or Microdrive.
<
Press up and down on the [NAV] wheel to move the selection up and down through this list.
<
To open a folder, select it and press in on the [NAV] wheel.
<
To exit a folder, press the [MENU] button.
<
To play a file, select it and press in on the [NAV] wheel.
<
To delete a file, select it and press the [DEL] button.
Record Settings Menu
This menu lets you determine the recording input, format, and resolution for subsequent audio recordings. Changing
these settings will have no effect on any of the files currently stored in memory. This menu will show a list of parameters
with their values after them. To change the values, first select the parameter by pressing up or down on the [NAV] wheel.
Then press in on the [NAV] wheel to confirm your selection. Once selected, pressing up or down on the [NAV] wheel will
change the value of the parameter. Once the desired value is shown, press in on the [NAV] wheel to confirm and return to
the previous menu. The options in this menu are as follows:
<
Input Source: This is where you select which input of MicroTrack II to use for recording.
1/8” Chooses the 1/8” mic input as the recording source.
1⁄4” TRS
Chooses the 1/4” TRS jacks as the recording source.
S/PDIF Selects the S/PDIF digital input as the recording source. When S/PDIF is selected, the
[LEVELS] buttons have no effect.
Monitor: Input Monitoring is the ability to listen to the incoming audio signal while recording is in
progress. This signal will be heard at the headphone and RCA outputs.
< Input
On
Turns Input Monitoring on.
Off
Turns Input Monitoring off.
MicroTrack II
User Guide
10
Time Available: This is not an adjustable parameter—it merely shows the space available on the media
in MicroTrack II. When you select this option, it may take a moment to calculate the available time and display
it on the screen. This information is provided to help you verify you will have enough recording space before
recording, and make a choice of which recording parameters to use. If you see that you’re getting low on CF
card or Microdrive space, you can choose to use MP3 encoding instead of WAV to yield recordings with
smaller file sizes. Keep in mind that this feature only accounts for recording space when determining record
time—it does not account for battery life.
< Rec
<
Encoder:
WAV Chooses WAV as the recording format. This format is uncompressed and will yield the highest
quality recordings. Be aware that the files created in this format can be quite large. Also select this
option to create BWF compatible files with position markers.
MP3 Selects MP3 as the recording format. This format compresses the audio data to yield smaller file
sizes.
Rate: The options available in this menu will depend on the Encoder selected above. Keep in mind
that file sizes will increase as the sample rate is increased.
< Sample
• Options (WAV):
44.1 / 48 / 88.2 / 96: These are the available sample rates when WAV is selected as the Encoder.
Tip:
44.1 kHz: This is the standard Audio CD sample rate.
96 kHz: This yields the best sound quality by improving high frequency
response.
• Options (MP3):
44.1 / 48: These are the available sample rates when MP3 has been selected as the Encoder.
Like Sample Rate, the options shown in this menu will depend on the Encoder selected above. Keep in
mind that file sizes will increase as this setting is increased.
< Bits:
• Options (WAV):
16 / 24: When WAV is selected as the Encoder, this menu allows you to set the bit-depth of your
recording.
Tip:
16-bit WAV: This is the standard audio CD bit depth.
24-bit WAV: This yields the best sound quality by maximizing the dynamic
range.
•
Options (MP3):
96 / 112 / 120 / 160 / 192 / 224 / 320: When MP3 is selected as the Encoder, this value will
determine the bit-rate of the file.
Tip:
96kbps MP3: This will effectively capture voice dictations.
160kbps MP3: This offers reasonable quality for popular music.
MicroTrack II
User Guide
< Channels:
11
•
tereo: The Stereo option causes MicroTrack II to record both the left and right inputs into a stereo
S
file. This is the default setting for MicroTrack II.
•
Mono: This option causes MicroTrack II to record only the left channel of audio instead of both.
L+R Gain: This is a simple on/off menu selection. When this option is set to on, the recording levels of
inputs L and R will be matched. If you use the left or right [LEVEL] buttons to adjust the recording level of one
of the inputs, the other input will automatically be matched to the same level. This is especially useful when
making stereo recordings as this setting will preserve the stereo image. When this option is turned off, the
input levels of the channels will become independent.
< Link
This option can be enabled (On) or bypassed (Off). When enabled, the analog input limiter prevents
digital distortion (clipping) in your recordings, which comes in handy when recording sources with a wide
dynamic range, such as drums or a gunshot. The limiter will ensure that the initial attack (transient) of these
sounds does not exceed the headroom of MicroTrack II. The analog limiter attenuates signal peaks above 1dBFS before they are converted to digital. This gives MicroTrack II greater gain-reduction capabilities than
the digital limiters found in other recorders. Also, while not intended to replace proper input level settings, the
limiter can be helpful when recording with little or no time to set input levels. If your recording levels are higher
than they should be, the limiter will ensure that you get a clip-free recording.
< Limiter:
Options Menu
Backlight
This menu sets the automatic shutoff time for the MicroTrack II backlight. Since the backlight drains more battery
power, you have the ability to automatically turn the light off to maximize your battery life.
When set to “Always off,” the backlight will never turn on. When “Always on” is selected, the back light will be on
whenever MicroTrack II is powered on. The other three settings available on this menu determine the amount of
time the backlight will stay on after the last control is pressed on MicroTrack II. For example, if “5 sec” is selected,
the backlight will turn on any time a button is pressed on MicroTrack II. The back light will then turn off 5 seconds
after the last button is pressed.
If the dimmer switch on the side of MicroTrack II is set to the Off position, the
backlight will never turn on no matter what setting is selected in this menu.
► N
OTE:
Contrast
This setting adjusts the contrast of the MicroTrack II display. Press up or down on the [NAV] wheel to adjust this
value. Higher values result in a darker display. Press in on the [NAV] wheel when finished.
MicroTrack II
User Guide
12
Playback EQ
This menu provides access to the six EQ curves built into MicroTrack II. These curves affect playback only—all
recordings are made without EQ. To activate an EQ preset, use the [NAV] wheel to select the curve, then press in
to activate it. The EQ has the following settings:
1. Normal: This defeats the EQ and provides flat playback response.
2. Bass Boost: Increases the low frequencies during playback.
3. Bass Reduce: Decreases the low frequencies during playback.
4. Treble Boost: Increases the high frequencies during playback.
5. Treble Reduce: Decreases the high frequencies during playback.
6. Bass and Treble Boost: Increases both the low and high frequencies during playback.
Scrub Audio
This is an on/off setting that allows you to hear audio as you rewind and fast-forward through an audio file. When
set to on, you will be able to hear bits of the file as you seek. When off, MicroTrack II will be silent while seeking.
Rec Time Display
This option dictates how MicroTrack II computes the remaining recording time that is shown on the LCD Display in
the Record and Record Pause States.
CF cards and Microdrives with a capacity of more than 512 MB use the FAT 32 file system. This file system has an
inherent 2GB limit on file size. Thus, MicroTrack II may show a shorter record time available, even if there are more
than 2GB available on the CF media. The Rec Time Display settings are:
• T
ime until 2GB: This setting will compute the remaining recording time available based on a 2GB size (or
the currently available space on the CF media if less than 2GB).
• T
ime on Media: This setting will compute the total available recording time remaining based on the free
space on the CF media.
When recording WAV files, MicroTrack II helps circumvent the 2GB file size limitation by automatically creating an
additional WAV file once the 2GB limit has been reached and continuing to record to the new file. This ensures that
you can record for a long period of time and the overall capacity of the media becomes the time limit. When recording
an MP3 file, the recording will stop when a 2GB file size is reached, and the recorded 2GB MP3 will be saved.
Record Button
This option will set the behavior of the Record Button. The settings are:
• Record: This setting causes MicroTrack II to enter the Record State when the Record button is pressed.
• R
ecord/Pause: This setting causes MicroTrack II to enter the Record Pause State when the Record
button is pressed. This allows the user to set recording levels before starting to record.
Pressing the Record button a second time, or pushing in on the [NAV] wheel starts the actual recording.
Verify Delete
This is a simple on/off menu preference that enables or disables the delete confirmation message. When this
feature is on, you will be asked to confirm a file delete any time you press the [DEL] key. This helps prevent
accidental erasure of files you wish to keep. When this feature is off, files will be deleted as soon as the [DEL]
button is pressed.
MicroTrack II
User Guide
13
System Menu
Connect to PC
This menu option is used to place your MicroTrack II in “host mode,” effectively turning MicroTrack II into a USB
Compact Flash card reader. This allows quick and easy transfer of audio and firmware files between your computer
and MicroTrack II.
While MicroTrack II is in host mode, it cannot play or record audio files. The screen will simply display the “MAudio” logo and USB icon to indicate it is in host mode.
It is suggested that you close the connection from the computer BEFORE
disconnecting the MicroTrack II USB cable or exiting host mode on MicroTrack II.
If you fail to do this, there is a slight chance that information on the CF card might
get corrupted. Refer to the section entitled “Disconnecting MicroTrack II from Your
Computer” for instructions how to unmount and disconnect your MicroTrack II from
Windows and Macintosh OS X computers.
► C
AUTION:
To enter host mode:
1. Connect a USB cable from the computer to MicroTrack II.
2.Select “Connect to PC” from the “System” menu. The “M-Audio” logo will appear on the screen to indicate
that MicroTrack II is in host mode.
Another method to enter host mode:
1. Turn off MicroTrack II.
2.Connect a USB cable from the computer to MicroTrack II. MicroTrack II will automatically power up and
enter host mode. The “M-Audio” logo will appear on the screen to indicate it is in host mode.
Format Media
This menu allows you to format the inserted CF or Microdrive media. It is necessary to format your media before
you can begin recording. Be aware that formatting a medium will erase any data it contains. Because of this,
formatting can be used as a quick way to delete all files on the CF or Microdrive media.
1. Select “Format Media” from the System Menu and press in on the [NAV] wheel.
2. You’ll see the message “Press NAV switch to format media or MENU to cancel.” Press the [NAV] wheel to
begin the formatting process.
3. MicroTrack II will restart after the formatting process has completed.
Test Media
This operation will perform a test on the removable media to determine its capabilities. At the end of the test, the
LCD display will show information indicating bit-rate and sample rate options for recordings (slower cards may not
be able to write the necessary data for high bit and high sample rates in time).
MicroTrack II
User Guide
14
Firmware Update
From time to time, M-Audio may release updates to the operating system for MicroTrack II. Directions for using
this feature to update the firmware will be included with the update files you download from the M-Audio website
(www.m-audio.com).
Factory Defaults
Entering this menu option will allow you to reset all of the internal settings of MicroTrack II to their original
factory defaults. (This also resets the internal counter for file names, so the next file you record will attempt to be
“File0001.wav”.) Press in on the [NAV] wheel to restore the defaults. If you want to cancel this operation, press
[MENU] to exit.
Version
This option will show the current firmware and bootloader versions. The screen will appear as follows:
Version
Resource File – z.z.z
Firmware – x.x.x
Bootloader – y.y
Pressing in on the [NAV] wheel or pressing [MENU] will return to the System menu.
Date & Time
This option is used for setting the date and time as well as choosing the time and date format. When this option is
selected, the LCD display will show the following options:
•
•
•
•
HH MM am/pm
MM DD YYYY
Time [12 hour]
Date [US]
The [NAV] wheel will be used to select the option to edit. Pressing in on the [NAV] wheel will open an additional
setting screen:
<
Editing Time
When clicking on the time, a flashing box will appear around the hour. The [NAV] wheel will be used to
increment or decrement the hour. When using the 12-hour display, the AM/PM display will change when
incrementing past 12 (or decrementing below 1). Once set, pressing in on the [NAV] wheel will move the
flashing box to the minute. The [NAV] wheel will then increment or decrement the minute. Pressing in on
the [NAV] wheel will save the new time settings and the flashing box will disappear.
<
Editing Date
The date is displayed in three sections for Day, Month and Year. The order in which these sections are
displayed depends on the selected date format (US/Europe/Japan). Pressing in on the [NAV] wheel
selects the first section. Pushing the [NAV] wheel up or down allows you to change the value. Push in on
the [NAV] wheel to accept the changed value and move the flashing box to the next section. Repeat this
process for the second and third section. Once the third value change is accepted by pushing in on the
[NAV] wheel, date edit mode is exited and the flashing box disappears.
MicroTrack II
<
User Guide
Time
This option will allow you to select the display format for the time. It will present the following options:
•
12 hour
•
24 hour
<
Date
This option will allow you to select the display format for the date. It will present the following options:
• US—MM DD YYYY
15
• Europe—DD MM YYYY
• Japan—YYYY MM DD
Language
This option will select the language to use for the LCD Display. The settings are:
• English • French • German • Italian • Japanese • Spanish • Chinese (simplified)*
► N
ote:
MicroTrack II will display the above options in their native languages.
*Simplified Chinese language option
If Chinese (simplified) is not an available option on your MicroTrack II, you can add this functionality by
downloading and installing the most recent firmware update from the M-Audio website (www.m-audio.com).
To locate the updated firmware file:
1. Click “Support” on the navigation bar on the main M-Audio webpage.
2. Click “Drivers & Updates.”
3. In the Drivers and Software Search window,
a) select “MicroTrack” in the first column,
b) select “MicroTrack II” in the second column,
c) select your operating system in the third column.
4. A
list of available firmware downloads will appear in the lower portion of the screen. Click on the latest
version and follow the instructions for download.
5. Once downloaded, follow the “Firmware Update” instructions included with the downloaded firmware.
About
Choosing this option will display legal information such as copyright and licensing notices. Press in on [NAV] or
press [MENU] to exit back to the System menu.
MicroTrack II
User Guide
16
4 - Operating Instructions
MicroTrack II is an easy-to-use, portable audio recorder. Its primary function is to create high-quality recordings that can
be transferred easily to a computer. As such, the steps for operating MicroTrack II are few and simple to understand.
In essence, MicroTrack II has two functions: recording audio files and playing audio files. Because a file needs to
be recorded before it can be played back, we will explain the recording process first, followed by playback and file
management functions.
Recording
To begin recording a new audio file, connect an audio source to MicroTrack II, select the proper input source, select your
recording format and resolution, adjust your recording levels, then initiate the recording. MicroTrack II will automatically
assign a name to the file in the format “FILExxxx.eee” where xxxx is a number from 0001 to 9999 and eee is either “wav”
or “mp3.” The procedure is outlined below:
1
Using the [+48] switch on the side of MicroTrack II, turn off phantom power.
2. Turn down the input gain of MicroTrack using the [LEVELS] buttons on the front panel.
3. Connect an audio source to MicroTrack II. This can be any one of the following:
a mono or stereo dynamic, or electret microphone connected to the 1/8” input.
<
< one
<
a mono or stereo line-level source to the 1/4” TRS inputs.
<
a digital source connected to the S/PDIF input.
or two professional microphones to the 1/4” TRS inputs. Because most professional microphones
have XLR connectors, you may need to use XLR-to-TRS cables or adapters to make your connections.
4.Select the INPUT SOURCE of MicroTrack II. Use the [MENU] button and [NAV] wheel to select “Record
Settings” > “Input Source.” Select the proper input and press the [NAV] wheel in again to make your selection.
5.Select the ENCODER. Use the menu key and [NAV] wheel to select “Record Settings” > “Encoder.” Select
MP3 or WAV and press the [NAV] wheel in again to make your selection.
6.Select the SAMPLE RATE of MicroTrack II. Use the [MENU] button and [NAV] wheel to select “Record
Settings” > “Sample Rate.” Select the appropriate sample rate and press the [NAV] wheel in again to make
your selection.
7.Select the BIT RATE of MicroTrack II. Use the [MENU] button and [NAV] wheel to select “Record Settings” >
“Bits.” Select the appropriate bit rate and press the [NAV] wheel in again to make your selection.
8.If needed, select PHANTOM POWER. If you are using condenser microphones that require phantom power,
turn on the [+48V] switch on the side of MicroTrack II. Note that phantom power should be disengaged while
connecting or disconnecting microphones to prevent damage to the microphone’s internal electronics.
9.Enable INPUT MONITORING. This will allow you to hear incoming signal on the RCA and 1/8” audio outputs
while MicroTrack II is recording or is in the Record Pause State. This option is enabled by default, but you
can manually adjust it by using the [MENU] button and the [NAV] wheel to select “Record Settings” > “Input
Monitor.” Select “On” and press in on the [NAV] wheel to activate.
MicroTrack II
User Guide
17
10. Set input levels appropriately for this source.
< Press
[REC]. At this point, MicroTrack II will either begin to record a file, or will enter the Record Pause
State, depending on the Record Button setting found in the Options menu. (See the Record Button
section of the Options Menu portion of this User Guide for further information this settings.) Now play
the loudest sound you wish to record. If a file is being recorded, you will be able to delete the file as
soon as you are done, if you wish.
< Use
< To
the [LEVELS] controls on the surface of MicroTrack II to adjust the input level so that it is as high
as possible without peaking. The input level settings are represented as triangles in the level meters on
the main screen.
stop recording, press [REC] again. If you have recorded a file (once again, depending on the
Record Button setting) you may immediately delete the file, press [DEL].
11.Once the recording levels and parameters are set, you may begin recording. Press the [REC] button to start
recording a new file.
12. While a file is recording, you can:
Make adjustments to the recording levels if necessary, using the [LEVELS] buttons.
<
< Pause
<
Stop the recording by pressing the [REC] button again.
<
Delete the file being recorded by pressing the [DEL] button.
the recording by pushing in on the [NAV] wheel once. To resume recording, push in on the
[NAV] wheel again.
13.Once the recording is stopped, MicroTrack II will finish writing the file to memory. If you are recording a
WAV file, and your recording exceeds the 2GB file size limit of CF or Microdrive media, an additional file will
automatically be created with virtually no time lost between files. When recording an MP3 file, the recording
will stop when a 2GB file size is reached, and the recorded 2GB MP3 will be saved.
Adding Markers to a WAV Recording: If the [MENU] button is pressed while MicroTrack II is recording a
WAV file, the Record icon will change from solid to outline for 0.5 seconds and a marker will be dropped at
that location in the WAV file. When imported into Pro Tools, or other audio editing programs that recognize
Broadcast Wave Files (BWFs), regions or cue points will be created for each marker. If your specific audio
editing program does not recognize the extra data contained in BWF files, it will still read the recorded audio
as a WAV file.
Markers follow the Broadcast Wave Format (BWF) standard. BWF files are
files stored in WAV format that contain additional embedded data beyond basic
WAV audio information, such as position markers. BWF files are stored with a .WAV
extension. The audio software you are using on your computer must be capable of
reading BWF information to take advantage of this feature. If your software does not
recognize BWF data, the file will be treated as a standard WAV file and the markers
will be ignored.
► N
ote:
This feature is useful for journalists—they can place a marker before each question
during an interview. It is also great for recording bands—markers can be placed
between each song. Or, if gathering sound effects, a marker can be placed before
each noise (as opposed to starting and stopping recording for each individual sound).
► N
OTE:
The [MENU] button is without function while recording in MP3 format.
MicroTrack II
User Guide
18
Playback
Now that a file has been recorded, you can play it back to check the recording.
1.Connect the outputs of MicroTrack II so you can hear the playback. You can use any combination of the
following:
<
Plug a pair of headphones into the 1/8” jack on MicroTrack II.
<
Connect the RCA outputs to an amplifier or mixer.
2. Use the [MENU] button and [NAV] wheel to navigate to the “Files” menu.
3.Use the [NAV] buttons to select a file to play. Press in on the [NAV] wheel to begin playback of the current
file.
4. While an audio file is playing, you can:
<
Adjust the playback volume using the [VOLUME] button.
<
Delete the file by pressing the [DEL] button.
<
Immediately begin recording a new file by pressing the [REC] Button.
<
Loop playback of the file using the procedure explained in the Loop Playback section below.
<
Fast-forward through the file by holding the [NAV] wheel down.
<
Skip ahead to the next file by pressing down on the [NAV] wheel.
< Return
<
Rewind the file by holding up the [NAV] wheel.
<
Pause playback by pressing in on the [NAV] wheel. Press in again to resume playback.
Additional [NAV] wheel functions when an audio file is paused or stopped include:
to the beginning of a file by pressing up on the [NAV] wheel. If you are within the first three
seconds of a file, pressing up will skip back to the previous file.
<
Return to a previous file by pressing up on the [NAV] wheel.
<
Resume playback by pressing in on the [NAV] wheel.
MicroTrack II
User Guide
19
Loop Playback
MicroTrack II will allow you to loop a section of an audio file. This can be useful when practicing parts or studying
dictation. The method for looping a file requires setting a start and end point, and is accomplished as follows:
1.To engage Loop Playback, press and hold the [MENU] button for over 2 seconds while the file is playing. The
loop icon will appear on the lower left of the screen.
2.Press the [MENU] button once when you reach the start point of the loop. A small “+” will appear to the left of
the loop icon.
3.Press the [MENU] button a second time when you reach the end point of your loop. The section will begin to
loop immediately. A small “+” will appear to the right of the loop icon.
4. Pressing the [MENU] button a third time will exit loop mode.
While using Loop Playback mode, you can:
<
Adjust the playback volume using the [VOLUME] button.
<
Delete the file by pressing the [DEL] button.
<
Immediately begin recording a new file by pressing the [REC] Button.
<
Fast-forward through the file by holding the [NAV] wheel down.
<
Skip ahead to the next file by pressing down on the [NAV] wheel.
<
Return to the beginning of a file by pressing up on the [NAV] wheel.
<
Rewind the file by holding up the [NAV] wheel.
<
Pause playback by pressing in on the [NAV] wheel. Press in again to resume playback.
Additional [NAV] wheel functions when an audio file is paused in Loop Playback mode include:
<
Return to a previous file by pressing up on the [NAV] wheel.
<
Resume playback by pressing in on the [NAV] wheel.
MicroTrack II
User Guide
20
5 - Using MicroTrack II with a Computer
MicroTrack II will interact with a computer for multiple purposes.
<
MicroTrack II will charge its battery with power it receives from the computer.
<
The contents of the CF card or Microdrive can be transferred to the computer.
<
Files can be uploaded from a computer to MicroTrack II.
Please refer back to the section titled “Connect to PC” to learn how to properly connect the device.
Charging MicroTrack II from the Computer
MicroTrack II will automatically begin recharging the internal battery any time power is received at the MicroTrack USB
port. Depending on the manufacturer of your computer, your computer may need to be powered on to provide power
to the USB port. An animated battery symbol will be displayed in the right upper corner of the LCD on MicroTrack II to
indicate that the device is being charged. When the battery is fully charged, the animation will stop, the battery symbol
will appear solid, and a check mark will be displayed next to the battery symbol, indicating that the charging process has
finished.
If MicroTrack II is off and you connect it to the USB port of computer that is
running, MicroTrack II will power up and enter host mode. It is suggested that you
close the connection from the computer or exiting host mode BEFORE disconnecting
the MicroTrack II USB cable.
► N
ote:
Transferring Audio Files to a Computer
When connected to a computer, MicroTrack II will appear as a removable disk‡ on that computer. To transfer files from
MicroTrack II, locate the removable disk icon‡ under My Computer in Windows and on the Desktop on the Mac and
double-click the icon to see the stored files. Drag files from MicroTrack II to the desired destination on your computer.
Your computer will then begin copying the files. To send files back to MicroTrack II, simply drag the files back into the
MicroTrack II window. You can also create and delete file folders, rename files, and move them to new locations when
connected to the computer. These features allow you to organize your collection of recordings with ease.
‡The name under which MicroTrack II will appear on your computer depends on the following factors:
• If the CF card or Microdrive was given a name at time of formatting, or was renamed later, then that name
will be displayed in Windows or Mac OS X
• If the CF card or Microdrive was never formatted or renamed, was formatted directly from MicroTrack II,
or was not given a name at time of formatting using Windows, then it will appear as “Removable Disk” in
Windows XP/Vista and as “NO NAME” in Mac OS X.
• If the CF card or Microdrive was formatted using Mac OS X but was not given a name at time of
formatting, then it will appear as “UNTITLED” in any Operating System.
MicroTrack II
User Guide
21
Using MicroTrack II as a Portable Data Drive
While MicroTrack II can only play and record WAV and MP3 files, you can store any file you wish on the CF card or
Microdrive. This allows you to use MicroTrack II as a portable memory card or hard drive. Any unsupported files stored on
a CF card or Microdrive will be hidden from the Files menu on MicroTrack II, but they will still be there when MicroTrack II
is reconnected to a computer.
Formatting CompactFlash cards or Microdrives using a Computer
If other removable drives or media are connected to your computer and you are unsure which removable disk represents
MicroTrack II, unmount and disconnect any such drives or media from your computer before starting the formatting
process. If the wrong disc is selected and formatting is initiated, all data stored on that disc will be lost.
On Windows computers, right click on the Removable Disk icon, and select Format. For media less than 512 MB, select
FAT under File system. For media greater than 512 MB, select FAT32 under File system.
On a Macintosh OS X computer, open the Disk Utility application by going to Macintosh HD > Applications > Utilities
and double-clicking Disk Utility. Click the MicroTrack hard drive icon on the left side of the window, and click Erase. Select
MS-DOS File System then click the Erase button in the lower right.
Disconnecting MicroTrack II from Your Computer
When you want to disconnect your MicroTrack II from your computer, it is important to properly exit host mode to prevent
corrupting data on the drive. This procedure only applies if MicroTrack II is currently in host mode – meaning the
“M-Audio” logo and USB icon are displayed on the screen.
If you use the traditional shut down procedure on your computer, all drives will automatically be unmounted. If you wish to
leave your computer on, follow the procedures below for Windows or Macintosh OS X.
Disconnecting from Windows
To disconnect MicroTrack II from Windows, click on the “Safely Remove Hardware” icon located in the
System Tray.
#LICKHERETOREMOVETHE-ICRO4RACK))
#LICKHERETOSHOWCONNECTEDDEVICES
#LICKHERETOSHOWCONNECTEDDEVICES
#LICKHERETOREMOVETHE-ICRO4RACK))
Windows XP
Windows Vista
A list of connected devices will be shown. MicroTrack II will be listed as a “USB Mass Storage Device.” Click this device
and Windows will attempt to unmount MicroTrack II. Windows will only be able to unmount MicroTrack II if there are no
programs trying to use files contained on the CF media. If Windows says that it cannot remove MicroTrack II, quit your
running programs and try again. Once MicroTrack II has been unmounted, you can press its [DEL] key to exit host mode
and return to normal operation.
MicroTrack II
User Guide
22
Disconnecting from Mac OS X
To disconnect MicroTrack II from Mac OS X, simply drag the MicroTrack II hard drive icon
on your desktop
to the trash can. When dragging the hard drive icon to the Trash, the Trash icon will change to an Eject symbol,
and will be labeled “Eject.” MicroTrack II can safely be unplugged as soon as the hard drive icon disappears .
Swapping CompactFlash or Microdrive Media
If you wish to change out the CompactFlash card or Microdrive while MicroTrack II is connected to the computer, you will
have to disconnect MicroTrack II using the procedure above before changing out the media. Once you’ve changed the
media, you can reconnect MicroTrack II to the computer.
MicroTrack II
User Guide
23
6 - Warranty Terms and Registration
Warranty Terms
M-Audio warrants products to be free from defects in materials and workmanship, under normal use and provided that the
product is owned by the original, registered user. Visit www.m-audio.com/warranty for terms and limitations applying to
your specific product.
Warranty Registration
Thank you for registering your new M-Audio product. Doing so immediately both entitles you to full warranty coverage and
helps MAudio develop and manufacture the finest quality products available. Register online at www.m-audio.com/register
to receive FREE product updates and for the chance to win FREE M-Audio gear.
MicroTrack II
Tested to comply with
FCC standards
FOR HOME OR STUDIO USE
WARNING: This product contains chemicals, including lead, known to the State of California to cause cancer, and birth
defects or other reproductive harm. Wash hands after handling.
© 2008 Avid Technology, Inc. All rights reserved. Product features, specifications, system requirements and availability
are subject to change without notice. Avid, M-Audio and MicroTrack II are either trademarks or registered trademarks of
Avid Technology, Inc. All other trademarks contained herein are the property of their respective owners.
Certain software contained in this product is copyrighted work of PortalPlayer, Inc. © PortalPlayer, Inc. 1999-2007. All
Rights Reserved.
PortalPlayer and the PortalPlayer logo are trademarks owned by PortalPlayer, Inc.
PORTALPLAYER
Supply of this product does not convey a license nor imply any right to distribute content created with this product
in revenue-generating broadcast systems (terrestrial, satellite, cable and/or other distribution channels), streaming
applications (via Internet, intranets and/or other networks), other content distribution systems (pay-audio or audio-on
demand applications and the like) or on physical media (compact discs, digital versatile discs, semiconductor chips,
hard drives, memory cards and the like). An independent license for such use is required. For details, please visit
http://mp3licensing.com.
MicroTrack II
User Guide
7 - Appendix
Recording Time vs. Media Chart
MP3 Recording Time in Seconds
Bit Rate
96000
128000
160000
192000
224000
320000
5592
4194
3355
2796
2397
1678
Media
Capacity (MB)
64
128
11185
8389
6711
5592
4793
3355
256
22370
16777
13422
11185
9587
6711
512
44739
33554
26844
22370
19174
13422
1024
89478
67109
53687
44739
38348
26844
2048
178957
134218
107374
89478
76696
53687
4096
357914
268435
214748
178957
153392
107374
6144
536871
402653
322123
268435
230088
161061
8192
715828
536871
429497
357914
306783
214748
224000
320000
MP3 Recording Time in [Days]:H:M:S
Bit Rate
96000
128000
160000
192000
Media
Capacity (MB)
64
[0]:1:33:12
[0]:1:9:54
[0]:0:55:55
[0]:0:46:36
[0]:0:39:57
[0]:0:27:58
128
[0]:3:6:25
[0]:2:19:49
[0]:1:51:51
[0]:1:33:12
[0]:1:19:53
[0]:0:55:55
256
[0]:6:12:50
[0]:4:39:37
[0]:3:43:42
[0]:3:6:25
[0]:2:39:47
[0]:1:51:51
512
[0]:12:25:39
[0]:9:19:14
[0]:7:27:24
[0]:6:12:50
[0]:5:19:34
[0]:3:43:42
1024
[1]:0:51:18
[0]:18:38:29
[0]:14:54:47
[0]:12:25:39
[0]:10:39:8
[0]:7:27:24
2048
[2]:1:42:37
[1]:13:16:58
[1]:5:49:34
[1]:0:51:18
[0]:21:18:16
[0]:14:54:47
4096
[4]:3:25:14
[3]:2:33:55
[2]:11:39:8
[2]:1:42:37
[1]:18:36:32
[1]:5:49:34
6144
[6]:5:7:51
[4]:15:50:53
[3]:17:28:43
[3]:2:33:55
[2]:15:54:48
[1]:20:44:21
8192
[8]:6:50:28
[6]:5:7:51
[4]:23:18:17
[4]:3:25:14
[3]:13:13:3
[2]:11:39:8
24
MicroTrack II
User Guide
Recording Time vs. Media Chart (continued)
WAV Recording Time in Seconds
sample rate/
bit-width
Media
Capacity (MB)
44100/16
48000/16
88200/16
96000/16
44100/24
48000/24
88200/24
96000/24
64
380
350
190
175
254
233
127
117
128
761
699
380
350
507
466
254
233
256
1522
1398
761
699
1014
932
507
466
512
3043
2796
1522
1398
2029
1864
1014
932
1024
6087
5592
3043
2796
4058
3728
2029
1864
2048
12174
11185
6087
5592
8116
7457
4058
3728
4096
24348
22370
12174
11185
16232
14913
8116
7457
6144
36522
33554
18261
16777
24348
22370
12174
11185
8192
48696
44739
24348
22370
32464
29826
16232
14913
48000/24
88200/24
96000/24
WAV Recording Time in Seconds
sample rate/
bit-width
Media
Capacity (MB)
44100/16
48000/16
88200/16
96000/16
44100/24
64
0:6:20
0:5:50
0:3:10
0:2:55
0:4:14
0:3:53
0:2:7
0:1:57
128
0:12:41
0:11:39
0:6:20
0:5:50
0:8:27
0:7:46
0:4:14
0:3:53
256
0:25:22
0:23:18
0:12:41
0:11:39
0:16:54
0:15:32
0:8:27
0:7:46
512
0:50:43
0:46:36
0:25:22
0:23:18
0:33:49
0:31:4
0:16:54
0:15:32
1024
1:41:27
1:33:12
0:50:43
0:46:36
1:7:38
1:2:8
0:33:49
0:31:4
2048
3:22:54
3:6:25
1:41:27
1:33:12
2:15:16
2:4:17
1:7:38
1:2:8
4096
6:45:48
6:12:50
3:22:54
3:6:25
4:30:32
4:8:33
2:15:16
2:4:17
6144
10:8:42
9:19:14
5:4:21
4:39:37
6:45:48
6:12:50
3:22:54
3:6:25
8192
13:31:36
12:25:39
6:45:48
6:12:50
9:1:4
8:17:6
4:30:32
4:8:33
25
M-Audio USA
M-Audio Germany
Technical Support
Technical Support
5795 Martin Rd., Irwindale, CA 91706
Kuhallmand 34, D-74613 Ohringen, Germany
web . . . . . . . . . . . . . . . . . . . . . . www.m-audio.com/tech
email. . . . . . . . . . . . . . . . . . . . . . . [email protected]
tel (pro products). . . . . . . . . . . . . . . . . . . (626) 633-9055
tel . . . . . . . . . . . . . . . . . . . . . . +49 (0)7941 - 9870030
tel (consumer products) . . . . . . . . . . . . . . . (626) 633-9066
tel . . . . . . . . . . . . . . . . . . . . . . +49 (0)7941 - 98 70070
fax (shipping) . . . . . . . . . . . . . . . . . . . . . (626) 633-9032
Sales
Sales
e-mail . . . . . . . . . . . . . . . . . . . . . . . . . [email protected]
e-mail . . . . . . . . . . . . . . . . . . . . . . . [email protected]
tel . . . . . . . . . . . . . . . . . . . . . . . +49 (0)7941 98 7000
tel . . . . . . . . . . . . . . . . . . . . . . . . . . 1(866) 657-6434
fax. . . . . . . . . . . . . . . . . . . . . . . +49 (0)7941 98 70070
fax. . . . . . . . . . . . . . . . . . . . . . . . . . . (626) 633-9070
Web. . . . . . . . . . . . . . . . . . . . . . . . . . . www.m-audio.de
Web. . . . . . . . . . . . . . . . . . . . . . . . . . www.m-audio.com
M-Audio U.K.
Floor 6, Gresham House, 53 Clarenden Road, Watford
WD17 1LA, United Kingdom
Technical Support
e-mail . . . . . . . . . . . . . . . . . . . . . [email protected]
tel (Mac and PC support) . . . . . . . . . . . +44 (0)1753 658630
Sales
M-Audio Canada
1400 St-Jean Baptiste Ave. #150, Quebec City,
Quebec G2E 5B7, Canada
Technical Support
e-mail . . . . . . . . . . . . . . . . . . . [email protected]
tel . . . . . . . . . . . . . . . . . . . . . . . . . . . (418) 872-0444
fax. . . . . . . . . . . . . . . . . . . . . . . . . . . (418) 872-0034
Sales
tel . . . . . . . . . . . . . . . . . . . . . . . . +44 (0)1923 204010
e-mail . . . . . . . . . . . . . . . . . . . . [email protected]
tel . . . . . . . . . . . . . . . . . . . . . . . . +44 (0)1923 204039
tel . . . . . . . . . . . . . . . . . . . . . . . . . . . (866) 872-0444
Web. . . . . . . . . . . . . . . . . . . . . . . . . . www.maudio.co.uk
fax. . . . . . . . . . . . . . . . . . . . . . . . . . . (418) 872-0034
Web. . . . . . . . . . . . . . . . . . . . . . . . . . . www.m-audio.ca
Benelux
Technical Support
Belgium tel . . . . . . . . . . . . . . . . . . . . . +32 22 54 88 93
Holland tel . . . . . . . . . . . . . . . . . . . . . +31 35 625 0097
M-Audio Japan
アビッドテクノロジー株式会社|エムオーディオ事業部:
〒460-0002 愛知県名古屋市
中区丸の内2-18-10
Avid Technology K.K.:2-18-10 Marunouchi, Naka-Ku, Nagoya, Japan
460-0002
M-Audio France
Floor 6, Gresham House, 53 Clarenden Road, Watford
WD17 1LA, United Kingdom
Renseignements Commerciaux
tel . . . . . . . . . . . . . . . . . . . . . . . . . . . 0 810 001 105
email. . . . . . . . . . . . . . . . . . . . . . . . . . [email protected]
Assistance Technique
PC. . . . . . . . . . . . . . . . . . . . . . . . . . . 0 820 000 731
カスタマーサポート(Technical
Support)
e-mail . . . . . . . . . . . . . . . . . . . . . . [email protected]
e-mail (Macintosh 環境専用). . . . . . . . . . [email protected]
tel . . . . . . . . . . . . 052-218-0859(10:00~12:00/13:00~17:00)
セールスに関するお問い合わせ(Sales)
e-mail . . . . . . . . . . . . . . . . . . . . . . . . . . [email protected]
tel . . . . . . . . . . . . . . . . . . . . . . . . . . . . . 052-218-3375
fax . . . . . . . . . . . . . . . . . . . . . . . . . . . . . 052-218-0875
Web. . . . . . . . . . . . . . . . . . . . . . . . . . . www.m-audio.jp
Mac . . . . . . . . . . . . . . . . . . . . . . . . . . 0 820 391 191
e-mail (PC) . . . . . . . . . . . . . . . . . . . . [email protected]
email (Mac). . . . . . . . . . . . . . . . . . . . . . [email protected]
fax. . . . . . . . . . . . . . . . . . . . . . . . +33 (0)1 72 72 90 52
Web. . . . . . . . . . . . . . . . . . . . . . . . . . www.m-audio.com
080128_MTII_UG_EN02