1
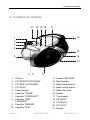
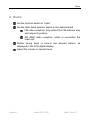
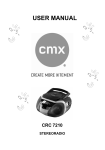
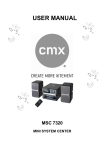
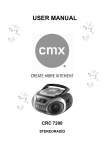
USER MANUAL
CRC 7270
STEREORADIO
Dear customer!
First of all thank you very much, that you have decided for the
cmx® CRC 7270!
Please read all information’s carefully before you start running the
cmx® CRC 7270.
Our company reserves the right to improve the product. That
changes to specifications and design, also without notice.
If you have problems, please visit our website at
www.cmx-electronics.com
and select your device.
Under the point "Support" you find the most frequently asked
questions about your device - if not, please use the contact form.
If you provide variations of your product, please visit our website.
Version 1
cmx® CRC 7270
Side 2 from 17
Index of contents
1. SAFETY INFORMATIONS .............................................................................. 4
2. LOCATION OF CONTROLS ............................................................................ 5
3. INCLUDED IN DELIVERY ............................................................................... 6
4. CONNECTORS .............................................................................................. 7
4.1. POWER SUPPLY ................................................................................................. 7
4.2. BATTERY OPERATION .......................................................................................... 7
4.3. HEADPHONE ..................................................................................................... 7
5. CD-PLAYER .................................................................................................. 8
5.1. INSERT AND REMOVAL OF DISCS ............................................................................ 8
5.2. CD- AND MP3-CD OPERATION............................................................................ 8
5.3. SKIP+10 & FOLDERS ON MP3-CD ...................................................................... 9
5.4. CD REPEAT ..................................................................................................... 10
5.5. DBBS (BASS BOOSTER SYSTEM)......................................................................... 10
5.6. PROGRAMMING .............................................................................................. 10
6. RADIO ....................................................................................................... 12
7. CASSETTE TAPE ......................................................................................... 13
7.1. CASSETTE TAPE PLAYBACK .................................................................................. 13
7.2. CASSETTE TAPE RECORDING ............................................................................... 13
7.2.1. Recording from radio to tape .............................................................. 14
7.2.2. Recording from CD/MP3-CD/ USB....................................................... 14
7.2.3. Preservation of recordings .................................................................. 14
8. SPECIFICATIONS ........................................................................................ 16
Version 1
cmx® CRC 7270
Side 3 from 17
Safety Informations
1. Safety Informations
CAUTION
RISK OF ELECTRIC SHOCK
DO NOT OPEN
The lightning flash is a warning
sign alerting you of „dangerous
voltage“ inside the product.
The exclamation point is a
warning sign alerting you of
important instructions
accompanying the product.
WARNING
To reduce the risk of electric shock, do not remove cover (or back).
No user-serviceable parts inside. Refer servicing to qualified service
personnel.
To reduce the risk of fire or electric shock, do not expose this
appliance to dripping or splashing liquids.
NOTE
Caution symbols are printed on lower side of unit. Please refer to
instruction manual.
CAUTION
Grounding or polarization. The precautions should be taken
so that the wider blade of the AC plug must match the slot in
receptacle “wall socket”.
Invisible laser radiation when open and interlocks defeated.
Avoid exposure to beam.
CLASS 1 LASER PRODUCT
Version 1
cmx® CRC 7270
Side 4 from 17
Location of controls
2. Location of controls
20 19 18
21
17
16
1
2
3
4
15
14
5
13
6 - 11
12
1.
2.
3.
4.
5.
6.
7.
8.
CD door
CD “REPEAT/PROGRAM“
CD “SKIP+10/FOLDER“
CD „STOP“
Cassette door
Cassette “PAUSE”
Cassette “STOP/EJECT”
Cassette “FAST
FORWARD”
9. Cassette “REWIND”
10. Cassette “PLAY“
Version 1
cmx® CRC 7270
11.
12.
13.
14.
15.
16.
17.
18.
19.
20.
21.
Casette “RECORD“
Main Speaker
Radio band selector
Radio tuning control
Radio dial scale
Handle
Top speaker
CD “NEXT”
CD “BACK”
CD “PLAY”
Display
Side 5 from 17
Included in delivery
3. Included in delivery
User’s manual
Warranty card
Version 1
cmx® CRC 7270
Side 6 from 17
Connectors
4. Connectors
4.1. Power supply
This set works on normal household AC-power.
Make sure the set voltage of unit matches your local voltage.
Insert the plug oft he AC-cord into a wall outlet with ACpower.
How to tell if the unit is “off”
Please make sure to set the function switch to “TAPE (OFF)“
position when unit is not in use to conserve power. No
cassette button is pressed.
4.2. Battery operation
Open the battery door and insert 6 pieces “C-cell” (UM2/LR14 type) batteries. Please observe correct battery
polarities or the set will not work.
IMPORTANT
When the set is not used or is only used with „AC“, please remove
the batteries, to avoid damage to the set from leakage of batteries.
4.3. Headphone
To connect the headphones or earphones insert the cable
into socket on the rear of main unit.
When the plug of a headphone is inserted into this jack, the
built-in speakers will automatically be disabled. When the
headphone is disconnected, the speakers will be reactivated.
Version 1
cmx® CRC 7270
Side 7 from 17
CD-Player
5. CD-Player
5.1. Insert and removal of discs
When opening the CD-door, always ensure the discs is not
in motion (not spinning) when you open the CD-door.
Always press the “STOP” key to stop the disc spinning first.
Place a CD into the compartment with the label-side (printed
side of disc) facing upwards. Press down in the center part
of disc until the disc “locks” onto the center spindle.
When the CD has been placed onto the center spindle,
gently lower the CD-door downwards until it locks shut.
The CD is now ready to be played.
To remove a disc, follow the same procedure as described
above, except to remove the CD instead of inserting it into
the compartment, by placing one finger at the middle of disc
(center spindle) and the other at the edge of the disc and
gentle pulling upwards.
5.2. CD- and MP3-CD operation
Insert a CD as described. Set the function switch to
“CD/MP3”.
Once the CD door is closed (with a disc inside) the set will
immediately read the disc and the display shows the number
from the song (tracks).
The disc will automatically start spinning and the first song
(track) will start playing. The display will indicate the current
track number (“001” if it is the first track).
At anytime during playback, press CD “PLAY/PAUSE” to
stop the operation of the unit. Press “PLAY/PAUSE” to
resume the operation at the same track and position.
Version 1
cmx® CRC 7270
Side 8 from 17
CD-Player
At anytime during playback, press ”STOP” key to stop the
operation of the set. This will reset the set to the first track.
At anytime during playback, “press and release” the
”BACK/NEXT” keys to skip backwards or forwards by one
track, as desired.
At anytime during playback, “press and hold” the
“BACK/NEXT” keys to fast-reverse or fast-forward the
specific track, which is currently playing.
5.3. SKIP+10 & folders on MP3-CD
MP3 files (songs) can be organized into folders when you record
them on to a CD-R disc. You can (for example) organize your
folders on a disc so that each folders contain songs by a particular
artist, or alternatively, by a different genre or type. You can organize
songs & folders in any way you wish so that you can locate & play
back those songs with greater ease & convenience.
If your MP3-CD has no folders, you can use the
“SKIP+10/FOLDER” key to jump 10 songs ahead. This is useful if
you have many songs on you want to quickly jump to a particular
song.
Press and hold “SKIP+10/FOLDER” several times until you
reach a song number near to your desired song, and then
press “BACK” or “NEXT” repeatedly to arrive and the exact
song you desire.
If your MP3-CD has folders, you can select the folder to playback
by pressing and holding the “SKIP+10/FOLDER” button for about 2
seconds.
Each time you press and hold the “SKIP+10/FOLDER” key
(for 2 seconds), the player jumps to the first song in the next
folder.
Version 1
cmx® CRC 7270
Side 9 from 17
CD-Player
NOTE
The “folder” function only works on MP3-discs which have
folders. If your disc has no folders, pressing
“SKIP+10/FOLDER” will perform the “SKIP+10/FOLDER”
“SKIP+10” function.
5.4. CD repeat
At
anytime
during
playback,
press
the
“REPEAT/PROGRAM” key once, than the set will repeat the
current track (Repeat symbol will “flash”).
At
anytime
during
playback,
press
the
“REPEAT/PROGRAM” key twice, than the set will repeat all
tracks (Repeat symbol will shown).
5.5. DBBS (Bass Booster System)
The built in “Bass Booster” circuit provides a powerful enhancement
to low frequency music, giving a stronger bass sound which is ideal
for “rock” or “jazz” music. This function is only effective for CDmode.
Anytime during playback, slide the DBBS “ON/OFF” switch as
required.
5.6. Programming
The CD player can be programmed to play any sequence of up to
20 tracks for Audio-CD and 99 tracks for MP3-CD, as desired.
Always press
programming.
the
”STOP”
key
before
starting
the
Press the “REPEAT/PROGRAM” key. The Display will show
“P01” and the “program” symbol “P” will be shown, to
Version 1
cmx® CRC 7270
Side 10 from 17
CD-Player
indicate that the set is now in “memory programming mode”,
at the first memory position.
Press the “NEXT/BACK” keys to select the track (song)
number you wish to be stored in the first memory (program)
position and press the “REPEAT/PROGRAM” key to confirm
your selection.
When you press “REPEAT/PROGRAM” key the display will
advance to the next memory position number.
Repeat the previous 2 Steps, each time selecting any track
number of your choice to be stored in the successive
memory (program) positions.
After each track number,
“REPEAT/PROGRAM” key.
remember
to
press
the
After a maximum of songs (Audio-CD – 20 songs, MP3-CD
– 99 songs) (or less) have been selected as described
above, press the “PLAY/PAUSE” key.
Also, the “program/repeat” symbol “P” will remain “on” to
indicate that you have saved a program-memory
(sequence).
Pressing “PLAY/PAUSE” key will now play back the “saved
sequence” in the program memory.
Pressing “NEXT/BACK” will move to the next or previous
song in the saved sequence.
To clear (cancel) the entire program which is stored in the
memory, simply press “STOP” key twice, or switch off the
set.
Version 1
cmx® CRC 7270
Side 11 from 17
Radio
6. Radio
Set the function switch to “radio”.
Set the radio band selector switch to the desired band.
FM radio reception: fully extend the FM antenna wire
and adjust its position
AM (MW) radio reception: rotate or re-position the
main unit
Rotate tuning knob to tune-in the desired station, as
displayed in the LCD digital display.
Adjust the volume to desired level.
Version 1
cmx® CRC 7270
Side 12 from 17
Cassette tape
7. Cassette tape
7.1. Cassette tape playback
Slide the function switch to the “TAPE (OFF)” position.
Open the cassette door by pressing the “STOP/EJECT” key.
Insert a pre-recorded cassette with the tape-side up, into the
proper guide-rails on the inside of the cassette door.
Gently push the cassette door forward to close it. Make sure
the tape is fully and properly inserted before doing so.
Press the cassette-“PLAY” key. This will start the playback.
NOTE
The Tape moves from right to left.
Adjust the volume to the desired level.
The tape playback can be stopped at anytime, by pressing
the cassette-“STOP” key. At the tape’s end, the set switches
itself off automatically, and release the play button at the
same time.
Press the cassette-“STOP” key followed by the cassette“REWIND” or cassette-“FAST-FORWARD” key to rewind or
forward the tape at high speed.
7.2. Cassette tape recording
Open the cassette door
“STOP/EJECT” key.
by
pressing the
cassette-
Insert a blank cassette with the tape-side up, into the proper
guide-rails on the inside of the cassette door.
Version 1
cmx® CRC 7270
Side 13 from 17
Cassette tape
Gently push the cassette door forward to close it. Make sure
that the tape is fully and properly inserted before doing so.
The set is now ready to start recording, which can be done
from either the radio or CD player.
7.2.1. Recording from radio to tape
Slide the function switch to “RADIO” position.
Tune in the desired station by turning the “tuning knob”. If
necessary, extend the telescopic antenna and adjust
position of the set to improve reception.
Press the cassette-“PLAY/RECORD” keys.
Due to the “ALC function” (automatic level control), no
further adjustment are required. The volume control will not
affect the recording.
7.2.2. Recording from CD/MP3-CD/ USB
Slide the function switch to “CD/MP3” position.
Start to playback with the desired source (either Audio-CD
MP3-CD or USB) and select the exact song to be recorded.
Press the cassette-“PLAY/RECORD” keys to start the
recording.
Simply press the cassette-“STOP” key to stop recording.
7.2.3. Preservation of recordings
To prevent accidental erasing of a cassette, simply break off
the two plastic tabs located on the cassette tape’s rear
edge.
Version 1
cmx® CRC 7270
Side 14 from 17
Cassette tape
When a cassette with removed plastic tabs is inserted, the
recording button cannot be pressed.
If a cassette is to be erased and re-recorded at a later stage,
simply cover the holes on the cassette where the tabs were
removed, with a piece of strong adhesive tape.
Version 1
cmx® CRC 7270
Side 15 from 17
Specifications
8. Specifications
Formats
Audio-CD / CD-R / CD-RW /
MP3-CD / MP3-CD-R / MP3CD-RW / CASSETTE
Connectors
Headphone
Radio
AM / FM
Frequency
AM
FM
Speakers
maximum 80 Watt PMPO
Power consumption
15 W
Power supply
AC 230 V ~ 50 Hz
Batteries
6 pieces C/UM-2/LR14 – 9V
530 – 1600 kHz
87,5 – 108 Mhz
The apparatus should not be exposed to dripping or
splashing and no objects filled with liquids should be placed
on the apparatus.
The marking and rating label is located at rear enclosure of
the apparatus.
The mains plug is used as the disconnect device and it shall
remain readily operable. To be completely disconnected the
power input. The mains plug of the apparatus shall be
disconnected from the mains completely. The mains plug
should not be obstructed or should be easily accessed
during intended use.
Under the influence of electrostatic phenomenon, the
product may malfunction and user to power reset.
Version 1
cmx® CRC 7270
Side 16 from 17
Specifications
Excessive sound pressure from earphones and headphones
can cause hearing loss.
Electrostatic discharge (ESD) Precaution
When electrostatic discharge (ESD) occurs
at the front surface (whether metal or plastic)
or near any part
or any buttons of this unit
there may be a possibility that the product may stop operation
and/or shut down immediately.
This is a normal condition and intended to protect the unit and
internal components against damage.
In such a case, please reset the unit (by disconnecting and
reconnecting AC power source) to revert the unit to normal
operation.
CAUTION
Danger of explosion if battery is incorrectly replaced. Replace only
with the same or equivalent type.
Version 1
cmx® CRC 7270
Side 17 from 17