1
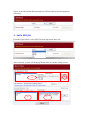
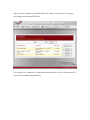
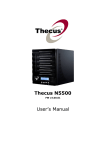
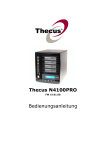
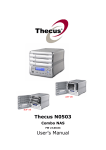
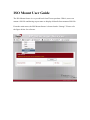
ISO Mount User Guide
The ISO Mount feature is very useful tool from Thecus products. With it, users can
mount a ISO file and having export name to display all details from mounted ISO file.
From the main menu, the ISO Mount feature is located under “Storage”. Please refer
the figure below for reference.
Select on the ISO mount function and you will have the screen shot appear as
following.
A. Add a ISO file
From the figure above, select ISO file from drop down share list.
After selection, system will bring up Mount table for further setting screen.
B
A
D
C
The Mount Table has divided to several portions for usage. The top one with red
rectangle area “A” has indicated the mounted lists with associated “ISO path” and
“ISO size” by pointed left hand side mounted ISO file.
You could remove single mounted ISO file or remove all by click right pane as
rectangle area “B”.
To mount new ISO file, select from rectangle “C” listed ISO file and input desired
mounting name into “Mount as:” field. Click “ADD” with confirmation to complete
mounting ISO file. Or without “Mount as” ISO file export name input, system will
automatic to give the export name by ISO file name. The “ISO filter” option is default
“Enable” to list only ISO files.
If left “Mount as:” blink then system will create mount point by ISO file name.
The rectangle “D” will list contains for mounted ISO file. By click the ISO file, the
next layer’s folders will appear. Same way apply to 2nd, 3rd layers …. By clicking
“Parent directory” it will bring you back to previous layer. You could get the directory
information “Current Directory” on top of rectangle “D”.
After you have completed to add ISO, then click “Back” to main screen. The page
will displayed all mounted ISO files,
You could click “Unnmount” to eliminate mounted ISO file or click “Unmount All” to
remove all created mounted ISO files.
B. Using ISO
The mounted ISO file will be located same share folder with name giving. Please
refer the screen shot below.
ISO file “image” has mounted as folder “Image” you could see. The ISO file “Neutral
V1.0 20080418” without assign mounting name, system automatically has folder
“Neutral V1.0 20080418” created.