1
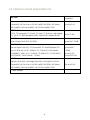
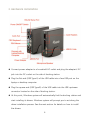
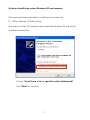
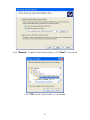
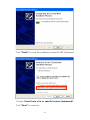
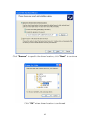
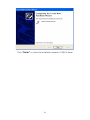
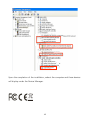
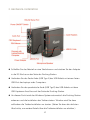
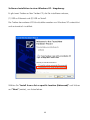
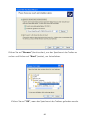
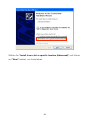
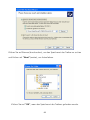
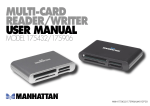
USB 2.0
DOCKING STATION
Universal | 128575
1. Introduction
equip USB 2.0 Docking Station is a perfect solution for PC or Notebook to
increase the available I/O ports. With only one USB port required from PC or
Notebook computer, such devices as Hub, card reader, LAN, PS/2, Microphone,
Speaker, RS-232 and eSATA peripheral can be accessed and operated freely via
the Docking Station.
1.1 Features
Supports USB High-Speed and Full-Speed operation
Built-in 53 in 1 multiple card reader and 4x USB Hub
1x Fast Ethernet LAN port and microphone/speaker audio ports
PS/2 keyboard/mouse interface and 1x RS-232/eSATA port
1.2 Package Contents
1x Docking Station
1x Stand
1x USB Cable
1x Driver Disc
1x Power Adapter
1
1.3 Supported Operating System
Operating
System
Hub, PS/2 10/100Mbps
Card Reader Fast Ethernet
RS-232
eSATA
Audio
Windows 98SE
Support*
Support*
Support*
Support*
N/A**
Windows ME
Support
Support*
Support*
Support
N/A**
Windows 2000
Support
Support*
Support*
Support
Support
Windows XP
Support
Support*
Support*
Support
Support
Windows Vista
Support
Support*
Support*
Support
Support
Windows 7
Support
Support*
Support*
Support
Support
Mac OS 10.4.x
Support
Support
Support*
Support
Support
Mac OS 10.5.x
Support
Support
Support*
Support
Support
Mac OS 10.6.x
Support
Support
Support*
Support
Support
* Need to install driver; the drivers are provided within the accompanied CD.
** USB Audio port does not support under Windows 98SE/ME.
2
1.4 Specifications
Model
128575
Computer Connection
USB 1.1 or USB 2.0 Port
53 in 1 Card Reader
Audio (Mic/Speaker)
4x USB 2.0 Hub
Expansion Interfaces
10/100Mbps Fast Ethernet
PS/2 (Keyboard/Mouse)
RS-232 (DB9 Male)
Red – Power ON
LEDs
Green – Memory Card Inserted
Red/Green
Green Flashing – Read/Write files
from/into Memory Card
AC Input 100 V~240V
Power Supply
DC Output 5V, 2.0A
CE, FCC
Safety Certificate
Environment
Physical
Properties
TUV/GS (Power Adapter)
Operating Temp.
0-40°C
Storage Temp.
-10-60°C
Humidity
0-80% RH, Non-condensing
Housing
Plastic & Aluminum
Weight
280g (device only)
Dimensions (W x D x H)
120 x 135 x 37 mm
3
1.4.1 Memory Cards Supported List
Capacity
MS Slot:
Supported
Memory Stick (MS), MS MagicGate (MG), MS Pro/MG, MS Pro
Extreme/III, MS Pro Ultra II, HS MS Pro/MG MS ROM, MS Select,
Up to MS-4G
MS Duo/MG, MS Pro Duo/MG, HS MS Pro Duo/MG, M2*
CF/MD Slot:
CF I/II, CF Extreme/III, CF Ultra/II, CF Pro/II, CF Elite Pro, High Speed
CF, XS-XS CF, IBM Microdrive (MD), Hitachi MD, Magicstor MD
Up to CF-8G
SMC Slot:
Smart Media Card (SM), SM ROM
Up to SMC-32MB
SD/MMC Slot:
Secure Digital Card (SD), SD Extreme/III, SD Ultra/II/X/Speed, SD
Up to MMC-
Pro, SD Elite Pro, HS SD, HS/Mini SD*, Micro SD, Multi Media
512MB
Card(MMC), MMC 4.0*, HS MMC, RS MMC/4.0*, HS RS MMC*,
Up to SD-4G
DV-RS MMC*, MMC Micro*, T-Flash*
Up to SDHC-8G
MS Slot:
Memory Stick (MS), MS MagicGate (MG), MS Pro/MG, MS Pro
Extreme/III, MS Pro Ultra II, HS MS Pro/MG MS ROM, MS Select,
MS Duo/MG, MS Pro Duo/MG, HS MS Pro Duo/MG, M2*
* Need Adapter
4
Up to MS-4G
2. Hardware Installation
Connect power adapter to a household AC outlet and plug the adapter’s DC
jack into the DC socket on the side of docking station.
Plug the flat end (USB Type A) of the USB cable into a free USB port on the
laptop or desktop computer.
Plug the square end (USB Type B) of the USB cable into the USB upstream
connector located on the side of docking station.
At this point, Windows system will automatically find the docking station and
start installing its drivers. Windows system will prompt you to act along the
driver installation process. See the next section for details on how to install
the drivers.
5
3. Software Installation
Please make sure your laptop or desktop computer is powered ON properly and
the docking station is also powered and connected to the laptop/desktop
Computer’s USB port with a USB 2.0 cable (included in the package). The
computer will start the enumeration (driver installation) process automatically. If
this is the first time that the docking station connected to the computer, the
computer system will proceed to install all the required drivers. It will prompt
user to take some action if needed.
The driver installation process is only needed for the very first time of connecting
docking station to the laptop/desktop computer and will be briefly introduced in
this section.
Below installation processes is for Windows XP; for Windows 98SE/ME/2000/7,
the processes are similar, please follow the prompts on screen and finish the
Installation
Note: Please make sure the driver CD is placed in the CD-ROM drive before
Proceed.
6
Software Installation under Windows XP environment:
There are two drivers that need to install from the driver disc,
(1). USB to Ethernet (2) USB to Serial
The drivers of other I/O interfaces are provided by Windows XP and will be
installed automatically.
Choose “Install from a list or specific location (Advanced)”
Click “Next” to continue
7
Click “Browse” to specific the driver location; click ”Next” to continue
Click ”OK” when driver location is confirmed
8
Click “Finish” to close the installation wizard of USB to Ethernet
Choose “Install from a list or specific location (Advanced)”
Click “Next” to continue
9
Click “Browse” to specific the driver location; click “Next” to continue
Click “OK” when driver location is confirmed
10
Click “Finish” to close the installation wizard of USB to Serial
11
Upon the completion of the installation, reboot the computer and these devices
will display under the Device Manager.
12
1. Einführung
Die equip USB 2.0 Docking Station ist die perfekte Lösung für den PC oder das
Notebook, um die Verfügbarkeit an I/O-Ports zu erhöhen. Mit nur einem USBAnschluss des PCs oder Notebooks können Hub, Kartenleser, LAN, PS/2,
Mikrofon, Lautsprecher, RS-232- und eSATA-Geräte über die Docking-Station
betrieben werden.
1.1 Leistungsmerkmale
Unterstützt USB High-Speed- und Full-Speed-Betrieb
eingebauter 53 in 1 Card-Reader und 4x USB Hub
1x Fast Ethernet LAN-Anschluss und Mikrofon- / Lautsprecher-Ports
PS/2, Tastatur-/Maus-Schnittstelle und 1x RS-232-/eSATA-Port
1.2 Package Contents
1x Docking Station
1x Standfuss
1x USB-Kabel
1x Treiber-CD
1x Netzteil
13
1.3 Unterstützte Betriebssysteme
Operating
System
Windows 98SE
Hub, PS/2
Card Reader
10/100Mbps
Fast Ethernet
RS-232
eSATA
wird
wird
wird
wird
unterstützt * unterstützt * unterstützt * unterstützt *
Audio
nicht
verfügbar **
Windows ME
wird
unterstützt
wird
wird
unterstützt * unterstützt *
wird
unterstützt
nicht
verfügbar **
Windows 2000
wird
unterstützt
wird
wird
unterstützt * unterstützt *
wird
unterstützt
wird
unterstützt
Windows XP
wird
unterstützt
wird
wird
unterstützt * unterstützt *
wird
unterstützt
wird
unterstützt
Windows Vista
wird
unterstützt
wird
wird
unterstützt * unterstützt *
wird
unterstützt
wird
unterstützt
Windows 7
wird
unterstützt
wird
wird
unterstützt * unterstützt *
wird
unterstützt
wird
unterstützt
Mac OS 10.4.x
wird
unterstützt
wird
unterstützt
wird
unterstützt *
wird
unterstützt
wird
unterstützt
Mac OS 10.5.x
wird
unterstützt
wird
unterstützt
wird
unterstützt *
wird
unterstützt
wird
unterstützt
Mac OS 10.6.x
wird
unterstützt
wird
unterstützt
wird
unterstützt *
wird
unterstützt
wird
unterstützt
* Bitte installieren Sie den Treiber, dieser ist auf der mitgelieferten CD enthalten.
** Der USB-Audio-Anschluss wird bei Windows 98SE/ME nicht unterstützt.
14
1.4 Spezifikationen
Computer-Anschluss
USB 1.1 oder USB 2.0-Port
53 in 1 Card Reader
Audio (Mikrofon/Lautsprecher)
4x USB 2.0 Hub
Erweiternde Schnittstellen
10/100Mbps Fast Ethernet
PS/2 (Tastatur/Maus)
RS-232 (DB9 Male)
Rot - Power ON
LEDs
Grün - Memory-Karte eingelegt
Rot / Grün
Grün blinkend - Lesen/Schreiben
von Dateien von/auf die Memory
Card
Betriebstemperatur
AC-Eingang 100V ~ 240V
DC 5V, 2.0A
CE, FCC
TÜV / GS (Netzteil)
0 ~ 40°C
Lagertemperatur
-10 ~ 60°C
Luftfeuchtigkeit
0 ~ 80% RH, nicht kondensierend
Gehäuse
Kunststoff und Aluminium
Gewicht
280g (nur Gerät)
Netzteil
Sicherheitszertifikate
Umwelt
Physikalische
Eigenschaften
Abmessungen (B x T x H)
15
120 x 135 x 37 mm
1.4.1 Unterstützte Speicherkarten Liste
unterstütze
Kapazität
MS Slot:
Memory Stick (MS), MS MagicGate (MG), MS Pro/MG, MS Pro
Extreme/III, MS Pro Ultra II, HS MS Pro/MG MS ROM, MS Select,
bis zu MS-4G
MS Duo/MG, MS Pro Duo/MG, HS MS Pro Duo/MG, M2*
CF/MD Slot:
CF I/II, CF Extreme/III, CF Ultra/II, CF Pro/II, CF Elite Pro, High
Speed CF, XS-XS CF, IBM Microdrive (MD), Hitachi MD,
bis zu CF-8G
Magicstor MD
SMC Slot:
Smart Media Card (SM), SM ROM
bis zu SMC-32MB
SD/MMC Slot:
Secure Digital Card (SD), SD Extreme/III, SD Ultra/II/X/Speed, SD
Pro, SD Elite Pro, HS SD, HS/Mini SD*, Micro SD, Multi Media
bis zu MMC-512MB
bis zu SD-4G
Card(MMC), MMC 4.0*, HS MMC, RS MMC/4.0*, HS RS
MMC*, DV-RS MMC*, MMC Micro*, T-Flash*
bis zu SDHC-8G
MS Slot:
Memory Stick (MS), MS MagicGate (MG), MS Pro/MG, MS Pro
Extreme/III, MS Pro Ultra II, HS MS Pro/MG MS ROM, MS Select,
MS Duo/MG, MS Pro Duo/MG, HS MS Pro Duo/MG, M2*
* Adapter wird benötigt
16
bis zu MS-4G
2. Hardware-Installation
Schließen Sie das Netzteil an eine Steckdose an und stecken Sie den Adapter
in die DC-Buchse an der Seite der Docking-Station.
Verbinden Sie das flache Ende (USB Typ A) des USB-Kabels mit einem freien
USB-Port des Laptops oder Computers.
Verbinden Sie das quadratische Ende (USB Typ B) des USB-Kabels mit dem
USB-Upstream-Anschluss auf der Seite der Docking-Station.
An diesem Punkt wird das Windows-System automatisch die Docking-Station
erkennen und die Installation der Treiber starten. Window wird Sie dazu
auffordern die Treiber-Installation zu starten. (Sehen Sie dazu die nächsten
Abschnitte, um weitere Details über die Treiberinstallation zu erhalten.)
17
3. Software Installation
Bitte stellen Sie sicher, dass Laptop oder Computer eingeschaltet sind und
ordnungsgemäß mit der Docking-Station über den USB-Port mit einem USB 2.0
kabel (im Lieferumfang enthalten) verbunden worden sind. Der Computer
startet die installation des Treibers automatisch. lst die Docking Station das erste
Mal an das Laptop oder den Computer angeschlossen, wird das Betriebssystem
alle benötigten Treiber installieren. Falls erforderlich, wird der Anwender dazu
aufgefordert, einige Einstellungen vorzunehmen.
Die TGreiber-Installation wird nur beim ersten Mal durchgeführt, wenn die
Docking-Station an den Laptop / Computer angeschlossen wird. Im folgenden
Abschnitt wird der Prozess nun beschrieben.
Der nachfolgende Installationsprozess ist für Windows XP beschrieben; Windows
98SE/ME/2000/7 laufen ähnlich. Bitte folgen Sie den Anweisungen auf dem
Bildschirm, um die Installation abzuschließen.
Hinweis: Bitte stellen Sie sicher, dass sich die Treiber-CD im CD-ROM-Laufwerk
befindet, bevor Sie fortfahrehn.
18
Software-Installation in einer Windows XP - Umgebung:
Es gibt zwei Treiber auf der Treiber-CD, die Sie installieren müssen
(1) USB zu Ethernet und (2) USB zu Seriell.
Die Treiber der anderen I/O-Schnittstellen werden von Windows XP unterstützt
und automatisch installiert.
Wählen Sie "Install from a list or specific location (Advanced)" und klicken
auf "Next" (weiter), um fortzufahren.
19
Klicken Sie auf "Browse" (durchsuchen), um den Speicherort des Treiber zu
suchen und klicken auf "Next" (weiter), um fortzufahren.
Klicken Sie auf "OK", wenn der Speicherort des Treibers gefunden wurde.
20
Klicken Sie auf "Finish" (beenden), um den Installations-Assistenten für "USB
zu Ethernet" zu beenden.
21
Wählen Sie "Install from a list or specific location (Advanced)" und klicken
auf "Next" (weiter), um fortzufahren.
22
Klicken Sie auf Browse (durchsuchen), um den Speicherort des Treiber zu suchen
und klicken auf "Next" (weiter), um fortzufahren.
Klicken Sie auf "OK", wenn der Speicherort des Treibers gefunden wurde.
23
Klicken Sie auf "Finish" (beenden), um den Installations-Assistenten für "USB
zu Seriell" zu beenden.
24
Nach Abschluss der Installation starten Sie den Computer bitte neu, und die
Geräte werden im Geräte-Manager angezeigt.
25