1
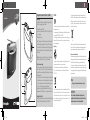
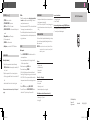
Portable Radio AE 2160 Important notes for users in the U.K. 1 4 3 Mains plug This apparatus is fitted with an approved 13 Amp plug. To change a fuse in this type of plug proceed as follows: 2 1 Remove fuse cover and fuse. 2 Fix new fuse which should be a BS1362 5 Amp, A.S.T.A. or BSI approved type. 3 Refit the fuse cover. 1 If the fitted plug is not suitable for your socket outlets, it should be cut off and an appropriate plug fitted in its place. If the mains plug contains a fuse, this should have a value of 5 Amp. If a plug without a fuse is used, the fuse at the distribution board should not be greater than 5 Amp. Note: The severed plug must be disposed of to avoid a possible shock hazard should it be inserted into a 13 Amp socket elsewhere. How to connect a plug The wires in the mains lead are coloured with the following code: blue = neutral (N), brown = live (L). As these colours may not correspond with the colour markings identifying the terminals in your plug, proceed as follows: • Connect the blue wire to the terminal marked N or coloured black. • Connect the brown wire to the terminal marked L or coloured red. • Do not connect either wire to the earth terminal in the plug, marked E (or e) or coloured green (or green and yellow). Before replacing the plug cover, make certain that the cord grip is clamped over the sheath of the lead - not simply over the two wires. 5 6 7 8 AE2160_05.indd 1 Copyright in the U.K. Recording and playback of material may require consent. See Copyright Act 1956 and The Performer’s Protection Acts 1958 to 1972. Notice This product complies with the radio interference requirements of the European Community. This product complies with the requirements of the following directives and guidelines: 2004/108/EC + 2006/95/EC Any changes or modifications made to this device that are not expressly approved by Philips Consumer Lifestyle may void the user’s authority to operate the equipment. Your product contains batteries covered by the European Directive 2006/66/EC, which cannot be disposed of with normal household waste. When you see the crossed-out wheel bin symbol with the chemical symbol ‘Pb’, it means that the batteries comply with the requirement set by the directive for lead: Pb Recycling Please inform yourself about the local rules on separate collection of batteries. The correct disposal of batteries helps prevent potentially negative consequences on the environment and human health. Your product is designed and manufactured with high quality materials and components, which can be recycled and reused. Environmental information All unnecessary packaging has been omitted. We have tried to make the packaging easy to separate into three materials: cardboard (box), polystyrene foam (buffer) and polyethylene (bags, protective foam sheet.) Your system consists of materials which can be recycled and reused if disassembled by a specialized company. Please observe the local regulations regarding the disposal of packaging materials, exhausted batteries and old equipment. When you see the crossed-out wheel bin symbol attached to a product, it means the product is covered by the European Directive 2002/96/EC: Note: The type plate is located on the bottom of the set. Never dispose of your product with other household waste. Please inform yourself about the local rules on the separate collection of electrical and electronic products. The correct disposal of your old product helps prevent potentially negative consequences on the environment and human health. CAUTION Use of controls or adjustments or performance of procedures other than herein may result in hazardous radiation exposure or other unsafe operation. 2009-04-24 10:36:06 AM Portable Radio AE 2160 Important notes for users in the U.K. 1 4 3 Mains plug This apparatus is fitted with an approved 13 Amp plug. To change a fuse in this type of plug proceed as follows: 2 1 Remove fuse cover and fuse. 2 Fix new fuse which should be a BS1362 5 Amp, A.S.T.A. or BSI approved type. 3 Refit the fuse cover. 1 If the fitted plug is not suitable for your socket outlets, it should be cut off and an appropriate plug fitted in its place. If the mains plug contains a fuse, this should have a value of 5 Amp. If a plug without a fuse is used, the fuse at the distribution board should not be greater than 5 Amp. Note: The severed plug must be disposed of to avoid a possible shock hazard should it be inserted into a 13 Amp socket elsewhere. How to connect a plug The wires in the mains lead are coloured with the following code: blue = neutral (N), brown = live (L). As these colours may not correspond with the colour markings identifying the terminals in your plug, proceed as follows: • Connect the blue wire to the terminal marked N or coloured black. • Connect the brown wire to the terminal marked L or coloured red. • Do not connect either wire to the earth terminal in the plug, marked E (or e) or coloured green (or green and yellow). Before replacing the plug cover, make certain that the cord grip is clamped over the sheath of the lead - not simply over the two wires. 5 6 7 8 AE2160_05.indd 1 Copyright in the U.K. Recording and playback of material may require consent. See Copyright Act 1956 and The Performer’s Protection Acts 1958 to 1972. Notice This product complies with the radio interference requirements of the European Community. This product complies with the requirements of the following directives and guidelines: 2004/108/EC + 2006/95/EC Any changes or modifications made to this device that are not expressly approved by Philips Consumer Lifestyle may void the user’s authority to operate the equipment. Your product contains batteries covered by the European Directive 2006/66/EC, which cannot be disposed of with normal household waste. When you see the crossed-out wheel bin symbol with the chemical symbol ‘Pb’, it means that the batteries comply with the requirement set by the directive for lead: Pb Recycling Please inform yourself about the local rules on separate collection of batteries. The correct disposal of batteries helps prevent potentially negative consequences on the environment and human health. Your product is designed and manufactured with high quality materials and components, which can be recycled and reused. Environmental information All unnecessary packaging has been omitted. We have tried to make the packaging easy to separate into three materials: cardboard (box), polystyrene foam (buffer) and polyethylene (bags, protective foam sheet.) Your system consists of materials which can be recycled and reused if disassembled by a specialized company. Please observe the local regulations regarding the disposal of packaging materials, exhausted batteries and old equipment. When you see the crossed-out wheel bin symbol attached to a product, it means the product is covered by the European Directive 2002/96/EC: Note: The type plate is located on the bottom of the set. Never dispose of your product with other household waste. Please inform yourself about the local rules on the separate collection of electrical and electronic products. The correct disposal of your old product helps prevent potentially negative consequences on the environment and human health. CAUTION Use of controls or adjustments or performance of procedures other than herein may result in hazardous radiation exposure or other unsafe operation. 2009-04-24 10:36:06 AM Portable Radio AE 2160 Important notes for users in the U.K. 1 4 3 Mains plug This apparatus is fitted with an approved 13 Amp plug. To change a fuse in this type of plug proceed as follows: 2 1 Remove fuse cover and fuse. 2 Fix new fuse which should be a BS1362 5 Amp, A.S.T.A. or BSI approved type. 3 Refit the fuse cover. 1 If the fitted plug is not suitable for your socket outlets, it should be cut off and an appropriate plug fitted in its place. If the mains plug contains a fuse, this should have a value of 5 Amp. If a plug without a fuse is used, the fuse at the distribution board should not be greater than 5 Amp. Note: The severed plug must be disposed of to avoid a possible shock hazard should it be inserted into a 13 Amp socket elsewhere. How to connect a plug The wires in the mains lead are coloured with the following code: blue = neutral (N), brown = live (L). As these colours may not correspond with the colour markings identifying the terminals in your plug, proceed as follows: • Connect the blue wire to the terminal marked N or coloured black. • Connect the brown wire to the terminal marked L or coloured red. • Do not connect either wire to the earth terminal in the plug, marked E (or e) or coloured green (or green and yellow). Before replacing the plug cover, make certain that the cord grip is clamped over the sheath of the lead - not simply over the two wires. 5 6 7 8 AE2160_05.indd 1 Copyright in the U.K. Recording and playback of material may require consent. See Copyright Act 1956 and The Performer’s Protection Acts 1958 to 1972. Notice This product complies with the radio interference requirements of the European Community. This product complies with the requirements of the following directives and guidelines: 2004/108/EC + 2006/95/EC Any changes or modifications made to this device that are not expressly approved by Philips Consumer Lifestyle may void the user’s authority to operate the equipment. Your product contains batteries covered by the European Directive 2006/66/EC, which cannot be disposed of with normal household waste. When you see the crossed-out wheel bin symbol with the chemical symbol ‘Pb’, it means that the batteries comply with the requirement set by the directive for lead: Pb Recycling Please inform yourself about the local rules on separate collection of batteries. The correct disposal of batteries helps prevent potentially negative consequences on the environment and human health. Your product is designed and manufactured with high quality materials and components, which can be recycled and reused. Environmental information All unnecessary packaging has been omitted. We have tried to make the packaging easy to separate into three materials: cardboard (box), polystyrene foam (buffer) and polyethylene (bags, protective foam sheet.) Your system consists of materials which can be recycled and reused if disassembled by a specialized company. Please observe the local regulations regarding the disposal of packaging materials, exhausted batteries and old equipment. When you see the crossed-out wheel bin symbol attached to a product, it means the product is covered by the European Directive 2002/96/EC: Note: The type plate is located on the bottom of the set. Never dispose of your product with other household waste. Please inform yourself about the local rules on the separate collection of electrical and electronic products. The correct disposal of your old product helps prevent potentially negative consequences on the environment and human health. CAUTION Use of controls or adjustments or performance of procedures other than herein may result in hazardous radiation exposure or other unsafe operation. 2009-04-24 10:36:06 AM Portable Radio AE 2160 Important notes for users in the U.K. 1 4 3 Mains plug This apparatus is fitted with an approved 13 Amp plug. To change a fuse in this type of plug proceed as follows: 2 1 Remove fuse cover and fuse. 2 Fix new fuse which should be a BS1362 5 Amp, A.S.T.A. or BSI approved type. 3 Refit the fuse cover. 1 If the fitted plug is not suitable for your socket outlets, it should be cut off and an appropriate plug fitted in its place. If the mains plug contains a fuse, this should have a value of 5 Amp. If a plug without a fuse is used, the fuse at the distribution board should not be greater than 5 Amp. Note: The severed plug must be disposed of to avoid a possible shock hazard should it be inserted into a 13 Amp socket elsewhere. How to connect a plug The wires in the mains lead are coloured with the following code: blue = neutral (N), brown = live (L). As these colours may not correspond with the colour markings identifying the terminals in your plug, proceed as follows: • Connect the blue wire to the terminal marked N or coloured black. • Connect the brown wire to the terminal marked L or coloured red. • Do not connect either wire to the earth terminal in the plug, marked E (or e) or coloured green (or green and yellow). Before replacing the plug cover, make certain that the cord grip is clamped over the sheath of the lead - not simply over the two wires. 5 6 7 8 AE2160_05.indd 1 Copyright in the U.K. Recording and playback of material may require consent. See Copyright Act 1956 and The Performer’s Protection Acts 1958 to 1972. Notice This product complies with the radio interference requirements of the European Community. This product complies with the requirements of the following directives and guidelines: 2004/108/EC + 2006/95/EC Any changes or modifications made to this device that are not expressly approved by Philips Consumer Lifestyle may void the user’s authority to operate the equipment. Your product contains batteries covered by the European Directive 2006/66/EC, which cannot be disposed of with normal household waste. When you see the crossed-out wheel bin symbol with the chemical symbol ‘Pb’, it means that the batteries comply with the requirement set by the directive for lead: Pb Recycling Please inform yourself about the local rules on separate collection of batteries. The correct disposal of batteries helps prevent potentially negative consequences on the environment and human health. Your product is designed and manufactured with high quality materials and components, which can be recycled and reused. Environmental information All unnecessary packaging has been omitted. We have tried to make the packaging easy to separate into three materials: cardboard (box), polystyrene foam (buffer) and polyethylene (bags, protective foam sheet.) Your system consists of materials which can be recycled and reused if disassembled by a specialized company. Please observe the local regulations regarding the disposal of packaging materials, exhausted batteries and old equipment. When you see the crossed-out wheel bin symbol attached to a product, it means the product is covered by the European Directive 2002/96/EC: Note: The type plate is located on the bottom of the set. Never dispose of your product with other household waste. Please inform yourself about the local rules on the separate collection of electrical and electronic products. The correct disposal of your old product helps prevent potentially negative consequences on the environment and human health. CAUTION Use of controls or adjustments or performance of procedures other than herein may result in hazardous radiation exposure or other unsafe operation. 2009-04-24 10:36:06 AM Portable Radio AE 2160 Important notes for users in the U.K. 1 4 3 Mains plug This apparatus is fitted with an approved 13 Amp plug. To change a fuse in this type of plug proceed as follows: 2 1 Remove fuse cover and fuse. 2 Fix new fuse which should be a BS1362 5 Amp, A.S.T.A. or BSI approved type. 3 Refit the fuse cover. 1 If the fitted plug is not suitable for your socket outlets, it should be cut off and an appropriate plug fitted in its place. If the mains plug contains a fuse, this should have a value of 5 Amp. If a plug without a fuse is used, the fuse at the distribution board should not be greater than 5 Amp. Note: The severed plug must be disposed of to avoid a possible shock hazard should it be inserted into a 13 Amp socket elsewhere. How to connect a plug The wires in the mains lead are coloured with the following code: blue = neutral (N), brown = live (L). As these colours may not correspond with the colour markings identifying the terminals in your plug, proceed as follows: • Connect the blue wire to the terminal marked N or coloured black. • Connect the brown wire to the terminal marked L or coloured red. • Do not connect either wire to the earth terminal in the plug, marked E (or e) or coloured green (or green and yellow). Before replacing the plug cover, make certain that the cord grip is clamped over the sheath of the lead - not simply over the two wires. 5 6 7 8 AE2160_05.indd 1 Copyright in the U.K. Recording and playback of material may require consent. See Copyright Act 1956 and The Performer’s Protection Acts 1958 to 1972. Notice This product complies with the radio interference requirements of the European Community. This product complies with the requirements of the following directives and guidelines: 2004/108/EC + 2006/95/EC Any changes or modifications made to this device that are not expressly approved by Philips Consumer Lifestyle may void the user’s authority to operate the equipment. Your product contains batteries covered by the European Directive 2006/66/EC, which cannot be disposed of with normal household waste. When you see the crossed-out wheel bin symbol with the chemical symbol ‘Pb’, it means that the batteries comply with the requirement set by the directive for lead: Pb Recycling Please inform yourself about the local rules on separate collection of batteries. The correct disposal of batteries helps prevent potentially negative consequences on the environment and human health. Your product is designed and manufactured with high quality materials and components, which can be recycled and reused. Environmental information All unnecessary packaging has been omitted. We have tried to make the packaging easy to separate into three materials: cardboard (box), polystyrene foam (buffer) and polyethylene (bags, protective foam sheet.) Your system consists of materials which can be recycled and reused if disassembled by a specialized company. Please observe the local regulations regarding the disposal of packaging materials, exhausted batteries and old equipment. When you see the crossed-out wheel bin symbol attached to a product, it means the product is covered by the European Directive 2002/96/EC: Note: The type plate is located on the bottom of the set. Never dispose of your product with other household waste. Please inform yourself about the local rules on the separate collection of electrical and electronic products. The correct disposal of your old product helps prevent potentially negative consequences on the environment and human health. CAUTION Use of controls or adjustments or performance of procedures other than herein may result in hazardous radiation exposure or other unsafe operation. 2009-04-24 10:36:06 AM CONTROLS ( see figure 1 ) 1TUNING - tune to a radio station 2TONE - NEWS/MUSIC - adjusts sound 3BAND - selects FM/MW (or LW) waveband 4VOLUME / POWER OFF - switches radio on/off and adjusts volume level 5Telescopic Aerial - improves FM reception 6p - 3.5mm earphone socket 7AC MAINS ~ - socket for mains lead 8Battery Door - open and insert 2x R20/UM1/D-cell batteries AC Mains 1 Check if the mains voltage as shown on the type plate on the bottom of set, corresponds to your local mains voltage. If it does not, consult your dealer or service centre. 2 Connect the mains lead to the AC MAINS ~ socket and the wall socket. The mains supply is now connected and ready for use. 3 To switch off completely, withdraw the mains lead from the wall socket. • Disconnect the mains lead from the wall socket to protect your set during heavy thunderstorms. RADIO Radio reception POWER SUPPLY Batteries (Not included) 1 Open the battery compartment and insert two batteries, type UM1,R20 or D-cells, with the correct polarity as indicated by the “+” and “–” symbols. 2 Replace the compartment door. The set is now ready to operate. • The battery supply is switched off when the set is connected to the AC Mains. • Remove the batteries if the set is not to be used for a long time Batteries contain chemical substances, so they should be disposed of properly. 1 Turn the VOLUME/POWER OFF knob clockwise to switch on the radio and adjust the volume. • You may connect headphones with a 3.5 mm plug to the socket p - The built -in speaker will be muted. 2 Select the wave band using the BAND switch. 3 Tune to a radio station using TUNING. • For FM, pull out the telescopic aerial. Incline and rotate the aerial. Reduce its length if the signal is too strong (very close to a transmitter). • For MW (AM or LW) the set is provided with a built-in aerial so the telescopic aerial is not needed. Direct the aerial by turning the whole set. 4 Adjust the TONE switch by selecting NEWS or MUSIC. 5 To switch off the set, turn the VOLUME/ POWER OFF knob anticlockwise to the OFF position and you will hear a small click. MAINTENANCE • Do not expose the set to humidity, rain, sand or excessive heat caused by heating equipment or direct sunlight. • To clean the set, use a soft dry cloth. Do not use any cleaning agents containing alcohol, ammonia, benzene or abrasives as these may harm the housing. TROUBLESHOOTING 2 – FM aerial not fully extended • Extend FM aerial fully AE 2160 - Portable radio Continuous crackling/hiss disturbance during MW (AM/LW) broadcast – Electrical interference from TV, computer, fluorescent lamp, etc. • Move set away from other electrical equipment If a fault occurs, first check the points listed below before taking the set for repair. If you are unable to remedy a problem by following these hints, consult your dealer or service centre. WARNING: Do not open the set as there is a risk of electric shock! Under no circumstances should you try to repair the set yourself, as this will invalidate the guarantee. No power – • – • Wrong battery polarity Insert batteries correctly Batteries exhausted Replace batteries No sound (see also No power) – Volume is turned down • Turn up volume – Headphones plug is inserted • Disconnect headphones if you are not using them Poor headphones sound/ sound from one channel only – Headphones plug not fully inserted • Insert plug fully AE2160_05.indd Severe radio hum/distortion © 2009 Koninklijke Philips Electronics N.V. All rights reserved. Printed in China AE2160_05_UM_V1.0 2009-04-24 10:36:06 AM CONTROLS ( see figure 1 ) 1TUNING - tune to a radio station 2TONE - NEWS/MUSIC - adjusts sound 3BAND - selects FM/MW (or LW) waveband 4VOLUME / POWER OFF - switches radio on/off and adjusts volume level 5Telescopic Aerial - improves FM reception 6p - 3.5mm earphone socket 7AC MAINS ~ - socket for mains lead 8Battery Door - open and insert 2x R20/UM1/D-cell batteries AC Mains 1 Check if the mains voltage as shown on the type plate on the bottom of set, corresponds to your local mains voltage. If it does not, consult your dealer or service centre. 2 Connect the mains lead to the AC MAINS ~ socket and the wall socket. The mains supply is now connected and ready for use. 3 To switch off completely, withdraw the mains lead from the wall socket. • Disconnect the mains lead from the wall socket to protect your set during heavy thunderstorms. RADIO Radio reception POWER SUPPLY Batteries (Not included) 1 Open the battery compartment and insert two batteries, type UM1,R20 or D-cells, with the correct polarity as indicated by the “+” and “–” symbols. 2 Replace the compartment door. The set is now ready to operate. • The battery supply is switched off when the set is connected to the AC Mains. • Remove the batteries if the set is not to be used for a long time Batteries contain chemical substances, so they should be disposed of properly. 1 Turn the VOLUME/POWER OFF knob clockwise to switch on the radio and adjust the volume. • You may connect headphones with a 3.5 mm plug to the socket p - The built -in speaker will be muted. 2 Select the wave band using the BAND switch. 3 Tune to a radio station using TUNING. • For FM, pull out the telescopic aerial. Incline and rotate the aerial. Reduce its length if the signal is too strong (very close to a transmitter). • For MW (AM or LW) the set is provided with a built-in aerial so the telescopic aerial is not needed. Direct the aerial by turning the whole set. 4 Adjust the TONE switch by selecting NEWS or MUSIC. 5 To switch off the set, turn the VOLUME/ POWER OFF knob anticlockwise to the OFF position and you will hear a small click. MAINTENANCE • Do not expose the set to humidity, rain, sand or excessive heat caused by heating equipment or direct sunlight. • To clean the set, use a soft dry cloth. Do not use any cleaning agents containing alcohol, ammonia, benzene or abrasives as these may harm the housing. TROUBLESHOOTING 2 – FM aerial not fully extended • Extend FM aerial fully AE 2160 - Portable radio Continuous crackling/hiss disturbance during MW (AM/LW) broadcast – Electrical interference from TV, computer, fluorescent lamp, etc. • Move set away from other electrical equipment If a fault occurs, first check the points listed below before taking the set for repair. If you are unable to remedy a problem by following these hints, consult your dealer or service centre. WARNING: Do not open the set as there is a risk of electric shock! Under no circumstances should you try to repair the set yourself, as this will invalidate the guarantee. No power – • – • Wrong battery polarity Insert batteries correctly Batteries exhausted Replace batteries No sound (see also No power) – Volume is turned down • Turn up volume – Headphones plug is inserted • Disconnect headphones if you are not using them Poor headphones sound/ sound from one channel only – Headphones plug not fully inserted • Insert plug fully AE2160_05.indd Severe radio hum/distortion © 2009 Koninklijke Philips Electronics N.V. All rights reserved. Printed in China AE2160_05_UM_V1.0 2009-04-24 10:36:06 AM CONTROLS ( see figure 1 ) 1TUNING - tune to a radio station 2TONE - NEWS/MUSIC - adjusts sound 3BAND - selects FM/MW (or LW) waveband 4VOLUME / POWER OFF - switches radio on/off and adjusts volume level 5Telescopic Aerial - improves FM reception 6p - 3.5mm earphone socket 7AC MAINS ~ - socket for mains lead 8Battery Door - open and insert 2x R20/UM1/D-cell batteries AC Mains 1 Check if the mains voltage as shown on the type plate on the bottom of set, corresponds to your local mains voltage. If it does not, consult your dealer or service centre. 2 Connect the mains lead to the AC MAINS ~ socket and the wall socket. The mains supply is now connected and ready for use. 3 To switch off completely, withdraw the mains lead from the wall socket. • Disconnect the mains lead from the wall socket to protect your set during heavy thunderstorms. RADIO Radio reception POWER SUPPLY Batteries (Not included) 1 Open the battery compartment and insert two batteries, type UM1,R20 or D-cells, with the correct polarity as indicated by the “+” and “–” symbols. 2 Replace the compartment door. The set is now ready to operate. • The battery supply is switched off when the set is connected to the AC Mains. • Remove the batteries if the set is not to be used for a long time Batteries contain chemical substances, so they should be disposed of properly. 1 Turn the VOLUME/POWER OFF knob clockwise to switch on the radio and adjust the volume. • You may connect headphones with a 3.5 mm plug to the socket p - The built -in speaker will be muted. 2 Select the wave band using the BAND switch. 3 Tune to a radio station using TUNING. • For FM, pull out the telescopic aerial. Incline and rotate the aerial. Reduce its length if the signal is too strong (very close to a transmitter). • For MW (AM or LW) the set is provided with a built-in aerial so the telescopic aerial is not needed. Direct the aerial by turning the whole set. 4 Adjust the TONE switch by selecting NEWS or MUSIC. 5 To switch off the set, turn the VOLUME/ POWER OFF knob anticlockwise to the OFF position and you will hear a small click. MAINTENANCE • Do not expose the set to humidity, rain, sand or excessive heat caused by heating equipment or direct sunlight. • To clean the set, use a soft dry cloth. Do not use any cleaning agents containing alcohol, ammonia, benzene or abrasives as these may harm the housing. TROUBLESHOOTING 2 – FM aerial not fully extended • Extend FM aerial fully AE 2160 - Portable radio Continuous crackling/hiss disturbance during MW (AM/LW) broadcast – Electrical interference from TV, computer, fluorescent lamp, etc. • Move set away from other electrical equipment If a fault occurs, first check the points listed below before taking the set for repair. If you are unable to remedy a problem by following these hints, consult your dealer or service centre. WARNING: Do not open the set as there is a risk of electric shock! Under no circumstances should you try to repair the set yourself, as this will invalidate the guarantee. No power – • – • Wrong battery polarity Insert batteries correctly Batteries exhausted Replace batteries No sound (see also No power) – Volume is turned down • Turn up volume – Headphones plug is inserted • Disconnect headphones if you are not using them Poor headphones sound/ sound from one channel only – Headphones plug not fully inserted • Insert plug fully AE2160_05.indd Severe radio hum/distortion © 2009 Koninklijke Philips Electronics N.V. All rights reserved. Printed in China AE2160_05_UM_V1.0 2009-04-24 10:36:06 AM CONTROLS ( see figure 1 ) 1TUNING - tune to a radio station 2TONE - NEWS/MUSIC - adjusts sound 3BAND - selects FM/MW (or LW) waveband 4VOLUME / POWER OFF - switches radio on/off and adjusts volume level 5Telescopic Aerial - improves FM reception 6p - 3.5mm earphone socket 7AC MAINS ~ - socket for mains lead 8Battery Door - open and insert 2x R20/UM1/D-cell batteries AC Mains 1 Check if the mains voltage as shown on the type plate on the bottom of set, corresponds to your local mains voltage. If it does not, consult your dealer or service centre. 2 Connect the mains lead to the AC MAINS ~ socket and the wall socket. The mains supply is now connected and ready for use. 3 To switch off completely, withdraw the mains lead from the wall socket. • Disconnect the mains lead from the wall socket to protect your set during heavy thunderstorms. RADIO Radio reception POWER SUPPLY Batteries (Not included) 1 Open the battery compartment and insert two batteries, type UM1,R20 or D-cells, with the correct polarity as indicated by the “+” and “–” symbols. 2 Replace the compartment door. The set is now ready to operate. • The battery supply is switched off when the set is connected to the AC Mains. • Remove the batteries if the set is not to be used for a long time Batteries contain chemical substances, so they should be disposed of properly. 1 Turn the VOLUME/POWER OFF knob clockwise to switch on the radio and adjust the volume. • You may connect headphones with a 3.5 mm plug to the socket p - The built -in speaker will be muted. 2 Select the wave band using the BAND switch. 3 Tune to a radio station using TUNING. • For FM, pull out the telescopic aerial. Incline and rotate the aerial. Reduce its length if the signal is too strong (very close to a transmitter). • For MW (AM or LW) the set is provided with a built-in aerial so the telescopic aerial is not needed. Direct the aerial by turning the whole set. 4 Adjust the TONE switch by selecting NEWS or MUSIC. 5 To switch off the set, turn the VOLUME/ POWER OFF knob anticlockwise to the OFF position and you will hear a small click. MAINTENANCE • Do not expose the set to humidity, rain, sand or excessive heat caused by heating equipment or direct sunlight. • To clean the set, use a soft dry cloth. Do not use any cleaning agents containing alcohol, ammonia, benzene or abrasives as these may harm the housing. TROUBLESHOOTING 2 – FM aerial not fully extended • Extend FM aerial fully AE 2160 - Portable radio Continuous crackling/hiss disturbance during MW (AM/LW) broadcast – Electrical interference from TV, computer, fluorescent lamp, etc. • Move set away from other electrical equipment If a fault occurs, first check the points listed below before taking the set for repair. If you are unable to remedy a problem by following these hints, consult your dealer or service centre. WARNING: Do not open the set as there is a risk of electric shock! Under no circumstances should you try to repair the set yourself, as this will invalidate the guarantee. No power – • – • Wrong battery polarity Insert batteries correctly Batteries exhausted Replace batteries No sound (see also No power) – Volume is turned down • Turn up volume – Headphones plug is inserted • Disconnect headphones if you are not using them Poor headphones sound/ sound from one channel only – Headphones plug not fully inserted • Insert plug fully AE2160_05.indd Severe radio hum/distortion © 2009 Koninklijke Philips Electronics N.V. All rights reserved. Printed in China AE2160_05_UM_V1.0 2009-04-24 10:36:06 AM CONTROLS ( see figure 1 ) 1TUNING - tune to a radio station 2TONE - NEWS/MUSIC - adjusts sound 3BAND - selects FM/MW (or LW) waveband 4VOLUME / POWER OFF - switches radio on/off and adjusts volume level 5Telescopic Aerial - improves FM reception 6p - 3.5mm earphone socket 7AC MAINS ~ - socket for mains lead 8Battery Door - open and insert 2x R20/UM1/D-cell batteries AC Mains 1 Check if the mains voltage as shown on the type plate on the bottom of set, corresponds to your local mains voltage. If it does not, consult your dealer or service centre. 2 Connect the mains lead to the AC MAINS ~ socket and the wall socket. The mains supply is now connected and ready for use. 3 To switch off completely, withdraw the mains lead from the wall socket. • Disconnect the mains lead from the wall socket to protect your set during heavy thunderstorms. RADIO Radio reception POWER SUPPLY Batteries (Not included) 1 Open the battery compartment and insert two batteries, type UM1,R20 or D-cells, with the correct polarity as indicated by the “+” and “–” symbols. 2 Replace the compartment door. The set is now ready to operate. • The battery supply is switched off when the set is connected to the AC Mains. • Remove the batteries if the set is not to be used for a long time Batteries contain chemical substances, so they should be disposed of properly. 1 Turn the VOLUME/POWER OFF knob clockwise to switch on the radio and adjust the volume. • You may connect headphones with a 3.5 mm plug to the socket p - The built -in speaker will be muted. 2 Select the wave band using the BAND switch. 3 Tune to a radio station using TUNING. • For FM, pull out the telescopic aerial. Incline and rotate the aerial. Reduce its length if the signal is too strong (very close to a transmitter). • For MW (AM or LW) the set is provided with a built-in aerial so the telescopic aerial is not needed. Direct the aerial by turning the whole set. 4 Adjust the TONE switch by selecting NEWS or MUSIC. 5 To switch off the set, turn the VOLUME/ POWER OFF knob anticlockwise to the OFF position and you will hear a small click. MAINTENANCE • Do not expose the set to humidity, rain, sand or excessive heat caused by heating equipment or direct sunlight. • To clean the set, use a soft dry cloth. Do not use any cleaning agents containing alcohol, ammonia, benzene or abrasives as these may harm the housing. TROUBLESHOOTING 2 – FM aerial not fully extended • Extend FM aerial fully AE 2160 - Portable radio Continuous crackling/hiss disturbance during MW (AM/LW) broadcast – Electrical interference from TV, computer, fluorescent lamp, etc. • Move set away from other electrical equipment If a fault occurs, first check the points listed below before taking the set for repair. If you are unable to remedy a problem by following these hints, consult your dealer or service centre. WARNING: Do not open the set as there is a risk of electric shock! Under no circumstances should you try to repair the set yourself, as this will invalidate the guarantee. No power – • – • Wrong battery polarity Insert batteries correctly Batteries exhausted Replace batteries No sound (see also No power) – Volume is turned down • Turn up volume – Headphones plug is inserted • Disconnect headphones if you are not using them Poor headphones sound/ sound from one channel only – Headphones plug not fully inserted • Insert plug fully AE2160_05.indd Severe radio hum/distortion © 2009 Koninklijke Philips Electronics N.V. All rights reserved. Printed in China AE2160_05_UM_V1.0 2009-04-24 10:36:06 AM