1
GV-RX80T256V
Radeon X800XT Graphics Accelerator
User's Manual
Rev. 101
12MD-RX80T256V-101
Copyright
© 2004 GIGABYTE TECHNOLOGY CO., LTD
Copyright by GIGA-BYTE TECHNOLOGY CO., LTD. ("GBT"). No part of this manual may be reproduced or transmitted in
any from without the expressed, written permission of GBT.
Trademarks
Third-party brands and names are the property of their respec tive owners.
Notice
Please do not remove any labels on VGA card, this may void the warranty of this VGA card
Due to rapid change in technology, some of the specifications might be out of date before publication of this booklet.
The author assumes no responsibility for any errors or omissions that may appear in this document nor does the author make
a commitment to update the information contained herein.
English
Table of Contents
1. Introduction .....................................................................................3
1.1. Features ................................................................................................. 3
1.2. Minimum System Requirement ................................................................ 3
2. Hardware Installation .......................................................................4
2.1. Board Layout .......................................................................................... 4
2.2. Hardware Installation ............................................................................... 6
3. Software Installation ........................................................................8
3.1. Win® XP Driver and Utilities Installation .................................................... 8
3.1.1. Operating System Requirement......................................................................... 8
3.1.2. DirectX Installation ............................................................................................... 9
3.1.3. Driver Installation ............................................................................................... 10
3.1.4. Utilities on Driver CD ......................................................................................... 12
3.1.5. Taskbar Icon ....................................................................................................... 14
3.1.6. Display Properties Pages ................................................................................. 18
3.2. Win® 2000 Driver Installation .................................................................. 28
3.3. BIOS Flaseh Utility ................................................................................ 28
4. Troubleshooting Tips ...................................................................... 29
5. Appendix ....................................................................................... 30
5.1. How to Reflash the BIOS ....................................................................... 30
5.2. Resolutions and Color Depth Table (In Windows® XP) ............................. 30
GV-RX80T256V Graphics Accelerator
-2 -
English
1. Introduction
1.1. Features
• Powered by ATI X800XT Visual Processing Unit (VPU)
• Supports the newest PCI Express x 16
• Integrated with 128MB DDR memory
• Supports DirectX 9.X
•
•
•
Features VIVO and D-Sub connectors
Supports DVI-I connector
Supports HDTV cable
1.2. Minimum System Requirement
•
IBM ® or 100% PC compatible with Pentium® III 650MHz or AMDAthlon 650MHz
class processor or higher
•
•
•
•
One PCI Express x 16 slot
Operating Systems Win® 2000 / Win® XP
64MB system memory
50MB of available disk space for full installation
•
CD-ROM or DVD-ROM drive
-3 -
Introduction
English
2. Hardware Installation
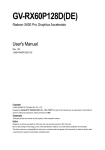
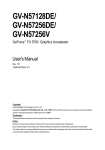
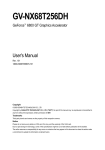
2.1. Board Layout
VG A Monitor Connector
(15pin)
VIVO
DVI -I Connector
OR
VGA Output
Analog LC D Monitor
A nalog Monitor
VGA Monitor
C onnector
(15pin)
S-V ideo Input
NTSC / PAL TV
AV Input
VIVO
AV Output
S-Video O utput
Projector
VGA Output
A nalog LC D M onitor
DVI Output
Digital LCD M onitor
DV I-I to D-Sub Connector
GV-RX80T256V Graphics Accelerator
-4 -
DVI -I Connector
1. Turn off your computer and unplug power supply.
2. Use a grounded wrist strap before handling computer components. If you do not
have one, touch both of your hands to a safely grounded object or to a metal object,
such as the power supply case.
3. Place components on a grounded antistatic pad or on the bag that came with the
components whenever the components are separated from the system.
The card contains sensitive electric components, which can be easily damaged by
static electricity, so the card should be left in its original packing until it is installed.
Unpacking and installation should be done on a grounded anti-static mat. The operator
should be wearing an anti-static wristband, grounded at the same point as the antistatic mat.
Inspect the card carton for obvious damage. Shipping and handling may cause damage
to your card. Be sure there are no shipping and handling damages on the card before
proceeding.
DO NOT APPLY POWER TO YOUR SYSTEM IF IT HAS BEEN DAMAGED ON
THE CARD.
In order to ensure your graphics card working correctly, please use official
Gigabyte BIOS only. Use none official Gigabyte BIOS might cause problem
on the graphics card.
-5 -
Hardware Installation
English
Expansion cards contain very delicate Integrated Circuit (IC) chips. To
protect them against damage from static electricity, you should follow
some precautions whenever you work on your computer.
English
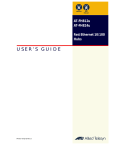
2.2. Hardware Installation
Installing Your Graphics card.
Now that you have prepared your computer, you are ready to install your graphics
accelerator card.
To install your graphics accelerator card:
1. Power off the computer and monitor, then
disconnect the display cable from the back
of your computer.
2. Remove the computer cover. If necessary,
consult your computer's manual for help
in removing the cover.
3. Remove any existing graphics card from
your computer.
Or, if your computer has any on-board
graphics capability, you may need to
disable it on the motherboard. For more
information, see you computer
documentation.
GV-RX80T256V Graphics Accelerator
-6 -
English
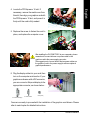
4. Locate the PCI Express x 16 slot. If
necessary, remove the metal cover from
this slot; then align your graphics card with
the PCI Express x 16 slot, and press it in
firmly until the card is fully seated.
5. Replace the screw to fasten the card in
place, and replace the computer cover.
After installing the GV-RX80T256V to your computer, please
remember to connect at lease one power cable on the
graphics card to the power supply connector.
We suggest you to connect both of the two power cables on
the graphics card to the power supply to achieve optimcal
graphics performance.
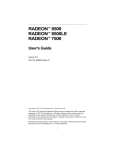
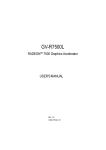
6. Plug the display cable into your card; then
turn on the computer and monitor. If your
graphics card came with a DVI connector,
you can connect a flat panel display to the
appropriate connector, as shown below...
To Flat Panel Display
To VGA Monitor
9 Pin(VIVO)
You are now ready to proceed with the installation of the graphics card drivers. Please
refer to next chapter for detailed instructions.
-7 -
Hardware Installation
English
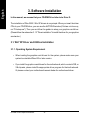
3. Software Installation
In this manual, we assume that your CD-ROM Drive letter to be Drive D:
The installation of Win® 2000 / Win® XP drivers is very simple. When you insert the driver
CD into your CD-ROM drive, you can see the AUTORUN window (if it does not show up,
run "D:\setup.exe"). Then you can follow the guides to setup your graphics card driver.
(Please follow the subsection 3.1.3 "Driver installation" to install the driver for your graphics
accelerator.)
3.1. Win® XP Driver and Utilities Installation
3.1.1. Operating System Requirement
• When loading the graphics card drivers for the system, please make sure your
system has installed DirectX 9 or later version.
• If you install the graphics card drivers for the motherboard, which consist of SIS, or
VIA chipsets, please install the appropriate driver program for that motherboard.
Or please contact your motherboard nearest dealer for motherboard driver.
GV-RX80T256V Graphics Accelerator
-8 -
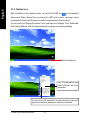
Install Microsoft DirectX to enable 3D hardware acceleration support for Windows® 2000
or Windows® XP to achieve better 3D performence.
M Note: For software MPEG support in Windows® 2000 or Windows® XP, you must
install DirectX first.
Step 1. When autorun window show up, click
Install DirectX 9 item.
Click "Install DirectX 9" item.
Step 2. Choose I accept the agreement and
Click "Next" button.
Step 3. Click "Next" button.
Installing the components.
Step 4. Click "Finish" to restart computer.
Then the DirectX 9 installation is completed.
-9 -
Software Installation
English
3.1.2. DirectX Installation
English
3.1.3. Driver Installation
A. New hardware found
After the graphics card is inserted into your computer at the first time, the windows will
automatically detect a new hardware in the system and pop out a "New Hardware Found"
message. The following is the step-by-step installation guide.
Step 1: Found new hardware wizard: Video controller (VGA Compatible)
Click "Next" button to install the driver. (There is
a driver CD disk that came with your graphics
accelerator, please insert it now.)
Or click the "Cancel" button to install the driver
from AUTORUN window.
Step 2: Found new hardware wizard: Searching and installing
The wizard will search for the driver and install it automatically.
Step 3: Found new hardware wizard: Finish
Click the "Finish" button to finish the installation.
GV-RX80T256V Graphics Accelerator
- 10 -
Insert the driver CD disk into your CD-ROM, and then you can see the AUTORUN window.
If it does not show up, please run "D:\setup.exe".
Step 1. When autorun window show up, click
Install Display Drivers (Radeon X800 Series)
item.
Click "Install Display Driver" item.
Step 2. Click "Next" button.
Step 3. Click "Yes" button.
Setp 4. Click "Express" or "Custom" icon.
Step 5. Click "Finish" button to restart computer.
Then the driver installation is completed.
- 11 -
Software Installation
English
B. Driver installation (Autorun Window)
English
3.1.4. Utilities on Driver CD
Insert the driver CD disk into your CD-ROM, and then you can see the AUTORUN window.
If it does not show up, please run "D:\setup.exe".
l Install V-Tuner2:
Click "GIGABYTE Utility" item.
Step 2. Click "Next" button.
Step 3. Enter your name and company.
Step 4. Click "Finish" button to restart computer.
Then the V-Tuner2 installation is completed.
GV-RX80T256V Graphics Accelerator
- 12 -
English
l Install Hydravision :
Click "Hydravision Install" item.
Step 2. Click "Next" button.
Step 3. Click "Yes" button.
Step 4. Click "Next" button.
Windows installings the components.
Step 5. Click "Next" button.
Step 6. Click "Finish" button to restart computer.
Then the Hydravision Install is completed.
- 13 -
Software Installation
English
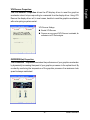
3.1.5. Taskbar Icon
After installation of the display drivers, you will find an GBT icon
on the taskbar's
status area. Right-clicking this icon opens the GBT control panel, showing a menu
composed of shortcute of the graphics card's enhanced and other functions.
You may click the "Display Properties" item, and then click Settings. Click "Advanced"
after clickng Settings. Click the appropriate tab to change your display settings.
Right click the icon.
Click "VGA Information" item
into the "VGA Info" and "Color
Adjust"tabs.
You can link to GBT website for updated information about the
graphics accelerator, latest drivers, and other information.
GV-RX80T256V Graphics Accelerator
- 14 -
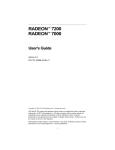
V-Tuner 2 lets you adjust the working frequency of the graphic engine and video memory
(Core Clock and Memory Clock).
Displays core clock status
Displays memory clock status
Core speed
adjustment
Enables auto adjustm ent of core/
memory cloc k settings set by user
when running 3D applications.
Core speed
adjust
Opens Help page
- 15 -
Select choice of skin
Software Installation
English
V-Tuner 2 (Overclock Utility)
English
VGA Information
VGA Info lists the relevant information about your card.
Color Adjust
Color Adjust allows you to make color adjustments, such as brightness, contrast and
gamma values for each or all of RGB colors.
GV-RX80T256V Graphics Accelerator
- 16 -
on the taskbar's
status area. Clicking this icon open the ATi control panel.
1.Using Single Display
HYDRAVISION™
HYDRAVISION™ and the Desktop Manager are activated whenever Windows® starts.
Installing HYDRAVISION™ adds menu options to the ATI Icon.
Click on the ATI icon to access the application's features and help, or to unload the
HYDRAVISION™ Desktop Manager.
2.Hydravision
HYDRAVISION™ is primarily software designed for multiple monitor settings.
GV-RX80T256V graphic cards that have more than one display output can benefit fully
from this software. GV-RX80T256V with only one display output can still take advantage
of the many features of HYDRAVISION™ .
HYDRAVISION™ installation enables the Desktop Manager and creates a Windows®
program group for HYDRAVISION™ display management software.
- 17 -
Software Installation
English
After installation of the display drivers, you will find an ATI icon
English
3.1.6. Display Properties Pages
The screen shows the information of display adapter, color, the range of display area
and the refresh rate.
Settings (Resolutions and Color depth for windows)
The Setting properties page allows you to adjust the Direct 3D settings.
You can move the slider to the
change resolution.
You can click the item to change the color
depth.
Click "Advanced" icon for adapter and setting.
Click "Advanced", into details settings:
Display
Matrix
Model
GV-RX80T256V
CRT+TV
Yes
CRT+DVI
Yes
DVI+TV
Yes
DVI+TV+CRT
Yes
GV-RX80T256V Graphics Accelerator
- 18 -
n Version Information provides the Catalyst version
number, 2D version number and the driver build
information.
n Details button access to the Details tab which lists the
card's hardware details and driver information.
n Re-activate all warning messages allows you to reactivate any disabled graphics warning messages.
n Enable ATI taskbar icon application enables or disables the ATI taskbar icon. However, this feature must
be enabled for ATI hotkey support.
n Show ATI icon on taskbar adds or removes the ATI icon from the taskbar.
n Disable quick resolution feature is accessible by left-clicking the ATI icon in the taskbar.
n Reduce DVI frequency on high-resolution displays Resolves display corruption or no image at high resolutions (for example 1280x1024 @75Hz) using a digital DVI display. (This setting has no effect when using a DVI-to-VGA adapter.)
n Alternate DVI operational mode Use this option if you are experiencing display corruption on
your DVI flat panel.
Rotation:
Use the Rotation tab to rotate the image on your display up to 180 degrees. This feature
is useful when using a flat panel display that can be physically rotated to different positions.
- 19 -
Software Installation
English
Options Properties:
English
Overlay Properties:
The Overlay Properties is used to adjust the Brightness / Contrast / Saturation / Hue /
Gamma settings.
Overlay properties allows for the viewing of full-motion video on your PC. However, there is only
one video overlay, which is only available on the Primary display. The video overlay controls are
automatically activated during playback of any video file type that supports overlay adjustments.
n Overlay Adjustments
l Brightness allows you to adjust the brightness of the
video image.
l Contrast allows you to adjust the contrast in the video
image.
l Saturation allows you to adjust the vividness of the
color. Sliding it all the way to the left removes all color
and produces a black and white picture.
l Hue allows you to adjust the pureness or tint of the
red, green and blue components of the color.
l Gamma allows you to adjust the overall intensity of the video image.
n Defaults button allows you to reset the Overlay settings to default values.
n Clone mode options button allows overlay settings are
only available in dual-controller Clone mode, and not
single-display or extended desktop configurations.
GV-RX80T256V Graphics Accelerator
- 20 -
You can adjust Direct3D and OpenGL settings from 3D properties page.
Direct3D Settings:
n Use custom settings checkbox
When Use sustom settings is checked, you can click
"Custom" button to access Custom Settings. Using
Custom Settings is recommended for advanced
users only.
n SMOOTHVISION 2.1
l Anti-Aliasing checkbox improves image quality
by removing jagged edges from 3D images, resulting in smoother, more naturallooking objects. Selecting Application Preference will result in high
quality images, with negligible reduction in the
application's performance.
l Anti-Aliasing slider can be applied using different sample patterns and sample points such as
2X, 4X, or 6X. Moving this slider to the right increases sampling to provide the most realistic 3D
image.
l Anisotropic Filtering checkbox uses a texture filtering technique that blends multiple
texture samples together. Selecting Application Preference will result in high quality
textures, with a negligible reduction in the application's performance.
l Anisotropic Filtering slider By moving this slider to the right, as the number of samples
taken increases, the quality of the final image increases significantly. 16X provides extremely detailed,crisp-looking images as a result of the largest number of texture samples
possible.
n Texture Preference slider
Selecting this decides whether your application should use high quality or high performance
textures. Moving the slider to the right delivers the highest quality experience. Moving the
slider to the left emphasizes a high performance solution while still providing good visuals.
- 21 -
Software Installation
English
3D Properties:
English
n Mipmap Detail Level slider
This will allow you to choose the texture quality of the mipmaps the application will use. Mipmaps
are a collection of different sized textures of the same image. As the user moves closer to a 3D
object the image quality should increase, requiring a higher quality texture of the same image.
The base mipmap is the highest quality texture, and all subsequent mipmaps are smaller sized
textures of the same image. Moving the slider to the right selects a higher quality base mipmap,
delivering the highest quality application experience. Moving the slider to the left selects a
lower quality mipmap, delivering the highest application performance.
n Wait for Vertical Sync
This will lower the frame rate of full screen games but reduce the image tearing that can occur
with the higher frame rate. Selecting Application Preference allows the application to decide
whether or not it should display its frames at the refresh rate of the monitor. Selecting Always
Off allows the application to run at its highest possible frame rate, regardless of the monitor’s
refresh rate which is typically less than the frame rate at which the application will run.
n TRUFORM makes the curved surfaces of 3D objects look smoother and more lifelike.
n Compatibility Settings button
This button allows you to access advanced settings that
can solve compatibility issues for a few specific Direct 3D
applications.
l Support DTX texture formats allows applications to use
this kind of texture format. There are a few applications that
can only support a limited number of texture formats. By
selecting Disabled, the driver will not support DTX texture
formats, thus reducing the number of texture formats
supported.
l Alternate pixel center This may eliminate problems with some Direct3D games which
display vertical and horizontal lines around textures, or text that appears incorrect. However,
this setting should only be used if you are experiencing the symptoms mentioned, as it may
cause problems with other games.
l Defaults button allows you to reset the Direct3D Compatibility Settings to default values.
GV-RX80T256V Graphics Accelerator
- 22 -
n Use custom settings checkbox
When Use custom settings is checked, you can click "Custom" button to access Custom
Settings. Using Custom Settings is recommended for advanced users only.
n SMOOTHVISION 2.1
l Anti-Aliasing checkbox improves image quality
by removing jagged edges from 3D images,
resulting in smoother, more naturallooking objects.
Selecting Application Preference will result in high
quality images, with negligible reduction in the
application's performance.
l Anti-Aliasing slider can b e applied using
different sample patterns and sample points such
as 2X, 4X, or 6X. Moving this slider to the right
increases sampling to provide the most realistic 3D
image.
l Anisotropic Filtering checkbox uses a texture
filtering technique that blends multiple texture
sa mp le s tog ether. Se lec ting Ap plic atio n
Preference will result in high quality textures, with
a negligible red uction in the applica tion 's
performance.
l Anisotropic Filtering slider By moving this slider
to the right, as the number of samples taken
increases, the quality of the final image increases significantly. 16X provides extremely
detailed,crisp-looking images as a result of the largest number of texture samples possible.
n Texture Preference slider
Selecting this decides whether your application should use high quality or high performance
textures. Moving the slider to the right delivers the highest quality experience. Moving the
slider to the left emphasizes a high performance solution while still providing good visuals.
- 23 -
Software Installation
English
OpenGL Settings:
English
n Mipmap Detail Level slider
This will allow you to choose the texture quality of the mipmaps the application will use. Mipmaps
are a collection of different sized textures of the same image. As the user moves closer to a 3D
object the image quality should increase, requiring a higher quality texture of the same image.
The base mipmap is the highest quality texture, and all subsequent mipmaps are smaller sized
textures of the same image. Moving the slider to the right selects a higher quality base mipmap,
delivering the highest quality application experience. Moving the slider to the left selects a
lower quality mipmap, delivering the highest application performance.
n Wait for Vertical Sync
This will lower the frame rate of full screen games but reduce the image tearing that can occur
with the higher frame rate. Selecting Application Preference allows the application to decide
whether or not it should display its frames at the refresh rate of the monitor. Selecting Always
Off allows the application to run at its highest possible frame rate, regardless of the monitor’s
refresh rate which is typically less than the frame rate at which the application will run.
n TRUFORM makes the curved surfaces of 3D objects look smoother and more lifelike.
n Compatibility Settings button
This button allows you to access advanced settings that
can solve compatibility issues for a few specific OpenGL
applications.
l Force Z-buffer depth allows you to explicitly set the ZBuffer depth. Most applications will work best when
Disabled is selected.
l Triple Buffering Enabling this feature allows rapid
updates of those portions of your screen that have
changed. Note that most applications will not be affected
by activating this feature.
l Defaults button allows you to reset the OpenGL Compatibility Settings to default values.
GV-RX80T256V Graphics Accelerator
- 24 -
The VPU Recover Properties allows the ATI display driver to reset the graphics
accelerator when it stops responding to commands from the display driver. Using VPU
Recover the display driver will, in most cases, be able to reset the graphics accelerator
without requiring a system restart.
VPU Recover Settings:
n Enable VPU Recover
n Prepare an error report if VPU Recover is activated, for
submission to ATI Technologies.
OVERDRIVE(tm) Properties:
The OVERDRIVE™ Properties maximizes the performance of your graphics accelerator
by dynamically increasing the speed of your graphics processor to the optimal level. By
constantly monitoring the temperature of the graphics processor the maximum clock
speed is always maintained.
- 25 -
Software Installation
English
VPU Recover Properties:
English
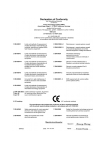
Display Properties:
If your VGA card is equipped with a S-Video connector, you can use a second output
device (e.q. a TV or a computer monitor) as part of your operating desktop extending
your desktop to second device or copying your desktop on the second device.
Select Display Type
Enable / Disable "Extend my windows
desktop onto this monitor"
The Display tab provides the multi monitor features.
Here you can enable/disable display devices and swap
the assignment of Primary and Secondary displays.
Connecting your graphics card to a TV or VCR
To connect your GV-RX80T256V graphics card to a TV (or VCR), use an S-Video cable. However,
most TVs (and VCRs) have a Composite video input, in which case you can use the supplied SVideo-to-Composite video adapter.
1. Turn off your computer and your television (or VCR).
2. Ensure your graphics card was installed correctly. (For information about placing the card in
your computer and installing the enhanced graphics driver, see the user's manual.)
3. Determine if your television (or VCR) has an S-Video or Composite video connection.
4. Looking at the back of your computer, locate your S-Video Out. Using an S-Video cable or the
supplied adapter cable, attach one end of the cable to your graphics card and the other to your
television (or VCR).
5. Turn on your television (or VCR) then your computer.
GV-RX80T256V Graphics Accelerator
- 26 -
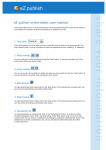
The Color Properties is used to adjust the color settings. It also allows gamma control
for video playing of the Video Overlay. The color settings affect all display devices mapped
to the view.You can change red, green, and blue display colors. Set Desktop and Video
Overlay brightness (gamma) levels can also be changed.
n Desktop increases or decreases the color brightness of
your desktop. The higher the gamma value, the higher
the brightness and contrast of your display.
n All Colors checkbox adjust the RGB individually or adjust all three colors at the same time.
n Gamma/Brightness/Contrast adjust the color by moving the slider with your mouse, to increase or decrease
the color gamma/brightness/contrast of Direct 3D and
OpenGL games played in fullscreen mode. (NOTE: Game
Gamma is NOT supported in Windows NT4.0)
n Default resets the desktop brightness and color settings to the default values.
n Full Screen 3D radio button Select Full Screen 3D
to configure the color settings for your 3D application.
Note that the configured settings will only be appar
ent within a full screen 3D application environment.
- 27 -
Software Installation
English
Color Properties:
English
3.2. Win® 2000 Driver Installation
With Windows running on your computer, you need to install the graphics card driver to
take advantage of the higher performance, resolutions, and special graphics features of
the graphics card. To ensure you install the latest driver, insert the Installation CD that
shipped with your graphics card.
To install the graphics card driver for Win® 2000, please insert the Installation CD. Then
the AUTORUN window will show up. Click Install Display Driver item, and follow the
wizard to install the driver.
If Windows® does not show the CD automatically, please run following steps:
1. Click the Start button on the control bar.
2. Select Run.
3. Type the following: D:\SETUP.exe
(If D is not your CD-ROM drive, substitute D with the correct drive letter.)
4.
5.
6.
7.
Click "OK".
Click on "Install Display Drivers" to begin the Installation Wizard.
Click "Next".
Click "Yes" to the license agreement.
8. Follow the Wizard's on-screen instructions to complete the installation.
Please make sure the Windows® 2000 have installed Windows® 2000
Service Pack (or later) before installing the graphics accelerator driver.
3.3. BIOS Flash Utility
BIOS update procedure:
MNote: Please download the newest BIOS from our website (www.gigabyte.com.tw)
or contact your local dealer for the file.
MIf you want to realize the BIOS flash information, please refer to detail on subsection
5.1. "How to reflash the BIOS".
GV-RX80T256V Graphics Accelerator
- 28 -
The following troubleshooting tips may help if you experience problems. Contact your
dealer or GBT for more advanced troubleshooting information.
n Check that the card is seated properly in the PCI Express x 16 slot.
n Ensure that the display cable is securely fastened to the card's display connector.
n Make sure that the monitor and computer are plugged in and receiving power.
n If necessary, disable any built-in graphics capabilities on your motherboard. For
more information, consult your computer's manual or manufacturer.
(NOTE: Some manufacturers do not allow the built-in graphics to be disabled or
to become the secondary display.)
n Make sure you selected the appropriate display device and graphics card when
you installed the graphics driver.
n Restart your computer.
Press the F8 key on your keyboard after system starts up. When the Windows
Advanced Options Menu appears, select Safe Mode and press Enter.
After getting into Safe Mode, in Device Manager check whether the driver for the
graphics card is correct.
n For more assistance, use the Troubleshooting Guide located in the Windows®
Help or contact your computer manufacturer.
If necessary, adjust your monitor's setting by monitor's adjust panel to make the
screen looks focused, crisp, and sharp. (Please refer to the monitor's manual.)
- 29 -
Troubleshooting Tips
English
4. Troubleshooting Tips
English
5. Appendix
5.1. How to reflash the BIOS?
1. Extract the downloaded Zip file to your hard disk (ex: drive C) or floppy disk. This procedure
assumes drive C.
2. Restart the computer in MS-DOS mode by choosing "Restart in MS-DOS mode" in the Shut
Down Windows dialog box.(This option is only available with Windows 98/98SE. For
Windows 2000/ME/XP, you need a startup disk to restart the computer in MS-DOS mode.)
3. Change the command prompt to C:\>.
4. Begin to flash BIOS by typing atiflash -p 0 filename (ex:r955128d.f1) at the C:\> prompt and
press Enter. (atiflash is the name of the flash utility).
5. Restart your PC when it's done.
5.2. Resolutions and Color Depth Table (In Windows® XP)
GV-RX80T256V 2D Single Display Modes
Display
Screen
Resolution
640 x 480
800 x 600
1024 x 768
1152 x 864
1280 x 768
1280 x 960
1280 x 1024
1600 x 1200
1792 x 1344
1800 x 1440
1856 x 1392
1920 x 1080
1920 x 1200
1920 x 1440
2048 x 1536
Refresh
Rate
(Hz)
200
200
200
100
85
160
120
100
85
70
75
75
85
75
66
GV-RX80T256V Graphics Accelerator
Color Depth (bpp)
8bpp(256 color)
Standard mode
P
P
P
P
P
P
P
P
P
P
P
P
P
P
P
- 30 -
16bpp(65K color)
High mode
P
P
P
P
P
P
P
P
P
P
P
P
P
P
P
32bpp(16.7M)
True mode
P
P
P
P
P
P
P
P
P
P
P
P
P
P
P
English
- 31 -
Appendix
English
GV-RX80T256V Graphics Accelerator
- 32 -