1
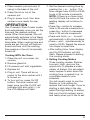
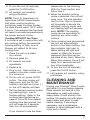
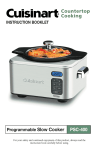
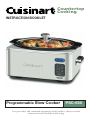
Countertop
Cooking
INSTRUCTION BOOKLET
Programmable Slow Cooker
PSC-650
For your safety and continued enjoyment of this product, always read the
instruction book carefully before using.
IMPORTANT
SAFEGUARDS
When using an electrical appliance,
basic safety precautions should
always be followed:
1. READ ALL INSTRUCTIONS.
2. Do not touch hot surfaces; use
handles or knobs.
3. To protect against risk of
electrical shock, do not immerse
the slow cooker housing in
water or any other liquid. If
housing falls into liquid, unplug
the cord from outlet
immediately. DO NOT reach into
the liquid.
4. To avoid possible accidental
injury, close supervision is
necessary when any appliance
is used by or near children.
5. Unplug from outlet when not in
use and before cleaning. Allow
to cool before putting on or
taking off parts.
6. Do not operate any appliance
with a damaged cord or plug or
after the appliance has
malfunctioned or has been
dropped or damaged in any way
or is not operating properly.
Return the appliance to the
nearest Customer Service (see
Warranty for details) for
examination, repair or
mechanical or electrical
adjustment.
7. The use of attachments not
recommended by Cuisinart may
cause fire, electrical shock, or
risk of injury.
8. Do not use outdoors or
anywhere the cord or unit
housing might come into
contact with water while in use.
9. Do not use the slow cooker for
anything other than its intended
use.
10. To avoid the possibility of the
slow cooker being accidentally
pulled off work area, which
could result in damage to the
slow cooker or personal injury,
do not let cord hang over edge
of table or counter.
11. To avoid damage to cord and
possible fire or electrocution
hazard, do not let cord contact
hot surfaces, including a stove.
12. Extreme caution must be used
when moving a slow cooker
containing hot oil or other hot
liquids.
13. Do not place on or near a hot
gas or electric burner, or in a
heated oven.
14. Do not operate slow cooker in
water or under running water.
15. Avoid sudden temperature
changes, such as adding
refrigerated foods to a heated
pot.
16. CAUTION: TO REDUCE THE
RISK OF ELECTRIC SHOCK,
COOK ONLY IN THE CERAMIC
POT PROVIDED OR PLACED
COOKING RACK INSIDE THE
CERAMIC POT. DO NOT USE
METAL CONTAINERS.
17. CAUTION: A heated ceramic
pot may damage countertops or
tables. When removing the hot
ceramic pot from the slow
cooker, DO NOT place it directly
on any unprotected surface.
Always set the hot pot on a
trivet or a rack.
18. To disconnect, press the On/Off
button, and then remove the
plug from the wall outlet.
SAVE THESE
INSTRUCTIONS
FOR
HOUSEHOLD
USE ONLY
SPECIAL CORD SET
INSTRUCTIONS
A short power supply cord is
provided to reduce the risks of
becoming entangled in or tripping
over a longer cord. Longer
extension cords are available and
may be used if care is exercised.
If a long extension cord is used,
the marked electrical rating of the
extension cord should be at least
as great as the electrical rating of
the appliance. The longer cord
should be arranged so that it will
not drape over the countertop or
tabletop where it can be pulled
on by children or tripped over
unintentionally.
NOTICE
CONTENTS
Important Safeguards . . . . . . . . 2
Introduction . . . . . . . . . . . . . . . . 3
Features and Benefits . . . . . . . .
4
Assembly Instructions . . . . . . . . . 4
Operation
Cooking with Timer . . . . . . . . . Setting Cooking Modes . . . . . .
Cooking Guidelines . . . . . . . . . .
Cooking without Timer . . . . . . .
5
5
6
7
Cleaning and Maintenance . . . . 7
Warranty Information . . . . . . . . 10
Introduction
Get ready to enjoy the easiest
homemade dinners ever…perfectly
cooked, warm and waiting when
you walk in the door. Once you
plug in your new Cuisinart®
Programmable Slow Cooker and
read our instructions, you’ll see
how easy it is to use – and how
many different things you can cook!
With a slow cooker, all the work is
done ahead of time, so dinnertime
is as relaxing for the cook as it is
for the diners. Enjoy!
This appliance has a polarized plug
(one prong is wider than the other).
As a safety feature, this plug will fit
into a polarized outlet only one
way. If the plug does not fit fully in
the outlet, reverse the plug. If it still
does not fit, contact a qualified
electrician. Do not attempt to
defeat this safety feature.
FEATURES AND
Benefits
1. Glass Lid with Stainless Steel
Rim and Chrome-Plated
Handle
See-through glass lid keeps
ingredients moist. Stainless
steel complements any kitchen.
(Not oven-safe.)
2. Cooking Rack
Allows you to use a 1-quart
soufflé pan in your Slow
Cooker.
3. Ceramic Pot
6.5-quart oval ceramic pot
accommodates larger cuts of
meat. Stick resistant and
dishwasher safe for easy
cleaning.
4. Stainless Steel Housing
Stainless steel construction is
easy to clean, while
wraparound heating elements
ensure even cooking.
5. Cooking Time Display
Large display in blue
background shows remaining
cook time. Countdown time up
to 24:00 hours.
6. Timer Control
24-hour timer allows you to set
the cook time. After the time
expires, the unit automatically
switches to the Warm setting.
7. LOW, HIGH and SIMMER
Indicator Lights
Indicate the unit is cooking on
the Low, High or Simmer
setting.
8. WARM Indicator Light
Indicates the unit has
automatically switched to the
Warm setting if time has
expired, or the unit has been
manually switched to Warm.
9. Chrome-Plated Handles
Cool-touch insulated handles.
10. Retractable Cord Storage
(not shown)
Convenient retractable cord
storage.
1
2
3
9
4
5
9
6
7/8
Assembly
Instructions
To use your Cuisinart® Slow Cooker:
1. Carefully unpack the Slow
Cooker.
2. Rinse the ceramic pot and glass
lid in warm, soapy water. Rinse
well and dry thoroughly.
3. Wipe all interior and exterior
surfaces of the Slow Cooker
base with a soft, damp cloth.
4. Place ceramic pot and rack (if
using) in the base of the unit.
5. Place the lid on top of the
ceramic pot.
6. Plug in power cord. Your slow
cooker is now ready for use.
OPERATION
Your Cuisinart® Slow Cooker cooks
food automatically once you set the
time and the desired cooking
mode. When time expires, the unit
automatically switches to the Warm
setting and the Warm indicator light
illuminates. When cooking time and
mode are set, the unit will perform
those functions until the cooking
time expires or the unit is manually
turned off.
Cooking WITH the Timer
1. Place the unit on a clean, dry
counter.
2. Remove glass lid.
3. Fill ceramic pot with ingredients.
4. Replace lid.
5. Plug in unit. There will be no
power to the slow cooker until it
is turned on.
6. To turn unit on, press On/Off
button. The slow cooker will
beep once, and the On/Off red
indicator light and colon (: ) on
the LCD display will flash.
7. Set the desired cooking time by
pushing the + or - button. The
timer ranges from 00:00 to 24:00
hours in 30-minute increments.
NOTE: If there is no timer input,
the On/Off and the colon on the
reading display will continue to
flash.
• Press the + button to increase
time in 30-minute increments or
press the - button to decrease
time in 30-minute increments.
• Press and hold + or - to scroll
automatically in 30-minute steps.
• Press + and - simultaneously to
reset to 00:00. Repeat the above
two steps to reset time.
• After setting time, timer display
and On/Off indicator will still
flash. Please proceed to setting
the cooking mode.
8. Setting Cooking Modes
Three cooking modes, Simmer,
Low and High, give you the
opportunity to prepare a wider
variety of dishes. You can adapt
many recipes to slow down the
cooking time, or speed it up, to
coordinate meals to your
schedule.
You will usually want to use the
Simmer or Low setting for
recipes that cook longer. If you’re
starting a dish later in the day,
select the High setting to ensure
that your food is cooked, warm,
and ready when you’d like to eat.
Cooking Guidelines
• When the desired cooking mode is selected, the unit will beep once, the
blue indicator next to Low, High or Simmer will illuminate to denote the
selected cooking mode, and any flashing light will become solid.
NOTE: The cooking mode can be overridden by pressing any other
mode buttons.
• Once cooking time has expired, the unit will automatically switch to the
Warm setting. The blue indicator light next to the Warm setting will light
and remain on Warm for 8 hours maximum (this time can be adjusted at
any time). When the Warm time expires, the unit will beep for 5 seconds
and then turn off automatically.
9. To turn the unit off manually,
press the On/Off button.
10. Lift ceramic pot carefully,
using potholders.
NOTE: The U.S. Department of
Agriculture (USDA) recommends
that when cooking anything
containing meat in a slow cooker,
the meat should reach 140°F within
2 hours. This ensures that the meat
will reach food-safe temperatures in
the proper amount of time.
Cooking WITHOUT the Timer
If no timer is set in conjunction with
any cooking setting, the selected
cooking setting of High, Low or
Simmer will default to 24-hour
cooking time.
1. Place the unit on a clean,
dry counter.
2. Remove glass lid.
3. Fill ceramic pot with
ingredients.
4. Replace lid.
5. Plug in unit. There will be no
power to the slow cooker until
it is turned on.
6. To turn unit on, press On/Off
button. The slow cooker will
beep once, and the On/Off
indicator red light and colon (: )
on the LCD display will flash.
7. Set the desired cooking modes
by pressing High, Low or
Simmer setting. Refer to the
cooking table guidelines on
page 6. Once 24-hour default
cooking time has expired, the
unit will beep for 5 seconds
then turn off automatically.
If you choose to use the timer,
please refer to the Cooking
With the Timer section and
follow Line 7.
8. When the desired cooking
mode is selected, the unit will
beep once, the blue indicator
next to Low, High or Simmer
will illuminate to denote the
selected cooking mode, and
any flashing light will become
solid. NOTE: The cooking
mode can be overridden by
pressing any other mode
buttons.
9. Once cooking time has expired,
the unit will automatically
switch to the Warm setting. The
blue indicator light next to
Warm setting will light and
remain on Warm for 8 hours
maximum (this time can be
adjusted at any time). When the
Warm time expires, the unit will
beep for 5 seconds and will
turn off automatically.
10. To turn the unit off manually,
press the On/Off button.
11. Lift ceramic pot carefully, using
potholders.
Cleaning and
Maintenance
Unplug your Cuisinart® Slow Cooker
and allow it to cool before cleaning.
Place ceramic pot and lid in the
dishwasher or wash with warm,
soapy water. If food sticks to the
surface, fill ceramic pot with warm,
soapy water and allow to soak
before cleaning. If scouring is
necessary, use a nonabrasive
cleanser or liquid detergent with a
nylon pad or brush.
NOTES
NOTES
WARRANTY
INFORMATION
LIMITED THREE-YEAR
WARRANTY
This warranty is available to
consumers only. You are a consumer if you own a Cuisinart®
Programmable Slow Cooker that
was purchased at retail for personal, family or household use.
Except as otherwise required
under applicable law, this warranty is not available to retailers
or other commercial purchasers
or owners.
We warrant that your Cuisinart®
Programmable Slow Cooker will
be free of defects in materials
and workmanship under normal
home use for 3 years from the
date of original purchase.
We suggest you complete and
return the enclosed product
registration card promptly to
facilitate verification of the date
of original purchase. However,
return of the product registration
card does not eliminate the need
for the consumer to maintain
the original proof of purchase
in order to obtain the warranty
benefits. In the event that you do
not have proof of purchase date,
the purchase date for purposes
of this warranty will be the date
of manufacture.
If your Cuisinart® Programmable
Slow Cooker should prove to
be defective within the warranty
period, we will repair it, or if we
think necessary, replace it. To
10
obtain warranty service, simply
call our toll-free number 1-800726-0190 for additional information from our Customer Service
Representatives, or send the
defective product to Customer
Service at Cuisinart, 150 Milford
Road, East Windsor, NJ 08520.
To facilitate the speed and
accuracy of your return, please
enclose $10.00 for shipping and
handling of the product.
Please pay by check or money
order (California residents need
only supply proof of purchase
and should call 1-800-726-0190
for shipping instructions).
NOTE: For added protection
and secure handling of any
Cuisinart® product that is being
returned, we recommend you
use a traceable, insured delivery
service. Cuisinart cannot be held
responsible for in-transit damage or for packages that are
not delivered to us. Lost and/or
damaged products are not covered under warranty. Please
be sure to include your return
address, daytime phone number, description of the product
defect, product model number
(located on bottom of product),
original date of purchase, and
any other information pertinent
to the product’s return.
Your Cuisinart® Programmable
Slow Cooker has been manufactured to the strictest specifications and has been designed for
use with the authorized accessories and replacement parts.
This warranty expressly excludes
any defects or damages caused
by accessories, replacement
parts, or repair service other
than those that have been
authorized by Cuisinart.
This warranty does not cover
any damage caused by accident,
misuse, shipment or other ordinary household use.
This warranty excludes all incidental or consequential damages. Some states do not allow
the exclusion or limitation of
these damages, so they may not
apply to you.
CALIFORNIA RESIDENTS ONLY:
California law provides that for
In-Warranty Service, California
residents have the option of
returning a nonconforming product (A) to the store where it was
purchased or (B) to another retail
store which sells Cuisinart products of the same type.
The retail store shall then, at
its discretion, either repair the
product, refer the consumer to
an independent repair facility,
replace the product, or refund
the purchase price less the
amount directly attributable to
the consumer’s prior usage of
the product. If the above two
options do not result in the
appropriate relief to the consumer, the consumer may then
take the product to an independent repair facility if service
or repair can be economically
accomplished. Cuisinart and not
the consumer will be responsible
for the reasonable cost of such
service, repair, replacement, or
refund for nonconforming products under warranty.
California residents may also,
according to their preference,
return nonconforming products
directly to Cuisinart for repair,
or if necessary, replacement, by
calling our Consumer Service
Center toll-free at 1-800-7260190.
Cuisinart will be responsible for
the cost of the repair, replacement, and shipping and handling
for such products under warranty.
Before returning your
cuisinart® product
If you are experiencing problems
with your Cuisinart® product,
we suggest that you call our
Cuisinart® Service Center at
1-800-726-0190 before returning
the product serviced. If servicing
is needed, a Representative can
confirm whether the product is
under warranty and direct you to
the nearest service location.
Important: If the nonconforming product is to be serviced by
someone other than Cuisinart’s
Authorized Service Center,
please remind the servicer to call
our Consumer Service Center at
1-800-726-0190 to ensure that
the problem is properly diagnosed, the product is serviced
with the correct parts, and the
product is still under warranty.
11
Coffeemakers
Food
Processors
Toaster Ovens
Blenders
Ice Cream
Makers
Cookware
Cuisinart offers an extensive assortment of top quality products to make life in the
kitchen easier than ever. Try some of our other countertop appliances and
cookware, and Savor the Good Life™.
www.cuisinart.com
©2008 Cuisinart
Cuisinart® is a registered
trademark of Cuisinart
150 Milford Road
East Windsor, NJ 08520
Printed in China
Any other trademarks or service marks of third
parties herein are the trademarks or service marks
of their respective owners.
08CU420
A
IB-7515A
Starlite Electronic Pre-Press System
Version No.: PSC650 IB-7515A
Size: 114mm(W)X 178mm(H)(New)
Material Cover: 157 GSM MATT ARIPAPER
Inside: 120 GSM GLOSS ARTPAPER
Coating: Gloss varnishing in cover
Color Front. Cover: 4C ; inside: 1C(black)
Back. Cover: 1C (black) ; inside: 1C (black)
Date: 2008-08-15
Co-ordinator: Astor
Client: Z0013
Starlite No: 129443IBB
Proof: 1st
Handled By: Z002013
Cyan
Magenta
Yellow
Black
5
10
20
30
40
50
60
70
80
90
100
5
10
20
30
40
50
60
70
80
90
100
5
10
20
30
40
50
60
70
80
90
100
5
10
20
30
40
50
60
70
80
90
100