1
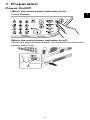
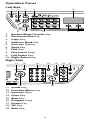
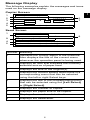
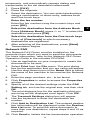
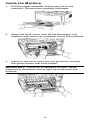
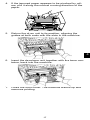
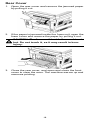
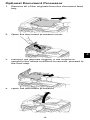
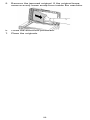
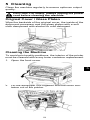
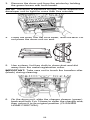
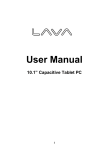
FS-1028MFP/FS-1128MFP
Quick Guide
About this Guide
This Guide is intended to help you operate the machine
correctly, perform routine maintenance and take a simple
troubleshooting action as necessary, so that you can
always use the machine in good condition.
Keep this guide in the pocket on the right side.
The following work can be done by this machine.
To make copies
• Basic Copying
• Combine Mode
• Duplex Mode
• EcoPrint
• Print Override Mode
To send documents
• Send as E-mail
• Send to Folder (SMB)
To send a FAX
• Using One-touch Keys
• Printing Activity Reports
• Memory Forwarding
• Delayed Transmission
• Broadcast Transmission
• Network FAX
To print
• Printing Documents Stored in USB Memory
Program function
• Registering Program Functions
• Using Program Functions
Contents
1 Preparation .........................................................3
2 Operation ............................................................7
3 Troubleshooting...............................................13
4 Clearing Paper Jams........................................15
5 Cleaning ............................................................21
2
1 Preparation
Power On/Off
When the main power indicator is lit...
Press Power.
1
When the main power indicator is off...
Open the main power switch cover and turn the main
power switch on.
3
Operation Panel
Left Side
1
1.
2.
3.
4.
5.
6.
7.
8.
9.
10.
3
2
4
5
6
8
7
System Menu/Counter Key
Document Box Key
Copy Key
Address Book Key
Message Display
Send Key
FAX Key
One-touch Keys
Left Select Key
Right Select Key
9
Right Side
12
11
0
11.
12.
13.
14.
15.
16.
17.
18.
19.
15
14
13
19
18
Arrow Key
Function Menu Key
Numeric Keys
Clear Key
Stop Key
Program Keys
Power Key
OK Key
Start Key
4
16
17
10
Message Display
The following examples explain the messages and icons
used on the message display.
Copier Screen
1
2
3
4
5
1
Ready to copy.
[
A4q
100%
Zoom
s VX
]
Copies:
A4a
[
1
6
7
]
Send Scrren
1
Ready to send.
9
4
5
Dest.: 3
p :[email protected]
A4
Off
[ SendSize ] [ Subject ]
8
Number Meaning
1
Indicates the current status of the machine.
Also displays the title of the current menu
whenever the operation panel is being used.
2
Displays an icon that indicates the currently
selected source of paper feed.
3
Displays the size of the original(s).
4
Displays the current setting when there is a
corresponding menu that can be selected
using the left or right Select keys.
5
Displays the title of the corresponding menu
that can be selected using the [Left Select]
or [Right Select].
6
Displays the number of copies.
7
Displays the paper size to be copied.
8
Displays the number of destinations.
9
Displays the destination.
5
Accessing Menu Items
When you configure the machine, you do so by
accessing a menu item and making your setting from
there. An example of a route map and its significance is
shown below.
1. Press [Copy]. The basic screen appears.
Ready to copy.
[
A4q
100%
Zoom
Copies:
A4a
s VX
]
[
1
]
2. Press [Function Menu]. The Function Menu
screen appears.
3. Press the up (U) or down (V) to select Original
Size.
a b
Function Menu:
4 Zoom
5 Combine
6 Original Size
[
Exit
]
4. Press [OK]. The Original Size screen appears.
5. Press U or V to select the original size.
a b
Original Size:
1 *A4q
2 A5q
3 A6q
[
Exit
]
6. Press [OK]. The display shows Completed and
returns to the basic screen.
6
2 Operation
Copy Functions
Basic Copying
Follow the steps as below for basic copying.
1. Press [Copy].
NOTE: If the panel is turned off, press [Power] and wait
for the machine to warm up.
Ready to copy.
[
A4q
100%
Zoom
Copies:
A4a
s VX
]
[
1
]
2. Place the originals on the platen or in the optional
document processor.
3. Use the numeric keys to enter the copy quantity.
Specify the desired number up to 999.
4. Press [Start]. Copying begins.
5. Remove the finished copies from the top tray.
Combine Mode
This mode allows you to copy 2 or 4 originals combined
onto a single page.
1. Press [Copy].
2. Place the originals.
3. Press [Function Menu].
4. Press U or V to select Combine and press [OK].
5. Press U or V to select 2 in 1 or 4 in 1 and
press [Right Select] (Detail).
6. Press U or V to select the direction of the layout
and press [OK].
7. Press U or V to select the borderline and [OK].
8. Press U or V to select the original orientation and
press [OK].
9. Press [Start]. Copying begins.
Duplex Copying
Using the document processor, you can automatically
print on both sides of the paper.
1. Press [Copy].
2. Place the originals.
3. Press [Function Menu].
4. Press U or V to select Duplex and press [OK].
7
2
5. Press U or V to select duplex printing mode and
press [Right Select] (Detail).
6. Press U or V to select the binding and press [OK].
7. Press U or V to select original orientation and
press [OK].
8. Press [Start]. Copying begins.
EcoPrint
Use EcoPrint to save toner when printing. Use this
function for test copies or any other occasion where high
quality print is unnecessary.
1. Press [Copy].
2. Place the originals.
3. Press [Function Menu].
4. Press U or V to select EcoPrint and press [OK].
5. Press U or V to select On and press [OK].
6. Press [Start]. Copying begins.
Print Override Mode
The print override mode allows the current job to be
interrupted in order to make copies of a more urgent job.
After the print override processing is completed, the
interrupted job will be resumed.
1. Press [Copy].
2. Press [Function Menu].
3. Press U or V to select Print Override and
press [OK].
4. Press U or V to select On and press [OK].
5. Press [Right Select] (Exit).
6. Program the functions as required and use the
numeric keys to enter the number of copies
required.
7. Place the original.
8. Press [Start]. Copying begins.
Scan Functions
Send as E-mail
Sends a scanned original image as an E-mail
attachment.
1. Press [Send].
2. Press U or V to select E-Mail.
3. Press [OK].
4. Enter the e-mail address with numeric keys.
5. Press [OK].
6. Program the settings as required from [Function
Menu].
7. Place the originals.
8
8. Press [Start]. The scanned image is sent to the destination e-mail address as an attachment.
Send to Folder (SMB)
Stores a scanned original image file in the specified
shared folder of any PC.
1. Press [Send].
2. Press U or V to select Folder(SMB) and press
[OK].
3. Enter the Host Name with numeric keys and press
[OK].
4. Enter the Path with numeric keys and press [OK].
5. Enter the Login User Name with numeric keys and
press [OK].
6. Enter the Login Password with numeric keys and
press [OK].
7. Press [Right Select] (Yes). The connection begins.
When the connection succeeds, the display shows
Completed.
NOTE: If the connection fails, the display shows Cannot
connect. Press [Right Select] (OK). Return to step 3.
Confirm the destination and input it again.
8. Press [Right Select] (OK). The display shows Completed and returns to the basic screen.
9. Place the originals.
10. Press [Start]. The scanned image is sent to the destination folder.
FAX Functions
Using One-touch Keys
Register destinations to One-touch keys, and you can
enter the desired destination by pressing the applicable
One-touch key.
Registering a New One-touch Key
1. In the basic screen, press and hold [One-touch]
that registers for at least two seconds. The Select
Key No. screen appears.
2. Press U or V to select the key number to which you
want to register the destination.
3. Press [OK]. The Address Book screen appears.
4. Press U or V to select the destination (contact or
group) you want to register.
5. Press [OK]. The selected destination is registered to
the One-touch key. The display shows Registered. and returns to the basic screen.
9
2
Selecting a Destination by One-touch Key
1. In Address Entry, press [One-touch] where the
desired destination is registered.
Recalling from One-touch Keys 1 to 11
Press [One-touch] where the destination is
registered.
Recalling from One-touch Keys 12 to 22
Press [Shift Lock] to turn on the lamp next to the
keys, and then press [One-touch] where the
destination is registered.
2. The destination registered to the one-touch key is
recalled and automatically entered on the screen.
Printing Activity Reports
The latest 50 sent or received fax data are printed as a
report.
1. Press [Status/Job Cancel].
2. Press U or V to select FAX and press [OK].
3. Press U or V to select Outgoing FAX Rpt (Outgoing FAX report) or IncomingFAX Rpt (Incoming
FAX report) and press [OK].
4. Press [Left Select] (Yes). The message
Accepted. appears and prints the report.
Delayed Transmission
When you have set a transmission start time, this
function automatically sends originals at the preset time.
You can use delayed transmission together with the
broadcast transmission function, etc.
1. Press [FAX].
2. Place the originals.
3. Press [Function Menu].
4. Press U or V to select FAX Delayed TX and
press [OK].
5. Press U or V to select On and press [OK].
6. To set the time, for each field press U or V as many
times as necessary to display the correct value then
press Z to move to the next field.
7. Press [OK].
8. Set the destination, and press [Start]. Originals are
scanned, and transmission begins at the preset
time.
Broadcast Transmission
This function allows you to send the same originals to
several destinations in one operation. The machine
stores (memorizes) originals to send in memory
10
temporarily, and automatically repeats dialing and
transmission to the set destination afterwards.
1. Press [FAX].
2. Place the originals.
3. Select the destination. You can select destinations
using a combination of direct entry, address book
and One-touch keys.
Enter the fax number
Enter the fax number using the numeric keys and
press [OK].
Select the destination from the Address Book
Press [Address Book], press U or V to select the
destination and press [OK].
Select the destination from the One-touch keys
Press all [One-touch] to which necessary
destinations are registered.
4. After selecting all the destinations, press [Start].
Transmission begins.
Network FAX
The Network FAX Driver must be installed on the
computer from which you want to send the documents.
For more information, refer to the Network FAX Driver
Operation Guide in the included CD-ROM.
1. Use an application on your computer to create the
documents to be sent.
2. Select Print from the File menu. The print dialog
box for the application that you are using will appear.
3. Use the drop-down menu in the Name field to select
the name of the machine to be used as the Network
FAX.
4. Enter the page numbers, etc., to be faxed.
5. Click Properties in order to access the Properties
window.
6. Specify all of the desired settings under the FAX
Setting tab, such as the original size, and then click
OK.
7. The print dialogue box for the application that you
are using will be displayed once again. Click OK.
The Transmit Settings dialog box will appear.
8. Use the keyboard to enter the destination fax
number.
9. Click Add to Destination List. The entered destination information will be displayed under the Destination List area. To send the same documents to
more than one destination, repeat steps 9 and 10 as
required.
10. Click Send to initiate the fax transmission operation.
11
2
Print Functions
Printing Documents Stored in USB Memory
Plugging USB memory directly into the machine enables
you to quickly and easily print the files stored in the USB
memory without having to use a computer.
1. Plug the USB memory into the USB memory slot.
2. Press [Document Box].
3. Press U or V to select USB Memory and press
[OK].
4. Press U or V to select the file you want to print and
press [Right Select]. If there are 3 or more files and
folders, pressing U or V repeatedly scrolls up or
down through the list. To print other folders, repeat
step 4 as required.
5. Press [OK].
6. Press U or V to select Print and press [OK].
7. To print 2 or more copies, use the nmeric keys to set
the number of copies to be printed.
8. Press [OK].
9. Press U or V to select the tray containing the paper
you want to use and Press [OK].
10. Press [Start]. Printing begins.
System Functions
Registering Program Functions
Up to four combinations of copy or send option modes
and functions displayed on the operation panel can be
registered as a single program.
1. Select the copy or send options to be registered (for
example: 5 copies, Original size A4, Cassette 1).
2. Press and hold [Program] (1 to 4) that registers for
at least two seconds. The program is registered.
IMPORTANT: When the program has already been
registered, press U or V to select Overwrite, and
press [OK]. The message Overwrite Are you
sure? is displayed. Press [Left Select] (Yes), the
program is registered.
Using Program Functions
1. Press [Program]. The display shows Recalled
and the program is loaded.
2. Position the originals and press [Start]. Copy jobs
or, send jobs are produced using the settings registered in the program.
12
3 Troubleshooting
Solving Malfunctions
The table below provides basic solutions for problems
you may encounter with the machine. We suggest you
consult this table to troubleshoot the problems before
calling for service.
Symptom
Corrective Actions
Print quality is Refer to Troubleshooting - Solving
poor.
Malfunctions section in the Operation
Guide.
Nothing lights
on the operation panel
even when
power is
turned on and
the fan makes
no noise.
Turn off the machine’s power, plug in
the power cord securely, and try turning on the machine’s power again.
Set the power switch to the on position.
Pressing the
[Start] does
not produce
copies.
Determine appropriate response to the
message and respond accordingly.
Press [Power] to recover the machine
from Sleep mode. The machine will be
ready to copy within 15 seconds.
The machine
prints a copy,
but does not
print jobs from
the computer.
Connect both ends of the printer cable
securely. Try replacing the printer
cable or the interface cable.
Try printing another file or using
another print command. If the problem
occurs only with a specific file or application, check the printer driver settings
for that application.
Cannot send Connect both ends of the modular cord
fax document. securely. Try replacing the modular
cord.
Refer to Troubleshooting section in the
FAX Operation Guide.
13
3
Tips
Machine problems may be solved easily by following the
tips below. When you have encountered a problem that
following the above guidelines will not solve, try the
following:
• Turn the machine power off and wait for several
seconds. Then, turn on the machine.
• Reboot the computer which sends the print jobs
to the machine.
• Obtain and use the latest version of the printer
driver. The latest versions of printer drivers and
utilities are available at: http://www.kyoceramita.com/download/.
• Make sure that the procedures for printing are
correctly followed in the application software.
Consult the documentation supplied with the
application software.
If Call service or Error occurred is displayed,
turn off the machine then turn it back on to see if the
machine has recovered. If the machine has not
recovered, turn off the machine, disconnect the power
cord, and contact your service representative or
authorized service center.
14
4 Clearing Paper Jams
Cassette/Paper Feeder
1. Pull the cassette or optional paper feeder.
2. Remove any partially fed paper.
3. Push the cassette back in securely. The machine
warms up and resumes printing.
Duplexer
1. Pull the paper cassette all the way out of the
machine.
2. Open the duplexer’s cover in front of the printer and
any jammed paper.
3. Open the duplexer's cover at the rear of the printer
and remove any jammed paper.
4. Push the cassette back in securely, and open and
close the front cover to clear the error. The machine
warms up and resumes printing.
15
4
Inside the Machine
1. Pull the paper cassette all the way out of the
machine. Remove any partially fed paper.
2. Open the front cover, and lift the developer unit
together with the toner container out of the machine.
3. Remove the drum unit from the printer by holding
the green levers with both hands.
IMPORTANT: The drum is sensitive to light. Never
expose the developer unit to light for more than five
minutes.
16
4. If the jammed paper appears to be pinched by rollers, pull it along the normal running direction of the
paper.
5. Return the drum unit to its position, aligning the
guides at both ends with the slots in the machine.
4
6. Insert the developer unit together with the toner container, back into the machine.
7. Close the front cover. The machine warms up and
resumes printing.
17
Rear Cover
1. Open the rear cover and remove the jammed paper
by pulling it out.
2. If the paper is jammed inside the fuser unit, open the
fuser cover and remove the paper by pulling it out.
CAUTION: The fuser unit inside the machine is
hot. Do not touch it, as it may result in burn
injury.
3. Close the rear cover, and open and close the front
cover to clear the error. The machine warms up and
resumes printing.
18
Optional Document Processor
1. Remove all of the originals from the document feed
tray.
2. Open the document processor cover.
4
3. Remove the jammed original. If the original is
caught in the rollers or difficult to remove, proceed to
the next step.
4. Open the document processor.
19
5. Remove the jammed original. If the original tears,
remove every loose scrap from inside the machine.
6. Close the document processor.
7. Place the originals.
20
5 Cleaning
Clean the machine regularly to ensure optimum output
quality.
CAUTION: For safety, always unplug the power
cord before cleaning the machine.
Original Cover / Glass Platen
Wipe the backside of the original cover, the inside of the
document processor and the glass platen with a soft
cloth dampened with alcohol or mild detergent.
Cleaning the Machine
To avoid print quality problems, the interior of the printer
must be cleaned with every toner container replacement.
1. Open the front cover.
5
2. Lift the developer unit together with the toner container out of the printer.
21
3. Remove the drum unit from the printer by holding
the green levers with both hands.
NOTE: The drum is sensitive to light. Never expose the
developer unit to light for more than five minutes.
4. Place the drum unit flat on a clean, level surface. Do
not place the drum unit on end.
5. Use a clean, lint free cloth to clean dust and dirt
away from the metal registration roller.
IMPORTANT: Take care not to touch the transfer roller
(black) during cleaning.
6. On the drum unit, slide the charger cleaner (green)
back and forth 2 or 3 times to clean the charger wire,
then return it to its original position (CLEANER
HOME POSITION).
22
IMPORTANT: Remove the fixing tape on the charger
cleaner before cleaning for the first time. After cleaning,
make sure you restore the charger cleaner to its home
position.
7. When cleaning is complete, return the drum unit to
the original position.
8. Return the developer unit to its position, aligning the
guides at both ends with the slots in the printer.
Then, close the front cover.
23
5
First edition 2009.5
Printed in China 302H956030