1
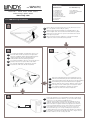
Included Items
USB Data Dock
2.5” HDD Data Tray
LINDY No’s: 42976, 42977, 42978, 42979,
42986, 42987, 42988, 42989
www.lindy.com
2.5” HDD Data Tray Installation
1
USB Data Dock
2.5” HDD Data Tray
1 x USB Data Dock
1 x 2.5” HDD Tray
1 x USB Hub Tray
1 x Card Reader Tray
1 x Internal USB cable
4 x Installation screws
1 x Dual Power USB Cable
1 x Carry Wallet
This manual
1 x 2.5” HDD Tray
1 x Dual Power USB Cable
1 x Carry Wallet
This manual
UK
Remove the top cover from the drive tray. You may find it easier to lever
the cover upwards from the USB port opening.
DE
Öffnen Sie die beiden Gehäusehälften des Festplattenghäuses. Sie
werden lediglich durch einen federnden Klemmmechanismus gehalten
FR
Retirez le dessus du boîtier. Vous pouvez l’ouvrir facilement en faisant
levier depuis le port USB.
IT
Rimuovere la metà superiore dell’astuccio. L’operazione risulta più
semplice facendo leva sulla feritoia della porta USB.
3
2
UK
To complete the installation, carefully replace the top cover.
Ensure the LEDs and the case tabs are correctly located.
DE
Fügen Sie sorgfältig die beiden Gehäusehälften wieder aufeinander. Achten Sie auf das korrekte Einrasten der
Gehäusehälften und die Positonierung der LEDs!
FR
Pour terminer l’installation, replacez le dessus du boîtier avec
précaution. Assurez vous que les LEDs soient visibles.
IT
Per completare l’installazione, risistemare la copertura.
Assicurarsi che i LED siano allocati correttamente.
2.5” HDD
PCB
4
UK
Remove the PCB and protective card. Carefully plug your 2.5”
HDD into the PCB and then place them both into the drive tray.
DE
Setzen Sie die Platine mit dem Anschlusstecker auf die Festplatte.!
Die Schutzfolie gehört unter die Platinenseite der Festplatte !
FR
Retirez le PCB et la carte protectrice. Branchez soigneusement
votre disque 2.5” dans le PCB et placez le tout dans le boîtier
IT
Per completare l’installazione, risistemare la copertura.
Assicurarsi che i LED siano allocati correttamente.
UK
Connect the data tray(s) to an external USB port using the supplied Dual
Power USB Cable. For the 2.5” HDD Tray, you can connect the red USB
connector to a second USB port for additional power.
DE
Schließen Sie das Gehäuse mit dem Dual Power USB-Kabel an einen
USB Port / Hub mit Stromversorgung an. Sie benötigen den roten USB
Stecker nur falls ihre Festplatte viel Strom benötigt (zuerst anschließen).
FR
Connectez le boîtier data tray à un port externe USB avec le câble Dual
Power USB fourni. Pour le tiroir 2.5” HDD, vous pouvez connecter le
connecteur USB rouge à un second port USB pour plus de puissance.
IT
Collegare gil/l’astucci/o in una porta USB esterna tramite il cavo USB Dual
Power incluso nella fonritura. Per alimentare HD da 2.5”, collegare anche il
connettore USB rosso in una seconda porta USB.
Data Dock Installation
1
2
UK
Switch off and unplug your computer! Remove your computer’s
case cover and slide the Data Dock into an available 3.5” bay.
Secure the Data Dock using the 4 supplied screws
UK
Use the supplied internal USB cable and a 3.5” type power plug
from the PC’s PSU to make the connections as illustrated.
Installation is now complete; reassemble and switch on your PC.
DE
Trennen Sie Ihren Rechner von der Netztspannung und
installieren Sie das Data Dock in einem freien 3,5“ Schacht mit
den beiliegenden Schrauben.
DE
1) Das beiliegende interne USB Kabel verbindet das Data Dock
mit Mainboard bzw. USB Karte.
2) Rechts hinten wird ein
3,5” Stromanschluss vom PC Netzteil angeschlossen.
FR
Eteignez et débranchez votre ordinateur! Retirez le cache et
glissez le Data Dock dans une baie 3.5” libre. Fixez le boîtier
rack data dock avec les 4 vis fournies
FR
Utilisez le câble USB interne et une prise d’alimentation du PC tel
qu’illustré ci-dessous. L’installation est maintenant terminée;
réalimentez et démarrez votre ordinateur!
Spegnere e scollegare il computer! Rimuovere la cover di uno
slot da 3,5” libero ed inserire il Data Dock. Assicurare il Data
Dock al case utilizzando le 4 viti incluse nella fornitura.
IT
Utilizzare il cavo USB interno e collegarlo alla PSU del PC
come illustrato nello schema sottostante. L’installazione è
completata; riassemblare ed accendere il computer!
IT
To Motherboard
USB Pin Header
! Refer to your motherboard manual for
the location of the USB Pin Header
! Die Position des USB Anschluss finden
Sie in Ihrem Mainboard Handbuch !
! Référez vous au manuel de votre carte
mère pour repérer le connecteur USB
!Consultare il manuale della motherboard
per effettuare il collegamento
3
UK
You can plug the data trays into Tray Input 1 or 2. The LED will glow blue
to indicate correct insertion. To eject the data tray, click the ‘Safe Removal’
icon on your Windows task bar and then press the eject button.
DE
Sie können die Einschübe beliebig in beiden Schächten des Data Dock
verwenden. Eine blaue LED zeigt Betriebsbereitschaft an. Verwenden Sie
„Hardware sicher entfernen“ bevor Sie einen Einschub auswerfen.
FR
Vous pouvez connecter les data trays (tiroirs) dans l’entrée 1 ou 2. La LED
s’allumera bleue pour indiquer une bonne insertion. Pour éjecter le data
tray, cliquez sur ‘Retirez mon périphérique’ dans la barre des tâches.
IT
E’ possibile collegare gli astucci nell’ingresso 1 o 2. Si accenderà il LED
blu per indicare il collegamento corretto. Per estrarre l’astuccio, cliccare
l’icona ‘Safe Removal’ sul task di Windows e premere il tasto eject.
Click the Task Bar ‘Safe Removal’
icon before ejecting a data tray
CE Statement
This device complies with the European Regulations for Electromagnetic Compatibility (EMC) of the European
Union and it is equipped with the CE mark. This unit has to be used with high quality shielded connection
cables. Only if these high quality shielded cables are used it can be sure that the EMC compatibility is not
adversely influenced.
FCC Statement
Shielded cables must be used with this equipment to maintain compliance with radio frequency energy
emission regulations and ensure a suitably high level of immunity to electromagnetic disturbances.
FCC Warning
This equipment has been tested and found to comply with the limits for a Class B Digital device, pursuant to
part 15 of the FCC Rules. These limits are designed to provide reasonable protection against harmful
interference in a residential installation. This equipment generates, uses, and can radiate radio frequency
energy and, if not installed and used in accordance with the instructions, may cause harmful interference to
radio communications. However, there is no guarantee that interference will not occur in a particular
installation. If this equipment does cause harmful interference to radio or television reception, which can be
determined by turning the equipment off and on, the user is encouraged to try to correct the interference by
one or more of the following measures:
Reorient or relocate the receiving antenna
Increase the separation between the equipment and receiver
Connect the equipment into an outlet on a circuit different from that to which the receiver is connected
Consult the dealer or an experienced technician for help
You are cautioned that changes or modifications not expressly approved by the party responsible for
compliance could void your authority to operate the equipment.
WEEE (Waste of Electrical and Electronic Equipment),
Recycling of Electronic Products
In 2006 the European Union introduced regulations (WEEE) for the collection and recycling of all waste
electrical and electronic equipment. It is no longer allowable to simply throw away electrical and electronic
equipment. Instead, these products must enter the recycling process.
Each individual EU member state has implemented the WEEE regulations into national law in slightly different
ways. Please follow your national law when you want to dispose of any electrical or electronic products.
More details can be obtained from your national WEEE recycling agency.
Germany / Deutschland
Die Europäische Union hat mit der WEEE Direktive umfassende Regelungen für die Verschrottung und das
Recycling von Elektro- und Elektronikprodukten geschaffen. Diese wurden von der Bundesregierung im Elektround Elektronikgerätegesetz – ElektroG in deutsches Recht umgesetzt. Dieses Gesetz verbietet vom 24.März
2006 an das Entsorgen von Elektro- und Elektronikgeräten über die Hausmülltonne! Diese Geräte müssen den
lokalen Sammelsystemen bzw. örtlichen Sammelstellen zugeführt werden! Dort werden sie kostenlos entgegen
genommen. Die Kosten für den weiteren Recyclingprozess übernimmt die Gesamtheit der Gerätehersteller.
st
1 Edition May 2007
www.lindy.com